USER MANUAL DH-22 FAGOR
The manufacturer reserves the right to modify the models described in this User's Manual.
PT - MANUAL DE INSTRUÇões
EN - INSTRUCTIONS FOR USE
FR - MANUEL D'UTILISATION
Fig.1 1.Abra ,1
Abb.1 Obr.1 Puc.1
Eik.1 Rys 1

Fig. 2 2. Ábra
Abb. 2
Eik. 2
- Ábra
Obr. 2
Rys 2
Φm.2
Pnc 2

ES
1. CHARACTERISTICAS TÉCNICAS
50% ▷ 55% ▷ 60% ▷ 65% ▷ 70%

Water tank capacity 5 litres
2. APPLIANCE DESCRIPTION (FIG. 1)
- Transport handle
- Air inlet grille
- Tank float
- Water tank
- Air inlet filter (internal)
5.1. Nylon support
5.2. Nylon filter
5.3. Charcoal filter (included)
- Control panel
6.1. Switch
6.2. Timer
6.3. Speed selector
6.4. % R.H. selector
6.5. Function selector
6.6. Display
- Air outlet grille
- Cable compartment
- Continuous drain outlet
Interference suppression: The interference of this appliance has been suppressed in accordance with interference suppression standards.
Electromagnetic compatibility: This appliance complies with the CEM standards of electromagnetic compatibility.
3. SAFETY WARNINGS
Before using the appliance for the first time, read this instruction manual carefully and keep it for later reference.
- Before using the appliance, ensure that the domestic mains voltage is the same as that indicated on the plaque fixed to the appliance.
- The appliance must be installed in accordance with the national regulations for electrical installations.
- On removing the packaging, check the appliance is in perfect condition. In case of doubt, contact the nearest authorised Technical Assistance Service.
- Keep all packaging elements (plastic bags, polystyrene foam, etc.) out of the reach of children, as they could be dangerous.
- The electrical safety of the appliance is only guaranteed if it is connected to an installation with an earth connection.
- We do not recommend the use of adaptors, plugs and/or extension leads. If it is absolutely necessary to use such elements, use only those which comply with current safety standards, taking care not to exceed the power limit indicated on the adaptor and/or extension lead.
This appliance is for domestic use only. Any other use is considered unsuitable and dangerous.
- In case of breakdown or malfunctioning, switch off the appliance. Do not attempt to repair it. If any repairs are necessary, they must only be made by a Technical Assistance Service authorised by the manufacturer. Insist on the use of original spare parts. Failure to comply with these points could be a safety hazard.
- The user must not replace the cable. If it is damaged or needs replacing, this must only be done by a Technical Assistance Service authorised by the manufacturer. Do not use the appliance if the cable or plug are damaged.
- The manufacturer holds no liability for any damages arising from unsuitable or improper use of the appliance or from repairs carried out by non-qualified personnel.

IMPORTANT: Never for any reason cover the appliance during operation as this could lead to dangerous overheating.
PARTICULARLY:
- Important: This appliance must not be used near baths, showers, sinks, etc.
- Do not install the appliance close to
4. CONTROL PANEL (6) (FIG. 1)
sources of heat, or in spaces where the air may contain gases, oil or sulphur, or in areas exposed to radiation.
- Do not spill any water or flammable liquids on the appliance.
- Do not handle the appliance with wet hands.
- Do not switch the appliance on and off by plugging it in and unplugging it.
- Altering or modifying the appliance's functional characteristics could be dangerous.
- Unplug the appliance when not in use, before moving it, and before carrying out any cleaning or maintenance.
- Never pull on the cable to remove the plug.
- Do not place any heavy or hot objects on the appliance.
- Do not allow children to handle or play with the appliance.
- Do not push any objects through the air inlet/outlet grilles as this could be dangerous when the fan is running at high speed.
- Do not cover the air inlet/outlet grilles.
- Do not use the appliance in narrow, sealed rooms.
FOR CORRECT FUNCTIONING
- Place the appliance on a flat, stable surface.
- Close the doors and windows of the room in which the appliance is to be used.
- The temperature in the room in which the appliance is to be used must be between 5^ and 35^ . If the temperature exceeds these limits the compressor will stop working.
If the ambient temperature is lower than 5^ , the absolute humidity will be very low and it will therefore not be necessary to use the dehumidifier.
- When the appliance stops, wait around 5 minutes before starting it up again.
- Do not place any objects or pour any liquids into the water tank.
6.1. I/O switch: for switching the dehumidifier on and off.

6.2. Timer: for the appliance to function during a certain interval of time, press this button to select an interval from 1 to 9 hours of functioning. The dehumidifier will stop when the selected time has elapsed. Time periods shorter than 1 hour cannot be selected.

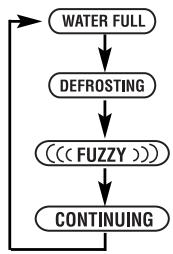
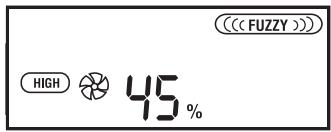
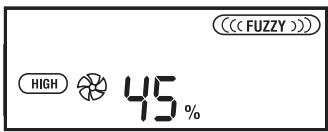
6.3. Speed selector: the appliance fan has two functioning speeds, high and low. Press this button to select the speed, either "HIGH" or "LOW".

6.4. %R.H. selector: this button is for selecting the desired percentage of relative humidity in the room (section 6. 6). Each time this button is pressed the selection will move on to a different setting according to the following sequence:

50% ▷ 55% ▷ 60% ▷ 65% ▷ 70%

6.5. Function selector: the dehumidifier has four functions, which are explained in section 5 (a, b, c and d). Each time this button is pressed the selection will move on to a different setting according to the following sequence:
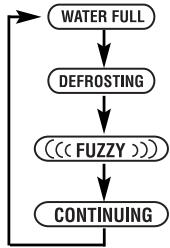
5. ICONS SHOWN ON THE DISPLAY (FIG. 2)
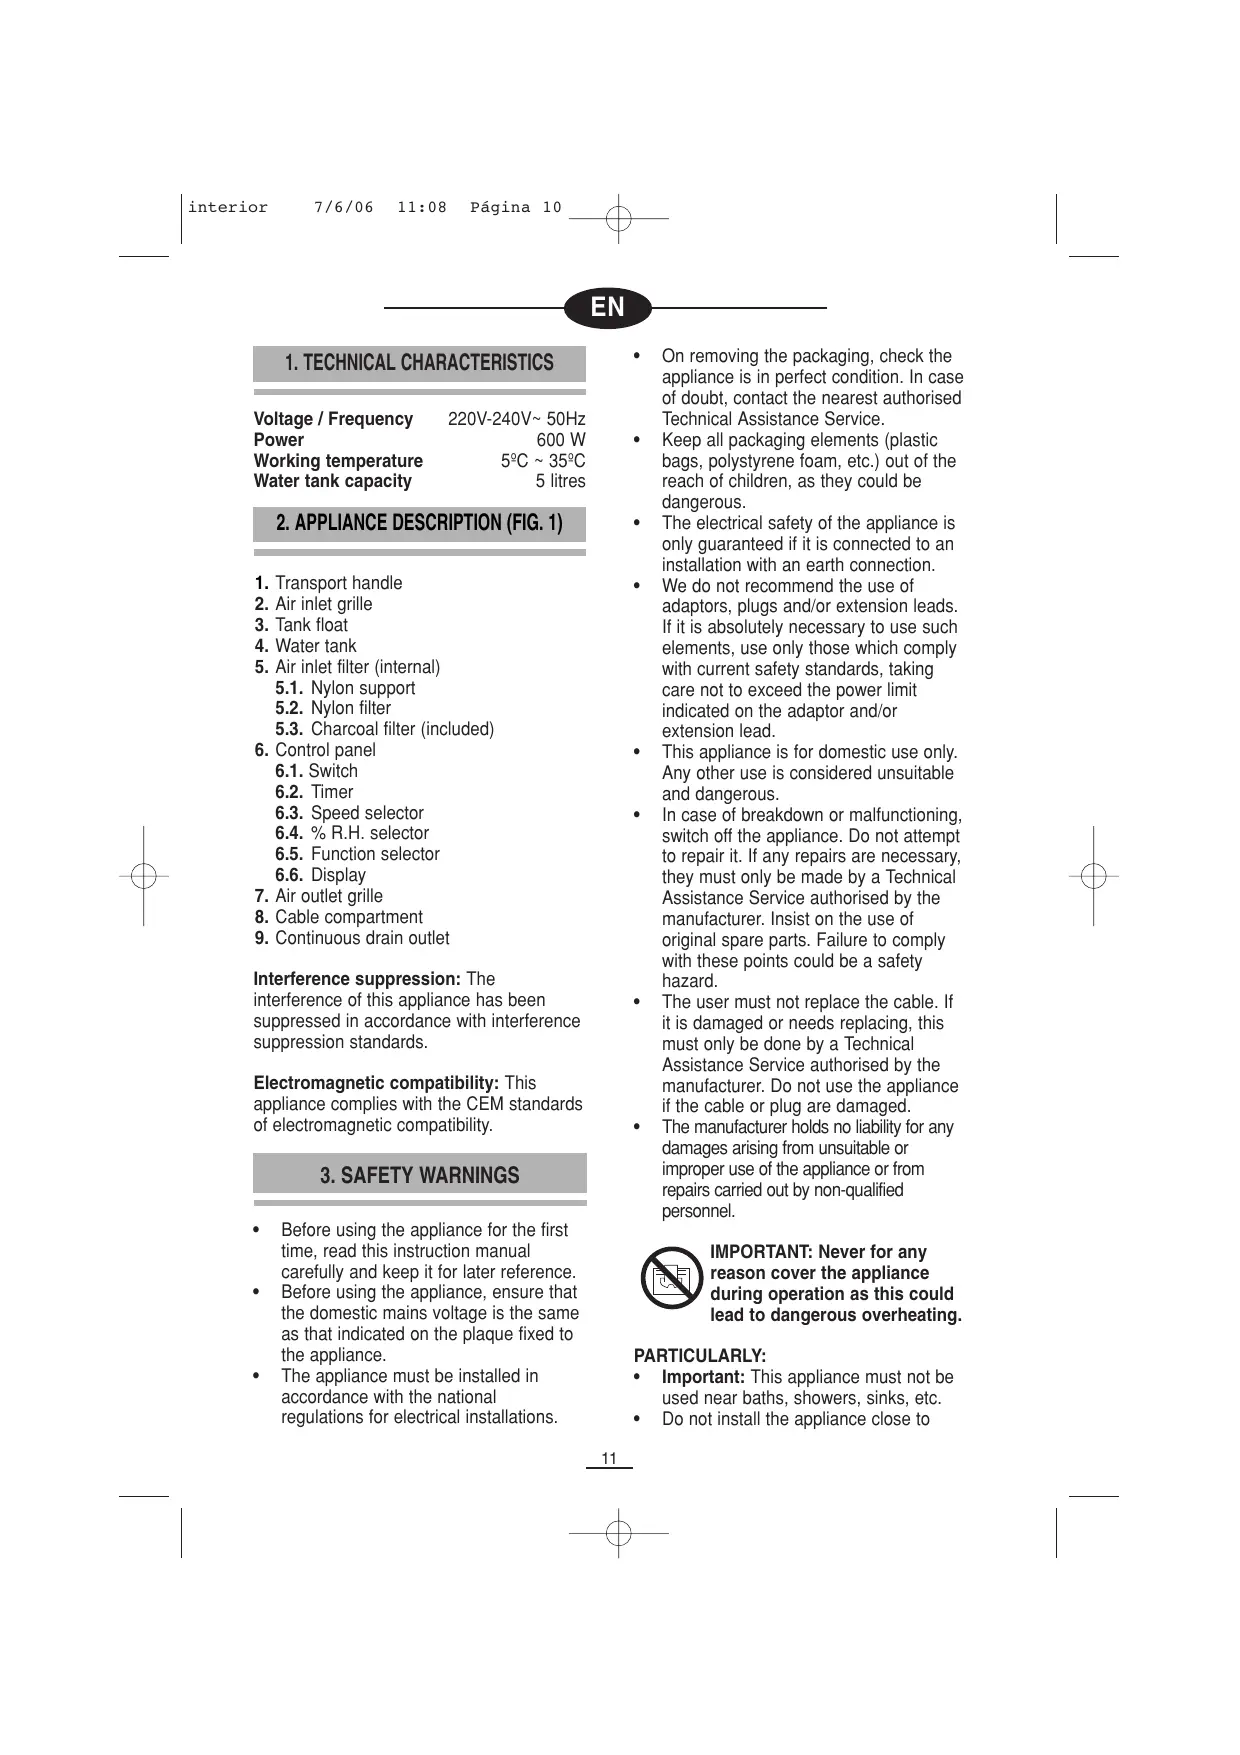
FUNCTIONS
((FUZZY))
a) The appliance will dehumidify the air when the ambient humidity is higher than 54% RH. If the ambient humidity is lower than this, the appliance will only clean the air.
CONTINUING
b) (continuous dehumidification).- The appliance will dehumidify the air continually, regardless of whether the ambient humidity is high or low.
AIR CLEAN
c) The appliance will only clean the air. It will not dehumidify it.
SETTING
d) This function is for selecting the desired relative humidity.
INDICATORS
WATER FULL
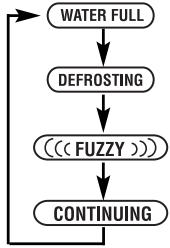
e) When the tank is full, this indicator will flash, three beeps will sound and the dehumidifier will switch off.
DEFROSTING
f) If this indication appears on the display, the dehumidifier is on defrost function. The user does not need to regulate this function, as the appliance will automatically go on to dehumidification after a few minutes. The compressor will switch off, the fan will continue to function, and the indicator will remain on.
g) The time selected with the timer appears on the display.
h) The dehumidifier speed appears on the display:

(high speed)

(low speed)
i) The relative humidity percentage appears on the display (%R.H.)
6. FUNCTIONING
(1) Plug in the appliance, and press on the air outlet grille (7) to turn it to the desired direction (FIG. 7)
(2) Press the ① button.
The dehumidifier is supplied with the following parameters selected by default:
If you wish to change the selection, proceed as follows:
(3) Select the fan speed with button 6.3.:

(high speed)

(low speed)
(4) You may select a determined time interval using the timer (6.6).
(5) Press the button to choose the desired function: FUZZY, CONTINUING, AIR CLEAN or SETTING.
(6) If you have chosen the SETTING, function, choose the desired relative humidity using the button.
For example: if you select 70% , this means the air will be dehumidified until it reaches a percentage of 70% . The appliance will automatically switch off if the humidity is lower than 70% (the compressor will switch off, but the fan will continue functioning). The appliance will switch on again when the humidity exceeds 70% . The same process
will take place if you have selected 50% , 55% , 60% or 65% humidity.
(7) To switch off the appliance, press the ① button. The ambient humidity will flash on the display.
Caution: If the "Defrost" function appears when the appliance is switched on and it is not possible to select another function, switch the unit off by pressing the on/off button and unplug the device. Then switch it back on again.
7. DRAINING OFF THE CONDENSATION WATER
WATER TANK
If the water tank (4) is full or if it has not been correctly fitted to the appliance, the "WATER FULL" indicator will appear on the display and the dehumidifier will automatically switch off.
To drain the water tank, remove it from the appliance as shown in FIG. 3. The water tank can be lifted up and carried by its handle, located on the back of the tank. Carefully fit the water tank to the appliance again, making sure the "WATER FULL" indicator switches off.
CONNECTION FOR CONTINUOUS DRAINAGE
The condensation water can be run off to a drain outlet down a drain tube connected to the condensation water outlet. The procedure for this is as follows:
a. Remove the water tank (FIG. 3)
b. Open the continuous drainage hole (9) with a sharp object (FIG. 5).
c. Insert the end of the plastic tube through this hole and adjust it to the condensation water outlet hole (FIG. 6). Run the other end of the tube to a drain outlet.
d. Lastly, fit the water tank back into position (the "WATER FULL" indicator will switch off).
8. MAINTENANCE AND CLEANING
Unplug the appliance before carrying out any maintenance or cleaning.
Clean the outside of the appliance with a soft damp cloth.
Do not use water, solvents or similar substances to clean the appliance. Do not use abrasive cleaning agents.
AIR FILTER (5)
The air filter is located behind the air inlet grille. It should be cleaned every two weeks. To clean the filter, proceed as follows:
Before removing the filter from its housing, first drain the water tank (FIG. 3).
To remove the filter from its housing, slide it downwards (FIG. 4).
The dirt accumulated in the filter can be vacuumed out. If the filter is very dirty, it may be washed in warm water. Rinse it and wait until it is completely dry before replacing it in its housing.
NOTE: do not expose the filter to the sun as it could warp.
On fitting the new filter, check the arrows are pointing towards you. Then insert the new filter and slide it upwards until it correctly fits into place.
CHARCOAL FILTER (5.3.)
The charcoal filter (included) can be mounted optionally. If you wish to mount this filter, follow the instructions shown in FIG.4.
This filter is fitted between the nylon filter (5.2) and the nylon support (5.1).
Warnings:
1) Take the filter out of its plastic bag before fitting it.
2) The charcoal filter should be replaced every 2 months.
3) The charcoal filter is not washable. It needs to be replaced by a new one.
9. TROUBLESHOOTING
Below is a list of possible causes which you should check before calling the Technical Assistance Service. Only contact an authorised Technical Assistance Service if you still cannot start up the appliance after having checked the indications below. Do not manipulate the appliance in any other way, and do not attempt to replace or repair the electrical components. Otherwise, you will be responsible for all expenses given rise to, even during the guarantee period.
The appliance does not work
Is it correctly plugged in?
Has a fuse blown?
- Has there been an electricity cut?
Is the water tank correctly fitted?
Is the water tank full?
Is the air filter dirty?
- Are the air inlet and outlet grilles obstructed?
The dehumidification capacity is low
Is the air filter dirty?
Is the room temperature too low?
Is the air inlet or outlet blocked?
- Have you selected a degree of humidity higher than the ambient humidity?
The appliance does not reach the degree of humidity set even after it has been working for a long time
- Are you opening the doors or windows too often?
Is there an appliance generating humidity in the room?
Is the room too large?
The appliance is functioning noisily
Is the floor uneven or too soft?
Is the appliance correctly positioned?
Water is dripping from the appliance
Is the condensation water tray outlet above the water tank blocked?
The appliance blocks on "Defrost" as soon as it starts up
- Turn the device off by pressing the on/off button and unplug it. Then start it up again.
DISPOSAL OF ELECTRICAL AND
ELECTRONIC APPLIANCES
At the end of its working life, the product must not be
disposed of as urban waste. It must be taken to a special local authority differentiated waste collection centre or to
a dealer providing this service. Disposing of a household appliance separately avoids possible negative consequences for the environment and health deriving from inappropriate disposal and enables the constituent materials to be recovered to obtain significant savings in energy and resources.
To remind you that you must collaborate with a selective collection scheme, the symbol shown appears on the product warning you not to dispose of it in traditional refuse containers.
For further information, contact your local authority or the shop where you bought the product.
FR
1. CARACTERISTIQUES TECHNIQUES
Tension / Fréquence
220V-240V\~50Hz
Puisance
600 W

WATER FULL
DEFROSTING
((FUZZY)))
CONTINUING
50% ▷ 55% ▷ 60% ▷ 65% ▷ 70%
m = 311 ;
4. BEDIENFELD (6) (ABB. 1)

m = 311 ;
50% ▷ 55% ▷ 60% ▷ 65% ▷ 70%-

1. TEXHnueECKN XAPAKTEPNCNIK
Pa6oTHa Tempepatya 5^ 35^
KanaunTeHa BODHnpe3epBoap 5IITpa
2. ONICAHNE HA ANAPATA (ФИГ.1)
1.Дрьхka3aТрансортуранe
2. Pešeɪtka ha BxOda 3a Bb3dɪya
3.Поллавьк на peзервogaа
4.BoDenpe3epBoap
5.ФИNTbРHa BXOJa 3a Bb3dYx (BbTppeWeH)
5.1.IIactmacobaOCHOBA
5.2.IIactmacobФЛNTbp
5.3.ФИЛТьрOT paCTIteH BbIJIeH (BkJIIOUeH)
6. KoHTpOJIeH nAneI
6.1.ПпевКлioчВаTeI
6.2. TaHmep
6.3.Ппевкlioчвateн Ha ckopoctinte
6.4.Ппевкючbatenзаизборнвлжноct%R.H.
6.5.IpeBkIOUBaTeI 3a I36Op Ha cyHKUNTE
6.6. Ekpan
7. Peuetka 3a n3xOHa Ba3dya
8. THe3do Ha Ka6eNa
9. OTrbOp 3a HenpeKbchAT dpeHax
OCTpHaBaHe Ha HInTepepeHcImte:
To3n anapaTe npOn3BedeH cBylaCHO nIpeKtNBITE 3a OTCpaHbAHe Ha nHTeppepeHcIMTe.
EJektpomarHHTHa CbBmecTmOCT:To3n anapaT OTROBAPa Ha eBponeeCKnte dIpuKeTbN CEM (OTHOcHO eJIekTpomarHHTHaTa CbBmecTmOCT).
3. ПравILA 3A сигуphоct
Ipei Da n3noJI3BaTe anapata 3a IbPBI nB T IpOyTeTe BHIMATEJHO HAcTOAUNTE INCTpyKUIN. 3ana3eT KHNKKATA C INHCTpyKUnTE 3a 6bDeuN KOHCyJItaUN.
- Преши унотpeба на anapata
ocntrypeTe ce,Ye moUHOCTTa Ha
BaшаТа[eIeKtpuYecka Мржа
cBbnaДa CTEXHnueCKnTe
xapakTepinCTnKn Ha ypeDa OTbeJIЯЗанi
cBoTBeTHO Bbpx TaBeJka
pa3nOLOXeHa Ha camna anapat.
CneI kaTo pa3oNaKOBaTe anapata npOBepeTe daH e B do6po cbCToHHe. B cnyauHa cBmHHe He ro n3PON3BaIte N ce o6bPheTe 3a NOMOu KbM Hn-6bn3Kn CepBn3 3a TexNuecka POndpbXka.
- YpeBt Tp8bA da 6bIe INHCTaIIpaH B CbOTBeTCTBHe C HauIOHaJIHnTe HOpM3a eJekTpueckn INHCTaIIaIIN.
- OnakOBbUHnT MaTePnA (HaJIIOHOBn IINKOBE, OJIIneCTep nIrp.) He TpR6Ba Da ce OCTaBn DO IOCTbNa Ha Deuca, TbKATO e NOTeHcuaJeH N3TOUHnK Ha ONaCHOCT.
- EneKtpnueckata cnypnoct HaTo3nypeid ce rapaHTnpa camo B cnyuay, YcBsiIe T BkLNouEn KbM eOPIKaCHO3a3EmeHa INCTaJaUry, TaKa KaKTo rOpNepDBrJdA TdeICTBaunTe HOPMN 3aeneKtpnuecka cnypnoct.
He npenopbUvBame ynoTpe6bata Ha aadantepn uydIjXnteJI. Ako ynoTpe6bata mE haoXnteJIHa N3PON3BaIte cAmO Te3N, KOINT OTOBAPAT Ha DeiCTBaIHTe HOPM3a CnryphOCT, KaTO BHNMaBaTe Da He npeBNIHTe JIMNTa Ha MoUHOCTTa OTBeJIra3AH BpXy aadantPeA INu YdbJXNTeJI.
To3n anapaTe npedHa3HaueHcMo 3a DomaSha ynoTpe6a. BcKaKbA pyra ynoTpe6a ce cmTa 3a HeaKeKBaTHa n onacha.
B cnyuah na nobpeda ha anapata BeHara ro n3KJIIOUte OT mpeXkaTn He ce onNTBaIte da ro nonpaBATE. B cnyuah Ha hykda ot nonpaBka o6pbuaTe ce camo KbM ynpabOMOuehen OT pOn3BOJNTeTn Texnueckn CepBn3 n 3NcKBaIte npi nonpaBkata My da 6bDat n3NoJ3BaHn camo opnInHaJIHn pe3epBHN qactn. Hecpna3BaHeTo Ha Te3n INHCTpyKUnn 6n noCTabuIIO B onaCHOCT cngypHOCTTa Ha anapata.
Iotpe6nteIaT He Tp8Ba Da ce ONTBa Da Cmeha Kaeba. B cnya, Ye cbuIe T e nobpeHn Ce hala Ta 6bJe CMeHen o6pbuaTe Ce 3a NOMOc Camo KbM ynpabOMoUeH OT npOn3BOJTeHa CepBn3 3a Texnuecka PoDpBXka. He n3PON3BaIte UpeDa C nobpeHn Kaebn nn IeNceI.
- Пожибовделг He HOCI OTROBOPHOCT 3aВрdiпчнehnOT He npabuHaHaTa, nOprseHnata NIn HeaDeKbAHTa yNtpe6a Ha anapaTa NIn OT nonpaBkn 3BbPshEn O NT HeKBaJIINФИцapn NIIua.

BAXHO: B HnkaKbB CnyaHne nokpnbaiTe ypeHa No BpeMe Ha pa60ta, Tb' KaTo TOBa MoKe da npedn3BnKa OnacHo nperpBaHe.
A UMEHHO:
BnmaHHe:To3n ypeI He e npedHa3NaueH 3a pa60Ta BvB BnaJHn NOMeUeHn. He n3non3BaIte ypeDa B 6bn3ocT do 6aHn, dUwOBe, MNBKn I dp. n.
He nHctaInpaIte To3n ypeB 6IIN3OCToTOJIINHHN I3TOCHNU ININ B NOMEueHInB YHINTO Bb3dYx E Bb3MOXHO da IMCaBbPkaHne Ha rA3OBe,Macna ININ Cpa, KaKTo N B 30HN I3JIOKeHn Ha paDnau.
He npbckai Te anapata c Boda nnn 3anaJIIMn TeHocTn.
He mAnHnPyIpaIte anapaTa c Mokpn pIe.
He BKJIIOUByaIe /n3KJIIOUByaIe anapaTa c NocTAbRHe /n3BaJxJaHe Ha IeNcEJa OT eJIeKTPuYeCKrKa KONTaKT.
- Пюмянота на Функционалнiteхарakтерпстукп ha anapata MOraT daДоведд ДО NOBNUwaBaHe Ha рИСКа OT ONaCHOCT.
- IЗклочаиTe anapata ot Мржатa, KOraTo He ro N3NoI3BaTe,прdi Na ro npemeCTnTe, KaKTo n Прdi KaKBaTO n Da 6bIo Onerpaun no PoIdpbXkKaTa n NOHcTBAHeTo My.
-ПиИЗКЛЮЧВанеHaц�селяOT KOHTaKТа HNKORA He Дьрnaite Kaбеля.
He noctabrayte Bbpxy anapata Tekkn nn TOnnn Ppedmtn.
He pa3pewaBaTe Ha da
n3no3BaT anapaTa, KaKTo n da cn UrgaT C Hero.
He BkapBaIte npEIMTe npE3 peWeTKeIte Ha BXOJa Nn3XoJa 3a Bb3DyX, TbKATO TOBa MoKe Da bDe onaCHO nnpuHa, Ye BEHTInaTOpB Ta6oTu HA MHOrBO BnCOKa CKOpocT.
He nokpmbaTe peWetKaTa Ha BxOda nnn 3XoJa 3a Bb3dyX.
He n3noJ3BaIte anapaTa B TECHn nn xepMeTnueckn 3aTBopeHn NOMEeHna.
CbBETN3A INPABINHA PABOTA HA APATA
- Постаытete anapata Вьрху paВни CTaБИнна NOВьрхНСТ.
3aTbapnTe BpaNTe n IpoZOpCnTe Ha nOmeueHneTO, B KoEt paBoTu anapaTa.
- OntmamHaTatemepaTypa 3a pa6ota Ha anapatae Mejdy 5^ n 35^ Ako Tempepatya n3Je3e ot Te3n rpaHnCi KOMPecOpbT Ha anapatae cnpe da yH LOHnp
Ako Temnepaypata B NOMEeHneTo e no-HNcKa OT 5^ C a6coIHTaBAJXHOCT Ha BV3dyxa ige e MHOrO HNcKa,napaDN KOEt HMa da Ce Hanara ynotpe6ata Ha To3n anapat.
- Пиинзклочане на anapataичakай Te OKОЛо 5 минутпpeди ду BGКИЧУТe OTHOBO.
He nocTabaIte HnkaKbI npEdmetn, HnTo pBk HaJIbBaTe KaKBInTO n Da 6nIO TeuHOCTN BbB BOHNJ DENo3nT.
4. KOHTPOJIEN IANAJI (6) (ФИГ. 1)

6.1.ПпeвклioчbaTeI O/3a BКЛIOчBaHe ИЗКЛIOчBaHe Ha a6cop6aTopa.

6.2.TaMep 3a n3bop Ha onpeJeH nepoD OT Bpeme 3a paObaHa anapata.PnI pocneIOBaTeJIHOTo HAtNcKaHe Ha To3n ByTOH MOKe n3bpaTe OT 1 Do 9 Yaca Ha paObaT. PnI n3TuHahe Ha n3bpaHTo OT Bac Bpeme 3a paObaTa abCObaTopbT ue ce n3KnUOni. He MoKe n3BepeTe nepoD OT Bpeme No-KpaTBk OT 1 qac.
6.3.ИЗборHa ckopoct.
BeHTnlaTopbT HaTo3n ypeD MoKeJa paBoTn Ha DBe pa3JInuHNCKOpocTN - BnCOKa N HnCKa, KOnTOMorat Da 6bDaT n3bupanu qpe3HaTnCKaHeTo Ha To3n 6yToH-"HIGH"(BnCOKa) nIIN "LOW"(HnCKa).
%RH
6.4.ИЗбор на Влжноct %R.H.
Upe3To3n6ytohMoKeJau36epeTe npoceHTaHaOTHOCTeHbIaXHoCT, KOITOKeJIaTe Da6bJeDOCTurHAT B daHeNo NOMEseHne (pa3deJ 6.6). BCraKo CLeDbAso HATNcKaHe Ha 6yToHa BOiIO cIeHnTa IpomHa Ha u36paHa BLaXHoCT:
50% ▷ 55% ▷ 60% ▷ 65% ▷ 70%

6.5.ПпевклювATEнHa
ФункциTe: A6cop6aTopbT pa3POnaRa C YeTpInr pa3IuHn Функци,поДрбHoОпиСаниВ pa3ДeI 5(a,b,c and d).BcЯК cIeDbaIo HATNcKaHe Ha 6yToHa BOi Do CJIeHnTa ПpOMHa Ha ФункциТа.
ФУHКЛМ
((FUZZY))
a) AnapaTbT 3anOyBa da a6copBupa BlaJxHocCTTa OT b3dyxa PnO OTHOCTeJIHa BlaJxHocT NO-BVCOKA OT 54% HR. Ako nokaataeHT Ha BlaJxHocCTTa e N-O-HNCbK anapaTbT cMo IpeuNCTBa Bb3dyxa.
CONTINUING
b) (ненрекьсата abcopбия)- AnapatbT abcopbupa BnaxHoCTTA OT b3dyxa 6e3 3haeHne daJIи cIaTa e BUCOKA nII HNCa.
AIR CLEAN
c) (YHCTBb3dyx)- AnapatbT camo NOnHCTBa Bb3dyxa 6e3 da a6copbupa BlaXHoCTTA.
SETTING
d) (Oπιμη Na a6cop6πηrTa)- Ta3n ΦyHKlμη Ce n3πoN3Ba 3a n3bOp Na JεηaHata OTHOCHTENHa BλαχHOCT.
INHINKALIM
WATERFULL
e) (πβνηρ e3ερboap)- Korato pe3ερboapbT ce HαπβλιHn Ta3N INHДИКАЦЯ 3aNOчВа Да npIMMΓBa Ha ekpaHa n anapaTbT N3dAba TpN NOCEIOBATEJIH N 3ByKOBn CnHAn. A6c0p6aTOpbT cnIPA pa6Ota.
DEFROSTING
f) (pa3mpa3BaHe)-IIOBbata Ha Ta3n INDnKaunHa ekpaha 03NaHaa,Ye a6cOp6aTOpBT pa60Tu Ha pexkM pa3mpa3BaHe. Pn TO3n peXm Hce HanaHa Meecata Ha Notpe6nteJ, TbN KaTO anapatBT ue IpeBKJIIOU nABOTMaTHUHO CLeD HAKOJIKO MNHyTN Ha pexkM ab6Cop6u. KomnpcecOpBT ce N3KJIIOUba,
BENTINaTOpbT pOdbIgKaBa Da pa6oTu, a INDnKaunrTa OCTaba Da CBetn Ha ekpaHa.
g) Bn3yaJIIn3aIyHa nI36paHnI nePnoI Ha pa6Ota Ha a6cop6aTopa.
h) Bnu3a3aue Ha ckopocTtHa a6cop6npahe.

GH (BnCOKa)

(HNCa)
i) Bn3yaJIn3aIuHa HbOTHOCNTeHATABlaXHOCT Ha Bb3dyxa (%R.H.)
6.PABOTA
(1) BkIIOUeTe anapaTa KbM eIeKtpuYeckaT aMpexa. HAcOHe Te peWetKaTa 3aBb3dyx(7) HATNcKaIKn I. (ФИг.7)

) HATNCHeTe ①

Dha
A6copaToptbT n3JIIN3a OT npOn3BOdCTBO cBc CJIeHNTE BceYn36paHn npaMeTpN:
AkoKeJaTe Da npOMeHnTe Te3n napaMeTpN:
AnapaTbT cb3daBa npekaJeHO MHO rWym no Bpeme Ha pa6ota
ПовьхhoeТа, Вьрх КОТо e nocTaBeH anapata, e HepaBHa ИлпpeKaJIeHO Meka.
AnapaTbT He e do6pe nocTaBeH.
Kane Boga oT anapata
I3xoDbT 3a KOHDeH3npaHa BOda, HAMipaS Ce Bbpxy BOHNpe3epBOap, e 3anyuhen.
AnapaTbT 6Ioknpa BeHara cIeD BKJIIOUcBaHe N Bn3yAJIIN3npa cbO6ueHneTo "Defrost"
Cnpete anapata, KaTo HaTnCHete npBkJIIOuBaTeIa 3a BkJI./N3KJI. IN3KJIIOUcTe OT KOHTaKTa, CJIeD KoETO BKJIIOUcTe OTHOBO.
10. INHΦOPMAU3A INPABUNHOTO EJIMMHINPAHE HA EJEKTPNUECKN IN EJEKTPOHHI DOMAKHNCKN UPEДN
m = 311 ;
B KpaHa nOle3HnJ KINBOT Ha anapata He 6Nba Da ro N3XBbPnIe B KOHTeHepa 3a O6nKHOBeHN DOMaSHN OTNaDbuM. Moxe da ce OCBO6oDnte OT Hero, KaTO ro
OTHECETe B CNEUaHInTe CEHTPOBE 3a
BTOPUNHn CUPOBHN KbM MecTHNte
aDMNHINCTpaunu INBaWNJIOCTaBvNK,
KoTOn Ca IINBXHn Da yIeCHABt Ta3N
DeiHOCT. Pa3DeHnOTo N3XBpLnHe Ha
eJeKTPo-DOMAKINHCn UpeNi
PiPeD0TBpATnBA peI HeRaTINBnIOOCLeDNz
3a OKONHaTcpeNa n 3dPaBeTO,
PiOn3TNuaUn OT HeaKeKBaTHOTnIM
n3XBpLnHe, KaKTo n IO3BOJANBa
peuKNlnpaHTo H aMeTpnaNTe, OT KOnTO
e HApapEn UpeDa, KaTo n TO3n HauHn Ce
IOCTnra YyBCTBnTEJIHa NKOHOMnHa
CUPOBHNn EHeprn.
C ceI da cneOpertae Ose BeNbX
3aDbLJxHeHnEto 3a pa3DeJIHo IN3XBpLnHe
Ha OTNaDbUnTe Ha BCEKn IpOdyKT e
OTBeJI3An CneUanEn 3HaK, KOITOn BV
PipeynpejXdaBa n IOncSeua Da He ro
IN3XBpLnTe B KOHTeHepa 3a ObNKHOBeHN
DOMaHN OtnAdbu.
3a Nobee INHOpMaunCe ObPhETe KbM
MEcTHNte Bnactn INN KbM MaTa3nHa, OT
KbDETo CTe KUYNI INPOdyKTa.
RU
1. TEXHmueCKne XAPAKTEPNCNTIKN
HapnkeHe / Yactota 220V-240V\~50T
MoUHocTb 600BT
Pa6o7a Tempepatya 5^ 35^
06bem BODoc6opnka 5IITPOB
2. ONICAHNE IPNBOPA (PNC.1)
- Pучka дя перемшени рпбopa
2.Воздухозборная ршета
3.Поллавов Вобocборниka
- Bóodium6bopnIK
5.BxoJHOI BO3dUHbI ΦnJIbTp (BHyTpeHHnI)
5.1. HeijioHObbl depKataIb
5.2.HeJIOHObBIΦJIbTp
5.3.YrOJIbHbIyΦnIbTp(BXoIIT B KOMPJIeKT)
- ПанIEL ураленян.
6.1. BbiklnochaTeJIb
6.2. Taumep
6.3.ПepeклioуателвсКОрocTи
6.4.ПepeKlIoUaTeIb ypoBnA OTHOCHTeBHO BnaXHocTn (%O.B.)
6.5.пеклочаелpeхимов
6.6. LufpoBoW duCnpei
7.Bo3dyxOBbInyckHaH peWetKa
- Otcek Дякавел.
- OTBepCTne HnpepbIBHoro dpehaka
NckJIIOUeHne NOMex: 3TOT npIN6Op
ФИьТROBaH CORIaCHO Tpe6OBaHnM NO
NCKJIIOUeHnO NOMEX.
3JektpomarHHTHAR COBmecTmOCTb:
3TOT npmbop fNbIbTpoBaH cOrnaCHO Tpe6oBaHnA CEM (3JNeKTpOmaHHTHaC OBMECTUMOCTb).
3. MEPbl B630NACHOCTN
Ipeed nepBbIM NcNoJIb3OBAHnEM npnbopa BHNMaTeJIbHO IpOHTnte HactoJUee pyKOBOIDCTBO I COxpaHNTe erO dJaIaNbHeNIX KOHCyJIbTaucI.
Ipeed nCnoB3OBAHnEm npi6opa yOcTObepbTeCb, YTO HApJxKeHne B CeTN COOTBeTCTByET 3HaueHnIO,
yka3aHHOMy Ha npIKpeJIeHHoK K npIbOpY pIacTINKe.
- Прибор должени устаньимьтсь в COOTBETCTBиС HaцноHAльHBIMи павлиампдя Злелктуpeckих рриборов.
Iocne n3BJeEHn H3 ynaKOBKn yIOCTOBepeTecb, YTO npnbop haxoNTcB 6e3ynpueHOM COCTOHN; B Cnyuae BO3NHKNHOBeHn COMHeHn O6paTntEcB 6nJxaiN LcHTp TexHueckoro O6cnyXnBaHn
CJIeIyET XpaHnTb COCTaBHeIe YacTn yIaNKOBKn (IIaCTNKObIe NaKeTbI, IeHONJaCT N.T.D.) B HeIOCTynHom DJIa DeTei MeCTe, TaK KaK OHN MOrYT 6blTb NOTEHuaJIbHbIM NcTOUHNKOM YrPo3blI JIa 3DOpOBBa.
3JIeKtpnuecka6e30nacHocTb npi6opa rapaHTnpyETcA LlB B CnUyae,ecIN OH IODKJIIOUeH K NCTOCHNYIITaHnC 3a3EmJeHHem.
He peKoMeHdyeTcNcNoIb3OBAHne aIaIaTePob, nepExoDnHkoB u/nnu yIINHtEnEi. B cIyae Heo6xOIMOCtN IcNoIb3OBAHn DaHHbIX npICNOC6JIeHn CJeLyET NcNoIb3OBAbToTbKO TaKHe n3 Hnx, KOTOpBie COOTBeTCTBYIOT DeICTByIOzHM HopMaM 6e3OnaCHocTn. CJeLyEt CJeIDMb, YTObI He 6bla npReBbIeHa npeDeIbHa rMoUHOCTb, yKa3aHHa Ha aJaIaTepe N/nn Ha Ka6ene-YdInHtene.
Даннbl npибopnpedha3naeHдЯ INCIOJIb3OBAHnTOLbKO BDOMaUNHX yCIOBnIX.Ero INCNoIb3OBAHneB IIO6bIX Dpyrnx yCIOBnIX RAJIETCA HENpaBnIbHbIM NOnaCHbIM.
B clyuae nolomkn u/nnn He npabunbHno pa60tI np6bop cneyuET bIKIOHTb H neItaTc8 OTpeMOHTnpoBaTb erO. B clyuae Heo6xOIMOCn peMOHTa np6bopa cneyuET o6paataCnCKIIOHTeJIbHO B LcHTp TexHueckoro O6cnyKINBaHn, cepTnФnUPOBaHHbI npOn3BOJNTeJeM, C 3anPocOM Ha 3ameHy oprInHaNbHbIX DeTaJe. B npOTNBHom clyuae pa60ta np6bopa moKeT 6bITb He6e3OpacHoI.
Польбател he Должен npоизвдпь 3амени Кабеля Злектponитаня.Еслк Кабел NOВрждан Или ectb
HeoXoDnMoCTb erO 3aMeHbI, cJeNyTe
obpaatcbra NCKJIuOHTeBHO B LcHTp
Texnueckoro O6cJyKuBaHHa,
cepTnFpuOpBaHHbI npOn3BOUHTeM.
He ekCnPyATnpuyTe npi60pB Cnyuae
noBpexdeHn Ka6eIa IIN uTepCeIbHOB
BUNIKI
ПюИЗВОДИТIEL He HecET OTBETCTBEHNOCTN 3a NOBPEKДЕНЯ, HaHECEHbIe BCJIeDCTBnE HeIPaBINbHOrO, OUN6OuHOrO IINI HeUeJIeBOrO INCIOJIb3OBaHnI PrIbOpa,a TaKJe BCJIeDCTBnE peMOHTa, PIOBEDeHORO HEKBaJIInΦuNcIpOBaHHbIM NepCOHaJIOM

BhimaHne: Hn B KOem cIyae He 3aKpbIbTaB NOBepXHOCTb annapata BO Bpem erO fynKcIOHnpOBaHn, TAK KaK 3TO pNBecTn K ONaCHOMy neperpeBy.
BOCOBEHHOCTN:
BhImaHHe:He cIeJyET BkJIIOuATb HactoIpi np6Op B6IIN3n BaHHbIX KOMHaT,dyIeBbIX,KOMHaT IJIaMbITbIPOcYbI INI NOIO6HbIX NOMEueHNI.
He yctaHaBnBaIte np6op B6n3n nCTOCHKOB TEIIa INIIN POMEeHNI, rDe MOrYT HaxoNDtCBra3bl, MaCJIa INIIN cepa, a TaKxBe B MeCTax, IOnDBepKeHHbIX N3JyueHIO.
3anpeaaetc6pb3raTbHa npibop BOOJ INI BOCJIaMEHHOUMMCJXUKOCTMNI.
He doTpaHbAaTebc do npibopa MOKpbIMn pyKaMn.
He BKJIIOUaIte N He BbIKJIIOUaIte npu6op B MOMENT eO NOKJIIOUeHnN nJIN OTKJIIOUeHnOT cETn.
HapyuheHne uINn 3mHeHne pa6OuXx xapaKTePncTnK npBopa MoKeT CtaTb NCTOCHNKOM ONaCHOCTN.
BbIKIIOUHTe npu6Op n3 ceTn,ecnN BbI He co6bnpaTeCb erO nCNoJIb3OBaTb,a TaKKe neped erO nepeHockOn npepd npoBeDeHm IIO60Iopeaunn no ChCTke nn yXOy.
- OTKIIOUaI WTeNCEJIbHyIO BUNKy I3 CETN, HNKoIgJa He TReHnTe 3a KaBeJIb 3JIeKTPoPITaHnI.
He KlaInte Ha npIbOp TAgKeIbIe IINI rOprYne npEdmTebl.
He n03B0JnTe DeTAM o6paTaTbCnI INrpaTb C npi6Opom.
He BCTabJIaIte npEIMeTbIB BO3dYX03a6OpHyIO BO3dYXOBblNyCKHyIO peJETKN, TAK KAK 3TO MOKeT npEcdTabJIaTb ONaCHOCTb, KOrJa BEHTnJIaTOp pa6Otaet Ha BbICOKoI CKOPoCTN.
He 3aKpbIbAaTe Bo3dYxO3a6OpHyIO n BO3dYXOBblNcKHyIO peUeTKn.
He nCnoJb3yIe Tnp6Op B TeChbIX 3aKpbITbIX NOMEueHnX
PEKOMEHDAUINIPOIPABUNbHOMY NCIOJIb3OBAHNUIPIBOPA
- UctaHOBInTe npin6op Ha nIIOcko IN yCTOuINBOI NOBepxHOCTN.
3akpoITe DBeRn OKHa B NpOmeuHIn, Ie 6yIeT pa6oTaTb np6Op.
- Pπi6op πpeHa3NaeHДЯ pa60tby npi Tempepatye OkpykaioeI cpeBly ot 5^ Cdo 35^ C.EcIn Tempepatya BbIXoNIT 3a ppeJIb yKa3aHHOrO dnaNa3OHa, KOMPecccOp ppeKpaauaET pa60TaTb.
- Ecπn TemnepaTpya OkpykaIoUe n cpebl Hnke 5^ TO a6cOJIOTHaB BIAxHOCtB 6ydet OueHb Hn3KoI, PO3OMy B 3TOM Cnyuae Het Heo6XoIMMOCTn NCNoJb3OBaTB OcyuHTeIb.
- Поссные осяповки пибора поюждени римерно 5 мнут, пered Tem Кам ВКЛЮЧИТь сю ChOBа
He nomeauTe HnKaKnx NocToPOHHnx npedMeTOB B BOoC6OpHnK n He HaNBaTe B Hero HnKaKnx KxNkOCTe.
4. ΠΑHΕЛБ ΦΥΡΑΒλΕΗΝ (6) (PNC. 1)

6.1.BbIKJIOuateIb:CnyKNTIJIBAKIIIOeHn/BybIKJIOeHnOcUJITeJIa

6.2.TaMep: cIyKNT dIy yCTaHOBKn nepoJa BpemeHn pa60tBi np6opa. Haxkab 3Ty KhoNky, Bby MoKeTe Bb6paTb nepoJd BpemeHn pa60tBi ot 1 do 9 cacob.Ocuyintel npekpATn pa6OToNo nCTeueHIO Bb6paHOrO BpemeHn. HeJIb3r Bb6paTb nepoJbBpemeHm MeHbSe 1 Yaca.

6.3.ПepeKJIIOHateJIb cKOpocTn: BeHTINIaTOp IpiNbopa ImMeet IdBe cKOpocTn pa60TbI - BbICOKyIO n Hn3KyIO.HaxkTaHem Ha 3Tu KhONky MOxHO BbIbpaTb cKOpocTb: «HIGH» (BbICOKa)Ил«LOW» (Hn3KaJ).
%RH
6.4.ПepeKJIIOUaTeIb yCTaHOBKn OTHOCHTeIbHOB BIAJXHOCTn:C NOMOuB 3TOrO NepeKJIIOUaTeIa MOxHO Bbl6paTb yPOBeHb OTHOCHTeIbHOB BIAJXHOCTn, KOTOPo Tpe6yueTc DOCTNHyTb B NOMEuEHN (cm. pa3den 6.6).Pp n KaJxDom HaxaTN Ha 3Tu KNOpKY npONCXoDIT nepeKJIIOUeHne yPOBHa BIAJXHOCTn Ha CNeDuOuMn IO OuepeDi, CornaCHO pInBeDeHNO HINKe NocJeDoBaTeIbHOCTn:
50% ▷ 55% ▷ 60% ▷ 65% ▷ 70%
6.5.ПepeKJIIOuateJIb peXIMOB: OCUWITeJIb MOKeT pa6OtaTb B YeTbIpeX peXIMax, KOToPbIe ONiCaHbI B pa3dene 5(a,b,c n d). PnKaJDom HauKaTm Ha 3Tu KHOInKy IpoINcXoJNT peEeKJIouHeHne peXIMOB B CLeNyUoSeI NocJeIOBaTeJIbHOCTN:
5. INΦOPMAÇU, OTOBPAKAEMAH HA LIVΦPOBOM DUNCJIEE (PNC. 2)
PEXKIMbl PABOTbl
((FUZZY))
a)ПиборБудETOCушТь BO3dYx,КoГД OTHOCINTeЛьнЯВlaЖHOCTb B NOMeUeHm CTaHET BblIe 54%.EcInBlaЖHOCTb6yIeT HIXe Yka3aHHOrO yPoBHЯ, ПиборБудETToJIbKO OCHUaTB BO3dYx.
CONTINUING
b) (HenpepbIBHOe Ocuyehne).Annapat 6ydtocuataB03dyx HenpepbIBHO, BHe 3aBNCIMOCTN OT ypOBHBAJXHOCTN BV NOMEueHN.
AIR CLEAN
c) (OuicTkA Bo3dyxa).-Pnp6Op 6yTeT TOnbKO OChuTaB BO3dyx,HO He OcyuTaB erO.
SETTING
d) (YctaHOBkA ocUySeHHN).-C NOMOUsIO DaHHo fYHKcIM MOXHO YCTaHOBnTb KEJaEMbI yPOBeHb OTHOCITeJIbHO BJaXHOCTN B NOMEseHN.
INHДИКATOРБI
WATER FULL
e) (Booc6bOpHnK noJIoH).- KOrda Booc6bOpHnK HAnOJIHNITcA DAHHbI INHdNKaTOp HaCHET MmTaB, IN np6bOp nOaCT TPN TOHKx 3ByKOBbIX CnIHana. PocJe 3TOrO OcyuINTeJB BbIKJIOUHTCRA.
DEFROSTING
f) (OTTaBAHnE).-EcJn Ha
DInCJIe ee NOBIeTcR 3TO
COoBSeHne,3To O3NaCyEt,
YTOOCUINTeJIb HAXOITcR B
peKIMe OTaBaNHa.
IepExoD B daHHbI peKIM
PpONCXoNT63
BMeJAteJIbCTBa
NoJIb3OBaTeJI,TaK KaK
Pnp6Op Pn PpoWeCTBm
HECKOJIbKIN MHNyT aBTOMaTNUeCKn
IpeeIeT B pexIM OcyuHeHJ.
KomPipeccop BbIKIIOHTcR, BeHTnIaTOp
6yIeT IpoIoJKaTb paOtaTb, a
yKa3aHHbI INdNKaTOp 6yIeT CBETNbCra.
g) OTo6paJehne Bbl6paHHoro BpeMeHn TaMepa.
h) OTo6paXeHne cKOpocTn pa6Otbl oCyuHTeJIa:
(HIGH) (BbICOKaR)
LOW (HIN3KaA)
i) OTo6paXeHHe 3NaUeHnI OTHoCInTeJbHOB BlaXHoCTN, B IpoCeHTax (%O.B.)
6.3KcJIyATAUIN
(1)ПоДКЛЮЧИТЕ пиборк сети. YCTaHOBHTe NOLOXKeHne BO3dYxOBbIpyCKHOr peWTeKN (7), HaxIMaHa Hee (PNC.7).
(2) HaxmTe KhoNkY

Ocuyntelnoctynaet C 3aBODa-n3rTOBNTELC O CNeDyUOIMNnpEynCTAHOBIIeHHbIMn npaMeTpamn:
Ecnn Bby Jxenaete n3MeHnTb daHHbIe napaMeTpbl, DeiCTByIte CLeDyIOUIM o6pa3OM:
(3) BbIbeIpTe cKOpocTb BeHTnJIaTopa C nOMOuH KHOJKN 6.3.:
HIGH (BbICOKaR)
LOW (Hn3KaA)
(4) MoxeTe BbIbpaTb BpeMa pa6oTbI OcyuINTEJI C NOMOcIbTOaIMepa (6.6)
(5) Haxmnte KhoNky DnBbIbopa XeIaemoro pexima: FUZZY, CONTINUING, AIR CLEAN nIg SETTING.
(6) EcIn BbI BblbpaIIpeXIM SETTING, BblbepnTe 3aTEM C NOMOJIbHO KHOJKN XeJIaEMbI yPOBeHb OTHOCITIELHOB BLaXHOCTN.
Hanpimep: ecn Bbl BbIbIpaTe 70%, To 3TO O3HaueT, YTO BO3dYx bIeT OCyuataCra Do Tex NOp, NOKa OTHOCTeBHaB BJIaxHOCTb BO3dYxa He DIOCTNHTET 70%. OCyuHTeB abTOMaTHUeCKn BblKIIHOHTcRA, ecn BJIaxHOCTb bIeT HIXe 70% (KOMPpeCCOP BblKIIHOHTcRA, HO BEHTINATop 6bIeT npOJXKaTb paOtaTb). Pnp6op NaHcHT CHOBa paOtaTb, KOrDa BIAJXHOCTb pReBICNT 70%. AnAIONHbI pOcecc 6bIeT npOxCODntb pRn BblObeYpOBH BAJXHOCTn 50%, 55%, 60%, 65%.
(7)ДЯВыклоченяпиборанхмnte KhoNky ① 3haeyne ypoBnB BnaXHOCTN B NOMEueHIn OCTaHETcR MNaTb HaДИСПЛee.
BnmaHne: Ecn nocne BKIOueHnna np6opa Ha dnCnIee BbICBeuHbaETcA yHKun "OTtaBaHne", n HeBO3MOxHO Bb6paTb HkKaUy IpyTuO yHKUIO, BbIKIOHTe np6Op HaxaTNem KONKINnyCK/OCTaHOB N OTOeDHNTE erO OT cETN. 3aTeM CHOBa BKIOHTe np6Op.
EcJn yctaHOBJennbI ypOBeHb BJIaXHOCTN He DoCTnraETcB TeYeHne DInTeJbHoro BpeMeHH pa60tI np60pa
He OTKpbIbAeTcJIIN CNIuKOM qaCTO DBepb NII IN OKHO B NOMEueHIn?
- EcTB li B nomeueHn np6op, reheepuyuOui BnaXHoCTb?
- TomeueHne cNIuKoM 60nboue?
Ppna pa6oTe np6op npOn3BOaNT cnHsKOM MHOO yMa
- RaJIaHTcA IIN IOBepxHOCt b, Ha KOTOpOY yCTaHOBJIeN Ipi6bOp, HepOBHoi NII CNIuKOM MraKoI?
- IpaBnIbHo nI yCTaHOBJIeN npI6Op?
C npnbopa Kaanaet Boda
He 3a6bIokIpOBaH IIN BbIXoD n3 PnDDoHa dJI KOnDEHCIpOBaHHo BObl, paCNOJIOKeHHoro HaD BOOc6OpHNKOM?
Pn6op 3a6bokupoBaH,Ha dncplee BbcBceuBaetc yHKzur
"OTTaBaanHe", n dpyrne yHKcnn HeIOCTynHbI
- BыклioчиTe npi6op HabkaTneM KhoTNk nyck/oCTaHOB n OTCoeDHHte erO t ceTn. 3aTeM CHOBA BkIIOUChTe npi6op.
10. INHΦOPMAÇI N O PAPBUNbHOY UTHJIN3AÇM N 3JEKTPUÇECKNX N 3JEKTPOHbIX PIPNBOPOB

13/14
Iocne OKOHuaHn Cpoka
cIyKbI,daHbI npi6Op He
doJxKe H yTNIN3uPoBaTbCa
BMeCTe C 6blTOBbIMN
OTXoDAMN. OH MOKeT 6blTb
pePeaH B CPeUaJIbHbIe
CHTpbI
Дифсеренцюрванornoсбора OTXODOB, HaxODIJIHNEcB BeDOMCTBE MyHIUNIaJIbHbIX BlaacteI,IIIN aReHTAM,pa6OtaUcIM M DAnHOI cpepe ycnyr. Pa3dJIbHaY yTNIIN3aUH 6bITOBx 3NeKTPoPnPbOpOB IIO3BOJNAET N36EkaTb BO3MOXHbIX HERATUBHbIX NOCLEDCTBm DnIg OKpyKaIOUeI CpeblI 3DOpOBbI JIOJeK, KOTOpbIE MOrY IMTeMbCELCTBne HEnPaBInbHOY yTNIIN3aUH, a TAKKe IIO3BOJNAET NOBTOPOH IcNIOJB3OBAbT MaTePnAJIbI, BXOJaUe B COCTAB 3TNX PnIP6OBpOB, IN DoBIbCSa, TaKIM O6pa3OM, cyueCTBeHHOn 3KOHOMMn 3Heprn n pecypcoB.
YTo6bI NOUChepKHyTb Heo6XoIMOCtB pa3dJIbHcN yTuIN3aCnN,Ha DaHHOM np6ope HaHeceH 3NaK, npEdupeKdaIoUsiO 3aPpeTe IcNoIb3OBaHNr TpaDnIOHHbIX MyCOPHbIX KOHTeHepOB.