EFG50300X - Fridge AEG-ELECTROLUX - Free user manual and instructions
Find the device manual for free EFG50300X AEG-ELECTROLUX in PDF.
User questions about EFG50300X AEG-ELECTROLUX
0 question about this device. Answer the ones you know or ask your own.
Ask a new question about this device
Download the instructions for your Fridge in PDF format for free! Find your manual EFG50300X - AEG-ELECTROLUX and take your electronic device back in hand. On this page are published all the documents necessary for the use of your device. EFG50300X by AEG-ELECTROLUX.
USER MANUAL EFG50300X AEG-ELECTROLUX
WE'RE THINKING OF YOU
Thank you for purchasing an Electrolux appliance. You've chosen a product that brings with it decades of professional experience and innovation. Ingenious and stylish, it has been designed with you in mind. So whenever you use it, you can be safe in the knowledge that you'll get great results every time. Welcome to Electrolux.
Visit our website to:

Get usage advice, brochures, trouble shooter, service information:
www.electrolux.com

Register your product for better service:
www.electrolux.com/productregistration

Buy Accessories, Consumables and Original spare parts for your appliance:
www.electrolux.com/shop
ENVIRONMENT CONCERNS
Recycle the materials with the symbol . Put the packaging in applicable containers to recycle it. Help protect the environment and human health and to recycle waste of electrical and electronic appliances. Do not dispose appliances marked with the symbol with the household waste. Return the product to your local recycling facility or contact your municipal office department for household waste or the shop where you purchased this product.
CUSTOMER CARE AND SERVICE
We recommend the use of original spare parts.
When contacting Service, ensure that you have the following data available.
The information can be found on the rating plate. Model, PNC, Serial Number.
Warning / Caution-Safety information.
i General information and tips
Environmental information.
Subject to change without notice.
1. SAFETY INSTRUCTIONS
Caution! Closely follow the instructions set out in this manual. All responsibility, for any eventual inconveniences, damages or fires caused by not complying with the instructions in this manual, is declined. The extractor hood has been designed exclusively for domestic use.
Warning! Do not connect the appliance to the mains until the installation is fully complete.
Before any cleaning or maintenance operation, disconnect hood from the mains by removing the plug or disconnecting the mains electrical supply.
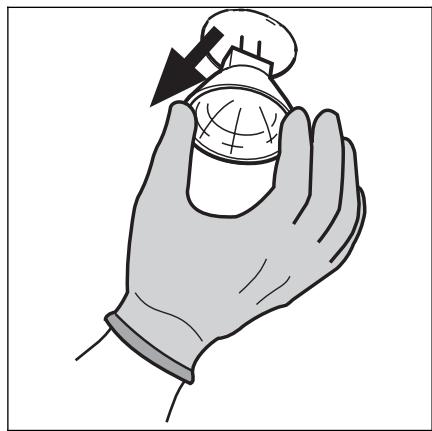
Always wear work gloves for all installation and maintenance operations.
The appliance is not intended for use by children or persons with impaired physical, sensorial or mental faculties, or if lacking in experience or knowledge, unless they are under supervision or have been trained in the use of the appliance by a person responsible for their safety.
This appliance is designed to be operated by adults, children should be monitored to ensure that they do not play with the appliance. This appliance is designed to be operated by adults. Children should not be allowed to tamper with the controls or play with the appliance.
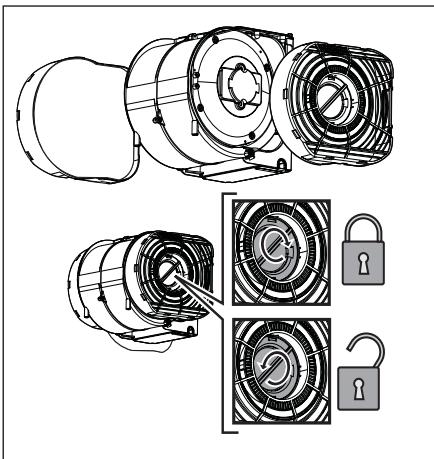
Never use the hood without effectively mounted grating!
The hood must NEVER be used as a support surface unless specifically indicated.
The premises where the appliance is installed must be sufficiently ventilated, when the kitchen hood is used together with other gas combustion devices or other fuels. The ducting system for this appliance must not be connected to any existing ventilation system which is being used for any other purpose such as discharging exhaust fumes from appliances burning gas or other fuels. The flaming of foods beneath the hood itself is severely prohibited.
The use of exposed flames is detrimental to the filters and may cause a fire risk, and must therefore be avoided in all circumstances.
Any frying must be done with care in order to make sure that the oil does not overheat and ignite.
Caution! Accessible parts of the hood may became hot when used with cooking appliance.
With regards to the technical and safety measures to be adopted for fume discharging it is important to closely follow the regulations provided by the local authorities. The hood must be regularly cleaned on both the inside and outside (AT LEAST ONCE A MONTH).
This must be completed in accordance with the maintenance instructions provided in this manual). Failure to follow the instructions provided in this user guide regarding the cleaning of the hood and filters will lead to the risk of fires.
Do not use or leave the hood without the lamp correctly mounted due to the possible risk of electric shocks.
We will not accept any responsibility for any faults, damage or fires caused to the appliance as a result of the non-observation of the instructions included in this manual.
2. USE
The hood serves to aspirate the fumes and vapors resulting from cooking.
The attached installation manual indicates the version to be used depending on the model you have, the suction version with
external evacuation

or filtering with
internal recirculation

3. INSTALLATION
The mains power supply must correspond to the rating indicated on the plate situated inside the hood. If provided with a plug connect the hood to a socket in compliance with current regulations and positioned in an accessible area, after installation. If it not fitted with a plug (direct mains connection) or if the plug is not located in an accessible area, after installation, apply a double pole switch in accordance with standards which assures the complete disconnection of the mains under conditions relating to over-current category III, in accordance with installation instructions.
Warning! Before re-connecting the hood circuit to the mains supply and checking the efficient function, always check that the mains cable is correctly assembled.
Warning! Power cable replacement must be undertaken by the authorised service assistance centre or similar qualified person. The minimum distance between the supporting surface for the cooking equipment on the hob and the lowest part of the range hood must be not less than 50cm from electric cookers and 65cm from gas or mixed cookers. If the instructions for installation for the gas hob specify a greater distance, this must be adhered to.
4. MAINTENANCE
ATTENTION! Before performing any maintenance operation, isolate the hood from the electrical supply by switching off at the connector and removing the connector fuse. Or if the appliance has been connected through a plug and socket, then the plug must be removed from the socket. The cooker hood should be cleaned regularly (at least with the same frequency with which you carry out maintenance of the fat filters) internally and externally. Clean using the cloth dampened with neutral liquid detergent. Do not use abrasive products. DO NOT USE ALCOHOL!
Warning! Failure to carry out the basic cleaning recommendations of the cooker hood and replacement of the filters may cause fire risks. Therefore, we recommend observing these instructions. The manufacturer declines all responsibility for any damage to the motor or any fire damage linked to inappropriate maintenance or failure to observe the above safety recommendations.
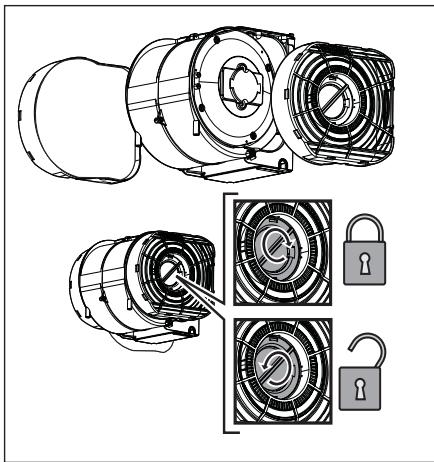
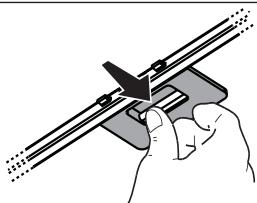
4.1 Grease filter - The grease filter must be cleaned once a month using non aggressive detergents, either by hand or in the dishwasher, which must be set to a low temperature and a short cycle. When washed in a dishwasher, the grease filter may discolour slightly, but this does not affect its filtering capacity.
4.2 NON-washable activated charcoal filter - The saturation of the charcoal filter occurs after more or less prolonged use, depending on the type of cooking and the regularity of cleaning of the grease filter. In any case it is necessary to replace the cartridge at least every four months. The charcoal filter may NOT be washed or regenerated.
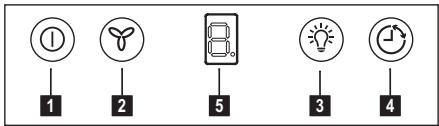
5. CONTROLS
The hood is fitted with a control panel with aspiration speed selection control and a light switch to control cooking area lights. Use the high suction speed in cases of concentrated kitchen vapours. It is recommended that the cooker hood suction is switched on for 5 minutes prior to cooking and to leave in operation during cooking and for another 15 minutes approximately after terminating cooking.
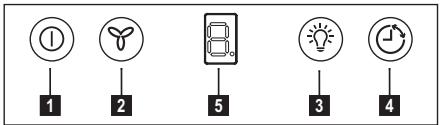
The control switches are located on the unit's front panel:
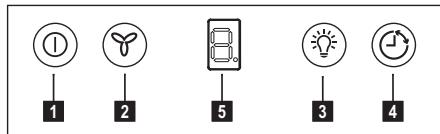
1. Motor ON/OFF button
By pressing the button, the hood starts at speed 1.
Pressing the button (OFF) while the hood is in function turns the latter off.
2. Speed increase button
By pressing the button, the hood starts
at speed 1.
Pressing the button (while the hood is on) modifies the motor speed:
Speed 1: the number "1" appears on the display
Speed 2: the number "2" appears on the display
Speed 3: the number "3" appears on the display
High-speed: the number "4" appears (flashing) on the display
The high-speed function is regulated by a timer. The standard time setting is 5^ at the end of which the hood adjusts to speed 2.
Press button 2 to deactivate this function before the set time expires; the hood will adjust to speed 1. Press button 1 to turn the hood off.
- Lights ON/OFF button
- Speed timer button
- Display
Speed timer button
Press button "4" to activate the speed timer; the hood turns off once the set time expires.
The timer functions in the following way:
- Speed 1 - 20 minutes (the number "1" and a small flashing LED light appear on the display)
- Speed 2 - 15 minutes (the number "2" and a small flashing LED light appear on the display)
- Speed 3 - 10 minutes (the number "3" and a small flashing LED light appear on the display)
- High-speed - 5 minutes (the number "4" and a small flashing LED light appear on the display)
Press button 1 or button 4 to turn the hood off while the speed timer is in function; by pressing button 2, the hood returns to the set speed.
Grease filter indicator
After 80 hours of operation, the number "1" starts flashing on the display.
Press and hold button 1 or 3 to reset the indicator.
Carry out maintenance on the grease filter according to the indications of this manual.
Charcoal filter indicator
After 320 hours of operation, the number "2" starts flashing on the display.
Press and hold button 1 or 3 to reset the indicator.
Carry out maintenance on the charcoal filter according to the indications of this manual.
When both filter signals appear simultaneously, numbers "1" and "2" will alternately flash on the display.
Reset the indicator by performing the above-mentioned procedure twice.
The first operation resets the grease filter indicator, while the second operation resets the charcoal filter indicator.
The charcoal filter indicator is not active in the standard mode.
If the hood is used in the recirculation mode, the charcoal filter indicator must be activated.
Perform the following steps to activate the charcoal filter indicator:
Turn the hood off and keep buttons 2 and 3 pressed for 3".
The numbers "1" and "2" will flash for 2" once the function has been activated.
Charcoal filter indicator deactivation:
Turn the hood off and keep buttons 1 and 2 pressed for 3".
The number "1" will flash for 2" to indicate that the function has been deactivated.
6. LIGHTING
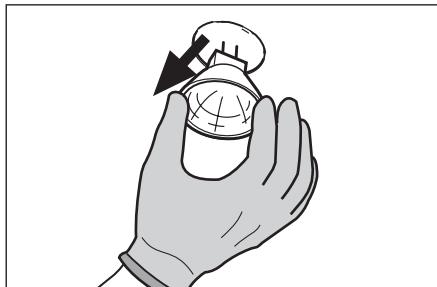
Disconnect the hood from the electricity. Warning! Prior to touching the light bulbs ensure they are cooled down.
Replace with a new 12 Volt, 20 Watt (Max) halogen light made for a GU4 base Ø35mm.

WIR DENKEN AN SIE
www.electrolux.com/productregistration

www.electrolux.com/productregistration

www.electrolux.com/productregistration

www.electrolux.com/productregistration

Visite oulosso website para:

www.electrolux.com/productregistration

WE'RE THINKING OF YOU
Signal for kullfilter
Utkobling signaled for kullfilter:
WE'RE THINKING OF YOU
Taimeppa6otaetcneyuoum0bpa3om:
- Ckopoocb 1 - 20 mNHyT (Ha nCnPee BbIbOaTcraΦpa "1"и He6oBbUoi MnraIoUnci CND)
- CkopocTB 2 - 15 MmHyT (Ha Diucnpee BbIOBraTcraUΦpa “2”и He6oNbIou MnraIoUssi CND)
- CkopoocTB 3 - 10 MmHyT (Ha DiNcPiee BbIBOJrTaC rHΦpa "3" n He6oNbSiOn MnraOuN CiD)
- BbICOKaCKOpocTb - 5 MNHyT (Ha INcPnlee BBIOJATrCA UΦpa "4" IN He6OJIbIoM MraIoumN CIN).
HaKMTe Ha KONkY 1 INI4 IJRA BbIKIOUeHnBaTAKKN BO BpeMra paoBtTaIeMepa CKOPOCTN; HaxIMMa Ha KONky 2, BbITAKKa BO3BpaUaTeCk K 3aDaHHoI CKOPOCTN.
HdNkaTop macJnHOro qnIbItpa
Посл e 80 yacob paobt haДисплee hyHnaeT MrgaTb Udpa "1".
HaxMMTe uydepKuBaIe KhoNky 1 nI3 dJIa c6pOca HnDnKaTopa.
BbIOpJIHrTe OepaunIO TeXhNueckomy
OcnyKBaHIO MacJHOro fNJIbTpa,
CJeDyra YKa3aHnM B HactoIeM
pyKOBOdCTBe.
Hndkatop yroIbHoro qnlbtpa
www.electrolux.com/productregistration

legadajieties iericei originalas rezerves dalas, materialus un pigeonumus:
www.electrolux.com/shop
APLINKOSAUGA
Nododiet otreizejai pärstradei materiālus ar simbol. levietojiet iepakojuma materiālus atbilstośos konteineros to ottreizejai pärstradei.
Palidziet aizsargat apkartego vidi un cilveku veselibu, atkartoti pärstradajot elektrisko un
POBJOTA 3 KJIIEHTAMN TA CEPBICHE OBCJNYROBYBAHNA
PekomeHnyeTbCByBVKOpncTObyBaTnOpriHaJIbHi 3aIuaCTHH.
Пи зевтын Diocерс HorO Heo6xIDH MaTn HAcTyHny iHOpMaIIO.
IIMOKHa 3HaHTn Ha Ta6JIuCi 3 TexHicHNi DaHIMN. MoJeB, HOpE BInpoBy, cepiHnH NHomep.
Ybara!BaxnBa iHΦopMaizj3 texhik6e3neK.
i 3araIbHa iHfOpMaizy nepeKoMeHdaJIi
IhOpMaiaJ 0do 3axncty HABKONiunHbOro CepeDoBua.
DahiMoKyTb 6yTu 3MiHeHi 6e3 nonepaJKeHHa.
1. !IHΦOPMAζιγ 3
TEXHIKN BE3NEKN
O6epeXho!UitKO DoTPMByBaTnca npBedeHnx B daHOMy KepiBNIuTbI IHCTpyKcii. BnpoBnHK 3Himae 3 c6be BCaKy BidiNObiAaNbHiCt b3 ae HnoNaJKn, 3bNTKN aBO noxapar, uO moKe Matn Micce npn BnKOpNCtAHHI npnbopy BhaCniDok HBeNKoHaHNH iHCTpyKcui, npBedeHnx B daHOMy KepiBNIuTbI. BntjKa npns3NaHea He BnKluHo Dnla No6yTOBO RnKOpNCtAHn.
!NonepdKeHnHa!He nid'EnHyBaTn npncptpi Do eJeKtpomepeksi nokynctaHObKa nobHcTIO He 3aBePseHa. Ipeed BvkoHaHNm 6yDb-koI onepaui no chtci afo pemOHTy, BiKlnHouNTn KOBnak BiEeKtpomepeksi, BmMaUOnu BUnKy aBO bIDKnHuaOChOBnB BMnKau npmMiueHnA.
OBlaHaHnHa He np3HaueHo dJa
BVKOpNCTaHn 3 BOKy DiTee a6o IIODei 3
OBmExeHnMn OImHnMn MOKInBOCTMa
CpNIHnTtA b6o pO3ymOBuMn i 3
BiDCyTHICTO DcBIDy i 3HaNb, 3a BNHTKOM
BUNaDkIB KOnI BOHN 3NaXODaTbcN PiD
HARJADOM a6o HauCeHi BVKOpNCTOBuBATN
OBlaHaHnHn IIOINHOU, 0o BiNDobIAe 3aix6e3NeKy. He DoynckaTe dItei do
PpNJaNy 6e3 HaJIaNy OBlaHaHnHa.
He BVKOpNCTOBuYte BVITaKky, kIoo peSiitKa
HEnpaBnIbHO 3MOHToBaHa BVITaKHN
KOBnak 6e3 npaBnIbHO BMOHToBaHOI
peSiTiK!
BnTjKKa He NOBnHa BnKOpNCTOByBaTncb Ja ONOPHa NOBepXHn, NlWSe y BnNAkax KOJI YcHO npO ce cKa3aHo.
B BNAnky BnKOpNCtAHn BnTJKKn pa3OM 3 iHNIMPiNCTPOAMn Ha rasi a60 iHNxN roPouHx, pnpMIueHHn MaE MaTN DoCTaTHo BEHTnIaIIO. PObITpy, IIO BCMOKTyEcBcR He Mae 6yTu HnPaBNeHO B BVnTKHNI KaHJI, kNn BnKOpNCTOByEcBcIJa BnKNDy DmIB BID pOBOTPiNCTPOIB Ha rasi a60 iHNxN roPouHx. CyBopo 3a6oPoHReTbc roTyBaTn UdaJINb IKy NiD BoRHeM.
BnKOpNCaHH BInbHOro BOrHIO e
UkiDnBnIM DnIaFIIbTpIB I MoKe BnKnKaTn
NoXeKy,OTKe Heo6XiIDHO yHNKaTn Ioro
BnKOpCTaHH y 6yDb-akOMy BnPaTkY.
CmaxeHH Maec BiOdyBaTncpiD
KOHTpOJeM,uo6 yHNkHyTn 3aImaHH
po3irpiToi oJIi.
! O6epeXHo! BiKpnTi YactHINMOxyTb CmIbHO HarpIBATnCJOIN BVKOpNCOTByIOYtCB pa3OM 3PnPiADAMN DnIaBAPIHNN.
Ioo x CTocyetybC BnKOpNCTaHH TExHiuHIN npabun Ta npabun 6e3neKn Dny BKNdy
ДИМВ,TO Heo6xIHO ChTko DoTpmyBaTncb HOPMaTnBIB,Nepe6baeHnx Mic6eBMn IHCTaHcIMN. YuIeHNH BNTAAKNI MaE peryIrpHO npOBoDHTNCsA, kBCEpeDHI, TaK i Ha3oBHl (HE MEHJE ODHOTO PA3V HA MICAU, B 6yDb-iaKomy BInpaIky BInKOHyBatn BCI iHCTpyKcii, IIO ONCaHl B cboMoy KepiBnHTBI).
HeDToPIMAHHNOHOPMOnuIeHHN BITRAKKI Ta 3aMIHNIOUChIeHHOΦJIbTpIBMOKe BUNKINKATNIPO3NK NOXEKI.
He BKNOPNCOTBye i He 3aJIINsauTe 6e3 BiPHO BMOHTOBaHInx IaMn y 3B'3Ky 3 MOXINUBM pN3NKOM ydApy eNeKTPuHNM CTpyMOM.
He HeceTbcx JKOHOI BiIDNOBIDAJIbHOCtI 3a HecnpaBnOCTI, yUKoJXeHNHa TAOXeki HaNEcHi npICTPOIO, 10E HAcNIdKOM HeDOrpIMMaHH NopAd, IOnaHIN B daHII IHCTpyKuII.
2. BVIKOPNCTAHH
BnTjKc cnKyNTb nIy BCMOKTyBaHH KInTBA Ta npay, 0o yTBOPHOITbcn iD qac npiroTOyBaHHi Xi.
B i nctpykui, 10 doaetbcra Bka3yebcra, B komy BnKoHaHHi MOXHb BnKOpNCTOByBaTn BaWy MoDeJb - Ja BNTJKKy 3 BnBeHeHHM
Ha3OBH,a6o JK BNTJKKy 3BHyTpihbOpeuNPKyIciEIO nobITpr

3. IHCTAJLJI
Hanpyra B eIeKtPomepeksi Maec BiNobiDaTn Bka3aHm XapaKTepnCTnKaMa H aEtNKeTci, Jka 3HaxoOnTcB CBepeDnHi BNTJkXn. JaKIO B KOMNKeT BxOJntb BILKIA NID'EdHaHHN B EJeKtPomepeKy, TO cIiD NID'EdHaTHn BNTJkKy DO pO3ETKn, IIO B iDNOBiDAc ICHyOuHm HopMaM Ta 3HaxoOnTbCBy B DOCTynHomy MiCi, IIO MoKNa HbKOHaTu NICsI IHCTanJIi. JAKIo K BILKNA HE BXoJNbB B KOMNKeT (PiPme NID'EdHaHHN B EJeKtPomepeKy), Abo PO3eTKa He 3HaxoOnTbCBy B DOCTynHomy Micci, TakoX i NcIaN IHCTanJIi, TO cIiD BMOHTyBaTu HaneKHN DBOX-NOUChn BIMNkau, JAKNI 3aBe3NeHtB NOBHe BiKIIuOeHHN B iD MepeKxi By YMObAx nepenHapnyr lll Kateropii, B NobHIN BiNDOBiHOcti 3 npABInamn IHCTanJIi.
! YBara! nepeT TmJ K 3HOBy nIDKIOHHTN BITJKKY DO eNEKTPOMEpexi I nepeBipNTn PpaBnJIbHcIbPo60tN, 3ABXdN KOHTPOnIJTe 5Ob SHypr Mepexi 6by 3MOHTOBAHn BIPHO.
Ybara! 3amHa eNeKtpoWhpya Mae 3diChHObATncb ABTOPI3OBAHIMN Cnyk6amn TexHiuHoro O6cNoyRObyBaHNH. BiDCTaHB NxKhBoI BiUdactHINB BNTAekn Do NOcyDu Ha KxOHnIH PnTI MaE 6ytN He MeHwe 50cm, y BnauKy eNeKtpuHnx PnIIT, Ta 65cm, y BnauKy rAzOBHX Ta KOM6iHOBaHINX PnIIT. Heo6XiDn Ho npimMaTn Do yBaRn BiDCTaHI, RaIKo Bka3yOtbc8 B IHCTpyKci 3 IHCTaJIaIra3OBOI PnITN.
4. OBCJYFOBYAHH
Ybara!pepe6ydb-kaoOnepaucio
NCTKNUOcbcnyroBvBaHn, BiD'EdHaIte
BNTKkUbiEeKtpomepexi, BNTaryuOu
BuNKy a0bBiKlouaOuOnrOOBn
BUMKAauXHTJa.
Bntjka Mae qnCTTncb qacto i kK 3OBHi TAK i B cepenH (no KpaHm Mpi 3 taKIOX nepioDnHcTIO kI dOgIa 3a fIbTpamn Dnla 3aTPMaHH JxnpiB).Jna YnCTKn BVKOpNCTOBuYTe CneiaIbHy cepBeTKy, HAMOey HneITpAlbHM pIKM MNUOUM 3acobom. He BVKOpNCTOBuYTe 3acobu Ioo Maohb abpazNBi MatepiJN. HE BVKOpNCTOBUYITE CnINT!
Ybara! He BUKOHaHHI npaBnI qHHeHHI 3amHn pIbTpIB MOKe npBBeCTn Do pN3Ky BUNHKHeHHI NOXeKi. Tomy peKOMeHdyE mo DOTpIMyBaTHc npBVeDEHHx IHCTpyKciJ. 3HimaTbCBA BcKa BiNDoBlaNbHicTB 3B'3KY 3 MOJIINBUMI yUKOJKeHHMn DBiRyHa I NOXeKaMn, 10 BuNKnI BhACNIIDOK HEBiPHoro pEmOHy a6o He BUKOHaHH BUNZeONCuHHx nonepdKeHb.
www.electrolux.com/productregistration

www.electrolux.com/productregistration

www.electrolux.com/productregistration

www.electrolux.com/productregistration

Kupite dodatke, potrošni material in originalne nadomestne dele za vaš aparat:
www.electrolux.com/shop
SKRB ZA VARSTVO OKOLJA
Reciklirajte materiale, ki jih označuje simbol. Embalažo odložite v ustrezne zabojnike za reciklažo.
Pomagajte zašcititi okolje in zdravje lijudi ter reciklarati odpadke elektrčnih in elektronskih
naprav. Naprav, označenih s simbolom ne odstranjujte z gospodinjskimi opadki.
KataxwpnoTe To Tpoiov OaC, WATE VA ExTe KaIUTepo epeBic:www.electrolux. com/productregistration

ayopaoetE Eapntmuata, avawoiama kai yvnoia avtalaktka yi t n ouokueoac: www.electrolux.com/shop
IPEPIBAΛΛONTIKA ΘEMATA
Avakukwote Ta uIiKa Tnou φepouv To ouβoLo. TottoeTne Ta uIiKa OuaKeuaaiac oKataaIhla doxieia yia avakukwOn.
He n3non3BaIte HNKORA acnnpaTopa, akoPeueTkata He e npabINHO MOHTnpaHa!AcnpaTopbT He Tpr6ba HNKOTA da ceH3non3Ba KaTo paObTeH PnOT, OCBEN AKO TOBA e CneuaJIHO Yka3aHo.
IomseHneTo Tp86Ba Da mma Do6po nPOBETPBAHe, KORAto KXYHECHKIArT acnnpaTOP ce n3noJ3Ba eHNOBpeMeHHO c dpyu ypeDc rA30BO Nnn Dpyr BnDTopINO.
Acnnpnpanr Tb3dyn He Tp8oBa da Ce OTBeKJa npe3 OTBoD, npe3 KOITo Ce OTBeKJa dIma OTypeInte, paobTeuNi ra3 nnN Dpyro roPBO.
Ctporo ce 3a6paHЯBa rotBeHTo Ha OTKpNT pIaMbK nOd acnIPAtopa.
N3no3BaHeTo HA OTKpNT PnAmbK E BpeH0 3a FInTPnTE MOKe Da npuHHn NOKap, 3aTOBA a6oJIIOTHo Tp86Ba Da ca n36Bra. TbpxHeTo Tp86Ba Da ca n3BbPwBa noD H6JIIODeHne, 3a Da ca n36BerHe Bb3PiameHReBaHe Ha ONOTO.
BnMaHHe! DoCTbHnHTe YacTn MoTa Ta ce HapReT 3HaHTeNHO KOrATo Ce nIIOJ3BaT 3aENoC rOITbApCKNuypeNi.
LIO ce OTHaCdo TEXHnuecknTe MepKn IMepKnTe 3a 6e3oNaChOCT, KOtTO TpRbda Ce npNarata 3a OTBeXJaHe Ha DIma, TpRbda CTporo Da ce npNdbPjxAte KbMnpEaBnDeHOTo B npaBnInnKa Ha MeCTHnTEKOMnTeHTHN BnActN.
AcnpaTopbT Tp6Ba Da ce NoCTBa
YeCTO, KaKTo OTbTpe, Taka N OTbH (NOHE
BEdHB MCELUA, Tp6Ba PnN BcUKN
CnyuAn Da ce Cna3BaT INCTpykUInTe 3a
NoDpBxKa, NocOeHN B Te3N Yka3AnH).
HeCna3BaHeTo Ha HOpMtE 3a NoCTBaHe
Ha acnpaTopa N 3a NODMaH N
NoCTBaHe Ha φnntPnTe, BOIN Do
OnachOCT OT NOJkapN.
He n3noJ3BaIe N He oCTaBMyTe acnpaTopa 6e3 npabUInHO MOHTnpaHn lamnukn! OnaHcOCT ot TKOB ydap! He ce noema hNkakBa OTROBOPoCT npne bEeHTyaHa HNe3npaBHOCT, Ueta nnnojkap, NaHeceHen Ha YpeDa BCJeDCTBVe Ha HeCna3BaHe Ha HAcToAunTE IHCTpyKUn.
2. YIOTPEBA
Acnipatopb3zacmykba Dnma nnapata, KOINTcOeOTdEJIPTPnI rTOBeHe.
B npnloKeHn HapbUHKn C nHcTpkyuHn e nocOeHo Koi e noXoJaUa 3a Bac BapnAHT B 3aBNCmOCT OT 3aKyIeHn MoJeI, KaTo I36OpBT e MeJdy acnnpuraata Bercn C BeHTnlaCIOHeN
4.2 Hemnue ce pfntbpcaktnbeH BbrJIeH
ФИNTbPbT cakTNBeH BByIeH ce 3aNyUba
pnp6n3iTeNHO CneI Dblr nepIOd Ha
h3NoI3BaHe b 3aBcIMoCT OHTaHa
Ha rotBeHe N OToba KOnIO YeCTo
noNUCTBaTe fNTbPa .BbB BCEKc CnyaH
e Heo6xOJMoMa IIOMeHReTe fNIbPa C
akTNBeH BByIeH H BCEKu YeTnpi Mececa
UNI KOraTO INDkaTOPbT 3a 3aCnUaHe Ha
fNITpTe noka3Ba,Ye e Heo6xOJMo.
He ce MNE HnTO MoKe da Ce h3NoI3Ba
NOBTOPOH.
5. ynpabJIeHnIa
AcnpaTopbTe ccha6dEn C KOMaHIO TabNo C Bb3MOxHOCCT 3a peRyInpaHe cKOpocCTTa Ha acnnpiPapHe n PpeBKnOChBaTeJ Ha OCBETJIeHNTo HA OTBapCkN IIOt. Ako pni rotBeHe ce OtJeI MHO npapa, PpemInHe Ta MaKcImaIepeKIMHa paBoTa. PpeopbUHTeIHO e Da BKNoCHte AcnPaTopa5 MNHyTneIpaDe 3aONOHete Da rotBNTe N da Ro OCTaBmTe Da paBOTN OSe 15 MHyTu CNeD KaTO ppiKlOChte. KomaHnTe ca pa3noJoxKeH bByxu liueBvnaH naH ha ypeDa:
1. Bytoh ON/OFF Ha Motopa
HaTnCHeTe To3n ByToH 3a Da BkInOuHTe acnnpatopa, 3adeJeCTBa ce 1-Ba CKOpOCT (MoUHOCT) Ha acnnpipane. Ipn BkInOueh acnnpatop (He3aBnCmO O tCKOpOCTTa) HaTnCHeTe To3n ByToH 3a Da N3KnIOHTe acnnpatopa.
2. BytoH 3a n3bupaHe Ha ckOpocTtA
Ppi n3kIouhen acnnpaTop haTncheTe T03n 6byTOH 3a Da n3bepeTe 1-BA CKOPOCT (MOUHOCT) Ha acnnpupaHe. Ppi nOBTOPHO HAntCKaHe e Bb3MOXHO Da n3bepeO octHaHAnITE cKOpOCTn (MOUHOCTn) Ha acnnpupaHe:
1-BaCKOPoCT(MOuHOCT)Ha acnnpupaHe:BbpxyDncpnerce NoRBBA YNCJTO “1"
2-pa ckopocT (MoUHOCT) Ha acnnpupaHe: Bbpxy Dncnnpe Ce IONBBA uNCJIoTO "2"
3-Ta ckopocT (MoUHOC) Ha acnnpupahe: Bbpxy Dncnnpe Ce NOBRA BA UNCJTO "3"
4-Ta ckopoct (MoUHOCT) Ha acnnpipahe - nHTeH3NBHa: Bbpyd INcPJIe Ce NOBRA YNCJIOTO "4" (PpeMnRba)
Интэнзивида скорoc (MOцноct)
Ha acnnpupahe e c onpeдениho
Врemeетраеон (OKОLO 5 MInHyTu),
Спед КОЕТо acnpaTopbT прмнава
abTomatuHOb KbM 2-ра скорoc (MOцноct) Ha acnpupahe.
3a Да DeзakтивираTE Интэнзивида
скорoc (MOцноct) Ha acnpupahe
пр徳 Да ИЗтуе орденино
Врeme:
HaTnCHeTe 6yToH N2- acnnpaTopbT
IpeMnHaba KbM 2-pa CkOpocT (MoUHOcT) Ha acnPupaHe
HIn6yToH N2: acnpaTopbT ce
H3KNIOvBa.
3. ByToH ON/OFF ocBETneHne
B3diH Be6-caTka 6apbIn KeNeciHi KapaHbI3:

KoIandahyra KaTbIcTb KeHeceTp, KITaIshaanap, aKayIbIKTb TY3eTy, KbI3MeT KepCetTy TypaIbI aknapaT: www.electrolux.com

Ci3re 6apbHwa JkaKcbI Kbl3MeT KepCeTy yuHIn eHimHizDi MbHa Jepre TipKeHiz: www.electrolux.com/productregistration

KypbIbIbI3fa KaKeTTi KepeK-JkapaKTapDbI, YbIbIHdbI MaTePnAnapDbI XHe
fmpalIK KocankbI 6eNWeKTePdi catbn any ywiH:
www.electrolux.com/shop
KOPSHAFAH OPTAFA 3иян KEлДIPMEY TYPАльы MAFЛМATTAP
Befri canbHrah MaTeepnAnapDbKaTAteHdeyDeH eTKi3yre TaCbIbH3. OpaMaMATEpHaanapbIH KaTAteHdeyDeH eTKi3y yuHIn TnicTi KOHTeHepJepre caBbH3. 3NeKtpNIk KHe 3JIeKTPoHNkaIbK KypbIbIaPdbIH KaNdbIbIH KaTtAeHdeyDeH eTKi3y apKbIb, KopUarAH opTaRa XaHE aAMHBn DeHCayIbFbHa 3NbIH KeTIpeTIN KaFaIaNPaFA KOJI bepMeYre 3Y yNeciH3di KocBbH3. BEnr caBbHraH KypblfBnApdbI TyMbICTbIK KaNbIbIKapMeH bipre TactAmHbI. OHIMDi JxeprinikTi KaTAte HDey optaIbIbHa eTKi3iH3 HeMece JxeprinikTi MekeMere xaBapNaCbH3.
TYTbIHyUbIFA Kbl3MET KOPCETY
ΦπpMaJIbIK 3aTAPdbI KOJaHaHyDbI yCbIHaMbI3.
Kb3met KepceTy opTaNbIfbHa xa6apnackaHa KeNeci DepekTeprH daBbH 60nybH KaMTamacbI3 etHi3.
IepeKTepei TeXnKanbIK aknapaT TakTaunacbHaH TaByFa 6oJaBly. Ylrici, EHiM Hemipi, CepraJIbIK
Eckepty /A6aIaNbI3 - Kayinci3ik TypaIbMaHb3IbMaFMyMaT.
i KaJIbIJaMa aknapaT XeHe KeHeCTep
KopwaahOpTaKaTbictbaknapaT.
Aanaba eckeptyciz 3e3reptinei.
1.!KAYIINCI3IIK
HYCKAYJIAPbI
CaKaTaNDbIpy TpyaIbI eckepTy!
JaBbIHdayuMbI acnAnTbI naDanaHy
bapbcibHda 6yn Hcyckayda 6enrineHreH
KoJdAHy wapTTrapbIH cKaTaMaHaHHbIH
KecipiHen 6oJfAH OKnblbIK ept
neH 3akbIM ywiH kayan 6epMeNdi.
Copfbls TEK KANA yIde naDanahyfa
bonaTbHdaI etin K06BaNaHaFh.
Ha3apbIbI3da 60bcH! AcnantbI KOHdbpy OpeaunrcbTolbIK aKaTaJIMaRaHua 3JKeKTP KeJicHe KocNaHbI? Ta3anay MeN KyTy OpeaunrcbHa KipicNeCTeH 6ypbH BnKahbI 8fapbIn HeMece 3JKeKTP KeJicHiH optak axbpaTkblbHaH cybpln copblt JxJIeH aXbpaTbHbI3.
BapIbIK ta3anay MeH KyTu onepaunycbIH
ictey bapbcblHa JyMblic KONfA6bH KNIiH3!
Balaanap MeH akbl eci keM aamdapFa
hemecse KeTkiIki TbiinMeTIN, TzKipne6eci
kok aadamdpfa, erep baKlIaycbI 0bnCa,
hemecse erep onapdbH kayinc3diirHe
kayanTbI aadam XaFbIHAn acnantbI KOJaHy
yupetimmece 6yn acnannen KOndaHy
kapamaNbl. Acnannen OHHamay yuHIn
baIanapdbI kapaycbl 3 KaIbpMaHbI3.
Erep topbI dypbc KOnDbIpBImaca
copfbItbI naDanaHbHa3!
OeepTeJIMereH KafdaiDa copfbItbI
tipey XaBtBfI peTIHde KOndaHyfa
TbIIbIM caJIbHaId.
Ac yinde copfbltbl r36beH kHahtbln
XkHe 6acka kHaHapMaApkblbl kHaHtbln
backacapanTapMeH KOJdaHaHKe3de
BeMHeH iya aHaJIbIMbIH Tnicti TypDe
KaMTamaccbI3 etHi3.
CopbIiFaH aya ra36eH xHaTbH Hemece
backa xaHaapMaJ apKbIbI xaHaTbH
acnantapDaHTyTih bIbFapyfa apHaJIFaH
ayaTeK3riUAPkIBjKepi CbPTka
UbIFapblMaybl Tnic.
«KaIbIHbIH acTbIHda» niicipinetIH TaarMdpdbI daIbIHdayra MynDem TbIbIM caIbHaNbI, ce6ebi xanbln qnlbTpnpre 3aKbIM KeNTipin ePTTI naiDa bonybHa eKeNyI yMmHIn, coNdbkTah 6yI eIdTeh aynak 60bnHbI3.
KaTbI KbI3bIN KEtKeH MaIbIH TytAHybl
MymKIn 6oNfAHdbIKTaH MaIda KybIPbIaTbIH
TaramDap ePdaiBIM 6akblayda 6Onybl
Tnic.
Eckepty! Nicipyre apHaanfah baca KaapanapMeH 6ipre KOnJaHaFah Ke3de acnantbH jxetIMdi 6eJIkTepi KaTbI Kb3ybi MymKIn.
TexHnKaIbIK waapanap MeH TyTIN bIrfapya
TexHnKaIbIK KayInci3iK wapTAPbl
XeHnHne 6JIkTI KeprinikTI eKIMuNlIK
BeIrIeRer anDbIH an TepTIN epexepePih
CaK TaHbI3dap!
Copfbltbl iihen Jhne cbipbHaH
mep3imdi ta3anan typy kaxeT (bepinreH
hckayda benrinehren hapTTapfa caikec
AiblHA BIP PET). HcykaDafbl copfbltbla
ta3anay men pfnbTpnpelid ta3anan
aayibctbpy epejekepin caKamay optTIN
nainda bonybHa keJiyi MymkiH.
JNeKtp TOfbI COfByI MymKiH 6oJIFaHdbIKTaH DpybIC KOHdbIpBImaHaJ IaMnblIaCbIMeH COfpBbTbI naJaIaNHaBbA h3 KHe KaIdbPMAh3.
Bi3 acnntbI naIdaIahy 6apbcihda 6yn Hcyka 6eIriJehreKoJIaHny 7apTtApBH CaKTamaHaHHbIH KecipiHeH 6oJfAH OKnblIK ePt ne 3akbIM yuiH kayan 6epMeM3.
2.ПАДАЛAHY
CopfbltamakdaibHdayanb6ynapblkHe tyTInepDi copy ywiin naIanaHaDbI. CizdiN yriHe baiNaHbCTa KocatBn naIanaHy HcKaybHJe KaKetTI copfbltBtiTypi KepcTeiReh,cbiptKa
yifapaTbIH CopfbiW peTihde

Hemece
iuki aHanaTbH pntp etInde

3. OPHATY
JKeiHin KepHeyi acnantbH iwiHne opHaIacKaH TaKtaiWada 6eRrIneHre TexHkAblk DepeKTepeDe KepHeye CkeKc Keeny Kepe. Erep copbB W BnKamEn KAbDblKTanFAn H 6oLca, OpaTbJFaHnH KeHH de icTeyRe 6oNaTbH, KOJ XeTepeNk XepDe 6oNybl Tnic, ICTen TyprH epexenepe CaiKeC aImaBlc-CanMaBb bTseNceBte CopfblTb KocblH3.Erep copbB W BnKamEn Ka6blKTanMafH 6oLca (XeJIre Typa Kocblny), HeMece anMaBlc CanMaBb WTeNCeB OpaTbJFaHnH KeHH de KOn XeTePNI KepDe 6oIMaca, OHda opHaTy HcyckaybHa caiKeC 3-AdpeXeJeri ackbH KepHeydi BoNdbIpMaTbH JxHe JeiHIN TOblk aBlbYbH KAMTaMacCbI3 etetIH Tnicti ekINIOCTIK axbipATKblTb NaandaHaBhl3.
Eckepty! Kopek JeicHe copfbluTbIH 3JIeKtpJIK JxIeNecIH KOCy anDbIHda Kopek Ka6eJI dypbIC MOHTaJdaJFaHbIH a K03 JeTeKl3iH3.
ECKEPTY! Həp bepuyi cbIMxejini
aBTOPn3aunraHFaH TexHnKaIbIK
OpTaIbIKTa HeMece biIkTi MaMaH
aybICTbipy KepeK.
Copfbltbln TEmeHri Kbipb Meh bIdbc
actbHafti Tipeiyu Xa3bIKtbIbHbIn apa KaWbIKTflbI 3JIeKtp PnITacbl yuiH 50cm, an ra3 Hemece biPiktiinre HnnTalap yuiH 65cm DeH KEM 60Jmaybl Tnic.
ErepHcyayda ra3 pntatcbih ophatyafapTbIbIpaKapaKaUbIKtbIK6enrInHeRb0nca,OnbI eckepiH3.
4. TEXHINKANbIK KYTIM KOPCETY
Eckenpy! Ke3 KeJIneH Ta3anay HeMece
TEXHnKaJIbIK KbI3MeT eTy OnepaunrcbIH
KacaydAn 6ypbH, BUNKaHbI UbIFapbln
HeMece 6eJImeHIn 6aCtbl aXbIpaTkBbUbH
CybIPbIN CopfbluTbI aNKeTp JeKeIciHe
aXbIpaTbHbI3. Copfblu IwIHeH KHe
cbIPTbHaH NkI Ta3aIaNbHbTI Typyb KaKeT
(KeM DeReHDe WAmAmeH MaIdbI YCTan
KanaTbHΦnIbTpdi Ta3anay MeP3iMine
ceske).Ta3anay yWHi 6eItan JxYfbl
3attne CynahraH arHaBly Wb6epeKTi
naIdaNaHbHbI3. A6pa3nJaBik Kocnacbl 6ap
3aTTb NaIdaNaHbAbH3.
CNIPTTI PAIJAIAHAHbI3!
Eckepy!Фиьт di aybICTpyжанe acnantbI tazaiay epexenepiHcakTaBih6aybi eptTIN naia 6OnyiHa ankyi MymkyH. CoNdbkTah bepinre HcyaMeH naiaananyfa kehec 6epem3. Kofapbnda Kepctinre echcpTynpdi cakTaMaFaHdbkTah Hemece dypbc emec KeHdey candapbHaanb 6oFAn ept Hemece Ko3raybIbTH 6yInHyHe 6aIIaNbICTbl 6apbIK kayankepwiNik aIbHaDbI.
4.1 Mau dy yctan kany fynbtpi
-Фиьтрд ai caын arpeccnbTi emec Kfbl 3aTTapMeH, KOlmH HeMece bIbICKyfbI MaunHa, TeMeh TemnepaTypda, YHemdi Ta3anay Təpti6iHne Jyy Kepek. bIbICKyfbI MaunHaJa JyblFaH MaJ yCTaTbIH fNlbTp Tycci3deHy MyMKIn, bipak OanH OhbH cy3riu kacneti MyJNe e3repicci3 Kanadbl.
4.2 KyybImaTbIH KEmipJIi FnIbTp
KemipniФиньТрдИн KaHbIFybl 3aK naДанayHy МерзIMiHIN KbICKa HeMece 3aK eTуIHe baiNanbIcTbIb OlaNabl, on ac YuIInI TPyI MeH MaNbIy cTaNbIHФnBtpDIYCTaHbIraFm Mep3imDIIik Ta3aIayMeh aIbIh ana AhbIKtanadbl. KaHdai JkaJdaI 6Ola ca, KaptrnIxJki Kem dereHne 4 anda bip pet aybIcTbPbHbI3.
KemipniФильтджууfaболмайдыхэн de perehepuЯfa kapamcbi3.
5. BACKAPY 3JIEMEHTTEPI
CybyjKeJNeTkiUHINKbIJaMdbfBn
6aKbIay yuH jHe nnTaHbIn yCTHe
kapbIK Tycipy yuH, cybyj KaIIaFbI
bacapy KaIkaHbIme HKa6DbItanrH.
ActbH bByany KOHeHTpauncBcE eDeyip
Ke6eIreH Ke3InDe, copfbIUtbH KApKbIHDbI
TepiH naJdaHaHbH3. Bi cOpfbIUtB
Tamakicipy aJbHda5 MmH 6ypbH Kocyfa,
Kehe nicipin 6oJFaHHn KeiH 15MH KcBn
KaNdbpyFa KeHec 6epMe3.
Backapy bactbipMaIapbl KpbIbIbHbI aIbIbIbI naHeJIInDe opHaIaCKaH:
1.Двигателді kocу/эшіру 6actbIPmacbl
Copfbltbl kocy yuiin ocbi 6actbipmahl bacblb3,1-copy xblnamdbflbl (kyat) opHaTbIaBl.
Copfblkocbltnypca(Ke3 KeIReH KbldAmbIKta), eWipy ywiH, Ocb6actblpMaHb6acblb3.
2. XbIJaMdbIKTbTaHday 6actbipmacbl.
CopfblkocbltnTypca,1-copy KblnamblbfH (KyaT) TaHday yuHIn, OcbI bactbpmhbl bachlb3.
Copy kbldAmdbfbH (kyaT) TaHday yuih, ocbi 6actbipMaHkiTanlan 6acbHb3:
1 copy xbldAmdbIfb (KyaT): DnCnneJe 《1》 caHb 7bIfaDbI
2 copy kbldaamblb (kyaT): DncnpeJe «2» caHb lwbifaBl
3 copy xbldAmdbIfb (KyaT): DcnpneJe «3» caHb lblfaDbI
Kapkblb copy kbldaMbIfbl (KyaT): DnCnneIe «4» caHbllbfaDbI. (XblbItaTaNbl)
KapkblNbI copy kblndaMdbIbI a3
yaKbITka (5MNHyTTaI) aKTNtBHeHdpiPeIeI,
CoaH KeiH copFbIu ABTOMaTTbIK
Typpe 2- copy kblDaMdbIbIHa K0wEi
KapkblNbI copy kblDaMdbIbIH (KyAT)
epTepeK eWipy yuih 2-bactbIpMacbIH
bacMbI3, copFbIu 2-kblDaMdbIbKa
aybCaDbI, HEmCe 1 di bacbIb3
-copFbIu eWeDi.
3. Kemekei xkapkTBkocy/ewipy
4. CopfbluTbH xMyBic yaKbITbH weKtey 6actbIpmacbl
5.Дистпец
CopfbilTBih xmbic yaKbITbIH wekTey
Бул КьзMet CopfblIbTbH TaHdIaHa
copy KblIaMdbIbFbIHda (KyaT) Kymblc
yaKblTBH WeKteYre MymKiHdk 6epei De, 4
6bacIbPmacbIH 6ackaHda AKTNBTeHdpiJei.
BeJIrJIb 6ip yaKblt ETKeHHHeN KeiH copfblIeWedi:
1 copy XblIaMdbIbI (kyat): -20 MInHyT (DinCnIeIe 1 caHbI naJa 6oNaIbI da KIuKeHTa INDnKaTop XblIbIbIKTaIbI)
1 copy XblIaMdbIbI (KyaT): - 15 MInHyT (DinCnIeJde 2 CaHb I naJa 60NaIbI da KIIuKeHTa INHdkaTop XblIbIbIKTaIbI)
1 copy XblIaMdbIbI (KyaT): - 10 MInHyT (DinCnIeJde 3 caHbI naJa 6oNaIbI da KIuKeHTaINHdkaTop XblIbIbIKTaIbI)
KapkblHbI copy KbldAmdbIfb (KyaT):
-05 MmHT (dncnneJe 4 canb naJa60IbIn, INDnKaTOp XblnbIKtaiNb) Copfbltbl 6eIriEnHRe yakblTah eptepekewipy ywiH 1 Hemece 4 bactbIpMaJapblh 6acblb3.2 bactbIpMacbH 6ackaKe3de, Copfblw anDbIHda opHaTbJFaH KblDaMdbkka opJaNbI.
MaJdbI yctan kany fumnbtpin KaHbIKTbipy HnDnKaTopbI
80 cafAT KxMbIC yakblbETbEtKeHHek KeiH, DnCnneJe XblnbIbIKtaFaH 1 cahbl naJa 6oNaIbI. FInbTpdi KaHbIKbpy INdNkAToBpIH aIbIN TaCTay/abICTbpy YuH 1 bactbPmacbIH 6acbln, 3 ckyHdTai YcTan TpybIH3. Bepinre Hyckayda Ka3blfAHdain, fInbTpre TexHkAaBik KbIMET KepceTydi opblHaHbI3.
Kemip qnIbTpIn KaHbIKTbIpY INdkaTopbl
320 cafT Kymbc yakblbE tKeHHeK KeiH, DnCnnpeJe XbInblbIKtaFaH 2 caHb I naJa 6oJaBl.ФIbTpdi KaHbIKbIpy INDnKaTOPbIH anBn Tactay/abICTbpy YwiH 1 6aCtbpMacbIH bacIn, 3 cekHyTai YcTan TypbIH3.
Bepinren HucKayda Jka3bIJaHaDa, qInbTpre TexHnKaIbIK KbI3MeT KepcetyDi opbIHaHbI3.
ErepnIbTpnpdi KaHbIKbIpy
HIMdkaTopnapbl XblnbIKtaBacTaca,2- Ke3eHRe aybICTpPydbI KaIFactbIpbHb3.
AIfaBbIHda MaDbI yctan Kany pfNbTipiHi KaHbIy cintemeci KaTa KocblJaDbI.
ErepMaIbIyCTanKanyΦnIbTpiriHKaHbIfy INdNkAToPbI dyPbc Emec XyMbIC icTece, KHe CopfblI WnIbTpImeH KOJaHaJFaH KaFdaIa, bipHpi pet KOnMeH aKtNBTeHdiPiHi3.
MaIdbI yctan kany fInbTpHIN KaHbIKTbipy INdNKaTOPbIH AKTNBTeHdpY:
Copfbltbl Kocbin 2 MeH 3 bactbIpMaIapbH 6ip Me3rInde 6acbin, 3 cekyHntaYcTan TypbHbI3.
Icnne 3 cek iHne 1 Meh 2 caHb I KblnbkTaNb. Byn, MaNb yctan kany fNtpiHn KaHbKbTypy NHdkaTopbl AKTNBTeHdipinReHH KepceTei.
KemipnIbTpIn KaHbIKbIpy INdNkaTopbIN DeakTNBTeHdpy:
CopfbltbcnDipin 2 MeH3
6abctbplmaIapbH bIp Me3rInde bacIn,3
cekyHtai yCTan TypbHbI3.
IicnnneJe 2 cek iuiHne TeK 2
caHbI KblbIKtaIbI. ByI, Kemip
fNtpiH KaHbIKTbpHy INdkaTopbl
deakTbTeHdipireHin KepCteJI.
6.ЖAPыIKТАнДыIPУ KYPАЛы
AcnanTbI aJIeKTP JxHeciHeH eUpiH3
EckepTy!JaMaNaHbI yCTaydAn 6ypbH,Onap cyBaHaBbHbHa K93 JeTeKl3HJ3.
12B-20Bt MaKcImaIaI -GU4-Ø35mm TeK raIopereHdi KaMaNaIapDbI fHa KaONdaHbHb3.IaMaNaIapDa KaONbHbI3dbI Tnri36eH3.
HNE MNCJIIME HA BAC
Bn 6naorapime wTO cTe kynIne Electrolux anapat. OdbpaTbe npOn3bO KoJwTo Hocn co Ce6e Deuehen Ha npOpeCnoHaHNo NCKyCTBO u NHOBaun. YNkaTeH n CTnncn, 6eWe d3ajnpancneuJaHNO 3a Bac. Cekoraaw Kora Ke ro KopNCtNe, MoKeTe da 6nDeTe cnpyhne DeKa Ke Imate do6pn pe3yIITaN BO CEKoe Bpeme. DObpoDojDoBe BO Electrolux.
IoceteTe ja hauata Be6 cTpaHua 3a da:

Добиете Корисни совети, бpoшури, Вдич за решаразе на поблеми, Инфомаши за сервсирале: www.electrolux.com

Perncnpate Baunot npoun3b0d 3a noo6pn ycnyr: www.electrolux.com/productregistration

KyuBaTe DoaToCu, POnOBn i OpuHnaJIH n DeIOBn 3a BaIInOT anapar: www.electrolux.com/shop
EKOJLOWKI INPAUHAHbA
PeuKnpajTe rMaTepeJaJIte Co CmboJOT .CTaBeTe ja ambaJaxaTa BO COoDbTHN KOHTeJHePn 3a da ja peuKnpaTe.
Помогнete BO 3aштntata Na ХиВТнаТС рсдиHA И РовековTO 3драве И рeшикларajte ro OTпадOT od eNEKtpuHn И eNEKtpoHcN anapatNi. He Фрайтг n anapatNTe 03анчehN CO CmбОЛOT BO OTNaIOT OД ДOMaКИНCTBOTO. BpaTeTo r npO3BOdOT BO BAWIOT NOKaJIEN KanaцNTET 3a peSINKIpaHbe Илк ONKTakpajte ja BAwata ONUHTINcKaHcIeIapJa.
ГРИЖА И YСЛУГА 3A KОПИСHIЦИ
Bn npenopaaybame da kopncTe opunHaJIHn DeJIOBN.
Kora Ke KONTAKTIPATE co CepBnCOT, 6ndete cnrypn Deka n mate Ha pacnojarahe cIeHNBE NOaTOU.
Информашиные може заIGN habлеше на почката сюдаци.Мосян, Б Proj на поизвдот, Серскпб Proj.

IpeDynpEduBaHe/BnHMaHne-CnpyHocHn HΦopMaUm.

OnuTn HOpmaun n COBETn

HOpMaun 3a OKOJIHaTa.
Moxhocta 3a npomeH e 3aDpKaHa.
1.!BE3BEdHOCNH HCHTPYKLIN
BnHMaHHe!PnIaPjxyBaJte Ce cTporo DO yNaTCTBATA dAedeHN BO OBOJ npIpaUHKn... Hne O6nbAme 6bIOKaKbA oIROBPOHCT3a 6bIOKAOKaBn PpO6JIeM, IITeTa NIN IOXap npeDn3BKNaH Na anapaTOT KAKO pe3yUTaT Ha HeCNEdeHe HA yNaTCTBAt BAkPyueHN BO OBOJ npIpaUHKn. AcnPapToPoTe hAmEhet NcKlyuYHbO 3a DomaUnHa yNtPe6a.
!PpeDynpEbyBahe! Da He ro NOBp3yBate anapatot co eNEKTPnHOTHO HanojyBaHe ce DODEKa MOHTaKaTa He 6nDe zuoNcHo KOMnIeTHa. Ipei 6nIOkAba OepauJa 3a YnCTeHe nnOOPxByBaHe, NCKnyCte Ro acnnpaTOpOT OD eNEKTPnuHaTa Mpeka Co BAdeHe Ha CtpyJHiOT pInKnUynIK nIi CO NCKnyuBaBe Ha DOnMaunHOT MPexKe HpeKnHyBaY.
3a cnte onepaun 3a MOHTaja n OoJyBaBe da ce KOpCTaT paOOTn pakabuN OBoj anapat He e Hamehet 3a KOpIcTeBe od CToPaHa Ha deca NII NII Za CO HamaJIeH NfNIMK, CEH3OPHN IIN MEHTaJIH CNOCOBHOCTN, INI aKO hemaat NCKYCTBO INI 3HaeBJe, DOKOIky He ce NOd HA3Op INIe Ce IMAaT oBcyUBAHO 3a yNtpeBaHa anapatOr od INIe OIOBOPHO 3a HNBATA Be36EHDIOCT. TpeBa Da ce BHNIMaba, DecaTa Da He cN IGpaAT co ypeDo. HIKORAu He KOpIcTeTe ro AcnPipAtoPOT ako ja Hemate npabINHO MOHTnpAHO peWeTkata! AcnPipAtoPOT HIKKOTAU He cMee Da ce KOpIcSTn KAO NobpUHnA 3a NoDprWka DOKOLKY He e PneuN3HO HabeDeHo. IpocTOpNJata Mopa Da 6bIe DoBONHO npOBETpeHa KORA KJHCKMOt AcnPipAtoPce KOpICNTs 3aEDNo Co anapatn KOI corOpYBaAT rac INI dpyrTOpIBa. N3dyBnOt BO3dXy He cMee Da ce npedBa BO AKTNBeH OuaK 3a qad CTBopeH ON anapatn KOI corOpYBaAT rac INI dpyrTOpIBa.CTporo Ce 3a6bpanyBa FJIAMbIPaHe Ha xpaHata ND camNOT acnPipAtoP. YNtpebata Ha OTBOPEH NpAmEH e 5tETHa 3a fInTPnte U MoKe Da ppei3BVk Pn3NK OD IOxkap INoparri Toa Mopa Da ce 136erHyBa BO CITE OKOINHOCTN. CKeOE npXkeHe mopa rpnKlNbO Da ce HanpABn CO ue Na ce CnpEn Da He JoJde Do p0e3aqrEbahe Ha MacNToI NpAMHyBaHe.
BHHMaHHe!PnCTaHnHTeJeNoBOnOd acnnpaTOPOT MOKaT 3HaUHTeJHO Da CE 3aRpeAT KOra Ce KopNCtN 3aeDHo ypeD 3a RoTBeHe.
UTo ce oNecyBa DoTexHnCknte I
6e36eHOCHTe MepK 3a npimHeHa 3a
HcPpIaBe Ha Napea BaxHO e BHIMATEJHO
da ce CneDat npabuNATA DaDeHN Od
KOMTeHTHnE Bnactn. AcnpaTopoT
Mopa peBOHO da Ce NCTn KaO Od
BhATpeWHOCTa Taka n Od HaDBopeWHOCTa (HAJMAJKY EINHAU MECEUHO, BO cekoj
Cnyuj NotpebHO e da ce noctanyBa BO
CoFNaCHOT CO yNAcTBaTA 3a ODpxyBaHe
daJeHN BO OBOJ pnpauHKn).Ako He
ce CneDat yNAcTBaBO ODHOC Ha
acnpaTopoT N UcHteHbeto H PhINTpnte Ke
do Pn3NK Ond NOkapn.
Да He ro kopructte nii octabate acnnpaTOpT 6e3 npaBInHO MOHTnpaHn CnjaJIuNi NopAIO MOnJHNOT Pn3NK OJ eNeKTPmUeH yIap. Hne OdbVbAME bILOKaBA ODROBOPHOCT 3a BnIOKAOB npObIeM, WTeTa nII INoKap ppeIN3BnKaH Na anapaTOT KAKO pe3yIITat Ha HeCneDeHeHa YNaTCTBaTA BKNUyeHn BO OBOj npRuPAHnK.
2. yIOTPEBA
AcnpaTopot cnyk3a BwmyKyBaHe Ha cnapyaBaHata n napenTe od rotBeHeto. Bo npIIOxehOTO ynatCTBO 3a MOHTnpaBe e pniKaXaHO Koja Bep3nJa MoKe Da ce KOpNCTNo MDoJIOT KOJr NmATE NOMeYBapnJaHT co NaDBopeUHcOpPnaHe Ha
n3DyBHNOT BO3dyx nIN BapNJaHTa COΦnTep CO KpyXHO CTpyeHb Na BO3dyXOT
3. MOHTAKKA
Главностружно Habоюьаье мора Да огвога со ONTO NOKЖан эпкета за каростсткпс CTABeha Вьату bo acinnapotot. Ак осипаторот Одсо пнклунчим NOВрзete ro BO штекот BO corlaachocCT co STpyhnte пponиси И поиюнИран Ha ппstанно МecTo Дури И NO MOtackа taxa. Ак He счбдени CO рпклунчим (Директва Врсka co eNEKTPNUHOT HoNoJyBaHe) Ипн АК пнклунчимот He e loцран Ha ппstанно MecTo, Дури И NO MOnTakcaТа, рпIMeHete БИ-ПОларен П配电иHyBaWBO CORlaachocCT Со CTANDArtne KoJ obes6edyBa КOMПЛЕТНО ИСКЛУЧУВаье На eNEKTPNUHOTO Наоюьаье РOD услови NOВрзанu Co нpeontTOВАРУВаьe Ha Мржata KaTEROpnja III, BO CORlaachocCT co YpNTCTBOTO 3a MOHTaQA.
!PpeynpeyBahe!Ppei (NOBTOPOH) NOBp3yBaHe Na KOJOTO OD ACNIPATOPOT CO eNEKTPnHOTO HANOjYBaHe NPOBepyBaHeTo HA FYNKNUHOHAJIHOCTaCEKORAu PPOBepTe DaIIN CTpyJHnOT Ka6eIe npabNJHO MOHTnpaH.
PpeynpeyBahe! 3aMeHaTa Ha
CTpyJHnOT Ka6eM Oma Da ja Ia3BpUIN
OBlaCTeH CepBcN POMOWeH CEHTap IIN
CnUH NO KBAJIuФKUBAHO JInue.
HajMaNoTO pactoJaHne NOMEfY PIOUaT a
OD WnOpETOT 3a CaDObNTe 3a rotBeHe
I DOnHnOT pa6 Ha acnPaTopOT Da He
6bIe NOMano OD 50cm 3a eNeKtpuHnTe
anapatn 3a rotBeHe 65cm 3a rachnTe
IIN KOMbHNpaHnTe anapatn 3a rotBeHe.
Ako YnATCTBOTo 3a MOtacka 3a PIIINckte
IIOUy ON WnOpETOT npeu3nPaat
NORJEMo pactoJaHne, Mopate Da ce
IpnIDPKyBaTe Do Toa.
4. ODPKUBAHbE
Ppeynpeybahe! Ppei 6nIOKakBa
Onerpauija 3a uCTeHe iIN oOpJyBaHe,
NCKnyte Ro acnpaTOPOt O
eJIeKTPuHaTMA mpeXa CO BAedeHbE Ha
CTpyJHNOPTNIKNUYHKn IIN CO NCKNUyBaHb
Ha domaunHOmpeXeHnePKeHyBaU.
AcnpaTOPOmpeoBHO Da ce YnCTn
(HajMaIky CO nCTaTo fpeKBENZJa CO KOA
ce BpUH ODPxYBaHeTo H a FNITepNTe 3a
MaCTn) KaO OD BnATpeuHoCTa Taka I O
HaNDBOpeuHooCTa. 3a UcTeHBeTo KOPcTETe
KPNa HABLnAIXHeTo Co TeuHi HeYTpAnH
DeTEpreHTn. Da HE KOpCtnte POn3BOdN
KoN cOpJrTa abpa3NuB. HE KOPNCETETE
AJKOXOI! PpeynpeybaHe! Ako
He Ce CNEdaT yNaTCTBaTA BO ODHoc
Ha YnCTeHTo HA acnnpaTOPOt N
3aMeHaTaN HfNtPrTe Ke DoBeDe DO
pn3NK OOn IOxpAr. Ce npenopayBa DO
npinDpxyBaHe Na ppeIoXeHNe ToYnATCTBA.
Hne OOnBaMe BnIOkAKBa OTOBOPHOCT
3a EBEHTyaHIn OwTeTyBaHa Ha MOTOT
IIIN NOXAPreDn3BVKAN KAO pe3yIPTat Ha
HenpabINHO ODPxYBaHe IIN HeCneJeBHe
Ha HabeDenHeTe YnATCTBaTA.
4.1Фиntep3aMaCTn
MetaIHHOT fIITep 3a MaCTn Tpe6a da ce YHCTN eHNaI MeCEUHO C HearpeCBHN DeTEpREHTN, paHIO INB BO MaSINHa 3a MHeBe Ha CaIDBO HA HNCK TeMpeAtpu N BO KpaTOK INTEpBaJ. Co IpeHeTo BO MaSINHa 3a MHeBe Ha CaIDBOI MetaIHHOT fIITep 3a MaCTN MOKeJa ja IN3rSybMaNky Bojata HO HerOBIne KapaKTepNCTNK 3a fIITnpaHBe BOONlTO He Ce MeHyBaat.
www.electrolux.com/productregistration

Blini aksesore, pjese konsumi, pjese kembimi originale pér pajisjen tuaj: www.electrolux.com/shop
PROBLEME QÉ LIDHEN ME MJEDISIN
Ricikloni materialet me simbolin Vendoseni ambalazhin te kontejneret ericiklimt nese ka.
Ndihmoni ně mbrojtjen e mjedisit dhe shéndetit tě njérēzve dhe ně riciklimin embétjeve
:jyil sila aia jia Jia
2 jj j j j j j j j j j j j j j j j j j j j j j j j j j j j j j j j j j j j j j j
13 3
1 1
J
6.
a aasll aasss jglal
L
.
j 1 j 1 j 1 j
.11W-G23(PL)
oON/OFF .3
ggl j.4
J 5
()4c
4" jll bi: jyj is all bi
e e e
Jaeill
a 1
:
)20-1b(g)4
LED 1"1"
(1)
15-2(g)
LED 2
10-3 h(g) 4
LED"3"
(
5-:a b(s)
LED"4"
(
1 4 jj1
2 2 2
aalall aagaa
jgsd 1
"1" 80
a 1
1 1
1j0302dUg
1 1
山山山
joo joo
320
4.2"
a a a a a a a a a a a a a a a a a a a a a a a a a a a a a a a a a a a a a a a a a a a a a a a a a a a a a a a a a a aaa
L
1.
s sll lalil 1 1 1 1 1 1 1 1 1 1 1 1 1 1 1 1 1 1 1 1 1 1 1 1 1 1 1 1 1 1 1 1 1 1
a 1 a 1
a 1 a 1
a 1 a 1
a 1 a 1
a 1 a 1
aaii i 1
jll jil jil jil jil jil jil jil jil jil jil jil jil jil jil jil jil jil jil jil jil jil jil jil jil jil jil jil jil jil jil jil jil jil jil jil jil jil jil jil jil jil jil jil jil jil jil jil jil jil jil jili jil jil jil jil jil jil jil jil jil jil jil jil jil jil jil jil jil
1 1
4 111 jiu ji 5 111 jiu xi u jiu li
i j k l a b c d e f g h i j k l m n o p q r s t
a 100000000000000000000000000000000000000000000000
1 1
Jg 1d j 1d j 1d j 1d j 1d j 1d
jSuyuall a yall ball 25
Laiic a wla bs la kui, ball ic uus
. jzj jzj gao
a
1 1 1 1 1 1 1 1 1 1 1 1 1 1 1 1 1 1 1 1 1 1 1 1
(j)
2 1
sui jai
Eelctrolux a
g jyjLai g yj
aaii iaii aiee
www.electrolux.com

Jusss
www.electrolux.com/productregistration

a 1
www.electrolux.com/shop

i jie1
aaiy aaii y jaiy aaiy oag 1. jaiy ai ayaiy aaiy aaiy aaiy aaiy aaiy aaiy aaiy aaiy aaiy aaiy aaiy aaiy aaiy aaiy aaiy aaiy aaiy aaiy aaiy aaiy aaiy aaiy aaiy aaiy aaiy aaiy aaiy aaiy aaiy aaiy aaiy aaiy aaiy aal y
eLoell aodg ylo
aaii jaii iiaai
y 1
PNC 1
Aa 1
Caiyali, 1ie Caijia

A

jbnn nnnnne
C E