USER MANUAL PSM VENTARO 1400 BOSCH
Power Tools Division
70745 Leinfelden-Echterdingen
Germany
www.bosch-pt.com
1 609 929 S60 (2009.08) O / 115 WEU
PSM VENTARO 1400

BOSCH
de Originalbetriebsanleitung
el Ipnotuno odnyiw xphonc
en Original instructions
tr Original isletme talimati
fr Notice originale
es Manual original
pt Manual original
it Istruzioni originali
nI Oorspronkelijke
gebruiksaanwijzing
da Original brugsanvisning
sv Bruksanvisning i original
no Original driftsinstruks
fi Alkuperäiset ohjeet

PSM Ventaro 1400
1609929 S60| (21.7.09)
Bosch Power Tools

5


Bosch Power Tools
1609929S60|(21.7.09)
Deutsch. 7
English. Page 16
Francais.. Page 25
Espanol . Pagina 34
Portugués Pagina 43
Italiano 51
Nederlands. 60
Dansk . 68
Svenska. 75
Norsk. 82
Suomi . 89
Elambdavika 96
Türkce Sayfa 105
Deutsch | 7
Sicherheitshinweise

Dr. Egbert Schneider Senior Vice President Engineering
Dr. Eckerhard Strötgen
Head of Product Certification

Robert Bosch GmbH, Power Tools Division
D-70745 Leinfelden-Echterdingen
23.06.2009
Montage
Read all safety warnings and all instructions. Failure to follow the warnings and instructions may result in electric shock, fire and/or serious injury.
Save these instructions.
Safety instructions for the sander with the vacuum cleaner

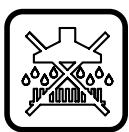
Keep the vacuum cleaner away from rain and moisture. Do not vacuum liquids and use the sander only for dry sanding. Water entering the vacuum cleaner increases the risk of an electric shock.
- Keep your work area clean and well lit. Cluttered benches and dark areas invite accidents.
- Keep children and other persons away while operating the sander. Distractions can cause you to lose control over the machine.
Stay alert, watch what you are doing and use common sense when working with the sander. Do not use the machine while tired or under the influence of drugs, alcohol or medication. A moment of inattention while operating the machine may result in serious personal injury.
- Wear personal protective equipment and always wear safety goggles. Depending on the type of sander and the application, the wearing of personal protective equipment such as a dust mask, protective gloves, or hearing protection, reduces the risk of injuries.
Dress properly. Do not wear loose clothing or jewellery. Keep your hair, clothing and gloves away from moving parts. Loose clothes, jewellery or long hair can be caught in moving parts.
-
Store the idle sander and vacuum cleaner out of the reach of children. Do not allow persons unfamiliar with the equipment or who have not read the instructions to use the sander and vacuum cleaner. Tools are dangerous in the hands of untrained users.
-
Do not use the vacuum cleaner when the mains cable is damaged. Do not touch the damaged cable and pull the mains plug when the cable is damaged while working. Damaged cables increase the risk of an electric shock.
- Do not vacuum materials that are harmful to one's health, e. g. dust from beech or oak wood, masonry dust, asbestos. These materials are considered carcinogenic.
- When operating the vacuum cleaner in damp environments, use a residual current device (RCD). Using a residual current device (RCD) reduces the risk of an electric shock.
Make sure that the switch of the sander is in the "0" position before switching on the vacuum cleaner. This safety measure prevents unintended starting of the sander.
Do not use the sander if its "On/Off" switch is defective. A machine that cannot be controlled with the switch is dangerous and must be repaired.
- Caution, fire hazard! Avoid overheating the object being sanded as well as the sander. Always empty the dust collector before taking breaks. In unfavourable conditions, e. g., when sparks emit from sanding metals, sanding debris in the dust bag, micro filter or paper sack (or in the filter sack or filter of the vacuum cleaner) can self-ignite. Particularly when mixed with remainders of varnish, polyurethane or other chemical materials and when the sanding debris is hot after long periods of working.
- Use the sander, accessories and tool inserts, etc., according to these instructions and as prescribed for this specific machine type. Take the working conditions and procedure into account. Use of the sander for applications other than intended for can lead to hazardous situations.
Provide for good ventilation at the working place.
English | 17
- Switch the vacuum cleaner off before performing adjustments on the machine, changing accessory parts or placing down the sander. This safety measure prevents unintended starting of the sander.
- Maintain the sander and the vacuum cleaner with care. Check for misalignment or binding of moving parts, breakage of parts, and any other condition that may affect the operation of the machine. Have damaged parts repaired before using the machine. Many accidents are caused by poorly maintained power tools.
Have the sander and the vacuum cleaner repaired only through qualified specialists and only using original spare parts. This ensures that the safety of your machine is maintained.
Safety instructions for the sander
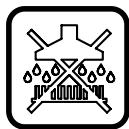
Do not vacuum liquids. The penetration of water into the vacuum cleaner increases the risk of an electric shock.
Do not allow children to use the vacuum cleaner without supervision. Children can injure themselves.
- Keep the vacuum cleaner away from rain and moisture. Water entering the vacuum cleaner increases the risk of an electric shock.
- Do not vacuum hot or burning dusts. Do not operate the vacuum cleaner in hazardous locations. The dusts or vapours can ignite.
Do not use the vacuum cleaner when the mains cable is damaged. Do not touch the damaged cable and pull the mains plug when the cable is damaged while working. Damaged cables increase the risk of an electric shock.
Do not pinch the cable. Do not misuse the cable for pulling the plug out of the socket outlet or moving the vacuum cleaner. Damaged cables increase the risk of an electric shock.
- When operating the vacuum cleaner in damp environments, use a residual current device (RCD). Using a residual current device (RCD) reduces the risk of an electric shock.
Do not vacuum materials that are harmful to one's health, e. g. dust from beech or oak wood, masonry dust, asbestos. These materials are considered carcinogenic.
Have the vacuum cleaner repaired only through qualified specialists and only using original spare parts. This ensures that the safety of your vacuum cleaner is maintained.
Products sold in GB only: Your product is fitted with an BS 1363/A approved electric plug with internal fuse (ASTA approved to BS 1362).
If the plug is not suitable for your socket outlets, it should be cut off and an appropriate plug fitted in its place by an authorised customer service agent. The replacement plug should have the same fuse rating as the original plug.
The severed plug must be disposed of to avoid a possible shock hazard and should never be inserted into a mains socket elsewhere.
Products sold in AUS and NZ only: Use a residual current device (RCD) with a rated residual current of 30mA or less.
Functional Description
Intended Use
Multi Sander
The multi sander is intended for dry sanding and polishing of wood, filler (except for gypsum) as well as coated surfaces. It is especially suitable for profiles, corners or hard to reach locations.
Vacuum Cleaner
The vacuum cleaner is intended to vacuum/extract and blow out non-hazardous materials.

18 | English
Product Features
The numbering of the product features refers to the illustration of the machine on the graphics page.
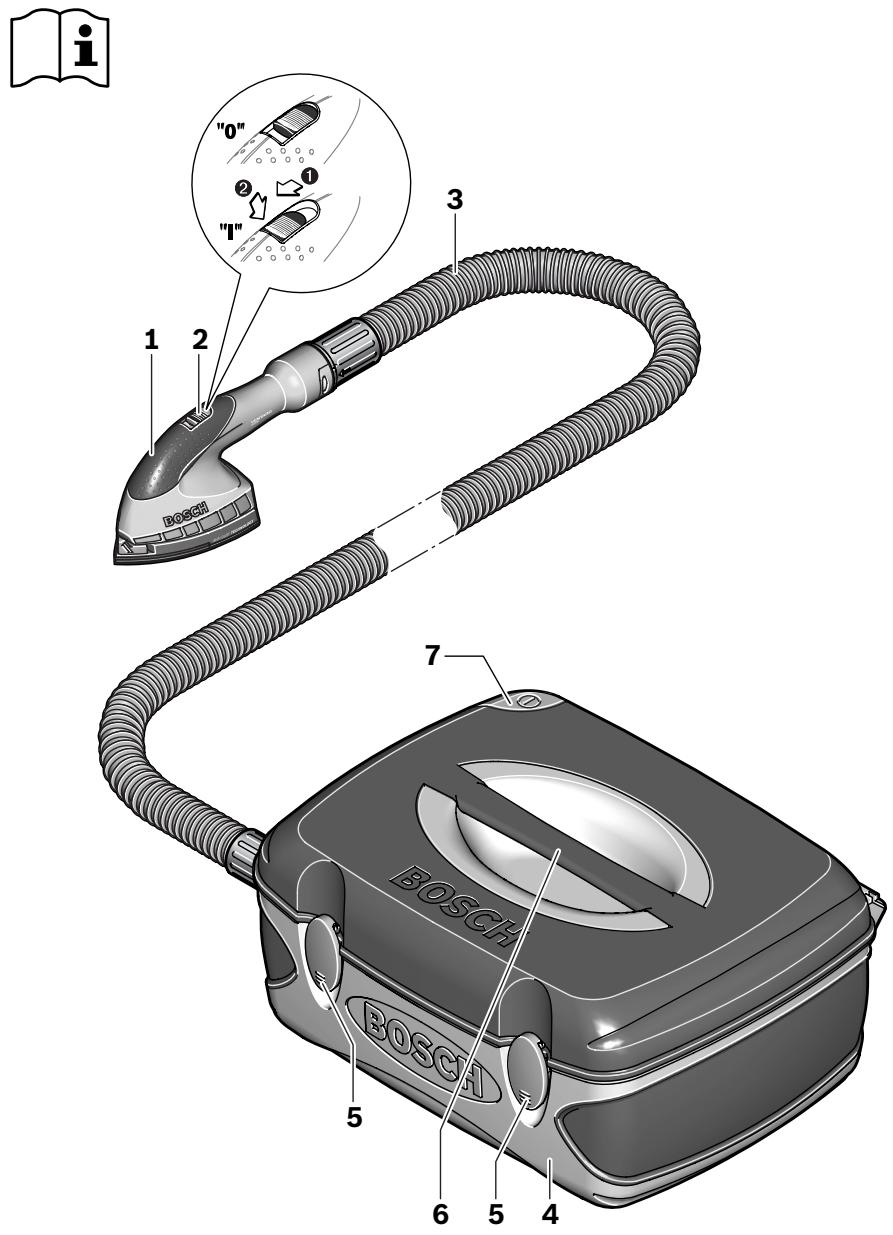
1 Multi sander
2 On/Off switch of the sander
3 Vacuum hose
4 Vacuum cleaner
5 Latch of the vacuum cover
6 Carrying handle
7 On/Off switch of the vacuum cleaner
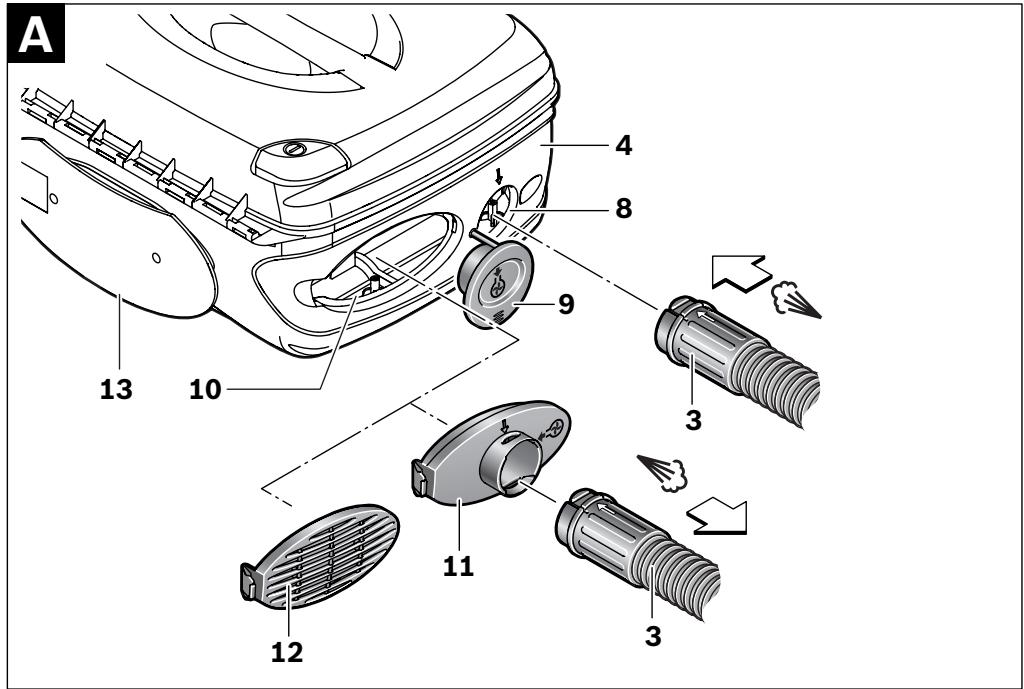
8 Vacuum hose connection
9 Plug cap for the vacuum hose connection
10 Holder for blower adapter/closing cover
11 Adapter for blower connection
12 Closing cover with blower filter
13 Cable reel
14 Vacuum lid
15 Bypass valve
16 Closing flap for dust bag enclosure
17 Guide for dust bag
18 Dust bag
19 Drilling helper
20 Extraction adapter, 35mm
21 Extraction/inflation nozzle
22 Vacuum hose connection of the multi sander
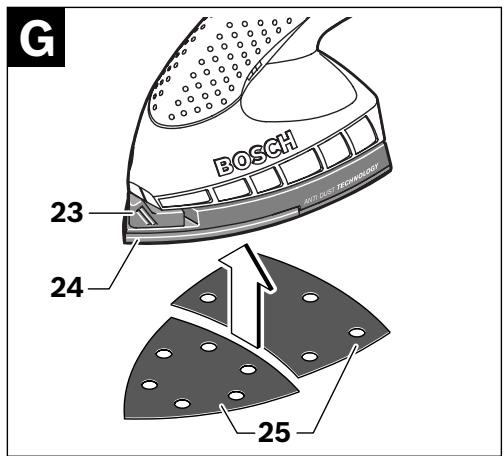
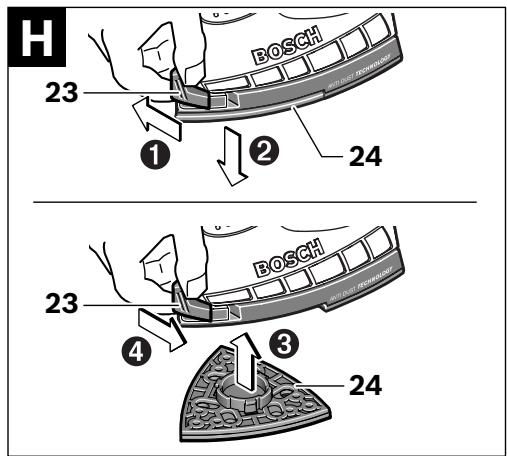
23 SDS button for release of the sanding plate
24 Sanding plate
25 Sanding sheet
26 Pad extender
27 Sanding plate for extender
28 Narrow pad extender
29 Narrow rounded pad extender
*Accessories shown or described are not part of the standard delivery scope of the product. A complete overview of accessories can be found in our accessories program.
Technical Data
| | PSM VENTARO
1400 |
| Air-driven multi sander | | PSM VENTARO |
| Article number | | 2 607 219 0.. |
| No-load speed | min-1 | 16000 |
| No-load orbital stroke rate | min-1 | 32000 |
| Sanding sheet surface | cm2 | 104 |
| Orbit diameter | mm | 1.6 |
| Vacuum cleaner | | VENTARO 1400 |
| Article number | | 3 603 C41 0.. |
| Rated power input | W | 1250 |
| Dust bag contents | I | 3 |
| Weight according to EPTA-Procedure 01/2003 | kg | 5.6 |
| Protection class | | ☐/II |
Please observe the article number on the type plate of your multi sander or vacuum cleaner. The trade names of individual machines may vary.
The values given are valid for nominal voltages [U] of 230/240 V. For lower voltage and models for specific countries, these values can vary.
Multi Sander
Measured values determined according to EN 60745.
Typically the A-weighted sound pressure level of the product is 80 dB(A). Uncertainty K = 3 dB. The noise level when working can exceed 80 dB(A).
Wear hearing protection!
Vibration total values (triax vector sum) determined according to EN 60745:
Vibration emission value a_h = 7m / s^2 Uncertainty K = 1.5m / s^2
The vibration emission level given in this information sheet has been measured in accordance with a standardised test given in EN 60745 and may be used to compare one tool with another. It may be used for a preliminary assessment of exposure.
The declared vibration emission level represents the main applications of the tool. However if the tool is used for different applications, with different accessories or poorly maintained, the vibration emission may differ. This may significantly increase the exposure level over the total working period.
An estimation of the level of exposure to vibration should also take into account the times when the tool is switched off or when it is running but not actually doing the job. This may significantly reduce the exposure level over the total working period.
Identify additional safety measures to protect the operator from the effects of vibration such as: maintain the tool and the accessories, keep the hands warm, organisation of work patterns.
Vacuum cleaner
Measured values determined according to EN 60704.
Typically the A-weighted sound pressure level of the product is 77 dB(A). Uncertainty K = 3 dB.

Multi Sander
We declare under our sole responsibility that the product described under "Technical data" is in conformity with the following standards or standardization documents: EN 792 according to the provisions of the directives 98/37/EC (until 28 Dec 2009), 2006/42/EC (from 29 Dec 2009).
Technical file at:
Robert Bosch GmbH, PT/ESC,
D-70745 Leinfelden-Echterdingen
Vacuum cleaner
We declare under our sole responsibility that the product described under "Technical Data" is in conformity with the following standards or standardization documents: EN 60335 according to the provisions of the directives 2006/95/EC, 2004/108/EC.
C05
Dr. Egbert Schneider Senior Vice President Engineering
Dr. Eckerhard Strötgen
Head of Product Certification
ppa. Maee i.v. Nogcu
Robert Bosch GmbH, Power Tools Division D-70745 Leinfelden-Echterdingen 23.06.2009
Assembly
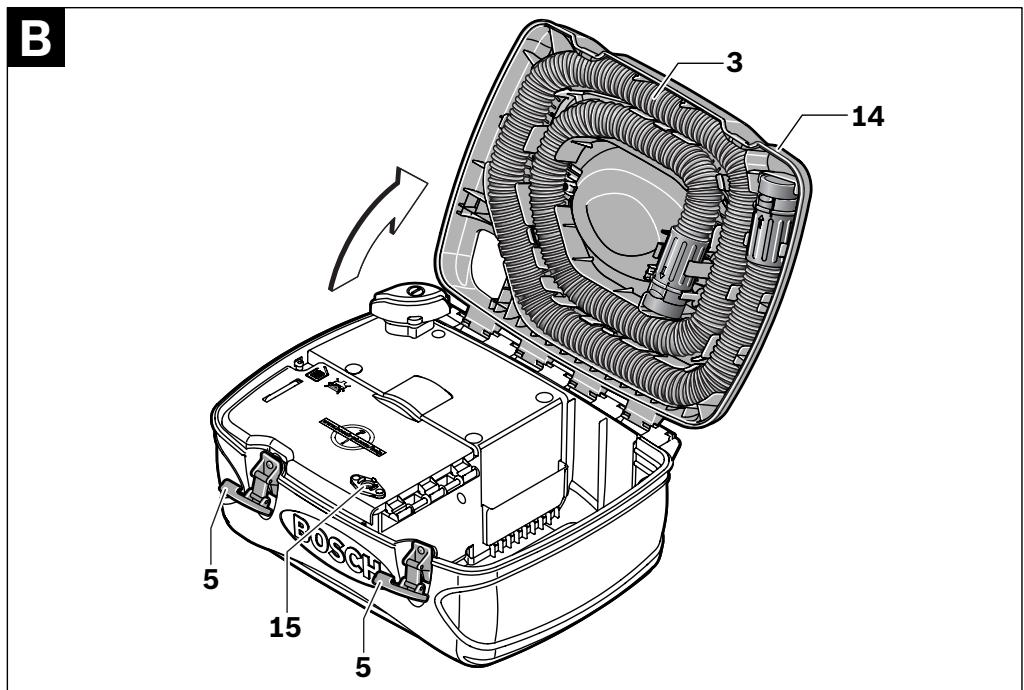
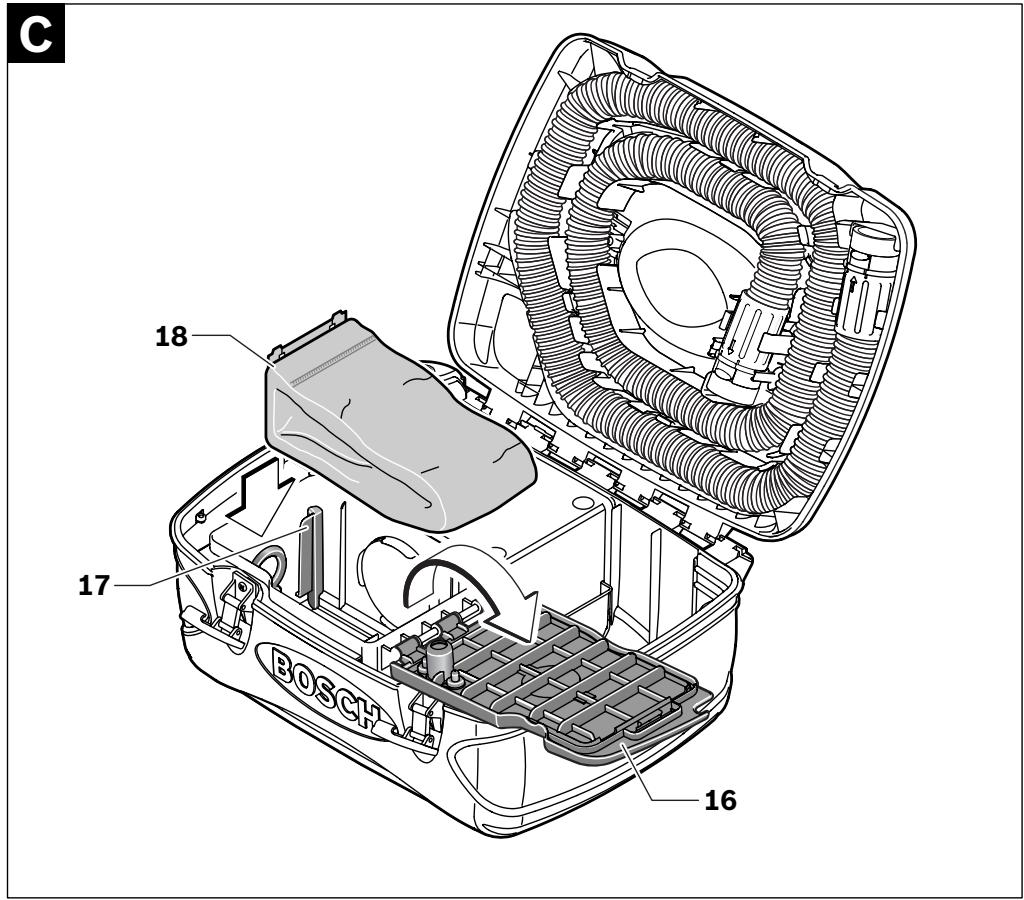
Unlatch both latches 5 and fold up the vacuum lid 14.
Open the closing flap 16 and guide the dust bag 18 from the top into the guide 17 as shown in the figure. Shut the closing flap 16 again until it can be heard to engage.
When removing a full dust bag, ensure that the dust bag enclosure is clean. If required, clean the enclosure with a moist cloth or a brush.
Fold down and lock the vacuum lid 14 with the latches 5.
Before using the vacuum cleaner, always remove the plug cap 9. Pay attention that the bypass valve 15 is never restricted or blocked. The motor of the vacuum cleaner can overheat und become damaged.
20 | English
Vacuuming Function
The vacuum cleaner 4 can be used to vacuum dry, non-hazardous materials. The supplied multi sander 1 can be used in this operating mode.
For vacuum cleaning, the dust bag must be inserted. For this, see chapter "Inserting/Replacing a Dust Bag".
Align the arrows on the vacuum hose 3 and the vacuum hose connection 8 and insert the vacuum hose into the vacuum hose connection. You will hear a distinct "click" when the vacuum hose locks in the vacuum hose connection.
You can connect the multi sander 1 or any of the accessories mentioned on the accessories page to the vacuum hose 3.
Blower Function
The vacuum cleaner 4 can easily be converted to a blower in no time at all.
Remove the closing cover with blower filter 12 from the holder 10 and insert the adapter for the blower connection 11 in its place.
Align the arrows of the vacuum hose 3 and the adapter for the blower connection 11 and insert the vacuum hose into the adapter. You will hear a distinct "click" when the vacuum hose locks in the adapter.
Do not point the blower jet at persons or animals. The blown-out air is warm.
Removing the Vacuum Hose
To remove the vacuum hose 3, rotate the hose a little and pull it off.
The supplied multi sander 1 can be used in the "Extraction" operating mode of the vacuum cleaner 4.
The closing cover with blower filter 12 should be inserted in the holder 10. The blower filter cleans the blown out air.
Insert the vacuum hose 3 into the vacuum hose connection of the multi sander 22.
Ensure that a dust bag is inserted in the vacuum cleaner when sanding.
To remove the vacuum hose 3, rotate the hose a little and pull it off.
When attaching a new sanding sheet, remove any dust or debris from the sanding plate 24 (e. g. with a brush).
To ensure optimum dust extraction, pay attention that the punched holes in the sanding sheet match with the holes in the sanding plate.
The sanding plate 24 is fitted with Velcro backing for quick and easy fastening of sanding sheets with Velcro adhesion.
Before attaching the sanding sheet 25, free the Velcro backing of the sanding plate 24 from any debris by tapping against it in order to enable optimum adhesion.
The multi sander is equipped with 2 sanding sheets. Depending on their condition of wear, these can also be changed individually.
Use the multi sander only when both sand-ing sheets are attached.
Only use sanding sheets with the same grain size.
Position the sanding sheet 25 flush alongside one edge of the sanding plate 24, then lay the sanding sheet onto the sanding plate and press firmly.
To remove the sanding sheet 25, grasp it at one of the tips and pull it off from the sanding plate 24.
Sanding sheets of the Bosch Delta Sander can be used.
Sanding accessories, such as fleece pads/polishing cloth pads, are attached to the sanding plate in the same manner.
Selecting the Sanding Sheet
Depending on the material to be worked and the required rate of material removal, different sanding sheets are available:
Grain size
red:Wood
40-180
For the working of all wooden materials
| For coarse-sanding, e. g. | coarse | 40 |
| of rough, unplaned beams and boards | | |
| For face sanding and plan- medium 80, 120
ing small irregularities |
| For finish and fine sanding | fine | 180 |
| of hard woods | | |
white: Paint
40-180
For the working of paint/enamel coats or primers and fillers
| For sanding off paint | coarse | 40 |
| For sanding primer | medium | 80, |
| For final sanding of prim-ers before coating | fine | 180 |
For reworking or polishing, especially of metal and stone, use fleece/polishing cloth pad. Depending on the desired surface quality of the workpiece, different fleece types or polishing cloth pads are to be used.
Slide the SDS button for release of the sanding plate 23 all the way to the right.
Remove the sanding plate 24.
Guide the sanding plate 24 from below against the sanding plate holder and firmly press them together.
Slide the SDS button for release of the sanding plate 23 all the way to the left.
If, e. g., the front tip of the sanding sheet is worn, you can also remove the complete sand-ing plate and reattach it turned by 120^
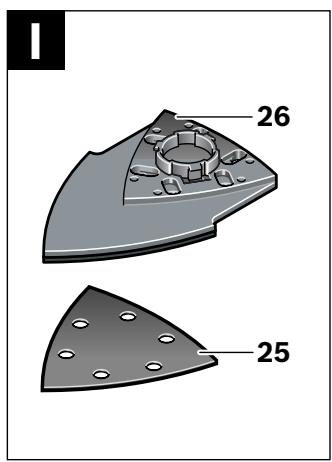
Specialty Sanding Plates
You can replace the supplied sanding plate 24 with a specialty sanding plate, which is available as an accessory.
The specialty sanding plate is attached in the same manner as the one supplied.
Attach and remove the respective sanding sheets in the same manner as when changing original sanding sheets.
With the pad extender 26 you can sand surfaces that are difficult to access, such as sills on windows, cabinets or doors.
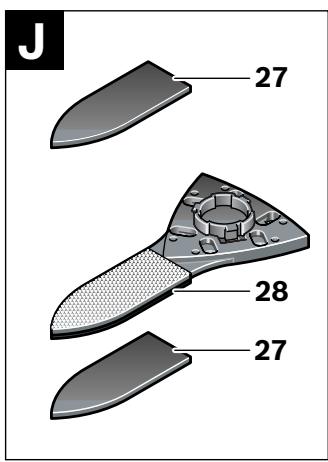
With the narrow pad extender 28 you can sand narrow openings, slots and passages.
The narrow rounded pad extender 29 allows you to sand curved and hollow areas or surfaces that are curved inward, such as on furniture, rails or heating radiators.
Operation
Starting Operation
Observe the correct mains voltage! The voltage of the power source must agree with the voltage specified on the nameplate of the vacuum cleaner. Vacuum cleaners marked with 230V can also be connected to 220V .
Switching On and Off
- Switch the vacuum cleaner on when the sander is set at "0". After switching off, wait until the sander has come to a stand-still before placing it down. The sander can move unintentionally.
- Completely unreel the cable before putting the vacuum cleaner into operation. The cable can heat up.
22 | English
Before using the vacuum cleaner, always remove the plug cap 9. Pay attention that the bypass valve 15 is never restricted or blocked. The motor of the vacuum cleaner can overheat und become damaged.
To start the vacuum cleaner, press the On/Off switch 7.
To switch the vacuum cleaner off, press the On/Off switch 7 again.
When putting the multi sander into operation, start the vacuum cleaner first and then push the On/Off switch of the sander 2 toward the front to position "1". Press the On/Off switch 2 downward to lock it in this position.
To switch off the multi sander, first push the On/Off switch 2 of the sander to the rear to position "0" and then switch off the vacuum cleaner.
Working Advice
- Keep the blower opening unrestricted and do not crease or bend the vacuum hose. The motor can overheat.
Always wait until the multi sander has come to a complete stop before placing it down.
Insert the plug cap for the vacuum hose connection 9 into the vacuum hose connection 8 when not using the vacuum cleaner for longer periods.
Working with the Multi Sander
In order to ensure maximum use of the Ventaro sanding attachment, the following must be adhered to:
- Do not extract any chips, glue residues or silicones with the sanding attachment.
- Do not wet-sand.
- When sanding hard wood, very fine dust is produced which can clog the pores of the dust bag.
- If the pores of the dust bag are congested, the sanding performance decreases.
- When sanding hard wood, the dust bag must accordingly be replaced more frequent.
The removal capacity during sanding is mainly determined by the selection of the sanding sheet.
Only flawless sanding sheets achieve good sanding capacity and extend the service life of the machine.
Pay attention to apply uniform sanding pressure; this increases the working life of the sanding sheets.
Intensifying the sanding pressure does not lead to an increase of the sanding capacity, but to increased wear of the machine and the sanding sheet.
For precise on-the-spot sanding of edges, corners and hard to reach areas, it is also possible to work only with the tip or an edge of the sand-ing plate.
A sanding sheet that has been used for metal should not be used for other materials.
To eliminate the hazard of fires, replace the dust bag in the vacuum cleaner before sanding metals.
Use only original Bosch sanding accessories.
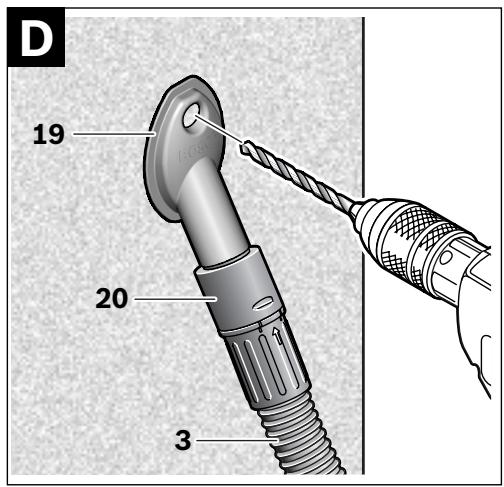
The drilling helper 19 enables dust-free drilling in walls etc. to the greatest extent.
Insert the vacuum hose 3 with the extraction adapter 20 mounted into the connection of the drilling helper 19.
Switch on the vacuum cleaner and position the drilling helper 19 against the wall in such a manner that the hole of the drilling helper is flush with the hole to be drilled. Due to the vacuum, the drilling helper remains attached to level surfaces without requiring further aides.
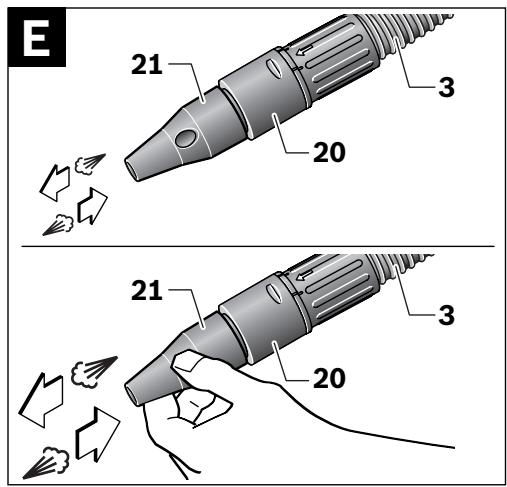
The extraction/inflation nozzle 21 can be used for vacuuming areas that are difficult to access or for inflating suitable objects.
Insert the vacuum hose 3 with the extraction adapter 20 mounted into the extraction/inflation nozzle 21.
You can regulate the air flow at the tip of the nozzle by covering the bore at the side of the nozzle with your finger or leaving it open.
Maintenance and Service
Maintenance and Cleaning
- Switch off the vacuum cleaner before attempting to carry out any work on it or on the sander.
For safe and proper working, always keep the vacuum cleaner and the multi sander as well as their ventilation slots clean.
Regularly check the filling level of the dust bag 18 and replace the dust bag in time to ensure optimal vacuuming performance. When using the multi sander, replace the dust bag as soon as the sanding performance decreases.
If the multi sander or vacuum cleaner should fail despite the care taken in manufacturing and testing procedures, repair should be carried out by an after-sales service centre for Bosch power tools.
In all correspondence and spare parts orders, please always include the 10-digit order number given on the nameplate of the multi sander or vacuum cleaner.
After-sales Service and Customer Assistance
Our after-sales service responds to your questions concerning maintenance and repair of your product as well as spare parts. Exploded views and information on spare parts can also be found under:
Our customer service representatives can answer your questions concerning possible applications and adjustment of products and accessories.
Great Britain
Robert Bosch Ltd. (B.S.C.)
P.O.Box 98
Broadwater Park
North Orbital Road
Denham
Uxbridge
UB95HJ
Tel. Service: +44 (0844) 736 0109
Fax:+44(0844)7360146
E-Mail: boschservicecentre@bosch.com
Ireland
Origo Ltd.
Unit 23 Magna Drive
Magna Business Park
City West
Dublin 24
Tel. Service: +353 (01) 466 67 00
Fax: +353 (01) 466 68 88
Australia, New Zealand and Pacific Islands
Robert Bosch Australia Pty. Ltd.
Power Tools
Locked Bag 66
Clayton South VIC 3169
Customer Contact Center
Inside Australia:
Phone: +61 (01300) 307 044
Fax: +61 (01300) 307 045
Inside New Zealand:
Phone: +64 (0800) 543 353
Fax: +64 (0800) 428 570
Outside AU and NZ:
Phone: +61 (03) 9541 5555
www.bosch.com.au
Republic of South Africa
Customer service
Hotline: +27 (011) 6519600
Gauteng - BSC Service Centre
35 Roper Street, New Centre
Johannesburg
Tel.: +27 (011) 493 93 75
Fax: +27 (011) 493 01 26
E-Mail: bsctools@icon.co.za
KZN - BSC Service Centre
Unit E, Almar Centre
143 Crompton Street
Pinetown
Tel.: +27 (031) 7 01 21 20
Fax: +27 (031) 7 01 24 46
E-Mail: bsc.dur@za.bosch.com
Western Cape - BSC Service Centre
Democracy Way, Prosperity Park
Milnerton
Tel.: +27 (021) 551 25 77
Fax: +27 (021) 5513223
E-Mail: bsc@zsd.co.za
Bosch Headquarters
Midrand, Gauteng
Tel.: +27 (011) 6519600
Fax: +27 (011) 6519880
E-Mail: rbsa-hq.pts@za.bosch.com
24 | English
Disposal
Multi sanders or vacuum cleaners, accessories and packaging should be sorted for environmental-friendly recycling.
Only for EC countries:
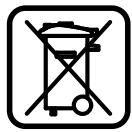
Do not dispose of multi sanders or vacuum cleaners into household waste!
According to the European Directive 2002/96/EC on waste electrical and electronic equipment and
its incorporation into national law, multi sanders or vacuum cleaners that are no longer suitable for use must be seperately collected and sent for recovery in an environmental-friendly manner.
Subject to change without notice.

ncais | 25
Dr. Egbert Schneider Senior Vice President Engineering
Dr. Eckerhard Strötgen
Head of Product Certification
Paa.
i.v. Mojgcu
Robert Bosch GmbH, Power Tools Division
D-70745 Leinfelden-Echterdingen
23.06.2009
Montage
Robert Bosch (France) S.A.S.
Dr. Egbert Schneider Senior Vice President Engineering
Dr. Eckerhard Strötgen
Head of Product Certification

Robert Bosch GmbH, Power Tools Division
D-70745 Leinfelden-Echterdingen
23.06.2009
Montaje
El rendimientoSEOSEOSEOSEOSEOSEOSEOSEOSEOSEOSEOSEOSEOSEOSEOSEOSEOSEOSEOSEOSEOSEOSEOSEOSEOSEOSEOSEOSEOSEOSEOSEOSEOSEOSEOSEOSEOSEOSEOSEOSEOSEOSEOSEOSEOSEOSEOSEOSEOSEOSEOSEOSEOSEOSEOSEOSEOSEOSEOSEOSEOSEOSEOSEOSEOSEOSEOSEOSEOSEOSEOSEOSEOSEOSEOSEOSEOSEOSEOSEOSEOSEOSEOSEOSEOSEOSEOSEOSEOSEOSEOSEOSEOSEOSEOSEOSEOSEOSEOSEOEO
Dr. Egbert Schneider Senior Vice President Engineering
Dr. Eckerhard Strötgen
Head of Product Certification


Robert Bosch GmbH, Power Tools Division
D-70745 Leinfelden-Echterdingen
23.06.2009
Montagem
Dr. Egbert Schneider Senior Vice President Engineering
Dr. Eckerhard Strötgen
Head of Product Certification


Robert Bosch GmbH, Power Tools Division
D-70745 Leinfelden-Echterdingen
23.06.2009
Montaggio
Dr. Egbert Schneider
Dr. Eckerhard Ströttgen
Senior Vice President
Head of Product
Engineering
Certification

Robert Bosch GmbH, Power Tools Division
D-70745 Leinfelden-Echterdingen
23.06.2009
Montage
Dr. Egbert Schneider Senior Vice President Engineering
Dr. Eckerhard Ströttgen
Head of Product Certification

Robert Bosch GmbH, Power Tools Division
D-70745 Leinfelden-Echterdingen
23.06.2009
Montering
Bosch Service Center
Telegrafvej 3
2750 Ballerup
Tel. Service Center: +45 (4489) 8855
Fax: +45 (4489) 87 55
E-Mail: vaerktoej@dk.bosch.com
Bortskaffelse
Dr. Egbert Schneider Senior Vice President Engineering
Dr. Eckerhard Strötgen
Head of Product Certification
ppa. /mea/ i.v. nuogcu
Robert Bosch GmbH, Power Tools Division
D-70745 Leinfelden-Echterdingen
23.06.2009
Montage
Bosch Service Center
Telegrafvej 3
2750 Ballerup
Danmark
Tel.: +46 (020) 41 44 55
Fax: +46 (011) 187691
Avfallshantering
Dr. Egbert Schneider Senior Vice President Engineering
Dr. Eckerhard Ströttgen
Head of Product Certification

Robert Bosch GmbH, Power Tools Division D-70745 Leinfelden-Echterdingen 23.06.2009
Montering
Dr. Egbert Schneider Senior Vice President Engineering
Dr. Eckerhard Ströttgen
Head of Product Certification

Robert Bosch GmbH, Power Tools Division D-70745 Leinfelden-Echterdingen 23.06.2009
Asennus
nEeponlNxi, kivduo npkayiac n/ka oBapouc Tpaumatouc.
Aiaapuaale ta autec tic obnyiec.
YnodeiEic aopaaieiac yia tov iavtnpa anoppoqntnpa

Mnv ekTeTc Tov
anoppoPnTnpa oE pOx n
uypia. Na mV avappopate
Upa kal va xpoiPonoeite Tov
Leiavtnpa mOvo yia Enp
Leiavon. H eipoN vepou OTV
anoppoPnTnpa auXavei Tov
kivduvo nAekTponlxiac.
Atnpeite to xwpo nou epyaZeOe kaqapo kai Taktonounpevo. AtaEia oTo xwpo nou epyaZeOe kai m np wtiouvec nepioxec epyaoiac mopei va odnynoov oe atuxmuata.
Otav xpoaonoiite To e i a v t h p a va kpatate paekia naiia kai alaa tuxov npoowna. Se nepiintwn nou aa atoua anoonadouv Tnv npoooxn ac nuopei va xaote tv eleyxo Tou unxavmuatoc.
Na eioe npooektikoc, va divete npoooxi n otnv epyaia nou kavete kalvaepyaceothe μe to λeiavtnpa μe nepiakeyn. Na unv kavete xpnan tou mnxavnatoctotav eioe koupaevoc, n otav bpiakeoetuno tnv emppohvapkwtkwv, oivonveuatoct n apmuakw. Mia oniuia anpooeixia kat a t n xpnanou mnxavnatoc mnopei va odnynei ooabapouc tpaumatuooc.
NaΦopate navtoe katalnnlo npootateutiko eonlioo kai npootateutika yuaia. Otav pofate npoownikpnpootateutiko eoanioo, onwc npoowniida npootaiaac ano okovn, npootateutikayavria /kai wtaonidec, avaloya me tov ekatoote uno xpon λeivtnpa, meiwvetai o kivduovoc atuxnatoc.
Na apopate katataa npoxa. Na n popate papdi poxa /kai kooanpa. Na kpatate ta paalia oac, ta poxa oac kal ta yavtia oac jakpi a no kivoumeva eapntmuata. Xalapn evdumaia, koumeta kai jakpi a palia mopei va eunlakoov ota kivoumeva eapntmuata.
aipulayete to aeavtnpa kai tov anoppoepnnpa,otav dev touc xnoaumoeite,muaki anpiaia. Mny apnvete atoua nou dev eivai eoikeupeva me to aeavtnpa kai tov anoppoepnnpa n dev exouv diaabei autec tic obnyie c xepiaou va touc xnoaumoiouv. Ta epyaia ivai enikivduva otav xnoiunoiuvta iao anepia atota.
Na nXPnOIpOnIoNEToV anOpPpOtnpa otav to nEeKtko kawto Tou eivai xaaoevo.Mnv ayyiEte to xalaouevo kaWbIO kai ByaTE to pIc anTnv npizc otav to nEeKtko kawdo unoTei katn diapkeia Tc epyoiaac oac. Xalaoueva nEeKtka kawdia auXavouv To kivuvo nEeKtponlNxiac.
Na unv avappopate avuyieivu ulka, n.x. okovn ano Eulo oxiac n 1eIavdiac, ano nenpomega t ano aiavto. Ta uikau auta 0ewpuvtai av kapkivoyova.
Otav n xpən tou anoppoepntnpa o uypo nepiβalov eivai avanopeuktn, tote va xpənpooiŋaete evav npootateutikodiaokntdiapponc (biaokntn F1). H xpən evoc npootateutikou diaokntn diapponc elambdaiwvei twv kivduvo nkektpoanxiac.
Piv θεοετe tov anoppoΦηntρa oε λειtouργia βεβαιωθείτe στο iδιακόππc ON/OFF βριακεται στη θεοη «O». Autó to προληπικό μέτο εμποδιζει την αθέληntη εκκίνησου tou λειαντρa.
Mn xnpouonouoTe to leiavtnpa otav o
diakontc tou eiva xaalagevoc.Eva
epyaleio to onioo dev mnpoei nEvov va teei
oe n ektoC aeitoupyiac eivai enikivduvo ka
npenie va enikeuaotei.
Pioooxh, kivduoc npkayiac! Na anopeyu- yete tnv unepboaikn thepavon tou uno leiavon ulikou kal tou leiavtnpa. Na aedeiaze- te navto to doxeio okovnc otav kavete dialemu ana ony epyaaia oc. Skovn leiavanc oto oako okovnc, oTo Microfilter, n 0to xaptivo oako okovnc (no 0ako qiltpou n 0to plo Tou anoppoqntpa okovnc) mpoei, uno duaneveic auvthkec, p.x. Eaiaic Tou anivnpiaou kat th aeianumetalawv, va autavaaexthetai. Autoc o kivduoc auave-tai ldiatepwc otav no kovn aeianac avaeiyuvetai me kataloina bepviikw h/kai noluoupeahvnc, n pe alaaa xnuika uikka, kaia tauoxpova, metao uvexh epyaia, to uno leiavon uliko exe iepuvthei unepboaikda.
XpouponoiieTe to aeavtnpa, ta
eapntmuata, ta diapopa epyaia kTλ.
ouuwpwa me tic napouoec obnyiec ka
muaiota onwc npoBleetai y' autov tov
eiidiko tuno mnxavnatoc. Na laubave Ta npalna unoyn oac tic ouvthetakec
epyaoiac kai tnV ekatoTe uno ekteean
epyaia. H xpnon tou aeavtnpa yia aAee
epyaioec, ektoc ano tic npoBlenovec
mnpoei va dnmuoynei enikivduvek
kataotaeic.
NaΦovriZe va unapxei kaLoC aepiooocTov Xwpo nou epyaceote.
Θεστε tov anoppoŋntρα εκτος λειουργία πριν δieξayete καnoiες puθμiaεις στο μηχανημα ἡταν πρόκειαι va προβεITE OE avtikataσaση εξαρτηματων kaθως και πριν αποθεσeTE to λειαντρα. Auto to προληπικό μετρο εμποδιζει την aθεληπη εκκινησιου tou λειαντρα.
Na nepinoieote npooektka to leavtnpa kai tov anoppoeptnpa. Na eleyxete, av ta kivoumeva tmmuatou aeitoupyouv awoya kai dev mlookapouv, n mwnwc exouv onaoei xalaoei kanoia eapntmuata, wote etoi va ennpaezetai apvtikn a n leitoupyia tou umxavmuatoc. Awote yia eniakueh tuxov xaasaevexaptmuata tou mxavmuato c npiv to xonpounoote. H eaunnc ouvtponon towu mxaavmuatow anotelei atria noaw atuxmuatw.
Na divete to leavtnpa kai tov anoppoqnnpa yia eniakeun ano apota etidekeupevo npoownko kalmo vynoi avtalAAktika. Etoeaoqpalizetai n diatnpon tncaaopaaleiac tounxavnmuotc.
YnO6eiEic aoopaaleiac yia tov anoppoqntnpa
Mny avappopate uypa. H
diieioduan vepou oTov
anoppoqnnpa auXavci Tov
kivduvo nKekponnEiaç.
Mny aipnvete naia va xnpaonoiouv aventnptetaov anoppoepntpa. Ta naiia npoei va tpaumatotuv.
Mny eKTeTe Tov anoppoqnTnpa oe Bpoxn uypoaia. H eipon vepou aTov anoppoqnTnpa auXavei Tov kivduvo nLektponlanxiac.
Na mny avappopate kauta n kaiyopeva uliká. Mn xnpoiponoite te tv anoppoqntpa oe xwpouc oTouc onoiouc unapxei kivduovoc ekpnEnc. Okovec n ot avaupmuaceic mnopei va avaplextouv.
Na nxpnooiohoetov anoppohtpa otav to nkeptko kalwio tou eiva xaagveo.Mnv ayviEte to xalaogvo kawio kai lyaltto qic ano tn npica otav to nkeptko kalwio unootei katn diapkeia tnc epyaiaac oac. Xalaoueva nkeptka kalwia auXavouv tokivuvo nkeptponlxiac.
Na mnu zouaiiete To nlektipko kaawdo. Na mnu tpa batc To nlektipko kaawdo yia va Byaleto qic ano tnv npiza yia va TpaBnEteTov anoppopntnpa.Tuxov xaalaueva kaawdelta auavov tv kivduvo nlektponlxiac.
Otav n xpion tou anoppopnnpa o e upo nepiabalov eivai avanopeuktn, toe va xpnoiponoiote evav npoataeutiko diakotn diapponc (diakotn FI). H xpion evoc npoatautikou diakotn diapponc elattwvei twv kivduvo nektponlanxiac.
98|EλnviKa
Na mnv avappopate avuyieivauiká,π.x. okovn ano Eluo oxiac n βeλavdiac, ano nenpωpata n ano aμiavto. Ta uiká auta θewpoʊvτai av kapkivoyóva.
Na divete tov anoppoepnTpa yia eniokeun ao apota eidiikeupevo npoowmiko. Etae aopaaizetai n diatnpnon tnc aopaaieiac tou anoppoepntpa.
Pepiypapn Aetoupyiac
Xpnooupwva tov npooipo
Tolualetavtipac
O nlaeavnpac npoopiZetaia Tny Enpn
Leiavon kai otllBwOn Eulwv, uikov
otokapiatoC (ekTc yuow) kaWc kai
BepviKwEvw v enpaveivw. Eiva idaitepa
kataaAloioc ia diatopec npoipia, yoviec n
doukoLa npoaitc theic.
Anoppoepntnpac
O anoppoepntnpac npooipzetai yia tyn avappoepn/aonppoepn kai to Eeepua n avuyieivw uikwv.
Anekovizómeva στοιχεia
H anapiθμηnTwv anéikovizóμevwv ΘoIXeiwv avapépetal otnv anéikovion tou nλektpikou εpyaεiou otn σελiδa γραφικwv.
1 Pioaueiavrtnpac
2 Dlakontnc ON/OFF tou leavrtip
3 a c avappoqnonc
4 AnoppoepnTnpa
5 Aαραλειγι το επάνω τμήμα tou anoppoφηntρα
6 Xeipoloaβn
7 DIAKoTnC ON/OFF tou anoppoqntnpa
8Σuδεσηavapροφησκ
9 Tiwa yia ouvdeoan avappopnonc
10 YnOdoxniia npoapnootikovappofoonc/Kanaki opaiaoataoc
11 PpOaPooTikO eEoBou aepa
12 Kanaki φαλισματος με φιλτρο εξόδου αέρα
13 Túμnavo tuλiγματος καλωδιου
14 Avu tmu anaoppoepnTnpa
15 i k a o e a b a
16 Kanaki opaiiaqatoc thalou oakou okovc
17 Obnynon yia oako oKovnc
18 ŠaKoC oKoVnC
19 Bɔnθημa trpuntμatoc
20 Ipoosapoootikó avappoΦŋoç 0 35 mm
21 AkpoΦuio avappoΦnOnc kai φouokwatoC
22 SuVdEoJsigmava aappOphioc oTov nlaeavtnpa
23 uptnc SDS yia aopalion tnc nakac iavanc
24 PIIaKa IeiaVOnC
25 e a v o n
26 Ppoektaaon aeiaanc eoataw
27Φuλlo λεiavocγia yawσaλeivoc
28 Γλωσα λειανος, επιηδη
29 Γλωσα λειανος, oβαλ*
*Eapntmuataou anekoviciovta n nepiypapovtat dev nepiexovt aotstavtap ouakeuaia. Ta tov n npkata loyo eapntmuatw Koita to npoypmaeapntmuatw.
Texvika xaapaktnpOtiKa
Dr. Egbert Schneider Senior Vice President Engineering
Dr. Eckerhard Strötgen
Head of Product Certification

Robert Bosch GmbH, Power Tools Division D-70745 Leinfelden-Echterdingen 23.06.2009
Συναρολόγηση
Avtikataaon/Tonoetnon tou sakou okovnc (βλeπε eikovec B kal C)
AvoicTe Tc duo aopaleiec 5 ka ta kanakia tou avw Tumuoc Tou anoppopntnpa 14.
AvoIeTo kanaki opaiaiatoC 16 kaI npaote to oako oKovnc 18 an eanw otnv oyynon, onwc paivetai otnv eikova 17. Kleiote naiTo kanaki opaiaiatoC 16 eoc v' akouoete otu aopalaie.
'Otav apaipiete evav napn oako okovnc npenei vadeltaote npooxh, av o thalaooc tou akou okovnc eivai kathetaoc. Av xpeiaotei, kaatipote tov ^ eva uypo navi n ^ eva niveo.
Katebaote to avw hpcou anoppoqntnpa 14 kai aopaaite to TIC aopaaie5.
Tpnoi leitoupyiac tou anoppoepntnpa (Blambda eikova A)
Piiv ano kaTe xpnTou anoppoPnTnpenepa va apaipoeTe to nwa ana oTo ouvdean Tc avappoPnOg 9. PovtriZeTa naPapévei navtoe eLeuOepn 8iaKaaboumev baBida 15. O kivtnpac tou anoppoPnTpa mnpei va unepeepauVtei kau va unoote
Aeitoupyia avappoPnonc
O aonoppoqnTnpac 4 mnopei va xnpoioointheta iya Tnv avappoepn E npw, n avvuyieivw ulikw. S' autov tov tpono aeitoupyiac mnopei va xnpoiooiNthetai kal o leavtnpac 1 nou tov ouvoidei.
Tia tvavappoan npene va tonoetntheta o akoC oKovnc, bLepe oxetika to Kepaalio «Toonotan/Avtikataotaon oakouokovnc
Euoypauiote to oTo va avappofoan3 1e to oTn ouvdean avappofoan8 kai eIoayete To oWlva avappofoanO tN ouvdean avappofoanC.
O owlvac avappofoanc aoaalizel otn ouvdeon avappofoanc ^ eva Klik>.
TTo oWAnva avappoPnOnc 3 mOpoei va ouvD8eoi o nolauEiaVnpaC 1 n eva ano ta EApntmuata nou avapéovtai otn oeiia ta eApntmuata.
Aeitoupyia EepuohmuatoC
O avappoopntnpac 4 npopei va metatpanei pe liyeoc ovo kivnoeic oe quontnpa.
Apaipote to kanaki opaiaiogatoc mTo piItro eEdeltaou aepa 12 ano tyn unodoxn 10, kaiavikataotnoTe to mTo npooapooTiko ouvdean c Edeltaou aepa 11.
Euoypauiote To eLooc enavw oTo va avappoqnonc 3eTo eLooc enawoTo npooapoootiko Edoou aepa11 kai eioayete to va apappoqnonc oTo npooapooatiko.
Tnpoume to 6ikaiwa aalayov.

Türkce | 105
Güvenlik Talimati

Dr. Egbert Schneider Senior Vice President Engineering
Dr. Eckerhard Strötgen
Head of Product Certification


Robert Bosch GmbH, Power Tools Division
D-70745 Leinfelden-Echterdingen
23.06.2009
Montaj
Toz torbasinin degiistirilmesi/takilmasi (Bakiniz: Sekil B ve C)
Bosch San. ve Tic. A.S.
Ahi Evran Cad. No:1 Kat:22
Polaris Plaza
80670 Maslak/Istanbul
Müsteri Danismani: +90 (0212) 335 06 66
Müsteri Servis Hatti: +90 (0212) 335 07 52
Tasfiye
red:Wood white:Paint
P 40-180
2608607417
2605411225(3x)