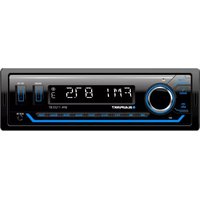
MADRID 210 - Car stereo BLAUPUNKT - Free user manual and instructions
Find the device manual for free MADRID 210 BLAUPUNKT in PDF.
User questions about MADRID 210 BLAUPUNKT
0 question about this device. Answer the ones you know or ask your own.
Ask a new question about this device
Download the instructions for your Car stereo in PDF format for free! Find your manual MADRID 210 - BLAUPUNKT and take your electronic device back in hand. On this page are published all the documents necessary for the use of your device. MADRID 210 by BLAUPUNKT.
USER MANUAL MADRID 210 BLAUPUNKT
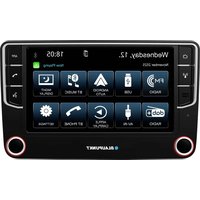
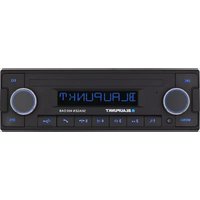
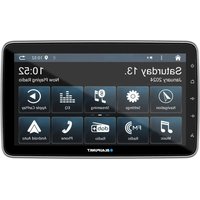
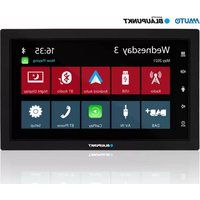
Madrid 210 7649068510/7649069510 San Francisco 310 7649073510/7649074510 Toronto 410BT 7640000510/7640001510

www.blaupunkt.com
Bedienungs- und Einbauanleitung
Operating and installation instructions
Mode d'emploi et de montage
Instruzioni d'uso e di installmente
Gebruiksaanwijzing en inboundwandelieiding
Bruks och monteringsanvising
Instrucciones de manejo e instalacion
Instruções de service e de montagem
Betjenings- og monteringsvejledning
Käytö- ja asennusohje
Ośnyiec tonoθéttnoç kαi xρηοnc
Instrukcia oblags i montažowa
Kezelési és beszerelési utmutató
Instruciuni de operare si montaj
Pbkoobdctbo 3a ekcnnoataunia mONTAX

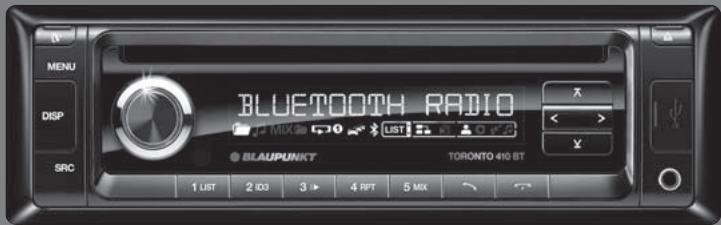
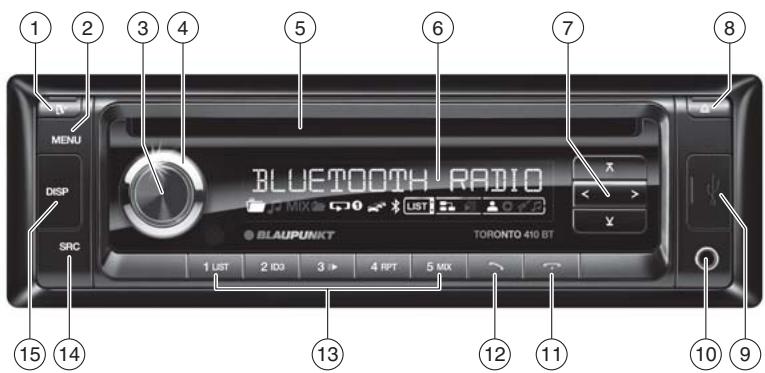
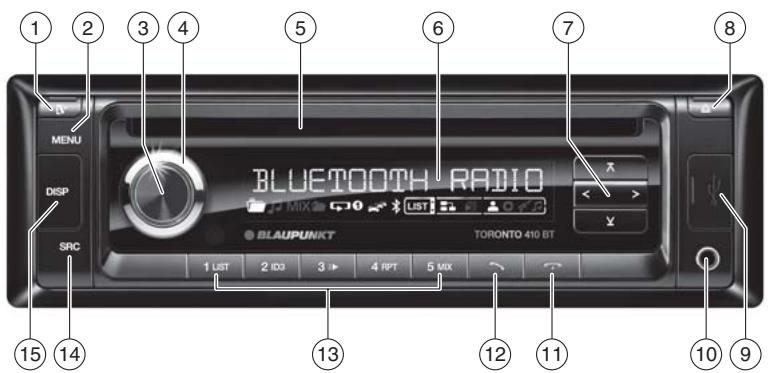
(13) Tastenblock 1-5
14 SRC-Taste
AUX EDIT (AUX editieren)
AM (MW): 531 - 1602 kHz
LW (nur Europa): 153 - 279 kHz
Wellenbereiche USA:
FM (UKW): 87,7 - 107,9 MHz
AM (MW): 530 - 1710 kHz
AM (MW): 530 - 1710 kHz
Short press: Call up/close menu
Long press: Start scan function
③ On/Off button
Short press: Switch on car sound system
In operation: Mute car sound system (Mute)
Long press: Switch off car sound system
(4) Volume control
In the menu: Change settings
⑤ CD tray
⑥ Display
⑦ 空 / 空 button
In the menu: Select menu item
Radio mode: Start seek tuning
MP3/WMA/iPod mode: Change to next/
previous folder
</>button
In the menu: Change menu level
Radio mode: Adjust the stations
Other operating modes: Track selection
⑧ ▲ button (Eject)
Eject a CD
⑨ USB socket
10 Front AUX-IN socket
11 button (only Toronto 410 BT)
Ending/rejecting a phone call
12 button (only Toronto 410 BT)
Short press: Answering a call, speed dial
Long press: Open the phone book of the cell phone or activate voice dialing
(13) Keys 1-5
14 SRC button
Select memory bank or audio source
15 DISP button
Short press: Switch display
Long press: Switch display brightness
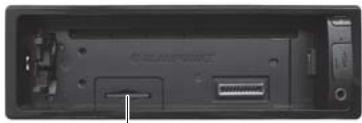
SD card slot (only San Francisco 310 and Toronto 410 BT)
Access only with detached control panel
16
Safety notes 26
Symbols used. 26
Road safety 26
General safety notes. 26
Declaration of conformity. 27
Cleaning notes 27
Disposal notes. 27
Scope of delivery 27
Optional equipment (not part of the scope of delivery)................................27
Placing the device in operation. 27
Attaching/detaching the control panel 27
Display language (only Toronto 410 BT)......28
Setting the reception area 28
Switching on/off 28
Volume 28
Display brightness. 29
Switching demo mode on/off. 29
Bluetooth® functions (only Toronto 410 BT)................................29
Traffic information 29
Radio mode 29
RDS. 29
Changing to radio mode or selecting a memory bank. 30
Tuning into a station 30
Storing stations or calling stored stations.....31
Scanning stations. 31
Storing stations automatically (Travelstore) 31
PTY. 31
Configuring the display. 32
CD/MP3/WMA/iPod mode. 32
Basic information. 32
Changing to CD/MP3/WMA/iPod mode.....33
Inserting/ejecting a CD 33
Connecting/removing a USB data carrier.....34
Inserting/removing an SD/MMC card (not for Madrid 210) 34
Selecting tracks. 34
Selecting a folder (only in MP3/WMA/iPod mode) 34
Fast searching. 34
Interrupting playback 34
Scanning all tracks 35
Playing tracks in random order 35
Repeatedly playing individual tracks or directories 35
Configuring the display. 35
Browse mode 36
External audio sources 37
Front AUX-IN socket. 37
Sound settings 37
Calling and exiting the "AUDIO" menu. 37
Making settings in the "AUDIO" menu. 38
Setting the 3-band equaliser. 38
User settings 39
Calling the user menu and selecting a menu. 39
Making settings in the "TUNER" menu.....40
Making settings in the "DISPLAY" menu.....41
Making settings in the "VOLUME" menu ....41
Making settings in the "CLOCK" menu.....41
Making settings in the "VARIOUS" menu.....42
Factory settings 43
Useful information 43
Warranty. 43
Service 44
Technical data 44
Installation instructions 330
Safety notes
The car sound system was manufactured according to the state of the art and established safety guidelines. Even so, dangers may occur if you do not observe the safety notes in these instructions.
These instructions contain important information to easily and safely install and operate the car sound system.
- Read these instructions carefully and completely before using the car sound system.
- Keep the instructions at a location so that they are always accessible to all users.
Always pass on the car sound system to third parties together with these instructions.
In addition, observe the instructions of the devices used in conjunction with this car sound system.
Symbols used
These instructions employ the following symbols:

DANGER!
Warns about injuries

CAUTION!
Warns about damaging the CD drive

DANGER!
Warns about high volume

The CE mark confirms the compliance with EU directives.
Identifies a sequencing step
- Identifies a listing
Road safety
Observe the following notes about road safety:
- Use your device in such a way that you can always safely control your vehicle. In case of doubt, stop at a suitable location and operate your device while the vehicle is standing.
- Remove or attach the control panel only while the vehicle is standing.
- Always listen at a moderate volume to protect your hearing and to be able to hear acoustic warning signals (e.g. police sirens). During mute phases (e.g. when changing the audio source), changing the volume is not audible. Do not increase the volume during this mute phase.
General safety notes
Observe the following notes to protect yourself against injuries:
- Do not modify or open the device. The device contains a Class 1 laser that can cause injuries to your eyes.
- Do not increase the volume during mute phases, e.g. when changing the audio source. Changing the volume is not audible during a mute phase. Do not increase the volume during mute phases, e.g. when changing the audio source.
Use as directed
This car sound system is intended for installation and operation in a vehicle with 12V vehicle system voltage and must be installed in a DIN slot. Observe the performance limits in the technical data. Repairs and installation, if necessary, should be performed by a specialist.
Installation instructions
You may only install the car sound system yourself if you are experienced in installing car sound systems and are very familiar with the electrical system of the vehicle. For this purpose, observe the installation instructions at the end of these instructions.
Declaration of conformity
The Blaupunkt AudioVision GmbH & Co. KG declares that the car sound systems Madrid 210 and San Francisco 310 comply with the basic requirements and the other relevant regulations of the directive 89/336/EEC and the car sound system Toronto 410 BT complies with the basic requirements and the other relevant regulations of the directive 1999/5/EC.
The declaration of conformity can be found on the Internet under www.blaupunkt.com.
Cleaning notes
Solvents, cleaning and scouring agents as well as dashboard spray and plastics care product may contain ingredients that will damage the surface of the car sound system.
- Use only a dry or slightly moistened cloth for cleaning the car sound system.
- If necessary, clean the contacts of the control panel regularly using a soft cloth moistened with cleaning alcohol.
Disposal notes

Do not dispose of your old unit in the household trash!
Use the return and collection systems available to dispose of the old device.
Scope of delivery
The scope of delivery includes:
1 Car sound system
1 Operating/installation instructions
1 Case for the control panel
1 Support frame
1 Antenna connection adapter
1 Set of small parts
Extended scope of delivery
(only for 7649069510/..074510, 7640001510):
1 Handheld remote control (incl. batteries)
1 Connecting cable chamber A
1 Connecting cable chamber B
Optional equipment (not part of the scope of delivery)
Use only accessories approved by Blaupunkt. Information is available from your Blaupunkt specialised dealer or on the Internet under www.blaupunkt.com.
Placing the device in operation
Attention
Transport securing screws
Before the startup of the car sound system, ensure that the transport securing screws are removed (see the chapter "Installation instructions").
Attaching/detaching the control panel
The car sound system is equipped with a detachable control panel (release panel) to protect your equipment against theft. In the delivery state, the control panel is in the supplied case. To start operating the radio after installation, you must first attach the control panel (see the section "Attaching the control panel" in this chapter).
Always take the control panel with you when leaving the vehicle. The car sound system is worthless to a thief without this control panel.
Caution
Damage to the control panel
Never drop the control panel.
Transport the control panel so that it is protected against impacts and the contacts cannot become dirty.
Do not expose the control panel to direct sunlight or another heat source.
Avoid direct skin contact with the control panel's electrical contacts.
Attaching the control panel
Push the control panel into the bracket at the right edge of the device.
Push the control panel carefully into the left bracket until it clicks into place.
Removing the control panel
Press the 1 button to unlock the control panel.
The left side of the control panel detaches from the device and is secured by the bracket against falling out.
Move the control panel slightly to the left until it disengages from the right bracket.
Carefully remove the control panel from the left bracket.
Note:
The car sound system automatically switches off as soon as the control panel is removed.
Display language (only Toronto 410 BT)
For the Toronto 410 BT, you can define whether the language for messages on the display is English or German. The setting is performed in the user menu (see the chapter "User settings", section "Making settings in the "DISPLAY" menu", menu item "LANGUAGE").
Setting the reception area
This car sound system is designed for operation in different regions with different frequency ranges and station technologies. The factory default of the reception area is "EUROPE". In addition, the reception areas "USA", "THAILAND" and "SOUTH AMERICA" are available.
Note:
If you operate the car sound system outside of Europe, you may first have to set a suitable reception area in the user menu (see the chapter "User settings", section "Making settings in the "TUNER" menu", menu item "TUNER AREA").
Switching on/off
Switching on/off with the On/Off button
For switch-on, press the On/Off button ③. The car sound system switches on.
To switch off the device, press and hold down the On/Off button ③ for longer than 2 seconds.
The car sound system switches off.
Note:
If you switch on the car sound system while the vehicle ignition is switched off, it automatically switches off after 1 hour to preserve the vehicle battery.
Switching on/off via vehicle ignition
The car sound system will switch off/on simultaneously with the ignition if the device is correctly connected to the vehicle's ignition as shown in the installation instructions and you did not switch the device off by pressing the On/Off button (3).
Volume
Adjusting the volume
You can adjust the volume in steps from 0 (off) to 50 (maximum).
Turn the volume control ④ to change the volume.
Note:
If a telephone or navigation system is connected with the car sound system as described in the installation instructions, the car sound system is muted in case of a telephone call or navigation announcement so that you can hear the playback of the telephone or navigation system undisturbed. While it is muted, the display shows "TELEPHONE".
Muting the car sound system (Mute)
Briefly press the On/Off button 3 to mute the car sound system or to reactivate the previous volume.
While it is switched low, the display shows "MUTE".
Display brightness
You can manually switch the display brightness between daytime mode and night-time mode or switch automatically with the driving lights of the vehicle.
Note:
The manual or automatic switching of the display brightness is selected in the user menu (see the chapter "User settings", section "Making settings in the "DISPLAY" menu", menu item "DIMMER").
Press the DISP button 15 for approx. 2 seconds to manually switch the display brightness.
Switching demo mode on/off
The demo mode shows the functions of the car sound system as scrolling text on the display. By pressing any button, the demo mode is interrupted and you can operate the device.
The demo mode can be switched on and off in the user menu (see the chapter "User settings", section "Making settings in the "VARIOUS" menu", menu item "DEMO MODE").
Bluetooth® functions (only Toronto 410 BT)
The Toronto 410 BT can be connected with suitable cell phones and MP3 players via Bluetooth. This enables it to perform hands-free calling with the connected telephone (via the loudspeakers and the integrated microphone of the car sound system) and audio playback of MP3 files stored on the Bluetooth device.
Note:
You can also connect an external microphone for hands-free calling (see the chapter "Installation instructions").
For the Bluetooth® functions of the Toronto 410 BT, please read the enclosed "Bluetooth® instructions for Toronto 410 BT".
Traffic information
In the reception area "EUROPE", an FM station can identify traffic reports by means of an RDS signal. If priority for traffic reports is switched on, a traffic report is automatically switched through, even if the car sound system is currently not in radio mode.
If priority is switched on, the display shows the traffic jam symbol ("TRAFFIC") is displayed during a switched-through traffic announcement.
The priority is activated and deactivated in the user menu (see the chapter "User settings", section "Making settings in the "TUNER" menu", menu item "TRAFFIC").
Notes:
- The volume is increased for the duration of the switched-through traffic announcement. You can adjust the minimum volume for traffic announcements (see the chapter "User settings", section "Making settings in the "VOLUME" menu", menu item "TRAFFIC VOL").
- To cancel a switched-through traffic announcement, press the SRC button 14.
Radio mode
RDS
Many FM stations broadcast an RDS (Radio Data System) signal in addition to their programme in the reception area "EUROPE" that allows the following additional functions:
- The station name is shown on the display.
- The car sound system recognises traffic announcements and news broadcasts and can automatically switch them through in other operating modes (e.g. in CD mode).
- Alternate frequency: If RDS is activated, the car sound system automatically selects the best receivable frequency for the station that is currently set.
Regional: At certain times, some radio stations divide their programme into regional programmes providing different content. If the REGIONAL function is activated, the car sound system changes only to those alternate frequencies on which the same regional programme is being broadcast.
The functions RDS and REGIONAL are activated and deactivated in the user menu (see the chapter "User settings", section "Making settings in the "TUNER" menu", menu items "RDS" and "REGIONAL").
Note:
If you adjust a different reception area than "EUROPE", RDS is automatically switched off. If you want to use radio stations with RDS features in your region, switch on RDS in the user menu.
Changing to radio mode or selecting a memory bank
The following memory banks are available in the different reception areas:
| Region | Memory banks |
| EUROPE | FM1, FM2, FMT, MW, LW |
| USA | FM1, FM2, FMT, AM, AMT |
| THAILAND | FM1, FM2, FMT, AM |
| SOUTH AMERICA | FM1, FM2, FMT, AM, AMT |
Press the SRC button 14 repeatedly until the desired memory bank is displayed.
Note:
Up to 5 stations can be stored in each memory bank.
Tuning into a station
There are various ways of tuning into a station:
Tuning into stations manually
Briefly press the < / > button ⑦ once or several times to incrementally change the frequency.
Note:
For the reception area "EUROPE": In the FM waveband, the next station of the broadcasting network is automatically tuned into if the RDS function is switched on.
Starting station seek tuning
Press the < / > button 7 for approx.2 seconds to start station seek tuning.
The radio tunes into the next receivable station.
Notes:
- For the reception area "EUROPE": In the FM waveband, only traffic information stations are tuned into if the priority for traffic information (一) is switched on.
- The sensitivity of seek tuning can be adjusted (see the chapter "User settings", section "Making settings in the "TUNER" menu", menu item "SENSITIVITY").
- If PTY and RDS are switched off, you can also start station seek tuning by pressing the / button ⑦.
Changing to the next station of the broadcasting network
Note:
This function requires that RDS is switched on and PTY is switched off (see the chapter "User settings", section "Making settings in the "TUNER" menu", menu items "RDS" and "PTY").
Press the / button ⑦.
Storing stations or calling stored stations
Select the desired memory bank.
If necessary, set the desired station.
Press the station button 1 - 5 for approx. 2 seconds to store the current station under the button.
-or-
Briefly press the station button 1-5 to call up the stored station.
Scanning stations
The scan function is used to scan every receivable station of the current waveband.
Note:
You can adjust the scan time for each station (see the chapter "User settings", section "Making settings in the "VARIOUS" menu", menu item "SCANTIME").
Press the MENU button ② for approx. 2 seconds to start scanning.
During the scan, the display alternately displays "SCAN" and the current frequency as well as memory bank or station name.
Briefly press the MENU button 2 to continue listening to the station that is currently being received.
Storing stations automatically (Travelstore)
With Travelstore, you can automatically search for and store the 5 FM stations offering the strongest reception in the region in one memory bank, Any previously stored stations in this memory bank are deleted in the process.
In the reception areas "EUROPE" and "THAILAND", you can store 5 FM stations in the FMT memory bank with Travelstore. In the reception areas "USA" and "SOUTH AMERICA", you can also store 5 AM stations in the AMT memory bank.
Select a memory bank of the desired waveband, e.g. FM1 or AM.
Press the SRC button 14 for approx. 2 seconds.
The tuner starts the automatic station seek tuning; the display shows "FM TSTORE" or "AM TSTORE". After the storing is completed, the radio plays the station at memory location 1 of the FMT or AMT level.
Notes:
- For the reception area "EUROPE": If the priority for traffic information is switched on (→), only traffic information stations are stored.
- If the FMT memory bank is deactivated (see the chapter "User settings", section "Making settings in the "TUNER" menu", menu item "BAND"), it is automatically reactivated if you initiate the Travelstore function.
PTY
In the reception areas "EUROPE" and "USA", an FM station can transmit its current programme type, e.g. CULTURE, POP, JAZZ, ROCK, SPORT or SCIENCE. Hence, the PTY function allows a targeted search for broadcasts of a certain programme type, e.g. for rock or sports broadcasts. Note that PTY is not supported by all stations.
Note:
The PTY function is only available if it has been activated (see the chapter "User settings", section "Making settings in the "TUNER" menu", menu item "PTY").
Selecting a programme type
To select a programme type. read the section "Making settings in the "TUNER" menu", menu item "PTY TYPES" in the chapter "User settings".
Note:
In the reception area "EUROPE", you can adjust the language in which the programme types are displayed (see the chapter "User settings", section "Making settings in the "TUNER" menu", menu item "PTY LANGUAGE").
Searching for stations
Press the / A button ⑦.
During the seek tuning, the currently selected programme type is shown on the display.
As soon as a station with the desired programme type is found, it remains being tuned into.
Notes:
- If no station with the selected programme type is found, "PTY NONE" is briefly displayed and 5 beeps can be heard. The radio will then retune to the station that it played last.
- If the tuned radio station or another station on the broadcasting network broadcasts your selected programme type at a later point in time, the car sound system will automatically switch from the currently tuned station or from the current audio source (e.g. CD) to the station whose programme type matches the one you selected. Note that this function is not supported by all stations.
Configuring the display
Press the DISP button 15 to toggle between these two displays:
| Display | Meaning |
| ABCDEF | Station name |
| FM1 102.90 | Memory bank/frequency |
CD/MP3/WMA/iPod mode
Note:
The playback of MP3/WMA files stored on an SD card as well as iPod mode are supported only by the models San Francisco 310 and Toronto 410 BT.
Basic information
CD/MP3/WMA mode
This car sound system can be used to play audio CDs (CDDA) and CD-R/RWs with audio, MP3 or WMA files as well as MP3 or WMA files on USB data carriers and SD/MMC cards.
Notes:
To ensure proper functioning, use only CDs with the Compact-Disc logo.
- Blaupunkt cannot guarantee the flawless function of copy-protected CDs and all CD blanks, USB data carriers and SD cards available on the market.
Note the following information when preparing an MP3/WMA data carrier:
- Naming of tracks and directories:
Max. 32 characters without the file extension ".mp3" or ".wma" (the use of more characters reduces the number of tracks and folders that the car sound system can recognise)
- No umlauts or special characters
- CD formats: audio CD (CDDA), CD-R/RW, 0:12 cm
- CD data formats: ISO 9669 Level 1 and 2, Joliet
- CD burn speed: Max. 16x (recommended)
- USB format/file system: Mass storage device/FAT16/32
SD card file system: FAT16/32 -
File extension of audio files:
-
.MP3 for MP3 files
WMA for WMA files -
WMA files only without Digital Rights Management (DRM) and created with Windows Media Player version 8 or later
-
MP3 ID3 tags: Version 1 and 2
-
Bitrate for creating audio files:
-
MP3: 32 to 320 kbps
WMA:32 to 192 kbps
Maximum number of files and directories:
- USB medium: Up to 20,000 entries depending on the data structure
- SD cards: Up to 1,500 files (directories and tracks) per directory
iPod mode (not for Madrid 210)
You can connect numerous iPod and iPhone models to the car sound system via the USB port and control the audio playback from the car sound system.
Note:
Blaupunkt cannot guarantee the flawless function of all iPod and iPhone models.
Use a suitable adapter cable to connect your iPod or iPhone with the USB port of the car sound system.
Changing to CD/MP3/WMA/iPod mode
Press the SRC button 14 repeatedly until the desired audio source is displayed:
- "CD": Inserted CD.
"SD":Inserted SD card - "USB": Connected USB data carrier.
"IPOD": Connected iPod
"AUX": Connected external audio source.
Notes:
- The respective audio source can be selected only if a corresponding CD is inserted or a corresponding device is connected.
- A connected iPod is initially selected under "USB" and as soon as the iPod has been recognised under "IPOD".
If the car sound system first has to read the data of a connected device or data carrier before the playback, the display shows "READING". The duration of the reading
depends on the data volume and design of the device or data carrier. If the device or data carrier is defective or the transferred data cannot be played back, a corresponding message appears on the display (e.g. "CD ERROR").
Inserting/ejecting a CD
Inserting a CD

Risk of severe damage to the CD drive!
Noncircular contoured CDs (shape CDs) and CDs with a diameter of 8cm (mini CDs) must not be used.
We accept no responsibility for any damage to the CD drive that may occur as a result of the use of unsuitable CDs.
Note:
You must not hinder or assist the drive as it automatically draws in the CD.
Insert the CD with its printed side up into the CD tray ⑤ until you feel a slight resistance.
The drive automatically draws in the CD and checks its data. Afterwards, the playback starts in CD or MP3 mode.
Note:
If the inserted CD cannot be played back, "CD ERROR" is briefly displayed and the CD is automatically ejected after approx. 2 seconds.
Ejecting a CD
Note:
You must not hinder or assist the drive as it ejects the CD.
Press the button ⑧ to eject an inserted CD.
Notes:
-
If a CD is ejected and not removed, the drive will automatically draw it back in again after approx. 10 seconds.
-
You can also eject CDs while the car sound system is switched off or whilst another audio source is activated.
Connecting/removing a USB data carrier
Connecting a USB data carrier
Switch of the car sound system so that the data carrier will be correctly registered.
Pull the protective cap of the USB socket 9 to the front until it moves out of the socket and fold it to the right.
Connect the USB data carrier.
Turn on the car sound system.
If the USB data carrier is initially selected as audio source, the data are read first.
Notes:
- If the connected USB data carrier cannot be seen, "USB ERROR" is briefly displayed.
- The time required for reading in the data depends on the design and size of the USB data carrier.
Removing a USB data carrier
Switch of the car sound system so that the data carrier will be correctly unregistered.
Disconnect the USB data carrier.
- Close the protective cap of the USB socket ⑨.
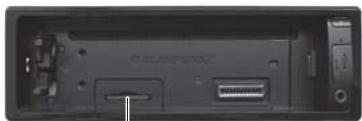
Inserting/removing an SD/MMC card (not for Madrid 210)
Inserting an SD/MMC card
Detach the control panel.
Insert the SD/MMC card with its labelled side up and its contacts first into the card slot 16 until it clicks into place.
Attach the control panel.
After switch-on, the device automatically selects the inserted SD card as audio source. The data of the SD card are read. Afterwards, the playback starts in MP3 mode.
Notes:
- If the inserted SD card cannot be played, "SD ERROR" is briefly displayed.
- The time required for reading in the data depends on the design and size of the SD card.
Removing the SD/MMC card
Detach the control panel.
push on the SD/MMC card until it disengages.
Pull the SD/MMC card out of the card slot (16).
Attach the control panel.
Selecting tracks
Press the < / > button ⑦ briefly to change to the previous/next track.
Note:
If the current track plays longer than 3 seconds, pressing < 7 once restarts the track.
Selecting a folder (only in MP3/WMA/iPod mode)
Press the / button ⑦ briefly to change to the previous/next folder.
Note:
In iPod mode, this allows you to change to the previous/next folder of the current category, e.g. to the next genre, if you previously selected a track on the iPod via the corresponding genre.
Fast searching
Press and hold down the button < / > until the desired position has been reached.
Interrupting playback
Press the 3 13 button to interrupt the playback ("PAUSE") or to continue it.
Scanning all tracks
The scan function scans all available tracks.
Press the MENU button ② for approx. 2 seconds to start the scan, or briefly to continue playing the currently scanned track.
During the scan, the display alternately displays "SCAN" and the current track number or file name.
Note:
The scan time can be adjusted (see the chapter "User settings", section "Making settings in the "VARIOUS" menu", menu item "SCAN TIME").
Playing tracks in random order
Press the 5 MIX button to change among the playback modes:
| Opera- tion | Display | Meaning |
| CD | MIX ALL | Mixing tracks |
| MP3/WMA/iPod | MIX FOLDER | Mixing tracks of the current folder |
| MIX ALL | Mixing tracks of the data carrier | |
| Gen. | MIX OFF | Regular playback |
If the MIX function is switched on, the icon MIX (mix all tracks) or MIX (mix tracks of current folder) is shown on the display.
Repeatedly playing individual tracks or directories
Press the 4 RPT button to change among the playback modes:
| Operation | Display | Meaning |
| CD | REPEAT TRACK | Repeating tracks |
| MP3/WMA/iPod | REPEAT TRACK | Repeating tracks |
| REPEAT FOLDER | Repeating folders | |
| Gen. | REPEAT OFF | Regular playback |
If the REPEAT function is switched on, the icon (repeat tracks) or (repeat folders) is shown on the display.
Configuring the display
Press the DISP button 15 once or several times to switch among these displays:
| Opera- tion | Display / icon | Meaning |
| CD | TRACK 01 0:15 | Track number and playing time |
| TRACK 01 3:37 | Track number and duration | |
| MP3/ WMA/ iPod | SONG-INFO / √ | Track name¹ |
| FILE-INFO / √ | File name | |
| PLAYTIME 0:15 | Playing time | |
| TOTAL TIME 3:37 | Track dura- tion | |
| ARTIST-INFO / √ | Artist¹ | |
| ALBUM-INFO / √ | Album name¹ |
1 Track name, artist and album name must be stored as ID3 tag to be able to display them.
Browse mode
In Browse mode, you can directly search for and select a certain track on the MP3/WMA data carrier or iPod without interrupting the current playback.
Browse mode in MP3/WMA mode
In MP3/WMA mode, you can select and play a track from a directory of the data carrier.
Press the 1 LIST button ① to call up the browse mode in the MP3/WMA mode.
The display shows the list icon. The first or current folder on the data carrier is being displayed.
Notes:
- The first folder is displayed only if the browse mode has been called for the first time after inserting or connecting the data carrier. Afterwards, the current folder is displayed whenever the browse mode is called.
- You can exit the browse mode at any time by pressing the 1 LIST button ① 3
Press the /A button ⑦ once or several times to select a different folder.
Press the button 7 to display the tracks of the selected folder.
The first track of the folder is shown on the display.
Note:
Pressing the <button ⑦ returns you to the folder list.
Press the /A button ⑦ once or several times to select a different track.
Press the button 7 to play the track.
The playback starts. You are exiting the browse mode.
Browse mode in iPod mode
In iPod mode, you can select and play a track using the categories "Artists", "Albums" or "Genre" stored in the ID3 tags.
Press the 2ID3 button to call up the Browse mode in the iPod mode.
The display shows the icon. The first category, "ARTISTS", is displayed.
Note:
You can exit the browse mode at any time by pressing the 2 ID3 button (13).
Press the / A button ⑦ once or several times to select a different category.
Press the button ⑦ to display the available entries of the category.
The first entry of the selected category is shown on the display (e.g. "Jazz" in the "Genre" category).
Note:
Pressing the <button ⑦ returns you to the list of categories.
Press the / A button ⑦ once or several times to select a different entry.
Press the button ⑦ to display the available tracks of the entry.
The first track of the entry is shown on the display.
Note:
Pressing the <button ⑦ returns you to the list of entries.
Press the / A button ⑦ once or several times to select a different track.
Press the button ⑦ to play the track.
The playback starts. You are exiting the browse mode.
Fast browsing
Fast browsing enables faster access to tracks. Instead of the arrow keys 7 , you use the volume control 4 and the On/Off button 3 to select and confirm list entries:
| Function | Browse mode | Fast browse mode |
| Selecting entries in lists | \( \underline{\mathbf{Y}}/\underline{\mathbf{X}} \)⑦ | Volume control ④ |
| Confirming entries | >⑦ | On/off button ③ |
| Return to the higher level | <⑦ | <⑦ |
Fast browsing is switched on or off in the user menu (see the chapter "User settings", section "Making settings in the "VARIOUS" menu", menu item "FAST BROWSE").
Note:
With activated fast browsing, you cannot change the volume in browse mode or mute the car sound system. To do so, first exit the browse mode by pressing the button 1 LIST (13) or 2 ID3 (13) or starting the track playback.
External audio sources
Front AUX-IN socket

Danger!
Increased risk of injury from connector.
In case of an accident, the protruding connector in the front AUX-IN socket may cause injuries. The use of straight plugs or adapters leads to an increased risk of injury.
For this reason, we recommend using angled jack plugs, e.g. the Blaupunkt accessories cable (7 607 001 535).
As soon as an external audio source, such as a portable CD/MiniDisc or MP3 player is connected to the front AUX-IN socket (10), it can be selected with the SRC button (14). "AUX" then appears on the display.
Notes:
- You can enter an individual name for the AUX source that is shown on the display in AUX mode (see the chapter "User settings", section "Making settings in the "VARIOUS" menu", menu item "AUX EDIT").
- You can play back an AUX source at the same time with one of the internal audio sources of the car sound system. Hence, you can play back the announcements of a navigation device connected to the front AUX-IN socket via the loudspeakers of the car sound system while listening to the radio or a CD at the same time. In addition, you can adjust the volume levels of both audio sources to each other. For more details, please read the section "Making settings in the "VARIOUS" menu", menu items "AUX MIX" and "AUX MIX GAIN" in the chapter "User settings".
Sound settings
The following sound settings can be changed in the "AUDIO" menu:
Adjusting bass and treble
- Setting the left/right volume distribution (Balance) or front/rear (Fader)
- Adjusting the increase of bass at low volume (Loudness)
- Selecting a sound profile (Sound Preset)
- Setting level and frequency of the preamplifier output (Sub-Out)
- Setting the 3-band equaliser
Calling and exiting the "AUDIO" menu
- Briefly press the MENU ② button to open the user menu.
Press the / button ⑦ repeatedly until the"AUDIO"menu item is selected.
Press the > button ⑦ to open the "AUDIO" menu.
Press the / button ⑦ repeatedly until the desired menu item is selected.
Perform the setting (see the next section).
Briefly press the MENU button ② to exit the menu.
Notes:
- The menu is automatically exited approx. 15 seconds after the last button activation and you are returned to the display of the current audio source.
- In the menu, you can press the button < ⑦ in each case to return to the higher menu level.
Making settings in the "AUDIO" menu
BASS
Bass level. Settings: -7 to +7.
Turn the volume control 4 to perform the setting.
TREBLE
Treble. Settings: -7 to +7.
Turn the volume control 4 to perform the setting.
BALANCE
Left/right volume distribution. Settings: L9 (left) to R9 (right).
Turn the volume control 4 to perform the setting.
FADER
Front/rear volume distribution. Settings: R9 (rear) to F9 (front).
Turn the volume control 4 to perform the setting.
LOUDNESS
Increase of bass at low volume. Settings: ON, OFF.
Turn the volume control 4 to perform the setting.
SOUND PRESETS
Selecting equalizer presettings. Settings: POP, ROCK, CLASSIC, PRESET EQ OFF.
Press the button ⑦ to open the menu.
Turn the volume control 4 to perform the setting.
SUB-OUT
Setting the level and frequency of the preamplifier output. Settings: GAIN 0 to +7, FREQUENCY 80/120/160 Hz.
Press the button ⑦ to open the menu.
Press the V button to toggle between the menu items "GAIN" and "FREQUENCY".
Turn the volume control 4 in each case to perform the setting.
Setting the 3-band equaliser
The radio features a 3-band equaliser. For each of the three treble, middle and bass bands, you can select a frequency as well as adjust the level. In addition, you can adjust the quality factor for bass and middle.
The equaliser also provides an adjustable increase of the bass at low volume (X-bass).
Opening the "EQUALIZER" menu
In the "AUDIO" menu, select the "EQUALIZER" menu item.
Press the button ⑦ to open the menu.
Press the 工 button to change among the following menu items:
- EQUALIZER
- EQTREBLE
- EQ MIDDLE
EQ BASS
EQX-BASS
EQUALIZER
Switching the equalizer on or off. Settings: ON, OFF.
Turn the volume control 4 to perform the setting.
EQ TREBLE
Adjusting treble frequency and level of the equalizer.
Press the button ⑦ to open the menu.
Press the 工 button ⑦ to change among the following menu items:
- FREQUENCY
settings: 10/12.5/15/17.5 kHz
- GAIN
settings: -7 to +7)
Turn the volume control 4 in each case to perform the setting.
EQ MIDDLE
Adjusting centre frequency and level of the equalizer.
Press the button ⑦ to open the menu.
Press the 工 button ⑦ to change among the following menu items:
FREQUENCY
settings: 0.5/1.0/1.5/2.5 kHz
GAIN
settings: -7 to +7)
Q-FACTOR
settings: 0.5/0.75/1.0/1.25
Turn the volume control 4 in each case to perform the setting.
EQ BASS
Adjusting bass frequency and level of the equalizer.
Press the button ⑦ to open the menu.
Press the 工 button ⑦ to change among the following menu items:
- FREQUENCY
settings:60/80/100/200Hz
- GAIN
settings: -7 to +7)
Q-FACTOR
settings: 1.0/1.25/1.5/2.0)
Turn the volume control 4 in each case to perform the setting.
EQ X-BASS
Adjusting the frequency and level for the increase of bass at low volume.
Press the button ⑦ to open the menu.
Press the Y / A button ⑦ to change among the following menu items:
FREQUENCY
settings: 60 / 80 / 100Hz
- GAIN
settings:0 to +3)
Turn the volume control 4 in each case to perform the setting.
User settings
Calling the user menu and selecting a menu
- Briefly press the MENU ② button to open the user menu.
In the user menu, the user settings can be found in the following menus:
TUNER
- AUDIO (see chapter "Sound settings")
DISPLAY
VOLUME
CLOCK
VARIOUS
- BLUETOOTH (only for Toronto 410 BT, see the accompanying "Bluetooth® instructions for Toronto 410 BT")
Press the /A button ⑦ repeatedly until the desired menu is selected.
Press the button 7 to open the selected menu.
Press the /A button ⑦ repeatedly until the desired menu item is selected.
Perform the setting (see the following sections).
Briefly press the MENU button ② to exit the menu.
Notes:
- The menu is automatically exited approx. 15 seconds after the last button activation and you are returned to the display of the current audio source.
- In the menu, you can press the <button ⑦ in each case to return to the higher menu level.
Making settings in the "TUNER" menu
TRAFFIC (traffic information) (only for reception area EUROPE)
Only possible in FM radio mode: Switching priority for traffic announcements on or off. Settings: ON, OFF.
Turn the volume control ④ to change among the settings.
If priority is switched on for traffic information, the display shows the icon
BAND (band selection)
Activating or deactivating memory banks.
Memory banks that can be deactivated: FM2, FMT, MW and LW (only for reception area EUROPE), AM and AMT (only for reception area USA and SOUTH AMERICA).
Settings in each case: ON, OFF.
Press the button ⑦ to open the menu.
Press the /A button ⑦ repeatedly until the desired memory bank is displayed.
Turn the volume control 4 to toggle between the settings ON (activate memory bank) and OFF (deactivate memory bank).
Deactivated memory banks are skipped during the source selection with the SRC button 14.
Note:
If a memory bank is deactivated, the stations stored in this memory bank are retained.
REGIONAL
(only for reception area EUROPE)
Only possible in FM radio mode: Switching REGIONAL function on or off. Settings: ON, OFF.
Turn the volume control 4 to change between the settings.
SENSITIVITY
Setting the sensitivity of station seek tuning. Settings: LO (-; low), HI (+; high).
Turn the volume control 4 to change between the settings.
RDS
Switching the RDS function on or off. Settings: ON, OFF.
Turn the volume control 4 to change between the settings.
PTY
Switching the PTY function on or off. Settings: ON, OFF.
Turn the volume control 4 to change between the settings.
PTY TYPES
Only possible with activated PTY function: Select a programme type.
Turn the volume control 4 to select a programme type.
PTY LANGUAGE
Select the language for the display of the programme types. Settings: ENGLISH, FRANCAIS (French), DEUTSCH (German).
Press the button ⑦ to open the menu.
Turn the volume control 4 to select a language.
TUNER AREA (reception area)
Select the reception area for the radio reception. Settings: EUROPE, USA, SOUTH AMERICA, THAI-LAND.
Press the button ⑦ to open the menu.
Press the X / A button ⑦ to select a reception area.
Press the > button ⑦ to set the reception area.
Press the ±b button 7 to confirm the selected reception area.
Making settings in the "DISPLAY" menu
DIMMER
Select automatic or manual switching of the display brightness for day or night. Settings: AUTO (display brightness is automatically switched by switching the driving lights on or off), MANUAL (display brightness can be switched manually).
Turn the volume control 4 to perform the setting.
Automatic switching of the display brightness is possible only if your car sound system is installed as described in the installation instructions and your vehicle features the corresponding connection.
SCROLLING
Select the display of scrolling text (e.g. when displaying MP3 file names) either as single display or continued display. Settings: 1X (single display), ON (continued display).
Turn the volume control 4 to change between the settings.
LANGUAGE
only for Toronto 410 BT)
Select the language for the display. Settings: ENGLISH, DEUTSCH (German).
Press the button ⑦ to open the menu.
Turn the volume control 4 to select a language.
Making settings in the "VOLUME" menu
ON VOLUME
Setting the power-on volume. Settings: ON VOL (power-on volume; 1 - 50) or LAST VOL (volume set last before switching off the car sound system).

Danger! High volume.
The power-on volume can be unexpectedly high if the LAST VOL setting is selected and a high volume was set the last time the radio was switched off.
Always set the device to a moderate volume.
Press the button ⑦ to open the menu.
Press the / button ⑦ to toggle between the settings LAST VOL and ON VOL.
If necessary, turn the volume control 4 to adjust the desired volume for the ON VOL setting.
TRAFFIC VOL (only for reception area EUROPE)
Setting the minimum volume for traffic announcements. Settings: 1 - 50.
Turn the volume control 4 to perform the setting.
BEEP
Switching the confirmation beep on or off. Settings: ON, OFF.
Turn the volume control 4 to perform the setting.
Making settings in the "CLOCK" menu
SET
Setting the time.
Turn the volume control 4 clockwise to set the hours.
Turn the volume control 4 counterclockwise to set the minutes.
Press the <button ⑦ to confirm the time entered and to return to the user menu.
-or-
Briefly press the MENU button ② to confirm the time entered and to exit the user menu.
Note:
When you set the time in 12-hour mode (HOUR MODE 12), an "AM" is displayed before the time for the time before noon or a "PM" for the time after noon.
HOUR MODE
Selecting the 12 or 24-hour time. Settings: 12, 24.
Turn the volume control 4 to perform the setting.
PERM CLOCK
Switch the permanent display of the time on or off. Settings: ON, OFF.
Turn the volume control 4 to perform the setting.
If the permanent display of the time is switched on, the time is shown on the display. The display of the respective audio source is shown only after pressing a button. Approximately 15 seconds after the button is pressed last, the time is displayed again.
Making settings in the "VARIOUS" menu
DEMO MODE
Switching the demo mode on or off. Settings: ON, OFF.
Turn the volume control 4 to perform the setting.
In demo mode, the features of the radio are shown as scrolling text on the display.
MIX AUX
Switching the combined playback of the AUX source with another audio source on or off. Settings: ON, OFF.
Turn the volume control 4 to perform the setting.
With the AUX MIX ON setting, an audio source connected to the front AUX-IN socket (10) is played back simultaneously with the respective active internal audio source of the car sound system (e.g. radio or CD).
AUX MIX GAIN (AUX MIX Level)
Adjusting the level of the AUX source with combined playback of the AUX source and another audio source (AUX MIX ON). Settings: -5 to +5.
Turn the volume control 4 to perform the setting.
This setting allows raising or lowering the level of the AUX source to adjust it to the level of the other active audio source.
AUXEDIT
Entry of an individual 15-digit name for the AUX source. Possible characters: space, 0 - 9 , A-Z.
Press the >button ⑦ to open the entry menu.
Turn the volume control 4 to select a character for the respective position.
Press the or < < button ⑦ to reach the next or previous position.
Press the > or < button ⑦ repeatedly until you reach past the first or last position in order to confirm the name entered and to return to the "VARIOUS" menu.
-or-
Briefly press the MENU button ② to confirm the name entered and to exit the user menu.
The name entered is shown on the display as soon as you select the AUX source.
FAST BROWSE
Switching fast track selection in browse mode on or off using the volume control 4 and the On/Off button 3). Settings: ON, OFF.
Turn the volume control 4 to perform the setting.
SCAN TIME
Setting the scan time in seconds. Settings: 4/8/12/16/60 SEC.
Turn the volume control 4 to perform the setting.
VERSION
Displaying the version of the CPU and software of the radio.
Press the button ⑦ to open the menu.
Press the / button ⑦ to toggle between the display of the version number of CPU (P) and software (E).
NORMSET
Restoring the original factory settings of the car sound system.
Press the button ⑦ to open the menu.
Press the A button ⑦ to confirm restoring the factory settings.
The factory settings are restored. You are returned to the VARIOUS menu to the "NORMSET" menu item.
Factory settings
Important factory settings in the user menu:
| Menu item | Factory setting |
| TUNER AREA | EUROPE |
| RDS | ON |
| REGIONAL* | ON |
| TRAFFIC* | OFF |
| SENSITIVITY | HI |
| PTY | OFF |
| ON VOLUME | LAST VOLUME |
| TRAFFIC VOL* | 20 |
| BEEP | ON |
| SCAN TIME | 8 SEC |
| DIMMER | MANUAL |
| HOUR MODE | 24 |
| CLOCK SET | 00:00 |
- Only in reception area "EUROPE"
In the user menu, you can restore the original factory settings of the car sound system (see the chapter "User settings", section "Making settings in the "VARIOUS" menu", menu item "NORMSET"):
Useful information
Warranty
We provide a manufacturer's warranty for products bought within the European Union. For devices purchased outside the European Union, the warranty terms issued by our respective responsible domestic agency are valid. The warranty terms can be called up from www.blaupunkt.com.
Service
In some countries, Blaupunkt offers a repair and pick-up service.
Information about the availability of this service in your country can be found at www.blaupunkt.com.
If you want to take advantage of this service, you may request a pick-up service for your car sound system via the Internet.
Technical data
Voltage supply
Operating voltage: 10.5 - 14.4 V
Current consumption
In operation: 10 A
10 sec. after switch-off: < 3.5 mA
Amplifier
Output power: 4 x 22 watts sine
at 14.4V at 4 ohms.
4 × 50 watts max. power
Tuner
Wavebands in Europe/Thailand:
FM: 87.5 - 108 MHz
AM (MW): 531 - 1,602 kHz
LW (Europe only): 153 - 279 kHz
Wavebands in the US:
FM: 87.7-107.9 MHz
AM (MW): 530 - 1,710 kHz
Wavebands in South America:
FM: 87.5-107.9 MHz
AM (MW): 530 - 1,710 kHz
FM frequency response: 30 - 15,000Hz
CD
Frequency range: 20 - 20,000 Hz
Pre-amp out
4 channels: 2 V
Input sensitivity
Front AUX-IN: 300mV / 10k
Dimensions and weight
WxHxD: 178x50x160mm
Weight: approx. 1.70kg

AUX EDIT (Editor AUX)
FM (OUC): 87,5-108 MHz
AM (OM): 531-1602 kHz
OL (uniquement Europe): 153 - 279 kHz
Gamme d'ondes USA :
FM (OUC): 87,7 - 107,9 MHz
AM (OM): 530 - 1710 kHz
FM (OUC): 87,5 - 107,9 MHz
AM (OM): 530 - 1710 kHz
FM-Bande passante: 30 - 15000Hz
CD
Bande passante: 20-20 000 Hz
AUXEDIT (modificaAUX)
AM (MW): 531 - 1602 kHz
OL (LW) (solo Europa): 153 - 279 kHz
Gamme d'onda USA:
FM: 87,7-107,9 MHz
AM (MW): 530 - 1710 kHz
AM (MW): 530 - 1710 kHz
AM (MW): 531 - 1602 kHz
LW (alleen Europa): 153 - 279 kHz
Golfgebieden USA:
FM (UKW): 87,7-107,9 MHz
AM (MW): 530 - 1710 kHz
AM (MW): 530 - 1710 kHz
Frequentiebereik FM: 30 - 15 000 Hz
CD
PTY LANGUAGE (PTY-sprak)
AUX EDIT (Redigera AUX)
SCAN TIME (Presentationsid)
Ställ in presentationstiden i sekunder. Installnagar: 4/8/12/16/60 SEC (sek).
FM (UKV): 87,5-108 MHz
AM (MV): 531 - 1602 kHz
LV (endast Europa): 153 - 279 kHz
AUX EDIT (editor AUX)
NORMSET (restablecer)
Colocaropainfrolntal
Sintonizar as estaceoes
AUX EDIT (Editar AUX)
AM (MW): 531 - 1602 kHz
LW (apenas Europa): 153 - 279 kHz
Bandas nos EUA:
FM (UKW): 87,7 - 107,9 MHz
AM (MW): 530 - 1710 kHz
Bandas América do Sul:
FM (UKW): 87,5-107,9 MHz
AM (MW): 530 - 1710 kHz
Gem station og hent gemt station. 182
Scan stationer 183
Automatisk lagring af stationer (Travelstore) 183
PTY 183
Indstil displayvising 184
Cd-/mp3-/WMA/iPod-tilstand. 184
Grundlaeggende ophysninger. 184
Skiftilcd-/mp3-/WMA-/iPod-tilstand.185
Indstilling of stationer
Derfindesfleradatindstille en stationpaa:
Indstil station manuelt
Tryk kort pa tasten < / > ⑦ en uller flere gange for at aendre frekvensen trinvis.
Bemark:
Gem station og hent gemt station
Titelynvalg (Fast Browsing)
Fast Browsing giver dig en hurtigere adgang til titerne. I stedet for piltasterne ⑦ bruger du lydstyrkereguleringen ④ og taend/sluk-knappen ③ til at valse og bekrafte listeposter:
AUX EDIT (Rediger AUX)
AM (MW): 531 - 1602 kHz
LB (kun Europa): 153 - 279 kHz
Bolgeomrade USA:
FM (VHF): 87,7 - 107,9 MHz
AM (MW): 530 - 1710 kHz
Bolgeomrade Sydamerika:
FM (VHF): 87,5-107,9 MHz
AM (MW): 530 - 1710 kHz
FM-frekvensrespons: 30-15000 Hz
CD
Overforselsomrade: 20-20 000 Hz
Pre-amp Out
4kanaler: 2V
Indgangsfolsomhed
Front-AUX-IN: 300mV / 10k
Målogvægt
BxHxT: 178x50x160mm
Vægt: ca. 1,70 kg
① N-nappain
AM (MW): 531 - 1602 kHz
LW (vain Eurooppa): 153 - 279 kHz
Aaltoalueet USA:
FM (ULA): 87,7-107,9 MHz
AM (MW): 530 - 1710 kHz
AM (MW): 530 - 1710 kHz
FM-toistovalue: 30-15000Hz
CD
Toistoalue: 20 - 20 000 Hz
Esivahvistimen lahto (Pre-amp Out)
4kanavaa: 2V
Tuloherkkyys
Front-AUX-IN: 300mV / 10k
Mitat ja paino
LxKxS: 178x50x160mm
Paino: n. 1,70 kg
1 PAnjKtpo Aataqpaiaion anooanewou nEoi xeiipou
(2) Πλήκτρο MENU Σύντομο πάτημα: Kλήση/Kλείσιμο μενόι Παρατεταμένο πάτημα: Ekkivηση τής λεῖουγίας αρώς
3 PAnKToPO ON/OFF SuVtOmo nTnma; EvEpyoioiOn npAoiWvou autokivntou Ee AIOUpyia: Siyaon pAoivovau TokiVNTou (Mute) IpaTeaMevo nTnma; AnEvepyoioiOn npAoivovau autokivntou
4 Puθμiαπις ἐνταοῦς ἡχου Στο μενόν; Aλλαγή μρθμισεων
⑤ YnOδoxn tou CD
⑥ Oθovn
7 PAnktpo A/V
To evo: Eiloyn 0eou
Aeiouyia paoowvou: Ekkivnoan aeoupyi
ac avzntnnc
Aeiouyia MP3/WMA/iPod: Aaiayn otov
Eioevo/panoyouevo paeklo
PAnktpo </>
To evo: Aaiayn 0eineoou evou
Aeiouyia paoowvou: PuOmuon otaohou
Aaloi tpoai aeouyiac: Eiloyn muoiokou
Komuatou (tirlou)
⑧ Πλικτρο Α (Eject) Eγωγη CD
⑨ Yπoδoxn USB
10 Mnpoovn uOdoxn AUX-IN
(85) Πλήκτρο (óvó Toronto 410 BT) Tερματισός/απόρριψη κλήσης
12 PnKtpo (moVTo Toronto 410 BT) SuVTOO nATnua; ATOOxN kHOnC, yPnyOpn EMIoyn NapatetauEvo nATnua; AVOiYMa Tou TnLEeWiKou KATAIyOu Tou KIVTou TnLEeWovU n EVepyOnoinTc ENIOLyNC yLWosac
13 P56io pAiktpovw 1-5
14 PnIrkpo SRC EnilovnyEπineδou anoθκεuοnc, nπηγικnXou
15 PAnktpo DISP SuVToMo nAtnua: AALayn EvdeEiNc NapatetauEvO nAtnua: AALayn φwTeivotn-tac oOvnc
16 YnOdoxN KApTuw SD (mOvo San Francisco 310 Kai Toronto 410 BT) Pooaon mOvo OEpiTTwoa apaipEevou πediou xeiipoiou

YnoeEic aoeaieac 220
a 220
OdiKaopaleia 220
Tevikc uno3eic aopaaiaac 220
Anwon niototntac. 221
Ppaatooinpovthetaewv sto evoC "CLOCK" (wpa) 238
Ppaatoonoin npu3muawv 0eou VARIOUS (di4oopa) 238
Puθμiεις εργοσταοιou. 240
Xpnoiuec nInpoopopiec. 240
Eyyunon 240
Service 240
Texvika stoiexia 240
Obnyiec tonotheonoc 330
Ynodεiεic aσφαλειαc
To paioovo autokivnTou katakeuadvtne oupva me nOmeipin EeIc nTc TeVooLyoic kai Touc avaywpiavouc kavoec aopaeiaac. Iapola auta unopei va npokuovkivduoi, eav dev npoeEETc tUOneiEIC aopaleiac oetuc tic odnyiec.
Autec oI obnyiec nepiéxouv onuavtikec nInpopoiec yia tvn anl kai aopaln tooBetonk kal to xeipiofo tou padiopowou tou autokivntou.
- Diaβaσe autεc tic odnyie προεκτικα kai oλοκληρωτικα, προτου χρησιμοιησετo to paδióφwνo tou autokivntou.
ΦuλaTe Tc obnyieC, wote va eivai ava naoc stiyun npoaβaouic, o olouc touc xnoTEc. - MētaβiβaTe TO pādióφwvo TOU autOKivnTou Σ e Tpītouc návTa μαζ iμe autéç TiC òönyieC.
IpoeeTe enionc tic oyniec twv oukeuwv nou xnpouoieite oe ouvduao e auto to paio- qwo autokivntou.
Σuβoλa
Evepyonoan/anEvepyonoan to nKpO ON/OFF
Tia tvv evepyoinon npatote to nAnktpo ON/OFF ③.
To padiopuvo tou autokivitou epeyonoietai.
Tia tnu anevepyooinan, kpatnoTe natnuevo to nktpo ON/OFF ③ yia naaw ano 2 deu- tepolaenra.
Mnpoostivn unooxn AUX-IN

Kivδuvoc!
Meyaloc kivduvoc tpaumatou ao to qic.
Evpyoioin n anevpyoioinon tnc leitoupyiac PTy. PuOmuic: ON (Evpyoioin), OFF (anevpyoioin).
Iepiotpety to puthetaiOn tnc Evtaonc tou xou 4, yia va aalalete metaeTuWputhetai- eowv.
PTY TYPES (túnοι προγάματος)
uvo o epiinon evpyoioevc toupia PTY: Eiloyn tuou npoypaatoc.
Iepiotpeyte to puthetaint ntc evtaoc tou xou 4, yia va eEeEeEevav tuno npoypaumatoc.
PTY LANGUAGE (yλωσα PTY)
Enioyyn yawoc yia tny evdeiyn twv tunw npoypamatoc. Puthetaic: ENGLISH (Ayylka), FRANCAIS (Flambda), DEUTSCH (Tepuvika).
PntnoTe to nAnKtpo ≥ 7 yia va avoiEeTo To evou.
Iepiotpeyte to puthetain tnc evtaonc tou nXou 4, yia va eTIAEETe mya IwOoA.
AUXEDIT (eEepyaia AUX)
Kataxwpon Evoc EAtoumukeuEvou, 15-psiou ovouatoc yia tynnAUX. duvatoi xaapaktnpec: Kevoi xapaaktnpEc,0-9,A-Z.
Pnto nAikpo> 7, ia va aovie to eoukataxwpnnc.
Iepioppeyote to puthetairot ntc evtaoanc tou xou 4, yia va enieEeTe yia tny ekaoTote θeon eva yapaktnpa.
PntnoTe to nIknKtpo ⑦, yia va ne-paogeTcTnv enouevn nTnv nponyoueyn Θeon.
Pntote To nhtpo> n< 7 toec qopec, muxvi Eaepaote Tnv teuataia eon npwtn the, ia va ebetaaiwaete to kataxw
AM (MW): 531 - 1602 kHz
LW (móvo Eupw): 153 - 279 kHz
AM (MW): 530 - 1710 kHz
N 01Aeepikn:
FM (UKW): 87,5-107,9 MHz
AM (MW): 530 - 1710 kHz
PTY LANGUAGE (Jęczyk PTY)
AM (MW): 531 - 1602 kHz
LW (tylko Europa): 153 - 279 kHz
Zakres fal dla USA:
FM (UKW): 87,7 - 107,9 MHz
AM (MW): 530 - 1710 kHz
AM (MW): 530 - 1710 kHz
AM (KH): 531 - 1602 kHz
LW (csak Europa): 153 - 279 kHz
Hullámsávok, USA:
FM (URH): 87,7 - 107,9 MHz
AM (KH): 530 - 1710 kHz
Hullamsavok, Del-Amerika:
FM (URH): 87,5 - 107,9 MHz
AM (KH): 530 - 1710 kHz
FM - atviteli sávszelesseg:
30-15000Hz
CD
Conectare/deconnectare
ON VOLUME (La conectare)
Reglarea volumului sonor de conectare. Reglaje: ON VOL (volumul sonor de conectare; 1-50) sau LAST VOL (ultimul volum sonor; ultimul volum sonor reglat inainte de deconnectarea radioulii pentru masina).

Pericol!
Volum sonor ridicat.
AM (MW): 531 - 1602 kHz
LW (numai Europa): 153 - 279 kHz
Lungimi de unda SUA:
FM (UKW): 87,7-107,9 MHz
AM (MW): 530 - 1710 kHz
Lungimi de undã America de Sud:
FM (UKW): 87,5 - 107,9 MHz
AM (MW): 530 - 1710 kHz
Zona de transmitere FM:
30-15000Hz
CD
Zona de transmisie: 20 - 20 000 Hz
Pre-amp Out
4 canale: 2V
Sensibilitatea de intrare
Frontal AUX-IN: 300mV / 10k
Dimensiuni sì greutate
Latime x inaltime
xdancime: 178× 50× 160mm
Greutate: aprox. 1,70 kg

① -ByTOH
Ie6boknpaHe Ha CbAIIaIIaCe o6cnykBaIpaHn
② ByToH MENU
KpaTko HaTnCKaHe: N3BVKBaHe/3aTBapAne Ha MeHIOTO
PnpbIJIxNteHnHaTnCKaHe: cTapTnpaHnHa
fYHKUATAcKaHnPaHne
③ BytoH BkJ./U3Kn.
KpataKoHaTnckaHe:BkIIOUbaHe Ha aBTOMO- 6NJHOTOPaIHO
Bpa6oTeH peKIM:BKNIOUbaHe Ha aBTOMO- 6nHTo paIHO ha Tnx peKIM (Mute)
PpOdbIJIgNteHNOHaTnCKaHe:I3KJIIOUBaHcHa aBTOMo6bHnHOTOpaHIO
4 Perynatop Ha cnata Ha 3Byka
B MeHIOTo: IpommaHa Ha HactpouKnTe
⑤ O Tbp 3a CD
⑥ Duscnnei
⑦ A/ByToH
B MeHIOTo: n36npaHe Ha ToUka OT MeHIOTo
Pexim pao: cTaptnpaHa Tbpche
PexMM MP3/WMA/iPod: npemnHaBaHe KbM cnEiBauaata/NpeuniHnata DnpeKTopna
< / > BytoH
B MeHIOTo: CmHa Ha HnBOTO Ha MeHIOTo
Pexm padno: hactpoiBaHe Na CTaHUnTe
IpyrnpeximnHa pa6oTa: n36op Ha 3aRnaBne
⑧ BytoH (Eject)
IzhBaxJaHe Ha CD
USB6yka
10 PteHaAUX-IN 6yka
⑪ BytoH (cAmO Toronto 410 BT)
PpekpatBaHe/OTKIOHnBaHe Ha 06aJdaHeTo
⑫ BytoTH (cMo Toronto 410 BT)
KpaTko HataNcKaHe; npIeMaHe Ha 06aXkaHeto, 6bP3o 136npaHe
IbIroHaTnCKaHe:OTBapHReHaTelefoHHata KInraHaMo6nHnTelefoH,peCn.akTNBpaHe Ha rnaocBOTo n3bupaHe
(13)БLOKc6yToHn1-5
14 SRC Byton
N36npahe Ha HNO Ha 3anaMeTaBaHe, pecn. ayDIO N3TOHnik
15 DISP byton
KpaTko HataNcKaHe; npeBkIIOuBaHe Ha ekpaHInTe
IbIroHaTnCKaHe: npEbkIouBaHe Ha rpkOcT-Ta HnCnpe
16 OTBOP 3a SD KapTa (cAmo San Francisco 310 n Toronto 410 BT)
DocbIcMo npi CBaHEn 06CnyXBaU naHEn
(16)
UHCTpykun 3a6e3oNaCHOCT 310
U3noJ3BaHn CUMBOJN 310
Be3onacnoct Ha DnHexHeMeTo 310
06uHnCTpykun3a 6e3oNaChocT. 310
ДeКларцязасьтВETCTBNE. 311
Yka3aHnna 3a nouchTbaHe 311
yka3aHna 3a yHnOxKaBaHe. 311
OkomnneKToBka 311
CpeuaJIHn KOHCyMaTbN (He Ca BKNUeHn BOKOMPJIeKTOBkTa) 311
Pnyckahe B ekcnnoataaia 311
IocTabaHHe/CbAJIHe Ha 06cIyXBaUzna naHelen 311
Ezuk Ha ndcnpiea (camo Toronto 410 BT).....312
HactpoBbAe Ha pernO 3a pniemane..... 312
BkIIOUbaHe/ɪzKlIOUbaHe. 312
Cinla Ha 3Byka 312
JrkocT Ha ducnpe. 313
BkIIOUBaHe/IMKIIIOUBaHe Ha demo-pexum...313
Bluetooth®Функции (camo Toronto 410 BT) 313
Papnoctahum 3a nbTHata 06ctahOBka... 313
Pexim padno 314
RDS. 314
BpezmpaIIOcmeHeTe,pecn.uz6epeTe HnBOHa3anaMeTBAhe 314
HacpoBaHe Ha cTaHcInTe. 314
3aametraBaHe Ha cTaHunite,pecn.
13BnKBAHe Ha 3aamTeHIne CTaHn.. 315
PpneMaHe Ha cTaHcunTe 315
ABTomaTnUHO 3anaMeTaBaHe Ha CTaHcIyTa (Travelstore) 315
PTY 316
HactpoBbAe Ha HndkaunraTa 316
CD-/MP3-/WMA/iPod pa60ra 316
OCHOBHa INΦopMaζη. 316
Cmha B CD-/MP3-/WMA-/iPod pa6oTa..... 317
BkapBaHe/N3BaXkaDaHe Ha CD. 318
CbP3BaHe/OTcpaHbAHe Ha USB HocnteHa HOpMaun. 318
BkapBaHe/ɪzKapBaHe Ha SD-/MMC KapTa (He e 3a Madrid 210) 318
U36op Ha 3aIabne. 319
I36op Ha dnpektopn (camo npn MP3-/WMA-/iPod pa60ta) 319
Bbp30 TbpceHe 319
PpeKbCbAHe Na Bb3npOn3BexKaHeto... 319
Bbpo npocnyuBaHa He BaCnuKn 3aRnaBn...319
Bb3npo13BvEckdaHeHa3aIabnB
B npo13BOJHa nocneIOBaTeJIHOCT 319
IOBTOHO B3PON3BExKaHe Ha OTJeHn 3aIaBna Hnn paKn. 320
HacrpoBaHe Ha HndkaZnraTa 320
Pexim Ha 136op 320
BbHnHaayno n3ToouHnU 322
PpEHaAUX-IN-6yKca 322
Hac trokna ha 3byka 322
I3BnKBaHe nHaNyckaHe Ha MeHIO "AUDIO" 322
HacTpoiKa Ha 3-ceKTopeH ekBaIaI3ep..... 323
HacrpoKn ha notpe6ntela 324
I3BnKBaHe Ha MeHTo Ha IOTpe6nteI
I 36Op Ha MeHIO. 324
N3BbPwBaHe Ha HAcTpoKn B MeHIO TUNER" 324
I3BbPbBaHe Ha HacTpOaKN B MeHIO "DISPLAY" 326
N3BbPbBaHe Ha NaHcTpoKn B MeHIO "VOLUME" (Cnila Ha 3Byka) 326
N3BbPbBaHe Ha NaHcTpoiKn B MeHIO "CLOCK" (ToHNo BpeMe) 326
N3BbPbBaHe Ha NaCTpoiKn B MeHIO "VARIOUS" (pa3Hn) 327
3aBODcN HacTpoKu 328
Pone3Ha HOpMaun 328
TapaHua 328
CepBn3 329
Texnueckn daHHN 329
PbKOBOCTBO 3a MOHTax 330
BkIIOUyBaH/ɪzKJIIOUyBaH
BkIIOUbaHe/U3KJIIOUbaHe c 6yToHa BKn./M3Kn.
3a BKNIOUBAHe HATINCHETe 6yTOHa BKn./N3KKn. ③
ABTOMO6HnHOTo paIIO CE BKJIouBa.
3a n3kIIOUbaHe 3aIpBxTe HaTnCHaT 6yToHa BKn./Mkn. ③ no-dbIroOT2ceK
ABTOMO6NJHOTOPaJIOceI3KJIIOUBa.
Yka3aHHe:
Ako BKJIOUHTe ABTOMO6NJHOTaJaNO npn 1N3KJIIOUHO 3aIaNbAHe Ha aBTOMo6Nu,TO Ce N3KJIIOUBA aBTOMaTIuHO CneI 1 cac,3a Da CE npEJaNA3Ba AkyMylaTopa Ha aBTOMo6Nu.
BkIIOUBaHe/u3KIOUbaHe 4pe3 3aIaIbHaTeTo Ha aBTOMO6nla
Korato aBTOMo6HnHOTo paNIO, KaKOe oONcaHO B pKOBoDCTBOTo 3a MOHTaX, e CbPb3aHO CbC 3anaBaHeTo Ha aTOMo6HnA n He e N3KnIOueHo C 6yToHa BkN./3Kn. ③ , To ce N3KnIOuYBa, peCn. BKNoCb 3aNanBAHeTO.
CnlaHa3Byka
HactpoBaHe Ha cnilata Ha 3Byka
Cinata Ha 3Byka ce hactpoBa Ha CTeneHn O T0 (n3Kn.) do 50 (MAKcImaHNO).
3aBbptete perynatopa Ha cunata Ha 3ByKa ④ ,3a da npomeHte cunata Ha 3ByKa.
Yka3aHne:
Ako c ABtOMoBnHOTOp paIIO e Cbbp3aH Te- nefoh IIN HABrAuaHOHa CnCTema, KaKTo e OIcHao B pBkOBoDCTBO 3a MOHTax, PnI Tenefohen pa3ROpO, pcN. HABrAuaHOHcBo6UeHe 3BykbT ce N3KnIOuBa, 3a Da MoKTe HeoBe3nOKoRaBOHa Da yUbATE B3POn1BExKaHETo Ha Telefoha, pcN. HABrAuaHOHa CnCTema. JOkato 3BykbT e M3KnIOuHe NaDCnJIe Ce noRBA,"TELEPHONE" (tenefoh).
BkIIOUbaHe Ha aBTOMo6nHTo paAno Ha Tnx pexmM (Mute)
HaTnCHETe KpaTko 6yToHa BkJ./M3Kn. ③ ,3a Da npeBknIOuHTe ABTOMObINHOto padno Ha Tnx peXIM,peCn.3a da aKTNbIpaTe OTHOBO npedunHata cnla Ha 3Byka.
Дokato 3BykTe ha Tnx pexnHa dncnpe ce noRBA, MUTE".
JpkocT ha ducnneer
Moxete da npeBknIOuBaTe pbuHO npKoCTTa Ha DCnIeM MeJy DHeBeH N HoSeH peXm NnABTOMaTuH O da npeBknIOuBaTe c apobete Ha ABTO6nla.
Yka3aHne:
PbHOTO, pecn. abTomauHOTOp npeBknOuBaHa na JRPoCTTa ha dncnne er ce 36nba MHeHOTo Ha Notpe6nte (BnxTe rI..HAcTpoKnHa Notpe6nte"pa3den ,N3BbPbBaHe Ha HAcTPOKn B MeHIO,"DISPLAY",ToKa OT MeHTo,"DIMMER").
HaTnCHTe 6yToH DISP (15)3a npn6J.2 cekyn- Dn, 3a da npeBknIOuHTe pbHNO npKoCTTa Ha DnCnJIe.
BkIIOUbaHe/U3KIIIOUbaHe Ha demo-pexnM
DEmo-peKIMbT Bn NOKa3Ba Ha DnCJIeF OyHKUInTe Ha ABTOMO6BnHOTo paNIO KATO 6raa Hau DNNC. Upez 3aJeCTBaHe Ha npOn3BOJen H ByToH DeMOpexIMbT ce PpeKbCBA n Bne MoKete da o6cnykBaTe ypea.
Mokete da BkIIOUbATEи n3KIOUbATE demo peXIMB MeHOTa HnOTpe6nteRA (BIXTe rN,HaCTpoKnHa nOTpe6nte"p3dien "N3BbPbWbAne Ha nactpoKn B MeHNO,VARIOUS"(paZIuHn),TOKaOtaMeHOTo,"DEMO MODE").
Bluetooth® φύнкυμη (camo Toronto 410 BT)
ModenbT Toronto 410 BT Moke da Ce Cbpb3Baype3 Bluetooth° c nOxodn MOBUNH TepeOHn IN MP3 nIebpn. Taka cTaba Bb3MOKHO CBO6OHTO TepeOHnpaHe cbc Cbpb3AH TepeOH (npe3 BNcOKOROpENT INTErPpAn MHkoPOOH Ha ABTOMOBnHO paoNo) nAydno npedabaneHo na 3a-nicahnte Bbpxy Bluetooth" ypea MP3-phiJnoble.
Yka3aHne:
Bne MoKTe Da CbPKeTe N BbHSeH MmKpO-foh 3a Cb6oDnHO TepeOHnpaHe (BnKTe rI. PbKOBoCTBO 3a MOtAe").
3aФункцинTe Ha Bluetooth® Ha Toronto 410 BT MOnla npOyTeTe npIIOxKeHTo pBkoBOdCTBO „Bluetooth® Toronto 410 BT".
HaTnCHETe6yToHV/An⑦.
IbpeMa HtbpceHTo Ha DcPiJe Ce noKa3Ba aKtuaHIO n36paHnBn IpOrpama.
Korato ce otkpie ctaHcNc TbpcHnBnI npOrpama,TaOCTaba HacTpoEHa.
Yka3aHaHa:
Ako He ce OTKpne cTaNzna C n36paHnBn Bn nporpama,3aKpTaKOce nOKa3BaPTYNONE" nIpo38yUaBt 56nKKaHn.OTHOBO ce Ha-CTPOIBa NocNeHNO n3JIbYBaHaTc TAnzna.
Ako hactpoehata mI npyra cTahnna OT Bepnrata cTahnIN B NO-KbceH MOMENT nIbIbVa keJaanBn BVn Iporpama, ATOMO6NlHOTo paNDIO CMeHRA ABTOMATUHO OT aKtayanHATA cTahnua, pecn. akTyanHnA ayDIO N3TOuHnK (HaNP. CD) Na cTahneta TcKeJaanBVD nporpama. ImaIte npedBnD, He taan FyuknHe ce noDlbPka OT BCNUKN CTAHNI.
HactpoBaHe Ha Hndkaaeta
HaTnCHTe 6yToHa DISP 15,3a Da CmehrTe Mekdy Te3n DBe INDnKaun:
Bb3npoU3BexJaHe Ha 3aIaNBA B npOu3BOJHa nocJeDoBaTeJIHOCT
HaTnCKaIte 6yToHa 5MIX(13),3aJa CMeHAre MekDy peXIMnTe Ha Bb3Pon3BexKaDaHe:
HaTnCHete 6byToHa 4 RPT 13,3a Da CMeHAre MExNy peXIMnTe Ha Bb3Pon3BexKaHe:
HactpoBaHe Ha HnDkaCyaTa
HaTnCHETe 6yToH DISP 15 eDIN NII HAKOJIKOp bTn,3a Da CMeHrTe MeJdy TeN INHnKaUcIM:
SENSITIVITY (yBCTBNTeJIHOCT)
HactpoiKa Ha YyBCTBNTeJIHOCT Ha TbPceHe I NaHactpoBaHe Ha CTAHcIIN.
Hactpoikn:LO(-;Hncka),HI(+;BvcoKa).
3aBpTepepyNatopaHaCnataHa3ByKa 4,3aDa CmHeTMeMxNy HAcTPOINKe.
RDS
BkIIOUBaHe IIN N3KIIIOUBaHe HA RDS-ФyHKnIa. HAcTpoIKn: ON (BKn.), OFF (u3Kn.).
3abptete perynatopa Ha cnilaHa 3Byka ④ ,3a da Cmeha MeJy HacTPOHKeTe.
PTY
BkIIOUBaHe nII IN3KIIIOUBaHe Ha PTY-ΦyHKUIA. HAcTpoIKn: ON (BKn.), OFF (n3Kn.).
3abptete perynatopa Ha cnnaTa Ha 3ByKa ④ ,3a da CmehTe MeJy HAcTPOINKe.
PTY TYPES (BnIOBE nporpaMn)
Bb3MOxHcMo npn BkIIOueHa PTY-kyHKuIa: n3-60p Ha BVn nporpaMa.
3abptete perynatopa Ha cnnaTa Ha 3Byka ④ ,3a da n36epete BnD nporpama.
PTY LANGUAGE (PTY e3nk)
I36op Ha e3nK 3a HnDnkaunra Ha BnOBeTe nporpama. HacptpoKn: ENGLISH (aHrnnckn), FRANCAIS (Φpehckn), DEUTSCH (Hemckn).
HaTnCHete 6yToHa >7,3a Da oTBOPnTe MEHOTO.
3abptete perynatopa Ha cnlaTa Ha 3Byka 4,3a da n36pepe e3nK.
TUNER AREA (pernoh 3a npneMahe)
Избор на Perион за піремане на радио. Habсторк:EUROPE (Еврona), USA, SOUTH AMERICA (Южна Amерika), THAILAND.
HaTnCHete 6yToHa >7,3a da OTBOpNTe MEHOTO.
HaTnCHeTe 6yToHa Y/ A ⑦,3a da n36epete perIOH 3a npneMaHe.
HaTnCHTe 6yToHa > ⑦,3a Da HactponTe perNoHa 3a npneMaHe.
HaTnCHete 6yToHa 7,3a da nOeBbPdnte H36paHnI perNoH 3a npHeMaHe.
ON VOLUME (npn BkIIOUbaHe)
HactpoBbAe Ha cunata Ha 3Byka npn BkIIOUbaHe. HActpoIKn: ON VOL (cuna Ha 3Byka npn BkIOUbaHe; 1-50) nIaL LAST VOL (nocpeHa cuna Ha 3Byka; nocJeHOn HActpoEHa cuna Ha 3Byka npdIn n3KIOUbaHTo HA abTOMO6INHO paoIO).

Onachoct!
Bucoka cuna ha 3Byka.
CnIata Ha 3Byka npn BkIOUbaHe MoKeJa e HeoayKaBaHO BVcOKA, B cNyau Ye e M3bpaHa HAcTpoiKaTa LAST VOL (nocneHa Cnla Ha 3Byka)u nPn nOcNeHDoHO nKIOUBAHe Ra paNToe e 6bnla HAcTPOeHa BVcOKA cnla Ha 3Byka.
BunHn hacptpoBaTe ymepeHa cnil Ha 3Byka.
HATINCHETe 6yToHa > ⑦,3a Da OTBOPHTe MEHIOTO.
HaTnCHeTe 6byToHa V/ A ⑦,3aJa CMeHJe T MeJxNy HAcTPOkNte LAST VOL (nocJeHa cnla Ha 3Byka) n ON VOL (CnuHa 3Byka npn BKJIouBaHe).
3abptete npn hyka perya topa ha cnilata Ha 3Byka 4, 3a da hargacnte npn hactpoiKaTa ON VOL (cnila Ha 3Byka npn BKIOUbahe) XeJahata cnila Ha 3Byka.
AM (MW): 531 - 1602 kHz
LW (camo Ebpona): 153 - 279 kHz
Диапаэон на радиовьлнite CAU:
FM (UKW): 87,7 - 107,9 MHz
AM (MW): 530 - 1710 kHz
Диаразон Ha paanOBbHnTe IoxHa Amepnka:
FM (UKW): 87,5 - 107,9 MHz
AM (MW): 530 - 1710 kHz
FM- YecToTHa IeHTa: 30-15000 Hz
CD
UyBCTBtENHOCT Ha BXOda
Ipehen-AUX-IN: 300mV / 10k
Pa3mepn terno
× × 178×50×160mm
Tero: npu6n.1,70 kg
DE Einbauanleitung

Sicherheitshinweise
EN Installation instructions

Safety instructions
When carrying out installation work and making connections please observe the following safety instructions:
- Do not connect the vehicle's plug connectors to the radio!
- Disconnect the negative terminal of the battery! When doing so, please observe the vehicle manufacturer's safety instructions.
Make sure you do not damage vehicle components when drilling any holes. - The cross sections of the positive and negative cables must not be less than 1.5mm^2
You can obtain the adapter cable required for your vehicle type from any BLAUPUNKT dealer.
Depending on the model, your vehicle may differ from the description provided here. We accept no responsibility for any damages due to incorrect installation or connection or for any consequential damages.
If the information provided here is not suitable for your specific installation requirements, please contact your Blaupunkt dealer, your vehicle manufacturer or our telephone hotline.
When installing an amplifier, you must first connect the device earth connections before connecting the plugs for the line-out jacks.
Earth connection of external devices may not be connected to earth of car sound system (housing).
Please keep the filled-in radio pass in a safe place!
Moi,dpjxtneonblnene naocnpHa paanoto Ha 6e3oanaCHO mCTO!
© 2010 All rights reserved by Blaupunkt. This material may be reproduced, copied or distributed for personal use only.
This product is protected by certain intellectual property rights of Microsoft. Use or distribution of such technology outside of this product is prohibited without a license from Microsoft.
iPod is a trademark of Apple Inc., registered in the U.S. and other countries.
Passport
Name:
764 510 Type:
Serial no: BP

BLAUPUNKT
Bluetooth® Instructions
Notice Bluetooth
(13) Tastenblock 1-5
14 SRC-Taste
1 button Unlock the detachable control panel
② MENU button
Short press: Call up/close menu
Long press: Start scan function
③ On/Off button
Short press: Switch on car sound system
In operation: Mute car sound system (Mute)
Long press: Switch off car sound system
Volume control In the menu: Change settings
⑤ CD tray
⑥ Display
7 A/√ button In the menu: Select menu item Radio mode: Start seek tuning MP3/WMA/iPod mode: Change to next/pre- vious folder </> button In the menu: Change menu level Radio mode: Adjust the stations Other operating modes: Track selection
8 button (Eject) Eject a CD
⑨ USB socket
10 Front AUX-IN socket
11 button Ending/rejecting a phone call
12 button Short press: Answering a call, speed dial Long press: Open the phone book of the cell phone or activate voice dialing
13 Keys 1-5
14 SRC button Select memory bank or audio source
DISP button Short press: Switch display Long press: Switch display brightness
16 SD card slot Access only with detached control panel

Safety notes 15
Symbols used. 15
About Bluetooth 15
The Bluetooth® menu 16
Calling the Bluetooth® menu. 16
Pairing and connecting a device 16
Pairing and connecting a cell phone. 16
Pairing and connecting a Bluetooth® streaming device. 17
Telephone functions. 17
Answering/rejecting an incoming phone call. 17
Making a call 18
Calling an entry in the phone book. 18
Making a call with voice dial. 18
Storing a phone number in the car sound system. 19
Speed dial. 19
Bluetooth® streaming mode 20
Starting the Bluetooth® streaming mode.....20
Selecting tracks. 20
Interrupting playback. 20
Additional functions in the Bluetooth® menu 20
Changing the Bluetooth® PIN 20
Managing paired devices. 21
Phone book functions 21
Setting the button function for speed dial...22
Safety notes
The car sound system was manufactured according to the state of the art and established safety guidelines. Even so, dangers may occur if you do not observe the safety notes in these instructions.
These instructions contain important information to easily and safely install and operate the car sound system.
- Read these instructions carefully and completely before using the car sound system.
- Keep the instructions at a location so that they are always accessible to all users.
- Always pass on the car sound system to third parties together with these instructions.

IMPORTANT!
Observe the safety notes for this device in the operating and installation instructions.
In addition, observe the instructions of the devices used in conjunction with this car sound system.
Symbols used
These instructions employ the following symbols:

DANGER!
Warns about injuries
CE The CE mark confirms the compliance with EU directives.
Identifies a sequencing step
- Identifies a listing
About Bluetooth®
You can connect the car sound system via Bluetooth® with other Bluetooth®-ready devices, such as cell phones or MP3 players. This allows you to use the car sound system with its integrated microphone as hands-free system for connected cell phones and control the audio output of other Bluetooth® devices and play them back via the loudspeakers of the car sound system (Bluetooth® streaming).
Note:
You can also connect an external microphone for hands-free calling (see operating and installation instructions, ch. "Installation instructions").
Bluetooth® technology is a wireless connection of short range. For this reason, Bluetooth® devices must be located near the car sound system (in the vehicle) to establish and maintain a connection.
To establish a Bluetooth connection, you must first pair the car sound system and the Bluetooth device. When you pair the devices, a Bluetooth connection is subsequently established automatically. This connection remains in effect as long as the Bluetooth device is within range. If the connection is interrupted, e.g. because you moved the cell phone outside the range, the connection is automatically re-established as soon as you are back within range.
You can connect only one cell phone and streaming device with the car sound system at a time. If you connect a new device with the car sound system, the connection to a currently connected device may automatically be interrupted. However, the car sound system leaves up to 5 different Bluetooth devices paired, and you can quickly and easily connect any of these devices with the car sound system again.
The Bluetooth® menu
In the Bluetooth® menu, you find all the functions for pairing, connecting and managing Bluetooth® devices.
Calling the Bluetooth® menu
Briefly press the MENU ② button to open the user menu.
Press the / A button ⑦ repeatedly until the "BLUETOOTH" menu item is selected.
Press the button 7 to open the Bluetooth® menu.
Press the / button repeatedly until the desired menu item is selected.
Perform the setting (see the following sections).
Briefly press the MENU button ② to exit the menu.
Notes:
- The Bluetooth® menu is automatically exited approx. 30 seconds after the last button activation and you are returned to the display of the current audio source.
- In the menu, you can press the button < ⑦ in each case to return to the higher menu level.
- If a Bluetooth® process is running (e.g. re-establishing the connection to the last connected device), the functions of the Bluetooth® menu are blocked. If you attempt to open the Bluetooth® menu during this time, "LINK BUSY" briefly appears on the display. If you want to cancel the Bluetooth® process and open the Bluetooth® menu, press the button 11.
Pairing and connecting a device
Note:
You can pair up to 5 Bluetooth® devices with this car sound system. Before you can pair a sixth device, you must first unpair one of the 5 already paired devices (see ch. "Additional functions in the Bluetooth® menu," section "Managing paired devices").
If you should attempt to pair a sixth Bluetooth® device, "PHONE LIST FULL - PLEASE DELETE ENTRIES FROM LIST" is displayed.
Pairing and connecting a cell phone
Note:
If a connection with a cell phone currently exists, this connection is automatically disconnected if you pair and connect another cell phone.
In the Bluetooth® menu, select the "PAIRING" menu item.
Press the button ⑦ to open the menu.
The "MOBILE PHONE" menu item is selected.
Press the button > ⑦ to pair a cell phone.
The display shows "PAIRING" and the Bluetooth® symbol is flashing. The car sound system can now be recognised by a Bluetooth® cell phone for approx. 2 minutes and connected.
Search the car sound system from your cell phone (Bluetooth® name: "TORONTO 410 BT").
As soon as the car sound system is located by the cell phone and is to be connected, the display briefly shows "ENTER PIN" and the currently stored PIN (by default "1234").
Establish the connection from your cell phone. Enter the PIN displayed by the car sound system.
The display may show "PAIRED", followed by "CONNECTED", as soon as the car sound system and the cell phone are paired and connected.
Notes:
- If no connection can be established, the display briefly shows "CONNECT FAILD".
- If the telephone connected last cannot be located after switching on the car sound system, the car sound system attempts to connect one of the other paired telephones. If none of the telephones can be located, the display briefly shows "NO DEVICE".
Pairing and connecting a Bluetooth® streaming device
Note:
If a connection with a streaming device currently exists, this connection is automatically disconnected if you pair and connect another streaming device.
In the Bluetooth® menu, select the "PAIRING" menu item.
Press the button ⑦ to open the menu.
The "MOBILE PHONE" menu item is selected.
Press the v button ⑦ to select the "STREAMING" menu item.
Press the > button ⑦ to pair a streaming device.
The display shows the currently stored PIN (default "1234"). If required, enter the PIN of the streaming device:
Turn the volume control 4 to select a digit for the respective position.
Press the or < < button ⑦ to reach the next or previous position.
Press the button ⑦ repeatedly until you reach past the last position to confirm the PIN entered.
Note:
Not all streaming devices require the entry of a PIN on the car sound system. For some streaming devices, you have to enter the PIN of the car sound system instead. For these devices, press only the button ⑦ repeatedly until you reach beyond the last position,
thereby confirming the current PIN, and then enter this PIN on the streaming device.
The display shows "PAIRING" and the Bluetooth® symbol is flashing. The car sound system can now be recognised by the streaming device for approx. 2 minutes and connected.
Search the car sound system from your streaming device (Bluetooth® name: "TORONTO 410 BT") and establish the connection. Enter the PIN of the car sound system, if necessary.
The display may show "PAIRED", followed by "CONNECTED", as soon as the car sound system and the streaming device are paired and connected.
Notes:
- If no connection can be established, the display briefly shows "CONNECT FAILD".
- After switch-on, the car sound system automatically attempts to reconnect the device connected last. If the connection attempt fails, the display briefly shows "CONNECTION LOST". If necessary, attempt to re-establish the connection from the streaming device.
- If the device connected last cannot be located after switching on the car sound system, the car sound system attempts to connect one of the other paired devices. If none of the devices is located, the display briefly shows "NO DEVICE".
Telephone functions
Answering/rejecting an incoming phone call
With an incoming call, the display alternately shows "INCOMING CALL" and the number of the caller. The current audio source is muted and a ring tone is played via the loudspeakers of the car sound system.
Note:
If the number of the caller is not being transmitted, the display shows "PRIVATE NUMBER" instead of the number. If the number of the
caller is stored together with a name, the name of the entry and the number are displayed (see the section "Storing a phone number in the car sound system" in this chapter).
Press the 12 button to answer the call.
"CALL" and the duration of the ongoing call are displayed.
Press the ① button to reject the call or to end the current call.
The display shows "CALL END".
Note:
During the call, you can adjust the volume with the volume control 4 or mute the device with a short press of the On/Off button ③.
Making a call
In the Bluetooth® menu, select the "DIAL NEW NUMBER" menu item.
Press the >button ⑦ to open the entry menu.
You can now enter a phone number with up to 20 digits:
Turn the volume control 4 to select a digit for the respective position.
Press the or < button to reach the next or previous position.
Notes:
- You can also reach the next position by pressing the ON/Off button ③.
- While entering the phone number, you cannot change the volume or mute the car sound system.
Press the ⑫ button to call the number entered.
"CALLING" and the dialed number are alternately shown on the display.
As soon as your calling party answers the call, the display alternately shows "CALL" and the time of the current phone call.
Upon ending the call, the display briefly shows "CALL END".
Calling an entry in the phone book
Note:
This function is only available if the phone book of the connected cell phone was transferred to the car sound system (see the chapter "Additional functions in the Bluetooth menu", section "Phone book functions").
In the Bluetooth® menu, select the "PHONEBOOK" menu item.
Press the > button ⑦ to open the phone book.
The display shows the first phone book entry.
Note:
If the phone book has not yet been transferred, the display briefly shows "PHONEBOOK NOT AVAILABLE".
Press the /A button ⑦ once or several times to select a different entry.
Notes:
- Press and hold down the / button ⑦ to quickly scroll through the entries.
- With activated fast browsing, you can select an entry in the phone book by turning the volume control (4). During this process, the volume cannot be changed. To switch fast browsing on/off, please read the chapter "User settings", section "Making settings in the "VARIOUS" menu", "FAST BROWSE" menu item in the operating and installation instructions.
Press the 12 button to call the number.
"CALLING" and the dialed number are alternately shown on the display.
Note:
You can also call an entry in the phone book via speed dial (see the section "Speed dial" in this chapter).
Making a call with voice dial
Note:
This function is only available if the connected cell phone supports voice dial.
In the Bluetooth® menu, select the "VOICE DIAL" menu item.
Press the >7 or 12 button to activate voice recognition.
The car sound system is muted and the display shows "SPEAK NOW".
Say the name of the desired calling partner.
Notes:
- If no Bluetooth® connection is established when voice recognition is activated, the display briefly shows "VOICE DIAL FAILD - NO BT CONNECTION".
- If the spoken name is not being recognised or the time for the voice recognition has already expired, theDISPLAYbrieflyshows"DIAL Failed".
- You can cancel the voice recognition by pressing the button.
- Please note that the duration of the voice recognition is limited and depending on the respective cell phone.
- You can also activate the voice recognition via speed dial (see the section "Speed dial" in this chapter).
Storing a phone number in the car sound system
You can store phone numbers in the car sound system and place calls with the speed dial (see the section "Speed dial" in this chapter).
A phone number is stored for the currently connected telephone and is available only for this telephone. The car sound system can store up to five numbers for up to five paired devices.
Enter the phone number as described in the section "Making a call".
Press the desired memory button 1-5 13 for approx. 2 seconds to store only the number.
-or-
Press the >7 button to enter a name for the entry.
You can now enter a name with up to 15 characters:
Turn the volume control 4 to select a character for the respective position.
Press the or < < button ⑦ to reach the next or previous position.
Note:
You can also reach the next position by pressing the ON/Off button ③.
Press the desired memory button 1-5 for approx. 2 seconds to store the number and name.
The display briefly shows "NUMBER SAVED". Afterwards, you are returned to the Bluetooth® menu and the "DIAL NEW NUMBER" menu item.
Notes:
- A number previously stored on the memory button is replaced.
- If a telephone is unpaired, the numbers stored for this telephone are automatically deleted.
Speed dial
Speed dial for any phone number or for the number dialed last or a stored number
With speed dial, you can make a call without first having to select the corresponding function in the Bluetooth® menu.
To call the number dialed last, a stored number or any number,
press the button 12.
The display shows the number dialed last.
Note:
If no cell phone is currently connected, the Bluetooth® menu is opened. The "PAIRING" menu item is selected.
If necessary, press a memory button 1-5 to call the stored number.
Note:
If no number is stored under the selected memory button, the display briefly shows "NO NUMBER".
If necessary, press the On/Off button 3 to open the entry menu and enter a number (enter the phone number as described in the section "Making a call").
Press the 12 button to call the number.
"CALLING" and the dialed number are alternately shown on the display.
Speed dial for phone book entries
Note:
This function is only available
- if the phone book of the connected cell phone was transferred to the car sound system (see the chapter "Additional functions in the Bluetooth® menu", section "Phone book functions")
- if the speed dial is set for phone book entries (see the chapter "Additional functions in the Bluetooth® menu", section "Setting the button function for speed dial").
To select an entry of the phone book with the speed dial and call it,
press the 12 button for approx. 2 seconds.
The display shows the first phone book entry.
If necessary, select another entry as described in the section "Calling an entry in the phone book".
Press the 12 button to call the number.
"CALLING" and the dialed number are alternately shown on the display.
Speed dial for voice dial
Note:
This function is only available
- if the connected cell phone supports voice dial
- if the speed dial is set for voice dial (see the chapter "Additional functions in the Bluetooth® menu", section "Setting the button function for speed dial").
Tom activate the voice recognition with the speed dial,
press the 12 button for approx. 2 seconds.
The car sound system is muted and the display shows "SPEAK NOW".
Say the name of the desired calling partner.
Bluetooth® streaming mode
Starting the Bluetooth® streaming mode
Press the SRC (14) button repeatedly until "BT STREAM" appears on the display.
The playback starts.
Notes:
- The Bluetooth® streaming mode can be selected only if a suitable streaming device is connected.
- If the connection to the streaming device is lost during playback, the display briefly shows "CONNECTION LOST" and the car sound system changes to the previous audio source.
Selecting tracks
Press the < / > button ⑦ briefly to change to the previous/next track.
Interrupting playback
Press the 3 13 button to interrupt the playback ("PAUSE") or to continue it.
Additional functions in the Bluetooth® menu
Changing the Bluetooth® PIN
The factory-set Bluetooth® PIN of the car sound system is "1234"; e.g. it must be entered on the cell phone when pairing a cell phone. This PIN can be changed.
In the Bluetooth® menu, select the "PIN EDIT" menu item.
Press the >button ⑦ to open the entry menu.
You can now enter the PIN:
Turn the volume control 4 to select a digit for the respective position.
Press the or < < button ⑦ to reach the next or previous position.
Notes:
- You can also reach the next position by pressing the ON/Off button ③.
- While entering the phone number, you cannot change the volume or mute the car sound system.
Press the button ⑦ repeatedly until you reach past the last position to confirm the PIN entered and return to the Bluetooth® menu.
Managing paired devices
In the Bluetooth® menu, you can manage the paired Bluetooth® devices (cell phones and streaming devices such as MP3 player).
In the device lists for cell phones and streaming devices, the Bluetooth® names or addresses of the paired devices are displayed. You can do the following:
- Connecting the connection to the currently connected Bluetooth® device
- Establishing a connection to one of the paired Bluetooth® devices
- Unpairing Bluetooth® devices
In the Bluetooth® menu, select the menu item "PHONE LIST" or "STREAMING LIST".
Press the button ⑦ to open the menu.
The first device on the list is displayed.
Note:
If no device is paired, "EMPTY LIST" is briefly displayed.
Press the / button ⑦ once or several times to select another device or the "DELETE ALL" option.
You have the following options:
To connect the displayed device,
press the 一 button 12
As soon as the device is connected, "CONNECTED" is briefly displayed and you are returned to the Bluetooth® menu.
Note:
If no connection can be established, the display briefly shows "CONNECT Failed". If the device is already connected, the display briefly shows "CONNECT EXIST".
To disconnect the connection to the displayed device,
press the button 11.
The display briefly shows "DISCONNECTED" and you are returned to the Bluetooth® menu.
Note:
If the device was not connected, the display briefly shows "NO CONNECTION".
To unpair the displayed device,
press the button 11 for approx. 2 seconds.
The display briefly shows "DELETED" and you are returned to the Bluetooth® menu.
Note:
If a telephone is unpaired, the numbers stored for this telephone and a phone book transferred from this cell phone are automatically deleted.
To unpair all the cell phones or streaming devices,
select the "DELETE ALL" menu item.
Press the button ⑦.
The display shows "CONFIRM".
Press the button 7 again or the button 12.
The display briefly shows "DELETED".
Note:
If no devices are connected, the display briefly shows "EMPTY LIST".
Phone book functions
Transferring the phone book of the cell phone to the car sound system
You can transfer the phone book of the connected cell phone to the car sound system to call entries of the phone book using the car sound system.
Notes:
- The car sound system accepts only entries from the memory of the telephone and not from the SIM card inserted in the telephone.
- The transfer does not delete the phone book from the cell phone.
The car sound system can store the phone books of the paired telephones with a total of up to 1000 entries. If several numbers are stored on the telephone for one contact (e.g. landline, cell phone number, office number and similar), each number is stored as a separate entry by the car sound system.
Each entry consists of a name and a number, each up to 20 characters on digits.
Note:
Do not switch off the car sound system while transferring the phone book. If you do or if the power supply of the car sound system should be interrupted for any reason, you have to restart the transfer.
In the Bluetooth® menu, select the "DOWNLOAD P-BOOK" menu item.
Press the button ⑦.
The display shows "CONFIRM".
Press the button ⑦ again.
The displays show "PHONEBOOK DOWNLOADING - PLEASE WAIT".
After the download is complete, the display briefly shows "DOWNLD COMPLETE".
Notes:
To cancel the transfer, press the button 11.
- If the transfer of the phone book fails, the display briefly shows "DOWNLOAD FAILD".
- If the transfer of the phone book exceeds the storage capacity of the car sound system, the display briefly shows "PHONEBOOK FULL". The phone book entries transferred so far remain stored.
- If you supplemented or changed entries on your cell phone since the last transfer, you can update the phone book on the car sound system by transferring it again. If the storage capacity of the car sound system is exceeded in the process, first delete the already transferred phone book (see the next section) or unpair another cell phone, if necessary, so that its phone book is also deleted from the car sound system (see the section "Managing paired devices" in this chapter).
- If you insert a CD during an ongoing transfer, the playback does not start until the transfer is completed.
Deleting the phone book of the cell phone from the car sound system
You can delete the phone book of the connected cell phone.
Note:
The telephone remains connected.
In the Bluetooth® menu, select the "DELETE P-BOOK" menu item.
Press the button ⑦.
The display shows "CONFIRM".
Press the button ⑦ again or the button ⑫.
Setting the button function for speed dial
You can select whether the long press of the button 12 opens the phone book or activates voice dial.
In the Bluetooth® menu, select the "SOFTKEY" menu item.
Next to "SOFTKEY", the current "P-BOOK" setting for phone book or "VOICE" for voice dial is displayed.
Turn the volume control 4 to perform the setting.
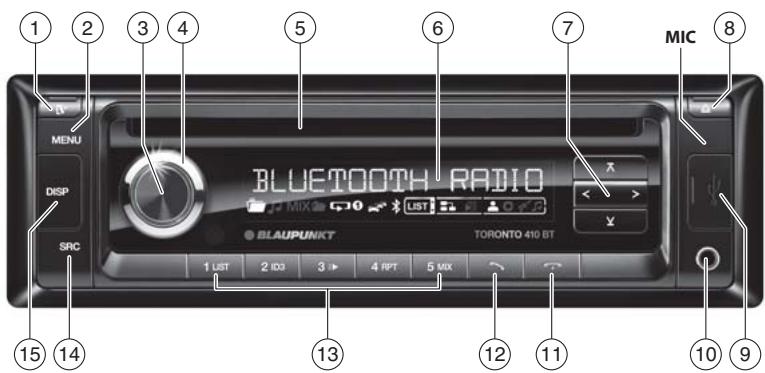
La lecture commence.
Remarques :
Radiolage: stalla in station
Andra driftlagen:valja spar
⑧ -knapp (Eject)
Mata ut CD-skiva
⑨ USB-uttag
AUX-IN-uttag på fronten
11 -knapp
Avvsluta/avvisainkommandesamtal
12 knapp
Bluetooth®-streaming-tilstand. 98
Start af Bluetooth®-streaming-tilstand.98
Valg af titel 99
Afbrydelse afspilningen 99
Flere functiorer i Bluetooth®-menuen 99
Shift Bluetooth®-PIN-kode. 99
Administer tilslutte de apparater 99
Bluetooth®-valikko 105
Bluetooth ^® -valikon avalanchein 105
10 MnpoovntuOnooxH AUX-IN
87 PAnktpo
U3BnKBaHe Ha Bluetooth® MeHOTO
HaTnCHeTe KpaTko 6yToHa MEnu ② 3a da OTBOpHTe MeHIOTo HA NOTpe6nte.
HaTnCKaIte 6yToHa Y/ A⑦,doKaTO n36epeTe TOUka OT MeHHTo,BLUETOOTH.
HaTnCHete 6yToHa >7,3a Da oTBOpHTe BluetoothMeHIO.To.
HaTnCKaIte 6yToHa Y/ A⑦,doKaTo n36epeTe XeJenaHaTa TOUka OT MeHOTO.
N3BbPwTe HAcTpoiKaTa (BnXte CneHnTe pa3dJI).
HaTnCHeTe KpaTko 6yToHa MEnu ② ,3a da HanyChete MeHOTO.
Yka3aHaHa:
- Bluetooth® MeHOTO ce Hanycka aBATOMaTNUHO npn6n. 30 cek. cneI nocneHOTO 3aedCTBaHe Ha 6bTOHa N BVE CE BpBsqate 6bpaTHO KbM DnCnIeN Ha kAkyANHnA ydmo N3TOuHnik.
B MeHIOIe Ce BbPHeTe Upe3 HATnCKaHe Ha 6yToHa < 7 06paTHo B NO-TopHO HnBO HA MEHIO.
B cnuyai, ye e b xoD Bluetooth® npoedypa (Hnnp. Bb3ctahOBBAhe Ha cBp3-BAHETO KbM nocleHNO cbbp3aHHypei), fynkuiHTe Hb Bluetooth® meHIO ta 6noKHPaHI. B cnuyai, ye toraba oniTate da oTbOPHTe Bluetooth® meHIO, ha DCnIeN 3a KpaTKO ce noka3Ba „LINK BUSY" (cBbp3-BAHeto e 3aETo). B cnuyai, ye nckate da npeKbChete Bluetooth® npoepdpyata n da OTbOPHTe Bluetooth® meHIO, hATncHete 6yToH
CzB0BaHe n Cbbp3BaHe Haypeda
Yka3aHne:
Moxete da cboaBate do 5 Bluetooth® ypea c abTOMo6nHTo pao. Ppeu da moxete da cboNTe wectn ype, Tp6Ba da otlenite eEHNOT 5-Te Buec cboEHn ypea (BnKte rnaBa, Dpyr nnbl Bluetooth® MeHTo", pa3den, Ynpablenhe ha cboEHn ypeu"). B cnuyai, ye ce onitate da cboNTe wectn Bluetooth® ype, ue ce nokae ,PHONE LIST FULL - PLEASE DELETE ENTRIES FROM LIST" (CnncbkbT C Homepa t e nIbEN - MOnJ, n3-tpniTE BnncBaHInO TcNcBka).
CdBoBaHe n CbBp3BaHe Ha Mo6nJIeH TepeOH
Yka3aHne:
Ako mHa hAnuHO Cbbp3BaHe KbM MOBnIeH Telefoh, TOBa Cbbp3BaH aBTOMaTuHc Ce npKeKcbA, KOraTO cDBOITe N CbbpXeTe Dpyr MOBnIeH TetefoH.
M36peTe B Bluetooth® MeHTo TO tOka OTo MeHTo,PAIRING" (perntpapahe).
HaTINCHETe 6yToHa > 7,3a Da OTBOPnTe MEHIOTO.
ToKaTa OTe MeHIOTo,“MOBILE PHONE"(Mo6n-HeN TelefoH)e 36paHa.
HaTINCHETe 6yToHa > 7,3a da cDBOITe MOBUNHeN TeneoH.
Ha nncnne Ce npok3aBa, PAIRING" (pernctpu- panhe) n CUMBOBt Bluetooth" mna. ABOmO6nHOTo paNIO cero Moze 3a np6I. 2 MNHyTn da pa3n03aHe OT MobJeH Tepeohc Bluetooth" n da ce CBpke c Hero.
IotbpcTe OT Baunr Mo6nien Tepeoh ABTOMO6nHTo pao (Bluetooth" mme: "TORONTO 410 BT").
Korato ABTOMO6BnHOTo paHIO sbIe HamepeHO OT MO6BnHNa TepoH n Tra6Ba 7a Ce CbPke c Horo, Ha DCnEJIe 3a KpATKO ce NoBBA,ENTER PIN" (BbEckJaHe n PAH) n AKTyAnHO zanametenei PIN (CTaHApTHO,1234).
Hapabete Cbpb3baHeTo OT Baunu MO6nEn TepeOH. Pn TOBa BbBeTe NocOeHn O T ABtOMo6nHTo pao PIN.
Ha dinpIe c nok3Ba cbOtBeTHo "PAIRED" (pernctpnap) n ,CONNECTED" (cBbP3aH), Cne KaTO ABtOMO6nHTo pAdNo m Mo6nHnT TepeOH Ce cDBoT n CbPjxAt.
Yka3aHaHa:
B cnuyai, ye He moke da ce ocbuiecbn CBbp3bahe, 3a kpaTko ce noka3Ba CONNECT FAILED" (CBbp3baHTo npobaleho).
B cnyuayue ne cie BkIIOUbaHTo Ha ABTOMObUNHO To padNO pOcneIDHO CBbp3AHmT TepeOH He 6bJe HamepeH, ABTOMObUNHO To padIO ue Ce OpiNTa da Ce CBpbXe C eHNOT dpyrnte cDboEHn TeneoHn. AKO He ce OKPrrAT TEeOHHa NcPiJIe 3a kpaTKCe noBa"NO DEVICE"(hma ype).
CdBoBaHe n CBbp3BaHe Ha Bluetooth® cTpiMmHr ype
Yka3aHne:
Ako Ima HauHNO CBbp3BaHe KbM CTpnIMnHr ypeD, TOBA CbBp3BaHe aBTOMaTHNo CE npKeKbCBA, KORATO CDBOHTe N CbBpXkTe Dpyr CTpnIMnHr ypeD.
N36epete B Bluetooth® MeHIO TOUka OT MeHIOTO „PAIRING" (pernctpupahe).
HaTINCHETe 6yToHa >7,3a Da OTBOPNTe MEHOTO.
ToKaTa O T MeHIOTo,“MOBILE PHONE"(Mo6n-lenTepeOH)e n36paHa.
HaTnCHete 6yToHa V⑦,3a da n36epete TOUka OT MeHIOTo "STREAMING".
HaTnCHete 6yToHa >7,3a da cDBOHTe CTpIMMnHr ypeI.
Ha dinpner c pe nok3Ba aKtyaHIO 3aIamTeHnI PIN (ctanapTHo,1234"). B cnyaui, ue e Heo6xOdmo, BbVeTeP PIN KOA Ha CTprIMMHrypea:
3abptete perynatopa Ha cnilata Ha 3Byka 4, 3a da n36epete uΦpa 3a cbOTBeTHata no3nui.
HaTnchete 6yToHa> pecn. < 7 3a da otN-DeTe Ha cIeBbAsTa,pecn.Ha npEiHHaTa nO3uJia.
HaTnCKaIte 6yToHa>⑦,doKaTO He NOctIrHHeTe Do NocLeIHaTa No3uNIA,3a Da NOTBbPdITe BbBeDeHNA PIN.
Yka3aHHe:
He BCNUKn CTPNIMMHr Ypei n3NCKBAT Bb-BeKdAHTO Ha CBOB PIN B aBTOMO6NIHOTo PAIO. Pn HKAON CTPNIMMHr Ypei nBVE BMeCTO TOBA TpRA6Ba DA BBBeDEte PIN KODa HA aBTOMO6NIHTO PAIO. 3a TAKINBA Ypei HATNCKaIe CAMO 6yToHa ⑦,doKaTHe ODOCTNHETe NOcNEHATA PO3Ntua N He noTbBpDHTe Taka AKTuANHnPIN He BBBeDeTe To3N PIN B cPTNIIMHr Ypeia.
Ha nncnpe ce noka3Ba PAIRING" (pernctpu- panhe) n CmboBnT Ble tooth Mira. ABTOmo6nHToPO paoNo cera Moke 3a npN6I.2 MNHyTu da pa3no3hae O CTpniMnHr yepa n da CEcbpke c Hero.
Iotbpcete BaWnna CtpnMmHrypeo ATBOMO6uHOTOPaNIO (Bluetooth IMe:"TORONTO 410 BT")NCb3aJte Cbbp3BaHeto. BBeJeTe cBoTBeTHO PIN hABtOMo6uHHTOp aNIO.
HaДисплеспokаЗвсьтБТон"PAIRED"(perntpupaH)n cneTToBA „CONNEcTED"(CBbp3aHo),doKaTo ABtOMoBunHOTo paDINO nCTPnIMMHypeDa caCBOeHNu CBp3aHn.
Yka3aHnA:
B cnuya, ye He moKe da ce ocbIeCTBn Cbbp3BaHe, 3a KpaTko Ce noka3Ba"CONNECT Failed" (Cbbp3BaHTo npOba- neHo).
CneB KBNIOUBAHETO ABTOMO6NIHOTo pa- DnO ce ONITBa ABTOMATNUHO da CbPpKe OTHOBO NOcNEHNO CbP3AHnY upeD, B CNYa, ye ONITb3a CbP3BAHe He ycnee, 3a KpaTko ce noka3Ba „CONNECTION LOST" (He e CBp3aHa) Na HcnpJe. OOniTae CbOTBEHO Da INBbPunTe CbP3BAHToOT CTPNIMHr ypeDa.
B cnyuay, ye cne BkIIOUBaHTo ha ABOtOMoBnHOTO paIIO NocIeIHO CBbp3aHnTAYpeH JeCe HamePi, ABOtOMoBnHOTO paIyIO cbOTBeTHO ONITBA CBpRze EJIN OTdpyrnte CdBOnEH ypei. AKO He Ce OTKpnrYT ypei, Ha IcnPmE 3a KpATKc Ce NOBBA,"NO DEVICE" (Hma ypeI).
TeJeOHHn yHKcHn
Приеман/OTka3BaHe Ha BXOДяso NOBNUKbaHe
PnBxOJaIO NOBnKBaHe Na DnCnIe CbC CmHa Ce nokA3BaT,INCOMING CALL" (BxOJaIO NOBnKBaHe) N HOMepa Na NobKBAuIN. AKTyaNHrT aydno n3TOUHnK ce 3aRnyuBaN c YeyBa 3BbHeNe Ipe3 BNCOKOROBOpTeJInTe Ha ABtOMoBnHOTopAno.
Yka3aHne:
B cnya, ye HOMepbT ha NOBnKbaunna He ce nok3aBa, BMeTo HOMepa ce nok3aBa, PRIVATE NUMBER" (HEn3BeTeH). B cnya, ye HOMepbT ha NOBnKbaunraT e 3anamTeH 3aeDnO C nme, To ce NOKa3BaT nMeTo Ha BnICBaHeTo n Homepa (BnKte pa3dEn, 3anamTeBAhe Ha TeIefoHen Homep B aBTOMo6nHOTo paIno" B Ta3n rnaBa).
HaTnCHete 6yToH 12,3a da npneMeTe NOBnKBaHeTO.
HaДисплеспказват „CALL" (nobikbahe) n TekytoBpeMe Ha pa3robopa.
HaTnCHTe 6yToH 11,3a Da OTxBbPnITe NOBnKbaHeto,peCn. da npeKpaTne TeKyuIpa3roBop.
Ha dincpner ce nokazba „CALL END" (nobuk-BAHETO pnekpateno).
Yka3aHne:
Ib BpeMe Ha pa3roBopa MoKeTe C peryNa-topa Ha cInata Ha 3Byka 4 da npOMeHrte cInata Ha 3Byka, pecn.ype3 KpaTko HATNcKa-he Ha 6byToHa BKn./M3Kn. ③ daarnywaBaTe ypeDa.
Cstaptnpahe Ha o6aKdahe
V36epete B Bluetooth® MeHIO TOKa OT MeHIOTo "DIAL NEW NUMBER" (Ha6npaHe Ha HOB Homep).
HaTnCHTe 6yToHa >7,3a da OTbOpnte MeHIOTo 3a BbBExKaHe.
Mozete cera da BbBeTe TeIefoHem HOpem cdo 20 no3u:
3abptete perynatopa Ha cnilata Ha 3Byka ④ ,3a da n36epete uΦpa 3a cbOTBeTHata IO3nui.
HaTnchete 6yToHa>pecn. < 7 3a da OTn-DeTe Ha cneBbauata, pecn. Ha npednHata n03uia.
Yka3aHa:
- Mochete ue3 haTnckaHTo Ha 6yToHa Bk./I3Kn. ③ da npemHHe Ha cneBa-uaTa no3uia.
- Поваме на вьвекданeto на телфонняnomepн можeteда поменятсилata на зуka плдзаглшавate abTOMO6nilhoTo padno (Mute).
HaTnCHeTe 6yToHa 12,3aJa n3BnKaTe BBBeDeHnHOmeP.
Ha nucnpe en cnoka3Ba cbc cmha "CALLING" (NoBnKbaHe) n 36paHn Homep.
Bedhara cnei kaTo OTcpeuHaTa CTpaHa npHe me pa3roBopa, Ha dinCnIe Ce noka3BaT peDyBaHn ce,"CALL" (o6aXdaHene) n TekyIoTo BpeMe Ha pa3roBopa.
PnnppekpatBaHetoHa pa3roBopa ce noKa3Ba camo KpaTko „CALL END" (npekpateno 6oaxdahe).
06aXdaHe Ha BnncBaHe ot cnncbKa c HomepaTa
Yka3aHne:
TaNn yHKnna e Ha pa3noJKeHne, KORAto CnncbKbT C Homepata e npBXbPbnEOT CBp3aHn MOBnH TeIeOHN KbM ABTOMObHn HOTO pAnIO (BnXte rnaBa ,Dpyr n FyHKnHa B Bluetooth MeHToT , pa3dien ,FyHKnHa h CnncbKa C HomepaT").
M36epete B Bluetooth® MeHOTO TOka OT MeHOTOPHONEBOOK" (cnccbk c Homepa).
HaTnCHeTe 6yToHa>7,3a Da OTBOpnte cnncBka C HOMepata.
Ha nncnpee ce npka3Ba nbpBTO BnncBaHe OT CnncbKa C HOMepaTa.
Yka3aHne:
Ako cnncbkbT c Homepata Oue He e npexBbpneH,Ha nucnpe 3a KpaTKe c noka3Ba"PHONEBOOK NOT AVAILABLE" (cnncbkbT cHomepata He e Ha pa3noJoxHe).
HaTnCHeBeDnBxNIIHЯKoIbTn6yToHa 7,3aJa n36peTe npyro BnncBahe.
yKa3aHnHa:
3aDpBxTe 6yToHa /A ⑦ HATINCHAT,3a DaI ppeINCTBaTe 6bP3O BnICBAHnIa.
- PnB BKJIOUHcO 6bp30 npEnICtBaHe MoXeTe Da MapKnpate BnncBaHe B CnncbKa C HOMepa 4pe3 BbIptHe Ha peryNaToP aHa cnIATA Ha 3Byka ④ .Pnp ToBa He MOpTeA Da IpomEnIte CnIATA Ha 3Byka.3a BkIoUBAHe/N3KlIOuBaHe Ha 6bp3Ot ToPceHe NpoJeTe BpbKOBOCTBOTo 3a EcknIOnaTuaNIMoHTax IraBa "HAcTpoIKa Ha NotpeBvTeN"paDien "M3BbpWbaHe Ha HAcTpoIKB MeHIO "VARIOUS"(pa3HN)TOKA OT MeHIO TO"FAST BROWSE" (6bp30 TbpCSeHe).
HaTnCHete 6yToHa 12,3a da n3BnKaTe HOMepa.
Ha nncnpe Ce noka3Ba cbc smha,CALLING" (NoBnKbaHe) niz6paHn Homep.
Yka3aHne:
Mozete da ce o6auiTe ha BnncBaHe OT cInCbKa C Homepata N npes3 6bp30TO n3bnpahe (BnKte pa3dJe "5bp30 n3bnpaHe" B Ta3n rnaBa).
Ha nncnner ce noka3Ba cbc smra "CALLING" (noBnKbaHe) n36paHn Homep.
Bb30 n36bpane 3a BnncBaHna O T CnncbKa c Homepa
Yka3aHne:
TazhiyHKZnE hapa3nOLOXKeHne cAmO
KOrato CnncbKbT C Hoomepa Ta CbBp3aHmoumbneH TenefoH e npexxBpneH KbM ABTOMObHnHO pao (BnKTe rnaBa Apyrny fynkUu B LbeToothMeHIOtoP,pa3dJe,dyHKUu Ha cncbKa c HoomepaTa"
Korato e hactpoeHO 6b3o n3bnpaHe 3a BnncBaHnraT B CnCbKa C HomepaT (BnXte rnaBa ,Dpyr fynkun B Bluetooth MeHIO", pa3dJeN, HAcToPka Ha fynkUnHa 6byToHa 3a 6b3o n3bnpaHe").
3a da n36epeTe nHa6epeTe C 6bp3o n36bnpaHe BnncBaHe OT CnncbKa C HOMepa,
HaTusche6bToHa 123a npn6n.2ceKynHn.
Ha nncnne Ce noka3Ba NbpBTO BnncBaHe OT CnncbKa C HOMepa.
I36epete cboTBeTHO dpyro BnncBaHe, KaKTo e oncaHO bpa3dien,06aXdaH He BnncBaHe OT CnncbKa C HOMepaTa.
HaTnCHete 6yToHa 12,3a da n3BnuKate HOMepa.
Ha nncnpe Ce noKa3Ba cbc cmHa, CALLING" (NoBnKBaHe) n36paHn Homep.
Бьрзои36иразеЗагласовии36иразе (Voice Dial)
Yka3aHne:
Ta3nФyHKUЯ eHa pa3IPOJXeHne caMo
KOraTo CBbp3aHnMo6bIeN TepeOH POnDbPka rnaCObO n3bupaHe.
KoratoeHaCTpoEHO6bP3oN36puAne 3a rnaCBO N36puAne (BnXTe rnaBa ,Dpyr nnHkyKnunn BluTeeth MeHIO"pa3den "HaCTpoiKa Ha FyHKpIa Ha 6yToHa 3a 6bp3oN36puAne").
3a da aktubnPate c 6bP3o n36PpHe rIacOBOTO pa3no3HaBaHe,
HaTusche6bToHa ⑫3a npu6n.2 ceKyuHm.
AByTOMO6mHHTo paHNo ce 3aRJyUba nДиСПЛЯТ nOKa3Ba „SPEAK NOW" (robopete cera).
Ha3OBeTe mMeTo Ha XeJaanHyaCTHnK.