
Cape Town 948 DAB - Car radio BLAUPUNKT - Free user manual and instructions
Find the device manual for free Cape Town 948 DAB BLAUPUNKT in PDF.
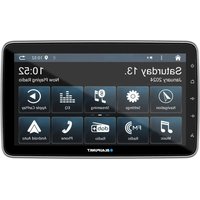


| Product Type | DAB+ Car Radio with FM/RDS Receiver |
| Brand | Blaupunkt |
| Model | Cape Town 948 DAB |
| Dimensions (front panel) | 1 DIN (178 x 50 mm) |
| Weight | Approximately 1 kg |
| Power supply | 12 V DC (vehicle) |
| Output power | 4 x 50 W max |
| Display | Color touchscreen |
| Radio reception | FM/RDS, DAB+ (band III) |
| Connectivity | Bluetooth 5.0, USB (front/rear), AUX input, rear camera input |
| Apple CarPlay compatible | Yes (via Bluetooth) |
| Android Auto compatible | Yes (via Bluetooth) |
| Supported audio formats | MP3, WMA, AAC, FLAC (via USB) |
| Supported video formats | MP4, AVI, MKV (via USB, when stationary) |
| Supported image formats | JPEG, BMP, PNG |
| Audio functions | 7-band equalizer, Loudness, Balance/Fader, Time Alignment |
| Steering wheel control input | Yes (programmable SWC) |
| Rear view camera input | Yes (AHD/CVBS) |
| Search sensitivity setting | LOC/DX (local/distance) |
| RDS function | AF, TA, PTY |
| Maintenance | Clean with a soft, dry cloth |
| Power consumption | Approximately 10 A max (with amplifier) |
| Operating temperature | -20 °C to +60 °C |
Frequently Asked Questions - Cape Town 948 DAB BLAUPUNKT
User questions about Cape Town 948 DAB BLAUPUNKT
0 question about this device. Answer the ones you know or ask your own.
Ask a new question about this device
Download the instructions for your Car radio in PDF format for free! Find your manual Cape Town 948 DAB - BLAUPUNKT and take your electronic device back in hand. On this page are published all the documents necessary for the use of your device. Cape Town 948 DAB by BLAUPUNKT.
USER MANUAL Cape Town 948 DAB BLAUPUNKT
Enjoy it.
Operating instructions
Operating instructions
Upgrade & Reset......15
System information....15

Note:

Current list:
Settings
System information
Short press: Turn ON device;
In operation: Mute audio source;
Long press: Turn OFF device.
3 HOME button
Go to source menu (short press)
Show background apps (long press)
4 Volume+ button
Press this button to increase the volume level.
5 Volume- button
Press this button to decrease the volume level.
6 Voice control button
Press this button to activate voice control.
Safety notes 26
Symbols used 26
Road safety....26
General safety notes 26
Declaration of conformity....26
Scope of delivery 27
Placing the device in operation....27
Switching on/off with the POWER button 27
Volume....27
Main menu (Home) 27
Split Screen.... 27
Radio mode....28
Start radio mode 28
Select memory bank....28
Tuning into a station....28
Storing stations manually....28
Storing stations automatically 28
Adjusting the seek tuning sensitivity 28
Switching RDS on/off 28
DAB mode 29
Sound Settings 30
Equalizer....30
Volume distribution (fader/balance) 30
Time Alignment....30
USB media playback....31
USB data carrier 31
Audio playback from USB 31
Video playback from USB....31
Image playback from USB....32
Bluetooth mode....32
Starting Bluetooth mode 32
Registering Bluetooth devices 32
Telephone mode....33
Dialing....33
Answer a call....33
Audio playback via Bluetooth streaming....33
Apple CarPlay....34
How to enter CarPlay mode 34
How to use CarPlay....34
Touch 34
Siri 34
Android Auto 34
How to enter Android Auto mode....34
Play with Android Auto....35
Map 35
Call Out / Receive Call....35
Play Music 35
Talk with Google....35
AUX IN 35
Camera Input 35
Steering wheel control (SWC)....35
Settings 36
Video....36
General 36
Language 36
SourceVolumeLevel 36
Navigation 37
Key Light 37
SWC 37
Upgrade & Reset......37
System Info....37
Useful information 37
Connection diagram....38
Installation 40
Installing the unit....40
Inserting microSD card 41
Removing the unit....42
Troubleshooting 43
Safety notes
The car sound system was manufactured according to the state of the art and established safety guidelines. Even so, dangers may occur if you do not observe the safety notes in these instructions.
These instructions are intended to familiarise you with the most important functions. Detailed information can be found on the Internet under www.blaupunkt.com.
- Read these instructions carefully and completely before using the car sound system.
- Keep the instructions at a location so that they are always accessible to all users. • Always pass on the car sound system to third parties together with these instructions.
In addition, observe the instructions of the devices used in conjunction with this car sound system.
Symbols used
These instructions employ the following symbols:

DANGER!
Warns about injuries

DANGER!
Warns about high volume

The CE mark confirms the compliance with EU directives.
Identifies a sequencing step
- Identifies a listing
Road safety
Observe the following notes about road safety:
- Use your device in such a way that you can always safely control your vehicle. In case of doubt, stop at a suitable location and operate your device while the vehicle is standing. As the driver, you may not use the applications that will distract you from traffic (depending on the scope of functions of the device, e.g. viewing videos, entering a destination).
- Follow the driving recommendations during the route guidance only if you are not violating any traffic regulations! Traffic signs and traffic regulations have always priority over driving recommendations.
- Always listen at a moderate volume to protect your hearing and to be able to hear acoustic warning signals (e.g. police sirens). During mute phases (e.g. when changing the audio source), changing the volume is not audible. Do not increase the volume during this mute phase.
General safety notes
Observe the following note to protect yourself against injuries:
Use as directed
This car sound system is intended for installation and operation in a vehicle with 12 V vehicle system voltage and must be installed in a DIN slot. Observe the output limits of the device. Repairs and installation, if necessary, should be performed by a specialist.
Installation instructions
You may only install the car sound system yourself if you are experienced in installing car sound systems and are very familiar with the electrical system of the vehicle. For this purpose, observe the connection diagram at the end of these instructions.
Declaration of conformity
The Blaupunkt Competence Center Car Multimedia - Evo Sales GmbH declares that the device complies with the basic requirements and the other relevant regulations of the directive 2014/53/EU.
The declaration of conformity can be found on the Internet under www.blaupunkt.com.
Cleaning notes
Solvents, cleaning and scouring agents as well as dashboard spray and plastics care product may contain ingredients that will damage the surface of the car sound system.
Use only a dry or slightly moistened cloth for cleaning the car sound system.
Disposal notes

Do not dispose of your old unit in the household trash!
Use the return and collection systems available to dispose of the old device, the remote control and exhausted batteries.
Warning
Do not ingest the battery, Chemical Hazard (The remote control supplied with) This product contains a coin/button cell battery. If the coin/button cell battery is swallowed, it can cause severe internal burns in just 2 hours and can lead to death.
Keep new and used batteries away from children.
If the battery compartment does not close securely, stop using the product and keep it away from children.
If you think batteries might have been swallowed or placed inside any part of the body, seek immediate medical attention.
Scope of delivery
The scope of delivery includes:
- Car audio system
- GPS antenna
- Connecting cables
- Screws
Placing the device in operation
Switching on/off with the POWER button
To switch on, press the [button. To switch off, press and hold the [ ] button for more than 2 seconds.
Volume
Adjusting the volume
You can adjust the volume in steps from 0 (off) to 40 (maximum).
- Press the + or - button to change the volume.
Muting the car sound system (Mute)
Briefly press the [ ⏻ ] button to mute the device or to reactivate the previous volume.
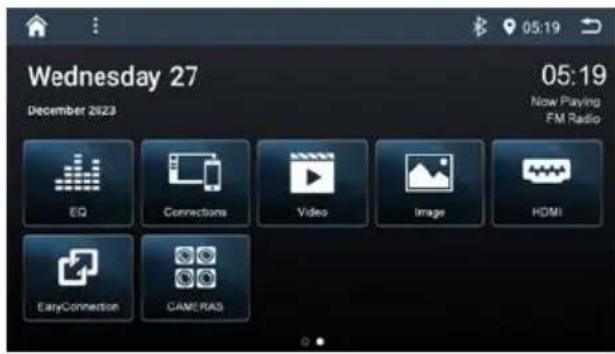
Main menu (Home)
In the main menu, you press the buttons on the touchscreen to call up the different sources and operating modes.
In the current source, press the [ ] button.
The main menu is displayed.
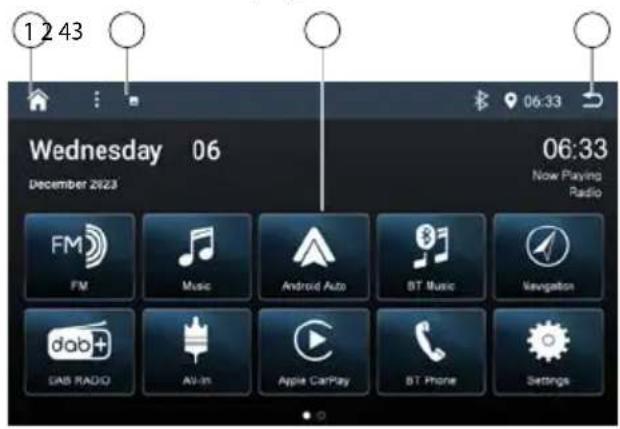
- Enter main menu
- Top bar: Drag down to see more functions
- Source menu
- Back
Touch the center of the screen and drag left to find more source icons.

Note:
The figures used in these instructions are intended to facilitate the explanations and details may deviate from your device.
Split Screen
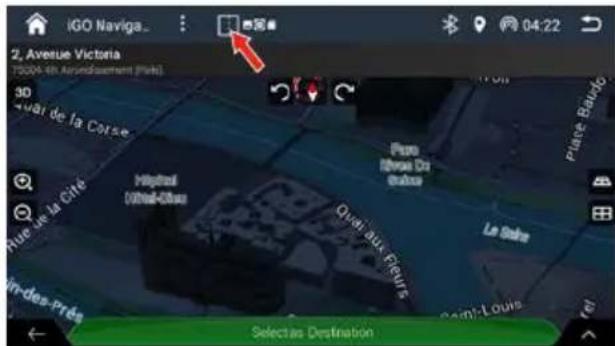
In Navigation mode, you can access the previous mode according to the split screen.
When navigating, touch the icon on the top bar to show the split screen.
Touch to return to full-screen navigation.
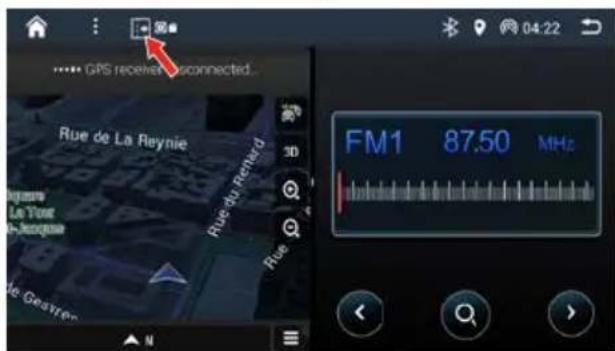
The radio playback menu is displayed.
Select memory bank
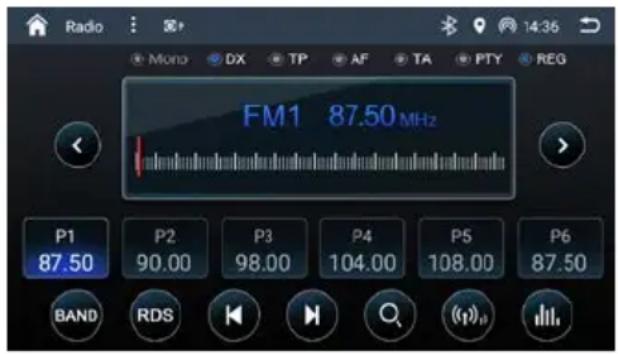
Different memory banks and wavebands are available. Up to 6 stations can be stored in each memory bank.
Press the [BAND] button repeatedly until the desired memory bank is displayed.
Tuning into a station
Tuning into stations manually
Briefly press the [◀] or [▶] button once or several times to change the frequency in increments. You can select a broadcast frequency directly by dragging the red " | " in the frequency.
Starting station seek tuning
Press the [K] or [▶] button to start station seek tuning. The radio tunes into the next receivable station.
Note:
For the reception area Europe: In the FM waveband, only traffic information stations are tuned into if the priority for traffic information is switched on.
Storing stations manually
Set the desired station. Press one of the memory buttons [P1] - [P6] for approx. 2 seconds to store the current station at the button.
Storing stations automatically
You can automatically search for and store the strongest reception in the region in the current memory bank. Any previously stored stations in this memory bank are deleted in the process.
Select a memory band. Press the [ ] button.
The tuner starts the automatic station seek tuning. After the storing is completed, the radio plays the station at memory location 1 of the previously selected memory band.
Note:
For the Europe reception area: If traffic information is switched-on, only traffic informations are stored.
Adjusting the seek tuning sensitivity
The seek tuning sensitivity decides whether the automatic station seek tuning finds only strong stations or also weaker stations that may be noisy.
Press the [ (1) button to adjust the sensitivity of station seek tuning.
If LOC is on, only stations with a strong signal are found during seek tuning.
If DX is on, stations with a strong and weak signal are found during seek tuning.
Switching RDS on/off
Many FM stations broadcast have RDS (Radio Data System) signal in addition to their programme in the reception area Europe that allows additional functions, such as the display of the station name.
Press the [RDS] button to show RDS options.
Switching the AF (alternate frequency) function on/off
If the AF function is activated, the car sound system automatically tunes into the best receivable frequency for the station that is currently set.
Press the button [AF] to switch the AF function on or off.
Switching priority for traffic announcements on/off
In the reception region Europe, a FM station can identify traffic announcements via RDS signal. If priority for traffic reports is switched on, a traffic report is automatically switched through, even if the car audio system is currently not in radio mode.
Press the button [TA] to switch the priority for traffic announcements on or off.
Selecting Program Type and Start Seek Tuning
You can select a programme type with the PTY function to purposefully search for stations, for example, that broadcast rock music or sport events.
Press the button [PTY] to display the programme types.
Scroll up/down a program with the selected program type, it locks on to it and commences playback.
DAB mode
This function allows you to receive DAB. DAB (Digital Audio Broadcasting) is the successor to the analogue FM radio. The transmission takes place digitally, there is no hiss in the reception, however the reception will be very suddenly gone if the signal is too weak. With DAB the radio stations are broadcasted in program packages, so called ENSEMBLES. In the program packages you will find the radio stations, so called SERVICES. If you receive an ENSEMBLE sufficiently well, all the SERVICES in it can be played well.
Starting DAB mode
In the main menu, press on [ DAB RADIO ].
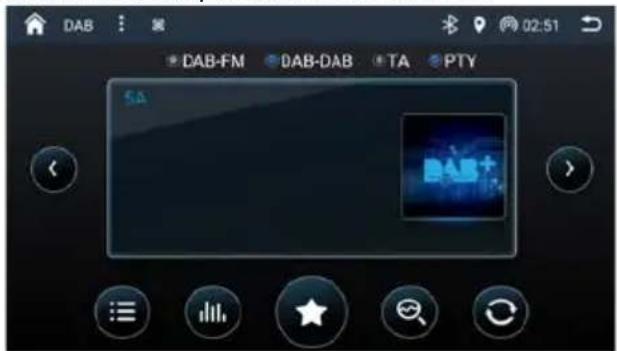
[◀/▶]: This will browse through services of Ensemble, Current or stored Presets (depending on setting of Type button). [ ]: Open three lists: Preset List, Current List, Ensemble List. [ ]: Open the EQ menu. [ ★ / i / 📷 ]: Changes behavior of [ ◀ / > ] keys (browse Preset, Current or Ensemble). [ ]: Update the available ENSEMBLES/ SERVICES you'll find in ENSEMBLE LIST.
[ ]: Scan all of the stations.
LIST SCREENS:
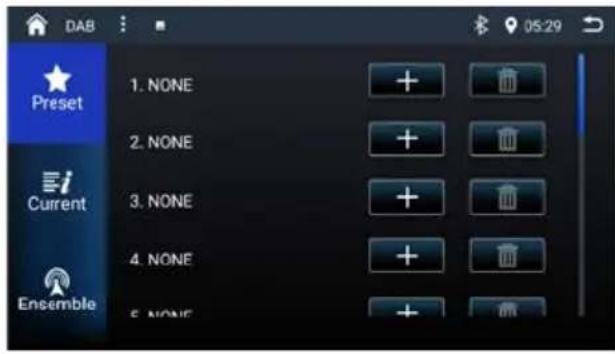
Preset List:
Here you can save and recall your favorite stations. Add a favorite with pressing [+] symbol or delete a favorite with pressing the [] symbol.
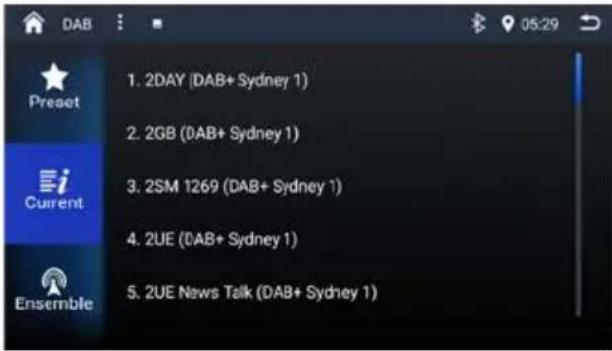
Current List:
Here you can find all SERVICES from the current ENSEMBLE you're listening to, you can select a SERVICE to listen to it.

Ensemble List:
Here you can find all available ENSEMBLES / SERVICES which has been found during last AUTOSCAN. If you open this screen, you'll see the ENSEMBLES first, each ensemble contains several SERVICES (DAB stations) as below picture. You can select a SERVICE to listen to it.

Sound Settings
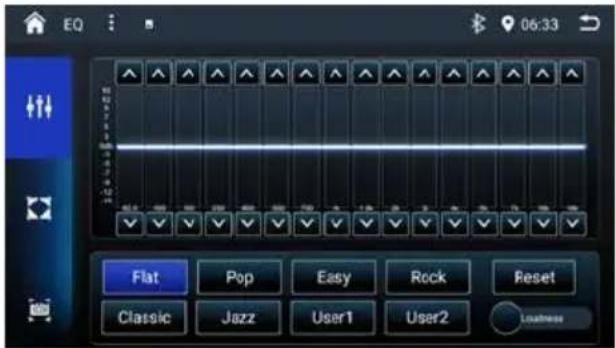
Equalizer
You can adjust the equalizer for all sources.
Press [EQ] on the main menu or [of the current audio source.
The equalizer menu is displayed.
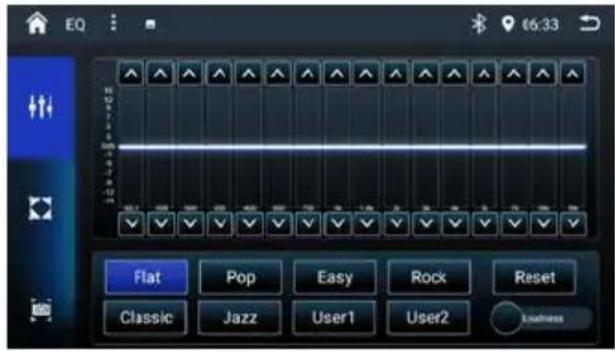
Select a preset equalizer via preset buttons - Flat / POP / Easy / Rock / Classic / Jazz / User1 / User2.
-Or-
Press the [User] button to adjust the level of the available frequency bands according to your preferences.
Note:
With the [Reset] button, you can reset the customised setting again.
-Or-
Press the [ Flat ] button for a linear sound playback.
Turn on the [Loudness] to increase bass and treble at low volume.
Volume distribution (fader/balance)
You can adjust the volume distribution in the vehicle for all sources.
Press the [ ] button in EQ menu.
The menu for fader and balance is displayed.
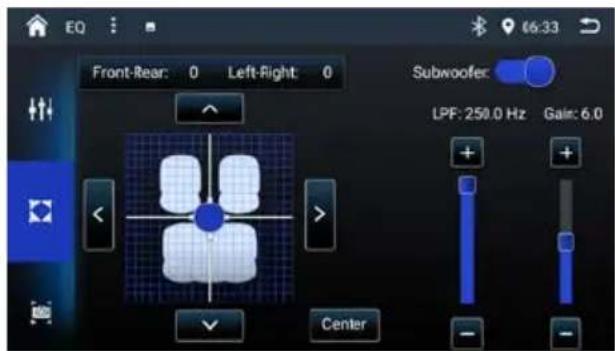
Press the arrow buttons or drag the cursor to adjust fader and balance.
Time Alignment
You can set the runtime delay for each loudspeaker.
Press the [ button in the EQ menu.
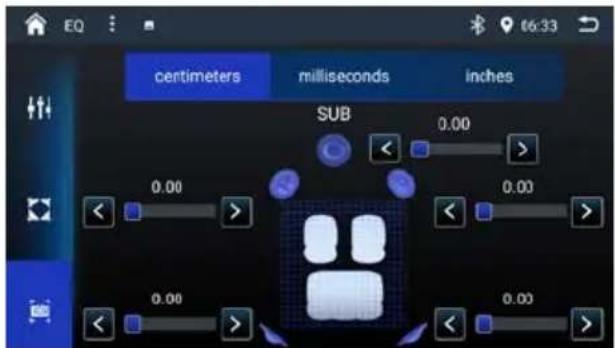
Tap on the slide control or swipe across the slide control of the respective loudspeaker to adjust the runtime delay.
USB media playback
Basic information
The car sound system can be used to play MP3 or WMA files on USB data carriers.
In addition, you can view movies and images from USB data carriers on the display or a connected monitor.
For safety reasons, the playback of movies and images on the integrated monitor is allowed only while the vehicle is in parked mode and the handbrake is applied. The "PARKING" cable must be connected with the hand brake connection of the vehicle (see Connection diagram at the end of these instructions). The movie playback on an external monitor is also possible while driving.
Note:
- Blaupunkt cannot guarantee the flawless function of USB data carriers available on the market.
USB data carrier
This device features 2 USB ports at the rear of the device.
Connecting a USB data carrier
Insert the USB data carrier in the USB socket.
The device automatically switches to USB mode. The data is read and playback.
Removing the USB data carrier
Turn off the car sound system.
- Disconnect the USB data carrier.
Audio playback from USB
The principles of the audio playback (MP3/WMA) from data carriers are identical for all sources.
Select the [Music] source via the main menu.
The device changes to the USB source and the play-back starts.
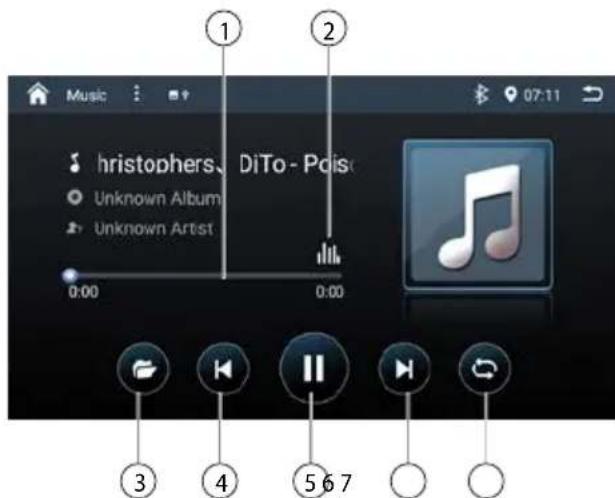
- Progress Bar
- Sound effect
- Display the folder/file list
- Previous track
- Interrupt playback and continue playback
- Next track
- Repeat/Random play
Folder/file list:
Briefly tap on the name of the folder/track. The folder is opened/the track is started.
After starting a title, the playback menu is displayed.
Video playback from USB
Select the [Video] source via the main menu.
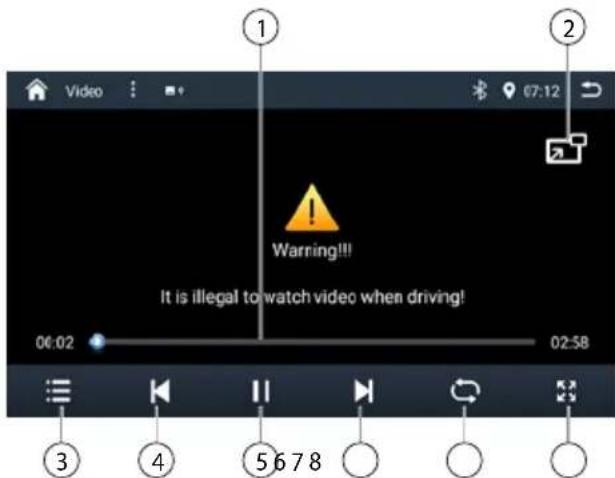
- Progress Bar
- Play in a small window
- Display the folder/file list
- Previous chapter
- Interrupt playback and continue playback
- Next chapter
- Repeat/Random play
- Aspect ratio
Folder/file list:
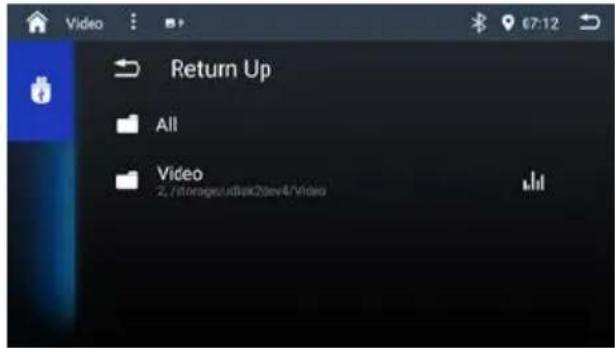
Note:
Folders and videos are selected and started as described under audio playback.
Image playback from USB
Select the [Image] via the main menu.
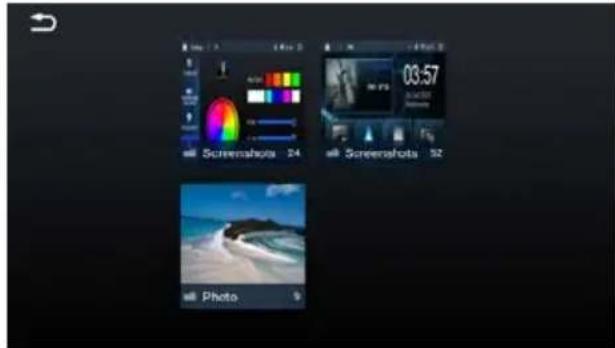
Touch the thumbnail to view the pictures.
Bluetooth mode
The Bluetooth® function allows registering cell phones and media playback devices with the car sound system.
When you register a cell phone with the car sound system, you can make phone calls with the built-in hands-free function. You can access the lists of dialled numbers and the phone book of the registered cell phone.
If the connected Bluetooth® device supports the functions A2DP and AVRCP, you can play the music via the car sound system and control the playback. During a call, the music playback is interrupted and continued again after the call.
If a cell phone is registered via Bluetooth® and a call is received during the playback of another source, the source playback is interrupted and the call menu is displayed.
Starting Bluetooth mode
In the main menu, press on [ BT Phone ].
The Bluetooth® menu is displayed. It contains the list of known Bluetooth® devices. Other audio sources are switched off.
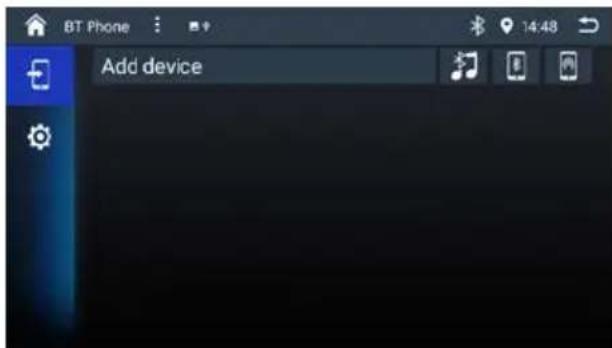
Registering Bluetooth devices
If you want to register a device with the car sound system for the first time, proceed as follows:
Ensure that Bluetooth® is activated at the car sound system and at your Bluetooth® device.
Search for new devices/connections on your Bluetooth® device.
The car sound system appears as "Series 948 DAB" in the list of Bluetooth® devices.
Establish the connection; you may have to enter the pairing code that was previously entered on the car sound system.
The connection is being established and the menu for the registered device is displayed.
Note:
If a telephone is connected with the car sound system, the Bluetooth® icon is lighted at the top of the display in all audio/video sources.
Telephone mode
If you connected a phone with the car sound system via Bluetooth ® , the following menu appears.
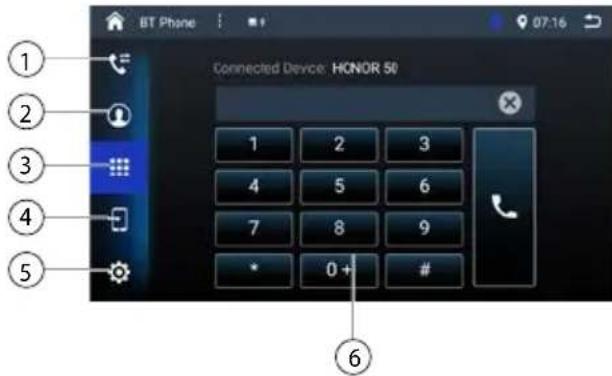
- Call up records lists.
- Call up phone book.
- Call up dial keypad menu
- Call up device menu
- Call up BT setting menu
- The dial keypad
Dialing
Enter a phone number with the keypad and press the [ ] button.
-Or-
Select a contact/number via the caller lists or phone book.
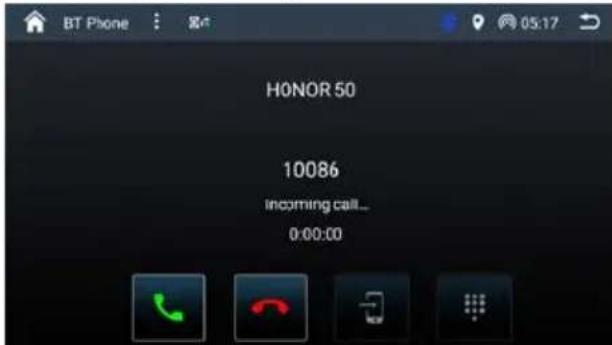
Answer a call
If a call is coming in, the "Call in" number is displayed.
Press the [ ] button to answer a call.
Press the [ ] button to reject a call.
Audio playback via Bluetooth streaming
If an audio streaming device is connected with the car sound system via Bluetooth®, you can play back the music via the car sound system and control the playback.
Press the [BT Music] button to change to the audio playback.
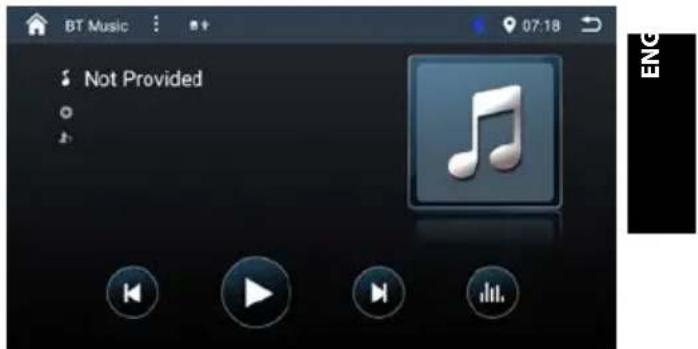
[ ] Short press: Title selection. [Ⅱ/▶] Interrupt playback and continue playback. [▶] Short press: Title selection.
Apple CarPlay
Available on select cars, CarPlay is a smarter, safer way to use your iPhone in the car. CarPlay takes the things you want to do with your iPhone while driving and puts them right on your car's built-in display. You can get directions, make calls, send and receive messages, and listen to audiobooks and music, all in a way that allows you to stay focused on the road.
How to enter CarPlay mode
1. Connect via Bluetooth
Establish a Bluetooth connection between the car unit and your iPhone (refer to the previous chapter "Bluetooth mode").
Agree to use CarPlay with the car device. Please turn off the Wi-Fi function in the settings menu of the car unit before connecting your phone via Bluetooth.
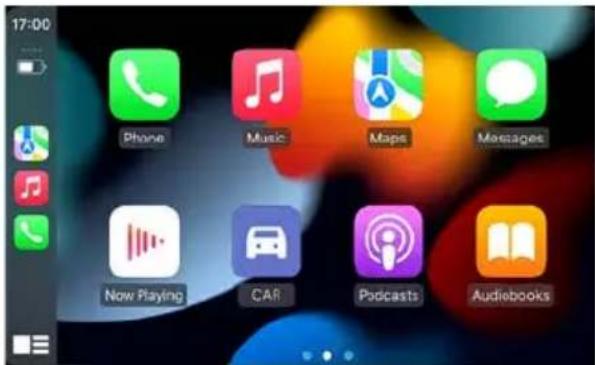
2. To exit CarPlay mode, touch the button on the front panel or touch the [CAR] icon on the screen.
To disconnect CarPlay, select [Connections] on the main menu, and deselect the options to the right of the iPhone.
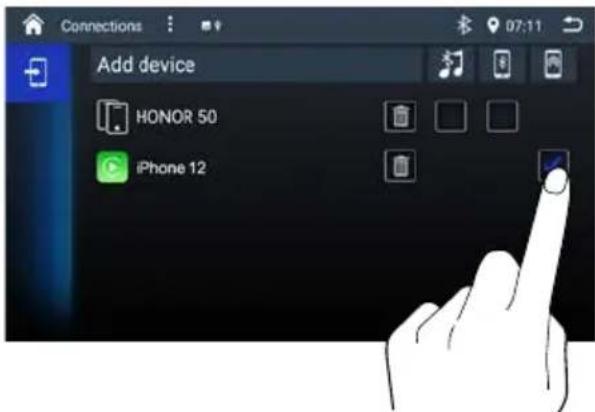
3. If you want to return to CarPlay mode, touch [CarPlay] on the main menu.
How to use CarPlay
CarPlay features and Siri voice control are specially designed for driving scenarios. They also work with your car's controls. And the apps you want to use in the car have been reimagined, so you can use them while your eyes and hands stay where they belong.
Touch
You can use the touch screen of the unit to control CarPlay.
Siri
- Press and hold the Apple Home key on the car product screen or the Side Button on the iPhone to use the Siri voice assistant, such as making a call, playing music, opening the map, and other voice commands.
- When the iPhone is connected, enable Siri by steering wheel control.
This function is only available on cars equipped with the equivalent key.
- Control with "Hey, Siri".
Android Auto
Connect an Android phone to the car device, and drivers can enjoy music from their phone, get directions with Google Maps or other map apps, and make or receive calls.
Required Android OS: 5.0. (The Android Auto app must be installed on the phone before connecting.)
How to enter Android Auto mode
1. Connect via Bluetooth
Establish a Bluetooth connection between the car unit and your Google phone (refer to the previous chapter "Bluetooth mode").
Agree with the terms provided by Google. Please turn off the Wi-Fi function in the settings menu of the car unit before connecting your phone via Bluetooth.
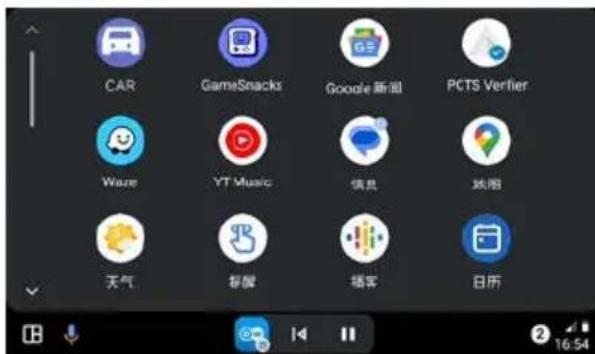
2. To exit Android Auto mode, touch the [L] button on the front panel or touch the [CAR] icon on the screen.
To disconnect Android Auto, select [Connections] on the main menu, and deselect the options to the right of the Google Phone.
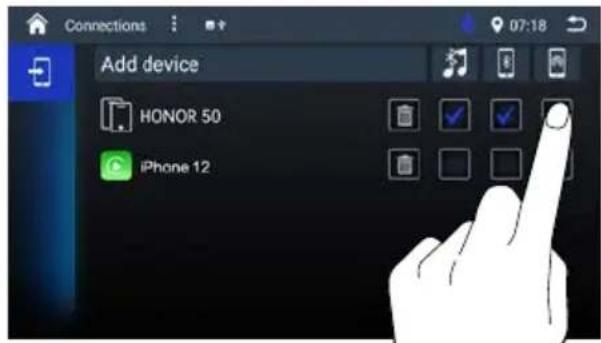
- If you want to return to Android Auto, touch [Android Auto] on the main menu.
Play with Android Auto
Select the Android Auto source to play music.
Map
Touch the (Google Maps) icon of Android Auto to let the phone show you the way.
Call Out / Receive Call
Touch the (Phone) icon on Android Auto for calling.
Play Music
Touch the (Music) icon of Android Auto to play music.
Talk with Google
- Touch the (☐) on the bottom left of LCD for using Google voice assistant, such as issuing a call, playing music, opening the map and other voice commands.
- When Phone is connected, enable Google voice by steering wheel control
This function is only available on cars equipped with the equivalent key
- Control with Voice Match, such as "Ok, Google".
AUX IN
This device features AUX input for audio playback. The AUX-IN input is located at the rear of the device.
Start the AUX-IN mode with the button [AV-In].
The display shows the audio or video playback of the selected AUX source.
Camera Input
This device features video input for connecting a camera. If a rear camera is connected, the image is displayed on the screen when the reverse gear is engaged.
To access the camera screen in other modes, press the [CAMERAS] button on the main menu.
You can set the camera hardware channel in the [Settings] -> [Video] menu.
AHD: only rear camera
AHD-4: 4 cameras
Steering wheel control (SWC)
Select [SWC] in the Settings menu to enter the SWC setting menu.
Select a function icon on the screen. Long press a steering wheel button. Repeat steps 1 and 2 until all settings are done. Touch [Save and Exit] after all buttons are set. To reset the programming, touch [Reset].
![Settings 14:58 Navigation Save and Exit Press the button on the steering wheel for one second! Learn button [ Navi ] Key Light SWC Upgrade & Reset Reset](/content/2026/04/685036/images/cc0698fdca07d49bcdb07ffb17d45dbc114fd646088c6cee4de764c76350770b.jpg)
Settings
In the settings menu, you can adjust the basic settings for the different functions of the device to your requirements.
In the main menu, press the [Settings] button.
The settings menu is displayed.
- Call up the submenus with the buttons in the lower area of the settings menu.
Video
Touch [Video], if necessary.
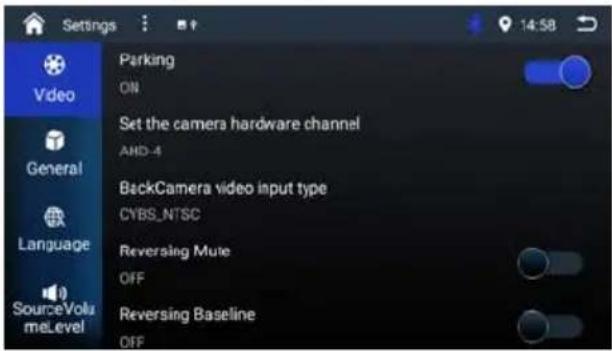
Parking – In Parking "Off" mode, the screen will display Warning information if you play the video. The warning screen will prevent the driver from watching videos for safety.
Set the camera hardware channel – Select the camera hardware channel from the submenu.
AHD: One camera can be connected and shown.
AHD-4: Up to four cameras can be connected and shown. Note: If AHD-4 is set, the reversing lines are displayed on channel 2 when activated.
BackCamera video input type – Select the BackCamera video input type from the submenu.
Reversing Mute – When On, the reversing sound is mute.
Reversing Baseline – Show/Hide the reversing baseline.
General
Select an option to access/setup.
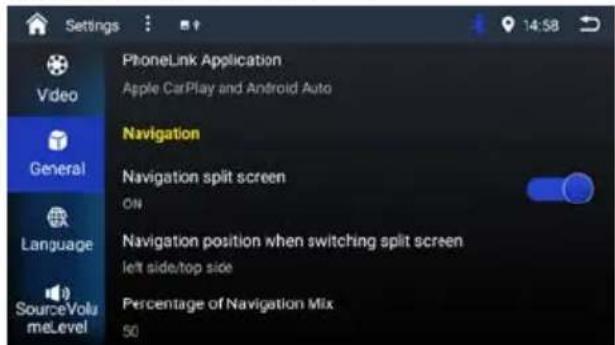
Audio - Set the Buzzer, USB auto Play mode and Bluetooth microphone type.
Radio - Select your local region from the submenu.
PhoneLink - Select the PhoneLink application from the submenu.
Navigation - Set the split screen of Navigation and Percentage of Navigation voice Mix.
Parameter - Select the protocol of USB ports.
Display - Touch "Headlight Switch" to turn on/off the light of the buttons.
Off Timer - Setting the period of time for which the appliance remains switched on without the ignition being activated.
If the appliance is switched off, it can be switched on again within 30 minutes and switches off automatically after the set time.
If this option is switched off, the appliance cannot be switched on without ignition.
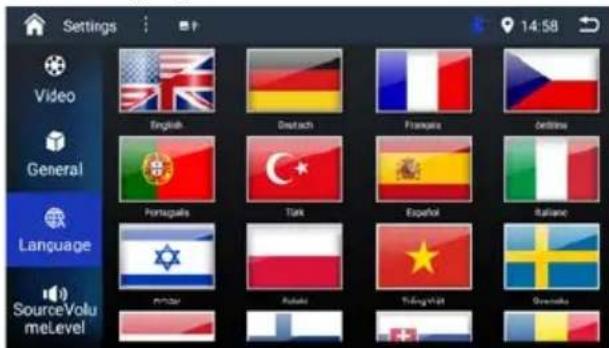
Language
Select a language for the OS.
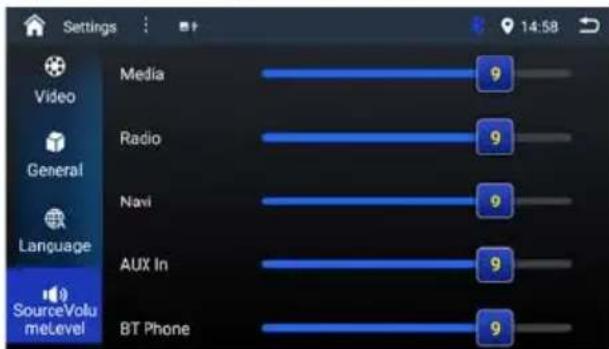
SourceVolumeLevel
Set the Volume Level of each Source.
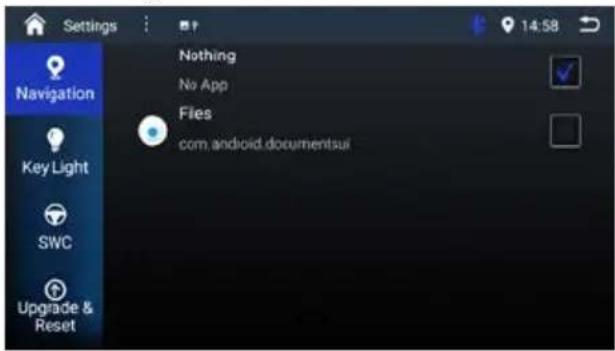
Files – Select the option to show files list on Navigation mode.
Navigation
Select a Navigation source from the available list.
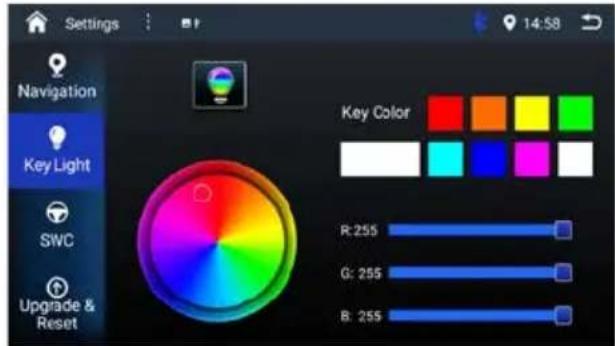
Key Light
Set the color of Key Light.
SWC
Refer to "Steering wheel control" in previous chapter.
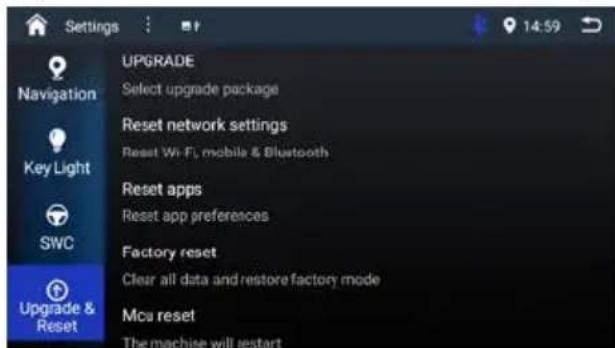
Upgrade & Reset
- Upgrade the software and reset the default settings.
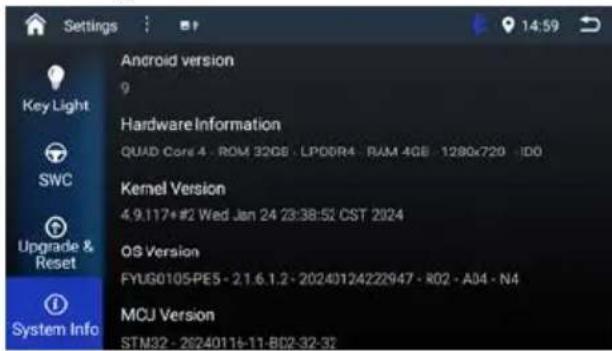
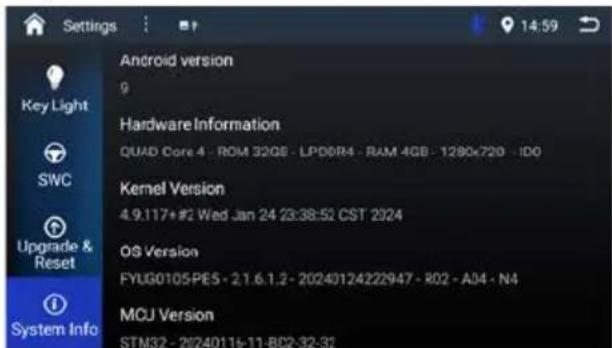
System Info
View the system information.

Useful information
Warranty
We provide a manufacturer's warranty for products bought within the European Union. For devices purchased outside the European Union, the warranty terms issued by our respective responsible domestic agency are valid.
Subject to technical changes!
Connection diagram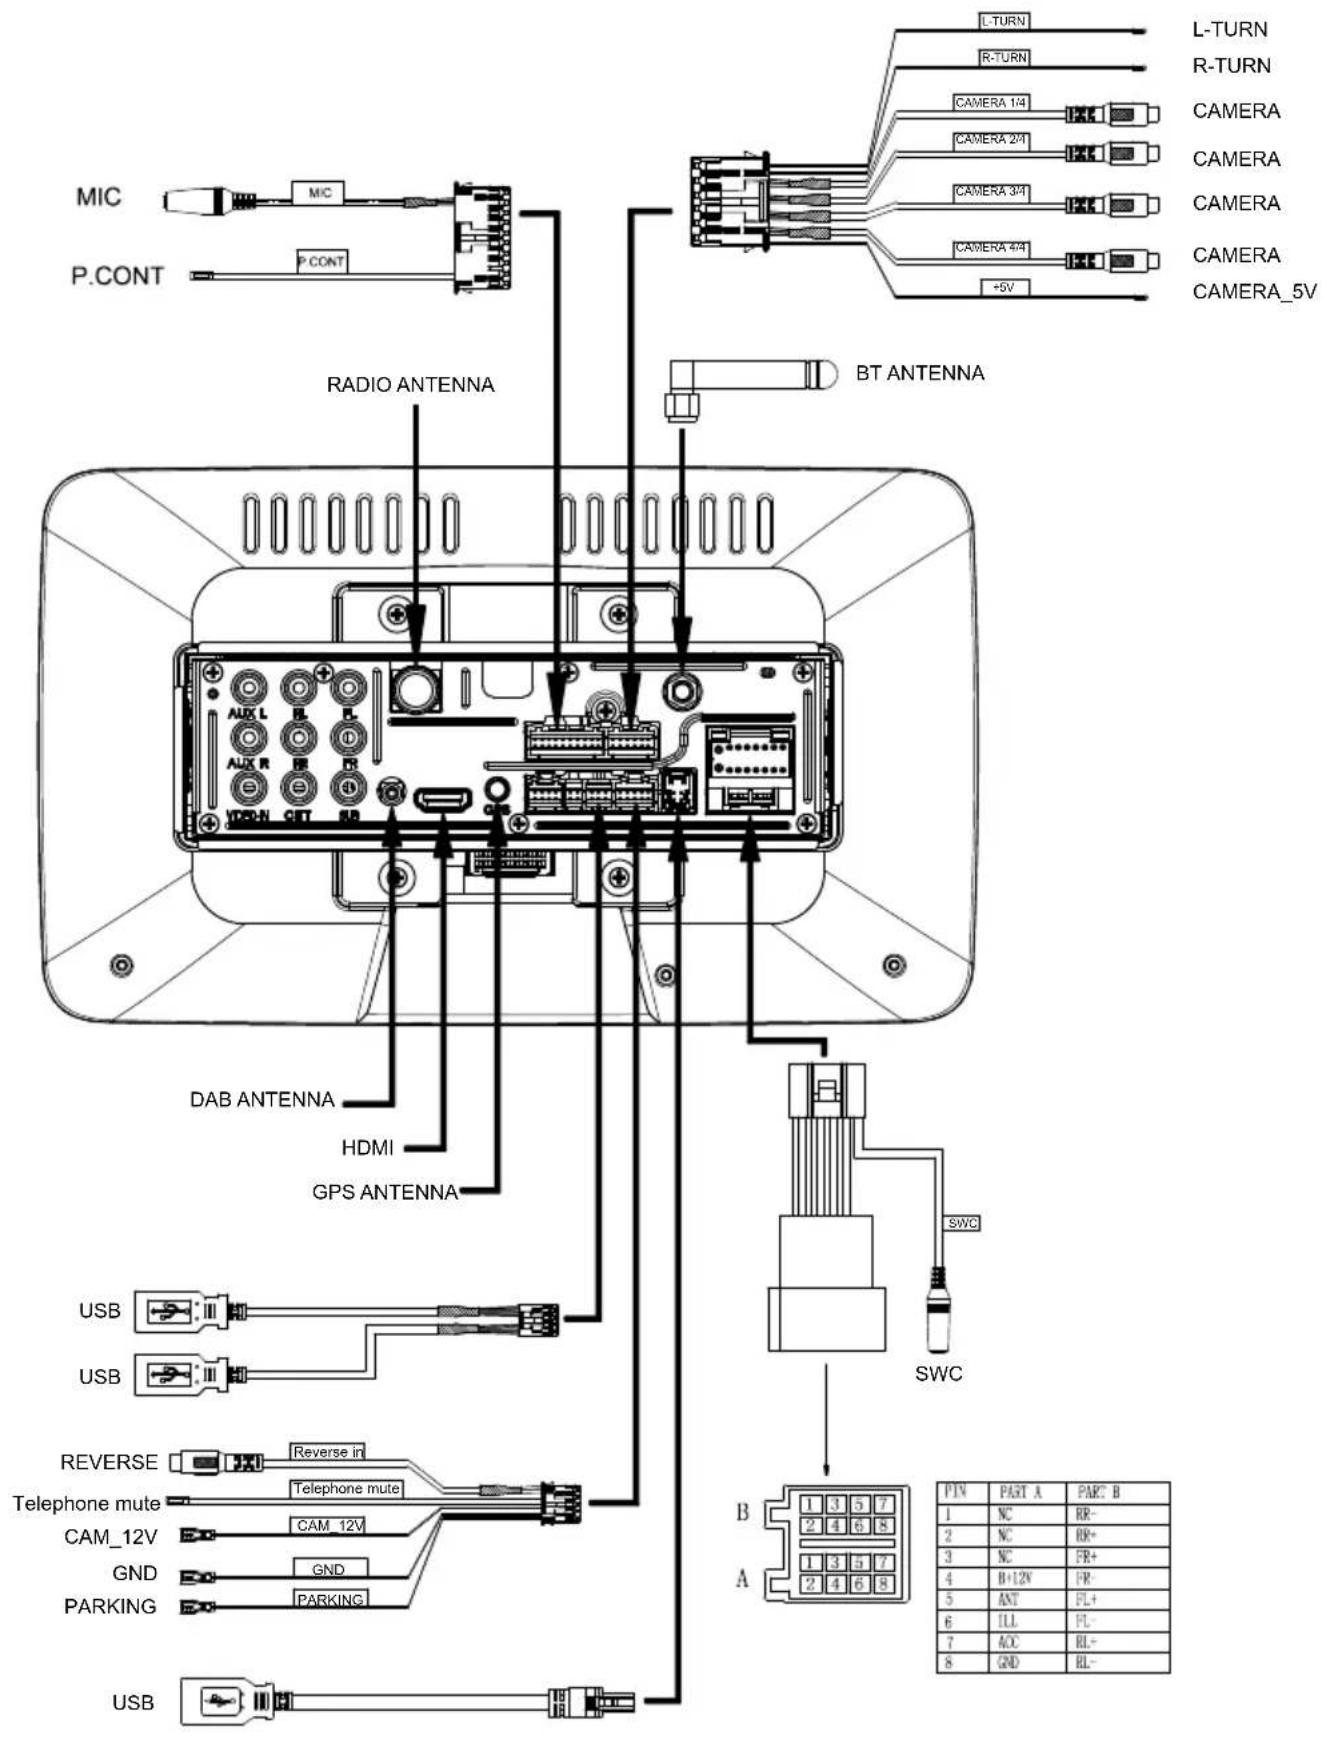
Explanation of the connections
MIC: External microphone connector (included in delivery content)
P. CONT: Switched power supply 12 Volt/ max. 200 mA for controlling external amplifiers, active antenna
L-TURN (FUTURE USE): Not used, future use
R-TURN (FUTURE USE): Not used, future use
CAMERA: Reverse camera input (only for setting option AHD) (note: this camera channel will be able to show parking lines if activated in settings)
CAMERA 1/4 Camera 1 input (only for setting option AHD 4), for example for rear view camera
CAMERA 2/4 Camera 2 input (only for setting option AHD 4), for example for reversing (note: this camera channel will be able to show parking lines if activated in settings)
CAMERA 3/4 Camera 3 input (only for setting option AHD 4), for example for grey water tank outlet
CAMERA 4/4 Camera 4 input (only for setting option AHD 4), for example for front camera
CAMERA 5V Camera power supply 5 volts (switched power supply 5 volts, max. 1000 mA)
CAMERA 12V Camera power supply 12 volts (switched power supply 12 volts, max. 1100 mA)
GND Ground (camera power supply)
RADIO ANTENNA FM antenna (with 12 volts phantom feeding for active antenna)
BT ANTENNA Bluetooth antenna (included in delivery content, don't use any other antenna)
DAB ANTENNA DAB antenna (with 12 volts phantom feeding for active antenna)
HDMI HDMI input
GPS ANTENNA GPS antenna (included in delivery content)
USB USB input (3x)
TELEPHONE MUTE Mute input (mass activated)
PARKING Parking signal (handbrake, mass activated)
REVERSE Reverse signal (12 volt activated)
SWC Steering wheel connector for resistive/voltage controlled steering wheel controls
ISO CONNECTOR A Power supply, details see connection diagram
ISO CONNECTOR B Speaker connection, details see connection diagram
Installation
Installing the unit
①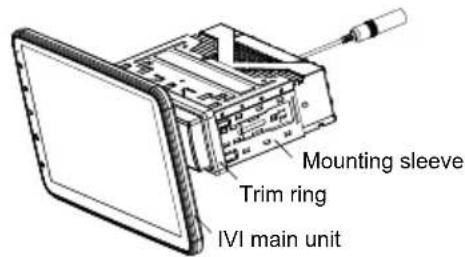
②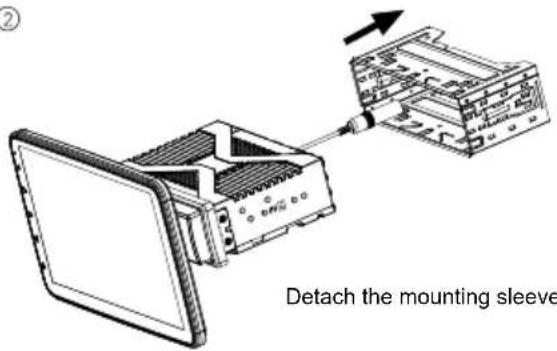
③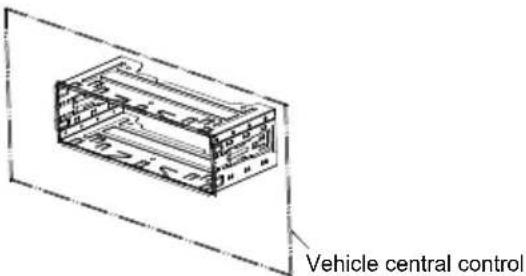
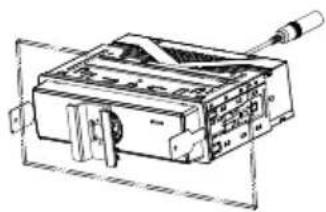
Secure the mounting sleeve in the central control of the vehicle.
④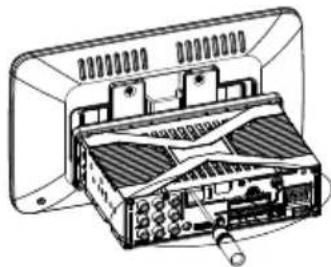
Connect the available wiring harness.
⑤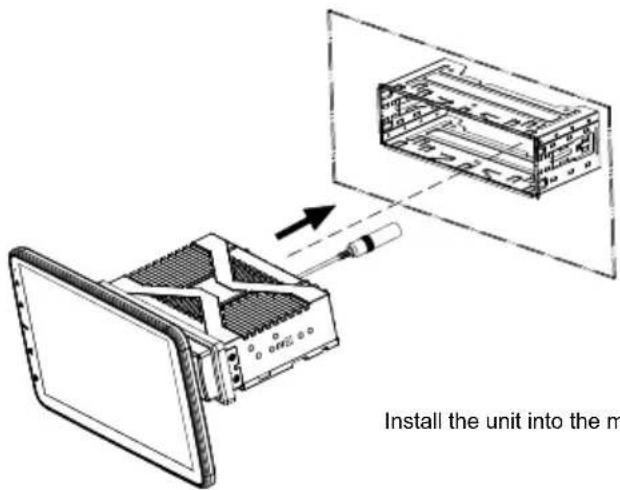
Install the unit into the mounting sleeve until it locked.
⑥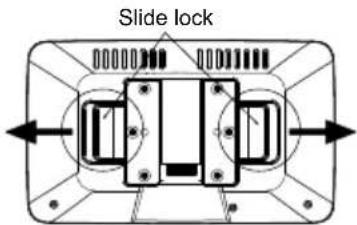
Adjust horizontal Angle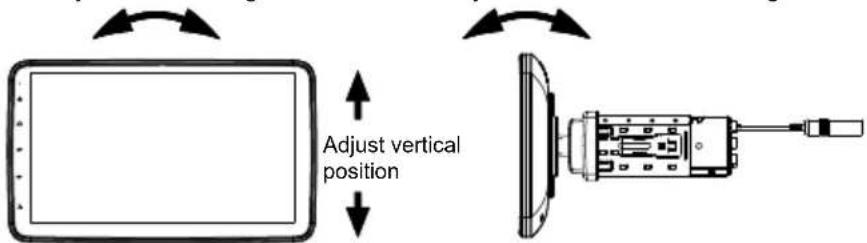
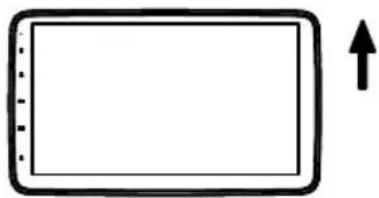
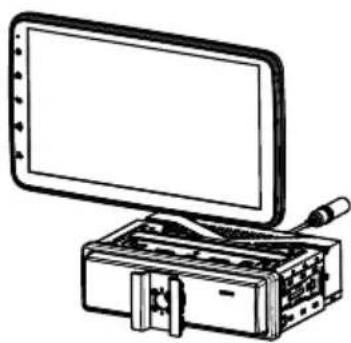
Adjust the screen panel to a suitable position and angle. Hold the screen panel and rotate to adjust the angle; pull the slide lock to the left and right sides to unlock the screen panel, and then you can adjust the vertical position.
Inserting microSD card
①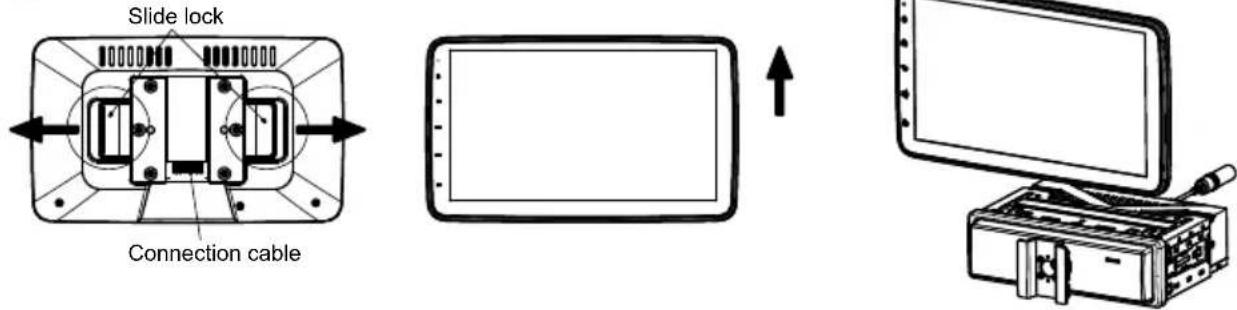
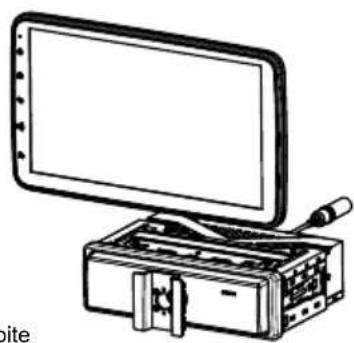
Detach the screen panel: pull the slide lock to the left and right sides to unlock the screen panel, move the panel upward until it's separated from the unit.
②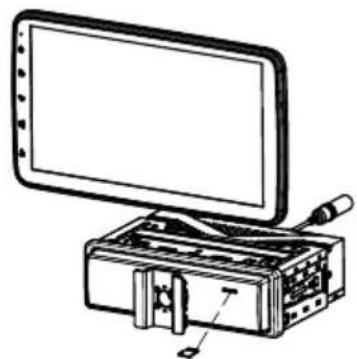
Insert the microSD card into the slot. Be sure the side with text is facing downward.
③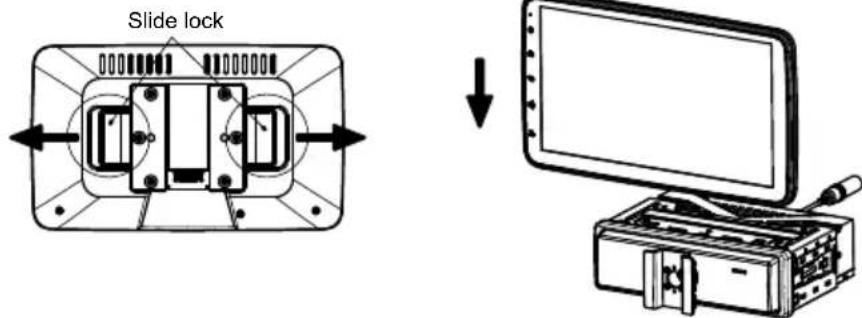
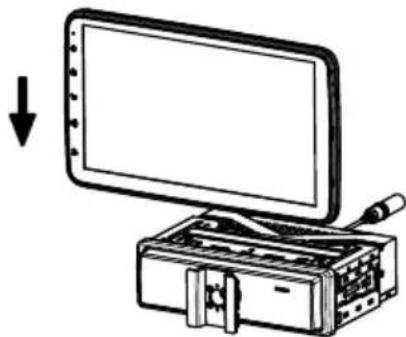
Install the screen panel: pull the slide lock to the left and right sides, fix the panel to the main unit from up to down.
Removing the unit
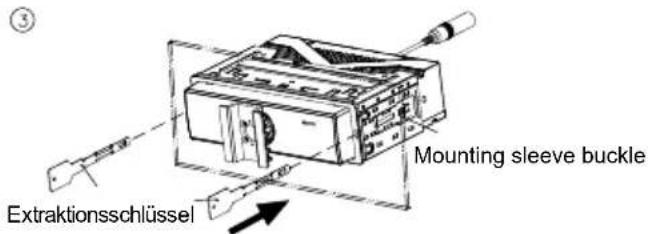
①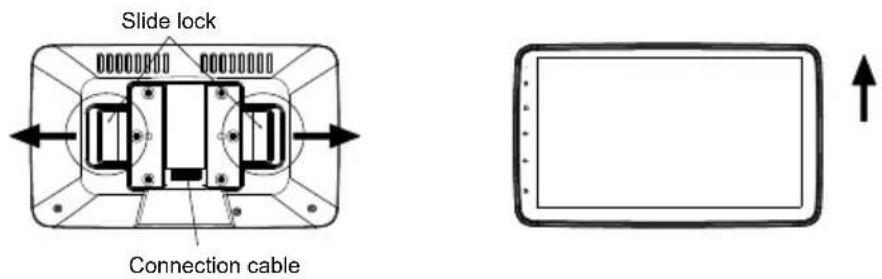
Detach the screen panel: pull the slide lock to the left and right sides to unlock the screen panel, move the screen panel upward until it's separated from the unit. Take off the connection cables, then detach the screen panel.
②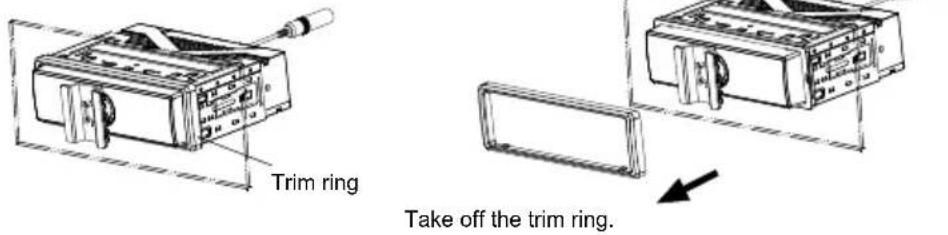
③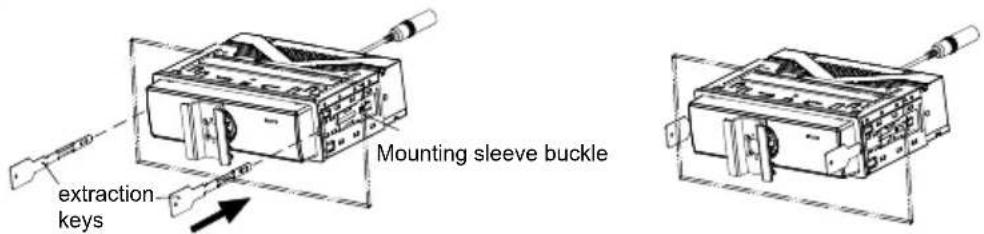
Insert the supplied extraction keys into the holes on both sides of the unit until the mounting sleeve buckle is unlocked.
④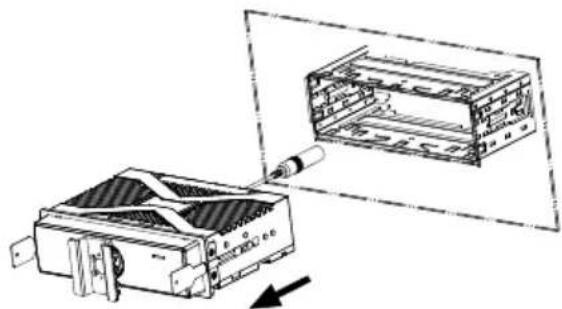
Pull the unit out of the dashboard, take off the connection cables.
Troubleshooting
What appears to be trouble is not always serious. Please check the following points before calling a service center.
| Problem Cause Corrective action | ||
| General | ||
| Unit can not power on | Unit fuse blown. Install new fuse with correct rating. | |
| Car battery fuse blown. Install new fuse with correct rating. | ||
| Illegal operation Reset the unit. | ||
| No/low audio output | Improper audio output connection. Check wiring and correct. | |
| Volume set too low. Increase volume level. | ||
| Speakers damaged. Replace speakers. | ||
| Heavily biased volume balance. | Adjust the channel balance to center position. | |
| Speaker wiring is in contact with metal part of car. | Insulate all speaker wiring connections. | |
| Poor sound quality or distortion | Speaker power rating does not match unit. | Replace speakers. |
| Wrong connections. Check wiring and correct. | ||
| Speaker is shorted. Check wiring and correct. | ||
| Unit resets itself when engine is off | Incorrect connection between ACC and BATT. | Check wiring and correct. |
| TFT monitor | ||
| Warning information is shown at all times | Parking break wiring is not correct. Check wiring and correct. | |
| Flashing image or interference appears on screen | Video cable damaged. Replace cables. | |
| Improper video signal connections. Check wiring and correct. | ||

This item incorporates copy protection technology that is protected by U.S. patents and other intellectual property rights of Rovi Corporation. Reverse engineering and disassembly are prohibited.
Windows® and Windows Media® are registered trademarks of the Microsoft Corporation in the U.S.A. and/or other countries.
This product is protected by certain intellectual property rights of Microsoft. Use or distribution of such technology outside of this product is prohibited without a license from Microsoft.
The Bluetooth® word mark and logos are registered trademarks owned by Bluetooth SIG, Inc.
Manufactured under license from Dolby Laboratories. "Dolby" and the double-D symbol are trademarks of Dolby Laboratories.
Front panel
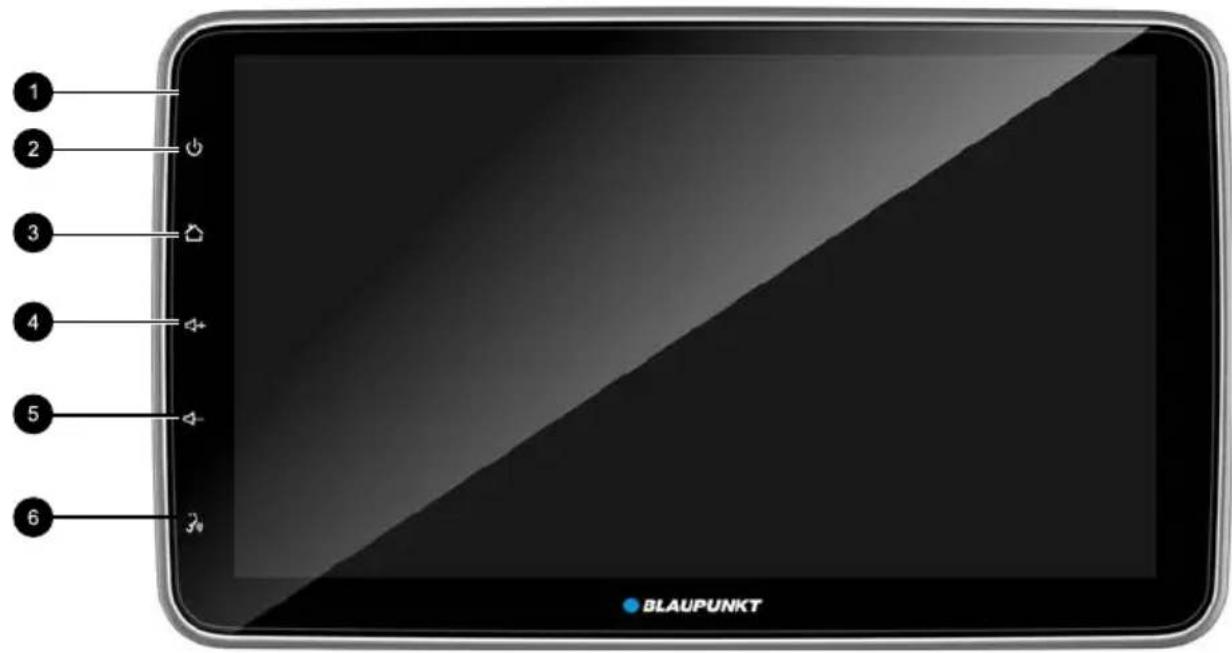

1 Microphone 2 POWER/MUTE button
Short press: Turn on the unit;
In operation: Mute the audio source;
Note:
Current list.
The equalizer menu is displayed.
- Retrieve track lists.
- Call the phone book.
- Retrieve the call keypad menu.
- Open the device menu.
- Retrieve the BT settings menu.
- Call keypad.
Call.
2. Press the [ ] button on the front panel or tap the [CAR] icon on the screen to exit CarPlay mode.
Settings.
Audio - Set buzzer, USB auto play mode, and Bluetooth microphone type.
Files – Select the option to display the file list in navigation mode.
Key light.
System information.
View system information.
Useful information
Warranty
Explanation of the connections
MIC External microphone connector (included in delivery content)
P. CONT Switched power supply 12 Volt/ max. 200 mA for controlling external amplifiers, active antenna
L-TURN (FUTURE USE) Not used, future use
R-TURN (FUTURE USE) Not used, future use
CAMERA Reverse camera input (only for setting option AHD) (note: this camera channel will be able to show parking lines if activated in settings)
CAMERA 1/4 Camera 1 input (only for setting option AHD 4), for example for rear view camera
CAMERA 2/4 Camera 2 input (only for setting option AHD 4), for example for reversing (note: this camera channel will be able to show parking lines if activated in settings)
CAMERA 3/4 Camera 3 input (only for setting option AHD 4), for example for grey water tank outlet
CAMERA 4/4 Camera 4 input (only for setting option AHD 4), for example for front camera
CAMERA 5V Camera power supply 5 volts (switched power supply 5 volts, max. 1000 mA)
CAMERA 12V Camera power supply 12 volts (switched power supply 12 volts, max. 1100 mA)
GND Ground (camera power supply)
RADIO ANTENNA FM antenna (with 12 volts phantom feeding for active antenna)
BT ANTENNA Bluetooth antenna (included in delivery content, don't use any other antenna)
DAB ANTENNA DAB antenna (with 12 volts phantom feeding for active antenna)
HDMI HDMI input
GPS ANTENNA GPS antenna (included in delivery content)
USB USB input (3x)
TELEPHONE MUTE Mute input (mass activated)
PARKING Parking signal (handbrake, mass activated)
REVERSE Reverse signal (12 volt activated)
SWC Steering wheel connector for resistive/voltage controlled steering wheel controls
ISO CONNECTOR A Power supply, details see connection diagram
ISO CONNECTOR B Speaker connection, details see connection diagram
Installation
Manufactured under license from Dolby Laboratories.
Upgrade & reset....79
System Info (system information).... 79
Useful information....79
Connection diagram 80
Installation 82
Note:
Radio mode
Start the radio mode
Register Bluetooth devices
Short press: Track selection. [1] / ▶ Pause the display and continue with the display. Short press: Track selection.

Apple CarPlay
Settings
System Info (system information)
Explanation of the connections
MIC External microphone connector (included in delivery content)
P. CONT Switched power supply 12 Volt/ max. 200 mA for controlling external amplifiers, active antenna
L-TURN (FUTURE USE) Not used, future use
R-TURN (FUTURE USE) Not used, future use
CAMERA Reverse camera input (only for setting option AHD) (note: this camera channel will be able to show parking lines if activated in settings)
CAMERA 1/4 Camera 1 input (only for setting option AHD 4), for example for rear view camera
CAMERA 2/4 Camera 2 input (only for setting option AHD 4), for example for reversing (note: this camera channel will be able to show parking lines if activated in settings)
CAMERA 3/4 Camera 3 input (only for setting option AHD 4), for example for grey water tank outlet
CAMERA 4/4 Camera 4 input (only for setting option AHD 4), for example for front camera
CAMERA 5V Camera power supply 5 volts (switched power supply 5 volts, max. 1000 mA)
CAMERA 12V Camera power supply 12 volts (switched power supply 12 volts, max. 1100 mA)
GND Ground (camera power supply)
RADIO ANTENNA FM antenna (with 12 volts phantom feeding for active antenna)
BT ANTENNA Bluetooth antenna (included in delivery content, don't use any other antenna)
DAB ANTENNA DAB antenna (with 12 volts phantom feeding for active antenna)
HDMI HDMI input
GPS ANTENNA GPS antenna (included in delivery content)
USB USB input (3x)
TELEPHONE MUTE Mute input (mass activated)
PARKING Parking signal (handbrake, mass activated)
REVERSE Reverse signal (12 volt activated)
SWC Steering wheel connector for resistive/voltage controlled steering wheel controls
ISO CONNECTOR A Power supply, details see connection diagram
ISO CONNECTOR B Speaker connection, details see connection diagram
Installation
6 Voice control button
Activation of voice control.

Time alignment....93
Note:
Activation/deactivation of RDS
Audio playback via Bluetooth streaming
Settings
Explanation of the connections
MIC External microphone connector (included in delivery content)
P. CONT Switched power supply 12 Volt/ max. 200 mA for controlling external amplifiers, active antenna
L-TURN (FUTURE USE) Not used, future use
R-TURN (FUTURE USE) Not used, future use
CAMERA Reverse camera input (only for setting option AHD) (note: this camera channel will be able to show parking lines if activated in settings)
CAMERA 1/4 Camera 1 input (only for setting option AHD 4), for example for rear view camera
CAMERA 2/4 Camera 2 input (only for setting option AHD 4), for example for reversing (note: this camera channel will be able to show parking lines if activated in settings)
CAMERA 3/4 Camera 3 input (only for setting option AHD 4), for example for grey water tank outlet
CAMERA 4/4 Camera 4 input (only for setting option AHD 4), for example for front camera
CAMERA 5V Camera power supply 5 volts (switched power supply 5 volts, max. 1000 mA)
CAMERA 12V Camera power supply 12 volts (switched power supply 12 volts, max. 1100 mA)
GND Ground (camera power supply)
RADIO ANTENNA FM antenna (with 12 volts phantom feeding for active antenna)
BT ANTENNA Bluetooth antenna (included in delivery content, don't use any other antenna)
DAB ANTENNA DAB antenna (with 12 volts phantom feeding for active antenna)
HDMI HDMI input
GPS ANTENNA GPS antenna (included in delivery content)
USB USB input (3x)
TELEPHONE MUTE Mute input (mass activated)
PARKING Parking signal (handbrake, mass activated)
REVERESE Reverse signal (12 volt activated)
SWC Steering wheel connector for resistive/voltage controlled steering wheel controls
ISO CONNECTOR A Power supply, details see connection diagram
ISO CONNECTOR B Speaker connection, details see connection diagram
Installation
Connection cable
Note:
List Current.
Settings
Explanation of the connections
MIC External microphone connector (included in delivery content)
P. CONT Switched power supply 12 Volt/ max. 200 mA for controlling external amplifiers, active antenna
L-TURN (FUTURE USE) Not used, future use
R-TURN (FUTURE USE) Not used, future use
CAMERA Reverse camera input (only for setting option AHD) (note: this camera channel will be able to show parking lines if activated in settings)
CAMERA 1/4 Camera 1 input (only for setting option AHD 4), for example for rear view camera
CAMERA 2/4 Camera 2 input (only for setting option AHD 4), for example for reversing (note: this camera channel will be able to show parking lines if activated in settings)
CAMERA 3/4 Camera 3 input (only for setting option AHD 4), for example for grey water tank outlet
CAMERA 4/4 Camera 4 input (only for setting option AHD 4), for example for front camera
CAMERA 5V Camera power supply 5 volts (switched power supply 5 volts, max. 1000 mA)
CAMERA 12V Camera power supply 12 volts (switched power supply 12 volts, max. 1100 mA)
GND Ground (camera power supply)
RADIO ANTENNA FM antenna (with 12 volts phantom feeding for active antenna)
BT ANTENNA Bluetooth antenna (included in delivery content, don't use any other antenna)
DAB ANTENNA DAB antenna (with 12 volts phantom feeding for active antenna)
HDMI HDMI input
GPS ANTENNA GPS antenna (included in delivery content)
USB USB input (3x)
TELEPHONE MUTE Mute input (mass activated)
PARKING Parking signal (handbrake, mass activated)
REVERSE Reverse signal (12 volt activated)
SWC Steering wheel connector for resistive/voltage controlled steering wheel controls
ISO CONNECTOR A Power supply, details see connection diagram
ISO CONNECTOR B Speaker connection, details see connection diagram
Installation
Main menu (Home)....132
Main menu (Home)
Note:
Current list:
Register Bluetooth devices
Settings
Explanation of the connections
MIC External microphone connector (included in delivery content)
P. CONT Switched power supply 12 Volt/ max. 200 mA for controlling external amplifiers, active antenna
L-TURN (FUTURE USE) Not used, future use
R-TURN (FUTURE USE) Not used, future use
CAMERA Reverse camera input (only for setting option AHD) (note: this camera channel will be able to show parking lines if activated in settings)
CAMERA 1/4 Camera 1 input (only for setting option AHD 4), for example for rear view camera
CAMERA 2/4 Camera 2 input (only for setting option AHD 4), for example for reversing (note: this camera channel will be able to show parking lines if activated in settings)
CAMERA 3/4 Camera 3 input (only for setting option AHD 4), for example for grey water tank outlet
CAMERA 4/4 Camera 4 input (only for setting option AHD 4), for example for front camera
CAMERA 5V Camera power supply 5 volts (switched power supply 5 volts, max. 1000 mA)
CAMERA 12V Camera power supply 12 volts (switched power supply 12 volts, max. 1100 mA)
GND Ground (camera power supply)
RADIO ANTENNA FM antenna (with 12 volts phantom feeding for active antenna)
BT ANTENNA Bluetooth antenna (included in delivery content, don't use any other antenna)
DAB ANTENNA DAB antenna (with 12 volts phantom feeding for active antenna)
HDMI HDMI input
GPS ANTENNA GPS antenna (included in delivery content)
USB USB input (3x)
TELEPHONE MUTE Mute input (mass activated)
PARKING Parking signal (handbrake, mass activated)
REVERESE Reverse signal (12 volt activated)
SWC Steering wheel connector for resistive/voltage controlled steering wheel controls
ISO CONNECTOR A Power supply, details see connection diagram
ISO CONNECTOR B Speaker connection, details see connection diagram
Installation
Note:

Radio mode
Current list:

Settings
Explanation of the connections
MIC External microphone connector (included in delivery content)
P. CONT Switched power supply 12 Volt/ max. 200 mA for controlling external amplifiers, active antenna
L-TURN (FUTURE USE) Not used, future use
R-TURN (FUTURE USE) Not used, future use
CAMERA Reverse camera input (only for setting option AHD) (note: this camera channel will be able to show parking lines if activated in settings)
CAMERA 1/4 Camera 1 input (only for setting option AHD 4), for example for rear view camera
CAMERA 2/4 Camera 2 input (only for setting option AHD 4), for example for reversing (note: this camera channel will be able to show parking lines if activated in settings)
CAMERA 3/4 Camera 3 input (only for setting option AHD 4), for example for grey water tank outlet
CAMERA 4/4 Camera 4 input (only for setting option AHD 4), for example for front camera
CAMERA 5V Camera power supply 5 volts (switched power supply 5 volts, max. 1000 mA)
CAMERA 12V Camera power supply 12 volts (switched power supply 12 volts, max. 1100 mA)
GND Ground (camera power supply)
RADIO ANTENNA FM antenna (with 12 volts phantom feeding for active antenna)
BT ANTENNA Bluetooth antenna (included in delivery content, don't use any other antenna)
DAB ANTENNA DAB antenna (with 12 volts phantom feeding for active antenna)
HDMI HDMI input
GPS ANTENNA GPS antenna (included in delivery content)
USB USB input (3x)
TELEPHONE MUTE Mute input (mass activated)
PARKING Parking signal (handbrake, mass activated)
REVERESE Reverse signal (12 volt activated)
SWC Steering wheel connector for resistive/voltage controlled steering wheel controls
ISO CONNECTOR A Power supply, details see connection diagram
ISO CONNECTOR B Speaker connection, details see connection diagram
Installation
Note:
Settings
Explanation of the connections
MIC External microphone connector (included in delivery content)
P. CONT Switched power supply 12 Volt/ max. 200 mA for controlling external amplifiers, active antenna
L-TURN (FUTURE USE) Not used, future use
R-TURN (FUTURE USE) Not used, future use
CAMERA Reverse camera input (only for setting option AHD) (note: this camera channel will be able to show parking lines if activated in settings)
CAMERA 1/4 Camera 1 input (only for setting option AHD 4), for example for rear view camera
CAMERA 2/4 Camera 2 input (only for setting option AHD 4), for example for reversing (note: this camera channel will be able to show parking lines if activated in settings)
CAMERA 3/4 Camera 3 input (only for setting option AHD 4), for example for grey water tank outlet
CAMERA 4/4 Camera 4 input (only for setting option AHD 4), for example for front camera
CAMERA 5V Camera power supply 5 volts (switched power supply 5 volts, max. 1000 mA)
CAMERA 12V Camera power supply 12 volts (switched power supply 12 volts, max. 1100 mA)
GND Ground (camera power supply)
RADIO ANTENNA FM antenna (with 12 volts phantom feeding for active antenna)
BT ANTENNA Bluetooth antenna (included in delivery content, don't use any other antenna)
DAB ANTENNA DAB antenna (with 12 volts phantom feeding for active antenna)
HDMI HDMI input
GPS ANTENNA GPS antenna (included in delivery content)
USB USB input (3x)
TELEPHONE MUTE Mute input (mass activated)
PARKING Parking signal (handbrake, mass activated)
REVERESE Reverse signal (12 volt activated)
SWC Steering wheel connector for resistive/voltage controlled steering wheel controls
ISO CONNECTOR A Power supply, details see connection diagram
ISO CONNECTOR B Speaker connection, details see connection diagram
Installation


- NOTE
- SETTINGS
- SYSTEM INFORMATION
- SAFETY NOTES
- SCOPE OF DELIVERY
- PLACING THE DEVICE IN OPERATION
- RADIO MODE
- DAB MODE
- SOUND SETTINGS
- USB MEDIA PLAYBACK
- BLUETOOTH MODE
- APPLE CARPLAY
- ANDROID AUTO
- AUX IN
- CAMERA INPUT
- STEERING WHEEL CONTROL (SWC)
- USEFUL INFORMATION
- CONNECTION DIAGRAM
- INSTALLATION
- TROUBLESHOOTING
- SYMBOLS USED
- DANGER
- ROAD SAFETY
- GENERAL SAFETY NOTES
- USE AS DIRECTED
- INSTALLATION INSTRUCTIONS
- DECLARATION OF CONFORMITY
- CLEANING NOTES
- DISPOSAL NOTES
- WARNING
- SWITCHING ON/OFF WITH THE POWER BUTTON
- VOLUME
- ADJUSTING THE VOLUME
- MUTING THE CAR SOUND SYSTEM (MUTE)
- MAIN MENU (HOME)
- SPLIT SCREEN
- SELECT MEMORY BANK
- TUNING INTO A STATION
- TUNING INTO STATIONS MANUALLY
- STARTING STATION SEEK TUNING
- STORING STATIONS MANUALLY
- STORING STATIONS AUTOMATICALLY
- ADJUSTING THE SEEK TUNING SENSITIVITY
- SWITCHING RDS ON/OFF
- SWITCHING THE AF (ALTERNATE FREQUENCY) FUNCTION ON/OFF
- SWITCHING PRIORITY FOR TRAFFIC ANNOUNCEMENTS ON/OFF
- SELECTING PROGRAM TYPE AND START SEEK TUNING
- STARTING DAB MODE
- LIST SCREENS
- EQUALIZER
- VOLUME DISTRIBUTION (FADER/BALANCE)
- TIME ALIGNMENT
- BASIC INFORMATION
- USB DATA CARRIER
- CONNECTING A USB DATA CARRIER
- REMOVING THE USB DATA CARRIER
- AUDIO PLAYBACK FROM USB
- VIDEO PLAYBACK FROM USB
- IMAGE PLAYBACK FROM USB
- STARTING BLUETOOTH MODE
- REGISTERING BLUETOOTH DEVICES
- TELEPHONE MODE
- DIALING
- ANSWER A CALL
- AUDIO PLAYBACK VIA BLUETOOTH STREAMING
- HOW TO ENTER CARPLAY MODE
- CONNECT VIA BLUETOOTH
- TO EXIT CARPLAY MODE, TOUCH THE BUTTON ON THE FRONT PANEL OR TOUCH THE [CAR] ICON ON THE SCREEN
- IF YOU WANT TO RETURN TO CARPLAY MODE, TOUCH [CARPLAY] ON THE MAIN MENU
- HOW TO USE CARPLAY
- TOUCH
- SIRI
- HOW TO ENTER ANDROID AUTO MODE
- TO EXIT ANDROID AUTO MODE, TOUCH THE [L] BUTTON ON THE FRONT PANEL OR TOUCH THE [CAR] ICON ON THE SCREEN
- PLAY WITH ANDROID AUTO
- MAP
- CALL OUT / RECEIVE CALL
- PLAY MUSIC
- TALK WITH GOOGLE
- VIDEO
- GENERAL
- LANGUAGE
- SOURCEVOLUMELEVEL
- NAVIGATION
- KEY LIGHT
- SWC
- UPGRADE & RESET
- SYSTEM INFO
- WARRANTY
- EXPLANATION OF THE CONNECTIONS
- INSTALLING THE UNIT
- INSERTING MICROSD CARD
- REMOVING THE UNIT
- FRONT PANEL
- CALL
- PRESS THE [ ] BUTTON ON THE FRONT PANEL OR TAP THE [CAR] ICON ON THE SCREEN TO EXIT CARPLAY MODE
- START THE RADIO MODE
- REGISTER BLUETOOTH DEVICES
- SYSTEM INFO (SYSTEM INFORMATION)
- ACTIVATION/DEACTIVATION OF RDS
Brand : BLAUPUNKT
Model : Cape Town 948 DAB
Category : Car radio