
KAX400PL - Autres robots de cuisine KENWOOD - Free user manual and instructions
Find the device manual for free KAX400PL KENWOOD in PDF.


| Product type | Meat grinder accessory for Kenwood food processor |
| Model | KAX400PL |
| Brand | Kenwood |
| Dimensions (L x W x H) | Approximately 20 x 10 x 10 cm |
| Weight | Approximately 1 kg |
| Material | Stainless steel and food-grade plastic |
| Power supply | Driven by the robot (no independent power supply) |
| Main functions | Grinding meat, making sausages, mixing stuffings |
| Capacity | Up to 2 kg of meat per minute |
| Included grinding plates | Fine, medium, and coarse grinding plates |
| Included accessories | Pusher, sausage nozzle, knife |
| Compatibility | Kenwood robots series Cooking Chef, Chef, Major, and others |
| Maintenance and cleaning | Hand wash with soapy water, dry immediately |
| Safety | Do not use without the pusher; safety lock |
| Spare parts | Blades, grinding plates, pusher available separately |
| Repairability | Repairability index: 7/10 (common parts) |
| Warranty | 2 years |
| Use | Raw meat without bones or sinews, pre-cut into pieces |
| Origin | Designed in the United Kingdom, made in China |
Frequently Asked Questions - KAX400PL KENWOOD
User questions about KAX400PL KENWOOD
0 question about this device. Answer the ones you know or ask your own.
Ask a new question about this device
Download the instructions for your Autres robots de cuisine in PDF format for free! Find your manual KAX400PL - KENWOOD and take your electronic device back in hand. On this page are published all the documents necessary for the use of your device. KAX400PL by KENWOOD.
USER MANUAL KAX400PL KENWOOD
© Copyright 2020 Kenwood Limited. All rights reserved 124201/2


English
Safety
- Read these instructions carefully and retain for future reference.
- Remove all packaging and any labels.
- Never leave the appliance unattended when it is operating.
- The slicing and dicing discs are sharp, handle with care when fitting, removing and cleaning.
- Never use your fingers to push food down the feed tube. Only use the pushers supplied with the attachment.
- Never remove the lid from the attachment until the slicing disc has completely stopped.
- Do not use excessive force to push food down the feed tube – you could damage the attachment.
- Never use a damaged attachment. Get it checked or repaired: see 'service and customer care'.
- Do not touch moving parts.
- Unplug the appliance before fitting or removing parts or cleaning.
- Misuse of your attachment can result in injury.
Refer to your main kitchen machine instruction book for additional safety warnings.
This KAX400PL attachment features the Twist Connection System 📂 and is designed to fit directly on the latest generation Kenwood Chef models (identified as TYPE KVC, KVL and KCC).
To check that this attachment is compatible with your kitchen machine you will need to ensure both components feature the Twist Connection System TWBT.
If your kitchen machine features the Bar Connection System BAR you will also need an adaptor before operation is possible. The reference code for the adaptor is KAT001ME. For more information and how to order the adaptor visit www.kenwoodworld.com/twist.
Use the dicing attachment to cut a variety of foods such as carrot, swede, beetroot, apples and ham into cubes.
before using for the first time
- Wash the parts: see 'Cleaning'.
key
① pushers: large and small
② feed tube
③ lid
④ shaft
⑤ slicing disc
⑥ finger grip
⑦ dicing grid
⑧ dicing disc
⑨ finger holes
⑩ slinger disc
⑪ body
⑫ food outlet
⑬ gearbox assembly
⑭ cleaning tool
to assemble your dicing attachment
1 Place the slinger disc into the body, ribs uppermost.
2 Hold the dicing disc by the finger holes and fit on top of the slinger disc. (The dicing grid should be on the opposite side to the food outlet with the mark on the dicing disc aligning with the mark on the body).
3 Hold the slicing disc by the finger grip and push onto the shaft 1.
4 Fit the lid onto the body, line up the ▼ symbol on the lid with the 🔒 on the body, then turn to 🔑 symbol to lock into place.
to use your dicing attachment
USE SPEED 4 TO MAX
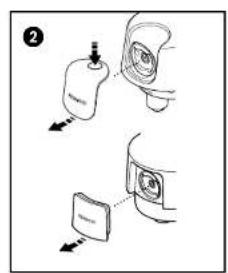
1 Lift off the slow speed outlet cover ②.
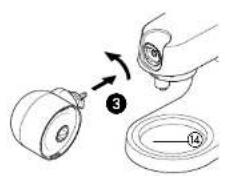
2 With the gearbox assembly in the position shown, locate to the slow speed outlet and rotate to lock in place ③.
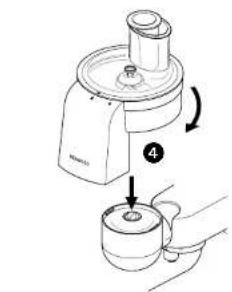
3 Fit the dicing attachment to the gearbox – position the food outlet to the front and rotate clockwise to secure 4.
4 Connect the appliance to the power supply and place a bowl under the food outlet.
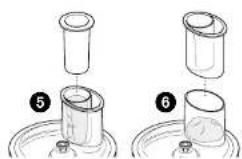
5 Choose which feed tube you want to use. The pusher contains a smaller feed tube for processing individual items or thin ingredients.
To use the small feed tube - first put the larger pusher inside the feed tube ⑤.
To use the larger feed tube - use both pushers together ⑥.
6 Put the food inside the feed tube (refer to the recommended usage chart for suitable foods and their preparation).
7 Switch on the appliance and at the same time push down evenly with the pusher – never put your fingers in the feed tube or use excessive force.
8 Switch off and unplug.
9 To remove – rotate the attachment anticlockwise and lift off. Then rotate the gearbox forward to remove.
recommended usage chart
| Food Preparation | Hints and tips | |
| Swede, potato Remove and turnip to fit feed tube. | skin and cut Process raw. | |
| Carrot Remove skin. For best results process one at a time down the small feed | small feed | tube. Process raw. |
| Beetroot Remove skin. Process raw or cooked. | Stack to fit feed tube. | |
| Aubergine Halve length necessary cut to fit the feed tube. | ways and if Process half at a time. | |
| Pepper | Halve and de seed. | Stack upright in feed tube. |
| Cucumber and courgette | For best results remove skin. | |
| Onion feed tube. | Peel and halve to fit pieces rather than cubes. | Produces roughly chopped |
| Celery Trim sticks to the | same Stack to fit feed tube. | |
| Hard fruits- apple, pear Halve, core and remove | Remove skin if required. | |
| pips. | ||
| Hard cheese- Gruyere Swiss | Cut to pack feed tube. | Process straight from the fridge. |
| Hard boiled eggs cool before removing shells. | Hard boil and allow to roughly chopped pieces rather than cubes. | Stack in feed tube. Produces rather |
| Ham Cut into blocks. Process straight from | Remove bones. than slices. the | Use a block of ham rather fridge. |
| Pickled gherkin feed tube. | Drain. | Process down the small |
hints
- For best results, use raw fresh fruit and vegetables.
- If processing cooked vegetables, refrigeration overnight is recommended.
- Don't cut food up, just trim to fit the feed tube. Fill the width of the large feed tube fairly full. This prevents the food from slipping sideways during processing and will give optimum results. Alternatively, use the small feed tube.
● Always remove pips or bones etc., from food before processing.
Note:
- Due to the various sizes and shapes of foods, the diced results will contain some misshapen pieces, this is normal.
- Some foods such as chorizo and Feta cheese are not recommended for use with this attachment.
cleaning
● Always switch off and unplug before removing the attachment from the appliance.
- Dismantle the attachment fully before cleaning.
- For easier cleaning always wash the parts immediately after use.
- Handle the cutting discs with care – they are extremely sharp.
- Use the cleaning tool to dislodge any food which may become trapped in the dicing grid. Push the food out from underneath the dicing grid ⑦.
- Never immerse the gearbox assembly in water or allow it to get wet.
All remaining parts can be washed in hot soapy water, then dried thoroughly. Take care as the cutting discs are sharp. Alternatively wash in the dishwasher (top rack only).
service and customer
care
UK only
If you need help with:
• using your attachment
- servicing or repairs (in or out of guarantee)
call Kenwood customer care on 023 9239 2333. Have your model number ready (KAX400PL) and date code (e.g. 18B08) ready. They are on the attachment outer carton.
- spares and attachments
call 0844 557 3653.
other countries
- If you experience any problems with the operation of your attachment, before requesting assistance visit www.kenwoodworld.com.
- Please note that your product is covered by a warranty, which complies with all legal provisions concerning any existing warranty and consumer rights in the country where the product was purchased.
- If your Kenwood product malfunctions or you find any defects, please send it or bring it to an authorised KENWOOD Service Centre. To find up to date details of your nearest authorised KENWOOD Service centre visit www.kenwoodworld.com or the website specific to your Country.
- Designed and engineered by Kenwood in the UK.
- Made in China.
Nederlands
.Twist Connection System
Brand : KENWOOD
Model : KAX400PL
Category : Autres robots de cuisine