
TL-SG1008PE - Network switch TP-LINK - Free user manual and instructions
Find the device manual for free TL-SG1008PE TP-LINK in PDF.


| Product Type | Network Switch |
| Brand | TP-Link |
| Model | TL-SG1008PE |
| Number of Ports | 8 RJ45 10/100/1000 Mbps ports |
| Power over Ethernet (PoE) | Yes, up to 56 W total PoE budget |
| Dimensions (W x D x H) | 158 x 101 x 25 mm |
| Weight | 0.6 kg |
| Power Supply | External power adapter (included) |
| Operating Temperature | 0 °C to 40 °C |
| Operating Humidity | 10 % to 90 % non-condensing |
| Installation | Desktop or rack (brackets included) |
| Ventilation | Fanless (silent) |
| Management | Unmanaged (plug-and-play) |
| Standards | IEEE 802.3, 802.3u, 802.3ab, 802.3x, 802.3af/at |
| Safety | Keep away from water, fire, humidity. Do not open. |
| Maintenance | Clean with a dry cloth. Disconnect before cleaning. |
| Warranty | Check the TP-Link website for period and conditions. |
| Package Contents | Switch, power adapter, rack brackets, screws, rubber feet, installation guide |
Frequently Asked Questions - TL-SG1008PE TP-LINK
User questions about TL-SG1008PE TP-LINK
0 question about this device. Answer the ones you know or ask your own.
Ask a new question about this device
Download the instructions for your Network switch in PDF format for free! Find your manual TL-SG1008PE - TP-LINK and take your electronic device back in hand. On this page are published all the documents necessary for the use of your device. TL-SG1008PE by TP-LINK.
USER MANUAL TL-SG1008PE TP-LINK
· SFP-Port
- Einschalten
Konfiguration
- Desktop Installation
To install the device on the desktop, please follow the steps below:
- Set the device on a flat surface strong enough to support the entire weight of the device with all fittings.
- Remove the adhesive backing papers from the rubber feet.
- Turnover the device and attach the supplied rubber feet to the recessed areas on the bottom at each corner of the device.
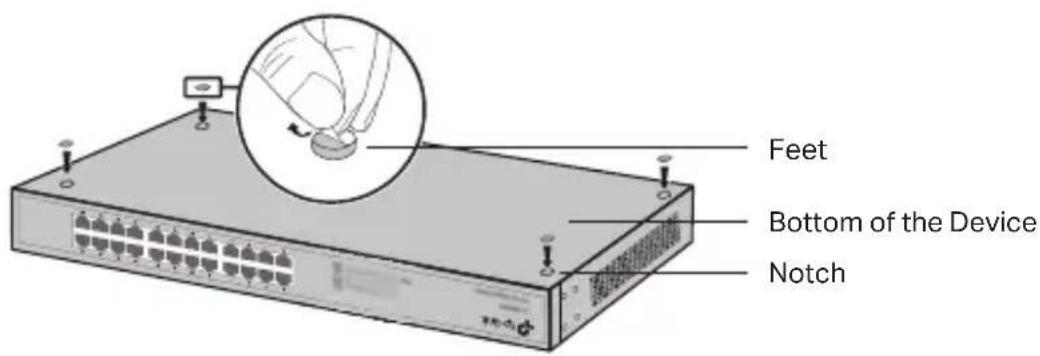
- Rack Installation
To install the device in a rack, follow the instructions described below:
- Check the grounding and stability of the rack.
- Secure the supplied rack-mounting brackets to each side of the device with supplied screws.
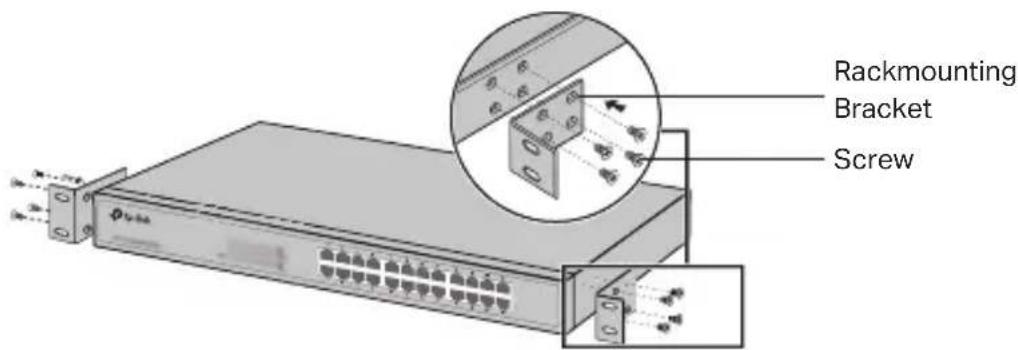
- After the brackets are attached to the device, use suitable screws (not provided) to secure the brackets to the rack.
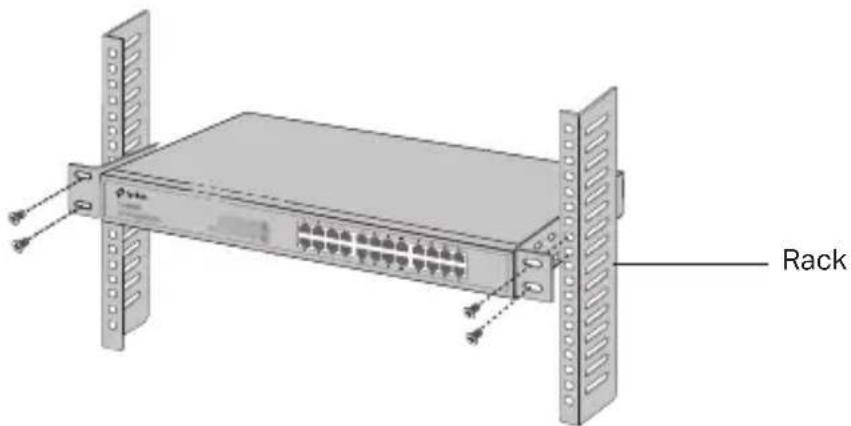
Connection
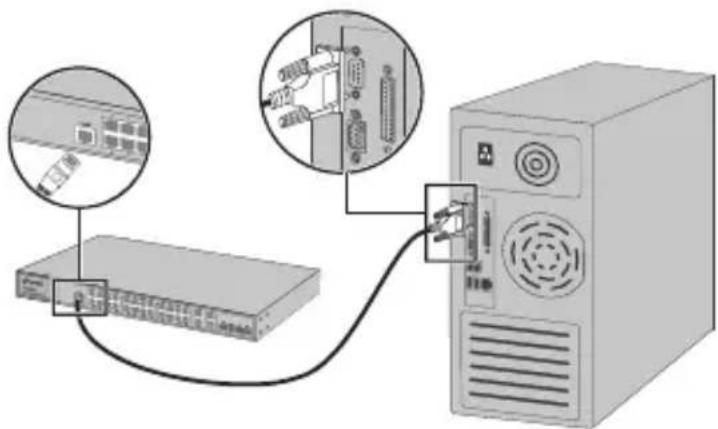
- Ethernet Port
Connect an Ethernet port of the switch to the computer by RJ45 cable as the following figure shown.
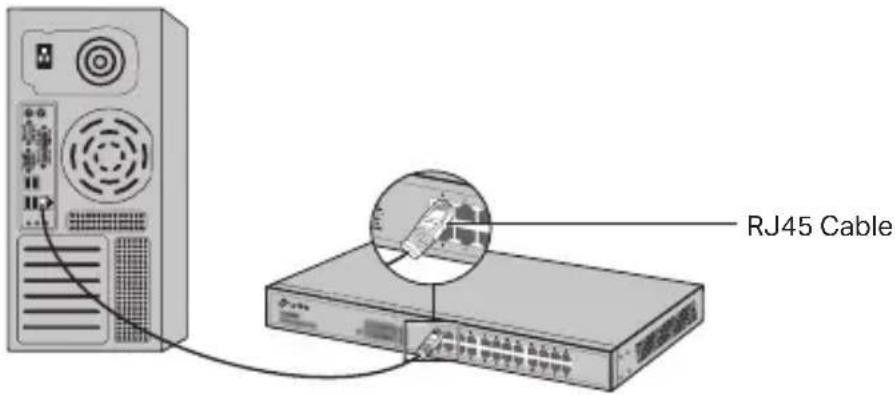
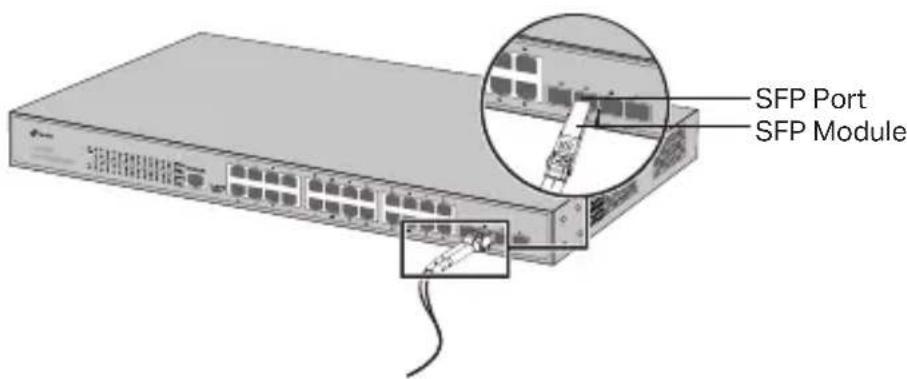
· SFP Port
For switches with SFP ports, you can connect a SFP port to a SFP module. If an SFP transceiver is installed in a slot and has a valid link on the port, the associated RJ45 port will be disabled and cannot be used.
- Console Port
For switches with the console port, you can connect the console port with your computer by the console cable. Then you can load the CLI to manage the switch.
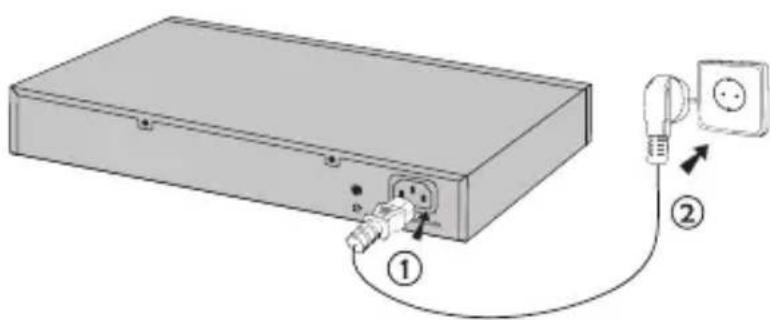
- Power On
Plug the female connector of the provided power cord into the power socket of the device, and the male connector into a power outlet.
Configuration
(Unavailable for Unmanaged Switches)
- Configure the Switch Using the GUI
-
Set the IP address of your PC in the same subnet of the switch. The IP address is 192.168.0.x ("x" is any number from 2 to 254); the Subnet Mask is 255.255.255.0.
-
Open a web browser and type the default management address http://192.168.0.1 in the address field of the browser, then press the Enter key.
-
Enter admin for the default User Name and Password, both in lower case letters. Then click the Login button or press the Enter key.
-
After a successful login, you can configure the switch on the management page.
- Configure the Switch Using the Controller
(Only for Smart Switches, Easy Managed Switches and Managed Switches)
You can use the Controller to centrally manage the entire network of the switches. For the detailed information as to how to do this, please refer to the product specifications and the Controller User Guide.
- Configure the Switch Using the CLI
(Only for Smart Switches and Managed Switches)
You can log on to the switch and access the CLI to manage the switch. For the detailed instructions as to how to do this, please refer to the CLI Guide.
- Configure the Switch Using the Utility
(Only for Easy Smart Switches)
You can use the Easy Smart Configuration Utility to centrally manage the entire network of the Easy Smart Switches. For the detailed instructions as to how to do this, please refer to the Utility User Guide.
Instalación
- Puerto SFP
Configuración
- Ενεργοποίηση
natural_image
Diagram of a device with labeled components, showing a box connected to an electrical outlet via wires (no text or symbols present)Ρύθμιση
Configuration
- Accensione
Configurazione
(Solo per Switch Smart, Switch Easy Managed e Switch Managed)
(Solo per Switch Smart e Managed)
·Ligar
Configuração
(Apenas para Smart Switches, Easy Managed Switches e Managed Switches)
- Virta päällä
Konfigurointi
• Inschakelen
natural_image
Diagram of a device with labeled components, showing a rectangular box connected to a plug and a socket (no text or symbols present)Configuratie
- Slå på strömmen
Konfiguration
- For å slå på
natural_image
Diagram of a device with labeled components, showing a box connected to an electrical outlet via wires (no text or symbols present)Konfigurasjon
(Kun for Smart Switches, Easy Managed Switches og Managed Switches)
• Tændt
natural_image
Diagram of a device with labeled components, showing a rectangular box connected to an electrical outlet via wires (no text or symbols present)Konfiguration
(Kun for Easy Smart-switches)
- Keep the device away from water, fire, humidity or hot environments.
- Do not attempt to disassemble, repair, or modify the device. If you need service, please contact us.
- The socket-outlet shall be installed near the equipment and shall be easily accessible.
- The plug on the power supply cord is used as the disconnect device, the socket-outlet shall be easily accessible.
- Place the device with its bottom surface downward.
Please read and follow the above safety information when operating the device. We cannot guarantee that no accidents or damage will occur due to improper use of the device. Please use this product with care and operate at your own risk.
TP-Link Limited Product Warranty
For TP-Link Branded Products Only. For the information about warranty period, policy and procedures, please visit https://www.tp-link.com/en/support
THIS WARRANTY GIVES YOU SPECIFIC LEGAL RIGHTS, AND YOU MAY HAVE OTHER RIGHTS THAT VARY FROM STATE TO STATE (OR BY COUNTRY OR PROVINCE).
TO THE EXTENT ALLOWED BY LOCAL LAW, THIS WARRANTY AND THE REMEDIES SET FORTH ARE EXCLUSIVE AND IN LIEU OF ALL OTHER WARRANTIES, REMEDIES AND
CONDITIONS.
TP-Link warrants the TP-Link branded hardware product contained in the original packaging against defects in materials and workmanship when used normally in according with TP-Link's guidelines for some period which depends on the local service from the date of original retail purchase by the end-user purchaser.
Español
TP-Link hereby declares that the device is in compliance with the essential requirements and other relevant provisions of directives 2014/30/EU, 2014/35/EU, 2011/65/EU and (EU)2015/863.
The original EU declaration of conformity may be found at https://www.tp-link.com/en/support/ce/
Español
For technical support, the user guide and more information, please visit https://www.tp-link.com/support/?type=smb, or simply scan the QR code.
- · SFP-Port
- - Einschalten
- Konfiguration
- - Desktop Installation
- - Rack Installation
- Connection
- - Ethernet Port
- · SFP Port
- - Console Port
- - Power On
- Configuration
- - Configure the Switch Using the GUI
- - Configure the Switch Using the Controller
- - Configure the Switch Using the CLI
- - Configure the Switch Using the Utility
- Instalación
- - Puerto SFP
- Configuración
- - Ενεργοποίηση
- Ρύθμιση
- - Accensione
- Configurazione
- ·Ligar
- Configuração
- - Virta päällä
- Konfigurointi
- • Inschakelen
- Configuratie
- - Slå på strömmen
- - For å slå på
- Konfigurasjon
- • Tændt
- TP-Link Limited Product Warranty
- CONDITIONS.
- Español
Brand : TP-LINK
Model : TL-SG1008PE
Category : Network switch