
Club A1000 - Receiver JBL - Free user manual and instructions
Find the device manual for free Club A1000 JBL in PDF.


| Product type | Monoblock amplifier (receiver) |
| Brand | JBL |
| Model | Club A1000 |
| Dimensions (L x H x D) | 320 x 51,3 x 180 mm |
| Weight | 3,52 kg |
| Power supply | 9-16 V DC, fuse 35 A x 3 |
| Output power (4 ohms) | 600 W RMS |
| Output power (2 ohms) | 1000 W RMS |
| Frequency response | 10 - 320 Hz |
| Input sensitivity (line level) | 200 mV - 2,0 V |
| Input sensitivity (high level) | 2 V - 20 V |
| Signal-to-noise ratio | >80 dB |
| Total harmonic distortion | <1% |
| Crossover frequency | 32-320 Hz adjustable, 12 dB/octave |
| Recommended wire gauge | 4 AWG |
| Features | Gain adjustment, Bass Boost, phase inverter, turn-on mode (REM/DC), input level selection, low-pass filtering |
| Protection | Thermal, short circuit, over/under voltage |
| Maintenance and cleaning | Clean with a soft dry cloth. Avoid moisture. |
| Safety | Disconnect the negative battery terminal before installation. Wear protective glasses. |
| Spare parts and repairability | Replaceable fuses. After-sales service via warranty. |
| General information | Monoblock amplifier dedicated to subwoofers, compatible with high and low level signals, master/slave connection capability. |
Frequently Asked Questions - Club A1000 JBL
User questions about Club A1000 JBL
0 question about this device. Answer the ones you know or ask your own.
Ask a new question about this device
Download the instructions for your Receiver in PDF format for free! Find your manual Club A1000 - JBL and take your electronic device back in hand. On this page are published all the documents necessary for the use of your device. Club A1000 by JBL.
USER MANUAL Club A1000 JBL
Club A600 and Club A1000 Amplifiers

natural_image
Simple line drawing of a rectangular container with hatched sides and a small square label in the center (no text or symbols)
| Owner's Manual | EN |
| Betjeningsvejledning | DA |
| Bedienungsanleitung | DE |
| Manual de propietario | ES |
| Käyttöopas | FI |
| Mode d'emploi | FR |
| Manuale d'istruzioni | IT |
| Gebruikershandleiding | NL |
| Instrukcja obsługi | PL |
| Manual do utilizador | PT |
| Bruksanvisning | SV |
| Kullanıcı Kılavuzu | TR |
| Руководство пользователя | RU |
| 用户手册 | ZH-CN |
| 使用者手册 | ZH-TW |
| Panduan Pengguna | ID |
| 取扱説明書 | JP |
| 사용자 설명서 | KO |
Торговая марка: JBL
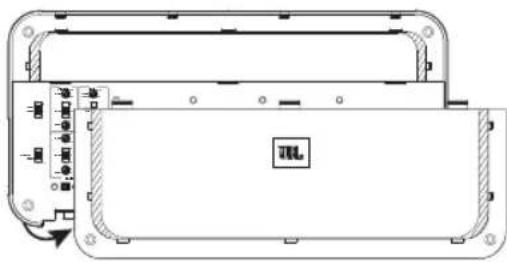
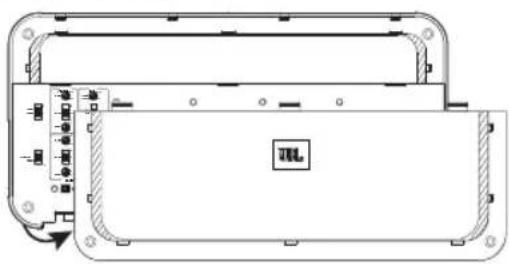
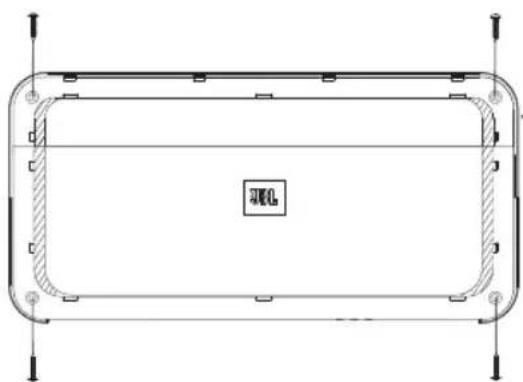
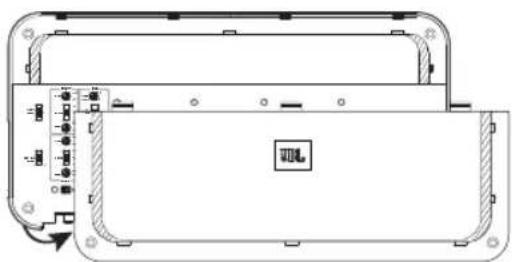
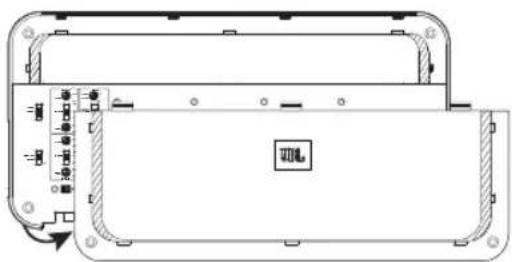
ACCESSING CONNECTORS AND CONTROL PANEL
EN
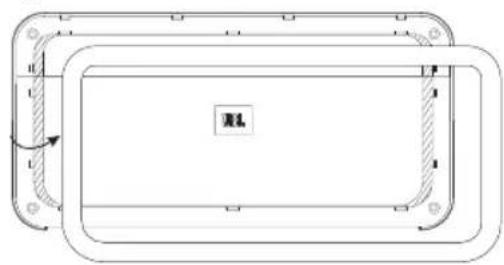
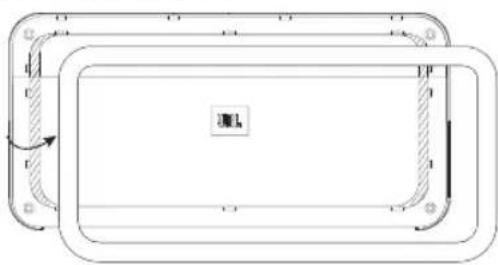
- Pry off trim piece

natural_image
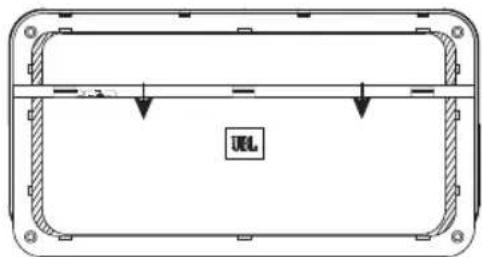
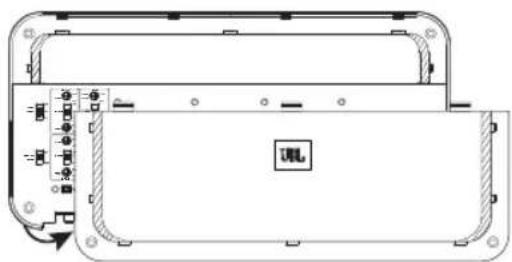
Pure technical line drawing of a rectangular frame with rounded corners and a central label (no text or symbols)- Slide the panel cover down

natural_image
Technical line drawing of a rectangular enclosure with mounting holes and a horizontal beam, no text or symbols present- Remove panel cover

natural_image
Technical line drawing of a device casing with internal components and mounting holes (no text or symbols)
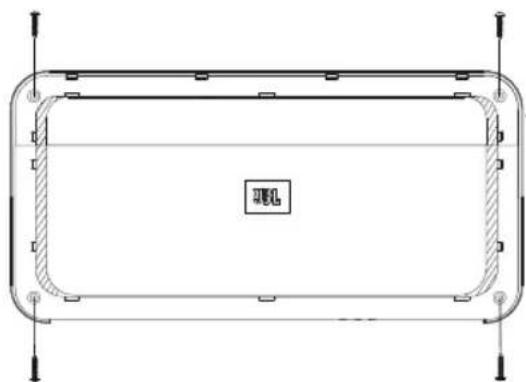
MOUNTING THE AMP

natural_image
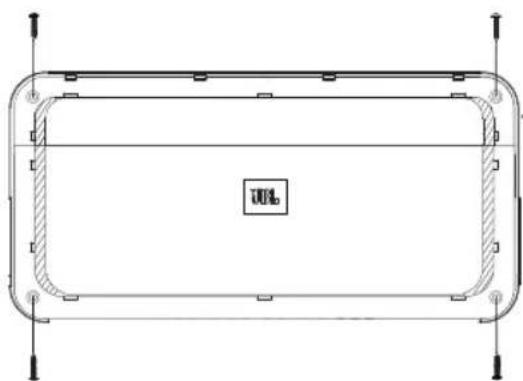
Pure technical line drawing of a rectangular frame with rounded corners and no text or symbolsNote: It is recommended that you make all wire connections before permanently mounting the amp.
IMPORTANT: Disconnect the vehicle's negative (−) battery terminal before beginning the installation.
• Always wear protective eyewear when using tools.
- Choose a safe mounting location, away from moisture. Check clearances on both sides of a planned mounting surface. Be sure that screws or wires will not puncture brake lines, fuel lines, or wiring harnesses and that wire routing will not interfere with the safe vehicle operation. Use caution when drilling or cutting in the mounting area.
- Choose a location that provides enough air circulation.
- Do not mount the amplifier with the heat sink facing downward, as this interferes with cooling.
- Mount the amplifier so that it will not be damaged by the feet of backseat passengers or shifting cargo in the trunk.
WIRING FOR POWER AND GROUND
At amplifier:

At ground location:
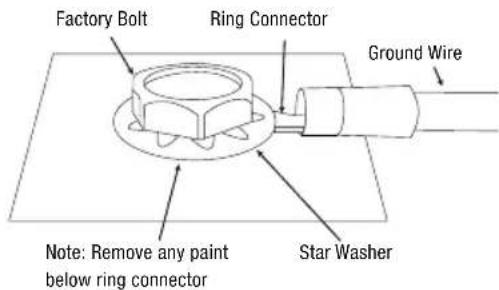
WIRING FOR INPUT SIGNAL
Low-level signals
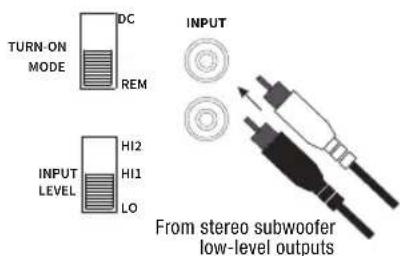
Note: when using low-level signals and remote turn-on lead, set the "TURN-ON-MODE" REM INPUT LEVEL
switch to 'LO
High-level signals
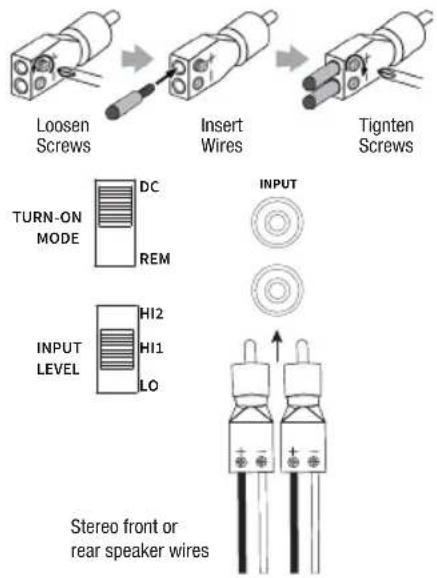
Note: when using high-level signals, set the "TURN-ON MODE switch to "DC" and the "INPUT LEVEL. If no sound plays, change the "INPUT LEVEL." HI1 HI2
CONNECTING TWO CLUB A1000 AMPLIFIERS FOR EXTRA POWER
To connect two Club A1000 amplifiers, use an RCA patch cable to connect the "PRIMARY OUT" of the primary amplifier to the "SECONDARY IN" of the secondary amplifier. Set the Primary/Secondary switch to "PRIMARY" on the primary amplifier, and to "SECONDARY" on the secondary amplifier.
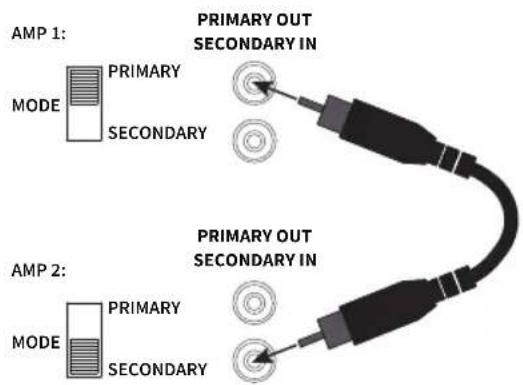
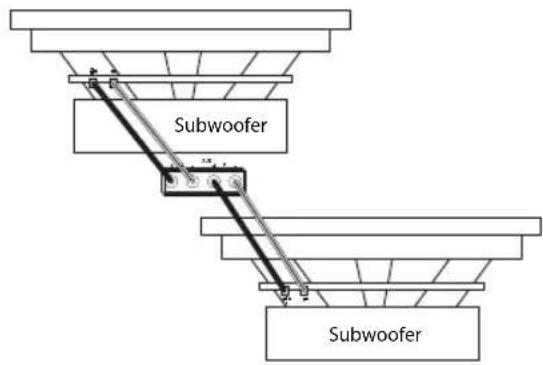
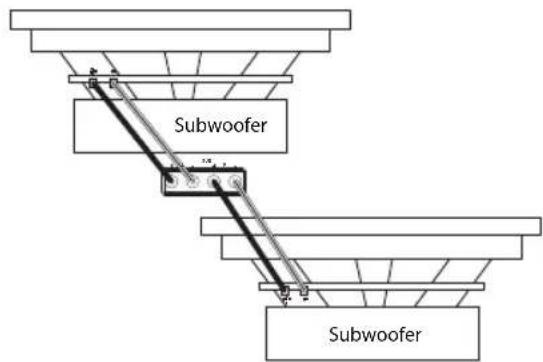
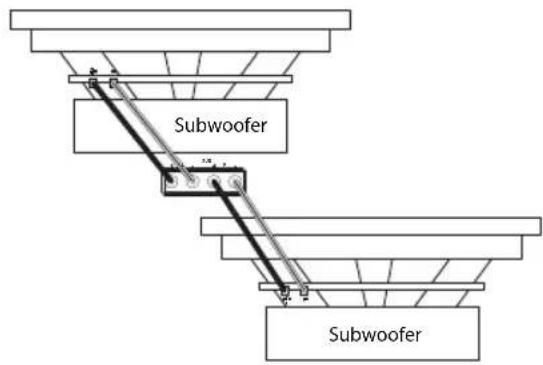
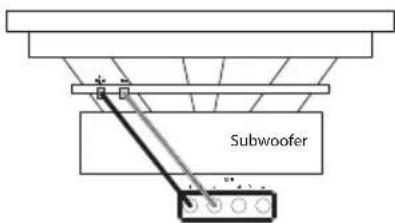
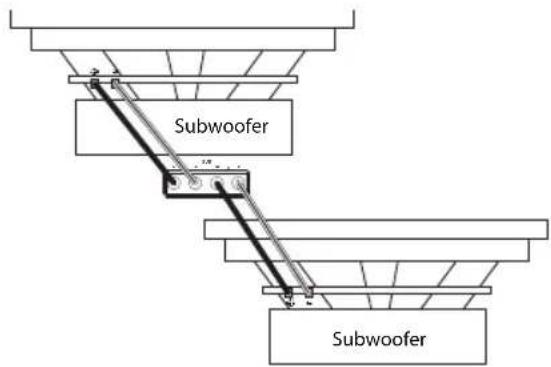
WIRING FOR AUDIO OUTPUT
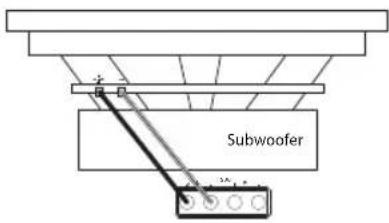
One subwoofer (4ohm/2ohm)

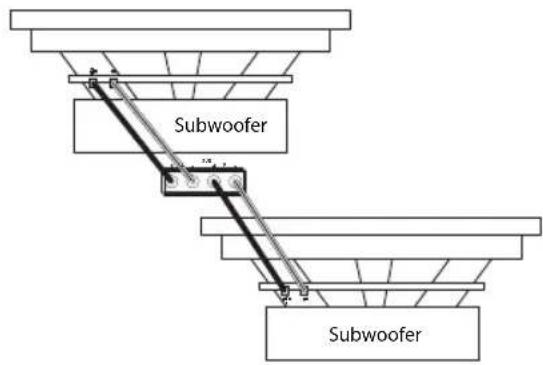
Two subwoofers (4ohm)

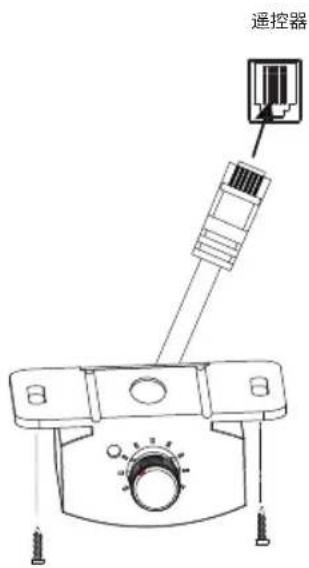
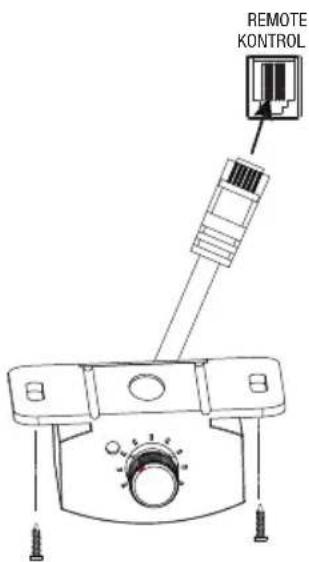
CONNECTING THE REMOTE BASS CONTROLLER

SETTING GAIN, CROSSOVERS, AND BASS BOOST
Setting the gain

- Start with GAIN control set to minimum, and the crossover control rotated midway.
- Choose music with substantial bass content.
- Turn the volume control on your receiver to 34 of its total output.
- Adjust the GAIN control clockwise, listening carefully to the bass output. If you hear distortion, turn the GAINrol counterclockwise to decrease the gain.
Selecting the crossover frequency

Choose the crossover point to suit listening preferences. Turn the dials to the left to lower the crossover point and to the right to raise the crossover point. Exact crossover settings depend on your listening preferences.
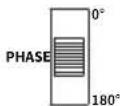
Selecting the subwoofer phase
Switch the PHASE back and forth to determine which setting provides the most clean bass output.
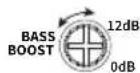
Selecting the bass boost
Adjust the BASS-BOOST control clockwise or counterclockwise to suit your taste.
SPECIFICATIONS
| Club A600 Club | A1000 | |
| Power output @ 4 ohms | 350 watts RMS x 1 | 600 watts RMS x 1 |
| Power output @ 2 ohms | 600 watts RMS x 1 | 1000 watts RMS x 1 |
| Frequency response 10 | -320 Hz 10-320 Hz | |
| Crossover frequencies | 32-320 Hz variable, 12 dB/octave | 32 -320 Hz variable 12 dB/Octave |
| Line-level input sensitivity | 200 mV rms - 2.0 V rms | 200 mV rms - 2.0 V rms |
| High-level input sensitivity | 2V rms - 20V rms. | 2V rms - 20V rms. |
| Signal-to-noise ratio >80 dB | >80 dB | |
| THD+N @ rated power | <1% | <1% |
| Fuse rating | 30 A x 2 | 35 A x 3 |
| Operating voltage | 9-16 V | 9-16 V |
| Dimensions (W x H x D) | 8-11/16" x 2-1/16" x 7-1/8" (220 mm x 51.3 mm x 180 mm) | 12-5/8" x 2-1/16" x 7-1/8" (320 mm x 51.3 mm x 180 mm) |
| Weight | 2.46 kg | 3.52 kg |
| Recommended wire gauge | 8 | 4 |
TROUBLESHOOTING
No audio and POWER INDICATOR is off.
- No voltage at BATT+ and/or REM terminals, or bad or no ground connection. Check voltages at amplifier terminals with VOM.
No audio and PROTECT INDICATOR flashes every 4 seconds.
EN
- DC voltage on amplifier output. Amplifier may need service; see enclosed warranty card for service information.
No audio and PROTECT and POWER INDICATORS flash.
- Voltage less than 9V on BATT+ connection. Check vehicle charging system.
No audio and PROTECT INDICATOR is on.
- Amplifier is overheated. Make sure amplifier cooling is not blocked at mounting location. Or, there may be voltage greater than 16V (or less than 8.5V) on BATT+ connection. Check vehicle charging system.
Amplifier fuse keeps blowing.
- The wiring is connected incorrectly or there is a short circuit. Check wiring connections.
Distorted audio.
- Gain Is Not Set Properly. Check Setting. Check Wires For Shorts Or Grounds. Amplifier Or Source Unit May Be Defective.
Distorted audio and PROTECT INDICATOR flashes.
- Short circuit in speaker or wire. Remove speaker leads one at a time to locate shorted speaker or wire, and repair.
Music lacks dynamics or "punch".
- Speakers are not connected properly. Check speaker connections for proper polarity.
Engine noise—whining or clicking—in system when the engine is on.
- Amplifier is picking up alternator noise. First, check ground connection on the amplifier – a loose or improper ground is one of the main causes for noise. Turn down gain. Move RCA audio cables away from power wires. Installing an alternator noise filter on power line between battery and alternator might also be necessary.
HVAD ER DER I AESKEN

ADGANG TIL TILSLUTNINGER OG KONTROLPANEL
- Fjern kantdel

natural_image
Technical line drawing of a rectangular electronic component with rounded corners and a central label (no text or symbols beyond the label)DA
- Skub paneldækslet ned
natural_image
Pure technical diagram of a rectangular enclosure with mounting flanges and internal structure, no text or symbols present.- Fjern paneldækslet
natural_image
Technical line drawing of a device casing with internal components and mounting holes (no text or symbols)
MONTERING AF FORSTÆRKEREN

natural_image
Pure technical line drawing of a rectangular frame with rounded corners and a central square, no text or symbols present.LEDNINGER TIL LYDUDGANG
En subwoofer (4 ohm/2 ohm)

To Subwoofere (4 ohm)
TILSLUTNING AF FJERNBETJENING AF BASSEN

INDSTILLING AF FORSTÆRKNING, CROSSOVERS OG BAS-FORSTÆRKNING
natural_image
Technical line drawing of a rectangular enclosure with mounting flanges and a horizontal beam, no text or symbols present.- Abdeckung entfernen

natural_image
Technical line drawing of a device casing with internal components and mounting holes (no text or symbols)
natural_image
Pure technical line drawing of a rectangular frame with rounded corners and a central square, no text or symbols present.ACCESO A LOS CONECTORES Y EL PANEL DE CONTROL
natural_image
Technical line drawing of a rectangular enclosure with mounting flanges and a horizontal beam, no text or symbols present.natural_image
Technical line drawing of a device casing with internal components and mounting brackets (no text or symbols)
natural_image
Pure technical line drawing of a rectangular frame with rounded corners and a central square, no text or symbols present.natural_image
Technical line drawing of a rectangular enclosure with mounting flanges and internal horizontal bars, no text or symbols present.- Poista paneelin kansi
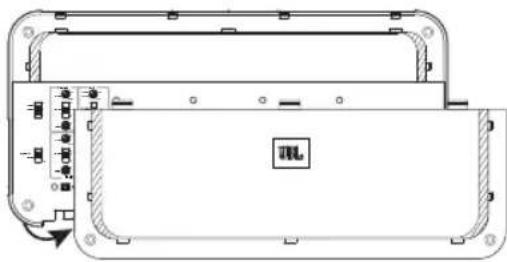
natural_image
Technical line drawing of a device casing with internal components and mounting brackets (no text or symbols)VAHVISTIMEN ASENTAMINEN

natural_image
Technical line drawing of a rectangular frame with corner supports and a central square label (no text or symbols)JOHDOTUS, VIRTA JA MAA
Vahvistimessa:
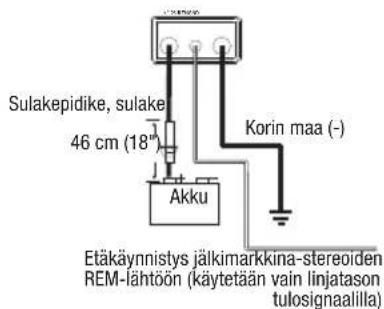
KAIUTTIMIEN JOHDOTUS
Yksi subwoofer (4 ohm / 2 ohm)

Kaksi subwooferia (4 ohm)
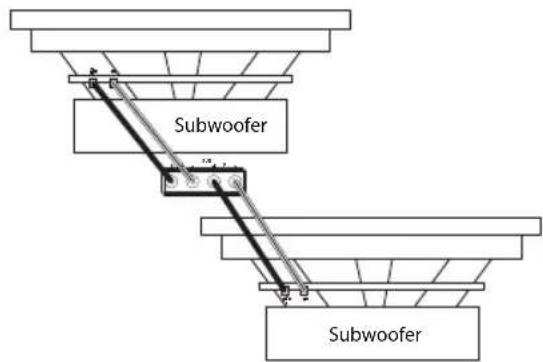
BASSON KAUKOSÄÄTIMEN KYTKEMINEN

ASETUKSET VAHVISTUKSELLE (GAIN), JAKOTAAJUUDELLE, VAIHEELLE JA BASSOTEHOSTUKSELLE
ACCÈS AUX CONNECTEURS ET AU PANNEAU DE COMMANDE
natural_image
Pure technical diagram of a rectangular enclosure with mounting flanges and internal structure, no text or symbols present.FR
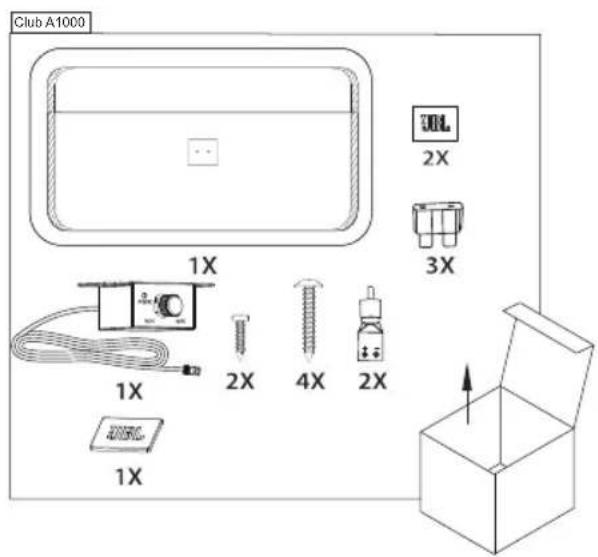
- Retirez le couvercle.

natural_image
Technical line drawing of a device casing with internal components and mounting holes (no text or symbols)MONTAGE DE L'AMPLIFICATEUR
natural_image
Pure technical line drawing of a rectangular frame with rounded corners and a central square, no text or symbols present.CÂBLAGE DE LA SORTIE AUDIO
Un caisson de basses (4 ohms / 2 ohms)

Deux caissons de basses (4 ohms)
BRANCHEMENT DE LA TÉLÉCOMMANDE DES GRAVES

RÉGLAGE DU GAIN, DU FILTRE DE RÉPARTITION ET DE L'AMPLIFICATION DES GRAVES

Réglage du gain
ACCESSO AI CONNETTORI ED AL PANNELLO DI CONTROLLO
- Rimuovere la cornice

natural_image
Pure technical diagram of a rectangular enclosure with mounting flanges and internal features, no text or symbols present.natural_image
Technical line drawing of a device casing with internal components and mounting holes (no text or symbols)MONTAGGIO DELL'AMPLIFICATORE

natural_image
Pure technical line drawing of a rectangular frame with rounded corners and a central square, no text or symbols present.CABLAGGIO PER L'USCITA AUDIO
Un subwoofer (4 ohm/2 ohm)

Due subwoofer (4 ohm)
COLLEGAMENTO DEL CONTROLLER REMOTO DEI BASSI

IMPOSTAZIONE DEL GUADAGNO, CROSSOVER E BASS BOOST
GEBRUIK VAN CONNECTOREN EN BEDIENINGSPANEEL
natural_image
Technical line drawing of a rectangular enclosure with mounting flanges and a horizontal beam, no text or symbols present.- Verwijder het kapje
natural_image
Technical line drawing of a device casing with internal components and mounting holes (no text or symbols)DE VERSTERKER MONTEREN
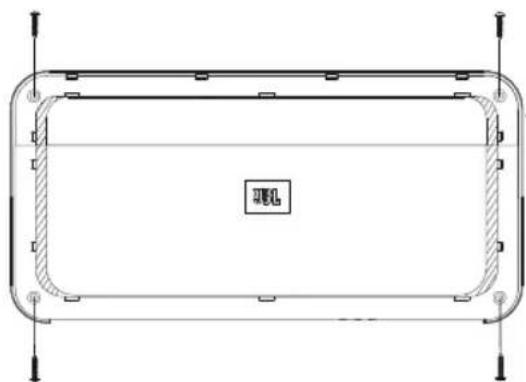
natural_image
Pure technical line drawing of a rectangular frame with rounded corners and a central square, no text or symbols present.BEDRADING VOOR AUDIO-UITVOER
Eén subwoofer (4 ohm / 2 ohm)

Twee subwoofers (4 ohm)

DE EXTERNE BASCONTROLLER AANSLUITEN
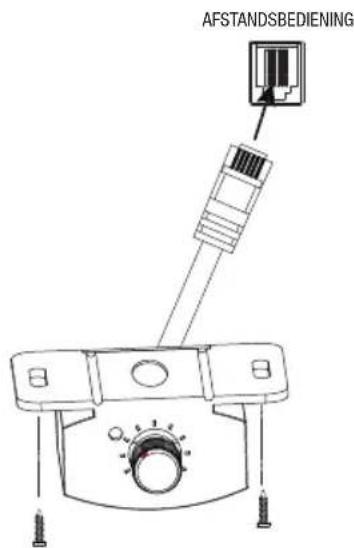
VERSTERKING (GAIN), CROSSOVERS EN BASVERSTERKING INSTELLEN
Versterking (gain) instellen

UZYSKIWANIE DOSTĘPU DO ZŁĄCZY I PANELU STEROWANIA
natural_image
Technical line drawing of a rectangular enclosure with mounting flanges and a horizontal beam, no text or symbols present.- Usuń pokrywę panelu
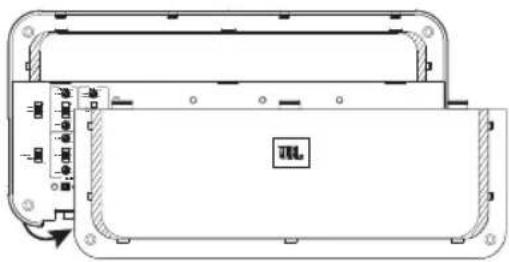
natural_image
Technical line drawing of a device casing with internal components and mounting holes (no text or symbols)
natural_image
Pure technical line drawing of a rectangular frame with rounded corners and a central square, no text or symbols present.PRZEWODY DLA WYJŚCIA AUDIO
Jeden subwoofer (4 omy/2 omy)
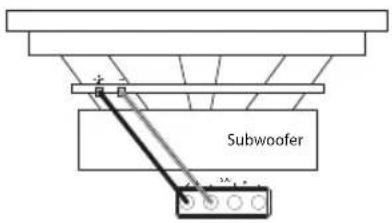
Dwa subwoofery (4 omy)

PODŁĄCZANIE PILOTA ZDALNEGO STEROWANIA NISKIMI TONAMI
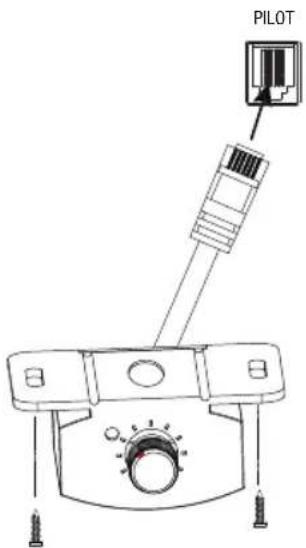
REGULOWANIE WZMOCNIENIA, ZWROTNIC I POZIOMU BASÓW
ACEDER AOS CONECTORES E AO PAINEL DE CONTROLO
natural_image
Pure technical diagram of a rectangular enclosure with mounting flanges and internal features, no text or symbols present.- Retire a tampa do painel

natural_image
Technical line drawing of a device casing with internal components and mounting holes (no text or symbols)
MONTAGEM DO AMPLIFICADOR

natural_image
Pure technical line drawing of a rectangular frame with rounded corners and a central square, no text or symbols present.CABLAGEM PARA SAÍDA DE ÁUDIO
Um subwoofer (4 ohm/2 ohm)

Dois subwoofers (4 ohm)
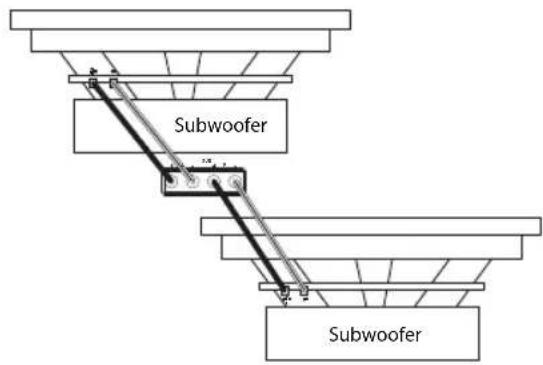
LIGAR O CONTROLO REMOTO DE GRAVES

DEFINIR O GANHO, CROSSOVERS E REFORÇO DE GRAVES
Definir o ganho

ÅTKOMST TILL ANSLUTNINGAR OCH KONTROLLPANEL
- Avlägsna ramen
natural_image
Pure technical diagram of a rectangular enclosure with mounting flanges and internal structure, no text or symbols present.natural_image
Technical line drawing of a device casing with internal components and mounting holes (no text or symbols)
natural_image
Pure technical line drawing of a rectangular frame with rounded corners and a central square, no text or symbols present.KABELDRAGNING TILL HÖGTALARE
En subwoofer (4ohm/2ohm)

natural_image
Technical line drawing of a mechanical device with ports and a connector (no text or symbols)STÄLLA IN FÖRSTÄRKNING, DELNINGSFILTER OCH BASFÖRSTÄRKNING
ERİŞIM BAĞLANTILARI VE KONTROL PANELI
natural_image
Technical line drawing of a rectangular enclosure with mounting flanges and a horizontal beam, no text or symbols present.natural_image
Technical line drawing of a device casing with internal components and mounting holes (no text or symbols)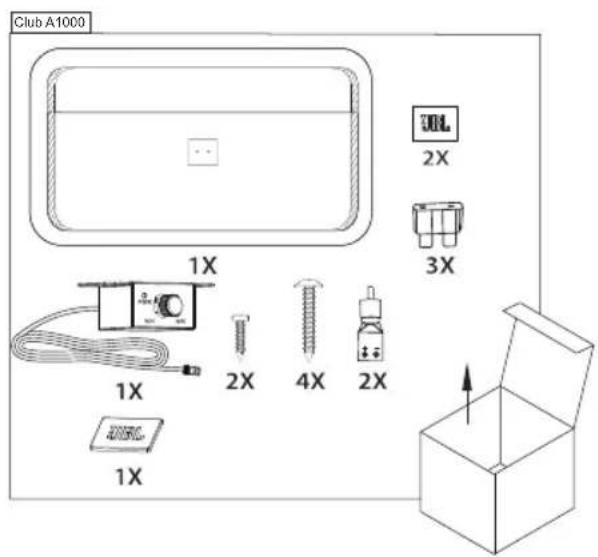
natural_image
Pure technical line drawing of a rectangular frame with rounded corners and a central square, no text or symbols present.SES ÇIKIŞI IÇIN KABLOLAMA
Bir subwoofer (4 ohm/2 ohm)

İki subwoofer (4 ohm)

UZAKTAN BAS KONTROLÖRÜNÜ BAĞLAMA

natural_image
Pure technical diagram of a rectangular frame with rounded corners and internal hatching, no text or symbols present.natural_image
Technical line drawing of a device casing with internal components and mounting holes (no text or symbols)
УСТАНОВКА УСИЛИТЕЛЯ
natural_image
Technical line drawing of a rectangular frame with rounded corners and a central square, no text or symbols present.使用接口和控制面板
1.撬开装饰件

- 向下滑动面板盖

natural_image
Technical line drawing of a rectangular electronic component with mounting flanges and internal features (no text or symbols)- 取下面板盖
natural_image
Technical line drawing of a device casing with internal components and mounting brackets (no text or symbols)
安装放大器

natural_image
Pure technical line drawing of a rectangular frame with rounded corners and a central square, no text or symbols present.ZH-CN
扬声器输出接线
一台低音炮 (4ohm/2ohm)

两台低音炮 (4ohm)

连接远程低音控制器
设置增益,分频和低音增强
设置增益

存取接口和控制面板
1.撬開裝飾件

natural_image
Pure technical diagram of a rectangular frame with rounded corners and internal hatching, no text or symbols present.- 向下滑動面板蓋

natural_image
Pure technical diagram of a rectangular enclosure with mounting flanges and internal horizontal bars, no text or symbols present.- 取下面板蓋
natural_image
Technical line drawing of a device casing with internal components and mounting brackets (no text or symbols)安装功放

natural_image
Pure technical line drawing of a rectangular frame with rounded corners and a central square, no text or symbols present.MENGAKSES KONEKTOR DAN PANEL KONTROL
natural_image
Technical line drawing of a rectangular enclosure with mounting flanges and a horizontal beam, no text or symbols present.- Lepas penutup panel
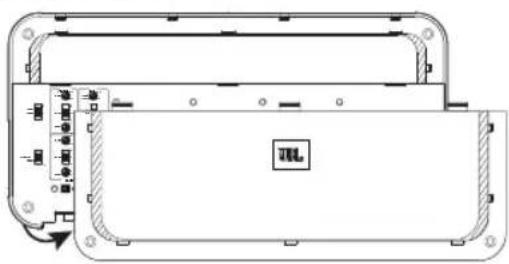
natural_image
Technical line drawing of a device casing with internal components and mounting brackets (no text or symbols)
natural_image
Pure technical line drawing of a rectangular frame with rounded corners and a central square label (no text or symbols)SAMBUNGAN KABEL OUTPUT AUDIO
Satu subwoofer (4 ohm/2 ohm)
Dua subwoofer (4 ohm)
MENYAMBUNGKAN PENGONTROL BAS JARAK JAUH
MENGATUR GAIN, CROSSOVER, DAN PENINGKAT BAS
Mengatur gain
コネクタとコントロールパネルの使用
- トリムピース を取り外す

natural_image
Technical line drawing of a rectangular frame with rounded corners and a central label (no text or symbols)- パネルカバーを下にスライドさせる

natural_image
Technical line drawing of a rectangular enclosure with mounting holes and a horizontal beam, no text or symbols present- パネルカバー を取り外す
natural_image
Technical line drawing of a device casing with internal components and mounting holes (no text or symbols)アンプの取り付け

natural_image
Pure technical line drawing of a rectangular frame with rounded corners and a central square labeled 'WIL' (no text or symbols beyond the label)커넥터 및 제어 패널 접근
- 테두리 부분을 들어 올립니다.
natural_image
Pure technical line drawing of a rectangular frame with rounded corners and a central square, no text or symbols present.2.패널 덮개를 아래로 믿니다.

natural_image
Technical line drawing of a rectangular electronic component with mounting flanges and internal features (no text or symbols)3.패널 덮개를 분리합니다.

natural_image
Technical line drawing of a device casing with internal components and mounting brackets (no text or symbols)
앱프 장착
natural_image
Technical line drawing of a rectangular frame with rounded corners and a central square labeled 'JUL' (no text or symbols beyond label)오디오 출력 배선
서브우퍼 한 개(4Ω/2Ω)
서브우퍼 두 개(4Ω)
원격 저음 컨트롤러 연결

- Club A600 and Club A1000 Amplifiers
- ACCESSING CONNECTORS AND CONTROL PANEL
- WIRING FOR POWER AND GROUND
- WIRING FOR INPUT SIGNAL
- CONNECTING TWO CLUB A1000 AMPLIFIERS FOR EXTRA POWER
- WIRING FOR AUDIO OUTPUT
- SETTING GAIN, CROSSOVERS, AND BASS BOOST
- Setting the gain
- Selecting the crossover frequency
- Selecting the subwoofer phase
- Selecting the bass boost
- TROUBLESHOOTING
- No audio and POWER INDICATOR is off.
- No audio and PROTECT INDICATOR flashes every 4 seconds.
- EN
- No audio and PROTECT and POWER INDICATORS flash.
- No audio and PROTECT INDICATOR is on.
- Amplifier fuse keeps blowing.
- Distorted audio.
- Distorted audio and PROTECT INDICATOR flashes.
- Music lacks dynamics or "punch".
- Engine noise—whining or clicking—in system when the engine is on.
- ADGANG TIL TILSLUTNINGER OG KONTROLPANEL
- LEDNINGER TIL LYDUDGANG
- TILSLUTNING AF FJERNBETJENING AF BASSEN
- INDSTILLING AF FORSTÆRKNING, CROSSOVERS OG BAS-FORSTÆRKNING
- ACCESO A LOS CONECTORES Y EL PANEL DE CONTROL
- JOHDOTUS, VIRTA JA MAA
- KAIUTTIMIEN JOHDOTUS
- BASSON KAUKOSÄÄTIMEN KYTKEMINEN
- ASETUKSET VAHVISTUKSELLE (GAIN), JAKOTAAJUUDELLE, VAIHEELLE JA BASSOTEHOSTUKSELLE
- ACCÈS AUX CONNECTEURS ET AU PANNEAU DE COMMANDE
- CÂBLAGE DE LA SORTIE AUDIO
- RÉGLAGE DU GAIN, DU FILTRE DE RÉPARTITION ET DE L'AMPLIFICATION DES GRAVES
- Réglage du gain
- ACCESSO AI CONNETTORI ED AL PANNELLO DI CONTROLLO
- CABLAGGIO PER L'USCITA AUDIO
- IMPOSTAZIONE DEL GUADAGNO, CROSSOVER E BASS BOOST
- GEBRUIK VAN CONNECTOREN EN BEDIENINGSPANEEL
- BEDRADING VOOR AUDIO-UITVOER
- DE EXTERNE BASCONTROLLER AANSLUITEN
- VERSTERKING (GAIN), CROSSOVERS EN BASVERSTERKING INSTELLEN
- Versterking (gain) instellen
- UZYSKIWANIE DOSTĘPU DO ZŁĄCZY I PANELU STEROWANIA
- PRZEWODY DLA WYJŚCIA AUDIO
- PODŁĄCZANIE PILOTA ZDALNEGO STEROWANIA NISKIMI TONAMI
- REGULOWANIE WZMOCNIENIA, ZWROTNIC I POZIOMU BASÓW
- ACEDER AOS CONECTORES E AO PAINEL DE CONTROLO
- CABLAGEM PARA SAÍDA DE ÁUDIO
- LIGAR O CONTROLO REMOTO DE GRAVES
- DEFINIR O GANHO, CROSSOVERS E REFORÇO DE GRAVES
- Definir o ganho
- ÅTKOMST TILL ANSLUTNINGAR OCH KONTROLLPANEL
- KABELDRAGNING TILL HÖGTALARE
- STÄLLA IN FÖRSTÄRKNING, DELNINGSFILTER OCH BASFÖRSTÄRKNING
- ERİŞIM BAĞLANTILARI VE KONTROL PANELI
- SES ÇIKIŞI IÇIN KABLOLAMA
- UZAKTAN BAS KONTROLÖRÜNÜ BAĞLAMA
- 使用接口和控制面板
- 扬声器输出接线
- 设置增益,分频和低音增强
- 设置增益
- 存取接口和控制面板
- MENGAKSES KONEKTOR DAN PANEL KONTROL
- SAMBUNGAN KABEL OUTPUT AUDIO
- MENYAMBUNGKAN PENGONTROL BAS JARAK JAUH
- MENGATUR GAIN, CROSSOVER, DAN PENINGKAT BAS
- Mengatur gain
- コネクタとコントロールパネルの使用
- 커넥터 및 제어 패널 접근
- 오디오 출력 배선
Brand : JBL
Model : Club A1000
Category : Receiver