
SNAPPY - Baby product CHICCO - Free user manual and instructions
Find the device manual for free SNAPPY CHICCO in PDF.
| Product type | Baby stroller |
| Brand | CHICCO |
| Model | SNAPPY |
| Recommended age | 6 to 36 months |
| Maximum supported weight | 15 kg |
| Harness type | 5-point harness |
| Backrest positions | 2 positions |
| Front wheels | Swivel with lock |
| Brakes | Unified brakes on rear wheels |
| Canopy | Yes, removable with velcro attachment |
| Included accessories | Rain cover, carry bag, transport strap, mattress (depending on version) |
| Folding | Manual with double safety (system 1 and 2) |
| Maintenance | Hand cleaning, lubrication of moving parts with silicone oil |
| Safety advice | Always use the harness, brake when stopped, do not leave unattended |
| Usage | Do not use on stairs or escalators |
Frequently Asked Questions - SNAPPY CHICCO
User questions about SNAPPY CHICCO
0 question about this device. Answer the ones you know or ask your own.
Ask a new question about this device
Download the instructions for your Baby product in PDF format for free! Find your manual SNAPPY - CHICCO and take your electronic device back in hand. On this page are published all the documents necessary for the use of your device. SNAPPY by CHICCO.
USER MANUAL SNAPPY CHICCO
Snappy/ Snappy Deluxe
79255 / 79255.930 / 79254
- ISTRUZIONI D'USO
MODE D'EMPLOI - GEBRAUCHSANLEITUNG
INSTRUCTIONS FOR USE
INSTRUCCIONES DE USO
INSTRUÇÉS PARA UTILIZAZão - GEBRUIKSAANWIJZINGEN
ANVÄNDNINGsinstruktionER - NÁVOD K POUZITI
INSTRUKCJE SPOSOBU UZYCIA
O△HΓIΕΣ XPHΣHΣ
KULLANIM BILGILERI - INHCTPYKLJNIO NO 3KCNJLYATAUIN
PbKOBOIDCTBO3A EKCNIOATAUIA
JLaeiw81 Claeioj

1 IMPORTANTE: CONSERVARLO PER OGNI RIFERIMENTO FUTURO - LEGGERE ATTENTAMENTE
F IMPORTANT: LE CONSERVER EN VUE D'UNE EVENTUELLE CONSULTATION FUTURE - LIRE ATTENTIVEMENT
WICHTIG: FÜR ZUKUNFTIGES NACHSCHLAGEN AUFBEWAHREN-BITTE DIESE GEBRAUCHSANLEITUNG SORGFÄLTIG LESEN
GB IMPORTANT: KEEP FOR FUTURE REFERENCE - READ CAREFULLY
E IMPORTANTE: CONSERVELO PARA FUTURAS CONSULTAS. - LEA ATENTAMENTE
P IMPORTANTE: CONSERVE-O PARA CONSULTAS FUTURAS - LEIA ATENTAMENTE
BELANGRIJK: VOOR LATERE RAADPLEGING BEWAREN - LEES DEZE GEBRUIKSAANWIJZINGEN
S VIKTIGT: SPARA FÖR FRAMTIDA BRUK - LÄS NOGGRANT
CZ DULEZITÉ: USCHOVESTE PRO PRIPADNÉ DALŠI POUŽITÍ - POZORNÉ SI PRECTETE!
PL WAZNE: ZACHOWA'c NA PRZYSZL-OsC -PRZECZYTAc UWAZNIE
GR ΣHMANTIKO: KPATHΣTE TIE OΔHΓΕΣ ΓIA NA TISE ΣYMBOYΛEYEΣTE ΣTO MEΛΛON - ΠPOΥΤΙTE BHΠΜΑTEJIbHO
TR ÖNEMLI: ILERDE REFERANS OLMAK ÜZERE SAKLAYINIZ - DIKKATLICE OKUYUNUZ
RUS OYEHb BAXKHO: COXPAHNTEДЯ ПОСLEДУЮЦИX KOHCyЛьТAUП - ΔIAB'AΣTE ПОБEXTIKA
BG BAXKHO: CbXPAHRAIte HA yIOBHO MACTO IN IPREPPOUHTAITE IPIH NOXODMOCT.
SA
J


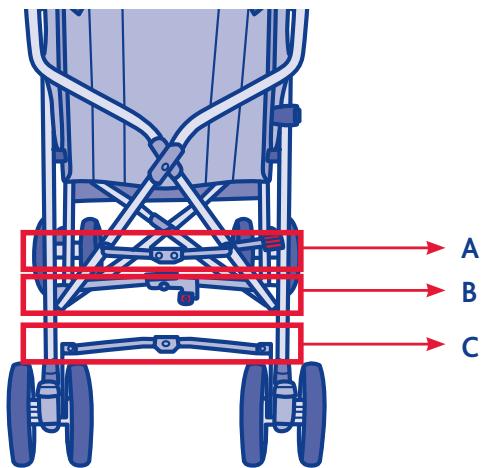
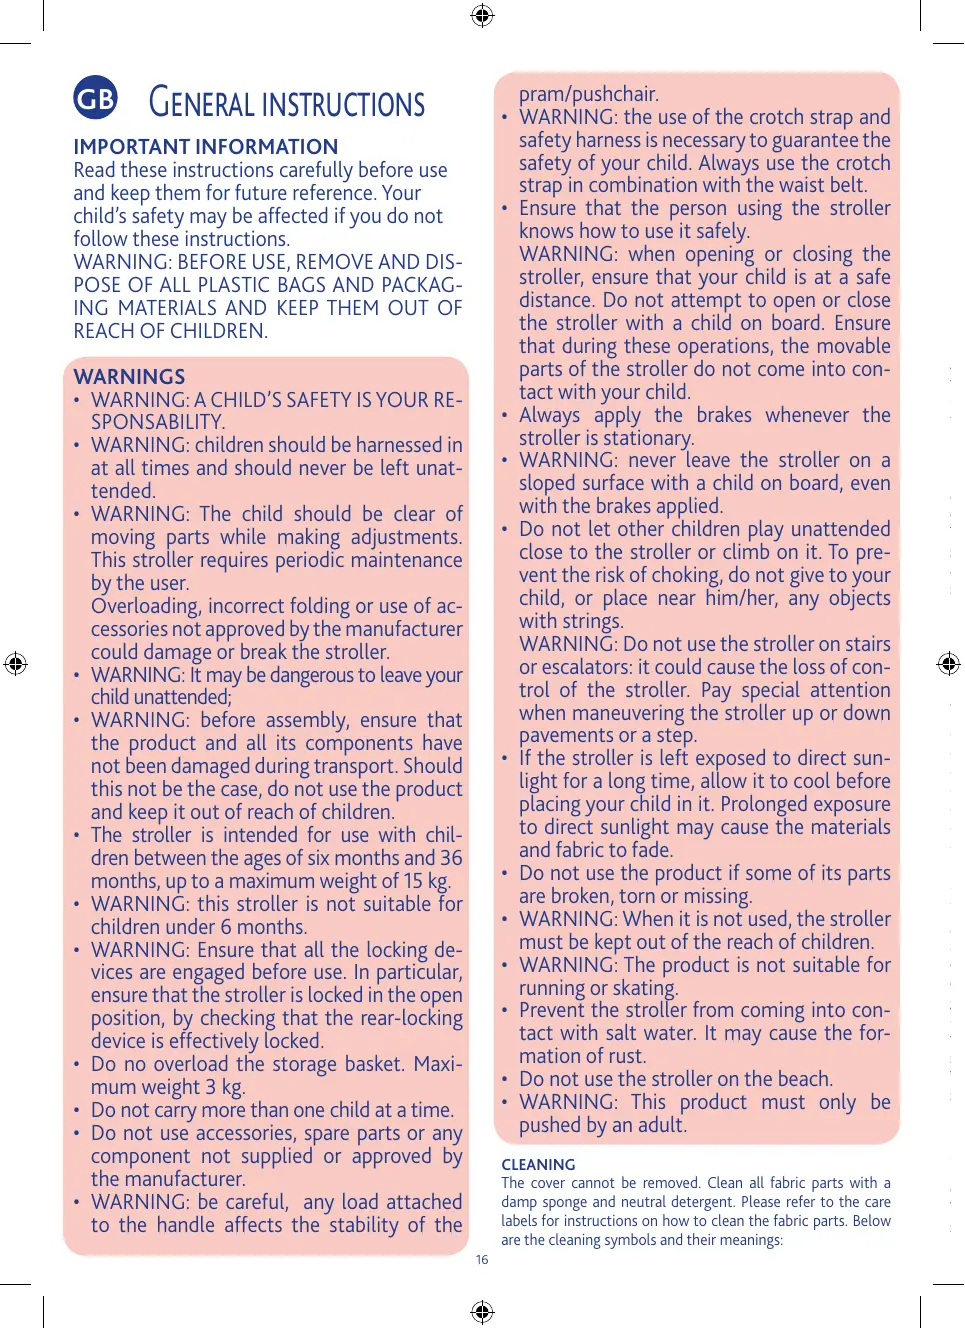
Componenti:

A: Safety system 2
B: Safety system 1
C: Linked brakes
Components:

Read these instructions carefully before use and keep them for future reference. Your child's safety may be affected if you do not follow these instructions.
WARNING: BEFORE USE, REMOVE AND DISPOSE OF ALL PLASTIC BAGS AND PACKAGING MATERIALS AND KEEP THEM OUT OF REACH OF CHILDREN.
WARNING
WARNING: A CHILD'S SAFETY IS YOUR RESPONSABILITY.
WARNING: children should be harnessed in at all times and should never be left unattended.
WARNING: The child should be clear of moving parts while making adjustments. This stroller requires periodic maintenance by the user.
Overloading, incorrect folding or use of accessories not approved by the manufacturer could damage or break the stroller.
WARNING: It may be dangerous to leave your child unattended;
WARNING: before assembly, ensure that the product and all its components have not been damaged during transport. Should this not be the case, do not use the product and keep it out of reach of children.
- The stroller is intended for use with children between the ages of six months and 36 months, up to a maximum weight of 15kg .
WARNING: this stroller is not suitable for children under 6 months.
- WARNING: Ensure that all the locking devices are engaged before use. In particular, ensure that the stroller is locked in the open position, by checking that the rear-locking device is effectively locked.
- Do no overload the storage basket. Maximum weight 3kg .
- Do not carry more than one child at a time.
- Do not use accessories, spare parts or any component not supplied or approved by the manufacturer.
WARNING: be careful, any load attached to the handle affects the stability of the
pram/pushchair.
WARNING: the use of the crotch strap and safety harness is necessary to guarantee the safety of your child. Always use the crotch strap in combination with the waist belt.
- Ensure that the person using the stroller knows how to use it safely.
WARNING: when opening or closing the stroller, ensure that your child is at a safe distance. Do not attempt to open or close the stroller with a child on board. Ensure that during these operations, the movable parts of the stroller do not come into contact with your child.
- Always apply the brakes whenever the stroller is stationary.
WARNING: never leave the stroller on a sloped surface with a child on board, even with the brakes applied. - Do not let other children play unattended close to the stroller or climb on it. To prevent the risk of choking, do not give to your child, or place near him/her, any objects with strings.
WARNING: Do not use the stroller on stairs or escalators: it could cause the loss of control of the stroller. Pay special attention when maneuvering the stroller up or down pavements or a step.
- If the stroller is left exposed to direct sunlight for a long time, allow it to cool before placing your child in it. Prolonged exposure to direct sunlight may cause the materials and fabric to fade.
- Do not use the product if some of its parts are broken, torn or missing.
WARNING: When it is not used, the stroller must be kept out of the reach of children.
WARNING: The product is not suitable for running or skating. - Prevent the stroller from coming into contact with salt water. It may cause the formation of rust.
- Do not use the stroller on the beach.
WARNING: This product must only be pushed by an adult.
CLEANING
The cover cannot be removed. Clean all fabric parts with a damp sponge and neutral detergent. Please refer to the care labels for instructions on how to clean the fabric parts. Below are the cleaning symbols and their meanings:

Wash by hand in cold water

Do not bleach

Do not tumble dry

Do not iron

Do not dry clean
Periodically wipe clean plastic parts with a soft damp cloth. Always dry the metal parts to prevent the formation of rust if the stroller has come into contact with water.
Certain models include a seat pad which should be cleaned following the instructions on its care label
MAINTENANCE
Lubricate the moving parts only if necessary, with the light application of a silicone based lubricant. Regularly check the condition of the wheels and, keep them clean of dust and sand. To avoid friction that may prevent the correct operation of the stroller, ensure that all the movable plastic parts placed along the metal frame are clean of dust, dirt or sand. Keep the stroller in a dry place.
LIST OF COMPONENTS
Check that you have all the parts required for this model before assembling the product. If any parts are missing, please contact the Chicco Customer Care Service. No tools are needed to assemble the product. The following parts are needed to assemble the product:
1 stroller
1 hood
1 rain cover
1 stroller carry bag (79255.930)
1 carry-all basket (79255.930)
1 shoulder carry strap (79254)
1 seat pad (79254)
OPENING INSTRUCTIONS
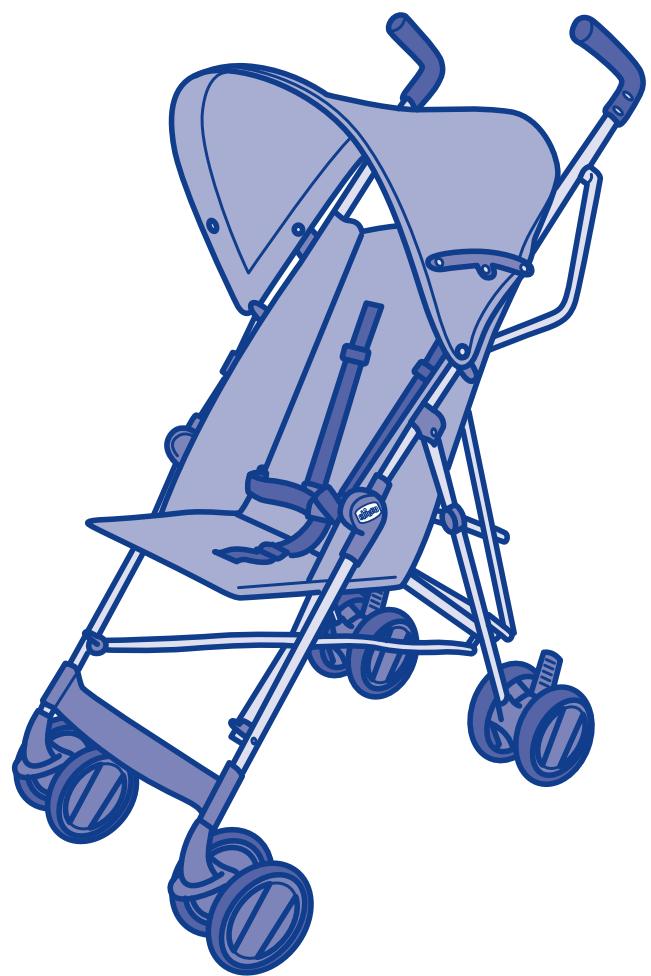
- Release the closure latch (diag. 1)
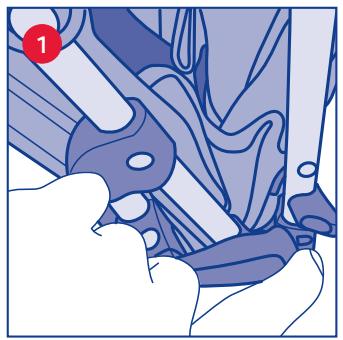
- Open the stroller (diag. 2).
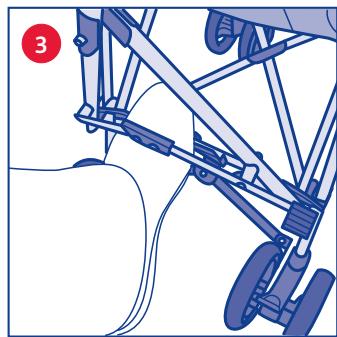
- Press the safety lock down with your foot as shown in the drawing (diag 3.) WARNING: pushing down the bar C which connects the two rear wheels (see 'components') does not guarantee that the stroller is open correctly.
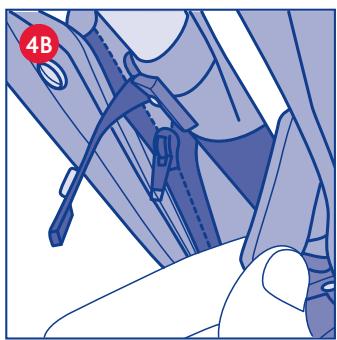
- Fit the sun hood (diag. 4A) on the stroller, by turning it towards the front and use the Velcro fasteners on the edges to secure it to the frame (diag. 4B)
WARNING: ensure that the sun hood is securely fitted on the relative support by pressing it downwards until you hear it click into place.
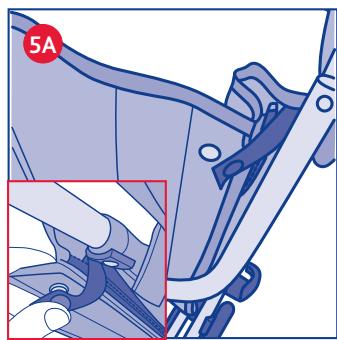
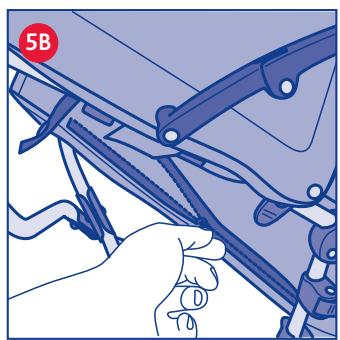
RECLINING THE BACKREST
- The backrest can be reclined to 2 different positions. After releasing the clips on the backrest (diag. 5 A), open the zips on either side of the seat (diag. 5 B).
WARNING: this adjustment is more difficult when the child is seated in the stroller. We recommend you adjust the backrest before placing your child in the seat.
BRAKES
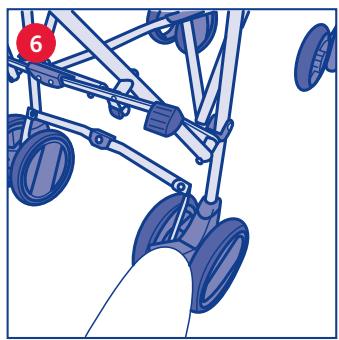
- To apply the brakes, press the levers on the rear wheels downwards (diagram 6). WARNING: the brakes are connected and are applied together.
When the brake levers are up, the wheel brake is off.
THE BRAKES MAY NOT FUNCTION AT THEIR OPTIMUM LEVEL ON STEEP SLOPES.
WARNING: Always apply the brakes whenever the stroller is stationary. Never leave the stroller on a sloping surface with a child inside, even with the parking brake ON.
WARNING: after applying the brake lever, check that the brakes are locked in place on both rear wheels.
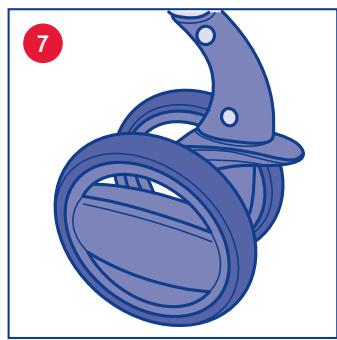
FRONT SWIVEL WHEELS
The stroller has front swivel wheels.
- To unlock the swivel wheels, lower the lever fitted between the two wheels (diag. 7). Use the swivel wheels on smooth surfaces. To lock the wheels, pull the lever in an upward direction.
WARNING: the swivel wheels make the stroller easier to manoeuvre; it is however recommended to use the wheels in a locked position on uneven ground to guarantee better stability (on gravel, unpaved roads etc.)
WARNING: Both wheels must be locked or unlocked at the same time.
SAFETY HARNESS
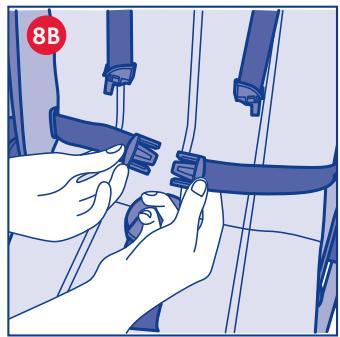
- All strollers are fitted with a 5 point safety harness (diag. 8A). Adjust the shoulder straps so they fit over the child's shoulders. Always use the safety harness together with the crotch strap. Always check that the safety harness is fitted correctly. WARNING: the safety harness must always be fastened to guarantee complete safety for your child. For extra safety, the stroller is fitted with D rings, which can be used to fit a separate safety harness, compliant with BS 6684 Standards. The rings are fitted on the right and left side of the stroller seat, as seen in points A and B.
Snappy Deluxe: Diag. 8B-8C. Bring the upper harness strap clasp (A) in line with the triangle on the lap belt clasp (B) and then insert them both in the harness buckle (C). Press the centre button (D) to release the safety harness straps.
WARNING: when closing the stroller, ensure that your child and all other children are at a safe distance. Ensure that during these operations the moving parts of the stroller do not come into contact with your child.
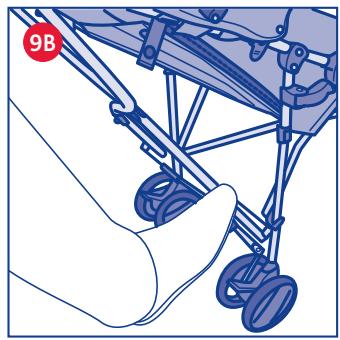
9. To close the stroller, pull the sun hood back, release the lock system 1 (see 'components') by pulling it towards you in a downward direction; then push it upwards to unlock the main locking system (diag. 9 A).
WARNING: THE STROLLER FEATURES A SECONDARY LOCKING SYSTEM TO PREVENT ACCIDENTAL CLOSURE. DO NO TRY TO CLOSE THE STROLLER WITHOUT UNLOCKING THE SECONDARY LOCKING SYSTEM (see 'components').
To release the secondary locking system, press the red pedal shown in the diagram (diag. 9 B).
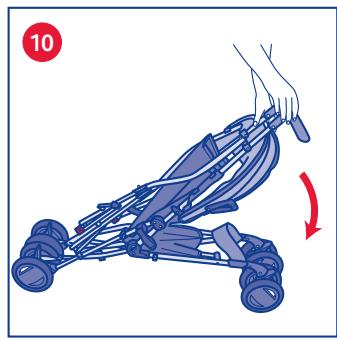
10. Push the handles in a forward direction and fold the stroller until it is completely closed (diag. 10).
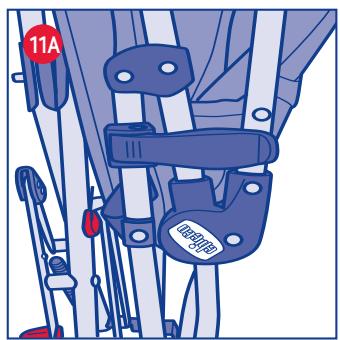
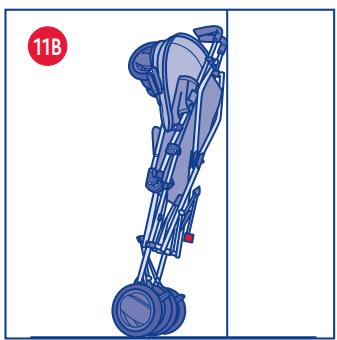
11. When it is closed, the hook on the side automatically locks the stroller (diag. 11 A) to prevent it from accidentally opening. The rear wheels can be locked in place so the stroller can be simply stood up, rested against a vertical surface, on its own (diag. 11 B).
ACCESSIONS:
WARNING: The accessories described below are not necessarily available on some versions of the product. Please read the instructions relative to the accessories fitted on the type of stroller you purchased carefully.
RAIN COVER
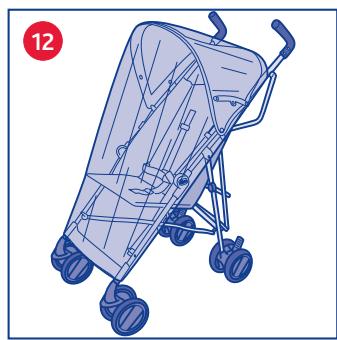
- The stroller is also fitted with a practical and light rain cover. Open the rain cover and fit it over the sun hood until it covers the whole stroller. Fasten the rain cover to the front legs and sides of the stroller using the Velcro fasteners (diag. 12).
WARNING: pay particular attention when using the rain cover.
WARNING: The rain cover cannot be used on a stroller that has no canopy or sun-hood as it could suffocate the child. When the rain cover is fitted on the stroller, never leave it exposed to direct sunlight with the child inside, as the temperature will rise considerably.
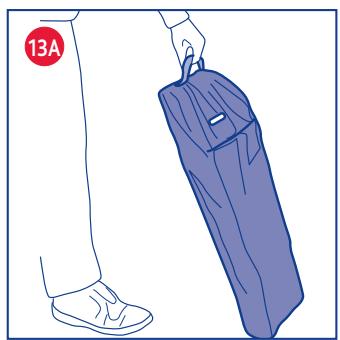
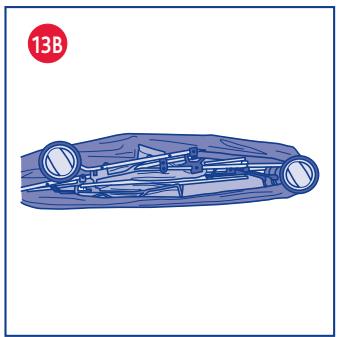
CARRY BAG
- The stroller also includes a handy carry bag for use when storing or carrying it (diag. 13 A); open the bag and place the folded stroller inside, as seen in diagram 13 B.
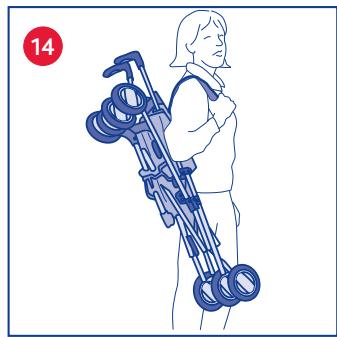
CARRY STRAP
- The stroller comes with a carry strap to carry it around when not in use (diag. 14). The strap can be used fitted to the stroller or to the carry bag.
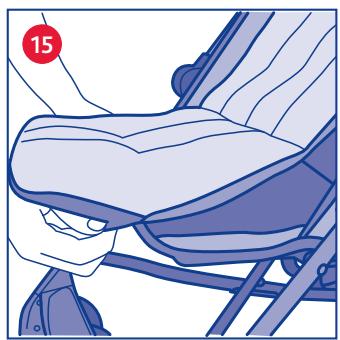
FITTING THE MATTRESS
Fasten the mattress to the stroller seat using the flap on the back, as seen in diag. 15 (when using in double face mode, turn the flap over beforehand).
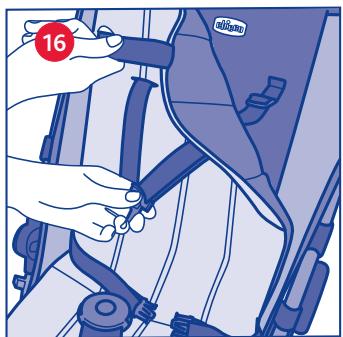
Thread the crotch and shoulder straps through the slots, as seen in diag. 16.
Now fasten the mattress to the stroller backrest using the velcro straps on the upper section of the mattress
Warning: only use the mattress when it is correctly fastened to the frame and the harness straps are all done up
FOR FURTHER INFORMATION PLEASE CONTACT THE ARTSANA CUSTOMER CARE SERVICE:
Postal address: ARTSANA SPA - Customer Care
Lowmoor Road Business Park
Kirkby in Ashfield
Nottinghamshire
NG17 7LF
Customer Services:
Tel: 01623 750870 (office hours only)
www.chicco.com

INSTRUCCIONES GENERALES
AVISO IMPORTANTE
"IMPORTANT: ANTES DE UTILizar LEER DETENIDAMENTE Este LIBRO DE INSTRUCCIONES PARA EVITAR PELIGROS DURANTE EL USO Y GUARDARLO PARA FUTuras CONSULTAS. LA SEGURIDAD DE TU NINO PUEDE VERSE AFFECTADA SI NO, SIGUES ESTAS INSTRUCCIONES". ATENCION: ANTES DE UTILizar, RETIRAR Y ELIMINAR LAS POSIBLES BOLSAS DE PLASTICO Y TODOS LOS DEMAS COMPONENTES QUE FORMEN PARTE DEL EMBALAJE DEL PRODUCTO Y, ENTodo CASO, MANTENERLOS LEJOS DEL ALCANCE DE LOS NINOS.
ADVERTENCIAS
DAHA DETAYLI BILGI I CIN ARTSANA M U S T E R I H I Z M E T L E R I SERVISI'NE B A S V U R U N U Z:
ARTSANA SPA - Müsseni Hizmetleri Servisi
MEPbI IPEdoCTOPOXHOCTN
BHIMAHNE: B3OJACHOCTb PEBEHKA 3ABNCIT IOTBAC!
BHIMAHHE: 6o3aTeIbHo npicTeINBaIte DeTei peMnMn 6eOpaNcoCTn. He octaBJIaIte DeTei 6e3 npICMOtpa.
BHIMAHHE: BO BpempepynnpOBKn KOJIckn CLeDnte, YTObI DeTn HaxOINNCb Ha 6e3OpaNCHom pacCToHnn OT ee NODBnKhbIX qactei. 3Ta KOJIaCKa Tpe6yet nepnoDnueckoro yXoJa CO CTOpONbI NOJb3OBAteJe. Ipeperpy3ka, He npaBnIbHoe cKnadlbA-Hne n NCNoB3OBAHne He yTBePxDeHHbIX npHaIaNExHocTeM MoKeT pInBeCTn K NOBpeKdEHnIO INI NOLOMKe PpOryLoyHOH KOJIaCKn.
BHIMAHHE: onacno octablaTb pe6eHka 6e3 npncmToPa.
BHIMAHHE: napei Naalom c6opkn KoIaCKn ybeNTecb B ceIoCTHOCTN BCex ee KOMPOneHTOB, pni O6napjxehn NOBpeKdEHN He NCpOJIb3yIte I3JeIne N depXHTe erO BdaII ON DeTei.
- Порогулочая Коляcka преегаЗнaya Ддя DeTeи ВОзразсом OT 6 и до 36 мecяць, ВсCOM He 60ilee 15 kr.
BHIMAHHE:Данная коляcka He npeHa3Ha-ueHa ДдЯ DeTeY BO3paCTOM Do 6 MecaIeB.
BHIMAHHE: napeH hauaIOM nCPOJb3OBAHnI npOBepbTe NcnpaBHOCT bCueJIpeHn3aIHTbIX MExAHN3MOB. B yactHOCTn, y6eIITecb B TOM, yTO KOJRAck 6JIOKpUyETcB PaKpblTom COCToHnI, npOBepNB, yTO 3aIHN KpeCTOBHnA DeiCTBNTeNbHO 3a6NoKInPOBaHa.
- He harpykaite kop3nHy cBbIe 3 Kr.
He ycajnbaiTe B KOJIaCKy OndHOBpeMeHHo HeCKOJIbKO DeTei.
He KpeHnTe K KOJIAcKe DOnOJIHNITeNbHbIe akCEccyapbl, He 3aMeHЯrTe YactIn N KOMNoHEHTbl, ecIn OHn He IIOCTaBJIeHbI iIN He ODo6peHbI n3rTOBOTeJIem.
BHIMAHHE: kajda cymka nll JIO6oI pyroI rpy3, noDBeWeHHbHa pyUkax KOJIaCKN, MOyT HApUwNTb ee yCTOuHBOCTb.
BHIMAHHE: O63aTeJbHO nCnOJIb3yIte paxOBbl pEmHb OT COCKaJIb3bIBaHna BHN3 n pEmHn 6e3ONaCHOCTn, Tak KaK OHn rapaHTnpyUOT 6e3ONaCHOCTb pe6eHka. PemHn 6e3ONaCHOCTn DOLXHb I NCnOJIb3OBAtbcr ODHOBpEMEHNO C paxOBbl pEMHem. - Y6eIntecb B TOM, yTO NOJIb3OBAteJI N KOLJCKN 3HaKOMbl C pInHcHnAmN ee pa6oTbI. BHIMAHHE: Bo Bpemr DeIcTBnA NO OTKpbITNo IIN 3aKpbITNo KOLJCKN cIeJNTe, yTO6bl pe6eHOK He HaxOdInCn PObJN3OCTN: He BbIpOJIHnTe paACKpbITne IIN 3aKpbITNe KOLJCKN C HaxOJaUeMcB H ne pe6eHKe. Bo Bpemr DeIcTBn No pEryJInpOBVe KOJACKN cIeJNTe, yTO6bl ee IOdBnKhbIe qactN He Kacalncb pe6eHka.
- 06aTeNo IcNoJIb3yIe TOpMo3a KaJDbI pa3 BO BpeM OCTaHOBKN.
BHIMAHHE: HN B KOEM CNYae He octaBJIaIte KOJANCy Cpe6eHcOM Ha NaKIOHHOI NOBepxHOCTn, DaJxe eCIn 3aJeICTBOBaH TOPMO3.
Cneinte, uTo6bI dpyrme JeTn He ngpann no6bn30cTN KOJRACKN H He 3a6npaNNscb Ha Hee. Bo n36exKaHne ONaCHOCTn yDySeHn He daBaIte pe6eHky N He OCTabJIaTe BO3- Ie Hero npedMeTb CO shHypamn.
BHIMAHHE: He noJb3yI TeCb KOJIaCKoH Ha leCTHnIe nIi Ha 3ckaIaTope: BO3MOxHa yTepa KOHTpOJa. BydTe oCtOpoxHb Ipn IpoDbemax nIi cnyckax (cTypeH, TpoTyapbl np.).
- NOCSJe DInIeBbHOrO ppe6bBaHnra KOLaCKn Ha CoINHe DoXdNITcB, UTo6b OHa OCTbIa, N ToJIbKO NOTOM ycaxnBaIte B Hee pe6eHka. DInIeBHOe ppe6bBaHnue KOLaCKn Ha CoINHe MoKTe Bbl3BaTb ObecuBeuHBnHe ee NOKpbItn.
3aŋpeəaetcncnOJIb3OBAt b KOJIaCKy c noBpeKdEHHbIM, OTOpBaHHbIMn IJIH HeOCTaHOUIMN YactAMN.
BHIMAHHE:EcIn BbI He NpIb3yeTeCb KOLJACKO, XpaHnTE ee B HeNDOCTyINOM DJIaDeTei MeCTe.
BHIMAHHE:He noIb3yIteCb KOJIaCKoHa 6eRy nIIN haoJdAcB Ha polKax.
- I36eRaIte KOHTaKTa KOJIaCKn C COJIeHOM BOJOn, KOTOpaY MOKeT BbI3BaTb IIOABJIeHne pKaBcHHbl.
He nCnoJIb3yIte KOJIaCKy Ha nIIJaKe.
BHIMAHHE:KoIaCKa IpeHa3NaYeHaДЯ ПОЛb3OBaHnA TOJIbKO B3pOcJIbIM NIIzAmN.
PEKOMEHDAUIMIOOCHCTKEUYXOy
DaHnoe 3ndeJIne Tpe6yET nepIOOnuYeCKo Ro yxoJa. OnpaIIN IO OUYCTKe I yXOyD IOJXHbI BbIOnHrTbCra TOlbKO B3pOCJIbIMI LIncAMy.
OuNCTKA
Osbka KOLACKH He ABJAREcBemHO.TKaHEbIe NOBepxHOCTN CNEyET YCHNTB BNAKHOY R6KO HNeITPbALbHM BMyLOM, BbIOJIHRA INCTpykUIN C 3TKKeTKN (Ha KOtOpO yka3AH COCTABN3dEINHA).Hnke npBBeHbCmBOJIc 3TKeTOK IN X3aHeHIN:

Puchna CTnPKa B XOIoNDH BOe

He oT6eINBaTb

He noDBepratb MexaHnuecko cyuke

He rnaTb

He noDBepratb xIMnuecko uNCTke
Пл actMaccobBteчг He6xOДМО nepoOnuueckn OUnIaTb BnaKHO TkaHbO. YTo6bI He 6pa3ObaIacb pXaBuHHa, He6xOДМО BbCyUWBaTb MeaJIuueckne ChAeTN B CJIyuae KOHTaTaC BDOJ.
Ecn moeIb noCTabIaETc C mTaPacIKOM, OUnCTte erO, cNe- dy INCHpyKUINAM Ha 3TNIKETe C COCTaBOM TKAHN
yXoA
Ipi Heo6xOIMOCTN BbINONHTe CMA3Ky NOBnHbIX cAteTey CyXIM CNIKKOHOBBIM MacNOM. IepNOINueCKN pOBepaTeB KOceca Ha n3HOC, OunuaiTe INX OT bJIN N neCk. Y6eINTEcB BOTCYTCBN bJIN, TpR3N N neCk Ha NIaCTMaCCOBx KOMTOHEtax, KOTOpBeIpeMeuaOTcN MoTaIIuNEckM TpyBaM. TaKIM o6pa3OM, MOxH0 N36EkaTb TpeHNA, KOTOpOE OTPuaTeBHO Bo3dEiCTBOByET Ha npabInbHyIO pa6Oty KOnAckN. XpaHITe KOJIACKY B CYXM MecTe.
IPEPEHb KOMIOHETOB
Ipeed c6bOpKo n3dJIIN npOBepBte ero noHnyo KOMPJIeKTHOCTb. EcJIn OTCyTCTBYOT COCTABLAHOUne qaCTN, o6paNTIECb B CepBnCHnb CEHTp Chicco.
C60pKa n3dEJIH He Tpe6yET DOnOJIHnTeIbHbIX INCTpyMeHTOB. IJRA C60PKI N3dEJIH DoJIxHbI 6bITb B HAIUYUOJIe yacti:
1 KOJIЯCKa
1 KaHIOHO
1yexonOTdoxj
1cymkaIpynporykn(79255.930)
1 kop3ина (79255.930)
1 cymka uepe3 nIeUo (79254)
1 MaTpacnK (79254)
PACKPbITME
- PacCTeRHTHe 3aMbIkaUoJnI CTOnOp (pnc.1)
- PackpojTe kOJAcKy (pnc. 2)
- 3aIeCTByte nepByu 3aIunTy, HauBaBn BnH3 HOrOi, KaK noKa3aHO Ha pncyHke 3. BHIMAHNE: pnpaBnBnAHm BnH3peKePaJInaHa MeYd bMyr 3aHmHM KOnecAMn (CM. «KOMNHeHTbI») He NO3BOINM KOJcKc KJaBbAutaCbTc.
- YctahOBHTe coHnIe3aunTHb HABec (pnc. 4A), noBopauHnBa ero Bnepei n3akpenJIynnyukamn oYrJAM (pnc. 4B) BHIMAHVE: y6eDntcB hadExkHonn KpEInHeH coHnIe3aunTHOrO HABec, npOTJKNyB ero BHN3 do fNkCaHn HA COOTBeTCTByUoJe onOpoe (doJIxHe p3aDaTbCzueNtOK).
PERYJINPOBKA CINIHKNI
5.CnInKa moKet perynIpOBoVaTcB r DByx nOnoJEnHx. Iocne otUeJIeHnra pacnOnoJEnHHbX Ha CnInHke KInIc (pnc. 5 A) paCtErHnTe MoHNn no 6okam cnJeHnna (pnc. 5 B).
BHIMAHHE: cpe6eHkOM, haxoJauMcB KOLIaCke, yka3aHbIe Oepaun MOyT 6bTy 3atpydHebl. PekomeHdyetcpeRyIInPOBaTb CnNHKy Ha NyctOi KOJIaCke.
TOPMO3A
6.утбы ВьзВаТс срабатыане TOPMO3OB N OCTaHOBKу KОЯ- ckn,ЗблOKичуTe 3днHe KOлеса NYteM OпУСКАнЯ рБИа罗 (pnc.6).BHIMAHINE:Topmo3aЯВЛЯOTcR B3aIMOCBra3aHHbIMn CрабатыанOT OДНOBРЕмEHOO
C NOДЯТыМи рьчагми TOPMOЖЕнге KOJEC HeBO3MOXHO.
TOPMO3A HE TAPAHNTPYIOT ONTINMAJIbHOrO TOPMOXEHNIA KPYtIx YKJIHOHAX.
BHIMAHHE: PnO octaHOBKe BcERda NcIOJb3yIe TOPMo3. HNkoTda He octaBJIe Tc KOJIaCKy C pe6eHNOM Ha HAKIoHHO NOBepxHOCTn, DaJke PnI 3aJeCTBOBaHHOM TOPMO3e.
BHIMAHNE: 3aDéηCTBOBAB pblvag TOPMO3a, cnéyET y6eDnTbCBA TOM, YTO TOPMO3a npaBnJIbHO cpa60TaN Ha O6OxN 3aDHNX KONEcAX.
IPEHHE IOBOPOTHbIE KOJIeCA
Ipeednne KOJleca KOLaCKN YBJIOTcI NOBOPOTbIMM.
- T06bI npiDaT kOleCama NOBOpauHbAEMoCTb, ONyCTInTe HaxoDJIuINcM EMeJy HmIMn pBlyar (pnc. 7).HcNoN3byTe CBO6OJHO NObOPauHbAeMbte KOneca Ha POBhNs IOpeBXHOCTEx. T06bI 3aBnOKIpOBaTb KOneca, nepeBEdIne pblar BBEpx.
BHIMAHHE: nobopoTHbIe Koneca rapaHTnpyOT Lyuuyo MaHeBpeHHocTb KOJIaCKn;Ha HepOBHoi dopore (ye6eHb, pa3bntaJdopora n np.) lyuwe 3a6loKIpOBaTa Koneca, YTo6bI oBeCneuNTb LyuWNI xOJ KoJIaCKn
BHIMAHHE: O6a koneca doJnxHbB CERda 6bTb ONDOBpeMeHHo NIO6 3a6JOKnPOBaHb, NIO6 pa36JOKnPOBaHb.
PEMHN B3OINACHOCTN
- BCE KOLNACKN OCHAUENbI PEMHAMN C KpEeJIeHnM N B 5 TOuKAX (PNC.8A).OTpeRyIpyIte PNeueBbe PEMH N TAK, YTO6bI OHNI pIIeRajN K PLeUAM pe6eHka. O63aTeNbHO pnpCTERiBAIte pe6eHka PEMHAMN Be3oNaChOCTN, BcERda NcNoJIb3yI naXOBblpeMeHb.BcERda npOBepRrTe npABInbHoCTb KpEeJIeHnIPEMHEn.
BHIMAHINE:Длбобсесчения 6e3oanachochtи Baшero pe6eHHa HeobxOIOIMO BCErda IcNoIb3ObaTb PEMHn 6e3oanachocht.Длббошew 6e3oanachocht KOnkca OchauSeHa KOnb4amn BФopme《D》,KOTOpbIe CnyKAT KpeNIIeHmMДлДОПнHTeBHOPEMH 6e3oanachocht,B COOTBTCTBmC HopMO BS 6684. Kolb4a paCpONIoXeHb BYTpRn CnDEHn KOnJIckn,CnpBa n CneBa,kak NOKa3Ho Ha TOnkax A n B. Snappy Deluxe: PincyHok 8B-8C.BCTabTe MexAHn3M CpeNIIeHn B cepxHn pemEHn (A),CTbkyra Ero TpeYroJbNHK n TpeYroJbNHKOM Ha MexaHn3Me CzeIeHnna IOrCHOro pemHn (B),NOChe Yero BCTabTe IV B npJxKy (C).UTo6bl OTeCTHyTb pemHN 6e3oanachocht,HaXmITte Ha CEHTpaIbHyIO KhONKy (D).
CKJIAdbiBAHNE
BHIMAHINE: PnBbINHENH NToI onepaun CneJeTc 3a Tem, yTObbl Bau pe6eHOK n Dpyrue DeTn HaxOINICb Ha 6e3-ONaCHOM paCCToHNN. Y6eJIteCb, 70 npu NTOM NOBnKHbIe UactN dTeCKo INpOryNoUHO KOnrckn He KacAOTc Tena pe6eHeka.
- YTo6bI cNoKInb KOnlACKy, nepeMeCTnE Ha3aD coNHez3aunHtBn HABec, 3aTEM paCCTeHNITE CnCTemy 3auNTb1 (CM. «KOMIOHEHTbI), NOTAHyB Ha ce6n BHN3 OJHOBpeMeHHO; BCNEI 3aTtM nPOTOLIKHnTE BBePx dJa IIOHn oPa3bNOkOpBKN 3auNTbI (pUC.9A).
BHIMAHIE: KONRACKOCHAUEHAJIOJIHNTIELHOI 3AUHTOINPEIDOTBPAUIOUEN CJUYAHNbE CKNAdBAH NHE. He bTIAETECb CNOXINTb KOJIKCYE, HE PA3BLOKIPOBAB IPEPED 3TNIM CNTEMPY 3AUHTb2 (cm. «Komnohehtr»).
YTo6bI pa36bIOKINPOBaT bOIOONHITbHyU 3aunTy, haxMMTe Ha KpaChyIO neaJIb, KaK IOKa3aHO Ha pncyHke 9 B. - Постолкнite ворец ручи и сюжITE полостьку Коляcke (pnc. 10).
- No 3abepweHHN cKnIaBbAHH N KpUOcK, paCNOLOXeHHbI b60ky, ABToMaTHueCKN 3aBIOKNpyET KOJAcKy B CNOXeHHOM NOLOXeHHN (pnc.11 A), npEYrTCTByE e CUYaHOMy PaCKpbITNIQ. MoXHO 3aBIOKNPOBaTb 3aHne KOJecA B NO3uHN CTORHKN, taK yTO6bMoXHO 6BJNO yDIOHO paCNOLOXmTB KOJACKy BEPTKANbHO B yCTOnHBOM NOLOXeHHN (pnc.11 B).
ПРИHAДLEЖHOCTN:
BHIMAHHE: PnHaJNeXHOctN, ONiCaHhBie DaIee B 3ToI 6PoUHope, MORYT OTCYCTBOBatb B HEKOTOpBX MOiΦKuIaIX N3dEINIA. BHIMATEJIbHO O3HaKOMbTEcB C INCTpyKlIaMn, OTHOcAIIIMCRA K IMeHIOUMcPnHaJLeXHOctB M PnIObPeTeH HOB BAMN MOiΦKauIm.
DOXDEBVK
- Konyracka ochaeta He Jerekm n npakTuHbIM DojdeBnKOM. PaKpoIte DojdeBnK uYctAHOBtE erHa coJIHcze3aunTHOM hAbeCe TAK, YTO6bl OH NOKpbJN BCIO KOJIaCKy. 3aKpePnte doJxDeBnK h nepeDHHN 60KOBJx TpybX KOJIaCKC n NOMOuBo IInnyuek (pnc.12).
BHHMAHHe: 6yIbTe BHHMaTeJIbHbI npn nCNoJIb3ObaHn DoJxDeBnKa.
BHIMAHHE: HnB3a NcPONb3ObaT DoJxBeNk Ha KOnLcKe, KO-Topra He NImeT KaIIOUHa NIN HABeCA OT COHua, NoCOKNoBy OH MoKET cTAb PnYnHO UyUHeNHa peBekHa. Bo N36EkaHne nepeRpeBa HNKoJa He OctAIBaIte KOnrcky C poeBekOM u YCTaHOBJIeHHbIM DoJxDeBVKOM Ha COHJe.
YEXOJI
- B KomplnekeTauHOn Kojansk BxOJNT yOo6HbY cheXon IaI nepeHocKn (pnc. 13 A);packpoTe erO n NomecTe cNoJeHHyU Kojansky BOHyTpB, kak nokazaoHa npucyHe 13 B.
HANJIeYhbI PEMehb IJIa IPEHOCKN
- B KOMPJIeKTAUIO KOJIaCKN BXOJNT HaNJIeUHbI peMeH bIe ee nepeHocKn (pnc. 14). PemeH MOxHO OTCTeHyTb I pIrkpeHITb K UexLy.
ФИК calma MATPACnKA
3aΦHKNCIOBAbMaTpaCnK CnDEnHIO KOJIaCKN C NOMOuBHO HAOJHcEeC3aDN TKAHeBOH KNaJaON KaK NOKa3AHO Ha PN.C 15 (npn cNIObOBAHIN DByCTOpOHHeMo TApaCnKa BbIePHyTb HAn3HaNHK TaHBeYBO NaKnAdy NepeiФHcAuaNei.
3a cIIO6BaHaTe He ca Heo6xOdMMN HnKaKbN INHCTpyMeHTM.
B kompnekeTa ha n3deneTo Bn3aT cneHnTe Yaacti:
1 KoliNuaKa
1 ropyk
1dbxdo6paH
1 chaTа 3a npHnAdJIeXKnOCTN KbM KOJIuKcTa (79255.930)
1 BAFAXEH KOU (79255.930)
1 KɔŋaH 3a HocHe Ipe3 paMo (79254)
1Дюшец (79254)
OTBAPRHE
1.Ocbo6oTe 3aKoIyajkata,KoITo 3aIbpxKa KOnuPkata B 3aTBopeHo noloxHeHne (fNr.1)
2.OTBOpTe KOJIUmKcTa (ΦI#.2)
3. BnokpaIte nbpBata KOHTpa, KaTo HATINCHete C Kpak HaOny, KaKTo e noka3aHO Ha qInr. 3.
BHIMAHHE: HatncKaHeTo HaOny Ha Tpb6aTa, KoTcBcEnnBa DbTa YHΦTa 3aHn KOleNa (BnK "KOMNoHEtN") He rapaHTnpa NO HkKaBb HauH NtBapraHeTo Ha KOJNUKaTata.
4. Ostbopete ceHHika (ФИг. 4A), kato Го завьрптЕ наразец И phкс nanopate caMo3aJIeNbIaIuNTe JIeHTN, pa3nOJIoJeHи lo bIJIte (ФИг. 4B)
m = 311
!LuljclcJibllawdoij
JLaeiWu JIabXiaow Lc abol 1 aaii i0ggsjoc EiiOg JLo8a oao
o a wio o oe y lc jahll n no sli: aaii i 10aie piaill sic aeyll g aasill cjz81 aiinl l ayell ao ciis hnnnllg Jueeill
P 为 CQ 平分线
j51 LgLo3 sic wSg j aegll iinii
aacncc gag: LgEoLc! sicg Lgolb no
daigo c JaoLo Jloeiwlg
j0g00gJabJIyjbjhtjooC:aaai .
JLJIJI JIJIJI IIO OIOJIJIJIJIJIJIJIJIJIJIJIJIJIJIJIJIJIJIJIJIJIJIJIJIJIJIJIJIJIJIJIJIJIJIJIJIJIJIJIJIJIJIJIJIJIJIJIJIJIJIJIJIJIJIJIJIJIJIJIJIJIJIJIJIJIJIJIJIJIJIJIJIJIJIJIJIJIJIJIJIJIJIJIJIJIJIJIJIJIJIJIJIJIJIJIJIJIJIJIJIJ
Cglj jll Jlalai jie aell oia Laoiwi 15 jgg aIg.36 g yg i6 jy Laci Jg21 aLs
Jai jai Jia bai Jai g aee Jlae w 8
aLs j no sllj JLoeWJ Lg: aii i 15i aio oLo8lg aoLwI slj Ig: i a o aoll j no yol J Sll 5l l 1o 1o 1o 10 gao
3 1c Lgjjg uji jaijgaxuui x
a>1gll y>1 g>1g labe joo jaij 2
g jie g h e g lao lo ayell g Jaeiwi X
g aeinll ag 10 o lglc Jgndl pojol sy
Ld1gLej 2000000000000000000000000000000000000000000000000
a0j>g j#LwJ aiae pJ> Jlaeiwi Jaiii Jlaeiwi JaiS. JaiJI aasW JaiJ Loo1
aog g oJ 1oJ LwJ aiae pJ> eo JLo81 aoj>
..>1g
aLs pI pI cI gI dI yIe IyIy IyIy
LgJooe:wo
iic a wio oieo glc Jalll j no sli: aaiii Jalllg aell glj gciai 8: aell gclg ciag Jauinill Jusell cIoo plall nic. Igilni Paae go woLiX 8 asnill sljz1 j no sli
LgE aegjoo J5 g y LSH JLoaW:clc
JalhJg JlO Chw Jc Ia J aee 12:aa .
G C L1 LoeiW d c iS gJg X LgI
.
Jlalj
Ic gluilll ciis gaiygiy jiei 8. giit jit Jaijai jaijai
EgiI iio o slwJg Jg Jbi slw Jbi
Jc gj jLwll Jc ayell JceiiW 8: auii
Jc oJyauuui nnai ne c18. aSsiill JdUll
aic jidl ilslj Lc: Jao Ue iayell
jagg Lgcl jgjjlg aagc gacgeall aio jgjjlg cagllgc geall nic gail clc alg b jai jwai jy jy jy j
JgLgJalhIgJgJgJbJIgJgJgJgJgJgJgJgJgJgJgJgJgJgJgJgJgJgJgJgJgJgJgJgJgJgJgJgJgJgJgJgJgJgJgJgJgJgJgJgJgJgJgJgJgJgJgJgJgJgJg
gai gai Su Lgji jai Li Jaoiuij 1
Jglio 111 Jgllblai 21 aii .
Jic aerjll Jlaoiwl jc elio8y cI1lc:aa
g<1 48 CJLo sLo J! aey jyej
yIeJIyIyIeJyIeJIyIeJyIeJy
Jieill Jlqiw jaiy auii .
aillg aaiiil ollac y
Jaa aaiall aaiiiaaiieaipai jy. aaiisai iiaaiiaaiiaaiiaai
b1 = 2,b2 = - 4
a, aieiwl Joeiwl, aaiwll gai wai, cai, aaiwai j 8
Lg:1eog
21L1 S1L1 S2 L2
Oolololo Joeiwi
y
S9 ≤ a1 + 64 = 276
131 JmmJmm
W

luc a,b, wla eah Jaaowu ayog ogya aLwll slj81 khiy i Lguc lwl jki wui Liig sll lgmo aieell sll
0gill 1eill gll lalil plall y, dss sll jssll
aI JLo gLoS LaoJgai paaLgeae JgJLooJooJooJooJooJooJooJooJooJooJooJooJooJooJooJooJooJooJooJooJooJooJooJooJooJooJooJooJooJooJooJooJooJooJooJooJooJooJooJooJooJooJooJooJooJooJooJooJooJooJoo
.3
gll glll lglll glll glll glll glll glll glll
aJg 1000000000000000000000000000000000000000000000000000
a 11g a5,11 a2a a2a a2a a2a a2a a2a a2a
L( 0,1) 或 L( -34,34)
aajl aai (AB Jsiuill) caii bai jai ayai ayai cyll 8
jai bui plaswily laia jai ayai jai ayai pisi ciay ai sii
saiyai Jsiuill abaoi ayai ayai joi ayai wali
pasiab axiu ge abaoi ayai ayai plaswily aai
D' JScJcIcIaIy aay aagj, jai Jel Jol Iol gSma Jgadl aegg
e .BS 6684 yalall log go galiy yuoy Jol pla Jauo yu Sall
Cagaggo Lo5 ayaiy al yalll sall gannll cglk lal kiai
. Bg A JScJcIc
1111 1111 1111 (A) all p12345678900123456789001234567890012345678900123456789001234567890012345678900123456789001234567890012345678900
jlll lal 10000000000000000000000000000000000000000000
S OBC = S BOC + S_ CBA
y- yj 1 Jalal 1 j Jalal 1 j o sll 1 j o sll 1 j o sll 1 j o sll 1 j o sll 1 j o sll 1 j o sll 1 j o sll 1 j o sll 1 j o sll 1 j o sll 1 j o sll 1 j o sll 1 j o sll 1 j o sll 1 j o sll 1 j o sll 1 j
ailll llll aalll allll 1 11g aall gale 1e ae 9.
lllglal y g uaii Lgauu (ayll syl) 1 Jdai 1 Jdai paiy
pali iac elal guyui Lgai gao gao gao gao gao gao gao gao gao gao gao gao gao
g 1 g 1 g 1 g 1 g 1 g 1 g 1 g 1 g 1 g 1 g 1 g 1 g 1 g 1 g 1 g 1 g 1 g 1 g 1 g 1 g 1 g 1 g 1 g 1 g 1 g 1 g 1 g 1 g 1 g 1 g 1 g 1 g 1 g 1 g
sIaill aIwglal Ic Iailll lIs g Jaell n gilll Jolb pi blaI g B9 JSllu anogll
.10 JJJJI LJI pJIJI gJIJI gJIJI gJIJI gJIJI gJIJI gJIJI gJIJI 10.
pLg! 1e Lgla Ic agaill dll Jao gauu aell y! ao sglzll 11
all gao 11.
(A 11 JScill) 50 Logal J Ssiv 332x auag 4
iue ellaiy 11.
(11 JScill) 50 logal 4 11 11 11 pLg! aolk! 50!
(B 11 JScill) 50logal gao gao slal gao cblw ay
a
juaaii aygaiyai yaiyai yaiyai yaiyai yaiyai yaiyai yaiyai yaiyai yaiyai yaiyai yaiyai yaiyai yaiyai yaiyai yaiyai yaiyai yaiyai yaiyai yaiyai yaiyai yaiyai yaiyai yaiyai yaiyai yaiyai yaiyai
joll jolgll
a aagll gac g aag yg lslh g hag g aag aall 12
aagll g aagll allall g ae aag g gall aag gall gall aag
aagll g aagll gall aag gall aag gall aag gall g (12)
j 1000000000000000000000000000000000000000000000000000000000000000000000
a. a. b.
gao aaiad jia: (A 13 J5 wll) [glai] aloc aiae gae aee Jaoi 13. B 13 J5 wll gai Jia gao gao Ls glaiae
Jai:
2 Loric aIgauu Igai So uo Igai Jua Suoi Suai Liui jia oao aai 14. aadally pajd g Jaa (Sol.14) (Jai) (Jgaiw)
4
ggtgll Jlaoiui, Jalai yie aao 1uui dui ci 5c uoi jygl Jlc Jlaeui (1) 15 oogall g cagoo g laS lals
16 105
JlaeWlclig Jalll aegy bnuu Lc aedl clc 1
JSLgJI JcIgii i aoo 0o Slll 21 auiu Iooiwi 4
:lluwj5lOAC aoosu Jwai81 ologell y wuj