Float - Baby product CHICCO - Free user manual and instructions
Find the device manual for free Float CHICCO in PDF.

User questions about Float CHICCO
0 question about this device. Answer the ones you know or ask your own.
Ask a new question about this device
Download the instructions for your Baby product in PDF format for free! Find your manual Float - CHICCO and take your electronic device back in hand. On this page are published all the documents necessary for the use of your device. Float by CHICCO.
USER MANUAL Float CHICCO
Read all instructions BEFORE assembly and USE of product.
KEEP INSTRUCTIONS FOR FUTURE USE.
WARNING
Failure to follow these warnings and the instructions could result in serious injury or death.
Fall Hazard: Babies have suffered skull fractures and head injuries while falling in and from bouncers and rockers.
- Use the product ONLY on the floor. Never use on any elevated surface.
- NEVER lift or carry baby in product.
Suffocation Hazard: Babies have suffocated when seats tipped over on soft surfaces and/or when seats have been used as a sleep product.
• NEVER use on a bed, sofa, cushion, or other soft surface.
- Stay near and watch baby during use. This product is not safe for sleep or unsupervised use. If baby falls asleep, remove baby as soon as possible and place baby on a firm, flat sleep surface such as a crib or bassinet.
To prevent falls and suffocation:
• ALWAYS use restraints and adjust to fit snugly.
- STOP using product when baby starts trying to sit up, attempts to climb out (approximately 9 months), or has reached 20 lbs., whichever comes first.
- Do not use the product if any components are damaged, broken, or missing.
• This product and all its components must be assembled by adults only.
• Make sure that the seat cover is always fitted correctly on the product frame.
• Periodically check for worn parts, loose screws, worn or frayed fabrics and immediately replace any damaged parts. - Do not allow children to play unsupervised near the product.
Strangulation Hazard:
- Do not place the product near windows or other objects where strings, curtains or other items with cords could become entangled with the child.
• To prevent the risk of fire, never place the product near electrical appliances, gas cookers or other sources of intense heat. - Do not use accessories or replacement parts other than those approved by Chicco.
Components
A.
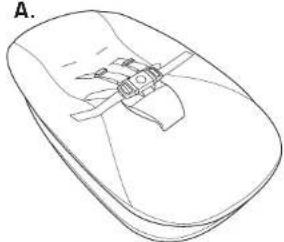
natural_image
Line drawing of a computer mouse with a handle and scroll (no text or symbols)A. Baby Seat
B.
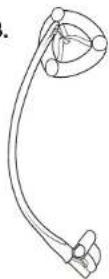
B. Mobile Arm and Mobile Mount
C.
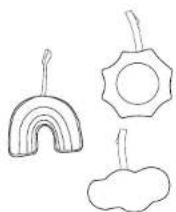
C. Mobile Stuffed Toys
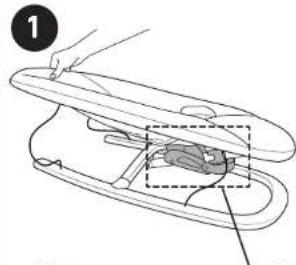
Parts List How to Open the B

text_image
Seat Waist Belt Harness Buckle Shoulder Strap Crotch Strap/ Cover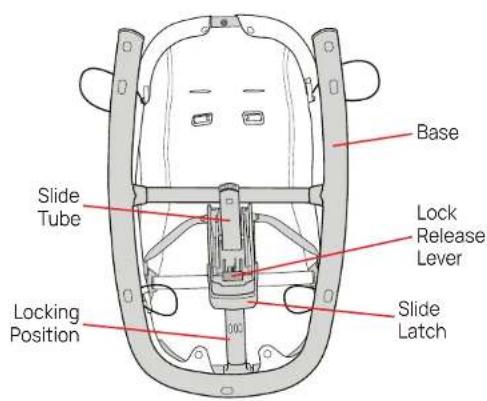
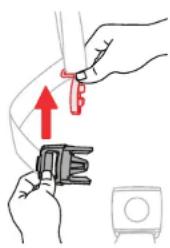
text_image
Base Slide Tube Lock Release Lever Locking Position Slide Latch- Hold onto the top edge of the Baby Seat. Locate and pull Slide Latch out until it locks into Locking Position, as shown.
text_image
Technical diagram showing a mechanical component with labeled parts and a highlighted section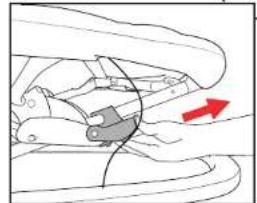
natural_image
Mechanical assembly diagram showing a bracket and curved components with a red arrow indicating direction (no text or symbols present)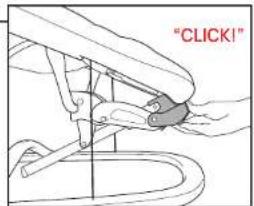
text_image
"CLICK!"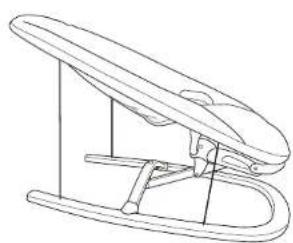
natural_image
Line drawing of a mechanical lever or support structure (no text or symbols)Mobile Assembly
2
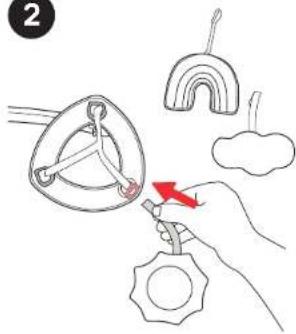
text_image
Diagram illustrating a hand using a pulley system to adjust a spring, with a red arrow indicating the process.- Attach all three Mobile Toys onto the Mobile hanger. Thread the Mobile Toy straps through each attachment opening on the hanger as shown. Then secure the Mobile Toy straps using the hook and loop tabs.

natural_image
Illustration of a hand holding a spring scale with a red arrow indicating direction, accompanied by abstract shapes and cloud (no text or symbols)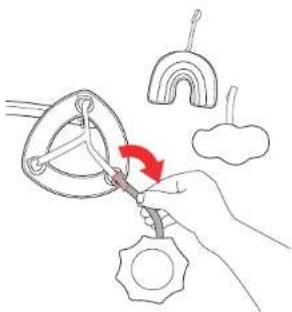
natural_image
Illustration of a hand using a tool to tie a rope knot, with a curved wire and cloud shapes nearby (no text or symbols)Mobile Assembly

text_image
3 3. Remo the Mob Mount S Mobile A the Mob Mount.- Remove the Mobile Mount from the Mobile Arm. Rotate the Mobile Mount 90 degrees to reveal the Mobile Arm locking tab. Pull out the Mobile Arm from the Mobile Mount.
Mobile Assembly

text_image
4A4A. Flip the Baby Seat upside-down and undo the top snaps on the seat fabric, as shown. Pull the fabric off of the top of the frame.
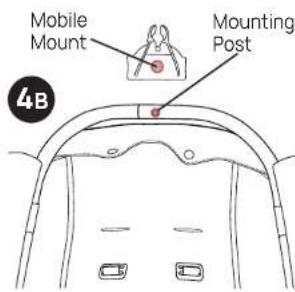
text_image
Mobile Mount Mounting Post 4B4B. Locate the Mounting Post on the frame. Line up the Mounting Post and the hole in the Mobile Mount.

text_image
"CLICK!" 4C4C. Then tilt the Mobile Mount and click in one side first, rotating the mount until it fully snaps on the tube and the post on the tube goes through the hole in the mount.
Pull the fabric back over the frame and fasten the snaps.

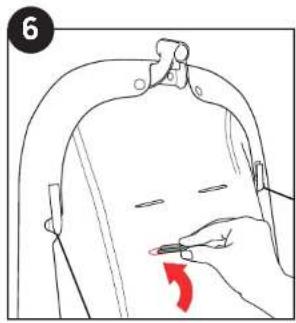
natural_image
Line drawing of a mechanical component with mounting holes and a curved base (no text or symbols)Mobile Assembly
5

natural_image
Medical illustration showing a surgical instrument inserted into a patient's hip joint with a red arrow indicating insertion (no text or symbols present)- Flip the Baby Seat back over and line up the Mobile Arm locking tab with the Mobile Mount slot, as shown. Then insert the Mobile Arm into the Mobile Mount and rotate to desired position.

natural_image
Line drawing of a baby's seat and backrest (no text or symbols)How to use Baby Seat
▲WARNING
Always use a harness position located ABOVE the child's shoulder line. If multiple harness positions are above the child's shoulder line, use the one closest to it.
natural_image
Line drawing of a person using a tool to adjust or install a garment (no text or symbols present)- The Shoulder Straps can be adjusted to 2 height positions as shown.
To Remove the Shoulder Straps, thread the D ring through the opening and insert the D ring into the opening below. Pull the D ring all the way through the opening and make sure it lays flat against the back of the fabric. Repeat for the other side.
Make sure both Shoulder Straps are at the same height.

natural_image
Diagram showing two identical views of a vehicle's seatbelt with two red circles highlighting the seatbelt (no text or symbols present)How to use Baby Seat
▲WARNING
Avoid serious injury from falls or sliding out. Always secure child in the restraint. Never leave child unattended in seat. Always keep child in view.

text_image
7 DE T T ED- This Baby Seat has a 5-point safety harness. The Shoulder Strap Connector is designed to break away from the Waist Clip when not secured in the Crotch Strap Buckle.

natural_image
Illustration of hands using a tool to adjust a component, with a red arrow indicating direction (no text or symbols)Make sure the Shoulder Strap Connector is in the correct position, as shown. Slide the Shoulder Strap Connector onto the Waist Strap Clip and repeat for the other side.
Then slide both Waist Clips into the Crotch Strap Buckle, as shown. Pull on both sides to make sure the Clips are secured to the Buckle.

text_image
"CLICK!"How to use Baby Seat
8

natural_image
Illustration of a hand pressing a red button on a gray safety belt (no text or symbols)- The Safety Harness can be released by pressing the button on the center of the Buckle and pulling both Waist Clips out.
Pull up on the Shoulder Strap Connector to remove it from the Waist Strap Clip.
natural_image
Illustration of hands holding a cable with a red upward arrow and a device icon (no text or symbols)How to use Baby Seat
9

natural_image
Diagram of a seatbelt buckle with red directional arrows indicating movement (no text or symbols)- The length of the Shoulder Straps can be adjusted by pulling on the adjustment buckles to tighten or loosen.
The length of the Waist Straps can be adjusted by pressing the tab at the end of the Waist Strap Clip and pulling on the strap to tighten or loosen to better fit your child.
How to Fold Baby Seat
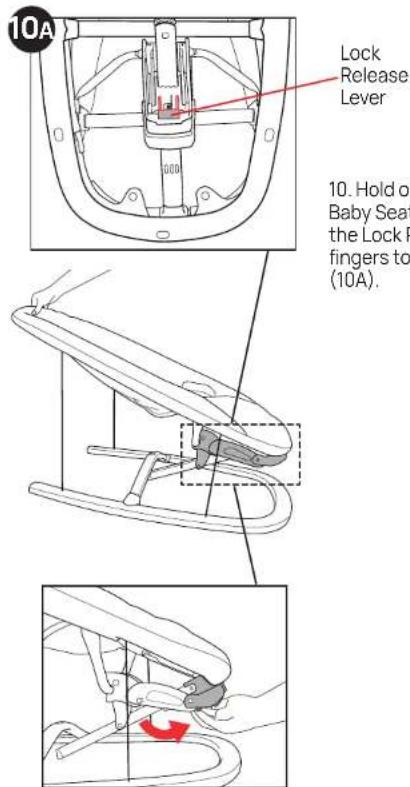
text_image
10A Lock Release Lever 10. Hold of Baby Seat the Lock F fingers to (10A).How to Fold Baby Seat
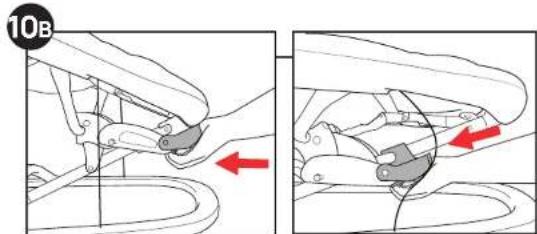
text_image
10B10B. At the same time, push forward with the palm of your hand and guide the Slide Latch down.
How to Remove Seat Fabric
11
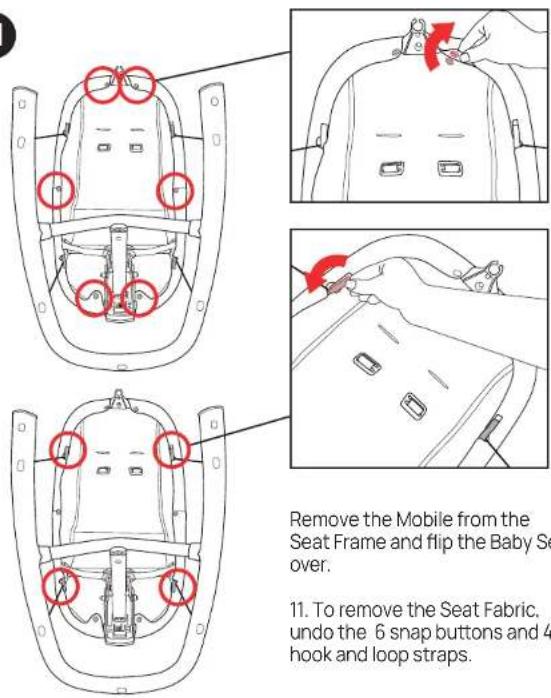
Remove the Mobile from the Seat Frame and flip the Baby Seat over.
11. To remove the Seat Fabric, undo the 6 snap buttons and 4 hook and loop straps.
How to Remove the Seat Fabric

12. Turn the Seat upright and pull the edge of the Seat Fabric off of the bottom edge of the Seat Frame, and completely remove from the Seat Frame.
To re-attach the Seat Fabric follow Steps 11-12 in reverse.
Cleaning and Maintenance
The cleaning and maintenance of the Baby Seat must only be carried out by an adult.
CLEANING
The fabric seat can be removed (please refer to the steps 11-12). Hand wash fabric seat using mild soap and water, or machine wash in cold water on delicate cycle using mild detergent. Hang to dry.
It is recommended to periodically wipe clean plastic parts with a soft damp cloth. Always dry the metal parts to prevent the formation of rust if the Baby Seat has come into contact with water. Plastic can be cleaned with mild detergent and warm water, no bleach or harsh cleaners/abrasives.
MAINTENANCE
This product requires regular maintenance. Periodically check the Baby Seat for wear, damage, or missing components. Should any parts be missing or damaged, the Baby Seat must not be used. Please call customer service for assistance.
For More Information
For USA customers :
If you have any questions or comments about this product, or are missing any of the parts, please do not return this product to the store. Contact us in one of the following ways:

(877)-424-4226

info.usa@artsana.com

www.chiccousa.com

1826 William Penn Way Lancaster, PA 17601