13Z010 - Coffee maker Zelmer - Free user manual and instructions
Find the device manual for free 13Z010 Zelmer in PDF.

| Product Type | Drip Coffee Maker |
| Model | 13Z010 |
| Brand | Zelmer |
| Capacity | 10 cups (1.25 L) |
| Power Consumption | 1000 W |
| Voltage | 220-240 V, 50/60 Hz |
| Color | Black / Stainless Steel |
| Dimensions (W x D x H) | 27 x 22 x 35 cm |
| Weight | 2.1 kg |
| Filter Type | Permanent mesh filter or #4 paper filter |
| Water Tank | Removable, 1.25 L capacity with level indicator |
| Keep Warm Function | Automatic keep warm for 40 minutes |
| Anti-Drip System | Yes, allows pouring a cup during brewing |
| Auto Shut-Off | After 2 hours of inactivity |
| Programming / Timer | 24-hour programmable timer |
| Water Level Indicator | External water level window |
| Construction Material | Plastic body with stainless steel warming plate |
| Descaling Indicator | LED indicator lights up when descaling is needed |
| Removable Parts | Filter basket, water tank, carafe lid |
| Cord Length | 0.9 m |
| Accessories Included | Glass carafe, permanent filter, measuring spoon |
Frequently Asked Questions - 13Z010 Zelmer
User questions about 13Z010 Zelmer
0 question about this device. Answer the ones you know or ask your own.
Ask a new question about this device
Download the instructions for your Coffee maker in PDF format for free! Find your manual 13Z010 - Zelmer and take your electronic device back in hand. On this page are published all the documents necessary for the use of your device. 13Z010 by Zelmer.
USER MANUAL 13Z010 Zelmer
natural_image
Line drawing of a standard espresso machine with control panel and lever (no text or symbols)
1-4
Instructions for use
Espresso machine
ZELMER Type 13Z010
Szanowni Klienci!
natural_image
Hand holding a mechanical component with an upward arrow indicating motion (no text or symbols)natural_image
Line drawing of a hand washing a water tap (no text or symbols)natural_image
Line drawing of a hand using a microwave oven to press or adjust the cup (no text or symbols)
natural_image
Line drawing of a coffee machine with a side arm and control panel (no text or symbols)natural_image
Line drawing of a hand pouring food into a cup using a blender (no text or symbols)natural_image
Hand holding a mechanical component with an upward arrow indicating force or direction (no text or symbols)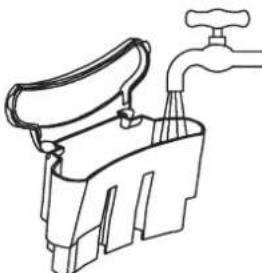
natural_image
Line drawing of a hand washing machine with a faucet (no text or symbols)UPOZORNĚNÍ!
natural_image
Line drawing of a hand using a blender to press or brush into a coffee machine (no text or symbols)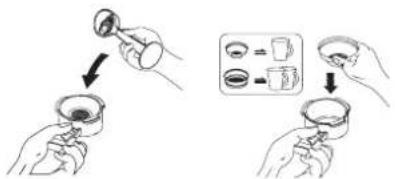
natural_image
Line drawing of a coffee maker with a side arm and control panel (no text or symbols)natural_image
Illustration of a hand pouring food into a cup using a blender (no text or symbols)natural_image
Line drawing of two hands holding a small container with a spoon (no text or symbols)Požadavky norem

SK
Vážení klienti!
natural_image
Hand holding a device with an upward arrow indicating motion (no text or symbols)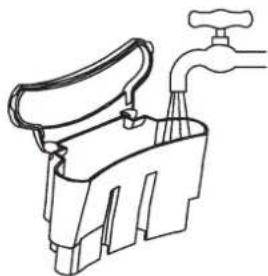
natural_image
Line drawing of a hand holding a faucet, no text or symbols presentnatural_image
Line drawing of a hand using a microwave oven to press a cup, with no text or symbols present.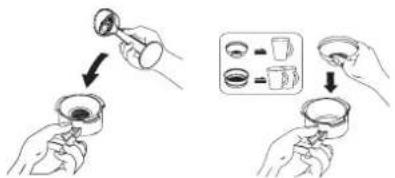
natural_image
Line drawing of a coffee maker with a side arm and control panel (no text or symbols)natural_image
Line drawing of a manual pump or blender with handle and control knob (no text or symbols)natural_image
Hand holding a small electronic device with an upward arrow indicating motion (no text or symbols present)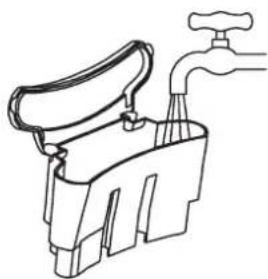
natural_image
Line drawing of a faucet with handle and water outlet (no text or symbols)natural_image
Line drawing of a hand using a microwave oven to press or watch (no text or symbols)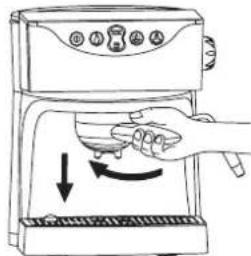
natural_image
Line drawing of a coffee maker with handle and side panel (no text or symbols)natural_image
Illustration of a hand pouring food into a mug using a blender (no text or symbols)natural_image
Line drawing of a coffee maker with handle and spout, showing no text or symbols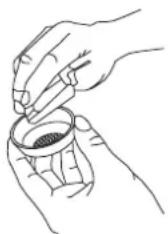
natural_image
Hand holding a mechanical component with an upward arrow indicating motion (no text or symbols)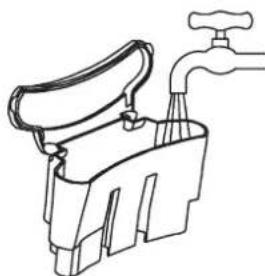
natural_image
Line drawing of a hand washing a water tap with a handle (no text or symbols)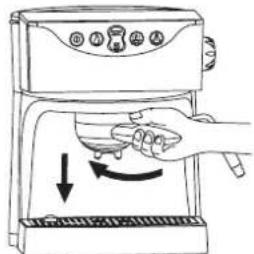
natural_image
Line drawing of a coffee maker with a side arm and control panel (no text or symbols)Reglarea temperaturii cafelei „espresso”
natural_image
Line drawing of a microwave oven with a hand valve and handle, showing a downward arrow indicating motion (no text or symbols)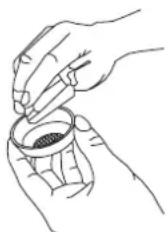
natural_image
Illustration of a hand holding a device with an upward arrow, no text or symbols present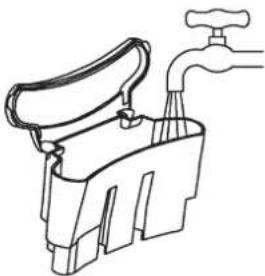
natural_image
Line drawing of a hand washing a faucet with a handle (no text or symbols)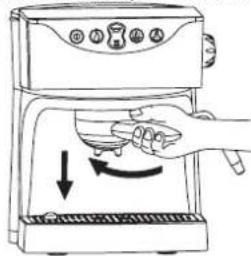
natural_image
Line drawing of a coffee machine with a side arm and base (no text or symbols)natural_image
Line drawing of a hand pouring liquid into a cup of food from a kitchen machine (no text or symbols)natural_image
Line drawing of a coffee maker with handle and spout, showing no text or symbols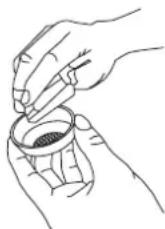
Соответствие нормам
natural_image
Hand holding a device with an upward arrow, no visible text or symbols
natural_image
Line drawing of a hand washing a water tap (no text or symbols)
natural_image
Line drawing of a hand using a tool to press or adjust a device on a machine (no text or symbols)natural_image
Line drawing of a coffee maker with a side arm and control panel (no text or symbols)natural_image
Line drawing of a kitchen mixer with handle and lever (no text or symbols)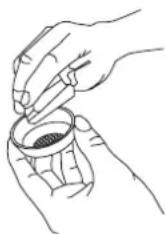
natural_image
Hand holding a mechanical component with an upward arrow indicating motion (no text or symbols)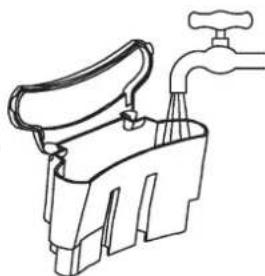
natural_image
Line drawing of a faucet with handle and water outlet (no text or symbols)ЗАСТЕРЕЖЕННЯ!
natural_image
Line drawing of a hand using a blender to press or brush (no text or symbols)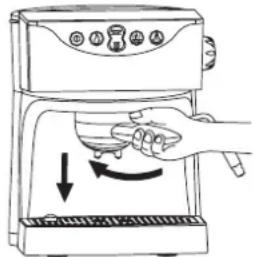
natural_image
Line drawing of a coffee maker with a glass stand and control panel (no text or symbols)natural_image
Illustration of a hand pouring liquid into a cup using a kitchen mixer (no text or symbols)natural_image
Line drawing of a microwave oven with a hand valve and a test tube, showing no text or symbols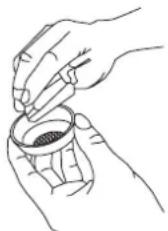
We urge that you read this user's manual carefully. Special attention needs to be paid to the safety precautions. Please save this manual so it can be referred to in the future use of the product.
The manufacturer is not liable for any potential damage caused by using the appliance for anything other than its intended use or by its incorrect operation.
The manufacturer reserves the right to modify the product at any time, without prior notice, in order to adjust it to the legal regulations, standards, directives or for construction, commercial, aesthetic or other reasons.
Contents
Safety precautions and guidelines on the proper use of the espresso machine 26 Technical data....26
Structure of espresso machine type 13Z010....26
Filling the water tank with water....26
Removing and replacing the filter holder 26
Rinsing the system....27
Rinsing the system for the espresso coffee function 27
Rinsing the system for the cappuccino function 27
Brewing espresso coffee with the use of the automatic brewing function..... 27
Preparing espresso coffee with the use of the manual brewing function ..... 27
Setting the temperature of espresso coffee 27
Changing the set amount of espresso coffee 27
Preparing frothed milk for cappuccino coffee....27
Steam function for cappuccino coffee....28
Filling the espresso machine with water – replenishing water.... 28
Emptying the drip tray 28
Descaling 28
Cleaning and maintenance....28
Standard requirements 28
Ecology – let's look after the environment 28
Safety precautions and guidelines on the proper use of the espresso machine
Always stick to the following basic safety precautions when using the electrical appliance:
- Espresso machine type 13Z010 is intended for household use only.
- Plug the espresso machine into a 230 V alternating current electric socket equipped with a safety pin only.
- Before using the espresso machine, unfold and straighten the connecting cord.
If the non-detachable part of the cord is damaged, it should be replaced by the producer or at a proper service point or by a qualified person in order to avoid any hazards.
Only qualified staff may make repairs to the appliance. A wrongly done repair may pose a serious threat to the user. In case any defects occur, take the appliance to a ZELMER specialist service point.
- Always disconnect the appliance from the power supply network:
- before removing any parts from the appliance and before replacing them,
• before cleaning or maintenance,
• after using the appliance, - if the appliance does not function properly.
- Extreme caution is necessary when using the espresso machine.
- Keep the espresso machine out of the reach of children.
- Empty the water tank after each use.
- Before preparing coffee, check that the filter holder is properly fixed.
- Do not operate the espresso machine if the connecting cord or any other part is damaged.
- Be careful not to wet the plug of the connecting cord.
- Do not use the appliance if it does not operate properly.
- Do not remove the plug from the mains socket by pulling the connecting cord and do not place the cord on sharp edges.
- Do not let children touch the appliance or the connecting cord when the espresso machine operates.
- Do not use extension cords which do not have suitable equipment certificates.
- Do not touch the hot parts of the appliance, e.g. the cup warming plate, the filter, the steam wand etc.
- Do not remove the filter holder when the espresso machine operates.
- Do not place or use the espresso machine on a wet or hot surface.
- Do not use the appliance when the drip tray or the grid for cups have not been properly placed in their place.
- Do not turn on the espresso machine if there is no water in the water tank.
- Do not immerse the appliance in water or any other liquid.
Do not open the body of the appliance and do not remove any parts – from the espresso machine.
Do not use any abrasive cleaning agents such as emulsions, creams, pastes, etc for cleaning the body of the appliance. They might remove graphic information symbols such as: scales, marks, warning signs, etc.
- This appliance is not intended for use by persons (including children) with reduced physical, sensory or mental capabilities, or lack of experience and knowledge, unless they have been given supervision or instruction concerning use of the appliance by a person responsible for their safety.
- Children should be supervised to ensure that they do not play with the appliance.
Technical data
The technical parameters are given on the data plate of the product.
Power rating: 970–1150 W at 220–240 V.
Capacity of the water tank: 1000 ml.
Dimensions: 233 x 245 x 300 mm.
The espresso machine is equipped with an additional safety device. If the appliance is not used for about 1 hr, the espresso machine will automatically switch off.
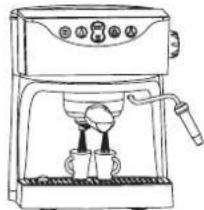
Structure of espresso machine type 13Z010
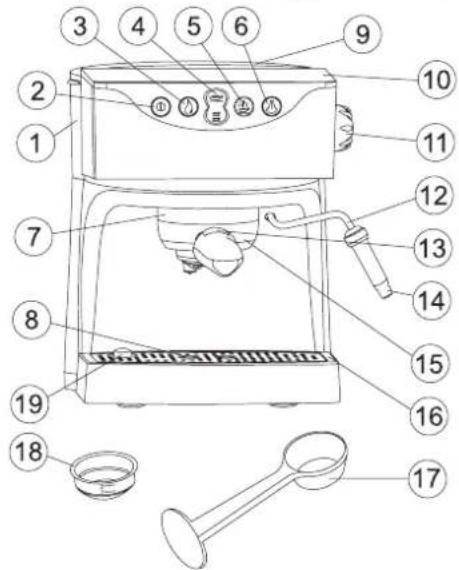
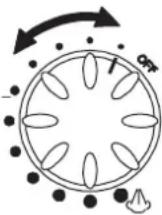
- Removable water tank
- Main switch with pilot light
- Button for manual espresso coffee brewing
- Button for setting espresso coffee brewing - 1 cup or 2 cups
- Button for setting temperature of espresso
-
Steam activating button for cappuccino coffee
-
Brew head
-
Plate for cups
-
Lid of water tank
-
Cup warming plate
-
Steam regulator knob
-
Steam wand
-
Filter lock
-
Cappuccino attachment
-
Filter holder
-
Drip tray
-
Measuring spoon
-
Filter for 1 or 2 cups
-
"Empty the drip tray" indicator
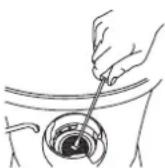
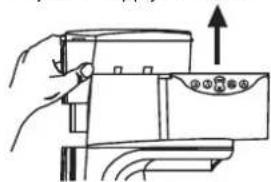
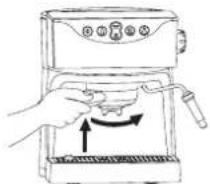
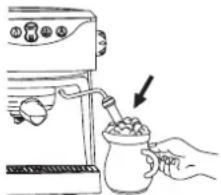
Filling the water tank with water
Disconnect the espresso machine from the power supply network.
- Pull the water tank (1) upwards and remove it.
- Open the water tank lid (9) and fill it with fresh cold water; do not exceed the MAX level.
- Close the lid of the water tank.
-Replace the water tank and press it.
The water tank may be filled without removing it from the appliance by e.g. pouring water from a jug.
WARNING!
Do not use the espresso machine when the water tank is empty. The tank needs to be filled when the water level is below the MIN level. Do not fill the tank with hot water. Do not leave cold water in the tank for a longer time for hygiene reasons.
natural_image
Hand holding a device with an upward arrow indicating motion (no text or symbols)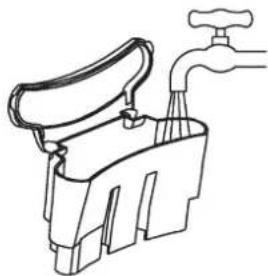
natural_image
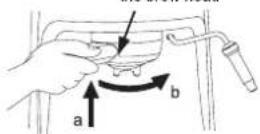
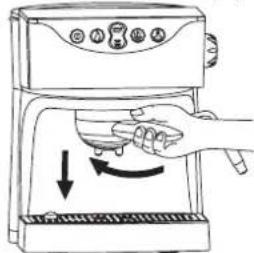
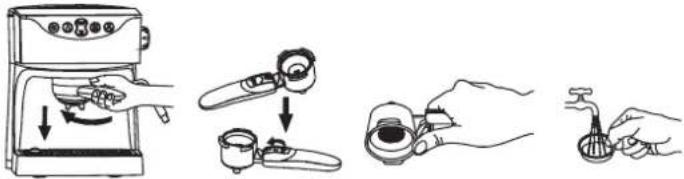
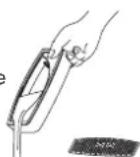
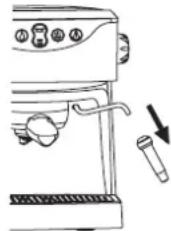
Line drawing of a faucet with handle and base (no text or symbols)Removing and replacing the filter holder
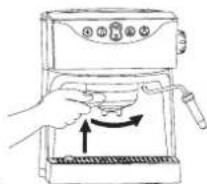
Always fix the filter holder (15):
Slot in the cover of the brew head
-(form the left, by pressing it upwards rection a) so that the holder fits in the slot in the cover of the brew head (7).
- turn it all the way to the right (direction b). To remove the filter holder, follow the procedure in reverse order – from the right to the left, and then remove it from the brew head by pulling it downwards.
Rinsing the system
The system needs to be rinsed before its first use or when the appliance has not been in use for a longer period of time.
- Rinsing the system for the espresso coffee function
Disconnect the espresso machine from the - power supply network.
- Fill the water tank with water (see: "Filling the water tank with water").
- Place an empty filter holder (15) in the brew head (7) and turn it all the way from the left to the right.
- Place a container (a jug) on the plate (8) under the brew head (7).
- Plug the espresso machine into a suitable mains socket; the appliance will come on. A sound signal will be heard and a pilot light start flashing.
When the required temperature is reached, the pilot light of the main switch will give continuous light.
- Press the button for setting espresso coffee brewing for 2 cups (4) to activate water flow.
-
Repeat water flow 3 times.
-
Rinsing the system for the cappuccino function
-
Press the steam activating button ("cappuccino") (6). A sound signal will be heard and the pilot light of the main switch will start flashing.
When the required temperature is reached, the pilot light of the main switch will give continuous light. - Place a container under the steam wand (12) and slowly turn the steam regulator knob (11) into position ⚠.
WARNING!
Always use a cup with a handle or a special cup for "cappuccino" for this activity.
- Empty the container after about 1 minute of steaming.
- Repeat the steaming process 3 times.
When the activities described above have been completed, the espresso machine is ready to use.
Brewing espresso coffee with the use of the automatic brewing function
- Disconnect the appliance from the power supply network.
- Fill the water tank with water (see: "Filling the water tank with water").
- Plug the espresso machine into a suitable mains socket; the appliance will turn on. A sound signal will be heard and a pilot light of the main switch will start flashing.
When the required temperature is reached, the pilot light of the main switch will give continuous light.
- Remove the filter holder from the appliance by turning it all the way from the right to the left and pulling it downwards.
- Using the measuring spoon (17) pour ground coffee into the filter (18) and tamp it lightly:
1 measure of coffee for 1 cup
• 2 measures of coffee for 2 cups
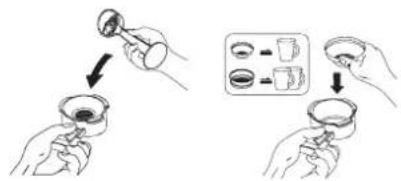
- Remove excess coffee from the rims of the filter.
- Place the filter holder containing coffee in the brew head and turn it all the way from the left to the right.
- Place a coffee cup or cups under the brew head, on the plate.
- Press the button for automatic espresso coffee brewing (4) to obtain brew.
The espresso machine was factory set to allow setting the appliance for two amounts of coffee brewed:
- 1 cup 35 to 65 ml – press the upper button (4).
- 2 cups, 35 to 65 ml each – press the lower button (4).
NOTICE:
In order to obtain a better aroma of the coffee brewed, cups need to be pre-warmed by putting them on the plate (10).
The steam wand may also be used for this purpose (12):
- Place a cup under the outlet of the steam wand, turn the regulator knob so that the hot water flowing out warms the cup.
To change the set amount, follow the instructions under: "Changing the set amount of espresso coffee".
- The brewing process stops automatically when the set amount of espresso has been brewed.
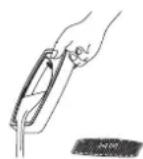
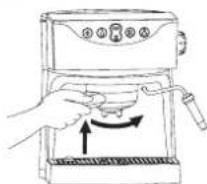
- Remove the filter holder (15) from the brew head (7) by turning it all the way from the right to the left.
- Remove the used coffee. When doing it, hold the filter by pressing the filter lock with a thumb (13).
- Rinse the filter with water.
Preparing espresso coffee with the use of the manual
brewing function
Espresso coffee may be obtained without using the automatic setting of the amount of coffee. The manual espresso brewing function allows to obtain an additional amount of coffee.
-Follow the description under "Brewing espresso coffee with the use of the automatic brewing function".
- Press and hold the button for manual espresso coffee brewing (3) until the desired amount of espresso coffee has been obtained.
The button for manual espresso brewing may be pressed and held to obtain additional portion of coffee after the process of brewing coffee with the use of the automatic function has been finished.
A smaller portion of coffee may be obtained by pressing the main switch or the brewing process may be stopped at any moment by using the automatic brewing function.
natural_image
Line drawing of a coffee maker with a side arm and control panel (no text or symbols)Setting the temperature of espresso coffee
The appliance allows to obtain 2 temperature options of espresso coffee:
Hot espresso coffee:
The appliance is factory set to brew hot espresso.
–Follow the description under “Brewing espresso with the use of the automatic or the manual function”.
Very hot espresso coffee:
–Follow the description of brewing hot espresso.
- Press the temperature button (5) and when the pilot light of the main button stops flashing and gives continuous light, wait a dozen or so seconds – the water will then be heated more.
-You can start brewing coffee.
Changing the set amount of espresso coffee
The programming process may be conducted while brewing espresso coffee:
Follow the description under "Brewing espresso with the use of the automatic or the manual function".
- Press and hold the automatic espresso brewing button (1 cup of espresso or 2 cups of espresso depending on which amount is to be programmed) until the desired amount of espresso has been obtained.
- The programming has been completed.
WARNING:
To programme, the brewing time may not be shorter than 9 seconds, otherwise the programming process may not be completed.
Restoring the factory settings for the amount of coffee:
–Follow the description under "Rinsing the system for the espresso coffee function".
- Press and hold the button for setting 1 cup of espresso, next press and hold the main switch (press and hold both buttons).
- Release the main switch after 10 seconds and then release the button for setting 1 cup of espresso.
The mode for setting 1 cup of espresso coffee has been restored to the factory set amount.
- If the setting for 2 cups of espresso needs to be restored, follow the description above 1-3 but pressing the button for setting 2 cups of espresso instead of the button for setting 1 cup of espresso.
Preparing frothed milk for cappuccino coffee
Steam function for cappuccino coffee
WARNING:
Since the temperature required for producing steam is higher than the temperature for espresso, espresso coffee should therefore be prepared before frothing milk. Otherwise espresso coffee may be burnt.
-(A4)th the cappuccino attachment steam wand (12).
Prepare espresso in a larger cup. –
Press the cappuccino brewing button, a signal sound will be heard and the light indicating temperature will start flashing.
The pilot light of the main switch will start giving continuous light when the appliance has reached the required temperature.
- Place an empty cup under the cappucciono attachment and slowly set the steam regulator knob into position Allow water to flow until steam appears. Next turn the steam regulator knob back to position „OFF”.
Pour milk into a cup with a handle (or a special cappuccino cup) to about 1/3 of its capacity. Immerse the cappuccino attachment so it – is about 2 cm under the surface – the upper outlet in the cappuccino attachment just below the surface of milk.
natural_image
Illustration of a hand pouring food into a cup using a blender (no text or symbols)- Slowly turn the steam regulator knob into position ⚠. The force of the steam produced may be changed by turning the steam regulator knob into another position.
- When the milk is hot enough and froth has been produced, turn the regulator knob back into position „OFF”.
- Pour or spoon the frothed milk into espresso coffee. The cappuccino coffee is ready.
Filling the espresso machine with water – replenishing water
If there is no water left in the espresso machine, the pump will operate loudly or steam will not come out of the steam wand while the cappuccino function is on.
In this situation:
- Disconnect the espresso machine from the power supply network.
- Fill the water tank with water (See the description under "How to fill the water tank").
- Plug the appliance into a suitable mains socket. The appliance will turn on producing a deep sound and the pilot light of the main switch will start flashing.
- Place an empty container under the brew head.
- Press the manual espresso brewing button to allow half of the water from the water tank to flow.
- The espresso machine has been filled and is ready to be used.
WARNING!
Be careful! The steam wand is hot!
Check that the temperature light is off before you start frothing milk.
Always use the steam function again only after the temperature light has come off. If the temperature light starts flashing during milk frothing, turn the steam regulator knob back into position "OFF" and wait until the light starts giving continuous light.
Emptying the drip tray
When the drip tray is full with water, the "Empty the drip tray" indicator (19) will rise above the grid for cups. The water from the drip tray needs to be removed.
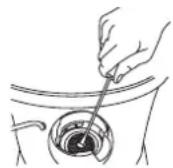
Descaling
It is recommended that scale is removed from the appliance every 3 months using citric acid.
NOTICE – Important: Dissolve 2 tablespoonfuls (about 30 g) of citric acid in 1 liter of water.
- Disconnect the appliance from the power supply network.
– Check that the appliance has cooled down completely. - Before descaling, unscrew the „brewing grid" from the brew head using a screwdriver.
- Clean the „brew grid” and the brew head from scale and remains of coffee.
-
Replace the spring of the valve and the washer on the brew head (without the grid) and screw them on tightly.
-
Take the cappuccino attachment (14) off the steam wand (12).
- Fill the water tank with 1 liter of a pre-prepared solution of citric acid.
- Close the water tank lid and place the tank in the appliance.
- Place empty containers under the brew head and the steam wand.
- Plug the appliance into a suitable mains socket.
- Press the cappuccino brewing button, a sound signal will be heard and a pilot light of the main switch will start flashing.
- The pilot light of the main switch will start giving off continuous light when the appliance has reach the required temperature.
- Press the espresso brewing button until half of the descaling solution has flown through.
- Turn the steam regulator knob into position ⚠.
- When steam comes out, turn it back into position OFF.
- Allow the remaining part of the descaling solution to work inside the espresso machine for about 10 minutes.
- Place an empty container under the brew head.
- Press the manual brewing button.
- Allow all of the descaling solution to flow through.
- Continue the activities by pressing and holding the manual espresso brewing button until two tankfuls of clean water have flown through.
– Fill the tank with cold water again.
- Place an empty container under the brew head and the steam wand.
- Press the cappuccino brewing button and wait until the pilot light stops flashing and starts giving continuous light.
- Set the steam regulator knob in position ⚠ for 30 seconds. Turn off the cappuccino brewing button.
- Press the manual espresso brewing button so that the remaining water can flow through the brew head.
- Press the main switch to turn off the appliance and allow it to cool.
- Unscrew the spring of the valve and the washer from the brew head and replace the "brew grid" with the spring of the valve and the washer on the brew head.
- Replace the cappuccino attachment on the steam wand.
Cleaning and maintenance
- Disconnect the appliance from the power supply network.
– Check that the appliance has cooled down completely. - Wipe the body of the appliance with a damp cloth or a damp sponge.
Remove the filter holder from the appliance and re- - move the used coffee.
- Clean the filter holder and the filter with a damp cloth or a damp sponge.
- Remove the grid for cups and the drip tray from the appliance and empty water and coffee which have been spilt on them and then clean them.
- Take out the cappuccino attachment to clean it by pulling it downwards.
Standard requirements
Espresso machines meet the requirements of standards in force.
The appliance is compliant with the requirements of the following directives:
- The Low Voltage Directive (LVD) - 2006/95/EC
- Electromagnetic Compatibility (EMC) - 2004/108/EC
The product is affixed with a CE Mark on the data plate.
Ecology – Environment protection
Each user can protect the natural environment. It is neither difficult nor expensive.
In order to do it: put the cardboard packing into recycling paper container; put the polyethylene (PE) bags into container for plastic.
When worn out, dispose the appliance to particular disposal centre, because of the dangerous elements of this appliance, which can be hazardous for natural environment.
natural_image
Line drawing of a coffee maker with handle and spout, showing no text or symbols
Do not dispose into the domestic waste disposal!!!