13Z011 - Coffee maker Zelmer - Free user manual and instructions
Find the device manual for free 13Z011 Zelmer in PDF.

| Brand | Zelmer |
| Model | 13Z011 |
| Product Type | Fully Automatic Espresso Machine |
| Power Consumption | 1300 W at 230 V |
| Water Tank Capacity | 2.2 L |
| Pump Pressure | 15 bar |
| Bean Container Capacity | Not specified (estimated ~250 g) |
| Grinder Adjustment | Initial (coarse/fine) and precise adjustment knobs |
| Display | LCD display with control panel |
| Cup Sizes | Small (20-58 ml), Medium (50-134 ml), Large (100-230 ml) |
| Brewing Options | Single or double cups; bean or ground coffee; hot water; steam for milk frothing |
| Adjustable Settings | Brew temperature, pre-brewing, brewing time, water hardness, energy saving mode, language |
| Self-Test & Cleaning | Self-test on start, automatic self-clean after ~10 cups, descaling program |
| Brewing Unit | Removable for cleaning, with start position indicator |
| Safety Features | Automatic shut-off, overheat protection, child lock not mentioned |
| Dimensions (approx.) | Not provided; typical for countertop espresso machine (est. 30x25x35 cm) |
| Weight (approx.) | Not provided; estimated ~8-10 kg |
Frequently Asked Questions - 13Z011 Zelmer
User questions about 13Z011 Zelmer
0 question about this device. Answer the ones you know or ask your own.
Ask a new question about this device
Download the instructions for your Coffee maker in PDF format for free! Find your manual 13Z011 - Zelmer and take your electronic device back in hand. On this page are published all the documents necessary for the use of your device. 13Z011 by Zelmer.
USER MANUAL 13Z011 Zelmer
natural_image
Exterior view of a modern espresso machine with digital display and two cups (no visible text or symbols)
2-26
natural_image
Close-up of a black plastic mechanical component with internal grid structure and a 14g measurement label (no readable text or symbols beyond the label)
natural_image
Close-up of a hand opening the interior of an electric air fryer oven, showing the lid and control panel (no text or symbols visible)Rys. 3
natural_image
Close-up of a hand operating the interior of a modern electric oven with digital display and control buttons (no visible text or symbols)Rys. 4 Rys. 5
natural_image
Hand inserting a device into an electric oven with control panel (no visible text or symbols)
natural_image
Close-up of a black plastic mechanical component with visible internal structure and no readable text or symbols
natural_image
Hand holding a black mechanical component with rotational arrow indicating rotation (no text or symbols)Rys. 6
natural_image
Close-up of a transparent container with a central screw and two black plastic connectors (no text or symbols visible)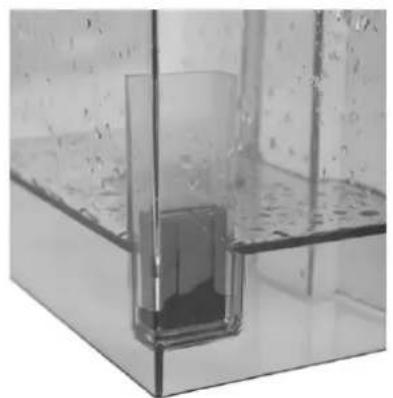
natural_image
Close-up of a transparent glass container with a submerged dark liquid, no visible text or symbols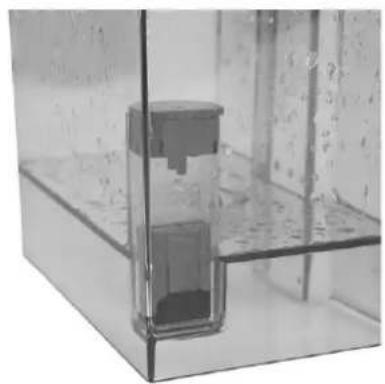
natural_image
Close-up of a transparent glass container with a small internal component, no visible text or symbolsRys. 7
natural_image
Close-up of a kitchen toaster with two white food items on top, showing a digital display and control buttons (no visible text or symbols)Rys. 9
flowchart
Flowchart of Kawy (GOTOWY) production process, showing steps from KAWY to language and timing, including Naciśnij przycisk, OSZCZ. ENER, CZAS, and Przyciskami stages.natural_image
Hand operating a mechanical lever on a vehicle (no visible text or symbols)
natural_image
Close-up of a hand inserting a component into a device (no visible text or symbols)Rys. 10
natural_image
3D-printed mechanical component with internal structure and mounting holes, labeled '14g' (no readable text or symbols beyond label)
natural_image
Close-up of a hand operating the interior of an electric air fryer oven, showing the lid and control panel (no text or symbols visible)Obr. 3
natural_image
Close-up of a hand operating the interior of a kitchen air fryer with digital display and control buttons (no visible text or symbols)Obr. 4 Obr. 5

natural_image
Hand inserting a device into an electric oven, showing internal components and control panel (no text or symbols visible)
natural_image
Black plastic industrial fan component with visible blades and mounting holes (no text or symbols)
natural_image
Hand holding a black plastic component with a circular arrow indicating rotation (no text or symbols)natural_image
Close-up of a kitchen toaster with two white food items on top, showing a digital display and control buttons (no visible text or symbols)Obr. 9
natural_image
Hand operating a mechanical lever with a black lever handle (no visible text or symbols)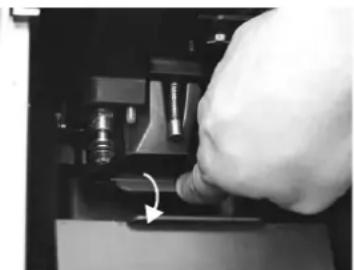
natural_image
Close-up of a hand pressing a button on a mechanical component (no visible text or symbols)Obr. 10
natural_image
3D-printed black plastic device with internal fan structure and 14g label (no readable text or symbols beyond branding)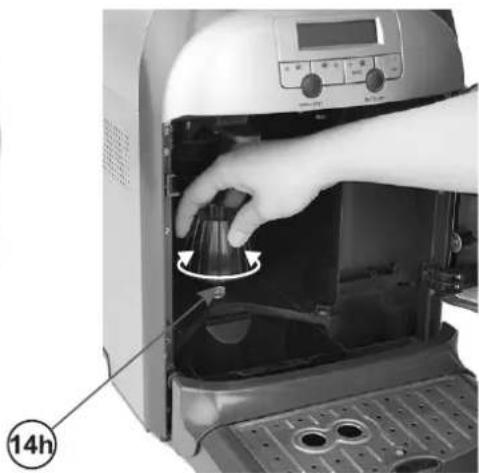
natural_image
Close-up of a hand opening the interior of an electric air fryer oven, showing the lid and control panel (no text or symbols visible)Obr. 3
natural_image
Person operating a digital kitchen appliance with control panel and door (no visible text or symbols)Obr. 4 Obr. 5
natural_image
Hand inserting a microwave oven into a kitchen appliance (no visible text or symbols)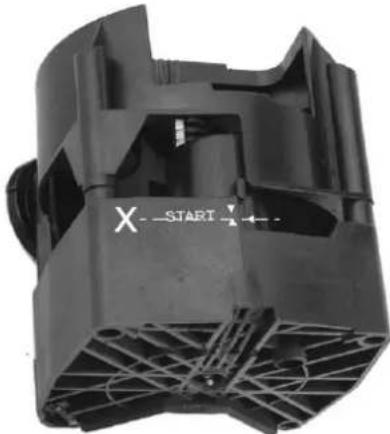
natural_image
Black plastic mechanical component with visible internal structure and no text or symbols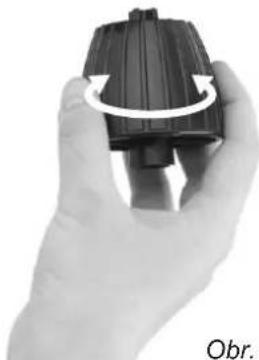
natural_image
Hand holding a black plastic component with a circular arrow indicating rotation (no text or symbols)Obr. 6
natural_image
Close-up of a kitchen toaster with two white food items on top, showing a digital display and control buttons (no visible text or symbols)Obr. 9
natural_image
Close-up of a hand using a lever to press or adjust a mechanical component (no visible text or symbols)
natural_image
Close-up of a hand pressing a small electronic component with a curved arrow indicating motion (no visible text or symbols)Obr. 10
- Čistenie trysky pary s kovovou chráničkou (16).
natural_image
3D-printed black mechanical component with internal fan structure and 14g measurement annotation (no readable text or symbols beyond labels)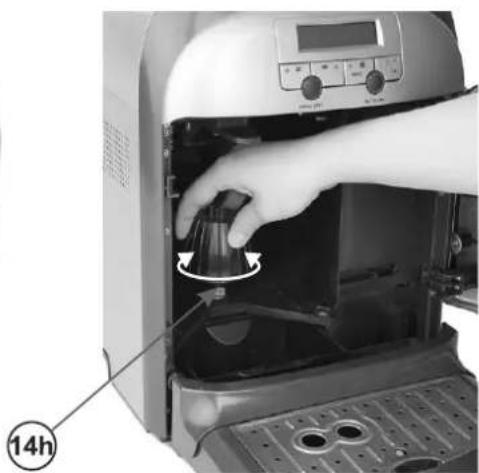
natural_image
Close-up of a hand operating the interior of an electric oven with a digital display and control panel (no visible text or symbols)- ábra
natural_image
Close-up of a hand inserting a digital microwave into an oven, showing the lid and control panel (no text or symbols visible)- ábra 5. ábra

natural_image
Hand inserting a device into an electric oven, showing internal components and control panel (no text or symbols visible)
natural_image
Black plastic mechanical component with visible fan and mounting holes, no text or symbols present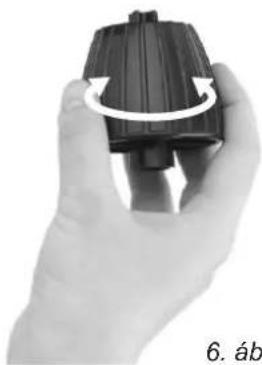
natural_image
Hand holding a black plastic component with a circular arrow indicating rotation (no text or symbols)natural_image
Close-up of a transparent container with a central screw and two small black plastic connectors (no text or symbols visible)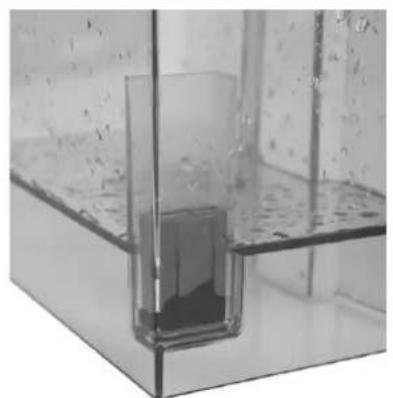
natural_image
Close-up of a transparent glass container with a submerged object, no visible text or symbols
natural_image
Close-up of a transparent glass container with internal components, no visible text or symbols7. ábra
natural_image
Close-up of a kitchen toaster with digital display and two white cylindrical food items on top (no visible text or symbols)- ábra
natural_image
Hand operating a mechanical lever with a black lever handle (no visible text or symbols)
natural_image
Close-up of a hand inserting a small mechanical component into a device (no visible text or symbols)natural_image
Black plastic mechanical component with internal fan structure and 14g measurement annotation (no readable text or symbols beyond labels)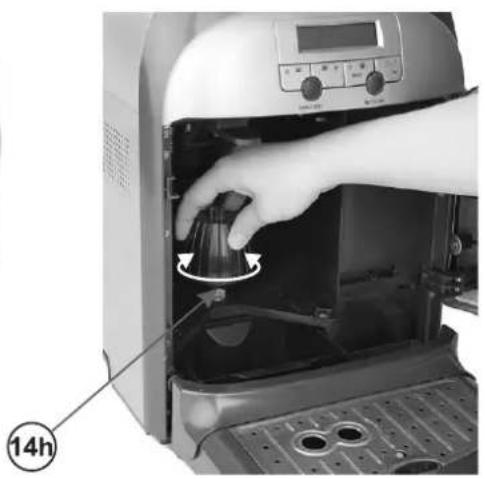
natural_image
Close-up of a hand opening the interior of an electric air fryer with a 14-hour mark indicator (no text or symbols on device)Desen nr. 3
natural_image
Close-up of a hand operating the interior of a modern electric oven with digital display and control buttons (no visible text or symbols)natural_image
Hand inserting a device into an electric oven with control panel (no visible text or symbols)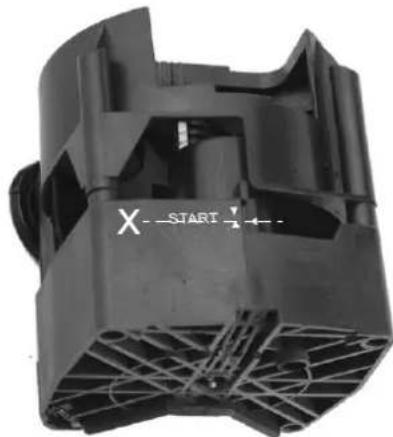
natural_image
Close-up of a black plastic mechanical component with visible internal structure and no text or symbols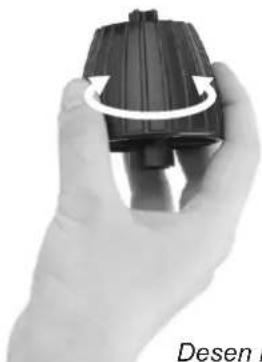
natural_image
Hand holding a black mechanical component with rotational arrow indicating rotation (no text or symbols visible)Desen nr. 6
natural_image
Close-up of a kitchen toaster with two white food items on top, showing a digital display and control buttons (no visible text or symbols)Desen nr. 9
natural_image
Hand operating a lever mechanism with a black lever (no visible text or symbols)
natural_image
Close-up of a hand pressing down on a mechanical component with a white arrow indicating motion (no visible text or symbols)Desen nr. 10
ECOLOGIA – SĂ AVEM GRIJĂ DE MEDIU
natural_image
Black plastic mechanical component with internal grid structure and 14g measurement annotation (no readable text or symbols)
natural_image
Person operating a digital kitchen appliance with a hand adjusting the interior panel (no visible text or symbols)Puc. 3
natural_image
Close-up of a hand operating the interior of a modern electric oven with digital display (no visible text or symbols)
natural_image
Hand inserting a small electronic device into an oven, showing internal components and control panel (no visible text or symbols)
natural_image
Black plastic mechanical component with visible fan and mounting holes (no text or symbols)Puc. 5Puc. 4
natural_image
Hand holding a black mechanical component with rotational arrow, labeled Puc. 6 (no text or symbols on the object itself)natural_image
Close-up of a transparent container with a central bolt and two black plastic connectors (no visible text or symbols)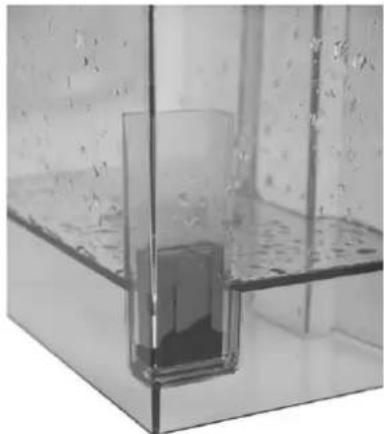
natural_image
Close-up of a transparent glass container with liquid inside, placed on a reflective surface (no text or symbols visible)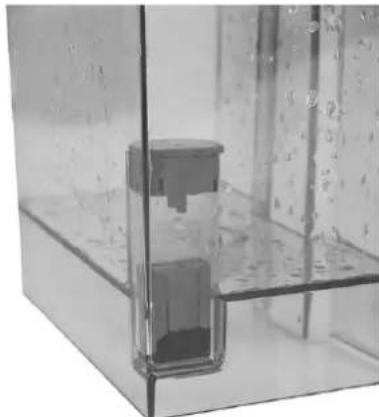
natural_image
Close-up of a transparent glass container with internal components, no visible text or symbolsPuc. 7
natural_image
Close-up of a kitchen toaster with two white food items on top, showing a digital display (no visible text or symbols)Puc. 9
natural_image
Close-up of a hand using a tool to press or install a mechanical component (no visible text or symbols)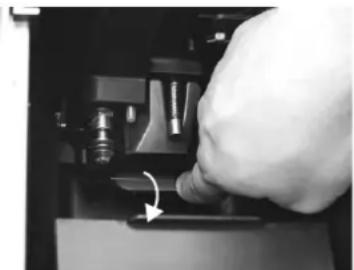
natural_image
Close-up of a hand pressing a button on a mechanical component (no visible text or symbols)Puc. 10
natural_image
Close-up of a black plastic mechanical component with internal fan structure and mounting holes (no visible text or symbols)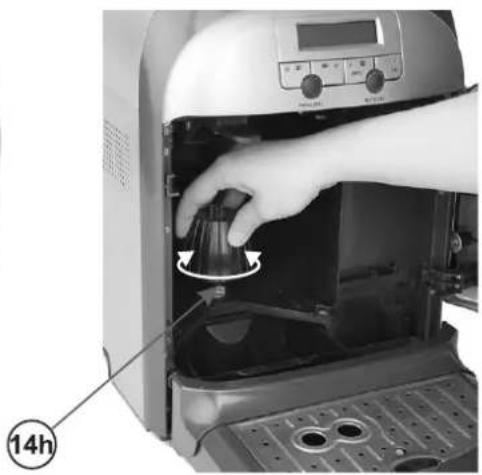
natural_image
Hand operating a digital kitchen appliance with a hand pressing down the door (no visible text or symbols)Puc. 3
natural_image
Close-up of a hand inserting a black appliance into a microwave oven (no visible text or symbols)Puc. 4 Puc. 5

natural_image
Hand inserting a device into an oven, showing internal components and control panel (no visible text or symbols)
natural_image
Close-up of a black plastic mechanical component with visible internal structure and no readable text or symbols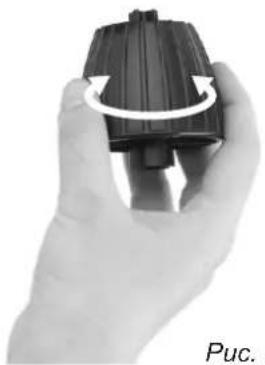
natural_image
Hand holding a black mechanical component with rotational arrow indicator (no text or symbols on the object itself)Puc. 6
natural_image
Close-up of a kitchen toaster with digital display and two white food items on top (no visible text or symbols)Puc. 9
natural_image
Hand operating a mechanical lever with a black lever handle (no visible text or symbols)
natural_image
Close-up of a hand pressing down on a mechanical component with a curved arrow indicating motion (no visible text or symbols)Puc. 10
Puc. 3
natural_image
Close-up of a hand inserting a black appliance into a microwave oven (no visible text or symbols)Puc. 4 Puc. 5

natural_image
Hand inserting a device into an electric oven with arrows indicating the process (no text or symbols visible)
natural_image
Close-up of a black plastic mechanical component with visible internal structure and no readable text or symbols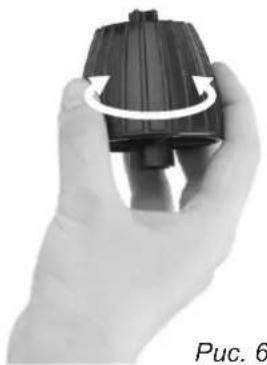
natural_image
Hand holding a black mechanical component with rotational arrow, labeled 'Puc. 6' (no other text or symbols)natural_image
Close-up of a kitchen toaster with two white food items on top, showing a digital display and control buttons (no visible text or symbols)Puc. 9
natural_image
Hand operating a mechanical lever with a black lever handle (no visible text or symbols)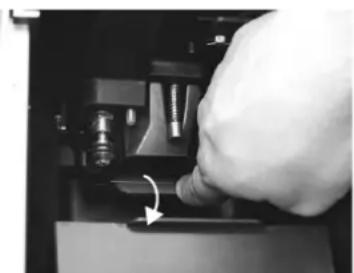
natural_image
Close-up of a hand inserting a component into a device (no visible text or symbols)Puc. 10
- Product features 206
- Parts (fig. 1) ...... 207
- Control panel and LCD display (fig. 2) 208
- Brewing head unit description (14) 209
- Before initial use - tips 210
- Filling the water tank 211
- Dosing coffee 211
7.1. Bean coffee 211
7.2. Ground coffee 212
- Cup warming 212
- Emptying the drip tray 212
- Emptying the dregs box 212
- Operating the coffee maker SELF-TEST 212
- Preparing coffee 212
12.1.Preparing a small cup of coffee 212
12.2.Preparing a medium cup of coffee 213
12.3.Preparing a large cup of coffee 213
12.4.Preparing 2 small cups of coffee 213
12.5.Preparing 2 medium cups of coffee 213
12.6.Preparing 2 large cups of coffee 213
- Preparing hot water 214
14.Preparing steam 214 - Setting the quantity of the small cup/medium cup/large cup 215
15.1. Setting the quantity of the small cup 215
15.2. Setting the quantity of the medium cup 215
15.3. Setting the quantity of the large cup 215
- Programming 216
16.1. Setting the energy saving function – ECONOMY MODE 216
16.2. Setting the language 217
16.3. Setting the temperature of the brewed coffee for the small cup/medium cup/large cup 217
16.3.1. Setting the temperature of the brewed coffee for the small cup 217
16.3.2. Setting the temperature of the brewed coffee for the medium cup 218
16.3.3. Setting the temperature of the brewed coffee for the large cup 218
16.4. Setting the pre-brewing function for the small cup/medium cup/large cup 219
16.4.1. Setting the pre-brewing function for the small cup 219
16.4.2. Setting the pre-brewing function for the medium cup 219
16.4.3. Setting the pre-brewing function for the large cup 220
16.5. Setting brewing time for the small cup/medium cup/large cup 220
16.5.1. Setting the brewing time for the small cup 220
16.5.2. Setting the brewing time for the medium cup 221
16.5.3. Setting the brewing time for the large cup 221
16.6 Setting the water hardness 222
16.7. Descaling 222
16.8 Checking the number of brewed cups of coffee 224
16.9. Setting the current time 224
16.10.Restoring factory settings 225
- Warnings 225
- Cleaning and general care 226
- Troubleshooting 227
Ecology – Environmental protection 227
Dear Customer,
All machines have been tested with coffee. Although they have been carefully cleaned there might be some coffee residuals in the machine. We guarantee however that machines are new.
We recommend to read the instruction before use.
Dear Customers!
Congratulations on your choice of our appliance, and welcome among the users of Zelmer products.
In order to achieve best possible results we recommend using exclusively original Zelmer accessories. They have been specially designed for this product.
Please read these instructions carefully. Pay special attention to important safety instructions. Keep this User's Guide for future reference.
The manufacturer does not accept any liability for any damages resulting from unintended use or improper handling. The manufacturer reserves his right to modify the product any time in order to adjust it to the regulations, norms, directives or due to construction, trade, aesthetic or other reasons without notifying in advance.
IMPORTANT SAFETY INSTRUCTIONS
Please read these instructions carefully. Please save these instructions.
The appliance is intended for household use only. ●
Do not use the appliance outside or for commercial purposes.
• Always place the appliance on a flat, even surface.
- Do not use the coffee maker with an empty water tank. Fill the water tank only with cold, filtered, clean and fresh water. The use of warm or hot water or other liquids may cause damage to the appliance or may pose a risk. Do not exceed the maximum water tank capacity amounting to 2.2 l.
- The steam nozzle becomes very hot during milk frothing and water flow. Avoid any direct contact with the steam nozzle, as it may lead to burns.
- Always switch off and unplug the appliance before cleaning or in case of problems during the coffee brewing process.
- Do not allow the cord to come into contact with any hot parts of the appliance, including the cup warming plate and the steam nozzle.
Do not touch any hot surfaces of the coffee maker. Use handles and knobs.
- Do not place hands directly under the steam, hot water or poured coffee stream as it may lead to burns or injuries.
- The use additional attachments that are not recommended by the manufacturer may pose a threat.
- Do not place any movable parts against the appliance during its operation.
- Do not move the appliance when it is switched on or working. Switch off and unplug the coffee maker before moving it.
- Always switch off the appliance before unplugging it. Do not unplug by pulling on cord – grasp only the plug.
- Always switch off and unplug the appliance if it is not used for a longer period of time or before cleaning.
- Do not use an extension cord with the coffee maker unless it has been checked by a qualified technician or service center personnel.
- Plug the appliance only to a grounded AC electrical outlet with the voltage corresponding to the voltage indicated on the rating plate.
- This appliance is not intended for use by persons (including children) with reduced physical, sensory or mental capabilities, or lack of experience and knowledge, unless they have been given supervision or instruction concerning use of the appliance by a person responsible for their safety.
- Children should be supervised to ensure that they do not play with the appliance.
- The appliance is not intended to be operated by means of an external timer or separate remote-control system.
- Turn off the device and unplug it from an outlet before replacing the equipment or approaching moving parts during use.
- Always unplug the appliance before cleaning, assembling or dismantling. Allow the appliance to cool.
- Use the appliance only for its intended purpose specified in this instruction manual.
- Never place the appliance near a source of heat, a flame, an electrical heating element or on top of a hot oven.
- Never place the coffee maker on top of any other appliance.
- Do not let the cord to hang over the edge of the table or counter or touch hot surfaces.
- Never operate the appliance if it is visibly damaged, if it has a damaged cord, if the appliance has fallen down or has been damaged in any other way. In case of a suspicion that the appliance is damaged, it can be checked, repaired or adjusted only by the qualified personnel of an authorized service point.
- Do not immerse the appliance in water or other liquid.
- If the non-detachable part of the cord is damaged, it should be replaced by the producer or at a proper service point or by a qualified person in order to avoid any hazards.
- Coffee beans can only be inserted to the coffee bean container. Using other food products, liquids or objects in the container may lead to a risk or damage to the appliance.
- Ground coffee can only be put into the ground coffee container. Using other food products, liquids or objects in the container may lead to a risk or damage to the appliance.
- Warning: Do not attempt to dismantle the appliance to avoid the risk of fire, electric shock or injury. There are no serviceable parts inside the coffee maker. Repairs should be performed only by the authorized personnel.
- Do not attempt to lubricate the appliance. No additional maintenance work is required.
- Warning: The water tank should not be opened during operation.
- Warning: Always make sure that there is water in the tank before operating the coffee maker, in case of lack of water in the tank the following message will show on the display: FILL TANK WITH FRESH WATER.
Make sure that the above instructions have been understood.
TECHNICAL PARAMETERS
The technical parameters are indicated on the rating label.
Power: 1300 W at 230 V.
Water tank capacity: max 2.2 l.
The coffee maker is a I class appliance equipped with a cord having a grounding wire with a grounding plug.
The coffee maker meets the requirements of the applicable norms.
The appliance is in conformity with the requirements of the directives:
Low voltage appliance (LVD) - 2006/95/EC -
Electromagnetic compatibility (EMC) - 2004/108/EC.
The appliance was marked by a CE sign on the rating label.
1. Product features
The appliance is a fully automatic coffee maker which grinds beans, brews espresso and has a function which enables to test the appliance. The appliance is equipped with a mechanical pump which increases the pressure up to 15 bar and enables to prepare a great espresso with a superb froth. The coffee maker is perfect for real coffee connoisseurs. The coffee maker brews an extremely tasty and aromatic coffee due to the fact that the proper water temperature of the brewing process 92–94°C is maintained. The coffee maker is easy to use, it is equipped with an easy menu, an LCD display and control lamps. After pressing a button, the appliance automatically grinds coffee beans and brews fresh, aromatic coffee. This appliance has all the functions typical for a coffee maker and additionally it is equipped with an LCD display thanks to which you will be able to check the mode and status of the appliance at any time. If a warning icon appears on the display, the appliance may automatically stop the operation. Additionally the coffee maker has a function which enables to test the appliance and to adjust it automatically. The appliance is equipped with a rotating base thanks to which the user can easily turn the coffee maker on its axis.
Thanks to the built-in memory, if the user does not apply the procedures necessary for the proper operation of the coffee maker, the appliance will automatically show appropriate messages on the LCD display concerning the way to prepare the coffee maker for operation.
- Parts (fi g. 1)

- Cord
- Power on/off switch 0/I
- Water tank
3a. Float
3b. Float plug - Bean coffee container
- Water tank lid
- Bean coffee container lid
- Cup-warming plate
- Coffee maker carrying handle
- Ground coffee container lid
9a. Ground coffee container - Initial grinding level adjustment knob
- Precise grinding level adjustment knob
- Control panel and LCD display
- Steam/ hot water knob
-
Brewing head unit
14a. Brewing head unit handle -
Coffee maker service doors
-
Steam/hot water nozzle
-
Adjustable coffee spout
-
Service door release button
-
Drip tray
-
Drip tray full indicator
-
Drip tray grill
-
Dregs box
-
Brewing head unit seal
-
Measuring spoon with brush – used to fill ground coffee (measuring spoon) and to clean the appliance (brush)
-
Brewing head unit key – used to adjust the axis of the brewing head unit and the shaft inside the espresso maker under the brewing head unit.
-
Projection which facilitates taking out the brewing head unit
-
Water hardness tester
The knobs (10) and (11) are used to adjust the grinding level of the coffee beans. The bigger knob (10) is used for an initial (basic) adjustment and the smaller knob (11) is used to adjust a precise setting. Adjustments made using those 2 knobs will change the taste of the coffee. The adjustments can be made only when the grinder is operating.
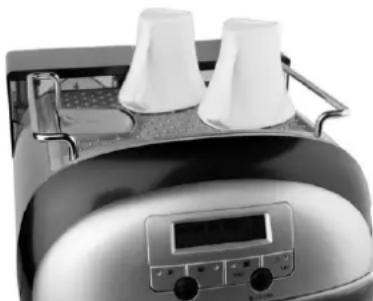
3. Control panel and LCD display (fi g. 2)
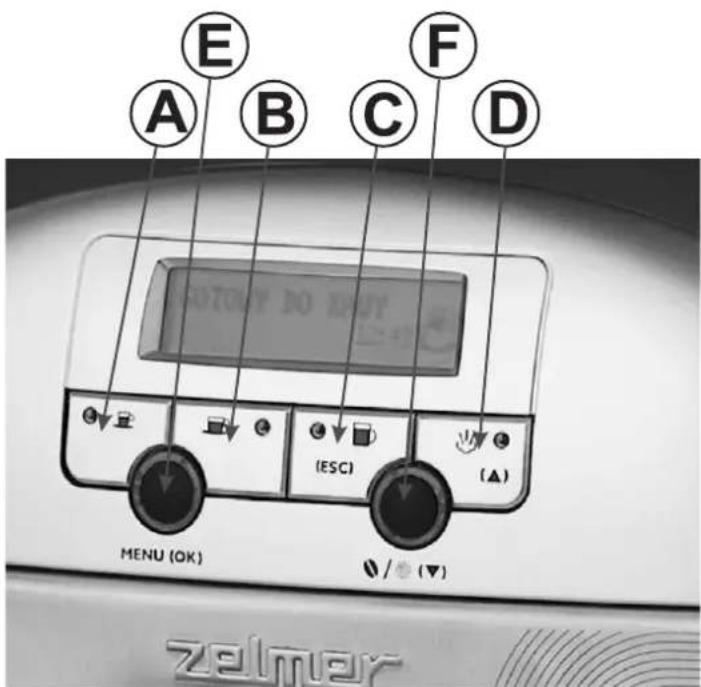
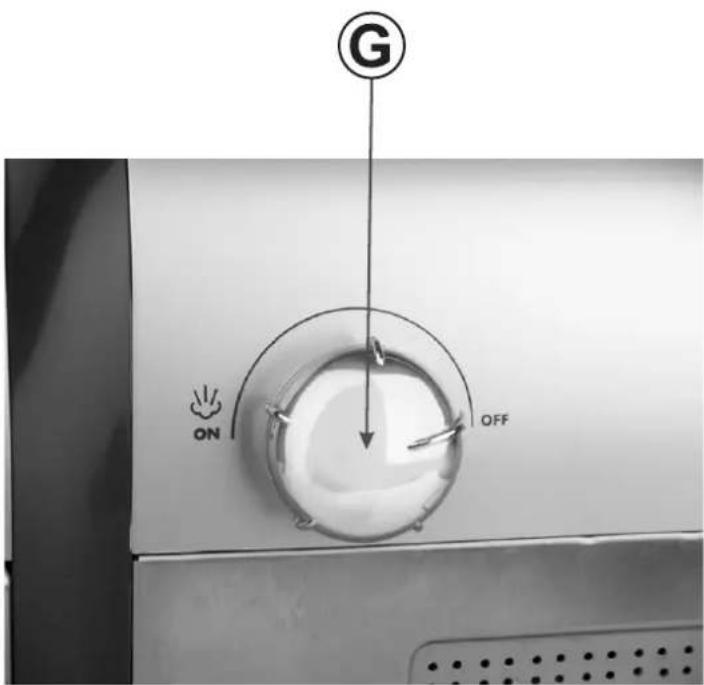
Fig. 2
A. Small cup of coffee button
B. Medium cup of coffee button
C. Large cup of coffee button (ESC) button
D. Stem button/menu up button (▲)
E. MENU button (OK).
G. Stem/hot water knob
F. Bean coffee/ground coffee selection button /Menu down button (▼)
A. Small cup of coffee button 🖱️
When the message READY TO BREW appears on the display press the 📋 button once. The message 1 SMALL CUP COFFEE will appear on the display together with the currently set capacity in ml and the brewing process will start immediately. After filling the cup with coffee, the message 1 SMALL CUP COFFEE will disappear from the display and the message READY TO BREW will appear on the display. If you press the 📋 button twice when the message READY TO BREW appears on the display, the message 2 SMALL CUP COFFEE will appear on the display together with the currently set capacity in ml and the brewing process will start immediately. After filling the cups with coffee, the message 2 SMALL CUP COFFEE will disappear from the display and the message READY TO BREW will appear on the display.
B. Medium cup of coffee button 🖱️
When the message READY TO BREW appears on the display press the 📋 button once. The message 1 MEDIUM CUP COFFEE will appear on the display together with the currently set capacity in ml and the brewing process will start immediately. After filling the cup with coffee, the message 1 MEDIUM CUP COFFEE will disappear from the display and the message READY TO BREW will appear on the display. If you press the 📋 button twice when the message READY TO BREW appears on the display, the message 2 MEDIUM CUP COFFEE will appear on the display together with the currently set capacity in ml and the brewing process will start immediately. After filling the cups with coffee, the message 2 MEDIUM CUP COFFEE will disappear from the display and the message READY TO BREW will appear on the display.
C. Large cup of coffee button (ESC)
When the message READY TO BREW appears on the display press the 📋 button once. The message 1 LARGE CUP COFFEE will appear on the display together with the currently set capacity in ml and the brewing process will start immediately. After filling the cup with coffee, the message 1 LARGE CUP COFFEE will disappear from the display and the message READY TO BREW will appear on the display. If you press the 📋 button twice when the message READY TO BREW appears on the display, the message 2 LARGE CUP COFFEE will appear on the display together with the currently set capacity in ml and the brewing process will start immediately. After filling the cups with coffee, the message 2 LARGE CUP COFFEE will disappear from the display and the message READY TO BREW will appear on the display. This button is also used to escape the programming mode without saving the changes.
D. Steam button ↩ menu up button (▲)
When the message READY TO BREW appears on the display press the ⏻ button. The control lamp will light indicating that the coffee maker is warming up. The message COFFEE --> STEAM will appear on the display. The coffee maker will warm up to the set temperature and will switch to the steam mode. The message READY TO USE STEAM will appear on the display. If you press this button again, the control lamp will go off and the message STEAM --> COFFEE will appear on the display indicating that after a fixed period of time the coffee maker will return to the coffee brewing mode. The message READY TO BREW will appear on the display.
This button is also used to rewind the menu up in the programming mode, that is after pressing the MENU (OK) button.
WARNING! The steam/ hot water nozzle (16) and the water are very hot. Be careful not to burn yourself. Always use a cloth to handle the steam/hot water nozzle (16). Never block the steam/ hot water nozzle (16) inlet.
E. MENU button (OK)
When the message READY TO BREW appears on the display press the MENU (OK) button once. The coffee maker will start to operate in the programming mode. The button will light after pressing it. The display will show the menu with the following messages: ECONOMY MODE, LANGUAGE, TEMPERATURE, PREBREWING, BREWING TIME, WATER HARDN., DESCALING, NO. OF CUPS, CLOCK, DEFAULT.
To save the changes press the MENU (OK) button.
F. Bean coffee/ground coffee/menu down button √/○ (▼)
When the message READY TO BREW appears on the display press the 🎨 / 🎨 button. The message COFFEEPOWDER will appear on the display under the message READY TO BREW. It means that the coffee maker is ready to brew ground coffee. Press the 🎨 / 🎨 button the message COFFEEPOWDER will disappear. It means that the coffee maker is ready to brew bean coffee. This button is also used to rewind the menu down in the programming mode, that is after pressing the MENU (OK) button.
ATTENTION! The function with the use of ground coffee enables to prepare only one cup of coffee (small, medium or large). Never add more than ONE measuring spoon of ground coffee to the ground coffee container (9a).
NOTE!
It is possible to immediately stop the coffee brewing process. In order to do so, use the buttons (A), (B) or (C) respectively while brewing a small, medium or large cup of coffee. Remember that in case of brewing bean coffee, it is possible to stop the brewing process only after the coffee grinding process is complete.
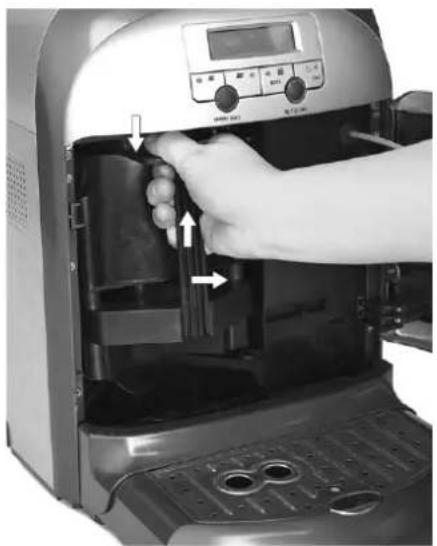
4. Brewing head unit description (14)
The brewing head unit (14) (fig. 3) consists of the lower (14f) and upper (14e) casing, the brewing chamber (14d), the screw lever (14c), the coffee delivering pipe (14b) and the D-shaped handle (14a). The main elements of the head are: the upper (14f) and lower casing (14e), the screw lever (14c) is connected with the motor enabling to control the brewing head unit (14) in order to brew espresso.
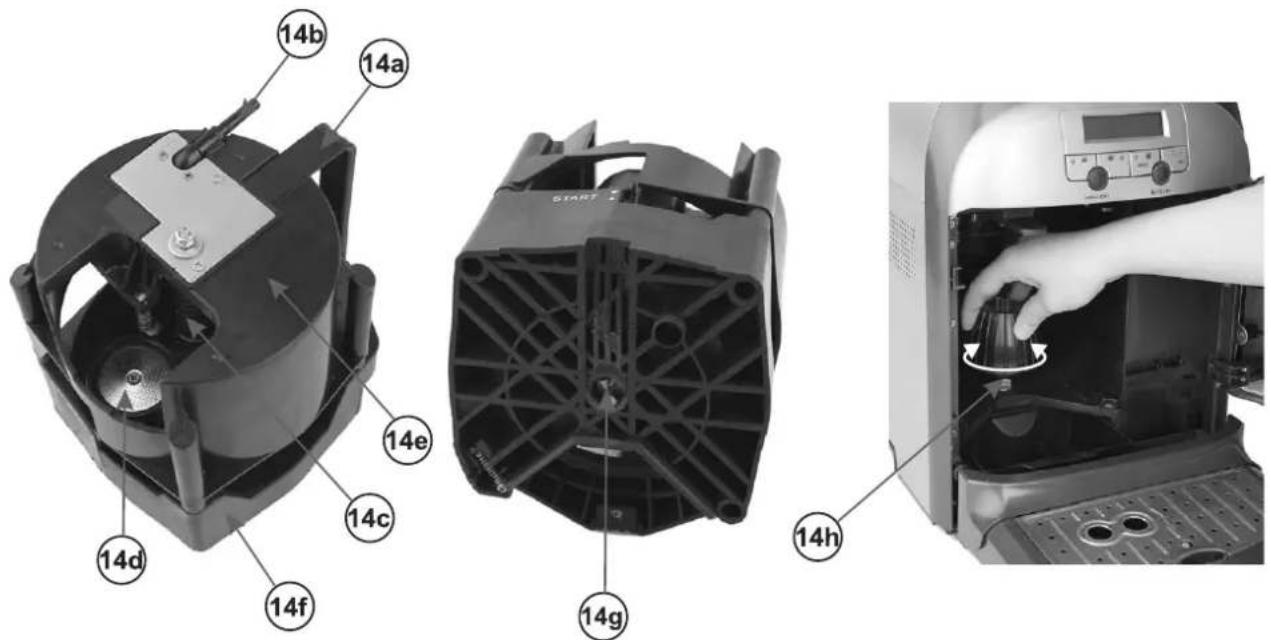
Fig. 3
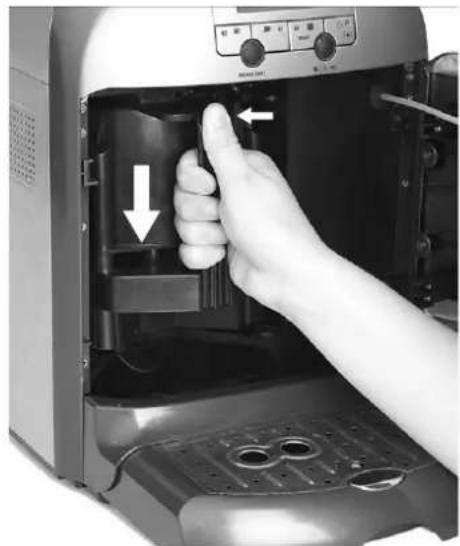
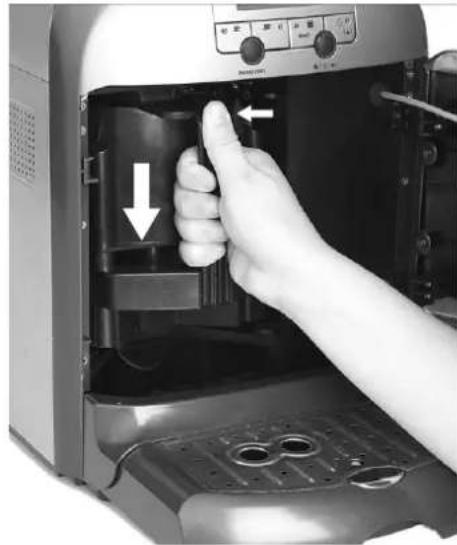
Carefully remove the brewing head unit (14). Press the protrusion (26) with your thumb (see fig. 2) and firmly grasp the handle (14a) with the other four fingers and take out the brewing head unit according to the directions of the arrows in fig. 4 (first a gentle upward movement and next a horizontal movement). Be careful when inserting the heat unit (14) back into place: holding the handle (14a) direct the head unit (14) on the protrusion (23) (see fig. 2), next push gently in the horizontal direction to the center of the coffee maker and next vertically downwards (see arrows in fig. 5).
natural_image
Close-up of a hand operating the interior of a microwave oven with digital display and control buttons (no visible text or symbols)Fig. 4 Fig. 5

natural_image
Hand inserting a microwave into an oven, showing internal components and control panel (no text or symbols visible)
natural_image
Black plastic mechanical component with visible internal structure and no text or symbols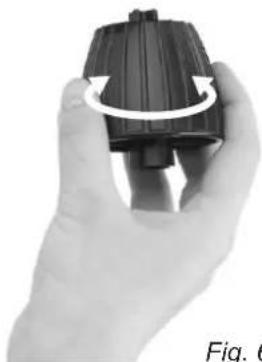
natural_image
Hand holding a black plastic component with a circular arrow indicating rotation (no text or symbols visible)Fig. 6
The brewing unit (14) is inserted properly if the coupling of the brewing head unit axis (14g) is on the shaft under the head unit (14h) (fig. 3). Gently close the door (15). Do not use force, if you cannot close the door. The brewing head (14) might not be installed properly. In such a case, remove the brewing head again according to the instructions above. Check if the brewing head unit mechanism is in the START position. This means that the axis of symmetry of the triangle on the right side ◀ (the X line) should be between the two verticals of the two triangles on the left side ▼ ▲ (fig. 6).
If for any reason (e.g. due to cleaning) the brewing head unit is not in the START position, turn the unit axis coupling (14) (fig. 6) to the right or to the left using the key (25) to set the “starting” position (fig. 6).
If the shaft inside the coffee maker (14h) is turned e.g. during cleaning, it needs to be reset properly using the other end of the brewing unit key (25). Never turn the coupling more than half a turn. Never use force while turning the key (25). Now try to insert the brewing head unit (14) again.
Warning: The brewing head unit (14) may be blocked if the coffee maker service door (15) is not completely open or is not properly and completely closed.
5. Before initial use – tips
- Unpack the appliance and remove all packaging materials. Never leave any plastic bags or polystyrene, etc. in the reach of children as they may pose a threat to them.
- Place the coffee maker on a flat surface, away from any heat or water source. Make sure there is at least 10 cm of free space around the appliance and 20 cm above the appliance.
- Never install the coffee maker in environments in which the temperature may fall below 3^ C, because freezing water may damage the pipes and elements inside the appliance. Keep the appliance away from direct sunlight and excessive heat.
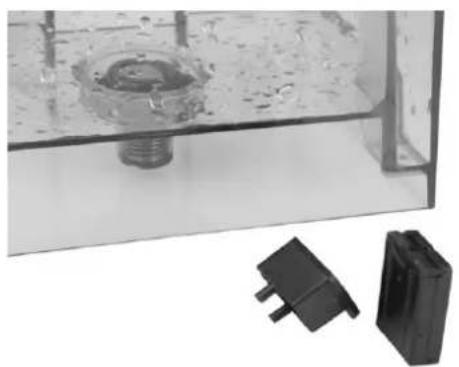
- Take out the measuring spoon (24), the brewing head unit key (25), the float (3a) and the float plug (3b) out of the water tank. The elements are wrapped in a plastic foil. Insert the float (3a) and the float plug inside the water tank (3). Check if the brewing head unit (14), the dregs box (22) and the drip tray (19) together with the drip tray grill (21) are in their proper places (fi g. 7).
- ATTENTION! Remove the self-adhesive transport tape from the drip tray (19) and the drip tray grill (21).
- Rinse the water tank (3), wipe the bean coffee container (4) clean with a damp cloth.
- Set the water hardness, following the directions in chapter 16.7 "Setting the Water Hardness".
- NOTE! Each coffee maker is checked in the factory before shipping using bean or ground coffee. Therefore the possibility of coffee remains inside the appliance is a normal situation. It is recommended to pour out 2 first cups of coffee when using the coffee maker for the first time.
- CAUTION! Never fill the water tank (3) with hot water, mineral water or other liquids. Use only cold, fresh water. The water tank (3) can be removed to fill it with water by lifting it upwards.
- Putting bean coffee or any other food products or liquids inside the ground coffee container by accident may result in damage to the coffee maker.
• Make sure the float (3a) is still in the left corner of the water tank (3). It is a sensor informing about the current water level. - Fill the water tank (3) with water before the initial use of the coffee maker (see chapter 6).
natural_image
Close-up of a transparent container with a central screw and two black plastic connectors (no text or symbols visible)
natural_image
Close-up of a transparent glass container with liquid inside, showing internal structure and bubbles (no text or symbols visible)
natural_image
Close-up of a transparent glass container with internal components, no visible text or symbolsFig. 7
- Plug in the appliance. Set the switch (2) in the position I. Due to the fact that the default language is English, all messages on the display will be displayed in this language. After switching the coffee maker on the message WELCOME will appear on the display and after a while the appliance will start the testing procedure. The message SELF-TEST will appear on the LCD – see section 11. If for any reasons the user forgets to fill the tank (3) with water, the message FILL THE TANK WITH FRESH WATER will immediately appear on the display and the appliance will stop the testing process. Proceed according to chapter 6 and the appliance will automatically finish the test. After the end of the testing process, the message READY TO BREW will appear on the display which indicates that the coffee maker is ready for further operation. At this point the user may change the language settings according to the instructions in section 16.2.
- Place a container under the steam/hot water nozzle (16) and not pressing any buttons turn the knob (13) to the position
ON for about 30 s. Hot water will come out of the nozzle (16). Next, set the knob (13) in the OFF position and perform the “brewing process with the use of only fresh water twice” proceeding according to section 12.1 or 12.2 or 12.3 with the use of ground coffee. Remember not to use ground coffee in this process. It is recommended to perform the “brewing process with the use of only fresh water twice” in case of using the appliance the next day in order to clean it and remove the coffee remains.
6. Filling the water tank
CAUTION! Fill the water tank (3) only if the appliance is unplugged. A built-in valve in the lower part of the water tank prevents the water from leaking.
Open the water tank lid • (5).
- Pull the handle upwards to take out the water tank (3).
- Fill the water tank with fresh, cold water; do not exceed the MAX level.
- Put the tank (3) back and lock it into place.
- Close the water tank lid (5).
- The water tank can also be filled without the necessity of taking it out of the coffee maker, e.g. by pouring water from a jug.
WARNING! Do not use the coffee maker with an empty water tank (3). Make sure there is water in the tank (3) before starting the coffee brewing process. Never fill the water tank (3) with hot water. For hygienic reasons never leave cold water in the water tank for a longer period of time.
7. Dosing coffee
7.1. Bean coffee
CAUTION! The bean coffee container can only be filled with coffee beans. Never fill the bean coffee container with any other products, as it may cause damage to the appliance.
- Open the bean coffee container lid (6).
- Fill the coffee bean container (4) with coffee beans (a moderate amount).
- Close the bean coffee container lid (6).
ATTENTION! Make sure the coffee beans are fresh. It is recommended to use only espresso roast coffee and to store the coffee in a tight container in a cool and dry place.
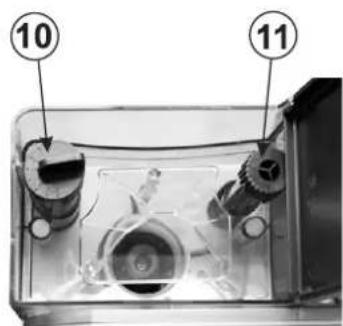
Fig. 8
If the espresso flows too quickly during the brewing process, the beans are ground too coarsely; if the espresso flows too slowly, the beans are ground too finely. Set the grinding level according to your taste using the initial (10) and precise (11) adjustment knob (fig. 8). The adjustment knob (10) is equipped with the bean coffee grinding level scale. Number "1" indicates the "finest grinding level", the number "8" indicates "coarsest grinding level".
The coffee grinding level setting recommended by the manufacturer is between "4" and "5".
However, if the coffee flows too quickly, set knob (10) to a finer grinding level e.g. "3" or "4".
If the coffee flows too slowly, set knob (10) to a coarser grinding level e.g. "6" or "7".
You can precisely set the grinding level using the knob (11). Always perform the precise adjustment after the initial adjustment. Adjustments made using those 2 knobs will change the taste of the brewed coffee.
CAUTION! The adjustments can be made only when the grinder is operating. Avoid extreme adjustment settings (e.g. setting "1" and "8"). The modified grinding level setting can only be noticeable after brewing three or four espresso cups, as there might still be coffee remains in the grinder from the previous grinder setting.
CAUTION! Never turn the knobs (10) and (11) using force when the grinder is not operating. This may cause damage to the coffee maker.
The bean coffee container is equipped with a built-in “grinding blade protection” which is a safety mechanism. It protects undesirable objects e.g. fingers, etc. from entering the grinder. While using big or oily coffee beans the grinder unit might be temporarily blocked. In such a case switch off the coffee maker, remove the remaining coffee beans, clean the bean container and the area around the grinder. However, it is recommended to use medium size and less oily beans for the proper functioning of the grinder.
7.2. Ground coffee
CAUTION! The ground coffee container can only be filled with ground coffee. Never fill the bean coffee container with any other products, as it may cause damage to the appliance.
Open the ground coffee container lid • (9).
- Fill the container (9a) with 1 measuring spoon of ground coffee using the measuring spoon with the brush (24).
NOTE! If you accidentally exceed the recommended amount of ground coffee, it will not influence the coffee brewing effect. However, try not to fill the ground coffee container (9a) with two measuring spoons.
Close the ground coffee container lid • (9).
8. Cup warming
Using a cup warmed to an appropriate temperature before the coffee brewing process will increase the taste of the coffee as well as the formation of a rich froth.
There are 2 ways of warming the cups. The first way is to warm the cup using hot water which can be obtained from the steam/hot water nozzle (16) proceeding according to section 13.
The second way is to place the cup before the planned coffee brewing process on the warming plate (7) on the top of the coffee maker (fig. 9).
natural_image
Close-up of a kitchen toaster with two white food items on top, showing a digital display (no visible text or symbols)Fig. 9
9. Emptying the drip tray
When the drip tray (19) is full of water, the red drip tray full indicator (20) will rise above the drip tray grill (21).
Remove the drip tray unit (19) together with the drip tray grill (20) from the coffee maker and pour out the water. Reinsert the elements back to the coffee maker.
10. Emptying the dregs box
Check the dregs box (22) periodically. In order to do so, just observe the box after opening the service door (15). When the dregs box (22) is full with used coffee, remove the drip tray unit from the coffee maker. Remove the dregs box (22) and empty its content. Next, rinse the dregs box under running water, dry it and insert it back to the drip tray unit. Reinsert the elements back to the coffee maker.
NOTE! If the dregs box (22) is full the message EMPTY DREGS BOX will appear on the LCD display.
11. Operating the coff ee maker SELF-TEST
• Fill the water tank according to section 6.
- Check if the brewing head unit (14), the dregs box (22) and the drip tray (19) together with the drip tray grill (21) are in their proper places. If not, assemble these parts properly.
- Plug in the appliance.
- Switch on the appliance by setting the switch in the position I.
- The appliance will automatically switch to the testing mode. The message SELF-TEST will appear on the display during test mode. During the appliance test water may drip from the coffee spout (17). This is a normal situation.
- When the appliance reaches the appropriate temperature, the message READY TO BREW will appear on the display.
12. Preparing coff ee
The appliance is ready to use when the message READY TO BREW appears on the display.
12.1. Preparing a small cup of coffee
Place a cup under the coffee spout (17). Adjust the height of the spout (17) to the size of the cup. Fill the bean coffee container (4) or the ground coffee container (9a) with an appropriate type of coffee according to point 7, set the type of coffee using the button ⏻/☐ (F) (see section 3F). Make sure there is water in the tank (3). Press the (A) ☐ button once. The message 1 SMALL CUP COFFEE will appear on the display together with the currently set capacity in ml and the brewing process will start immediately. After filling the cup with coffee, the message 1 SMALL CUP COFFEE will disappear from the display and the message READY TO BREW will appear on the display.
12.2. Preparing a medium cup of coffee
Place a cup under the coffee spout (17). Adjust the height of the spout (17) to the size of the cup. Fill the bean coffee container (4) or the ground coffee container (9a) with an appropriate type of coffee according to section 7, set the type of coffee using the button 📋/💡 (F) (see section 3F). Make sure there is water in the tank. Press the (B) 📋 button once. The message 1 MEDIUM CUP COFFEE will appear on the display together with the currently set capacity in ml and the brewing process will start immediately. After filling the cup with coffee, the message 1 MEDIUM CUP COFFEE will disappear from the display and the message READY TO BREW will appear on the display.
12.3. Preparing a large cup of coffee
Place a cup under the coffee spout (17). Adjust the height of the spout (17) to the size of the cup. Fill the bean coffee container (4) or the ground coffee container (9a) with an appropriate type of coffee according to section 7, set the type of coffee using the button / (F) (see section 3F). Make sure there is water in the tank (3). Press the (C) button once. The message 1 LARGE CUP COFFEE will appear on the display together with the currently set capacity in ml and the brewing process will start immediately. After filling the cup with coffee, the message 1 LARGE CUP COFFEE will disappear from the display and the message READY TO BREW will appear on the display.
12.4. Preparing 2 small cups of coffee
Place 2 cups under the coffee spout (17). Adjust the height of the spout (17) to the size of the cups. Fill the bean coffee container (4) to section 7, set the bean coffee mode using the button 🎋/💡(F) (see section 3F). Make sure there is water in the tank (3). Press the (A) 🔒 button twice. The message 2 SMALL CUP COFFEE will appear on the display together with the currently set capacity in ml and the brewing process will start immediately. The brewing process has 2 phases. First, the quantity of 1 small cup is evenly distributed to 2 cups. Next, the message 2 SMALL CUP COFFEE disappears from the display and the message 1 SMALL CUP COFFEE appears on the display. The second brewing phase starts. After filling both cups with coffee, the message 1 SMALL CUP COFFEE will disappear from the display and the message READY TO BREW will appear on the display.
NOTE! The preparation of 2 small cups of coffee is possible only using bean coffee. This function is not available for ground coffee.
12.5. Preparing 2 medium cups of coffee
Place 2 cups under the coffee spout (17). Adjust the height of the spout (17) to the size of the cups. Fill the bean coffee container (4) according to section 7, set the bean coffee mode using the button ⏻/☐ (F) (see section 3F). Make sure there is water in the tank (3). Press the (B) ☐ button twice. The message 2 MEDIUM CUP COFFEE will appear on the display together with the currently set capacity in ml and the brewing process will start immediately. The brewing process has 2 phases. First, the quantity of 1 medium cup is evenly distributed to 2 cups. Next, the message 2 MEDIUM CUP COFFEE disappears from the display and the message 1 MEDIUM CUP COFFEE appears on the display. The second brewing phase starts. After filling both cups with coffee, the message 1 MEDIUM CUP COFFEE will disappear from the display and the message READY TO BREW will appear on the display.
NOTE! The preparation of 2 medium cups of coffee is possible only using bean coffee. This function is not available for ground coffee.
12.6. Preparing 2 large cups of coffee
Place 2 cups under the coffee spout (17). Adjust the height of the spout (17) to the size of the cups. Fill the bean coffee container (4) according to section 7, set the bean coffee mode using the button ⏻/☐(F) (see section 3F). Make sure there is water in the tank (3). Press the (C) ☐ button twice. The message 2 LARGE CUP COFFEE will appear on the display together with the currently set capacity in ml and the brewing process will start immediately. The brewing process has 2 phases. First, the quantity of 1 large cup is evenly distributed to 2 cups. Next, the message 2 LARGE CUP COFFEE disappears from the display and the message 1 LARGE CUP COFFEE appears on the display. The second brewing phase starts. After filling both cups with coffee, the message 1 LARGE CUP COFFEE will disappear from the display and the message READY TO BREW will appear on the display.
NOTE! The preparation of 2 large cups of coffee is possible only using bean coffee. This function is not available for ground coffee.
ATTENTION! After brewing at least 8 cups of coffee the message EMPTY DREGS BOX will appear on the display. Clean the dregs box proceeding according to section 10.
ATTENTION! After brewing approximately 10 cups of coffee, the message SELF-CLEAN will appear on the display indicating that the coffee machine will perform a one-time automatic cleaning.
ATTENTION! After brewing a certain amount of coffee cups, the message DESCALING will appear in the second line of the LCD display. It means that the user has to remove limestone residue (proceeding according to section 16.8) which does not affect the coffee brewing process in any way.
13. Preparing hot water
The hot water function is perfect for the preparation of e.g. hot chocolate, for filling the coffee pot equipped with a pusher or filling the tea pot.
The appliance is ready to use when the message READY TO BREW appears on the display.
Place a cup or another utensil under the steam/hot water nozzle (16).
A
Make sure there is water in the tank (3). Turn the knob (13) anticlockwise and set it in the ON position. Hot water will come out of the nozzle and the message HOT WATER PREPARATION will appear on the display.
To stop the hot water function, set the knob (13) again in the OFF position. The message READY TO BREW will again appear on the display.
ATTENTION! If the 1 minute hot water pumping time is exceeded, the coffee maker will immediately stop working and return to the READY TO BREW status. To restart this function, set the knob (13) back to the OFF position and
[NO TEXT]
next turn and set the knob (13) in the position ONThe next pumping of hot water is possible for maximally for the next minute. Remember not to use the hot water operation mode for 30 minutes after using it for 5 1-minute intervals.
14. Preparing steam
The steam function is used to froth milk. The steam has two functions. First of all it warms up the milk. It also mixes the air, which results in a delicate, velvet froth. Similarly to coffee brewing, you will receive best results in frothing milk in the course of time and with experience.
Tip: Remember that coffee is the base of all coffee beverages, milk is only an addition.
Note: It is recommended to first prepare the coffee and then to froth milk. The steam function can also be used to heat beverages.
The appliance is ready to use when the message READY TO BREW appears on the display. Make sure there is water in the tank (3). Press the (D) ⏻ (▲) button. The control lamp of this button will light indicating that the coffee maker is warming up. The message COFFEE --> STEAM will appear on the display. The coffee maker will warm up to the set temperature and will switch to the steam mode. The message READY TO USE STEAM will appear on the display.
- Determine the amount of milk based on the number of brewed cups of coffee or the size of the milk jug.
Tip: • Remember that the volume of milk increases during frothing.
Pour cold milk to a stainless steel jug. Fill the jug from 1/3 to 1/2 of its capacity. - Tip: Store the stainless steel milk jug in the refrigerator, so that the milk is cold. Remember not to rinse the jug with warm water before use.
- Rinse the steam/hot water nozzle (16) by placing another appliance under the nozzle and turning the knob (13) anticlockwise to the steam position ON. After a few seconds, steam will come out of the nozzle (16) and the message STEAM GENERATION will appear on the display. (Note: The steam is very hot. Burn risk!). Switch off the steam by turning the knob (13) to the OFF position to stop the steam generating process. The steam nozzle has been pre-rinsed.
- Next, place the steam nozzle (16) in the milk jug so that the nozzle is about 12 cm below the surface of milk and activate the steam function by turning the knob (13) again to the position.
- Tilt the jug so that the steam nozzle is inside the jug, lower the jug until the end of the nozzle is just below the milk surface. This will cause the milk to froth.
- Note: Do not allow the steam to escape unevenly, the froth will not be properly aerated. To avoid this situation, lift the jug so that the steam nozzle is positioned deeper in the milk. Remember the perfect consistency is a soft, velvet froth.
- When the milk warms up and becomes frothy, the level of milk in the jug will begin to rise. In this situation, lower the jug, but keep the steam nozzle end just below the milk surface.
- Lift the jug upon receiving froth so that the steam nozzle is located in the middle of the milk.
- Tip: The required amount of froth will change depending on the type of the prepared beverage. For example cappuccino requires a larger amount of froth than a coffee beverage on the base of an espresso, served with frothy milk.
- Immediately switch off the steam when the milk is heated to the temperature of 60–65°C by turning the adjustment knob (13) to the OFF position.
- Tip: If you do not have a thermometer, a good indication of the proper temperature is that you cannot place your hand on the side of the jug for more than 3 seconds.
• Important: Do not boil the milk. - Remove the jug. Immediately wipe the steam nozzle (16) and its end using a damp cloth and rinse with a small amount of steam proceeding the same way as in the case of before frothing the milk.
- Holding the jug in one hand, lightly tap the jug on the table to release the air bubbles and next make a circular movement with the jug until the milk becomes shiny and without any bubbles. This will help to receive a uniform consistency of the milk and froth.
After the end of the steam generating process press the (D) button. The control lamp will go off and the message STEAM --> COFFEE will appear on the display indicating that after a fixed period of time the coffee maker will return to the coffee brewing mode. The message READY TO BREW will appear on the display.
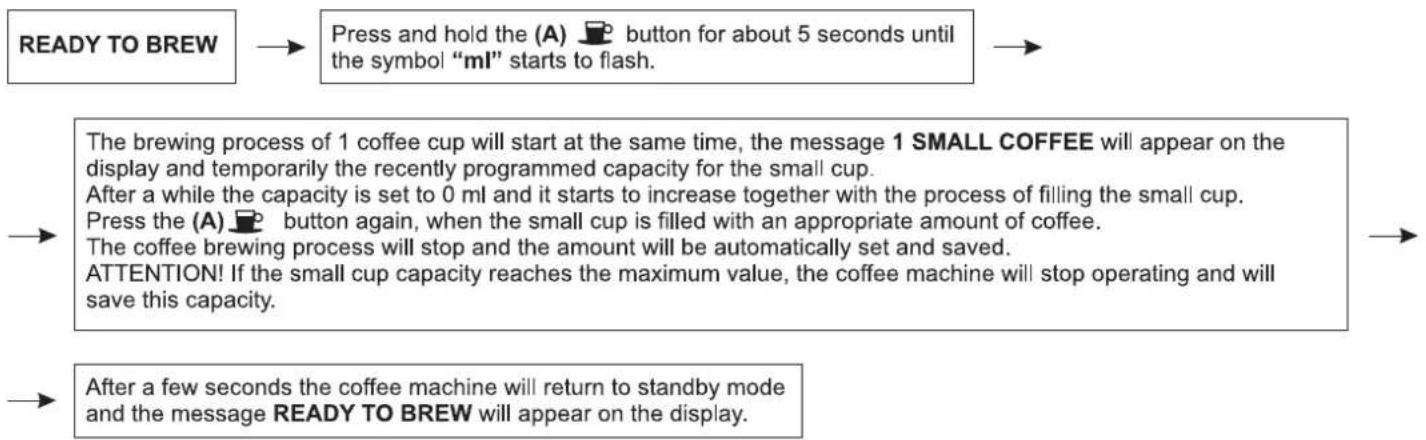
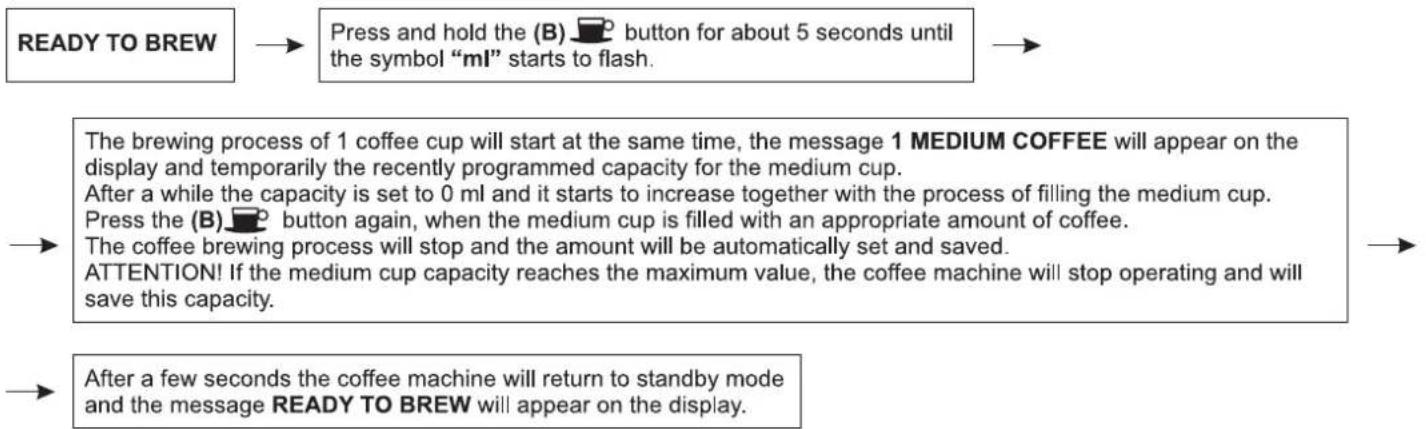
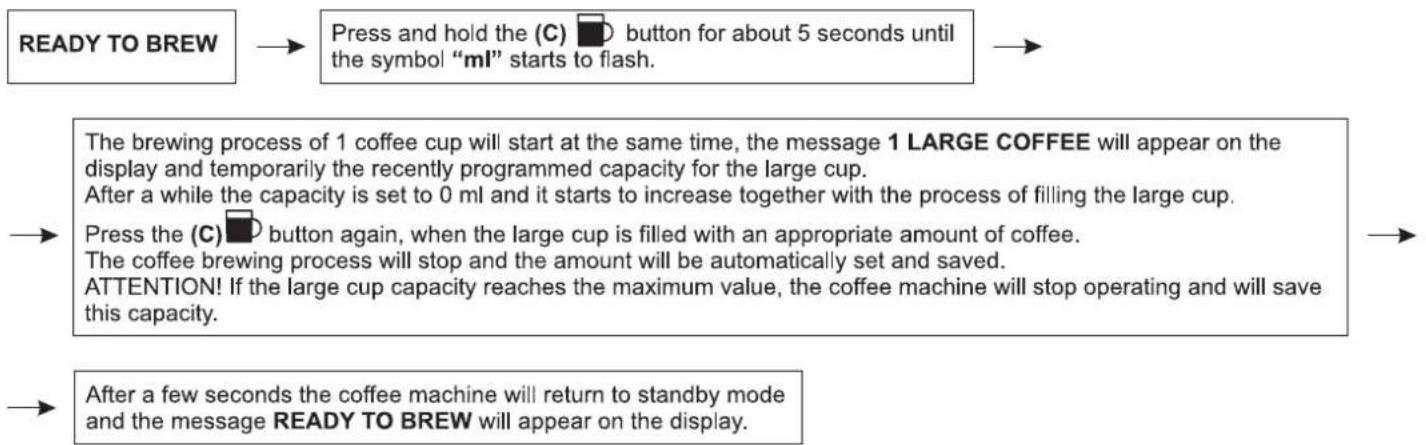
15. Setting the quantity of the small cup/medium cup/large cup
The coffee maker has the possibility to program the quantity of the small, medium and large cup. The range of setting the quantity for the cups is as follows:
small cup – from 20 ml to 58 ml (default setting 50 ml);
medium cup – from 50 ml to 134 ml (default setting 100 ml);
large cup – from 100 ml to 230 ml (default setting 150 ml).
ATTENTION! Remember that the quantity is set during the coffee brewing process. Remember to fill the tank (5) with water and to fill the bean coffee container (4) or the ground coffee container (9a).
15.1. Setting the quantity of the small cup
The appliance is ready to use when the message READY TO BREW appears on the display. To set the quantity of the small cup, proceed according to the algorithm below.
flowchart
graph TD
    A["READY TO BREW"] --> B["Press and hold the (A) 📋 button for about 5 seconds until the symbol “ml” starts to flash."]
    B --> C["The brewing process of 1 coffee cup will start at the same time, the message 1 SMALL COFFEE will appear on the display and temporarily the recently programmed capacity for the small cup.<br>After a while the capacity is set to 0 ml and it starts to increase together with the process of filling the small cup.<br>Press the (A) 📋 button again, when the small cup is filled with an appropriate amount of coffee.<br>The coffee brewing process will stop and the amount will be automatically set and saved.<br>ATTENTION! If the small cup capacity reaches the maximum value, the coffee machine will stop operating and will save this capacity."]
    C --> D["After a few seconds the coffee machine will return to standby mode and the message READY TO BREW will appear on the display."]
15.2. Setting the quantity of the medium cup
The appliance is ready to use when the message READY TO BREW appears on the display. To set the quantity of the medium cup, proceed according to the algorithm below.
flowchart
graph TD
    A["READY TO BREW"] --> B["Press and hold the (B) button for about 5 seconds until the symbol "ml" starts to flash."]
    B --> C["The brewing process of 1 coffee cup will start at the same time, the message 1 MEDIUM COFFEE will appear on the display and temporarily the recently programmed capacity for the medium cup.<br>After a while the capacity is set to 0 ml and it starts to increase together with the process of filling the medium cup.<br>Press the (B) button again, when the medium cup is filled with an appropriate amount of coffee.<br>The coffee brewing process will stop and the amount will be automatically set and saved.<br>ATTENTION! If the medium cup capacity reaches the maximum value, the coffee machine will stop operating and will save this capacity."]
    C --> D["After a few seconds the coffee machine will return to standby mode and the message READY TO BREW will appear on the display."]
15.3. Setting the quantity of the large cup
The appliance is ready to use when the message READY TO BREW appears on the display. To set the quantity of the large cup, proceed according to the algorithm below.
flowchart
graph TD
    A["READY TO BREW"] --> B["Press and hold the (C) button for about 5 seconds until the symbol "ml" starts to flash."]
    B --> C["The brewing process of 1 coffee cup will start at the same time, the message 1 LARGE COFFEE will appear on the display and temporarily the recently programmed capacity for the large cup.<br>After a while the capacity is set to 0 ml and it starts to increase together with the process of filling the large cup.<br>Press the (C) button again, when the large cup is filled with an appropriate amount of coffee.<br>The coffee brewing process will stop and the amount will be automatically set and saved.<br>ATTENTION! If the large cup capacity reaches the maximum value, the coffee machine will stop operating and will save this capacity."]
    C --> D["After a few seconds the coffee machine will return to standby mode and the message READY TO BREW will appear on the display."]
16. Programming
When the appliance is ready to use (the message READY TO BREW appears on the display) press the (E) MENU (OK) button once. The coffee maker will start to operate in the programming mode. The button will light after pressing it. The display will show the menu with the following messages: ECONOMY MODE, LANGUAGE, TEMPERATURE, PREBREWING, PRESOAKING, WATER HARDN., DESCALING, NO. OF CUPS, CLOCK, DEFAULT.
To select the desired setting press the button (D) (▲) or (F) (▼) until the appropriate setting appears on the display. When the symbol ▶ appears before the message, the selection of the desired function is confirmed. E.g. ▶ TEMPERATURE.
To confirm the selection of this function press the (E) MENU (OK) button, the coffee maker will operate in the temperature setting mode. Use the buttons (D) (▲) or (F) (▼) to rewind the submenu, confirm the selection of the function using the button (E) MENU (OK). When the symbol * appears on the right side, the given program has been set.
Press the (C) (ESC) button to exit the programming mode.
NOTE: You can press the (C) (ESC) at any time to stop programming without saving the changes. To save the changes press the (E) MENU (OK) button.
16.1. Setting the energy saving function – ECONOMY MODE
The appliance has an energy saving function which allows for a lower energy consumption when the coffee maker is used irregularly. This function switches on after a set period of time (default setting: 1 hour). The time setting can be changed in 15 minute intervals. The maximum setting time is 12 hours, the minimum setting time is 0 minutes.
The appliance is ready to use when the message READY TO BREW appears on the display. Proceed according to the algorithm below.
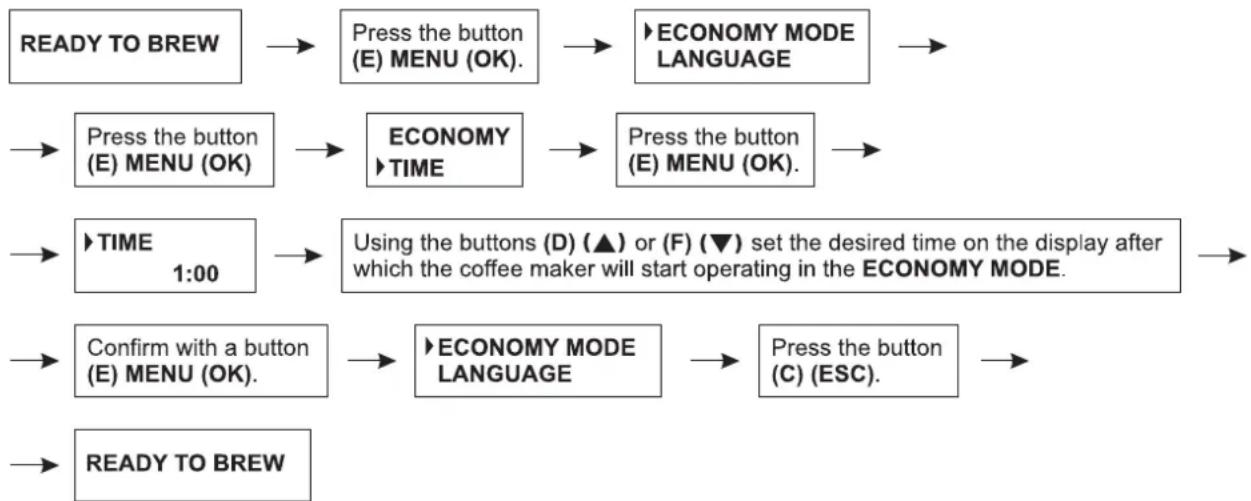
flowchart
graph TD
    A["READY TO BREW"] --> B["Press the button (E) MENU (OK)."]
    B --> C["ECONOMY MODE LANGUAGE"]
    C --> D["Press the button (E) MENU (OK)."]
    D --> E["ECONOMY TIME"]
    E --> F["Press the button (E) MENU (OK)."]
    F --> G["TIME 1:00"]
    G --> H["Using the buttons (D) (▲) or (F) (▼) set the desired time on the display after which the coffee maker will start operating in the ECONOMY MODE."]
    H --> I["Confirm with a button (E) MENU (OK)."]
    I --> J["ECONOMY MODE LANGUAGE"]
    J --> K["Press the button (C) (ESC)."]
    K --> L["READY TO BREW"]
The countdown to the switch on of the energy saving mode starts with the appliance test process or a different activity such as brewing coffee or preparing hot water or steam. The appliance cannot start operating in the energy saving mode until the set time has not elapsed and the heating element has not stopped operating.
The user can set the economy mode immediately. When the appliance is ready to use the message READY TO BREW appears on the display. Proceed according to the algorithm below.
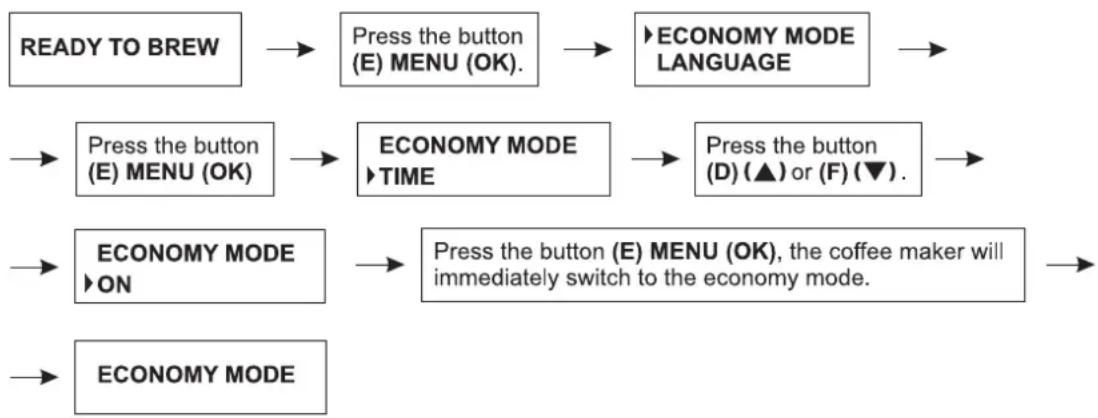
flowchart
graph LR
    A["READY TO BREW"] --> B["Press the button (E) MENU (OK)."]
    B --> C["ECONOMY MODE LANGUAGE"]
    C --> D["Press the button (D) (▲) or (F) (▼)."]
    D --> E["ECONOMY MODE ON"]
    E --> F["Press the button (E) MENU (OK), the coffee maker will immediately switch to the economy mode."]
    F --> G["ECONOMY MODE"]
To return from the economy mode to the normal mode, press any button on the control panel once, the message ECONOMY --> COFFEE will appear on the display. After reaching the appropriate temperature, the message READY TO BREW will appear on the display.
ATTENTION! The time necessary to return from the energy saving mode to the ready mode is strictly connected to the period of the stand-by mode (the switch off of the coffee maker heating element). The longer the coffee maker remains in the ECONOMY MODE, the longer the time necessary to reach the optimal temperature.
16.2. Setting the language
This function allows to change the language of the menu. The following languages can be set: English, Polish, Czech, Slovak, Russian and Romanian. The default language is English. To change the language setting e.g. from English into Polish, proceed according to the instructions below.
The appliance will perform a SELF-TEST after the first time you switch on the coffee maker. The message SELF-TEST will appear on the display. When the appliance is ready to use the message READY TO BREW appears on the display. Proceed according to the algorithm below.
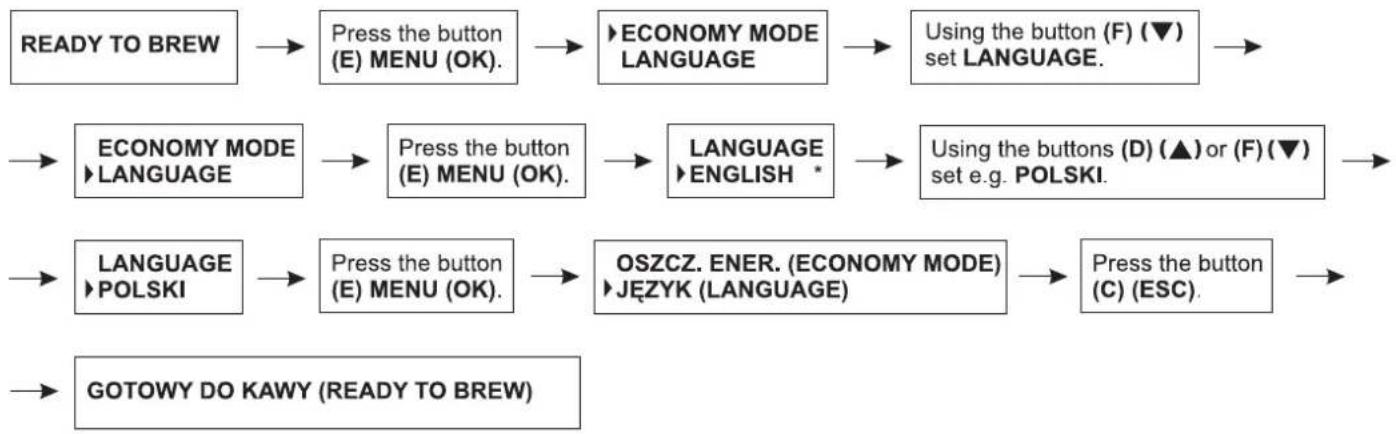
flowchart
graph LR
    A["READY TO BREW"] --> B["Press the button (E) MENU (OK)."]
    B --> C["ECONOMY MODE LANGUAGE"]
    C --> D["Using the button (F) (▼) set LANGUAGE."]
    D --> E["ECONOMY MODE LANGUAGE"]
    E --> F["Press the button (E) MENU (OK)."]
    F --> G["LANGUAGE ENGLISH *"]
    G --> H["Using the buttons (D) (▲) or (F) (▼) set e.g. POLSKI."]
    H --> I["LANGUAGE POLSKI"]
    I --> J["Press the button (E) MENU (OK)."]
    J --> K(OSZCZ. ENER. (ECONOMY MODE) JĘZYK (LANGUAGE)]
    K --> L["Press the button (C) (ESC)."]
    L --> M["GOTOWY DO KAWY (READY TO BREW)"]
ATTENTION! The symbol * next to the language means that this language is currently set. Changing the language setting is only possible in this mode. To change the language setting use the buttons (D) (▲) or (F) (▼).
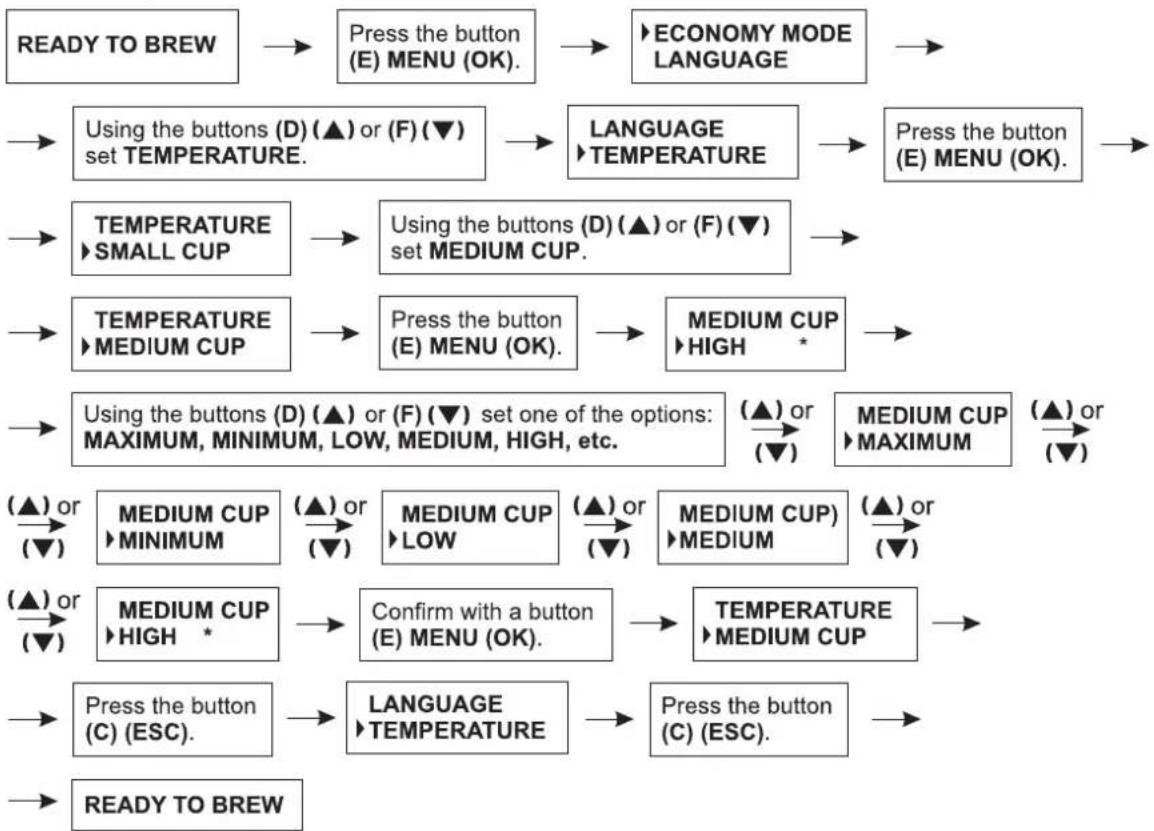
16.3. Setting the temperature of the brewed coffee for the small cup/medium cup/large cup
16.3.1. Setting the temperature of the brewed coffee for the small cup
When the appliance is ready to use the message READY TO BREW appears on the display. Proceed according to the algorithm below.
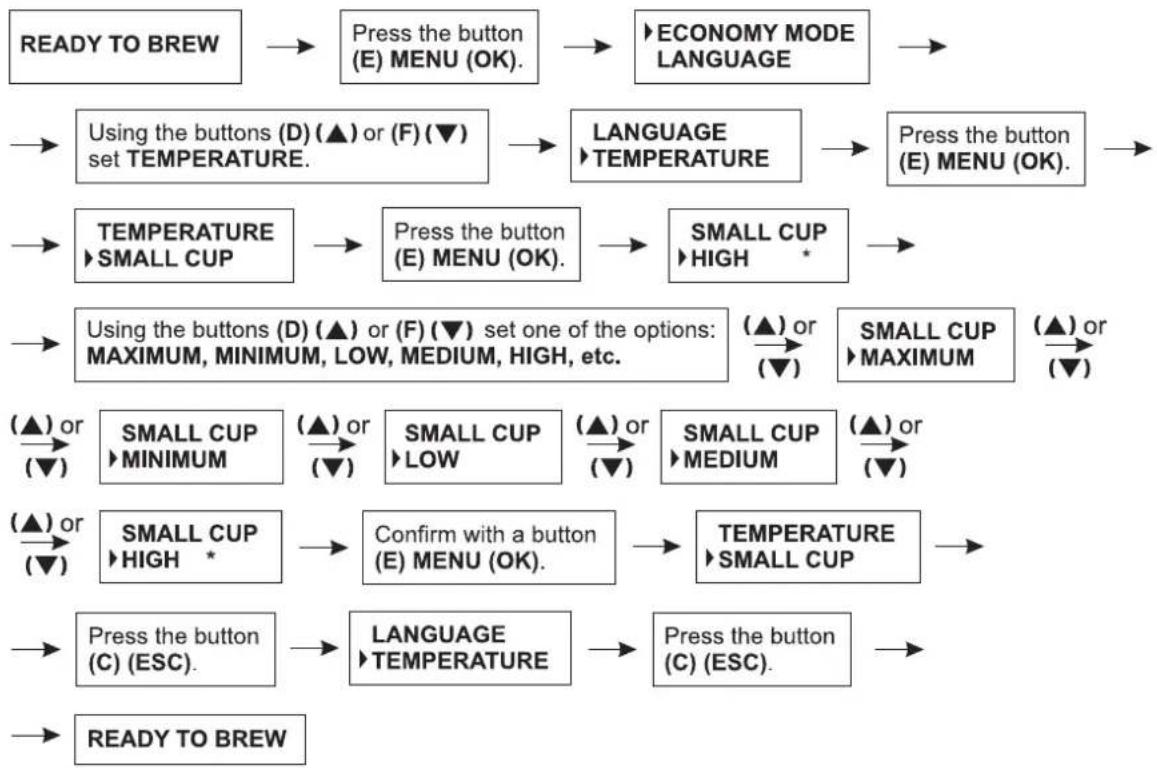
flowchart
graph TD
    A["READY TO BREW"] --> B["Press the button (E) MENU (OK)."]
    B --> C["ECONOMY MODE LANGUAGE"]
    C --> D["Using the buttons (D) (▲) or (F) (▼) set TEMPERATURE."]
    D --> E["LANGUAGE ▶TEMPERATURE"]
    E --> F["Press the button (E) MENU (OK)."]
    F --> G["TEMPERATURE ▶SMALL CUP"]
    G --> H["Press the button (E) MENU (OK)."]
    H --> I["SMALL CUP ▶HIGH *"]
    I --> J["Using the buttons (D) (▲) or (F) (▼) set one of the options: MAXIMUM, MINIMUM, LOW, MEDIUM, HIGH, etc."]
    J --> K["(▲) or (▼)"]
    K --> L["SMALL CUP ▶MINIMUM"]
    L --> M["(▲) or (▼)"]
    M --> N["SMALL CUP ▶LOW"]
    N --> O["(▲) or (▼)"]
    O --> P["SMALL CUP ▶MEDIUM"]
    P --> Q["(▲) or (▼)"]
    Q --> R["SMALL CUP ▶HIGH *"]
    R --> S["Confirm with a button (E) MENU (OK)."]
    S --> T["TEMPERATURE ▶SMALL CUP"]
    T --> U["Press the button (C) (ESC)."]
    U --> V["LANGUAGE ▶TEMPERATURE"]
    V --> W["Press the button (C) (ESC)."]
    W --> X["READY TO BREW"]
The symbol * on the right side indicates that the given temperature is set and saved.
The default temperature setting is HIGH.
16.3.2. Setting the temperature of the brewed coffee for the medium cup
When the appliance is ready to use the message READY TO BREW appears on the display. Proceed according to the algorithm below.
flowchart
graph TD
    A["READY TO BREW"] --> B["Press the button (E) MENU (OK)."]
    B --> C["ECONOMY MODE LANGUAGE"]
    C --> D["Using the buttons (D) (▲) or (F) (▼) set TEMPERATURE."]
    D --> E["LANGUAGE ▶TEMPERATURE"]
    E --> F["Press the button (E) MENU (OK)."]
    F --> G["TEMPERATURE ▶SMALL CUP"]
    G --> H["Using the buttons (D) (▲) or (F) (▼) set MEDIUM CUP."]
    H --> I["TEMPERATURE ▶MEDIUM CUP"]
    I --> J["Press the button (E) MENU (OK)."]
    J --> K["MEDIUM CUP ▶HIGH *"]
    K --> L["Using the buttons (D) (▲) or (F) (▼) set one of the options: MAXIMUM, MINIMUM, LOW, MEDIUM, HIGH, etc."]
    L --> M["(▲) or (▼)"]
    L --> N["MEDIUM CUP ▶MAXIMUM"]
    N --> O["(▲) or (▼)"]
    L --> P["(▲) or (▼)"]
    L --> Q["(▲) or (▼)"]
    L --> R["(▲) or (▼)"]
    L --> S["(▲) or (▼)"]
    L --> T["(▲) or (▼)"]
    L --> U["(▲) or (▼)"]
    L --> V["(▲) or (▼)"]
    L --> W["(▲) or (▼)"]
    L --> X["(▲) or (▼)"]
    L --> Y["(▲) or (▼)"]
    L --> Z["(▲) or (▼)"]
    L --> AA["(▲) or (▼)"]
    L --> AB["(▲) or (▼)"]
    L --> AC["(▲) or (▼)"]
    L --> AD["(▲) or (▼)"]
    L --> AE["(▲) or (▼)"]
    L --> AF["(▲) or (▼)"]
    L --> AG["(▲) or (▼)"]
The symbol * on the right side indicates that the given temperature is set and saved.
The default temperature setting is HIGH.
16.3.3. Setting the temperature of the brewed coffee for the large cup
When the appliance is ready to use the message READY TO BREW appears on the display. Proceed according to the algorithm below.
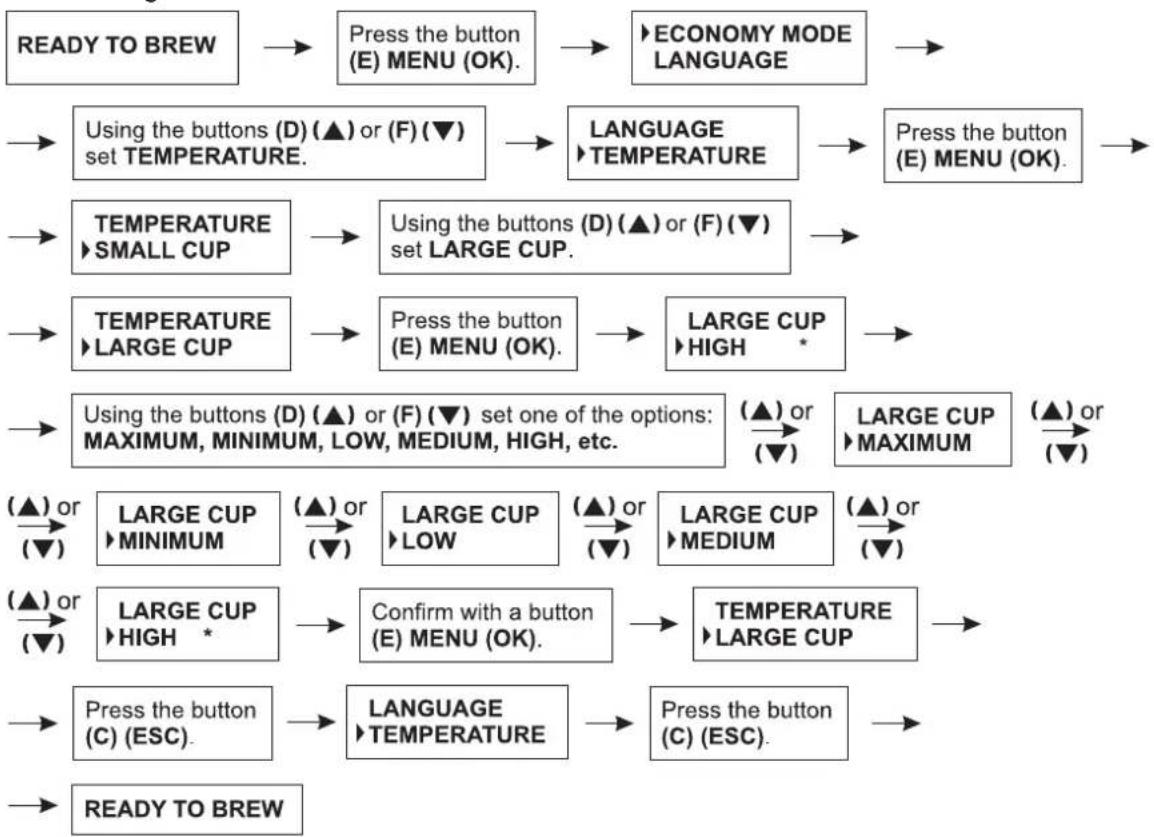
flowchart
graph TD
    A["READY TO BREW"] --> B["Press the button (E) MENU (OK)."]
    B --> C["ECONOMY MODE LANGUAGE"]
    C --> D["Using the buttons (D) (▲) or (F) (▼) set TEMPERATURE."]
    D --> E["LANGUAGE ▶TEMPERATURE"]
    E --> F["Press the button (E) MENU (OK)."]
    F --> G["TEMPERATURE ▶SMALL CUP"]
    G --> H["Using the buttons (D) (▲) or (F) (▼) set LARGE CUP."]
    H --> I["TEMPERATURE ▶LARGE CUP"]
    I --> J["Press the button (E) MENU (OK)."]
    J --> K["LARGE CUP ▶HIGH *"]
    K --> L["Using the buttons (D) (▲) or (F) (▼) set one of the options: MAXIMUM, MINIMUM, LOW, MEDIUM, HIGH, etc."]
    L --> M["(▲) or (▼)"]
    M --> N["LARGE CUP ▶MAXIMUM"]
    N --> O["(▲) or (▼)"]
    O --> P["(▲) or (▼)"]
    P --> Q["LARGE CUP ▶MINIMUM"]
    Q --> R["(▲) or (▼)"]
    R --> S["LARGE CUP ▶LOW"]
    S --> T["(▲) or (▼)"]
    T --> U["LARGE CUP ▶MEDIUM"]
    U --> V["(▲) or (▼)"]
    V --> W["LARGE CUP ▶HIGH *"]
    W --> X["Confirm with a button (E) MENU (OK)."]
    X --> Y["TEMPERATURE ▶LARGE CUP"]
    Y --> Z["Press the button (C) (ESC)."]
    Z --> AA["LANGUAGE ▶TEMPERATURE"]
    AA --> AB["Press the button (C) (ESC)."]
    AB --> AC["READY TO BREW"]
The symbol * on the right side indicates that the given temperature is set and saved.
The default temperature setting is HIGH.
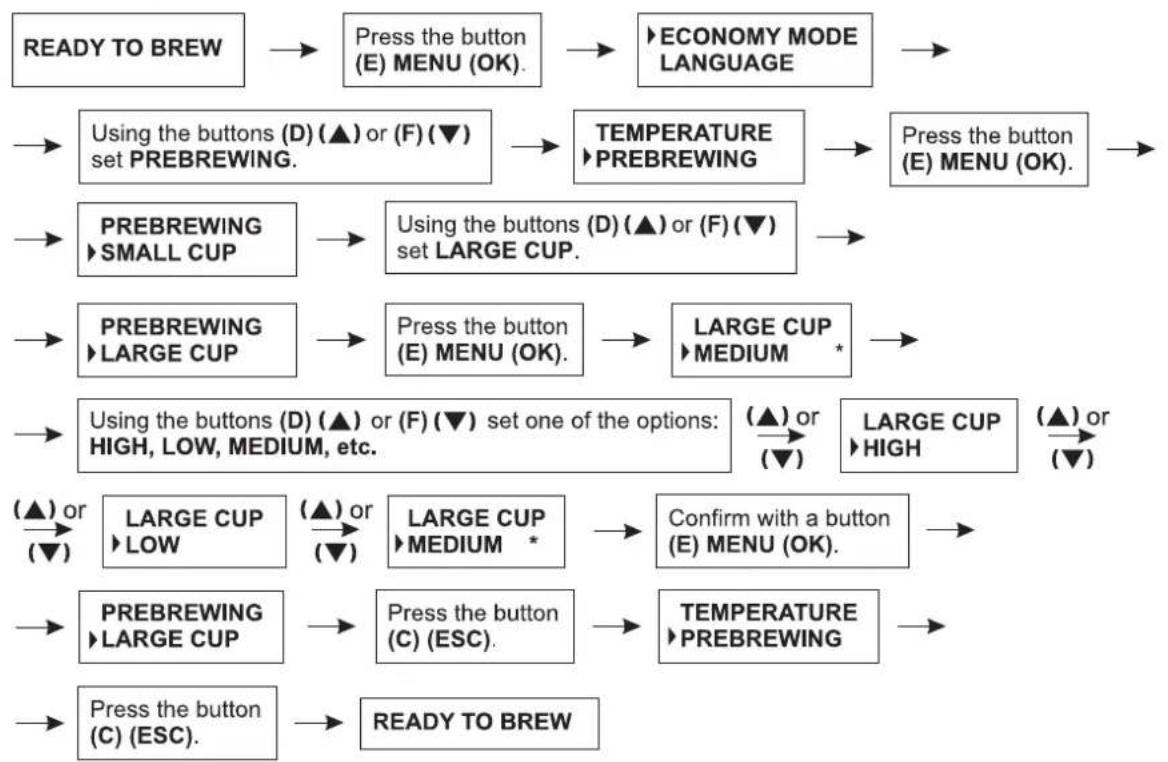
16.4 Setting the pre-brewing function for the small cup/medium cup/large cup
Thanks to the pre-brewing process the coffee is lightly soaked before the actual brewing process. This allows to obtain a richer taste an aroma of the coffee.
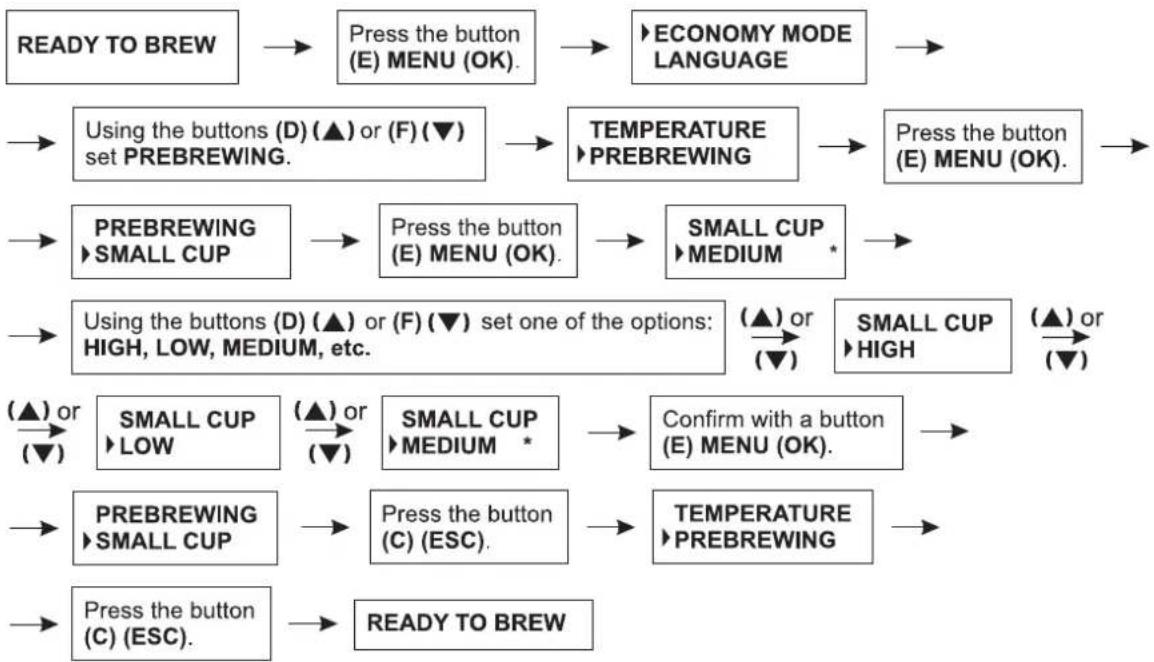
16.4.1. Setting the pre-brewing function for the small cup
When the appliance is ready to use the message READY TO BREW appears on the display. Proceed according to the algorithm below.
flowchart
graph TD
    A["READY TO BREW"] --> B["Press the button (E) MENU (OK)."]
    B --> C["ECONOMY MODE LANGUAGE"]
    C --> D["Using the buttons (D) (▲) or (F) (▼) set PREBREWING."]
    D --> E["TEMPERATURE ►PREBREWING"]
    E --> F["Press the button (E) MENU (OK)."]
    F --> G["PREBREWING ►SMALL CUP"]
    G --> H["Press the button (E) MENU (OK)."]
    H --> I["SMALL CUP ►MEDIUM *"]
    I --> J["Using the buttons (D) (▲) or (F) (▼) set one of the options: HIGH, LOW, MEDIUM, etc."]
    J --> K["(▲) or (▼)"]
    K --> L["SMALL CUP ►HIGH"]
    L --> M["(▲) or (▼)"]
    M --> N["SMALL CUP ►LOW"]
    N --> O["(▲) or (▼)"]
    O --> P["SMALL CUP ►MEDIUM *"]
    P --> Q["Confirm with a button (E) MENU (OK)."]
    Q --> R["PREBREWING ►SMALL CUP"]
    R --> S["Press the button (C) (ESC)."]
    S --> T["TEMPERATURE ►PREBREWING"]
    T --> U["Press the button (C) (ESC)."]
    U --> V["READY TO BREW"]
The symbol * on the right side indicates that the given value of the pre-brewing process is set and saved. The default setting is MEDIUM.
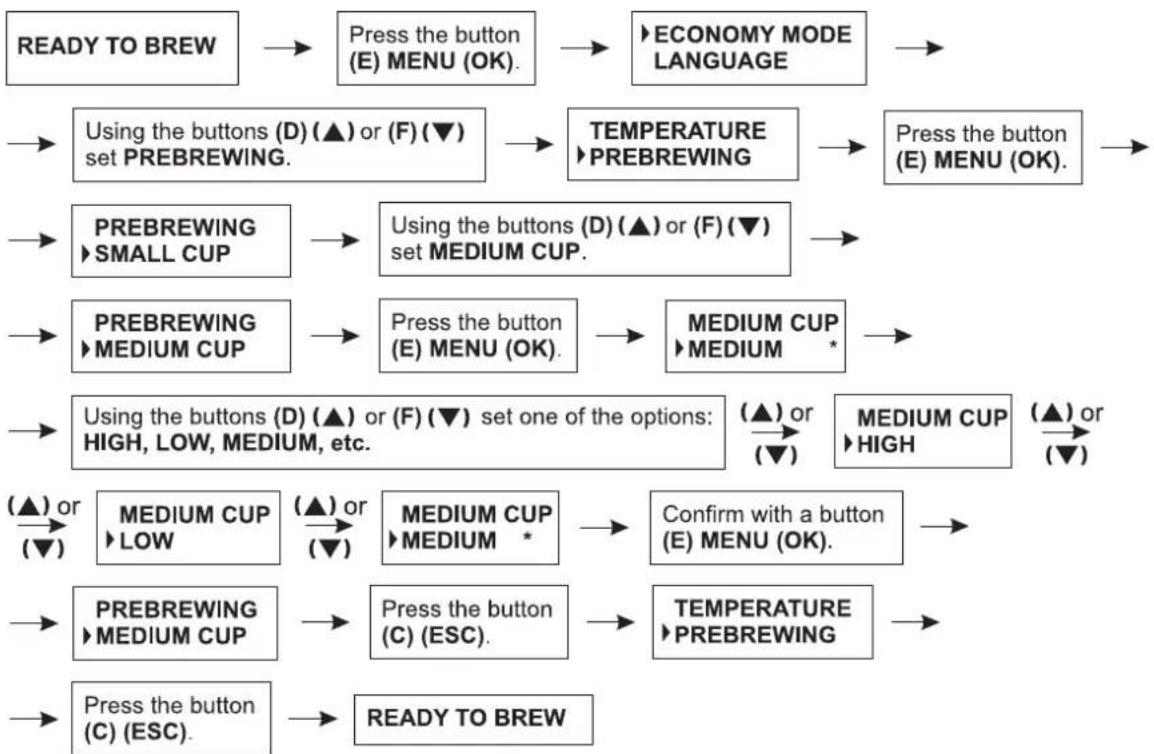
16.4.2. Setting the pre-brewing function for the medium cup
When the appliance is ready to use the message READY TO BREW appears on the display. Proceed according to the algorithm below.
flowchart
graph TD
    A["READY TO BREW"] --> B["Press the button (E) MENU (OK)."]
    B --> C["ECONOMY MODE LANGUAGE"]
    C --> D["Using the buttons (D) (▲) or (F) (▼) set PREBREWING."]
    D --> E["TEMPERATURE ►PREBREWING"]
    E --> F["Press the button (E) MENU (OK)."]
    F --> G["PRESBREWING ►SMALL CUP"]
    G --> H["Using the buttons (D) (▲) or (F) (▼) set MEDIUM CUP."]
    H --> I["PRESBREWING ►MEDIUM CUP"]
    I --> J["Press the button (E) MENU (OK)."]
    J --> K["MEDIUM CUP ►MEDIUM *"]
    K --> L["Using the buttons (D) (▲) or (F) (▼) set one of the options: HIGH, LOW, MEDIUM, etc."]
    L --> M["(▲) or (▼)"]
    L --> N["MEDIUM CUP ►HIGH"]
    N --> O["(▲) or (▼)"]
    L --> P["(▲) or (▼)"]
    L --> Q["(▲) or (▼)"]
    L --> R["(▲) or (▼)"]
    L --> S["(▲) or (▼)"]
    L --> T["(▲) or (▼)"]
    L --> U["(▲) or (▼)"]
    L --> V["(▲) or (▼)"]
    L --> W["(▲) or (▼)"]
    L --> X["(▲) or (▼)"]
    L --> Y["(▲) or (▼)"]
    L --> Z["(▲) or (▼)"]
    L --> AA["(▲) or (▼)"]
    L --> AB["(▲) or (▼)"]
    L --> AC["(▲) or (▼)"]
    L --> AD["(▲) or (▼)"]
    L --> AE["(▲) or (▼)"]
    L --> AF["(▲) or (▼)"]
    L --> AG["(▲) or (▼)"]
    L --> AH["(▲) or (▼)"]
    L --> AI["(▲) or (▼)"]
    L --> AJ["(▲) or (▼)"]
    L --> AK["(▲) or (▼)"]
    L --> AL["(▲) or (▼)"]
    L --> AM["(▲) or (▼)"]
    L --> AN["(▲) or (▼)"]
The symbol * on the right side indicates that the given value of the pre-brewing process is set and saved. The default setting is MEDIUM.
16.4.3. Setting the pre-brewing function for the large cup
When the appliance is ready to use the message READY TO BREW appears on the display. Proceed according to the algorithm below.
flowchart
graph TD
    A["READY TO BREW"] --> B["Press the button (E) MENU (OK)."]
    B --> C["ECONOMY MODE LANGUAGE"]
    C --> D["Using the buttons (D) (▲) or (F) (▼) set PREBREWING."]
    D --> E["TEMPERATURE ►PREBREWING"]
    E --> F["Press the button (E) MENU (OK)."]
    F --> G["PRESBREWING ►SMALL CUP"]
    G --> H["Using the buttons (D) (▲) or (F) (▼) set LARGE CUP."]
    H --> I["PRESBREWING ►LARGE CUP"]
    I --> J["Press the button (E) MENU (OK)."]
    J --> K["LARGE CUP ►MEDIUM *"]
    K --> L["Using the buttons (D) (▲) or (F) (▼) set one of the options: HIGH, LOW, MEDIUM, etc."]
    L --> M["(▲) or (▼)"]
    L --> N["LARGE CUP ►HIGH"]
    N --> O["(▲) or (▼)"]
    L --> P["(▲) or (▼)"]
    L --> Q["LARGE CUP ►LOW"]
    Q --> R["(▲) or (▼)"]
    L --> S["LARGE CUP ►MEDIUM *"]
    S --> T["Confirm with a button (E) MENU (OK)."]
    T --> U["PRESBREWING ►LARGE CUP"]
    U --> V["Press the button (C) (ESC)."]
    V --> W["TEMPERATURE ►PREBREWING"]
    W --> X["Press the button (C) (ESC)."]
    X --> Y["READY TO BREW"]
The symbol * on the right side indicates that the given value of the pre-brewing process is set and saved. The default setting is MEDIUM.
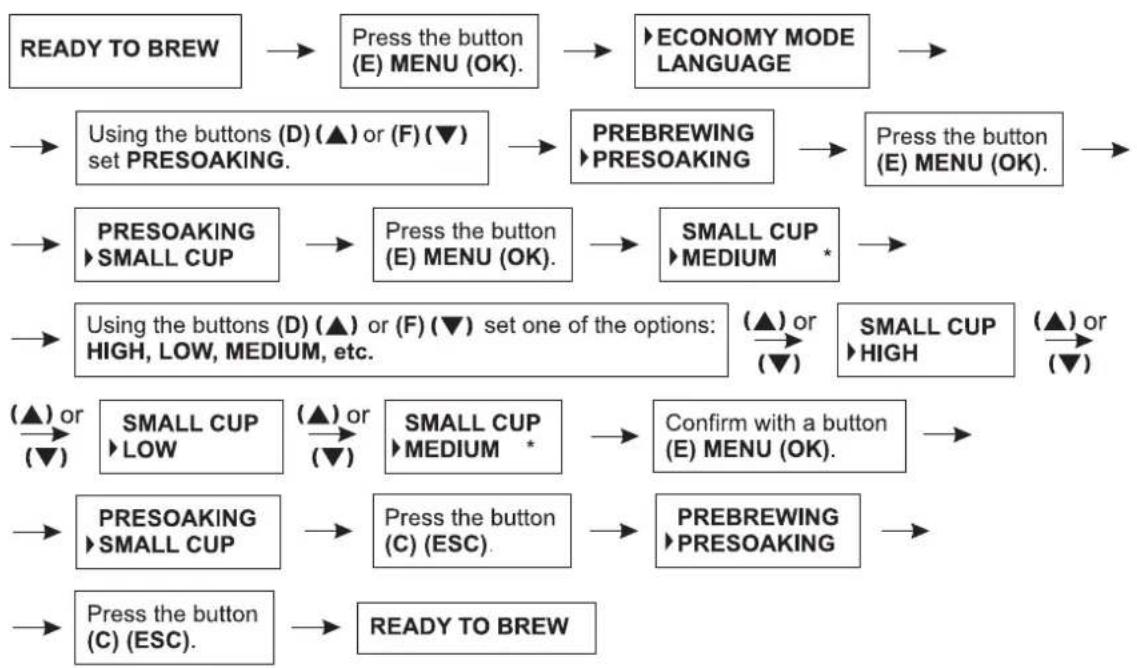
16.5 Setting brewing time for the small cup/medium cup/large cup
16.5.1. Setting the brewing time for the small cup
When the appliance is ready to use the message READY TO BREW appears on the display. Proceed according to the algorithm below.
flowchart
graph TD
    A["READY TO BREW"] --> B["Press the button (E) MENU (OK)."]
    B --> C["ECONOMY MODE LANGUAGE"]
    C --> D["Using the buttons (D) (▲) or (F) (▼) set PRESOAKING."]
    D --> E["PRESOAKING PREBREWING PRESOAKING"]
    E --> F["Press the button (E) MENU (OK)."]
    F --> G["PRESOAKING SMALL CUP"]
    G --> H["Press the button (E) MENU (OK)."]
    H --> I["SMALL CUP MEDIUM *"]
    I --> J["Using the buttons (D) (▲) or (F) (▼) set one of the options: HIGH, LOW, MEDIUM, etc."]
    J --> K["(▲) or (▼)"]
    K --> L["SMALL CUP LOW"]
    L --> M["(▲) or (▼)"]
    M --> N["SMALL CUP MEDIUM *"]
    N --> O["Confirm with a button (E) MENU (OK)."]
    O --> P["PRESOAKING SMALL CUP"]
    P --> Q["Press the button (C) (ESC)."]
    Q --> R["PRESOAKING PRESOAKING"]
    R --> S["Press the button (C) (ESC)."]
    S --> T["READY TO BREW"]
The symbol * on the right side indicates that the given brewing time is set and saved. The default setting is MEDIUM.
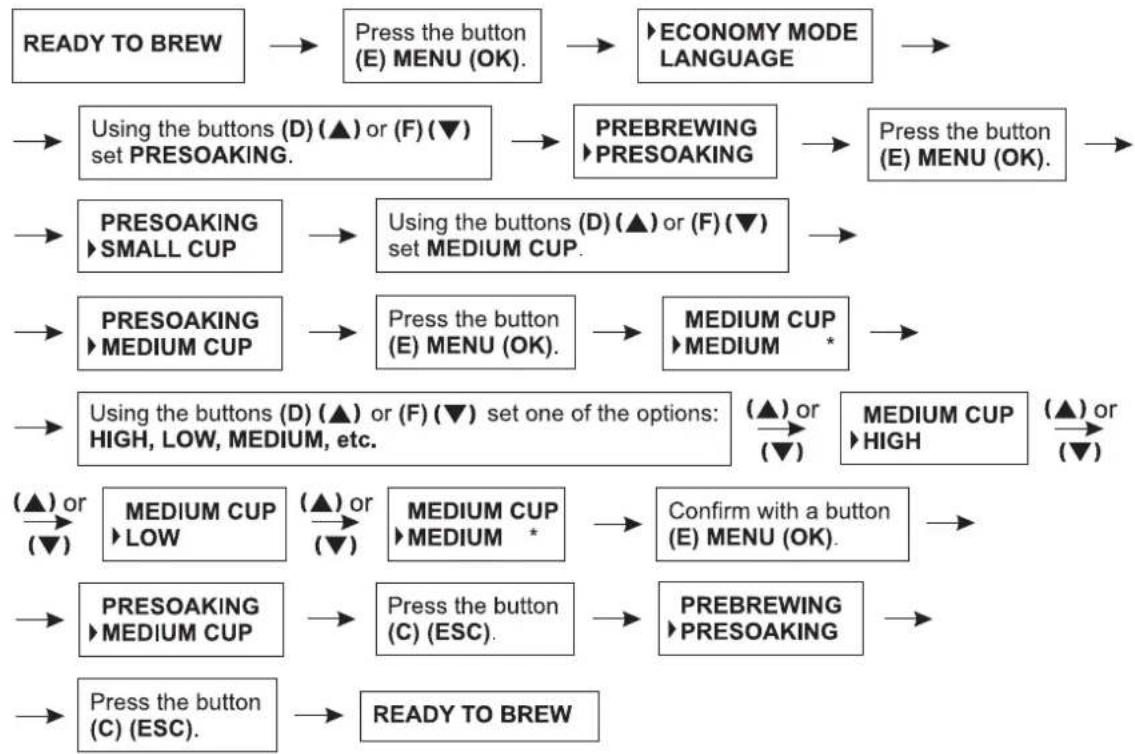
16.5.2. Setting the brewing time for the medium cup
When the appliance is ready to use the message READY TO BREW appears on the display. Proceed according to the algorithm below.
flowchart
graph TD
    A["READY TO BREW"] --> B["Press the button (E) MENU (OK)."]
    B --> C["ECONOMY MODE LANGUAGE"]
    C --> D["Press the button (E) MENU (OK)."]
    D --> E["PRESOAKING ▶ SMALL CUP"]
    E --> F["Using the buttons (D) (▲) or (F) (▼) set PRESOAKING."]
    F --> G["PRESOAKING ▶ PREBREWING ▶ PRESOAKING"]
    G --> H["PRESS THE BUTTON (D) (▲) or (F) (▼) set MEDIUM CUP."]
    H --> I["PRESOAKING ▶ MEDIUM CUP"]
    I --> J["Press the button (E) MENU (OK)."]
    J --> K["MEDIUM CUP ▶ MEDIUM *"]
    K --> L["Using the buttons (D) (▲) or (F) (▼) set ONE of the options: HIGH, LOW, MEDIUM, etc."]
    L --> M["(▲) or (▼)"]
    L --> N["(▲) or (▼)"]
    L --> O["MEDIUM CUP ▶ HIGH"]
    O --> P["(▲) or (▼)"]
    L --> Q["(▲) or (▼)"]
    L --> R["(▲) or (▼)"]
    L --> S["(▲) or (▼)"]
    L --> T["(▲) or (▼)"]
    L --> U["(▲) or (▼)"]
    L --> V["(▲) or (▼)"]
    L --> W["(▲) or (▼)"]
    L --> X["(▲) or (▼)"]
    L --> Y["(▲) or (▼)"]
    L --> Z["(▲) or (▼)"]
    L --> AA["(▲) or (▼)"]
    L --> AB["(▲) or (▼)"]
    L --> AC["(▲) or (▼)"]
    L --> AD["(▲) or (▼)"]
    L --> AE["(▲) or (▼)"]
    L --> AF["(▲) or (▼)"]
    L --> AG["(▲) or (▼)"]
    L --> AH["(▲) or (▼)"]
    L --> AI["(▲) or (▼)"]
    L --> AJ["(▲) or (▼)"]
    L --> AK["(▲) or (▼)"]
    L --> AL["(▲) or (▼)"]
The symbol * on the right side indicates that the given brewing time is set and saved. The default setting is MEDIUM.
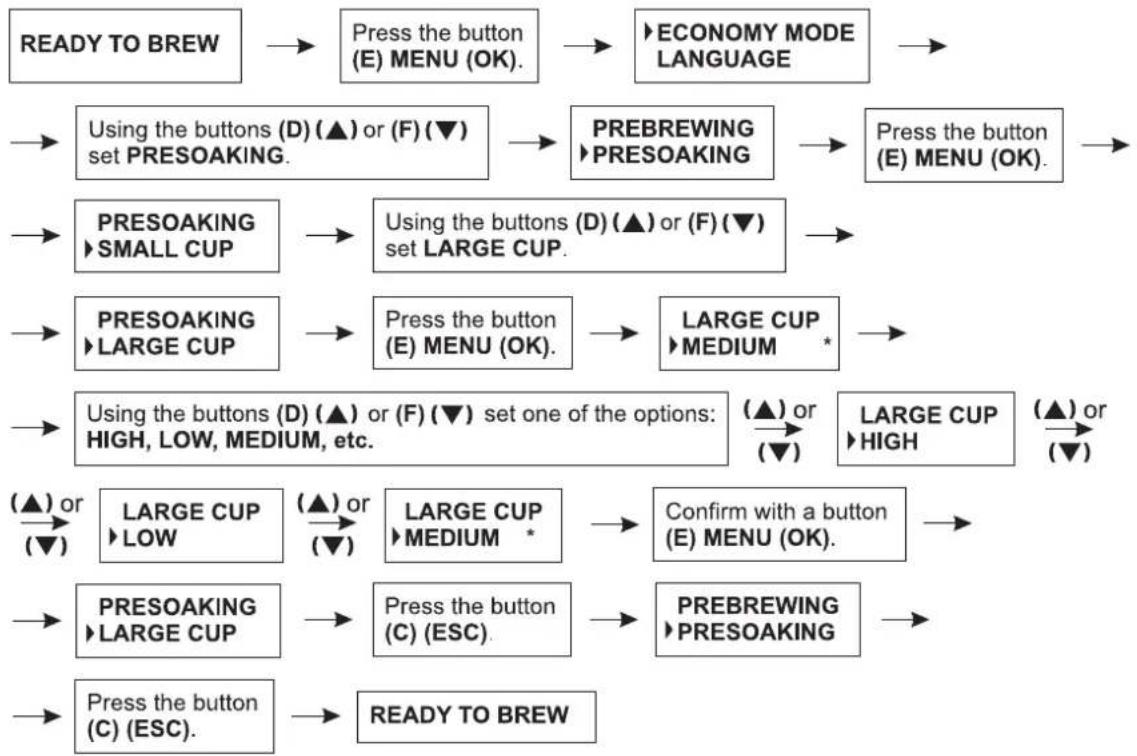
16.5.3. Setting the brewing time for the large cup
When the appliance is ready to use the message READY TO BREW appears on the display. Proceed according to the algorithm below.
flowchart
graph TD
    A["READY TO BREW"] --> B["Press the button (E) MENU (OK)."]
    B --> C["ECONOMY MODE LANGUAGE"]
    C --> D["Using the buttons (D) (▲) or (F) (▼) set PRESOAKING."]
    D --> E["PRESOAKING ▶PREBREWING ▶PRESOAKING"]
    E --> F["Press the button (E) MENU (OK)."]
    F --> G["PRESOAKING ▶SMALL CUP"]
    G --> H["Using the buttons (D) (▲) or (F) (▼) set LARGE CUP."]
    H --> I["PRESOAKING ▶LARGE CUP"]
    I --> J["Press the button (E) MENU (OK)."]
    J --> K["LARGE CUP ▶MEDIUM *"]
    K --> L["Using the buttons (D) (▲) or (F) (▼) set one of the options: HIGH, LOW, MEDIUM, etc."]
    L --> M["(▲) or (▼)"]
    M --> N["LARGE CUP ▶HIGH"]
    N --> O["(▲) or (▼)"]
    O --> P["(▲) or (▼)"]
    P --> Q["LARGE CUP ▶LOW"]
    Q --> R["(▲) or (▼)"]
    R --> S["LARGE CUP ▶MEDIUM *"]
    S --> T["Confirm with a button (E) MENU (OK)."]
    T --> U["PRESOAKING ▶LARGE CUP"]
    U --> V["Press the button (C) (ESC)."]
    V --> W["PRESOAKING ▶PRESOAKING"]
    W --> X["Press the button (C) (ESC)."]
    X --> Y["READY TO BREW"]
The symbol * on the right side indicates that the given brewing time is set and saved. The default setting is MEDIUM.
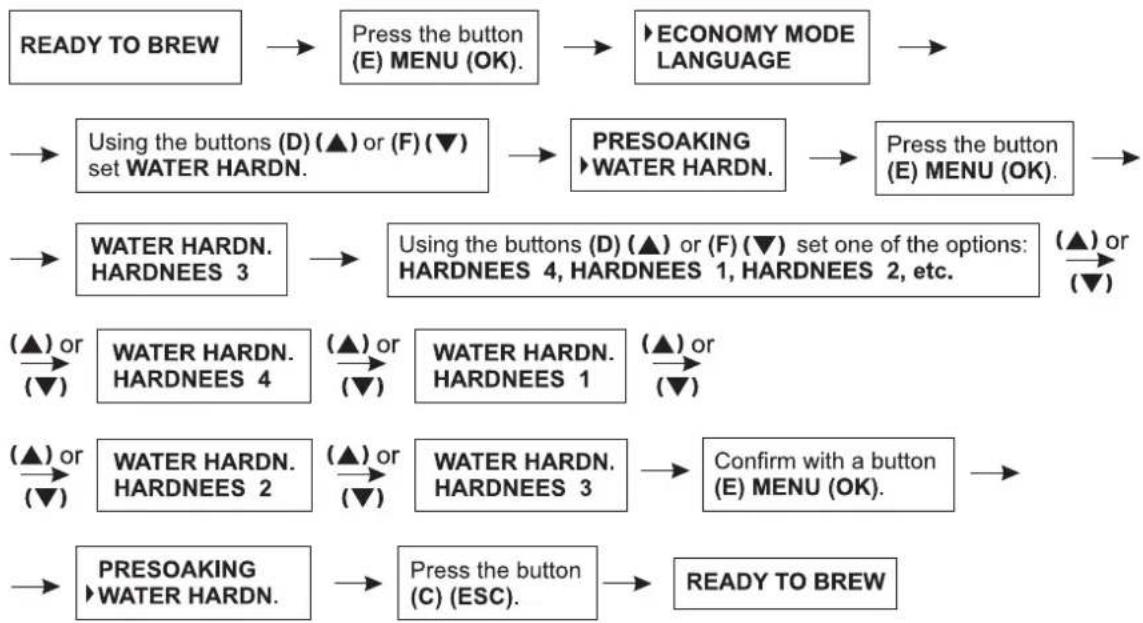
16.6 Setting the water hardness
The descaling frequency is determined automatically on the basis of the use and water flow in the coffee maker. It may be also adjusted to the water hardness. The coffee maker can be adjusted, to adapt it to the water hardness level. The water hardness scale is from 1 to 4.
When the appliance is ready to use the message READY TO BREW appears on the display. To set the water hardness, proceed according to the algorithm below.
flowchart
graph TD
    A["READY TO BREW"] --> B["Press the button (E) MENU (OK)."]
    B --> C["ECONOMY MODE LANGUAGE"]
    C --> D["Using the buttons (D) (▲) or (F) (▼) set WATER HARDN."]
    D --> E["PRESOAKING<br>WATER HARDN."]
    E --> F["Press the button (E) MENU (OK)."]
    F --> G["WATER HARDN.<br>HARDNEES 3"]
    G --> H["Using the buttons (D) (▲) or (F) (▼) set one of the options: HARDNEES 4, HARDNEES 1, HARDNEES 2, etc."]
    H --> I["(▲) or (▼)"]
    I --> J["WATER HARDN.<br>HARDNEES 4"]
    J --> K["(▲) or (▼)"]
    K --> L["WATER HARDN.<br>HARDNEES 1"]
    L --> M["(▲) or (▼)"]
    M --> N["WATER HARDN.<br>HARDNEES 2"]
    N --> O["(▲) or (▼)"]
    O --> P["WATER HARDN.<br>HARDNEES 3"]
    P --> Q["Confirm with a button (E) MENU (OK)."]
    Q --> R["PRESOAKING<br>WATER HARDN."]
    R --> S["Press the button (C) (ESC)."]
    S --> T["READY TO BREW"]
The default setting is 3.
To determine the water hardness level, the user may perform a test using a tester included in the coffee maker set. Dip the tester in water for 1 second. Take out the tester, shake off the water excess and read off the result after about 1 minute. A dry tester has 4 green squares. After dipping the tester into water, the squares will change the color into pink. The number of pink squares indicates the water hardness level 1, 2, 3 or 4.
On the basis of the obtained results, set the water hardness level in the coffee machine according to the above algorithm.
16.7. Descaling
This function allows to remove limestone residue from the coffee maker by using an integrated program. After using a certain amount of water determined by the water hardness level, the message DESCALING will appear on the LCD display next to the messages connected with the use of the coffee maker. You can descale the appliance now or a t a later time. However, remember that the message DESCALING will not disappear from the display until the full descaling process is performed.
If the water hardness level is 1, the message DESCALING will appear after using about 60 l of water.
If the water hardness level is 2, the message DESCALING will appear after using about 50 l of water.
If the water hardness level is 3, the message DESCALING will appear after using about 40 l of water.
If the water hardness level is 4, the message DESCALING will appear after using about 30 l of water.
When the appliance is ready to use the message READY TO BREW appears on the display. To prepare the coffee maker to the descaling process, proceed according to the algorithm below.
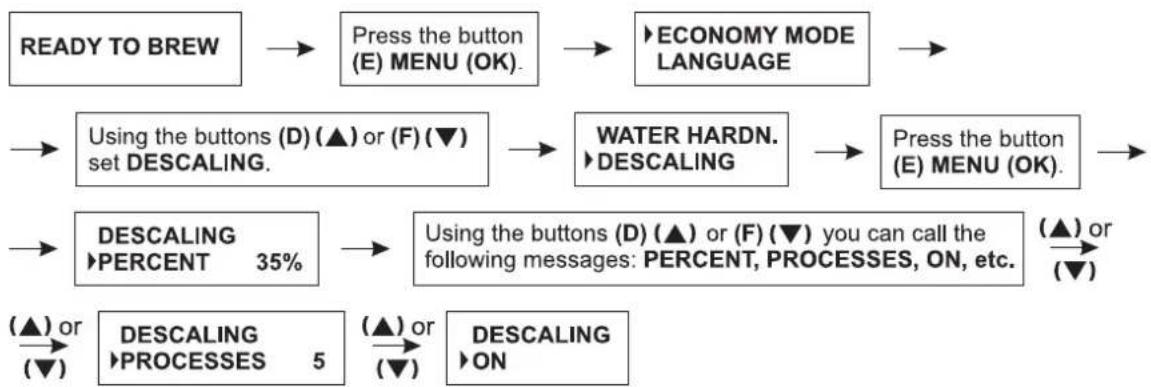
flowchart
graph TD
    A["READY TO BREW"] --> B["Press the button (E) MENU (OK)."]
    B --> C["ECONOMY MODE LANGUAGE"]
    C --> D["Using the buttons (D) (▲) or (F) (▼) set DESCALING."]
    D --> E["WATER HARDN. ▶DESCALING"]
    E --> F["Press the button (E) MENU (OK)."]
    F --> G["Using the buttons (D) (▲) or (F) (▼) you can call the following messages: PERCENT, PROCESSES, ON, etc."]
    G --> H["(▲) or (▼)"]
    H --> I["DESCALING ▶PROCESSES 5"]
    I --> J["(▲) or (▼)"]
    J --> K["DESCALING ▶ON"]
The message PERCENT indicates the amount of water that has been used from the last descaling process. If the displayed value amounts to 100%, the user has to perform the descaling process.
The message PROCESSES indicates the amount of descaling processes performed so far.
The message ON means: start the descaling process.
Before starting the descaling process, please follow the instructions below.
- When the message DESCALING appears on the LCD display, you can still brew coffee, but the coffee brewing functions will not be available when the descaling program is running. Never brew coffee during the descaling process until the message READY TO BREW appears on the LCD display.
- During the descaling process the pump will switch on and off from time to time. This is a normal situation.
- If for any reasons the descaling process is interrupted, it is recommended to start the descaling process again from the beginning.
- Limestone residue may cause damage to the coffee maker. Therefore it is important to perform the descaling process. Failure to perform a regular descaling process may result in the guarantee becoming null and void. It is recommended to remove limestone residue once a month or when the additional message DESCALING appears on the LCD display.
- It is necessary to prepare a descaling solution to remove limestone residue. Prepare the descaling solution using coffee maker descaling agents available in commercial sale. Remember to proceed according to the instructions on the package of the descaling agent when preparing the solution. Use the appropriate amount of the agent to prepare 2.2 l of the solution (the maximum capacity of the water tank (3)).
ATTENTION!
Never use a vinegar-based solution to descale the appliance.
The start of the descaling process (the descaling process consists of III stages):
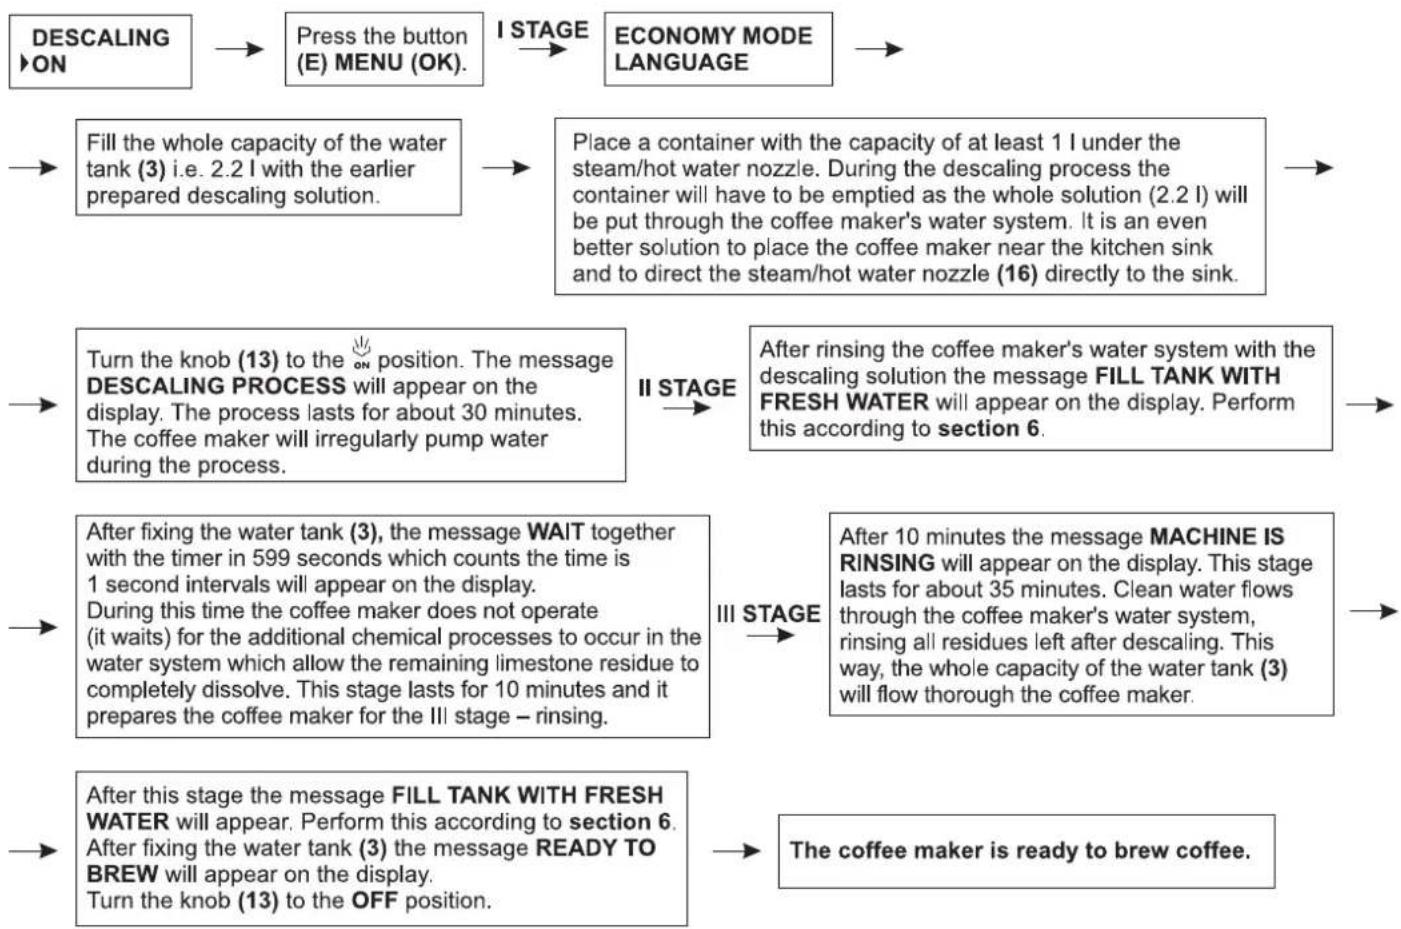
flowchart
graph TD
    A["DESCALING ON"] --> B["Press the button (E) MENU (OK)."]
    B --> C["I STAGE"]
    C --> D["ECONOMY MODE LANGUAGE"]
    D --> E["Fill the whole capacity of the water tank (3) i.e. 2.2 l with the earlier prepared descaling solution."]
    E --> F["Place a container with the capacity of at least 1 l under the steam/hot water nozzle. During the descaling process the container will have to be emptied as the whole solution (2.2 l) will be put through the coffee maker's water system. It is an even better solution to place the coffee maker near the kitchen sink and to direct the steam/hot water nozzle (16) directly to the sink."]
    F --> G["Turn the knob (13) to the ON position. The message DESCALING PROCESS will appear on the display. The process lasts for about 30 minutes. The coffee maker will irregularly pump water during the process."]
    G --> H["II STAGE"]
    H --> I["After rinsing the coffee maker's water system with the descaling solution the message FILL TANK WITH FRESH WATER will appear on the display. Perform this according to section 6."]
    I --> J["After fixing the water tank (3), the message WAIT together with the timer in 599 seconds which counts the time is 1 second intervals will appear on the display. During this time the coffee maker does not operate (it waits) for the additional chemical processes to occur in the water system which allow the remaining limestone residue to completely dissolve. This stage lasts for 10 minutes and it prepares the coffee maker for the III stage – rinsing."]
    J --> K["III STAGE"]
    K --> L["After 10 minutes the message MACHINE IS RINSING will appear on the display. This stage lasts for about 35 minutes. Clean water flows through the coffee maker's water system, rinsing all residues left after descaling. This way, the whole capacity of the water tank (3) will flow thorough the coffee maker."]
    L --> M["After this stage the message FILL TANK WITH FRESH WATER will appear. Perform this according to section 6. After fixing the water tank (3) the message READY TO BREW will appear on the display. Turn the knob (13) to the OFF position."]
    M --> N["The coffee maker is ready to brew coffee."]
ATTENTION!
If for any reasons you wish to stop the descaling process, simply press the (E) MENU (OK) button. The coffee maker will switch to the II phase and the message WAIT together with the timer (599 s) which counts the time is 1 second intervals will appear on the display. In this time remove the descaling solution from the water tank (3), rinse the tank thoroughly and fi II with fresh water (see section 6).
If you want to proceed to the rinsing phase immediately, press the (E) MENU (OK) button once again (otherwise the coffee maker will automatically start the rinsing process after 10 minutes of waiting). The message MACHINE IS RINSING will appear on the display- III stage. Irrespectively of the time the coffee maker remained in the I stage, the appliance must be rinsed so that the user can be sure that the remaining descaling agent is rinsed from the water system of the appliance. The end of this process is similar as in the case of the standard descaling process.
ATTENTION!
The manufacturer does not recommend stopping the descaling process in the way described above. It is recommended to run the process until the end.
ATTENTION!
If you did not start the descaling process when the message READY FOR DESCALING appeared on the display by turning the knob (13) to the ON position and you want to stop the process (without starting it at all), press the (E) MENU (OK) button. The message WAIT together with the timer (599 s) which counts the time is 1 second intervals will appear on the display. Press the (E) MENU (OK) again, the message SET ROTARY KNOB will appear on the display. Press the (E) MENU (OK) again. The message DESCALING FINISHED and next the message READY TO BREW will appear on the display.
16.8 Checking the number of brewed cups of coffee
This function allows to determine the number of small, medium and large cups of coffee brewed by the coffee maker from the first operation of the appliance. When the appliance is ready to use the message READY TO BREW appears on the display. To check the number of brewed cups proceed according to the algorithm below.
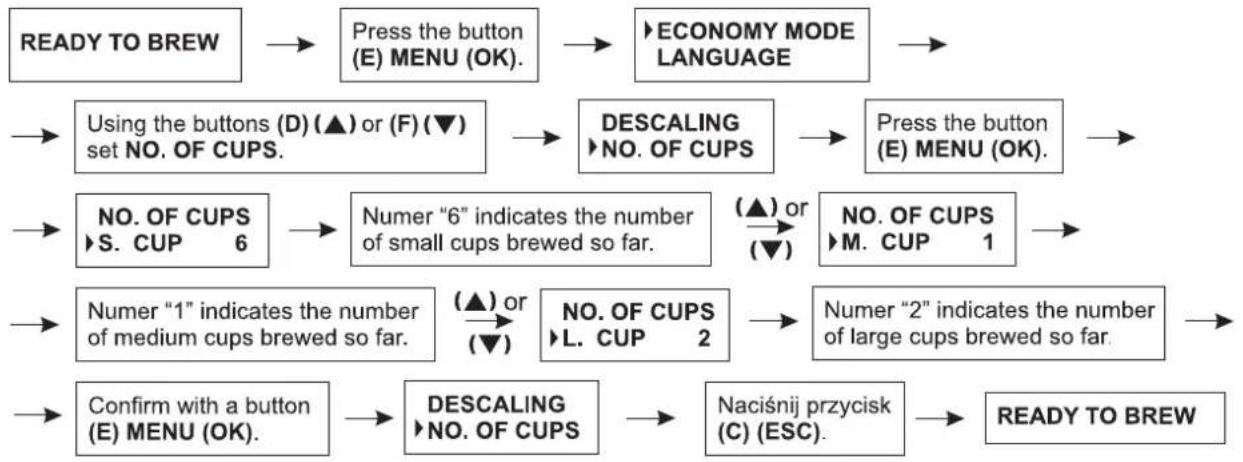
flowchart
graph TD
A["READY TO BREW"] --> B["Press the button (E) MENU (OK)."]
B --> C["ECONOMY MODE LANGUAGE"]
C --> D["Using the buttons (D) (▲) or (F) (▼) set NO. OF CUPS."]
D --> E["DESCALING<br>▶NO. OF CUPS"]
E --> F["Press the button (E) MENU (OK)."]
F --> G["NO. OF CUPS<br>▶S. CUP 6"]
G --> H["Numer "6" indicates the number of small cups brewed so far."]
H --> I["(▲) or (▼)"]
I --> J["NO. OF CUPS<br>▶M. CUP 1"]
J --> K["Numer "2" indicates the number of large cups brewed so far."]
K --> L["Confirm with a button (E) MENU (OK)."]
L --> M["DESCALING<br>▶NO. OF CUPS"]
M --> N["Naciśnij przycisk (C) (ESC)."]
N --> O["READY TO BREW"]
K --> P["(▲) or (▼)"]
P --> Q["Numer "1" indicates the number of medium cups brewed so far."]
Q --> R["(▲) or (▼)"]
R --> S["NO. OF CUPS<br>▶L. CUP 2"]
16.9. Setting the current time
When the appliance is ready to use the message READY TO BREW appears on the display. To start the time setting process, proceed according to the algorithm below.
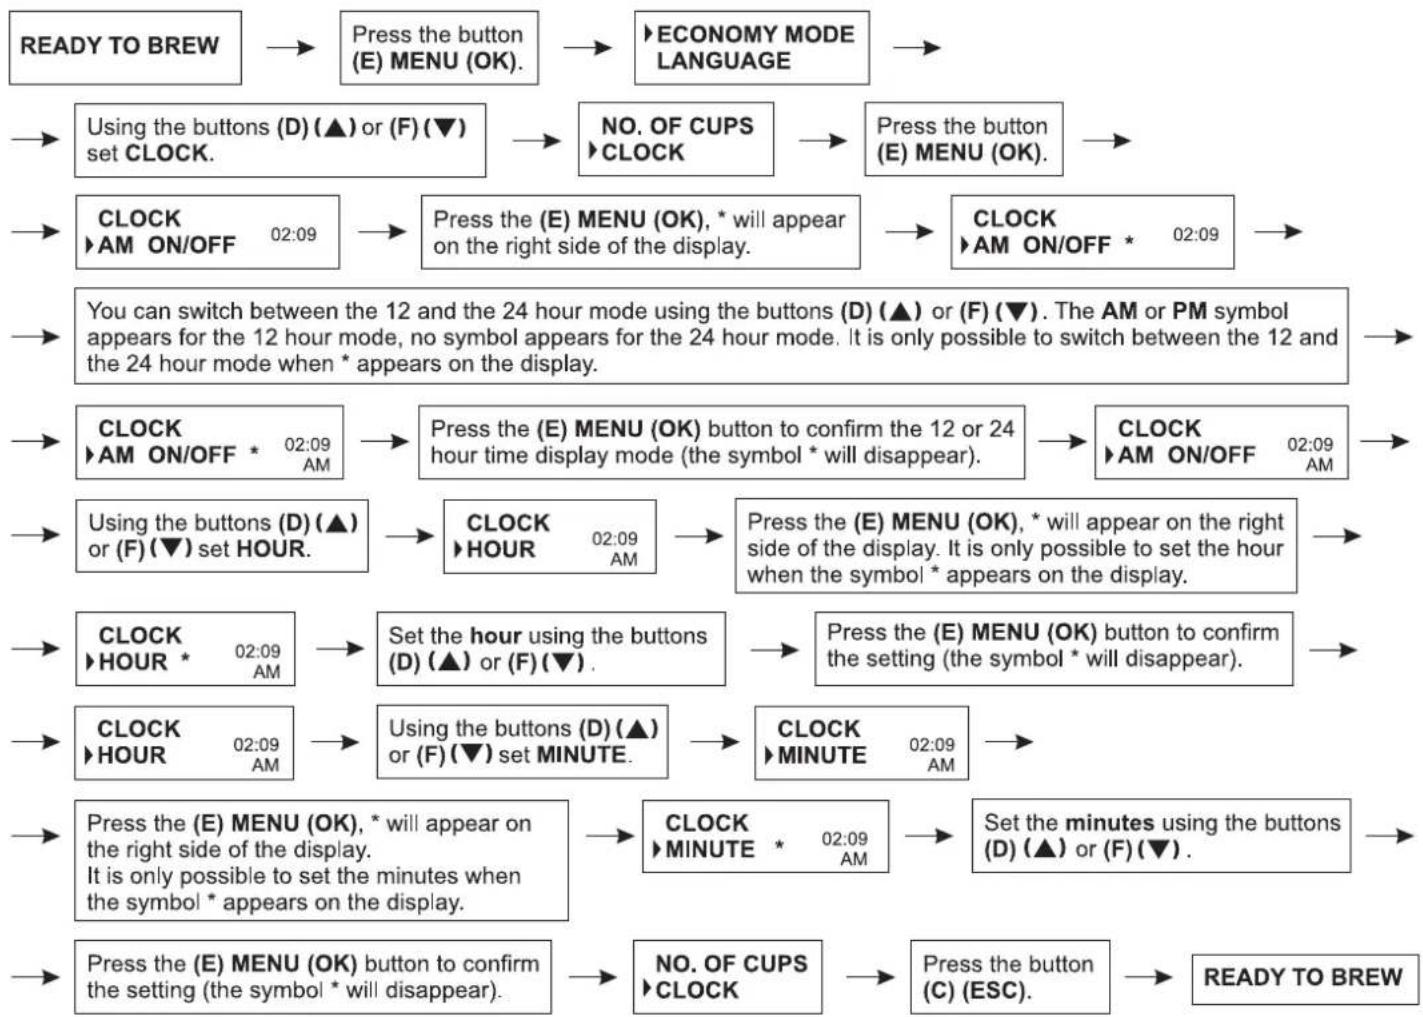
flowchart
graph TD
    A["READY TO BREW"] --> B["Press the button (E) MENU (OK)."]
    B --> C["ECONOMY MODE LANGUAGE"]
    C --> D["NO. OF CUPS ▶CLOCK"]
    D --> E["Press the button (E) MENU (OK)."]
    E --> F["CLOCK ▶AM ON/OFF 02:09"]
    F --> G["Press the (E) MENU (OK), * will appear on the right side of the display."]
    G --> H["CLOCK ▶AM ON/OFF * 02:09"]
    H --> I["You can switch between the 12 and the 24 hour mode using the buttons (D) (▲) or (F) (▼). The AM or PM symbol appears for the 12 hour mode, no symbol appears for the 24 hour mode. It is only possible to switch between the 12 and the 24 hour mode when * appears on the display."]
    I --> J["CLOCK ▶AM ON/OFF * 02:09 AM"]
    J --> K["Press the (E) MENU (OK) button to confirm the 12 or 24 hour time display mode (the symbol * will disappear)."]
    K --> L["CLOCK ▶AM ON/OFF 02:09 AM"]
    L --> M["Using the buttons (D) (▲) or (F) (▼) set HOUR."]
    M --> N["CLOCK ▶HOUR 02:09 AM"]
    N --> O["Press the (E) MENU (OK), * will appear on the right side of the display. It is only possible to set the hour when the symbol * appears on the display."]
    O --> P["CLOCK ▶HOUR * 02:09 AM"]
    P --> Q["Set the hour using the buttons (D) (▲) or (F) (▼)."]
    Q --> R["Press the (E) MENU (OK) button to confirm the setting (the symbol * will disappear)."]
    R --> S["CLOCK ▶HOUR 02:09 AM"]
    S --> T["Using the buttons (D) (▲) or (F) (▼) set MINUTE."]
    T --> U["CLOCK ▶MINUTE 02:09 AM"]
    U --> V["Press the (E) MENU (OK), * will appear on the right side of the display. It is only possible to set the minutes when the symbol * appears on the display."]
    V --> W["Press the (E) MENU (OK) button to confirm the setting (the symbol * will disappear)."]
    W --> X["NO. OF CUPS ▶CLOCK"]
    X --> Y["Press the button (C) (ESC)."]
    Y --> Z["READY TO BREW"]
16.10. Restoring factory settings
When the appliance is ready to use the message READY TO BREW appears on the display. To delete all settings made by the user and to restore factory settings proceed according to the algorithm below.
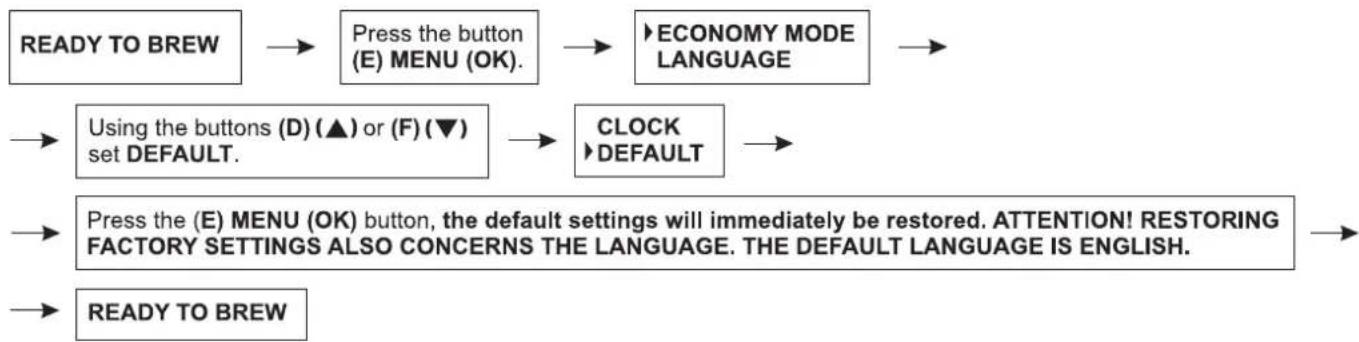
flowchart
graph TD
    A["READY TO BREW"] --> B["Press the button (E) MENU (OK)."]
    B --> C["ECONOMY MODE LANGUAGE"]
    C --> D["Using the buttons (D) (▲) or (F) (▼) set DEFAULT."]
    D --> E["CLOCK ➕ DEFAULT"]
    E --> F["Press the (E) MENU (OK) button, the default settings will immediately be restored. ATTENTION! RESTORING FACTORY SETTINGS ALSO CONCERNS THE LANGUAGE. THE DEFAULT LANGUAGE IS ENGLISH."]
    F --> G["READY TO BREW"]
ATTENTION! The language setting procedure is presented in section 16.2.
17. Warnings
a. The message MEASUREMENT ERROR TEMP. indicates that the temperature inside the coffee maker is too low (below 2°C). If this message appears when the room temperature is above 2°C, it means that there is no sensor in the coffee maker. Please contact your supplier for help.
b. The message TEMPERATURE TOO HIGH indicates that the temperature is too high during the operation of the coffee maker. Cool the coffee maker and restart the appliance. If the message is still on the display after starting the appliance, the sensor is damaged.
c. The message BREW UNIT BLOCKED indicates that the brewing head unit (14) is blocked and coffee cannot be brewed. Open the service door (15), take out the brewing head unit (14) and check if it is in the "start position". Next reinstall the brewing head unit (14) and close the door (15). The whole procedure is described in section 4. Restart the coffee maker. If the problem still exists even after unblocking the brewing head unit (14), turn to your supplier to solve the problem.
d. The message RELEASE UNIT indicates that the brewing head unit (14) is slid out. Take out the dregs box (22), close the service door (15) and restart the coffee machine. Press and hold for 5 seconds the (B) button, the brewing head unit (14) will slide out due to the reverse movement of the electric motor. Install the dregs box (22) properly and brewing head unit (14) and close the door (15). Restart the coffee maker.
e. The message TOP SWITCH FAILURE indicates that the top switch above the brewing head unit (14) does not function properly. Open the service door (15) to check if the brewing head unit (14) is blocked. After cleaning the unit (see section 4) install the brewing head unit (14) and close the door (15). Restart the coffee maker. If you still hear the noise, it means that the top switch is damaged and repair is necessary.
f. The message SET ROTARY KNOB indicates that the steam/hot water knob (13) is in the ON position during coffee brewing. Set the knob (13) in the 0 position during coffee brewing.
g. The message DREGS BOX MISSING indicates that the dregs box (22) might not be properly installed during the coffee brewing process. Check and install the dregs box (22) properly according to section 10.
h. The message FILL TANK WITH FRESH WATER indicates that there is not water in the tank (3). Immediately fill the water tank (3) with fresh water according to section 6.
i. The message FILL TANK WITH SOLUTION indicates that there is no descaling solution in the tank (3). If this message is displayed at the beginning of the descaling process, immediately fill the water tank (3) with the solution according to section 16.7.
j. The message EMPTY DREGS BOX indicates that the coffee maker brewed 8 (9) cups of coffee. Empty and clean the dregs box (22) according to section 10. It is also advantageous to clean the brewing head unit (14) according to section 18.7.
k. The message DATA LOSS indicates the lack of initial settings in the EEPROM memory or the loss of this data. Further operation of the coffee maker is only possible with default settings. This message disappears after 5 seconds.
I. The message WATER FLOW ERROR indicates that the brewing heat unit (14) filter is blocked or the water pipe is blocked. Take out the brewing head unit (14) and check if the filter is blocked. If there are a lot of coffee remains, clean the brewing head unit (14) (see section 18.7) and insert it back into place (see section 4). If there is no problem with the brewing head unit (14) try to brew several cups of coffee or to prepare a cup of hot water. If you cannot remove the brewing head unit (14) proceed according to section 19.7. If the problem still exists, the flowmeter might be damaged.
m. The message DOOR OPEN indicates that the service door is open (15). Close the door.
n. The message NO ELECTROMAGNET SWITCH indicates that the sensor does not recognize the electromagnetic switch. This message should disappear after 5 seconds. If the message appears several times it means that the electromagnetic switch might be damaged. The coffee maker must be repaired.
o. The message CLOCK MEMORY MISS indicates no time setting. Set the current time according to section 16.9. This message disappears after 5 seconds. The lack of time settings does not affect the coffee brewing process in any way.
p. The message COFFEE ABSENCE indicates the lack of bean coffee in the container (4). This message may appear while starting the coffee brewing process. Fill the container (4) with bean coffee (according to section 7.1) and restart the coffee brewing process according to section 12.
q. The message PUMP WATER TOO MUCH indicates that probably too much hot water was used. The hot water function will not be available for 30 minutes, as the coffee maker needs time to prepare hot water. This message disappears after 5 seconds.
r. The message INSERT BREW UNIT indicates that there is no brewing head unit (14) inside the coffee maker. Insert the brewing head unit (14) properly in the coffee maker according to section 4.
s. The message GRINDING MOTOR BLOCKED indicates that something has blocked the coffee grinder. Clean the grinder. If the message appears many times even after cleaning the grinder, there is a problem with the grinder. The coffee maker must be repaired.
Remember: If a failure appears that is not described above or the above solutions do not remove the cause of the failure, please contact an authorized service point.
18. Cleaning and general care
Always keep the coffee maker clean to ensure a proper quality of the brewed coffee and to prolong the life of the appliance.
Switch off and unplug the coffee maker before cleaning. 1.
Allow the coffee maker to cool before cleaning. 2.
Do not immerse the coffee maker into water or any other liquids. 3.
- Do not wash any parts of the coffee maker in the dishwasher.
- Dry the cleaned parts in free air or using a cloth, do not dry the parts in the oven or microwave oven.
- The dregs box (22) should be emptied daily. The water tank (3), the drip tray (19) and the dregs box (22) should be cleaned using mild cleaning agents e.g. dishwashing liquids. Dry these parts thoroughly after cleaning.
- The brewing head unit (14) should be cleaned regularly after brewing 25 cups of coffee. Switch off the coffee maker and open the service door (15). Take out the brewing head unit (14) and holding the handle (14a) wash it thoroughly under running warm water. Do not use cleaning agents.
NOTE: The brewing head mechanism (14) may be (for cleaning purposes) turned using the key (25). Section 4 presents the way to turn the mechanism and to set it in the start position.
- Cleaning the ground coffee inlet channel (fig. 10).
Open the ground coffee container lid (9). Insert the measuring spoon cleaning brush (24) to the channel of the ground coffee container (9a) to remove the coffee lumps which may be accumulated inside. Open the service door (15), take out the brewing head unit (14) and pull the partition backwards with your finger. This way all ground coffee lumps will be removed from the ground coffee container channel (9). It is recommended to clean this element once a month or when weak coffee is brewed.
natural_image
Hand operating a mechanical lever with a black lever handle (no visible text or symbols)
natural_image
Close-up of a hand turning a tool into a mechanical component with a curved arrow indicating rotation (no text or symbols visible)Fig. 10
- Cleaning the steam nozzle with the metal cover (16).
It is recommended to dismantle the steam nozzle unit (16) for cleaning purposes each time after you prepare froth (Note: the steel cover may be hot, handle it carefully). Remove the metal cover, twist off the plastic nozzle. If the nozzle is stuck, use a needle. Replace the plastic nozzle by twisting it on to the metal casing attached to the service door (15). Attach the metal cover to the nozzle.
- Never pour water to the bean coffee container (4). It may damage the coffee maker. Use only the brush to clean the grinder. The grinder does not require regular service. In case of problems with the proper operation of the grinder, please contact a qualified employee of the service point.
19. Troubleshooting
| No. | Problem Action | |
| 1. | The coffee does not flow from the head after pressing the button (A) or (B) (C), th sound of the pump is louder than usual. | Check if the water tank (3) is inserted properly, check if there is water in the tank (3), fill the tank with water (see section 6) without pressing any button, turn the steam knob (13) to the position after about 30 seconds. Next, turn the steam knob (13) to the OFF position. The problem should be solved. |
| 2. | The coffee does not flow from the head after pressing the button (A) or (B) or (C), the sound of the pump is quieter than usual. The display shows the message WATER FLOW ERROR. | Unplug the coffee maker, clean the brewing head unit (14) - see section 4. Next prepare a large cup of coffee according to section 12.3. If the coffee flows properly, the problem has been solved. |
| 3. | The brewed coffee is too weak or does not differ much from fresh water. | Check if there are coffee beans in the container (4). Clean the ground coffee inlet channel. Check the position of the knobs (10) and (11). |
| 4. | No steam emission | Clean the steam nozzle (16) - see section 18.9. |
| 5. | Water is in the bean coffee container (4). | Immediately switch off the coffee maker. Do not use the coffee maker until you wipe the surface of the bean coffee container (4) dry using a water absorbing cloth. The problem should be solved. Otherwise return the coffee maker to the nearest service point. |
| 6. | The sound of the operating brewing head unit (14) is louder than usual, but the brewing head unit can be removed. | There might be foreign objects in the lower part of the brewing head unit (14). Switch off the coffee maker. Take out the brewing head unit (14) - see section 4. Clean the brewing head unit. |
| 7. | The sound of the operating brewing head unit (14) is louder than usual, but the brewing head unit cannot be removed. | Step 1: Switch off the coffee maker with the switch (2). Take out the dregs box (22) and close the service door (15). Step 2: Switch on the coffee maker with the switch (2). Press and hold the (B) button until the appliance starts to operate. Step 3: When the appliance stops to operate, switch off the coffee maker again with the switch (2) and take out the brewing head unit (14) - see section 4. Step 4: Clean the whole brewing head unit (14) thoroughly. Check its starting position (correct in case of an improper setting) and install in the coffee maker - see section 4. Switch on the coffee maker once again with the switch (2). The problem should be solved. Otherwise return the coffee maker to the nearest service point. |
In case of other defects or problems remember not to attempt to remove them yourself. In such a case contact a qualified service point employee.
ECOLOGY – ENVIRONMENT PROTECTION
Each user can protect the natural environment. It is neither difficult nor expensive.
In order to do it: put the cardboard packing into recycling paper container; put the polyethylene (PE) bags into container for plastic.
When worn out, dispose the appliance to particular disposal centre, because of the dangerous elements of this appliance, which can be hazardous for natural environment.
Do not dispose into the domestic waste disposal!!!


- ábra
- ECOLOGIA – SĂ AVEM GRIJĂ DE MEDIU
- Dear Customer,
- Dear Customers!
- IMPORTANT SAFETY INSTRUCTIONS
- TECHNICAL PARAMETERS
- Product features
- Control panel and LCD display (fi g. 2)
- Small cup of coffee button 🖱️
- Medium cup of coffee button 🖱️
- Large cup of coffee button (ESC)
- Steam button ↩ menu up button (▲)
- MENU button (OK)
- Bean coffee/ground coffee/menu down button √/○ (▼)
- NOTE!
- Brewing head unit description (14)
- Before initial use – tips
- Filling the water tank
- Dosing coffee
- Bean coffee
- Ground coffee
- Cup warming
- Emptying the drip tray
- Emptying the dregs box
- Operating the coff ee maker SELF-TEST
- Preparing coff ee
- Preparing a small cup of coffee
- Preparing a medium cup of coffee
- Preparing a large cup of coffee
- Preparing 2 small cups of coffee
- Preparing 2 medium cups of coffee
- Preparing 2 large cups of coffee
- Preparing hot water
- Preparing steam
- Setting the quantity of the small cup/medium cup/large cup
- Setting the quantity of the small cup
- Setting the quantity of the medium cup
- Setting the quantity of the large cup
- Programming
- Setting the energy saving function – ECONOMY MODE
- Setting the language
- Setting the temperature of the brewed coffee for the small cup/medium cup/large cup
- Setting the temperature of the brewed coffee for the small cup
- Setting the temperature of the brewed coffee for the medium cup
- Setting the temperature of the brewed coffee for the large cup
- Setting the pre-brewing function for the small cup/medium cup/large cup
- Setting the pre-brewing function for the small cup
- Setting the pre-brewing function for the medium cup
- Setting the pre-brewing function for the large cup
- Setting brewing time for the small cup/medium cup/large cup
- Setting the brewing time for the small cup
- Setting the brewing time for the medium cup
- Setting the brewing time for the large cup
- Setting the water hardness
- The default setting is 3.
- Descaling
- ATTENTION!
- Checking the number of brewed cups of coffee
- Setting the current time
- Restoring factory settings
- Warnings
- Cleaning and general care
- Troubleshooting
- ECOLOGY – ENVIRONMENT PROTECTION
Brand : Zelmer
Model : 13Z011
Category : Coffee maker