ZCM7295 - Coffee maker Zelmer - Free user manual and instructions
Find the device manual for free ZCM7295 Zelmer in PDF.


| Product Type | Espresso Coffee Machine |
| Dimensions (approx.) | 30 x 25 x 35 cm |
| Weight (approx.) | 5 kg |
| Power Supply | 220-240V, 50/60Hz |
| Power Consumption (approx.) | 1200 W |
| Water Tank Capacity (approx.) | 1.5 L |
| Pump Pressure (approx.) | 15 bar |
| Functions | Single-cup espresso, manual coffee dispensing, steam for milk frothing, hot water |
| Coffee Filters Included | Single-cup filter, double-cup filter |
| Safety Features | Auto shut-off, overheat protection, child safety (use 8+ with supervision) |
| Maintenance | Descaling every 2-3 months; clean removable parts after use |
| Removable Parts | Water tank, drip tray, filter holder, filters, steam nozzle |
| Warranty | 2 years |
Frequently Asked Questions - ZCM7295 Zelmer
User questions about ZCM7295 Zelmer
0 question about this device. Answer the ones you know or ask your own.
Ask a new question about this device
Download the instructions for your Coffee maker in PDF format for free! Find your manual ZCM7295 - Zelmer and take your electronic device back in hand. On this page are published all the documents necessary for the use of your device. ZCM7295 by Zelmer.
USER MANUAL ZCM7295 Zelmer
natural_image
Black and white photo of a Zelmer coffee maker with visible branding and control buttons (no text or symbols on the device itself)EN USER MANUAL Espresso coffee machine
DE BENUTZERHANDBUCH Espressomaschine
DZIEKUJEMY ZA WYBÖR MARKI ZELMER. ŻYCZYMY SATYSFAKCJI Z UŻYTKOWANIA URZĄDZENIA.
OSTRZEŻENIE
PRZED ROZPOCZĘCIEM KORZYSTANIA Z PRODUKTU PROSIMY O UWAŻNE PRZECZYTANIE INSTRUKCJI OBSŁUGI I PRZECHOWYWANIE JEJ W BEZPIECZNYM MIEJSCU, ABY MÓC Z NIEJ SKORZYSTAĆ W PRZYSZŁOŚCI.
OPIS
natural_image
Technical line drawing of a cylindrical mechanical component with a central hub and side railings (no text or symbols)ZBIORNIK NA WODE
CZERWONY SILIKON
Theorem 1.2. (Theorem of [10, Theorem 1.1]) Let be a finite field and let (x) be the set of all elements of such that
PL
WE WOULD LIKE TO THANK YOU FOR CHOOSING ZELMER. WE WISH THE PRODUCT PERFORMS TO YOUR SATISFACTION AND PLEASURE.
WARNING
PLEASE READ THE USER MANUAL CAREFULLY PRIOR TO USING THE PRODUCT. STORE IT IN A SAFE PLACE FOR FUTURE REFERENCE.
DESCRIPTION
- Water tank cover
- Water tank
- Steam / hot water control knob
- Main body
- Steam nozzle
- Base
- ON/OFF switch
- Warm cup board
- Top cover
- Single-cup coffee / espresso button
- Manual coffee dispensing button
- Steam / milk frothing button
- Group head
- Drip tray floater
- Drip tray cover
- Drip tray
- Coffee scoop
- Single-cup coffee filter
- Double-cup coffee filter
- Filter holder
- Coffee outlet
SAFETY INSTRUCTIONS
If the supply cord is damaged it must be replaced by the manufacturer, its service agent or similarly qualified persons in order to avoid a hazard.
This appliance can be used by children aged from 8 years and above if they have been given supervision or instruction concerning use of the appliance in a safe way and if they understand the hazards involved.
Children shall not play with the appliance.
Cleaning and user maintenance shall not be made by children unless they are older than 8 and supervised.
Keep the appliance and its cord out of reach of children
EN
aged less than 8 years.
Appliances can be used by persons with reduced physical, sensory or mental capabilities or lack of experience and knowledge if they have been given supervision or instruction concerning use of the appliance in a safe way and understand the hazards involved.
This appliance is intended to be used in household. It is not intended to be used in applications such as: staff kitchen areas in shops, offices and other working environments; farm houses; by clients in hotels, motels and other residential type environments; Bed and breakfast type environments.
Proceed according to maintenance and cleaning section of this manual for cleaning.
Never immerse the appliance in water or any other liquid.
During brewing and after use due to residual heat some parts of the machine are hot.
Warning: potential injury from misuse!
This device is designed for use at a maximum altitude of 2000 m above sea level.
IMPORTANT WARNINGS
Any incorrect use or improper handling of the product shall render the warranty null and void.
Prior to plugging in the product, check that your mains voltage is the same as the one indicated on the product label.
The mains connection cable must not be tangled or wrapped around the product during use. Do not use the device, or connect and disconnect to the supply mains with the hands and / or feet wet.
Do not pull on the connection cord in order to unplug it or use it as a handle.
Never use your coffee machine without water in it.
Unplug the product immediately from the mains in the event of any breakdown or damage and contact an official technical support service.
In order to prevent any risk of danger, do not open the device. Only qualified technical personnel from the brand's Official technical support service may carry out repairs or procedures on the device.
B&B TRENDS SL disclaims all liability for damages that may occur to people, animals or objects, for the non-observance of these warnings.
EN
BEFORE THE FIRST USE (Important)
- Remove the product from packaging and check all the accessories according to the list given in the "DESCRIPTION" section.
- Clean all the detachable items.
- Remove the red silicone from the water tank before using the product.

- Pour water into the water tank. The water level should not exceed the "Max" mark. Put the water tank back in place and close the lid.
- Plug in the coffee maker to power supply and press ON/OFF switch (7). At this point, all indicators (10, 11, 12) will flash. The product will start the preheating process. When the indicators stop flashing and stay on, the preheating process will be completed. It takes about 1 minute.
- When preheating is complete, turn the steam control knob (3) to the left to the maximum position. The pump will continue to operate until hot water starts flowing out of the steam nozzle (5) for at least 30 seconds to clean the steam nozzle. After about 1-2 minutes, finish the process by turning the steam control knob to the initial position.
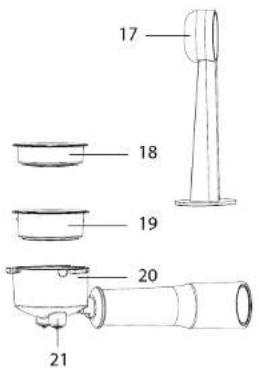
- Install the filter holder (20) in the group head (13). Turn the filter holder to the right from to position to install it accurately (without ground coffee) in the head. Then press the manual coffee dispensing button (11) to wash the filter holder and steam outlet with hot flowing water.
Operation manual

Press the ON/OFF button (7), the coffee maker will turn on and the indicators (10, 11, 12) will flash. The product starts the preheating process. The device will start the heating process. When the indicators stop flashing and stay on, the preheating process will be completed. The product will go into coffee or hot water preparation mode. If the ON/OFF button (7) is pressed again after the preheating process the coffee maker will turn off. (If the steam button (12) continues to flash quickly when the product is on, check the steam control knob (3) and turn it to the right to turn it off.)
Single-cup coffee / espresso button (10)
Touch it to start brewing coffee after preheating. The indicator will start flashing. The brewing process will continue until the product stops. The coffee maker will brew about 40 ml of espresso.
You can also stop the brewing process by touching the button again. The indicators will stop flashing and stay on. The automatic brewing time has been set in the product and includes the initial brewing of coffee.
EN
Manual coffee dispensing button (11)
Touch it to start brewing coffee after preheating. The indicator will start flashing. The brewing process will continue until the product stops. In this mode the coffee maker can brew up to 170 ml of coffee.
If you want to brew a smaller drink, you can stop the brewing process at any time by touching the button again. The indicators will stop flashing and stay on. The automatic brewing time has been set in the product and includes the initial brewing of coffee.
Steam / milk frothing button (12)
Touch the button, the indicator will start flashing. The steam preparation process will begin. You can use it for milk frothing. After steam preparation, the indicator will stop flashing and stays on and the products goes into steam production mode. If the steam preparation switch is touched again during the process, the device will switch back to coffee brewing mode.
If the single-cup coffee / espresso (10) and manual coffee dispensing (11) indicators flash, it means that the temperature is too high and you cannot brew another coffee. You need to wait until the temperature drops on its own. Coffee cannot be brewed until the indicators (10, 11, 12) are constantly on.
Steam /hot water control knob (3)
The steam knob shown below is in the closed position. There are two working modes. When the product is in coffee mode, the steam nozzle (5) feeds hot water. When the product is in steam mode, the steam nozzle feeds steam.
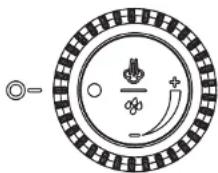
Note: when power is turned on and the steam preparation indicator flashes quickly, it means that the steam knob is not closed and you can turn the steam knob to the closed position.
COFFEE PREPARATION
- Open the lid (1), remove the water tank (2) and pour water into the tank. Do not exceed the MAX capacity mark.
- Put the water tank back in place and close the lid.
- Connect the product to power and press the ON/OFF button (7). At this point, all indicators will flash. The coffee maker starts the preheating process. This process will be completed after about 1 min. The coffee and steam indicators will stay on all the time.
- Remove the filter holder (20), put appropriate ground coffee into the coffee filter (18 – single coffee filter or 19 – double coffee filter) using the coffee scoop (17) and then press the ground coffee. Remove excess ground coffee exceeding over the edge of the filter holder so as to avoid damaging the head seal.
Note: If too much ground coffee remains on the filter edge, this will affect tightness and cause water leakage. - Turn the filter holder to the right from 🔒 Position to install it properly. Place the cup(s) under the coffee outlet.
- Touch the single-cup coffee / espresso button (10) to make an espresso of about 40 ml. If you want a bigger coffee, use the manual coffee dispensing button (11). The machine will start to pump water and coffee will begin to flow out of the nozzle.
- The coffee maker will stop working automatically (indicators go from pulsing to staying on). At this point,
the coffee is ready. You can remove the cup.
Warning: Do not leave the coffee maker unattended during coffee brewing process as it sometimes requires manual operation.
- After the coffee is ready, remove the filter holder (20) by turning it to the left. Immediately remove the coffee grounds from the filter (18 or 19) and rinse it with hot water. Touch the single-cup coffee / espresso button (10) or the manual coffee dispensing button (11), rinse the outlet with water and install the clean filter holder on the outlet. The machine is ready for the next use.
Warning: When using the product do not touch its hot surfaces with your hands, especially the coffee group outlet and steam nozzle, as this may cause burns.
How to make a good coffee
Coffee grinding and its quality largely determine the quality of coffee. The time to prepare a cup of coffee should be about 25-30s. If the coffee is ground too coarsely, the coffee is brewed in an insufficiently intense way, the taste is weak, the colour is lighter, and the foam is also thin and whiter. If the coffee is ground too finely, the coffee is brewed too intensively, it is too dark and without foam. Good coffee should be brewed from freshly ground coffee beans (use a coffee grinder) and from an adequate quantity of coffee beans. Every time you make coffee from ground coffee, the freshness of the beans is very important. Long storage causes the oil in the coffee beans to decompose.
It is recommended to weigh coffee each time you brew it to be sure of the quantity of ground coffee added. For a single cup we recommend using about 7-9.5 g, for a double cup about 16-16.5 g. You can press the coffee in the filter using the tip in the scoop (17).
The distance between the surface of pressed ground coffee and the edge of the filter holder should be about 3 mm. Too much or too little distance will affect the coffee brewing pressure and outcome.
CAPPUCCINO PREPARATION
- Use a large enough cup to prepare espresso in accordance with the „Coffee preparation" section
- Use fresh cold milk from the fridge (we do not recommend using skimmed milk) and pour 1/3 of the milk into a cup.
Note: We recommend using a stainless steel cup with a diameter of not less than 70 ± 5 mm, as the volume of milk will increase after frothing. - Touch the steam/milk frothing button (12). Preheating will begin. Indicators 10 and 11 will go out, the steam indicator (12) will flash. Than wait until the steam indicator stays on permanently. The preheating process is over.
- Place an empty cup under the steam nozzle (5), turn the steam control knob (3) to the left (counter clockwise) to the maximum position, release a little water through the nozzle, and turn the steam control knob to the right (clockwise) to turn off the steam after it appears.
- Place a stainless steel cup with milk under the steam nozzle (5). Place the steam nozzle under the surface of the milk.
- Turn the steam control knob (3) to the maximum position to froth the milk.
- When the required degree of milk frothing has been reached, turn off the knob. The steam will be stopped. Remove the cup and pour the frothed milk into the prepared espresso. Cappuccino is ready.
Note: When steam stops coming out, immediately clean the frothing nozzle and remove any milk from it to prevent milk foam from settling on the nozzle wall. Due to the high surface temperature of the steam nozzle, care should be taken to avoid burns when operating the product.
EN
HOT WATER PREPARATION
- Place a cup under the steam nozzle (5)
- When all indicators are on, open the steam/hot water control knob (3) and turn it to the maximum position. Hot water will immediately start to flow from the nozzle. During the production of hot water, the single-cup coffee/espresso indicator (10) will pulse.
- When the required amount of hot water is reached, turn the steam knob to the right (clockwise) to the off position. Hot water will stop flowing.
Note: Be careful with hot parts of the product during use. This applies especially to the group head (13), the steel part of the filter holder (20) and the steam nozzle (5). When using the product, do not touch these parts under no circumstances.
CLEANING AND MAINTENANCE
- Before cleaning and maintenance, make sure the machine is switched off and cool.
- Clean stainless steel surfaces with a clean and damp cloth.
Note: Do not use abrasive sponges, alcohol or solvents. - Clean the outlet and seal under the group head with a professional brush.
- Clean the outlet of the steam nozzle and make sure it is not blocked.
- Disconnect the filter holder by turning it to the left and remove any remaining coffee from inside. Then rinse it with clean water.
- Clean all detachable elements in the water and dry thoroughly.
- Clean and dry the drip tray regularly.
- Clean the water tank regularly.
DESCALING
- Lime deposits build up in the product over time, and the descaling process should be carried out approximately every 2-3 months. This is necessary to retain the warranty right.
- Pour water and descaler into the water tank up to the MAXIMUM capacity (the water and descaler ratio should be as stated by the descaler manufacturer). Instead of descaler, you can use citric acid - the water and citric acid ratio should be 100:3).
-
Lock the filter holder (with no ground coffee) in the group head (13). Follow the "Coffee preparation" section
-
Prepare about 150ml of coffee (if you are using the single-cup coffee/espresso button, just make a few cups), and then touch the steam/milk frothing button (12). Prehealing will begin. Open the steam knob after the steam indicator lights up. Let the steam out for about 2 minutes and close the knob.
-
Repeat the steps until the water with the descaler is removed from the tank.
-
Rinse the empty tank and fill it with clean water.
-
Make coffee again (with no ground coffee), repeat the steps from point ,4" three times, and then repeat brewing until there is no water in the tank.
-
Repeat step "6" at least three times to ensure that the pipes are clean.
EN
OPIS WSKAŻNIKÓW
| Single-cup coffee/ espresso button | Manual coffee dispensing button | Steam / milk fro- thing button | Cause Solution | |
| Flashing Flashing Flashing Coffee and hot | water preheating | - | ||
| Lights on Lights on Lights on Coffee and hot | water preheating completed | - | ||
| Pulsating light Lights off Lights off Making single-cup | coffee or water | - | ||
| Lights off Pulsating light Lights off Making double-cup | coffee / manual mode | - | ||
| Lights off Lights off Flashing Steam preheating - | ||||
| Lights off Lights off Lights on Steam preheating | completed | - | ||
| Lights off Lights off Pulsating light Making steam - | ||||
| Lights off Lights off Lights on Steam completed - | ||||
| Flashing quickly Flashing quickly Flashing quickly Temperature sensor | short circuit or open circuit | Please contact authorized service facility for repairs. | ||
| Flashing quickly Flashing quickly Lights off After making steam, | carefully touch the steam switch and check if the temperature is too high. Be careful not to get burned. | Wait until the temperature drops by itself or open the steam button to cool with hot water | ||
| Lights off Lights off Lights off Coffee maker off - | ||||
| Thermal fuse circuit is open. | Please contact authorized service facility for repairs. | |||
| Lights off Pulsating light Lights off Standby mode | enabled | Touch the display switch. | ||
TROUBLESHOOTING
| PROBLEM CAUSE/RESULT SOLUTION | ||
| No water coming out Water tank is Empty | Fill the tank with water | |
| The input voltage or frequency not in compliance with nameplate | Make sure the voltage and frequency is in compliance with the nameplate | |
| Product malfunction | Please contact authorized service | |
| No steam is produced Steam nozzle clogged Clean steam nozzle | ||
EN
| Coffee runs out around the edge of the filter holder (20) | There is ground coffee on the seal under the head | Turn off the product and wait for it to cool down, clean the filter, then put appropriate quantity of ground coffee |
| There is ground coffee on the seal under the head | ||
| After implementing the above actions, the problem does not disappear | Please contact authorized service | |
| Coffee comes out too slow or no coffee comes out | Ground coffee is too fine and blocked the filter | We recommend grinding the coffee more coarsely |
| Filter holes are blocked Clear filter | ||
| Water tank is not in place Place the water tank in place | ||
| Water leakage at the bottom of product | Drip tray is full Clean the drip tray | |
| Product malfunction Please contact authorized service | ||
| Product is not working Power cord is not connected properly | Plug the power cord into a socket properly | |
| There was a short circuit Please contact authorized service | ||
| Product malfunction | ||
| The steam cannot froth milk Steam indicator is not on Wait for the steam in indicator to light up | ||
| Container is too large or its shape is wrong Use a tall and narrow cup or jug | ||
| Skimmed milk was used Use whole milk | ||
PRODUCT DISPOSAL

This product complies with European Directive 2012/19/EU on electrical and electronic devices, known as WEEE (Waste Electrical and Electronic Equipment), provides the legal framework applicable in the European Union for the disposal and reuse of waste electronic and electrical devices. Do not dispose of this product in the bin, instead going to the electrical and electronic waste collection centre closest to your home.
DE
ELIMINAREA PRODUSULUI

B&B TRENDS, S.L. guarantees compliance of this product for the use for which it is intended for a period of two years. In the case of breakdown during the term of this warranty, users are entitled to repair or else the replacement of the product at no charge if the former is unavailable, unless one of these options proves impossible to fulfill or is disproportionate. In this case, you can then opt for a reduction in price or cancellation of the sale, which must be dealt with directly with the sales vendor. This also covers replacement of spare parts provided that the product has been used according to the recommendations specified in this manual for both cases, and has not been tampered with by any third party that is not authorised by B&B TRENDS, S.L. The warranty will not cover any parts subject to wear and tear. This warranty does not affect your rights as a consumer in accordance with the provisions in Directive 1999/44/EC for member states of the European Union.
USE OF WARRANTY
Customers must contact a B&B TRENDS, S.L. authorised Technical Service for repair of the product. Since any tampering of the same by anyone not authorised by B&B TRENDS, S.L., or the careless or improper use of the same shall render this warranty null and void. The warranty must be fully completed and delivered along with the receipt or delivery docket for the effective exercise of rights under this warranty.
This warranty should be retained by the user as well as the invoice, receipt or the delivery docket to facilitate the exercise of these rights. For technical service and after-sales care outside the Polish territory, please submit your query to the point of sale where you purchased the item or check for further aftersales information at www.zeimer.com


- OSTRZEŻENIE
- OPIS
- Theorem 1.2. (Theorem of [10, Theorem 1.1]) Let be a finite field and let (x) be the set of all elements of such that
- PL
- WARNING
- DESCRIPTION
- SAFETY INSTRUCTIONS
- EN
- IMPORTANT WARNINGS
- BEFORE THE FIRST USE (Important)
- Single-cup coffee / espresso button (10)
- Manual coffee dispensing button (11)
- Steam / milk frothing button (12)
- Steam /hot water control knob (3)
- COFFEE PREPARATION
- How to make a good coffee
- CAPPUCCINO PREPARATION
- HOT WATER PREPARATION
- CLEANING AND MAINTENANCE
- DESCALING
- PRODUCT DISPOSAL
- DE
- ELIMINAREA PRODUSULUI
- USE OF WARRANTY
Brand : Zelmer
Model : ZCM7295
Category : Coffee maker