
ALTA DA300 - Iron Eldom - Free user manual and instructions
Find the device manual for free ALTA DA300 Eldom in PDF.


| Type | Steam iron |
| Brand | Eldom |
| Model | ALTA DA300 |
| Power | 2400 W |
| Voltage | 220-240 V, 50 Hz |
| Steam rate | 50 g/min (jet) |
| Steam pressure | 2.5 bar |
| Water tank capacity | 1.2 L |
| Soleplate material | Ceramic |
| Continuous steam | Yes, with button |
| Shot of steam | Yes, powerful burst |
| Vertical steaming | Yes |
| Iron lock | Yes, for storage |
| Cord storage | Yes, pocket in base |
| Anti-calc filter | Yes, removable and cleanable |
| Dry ironing | Yes, without water |
| Safety | Earth pin, overheat protection (indicator light) |
| Cleaning | Wipe with damp cloth, descale filter with vinegar |
Frequently Asked Questions - ALTA DA300 Eldom
User questions about ALTA DA300 Eldom
0 question about this device. Answer the ones you know or ask your own.
Ask a new question about this device
Download the instructions for your Iron in PDF format for free! Find your manual ALTA DA300 - Eldom and take your electronic device back in hand. On this page are published all the documents necessary for the use of your device. ALTA DA300 by Eldom.
USER MANUAL ALTA DA300 Eldom
natural_image
Exterior view of a white steam iron with visible brand logo and control buttons (no text or symbols on main body)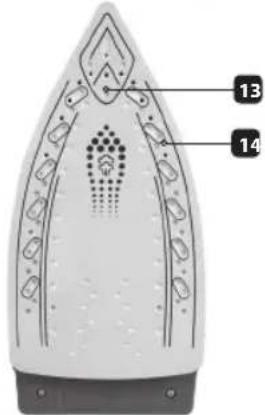
natural_image
3D rendered mechanical component with labeled parts (15 and 16), no readable text or symbols beyond labelsrys.1
natural_image
Close-up of a mechanical component with curved surfaces and a flat top (no visible text or symbols)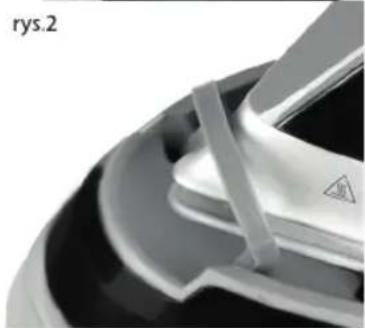
natural_image
Close-up of a metallic mechanical component with a clamping tool, no visible text or symbolsnatural_image
3D mechanical component diagram showing a piston-like structure before and after assembly, with no visible text or symbols.- Read thoroughly this manual before the first use of the unit.
- The appliance is intended for household use only.
- Before connecting the appliance to the mains, make sure that the data on its plate correspond with the parameters of the network.
- ATTENTION! Connect the appliance to the socket with the earth pin.
- Always disconnect the appliance from the mains pulling the plug, and not the power supply cord.
- Do not use the appliance without water in the tank.
- Tap water may be used for the appliance. If water is very hard, scale may quickly deposit; use distilled water instead.
- Do not add perfume, vinegar, descaling agents, agents that facilitate ironing or other chemicals, as this product is not suitable for adding chemicals.
- To store the appliance, first wait 60 minutes for it to completely cool down and empty water from the reservoir.
- Pull out the plug before cleaning or filling in the appliance with water.
- The appliance must not be left without supervision when plugged in to the mains.
- Contact with hot steam may cause burns. Be extremely careful while operating the steamer.
- Do not allow the steam nozzle to contact any surface.
- Prevent contact of the power cord with hot steam when using the steamer.
- The power cord should never be close to any source of heat.
- This appliance may be used by children of at least 8 years old and by persons with reduced physical and mental capacity and persons with no experience and knowledge of the equipment if the supervision or
instruction is provided for use of the equipment in a safe way, so that the related hazards are understandable. Children should not play with the appliance. Children without supervision should not clean and maintain the appliance.
-
Do not leave children unattended near the appliance.
-
Do not use in open air.
-
Do not immerse the cord or the appliance in water.
-
The appliance should not be used if there are visible damages or water leaks out of it.
-
The appliance must not be used with a damaged power cord. If the power cord is damaged, it must be replaced by the Service of the Manufacturer to prevent hazardous situations.
-
Only an authorised service facility can repair the equipment (see the list in the annex and in the website: www.eldom.eu).
-
Any modernisations or using non-original spare parts or elements of the appliance is forbidden and compromises safety of its use.
-
NOTE: Steam coming out from the appliance is hot. Danger of scalding or burning.
-
Before attaching or removing the brush, always disconnect the appliance from the mains. Be cautious: the steam nozzle may still be hot.
-
Eldom Sp. z o.o. shall not be responsible for any damages resulting from improper use of the appliance.

This symbol is a warning against the high temperature of the appliance surface.
EN
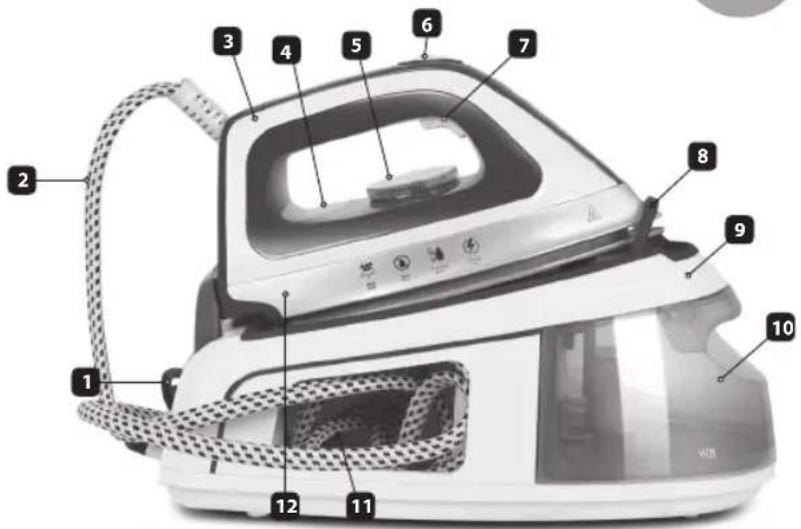
- Power cord
- Steam cord
- Handle
- Indicator light
- Temperature dial
- Continuous steam button
- Shot of steam button
- Iron lock
- Main house
- Water tank
- Cord pocket
- Iron
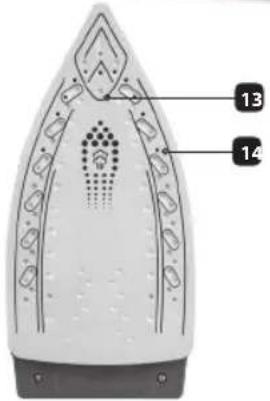
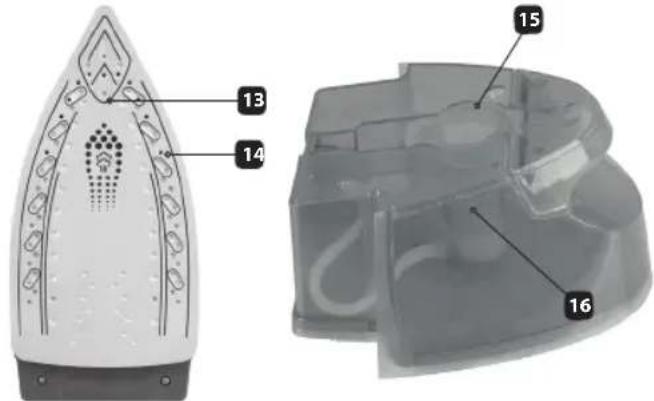
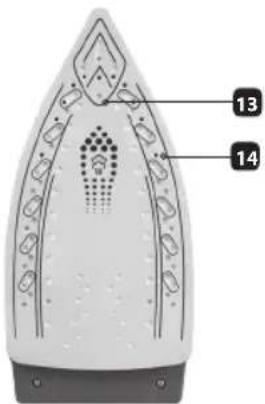
- Soleplate
- Steam holes
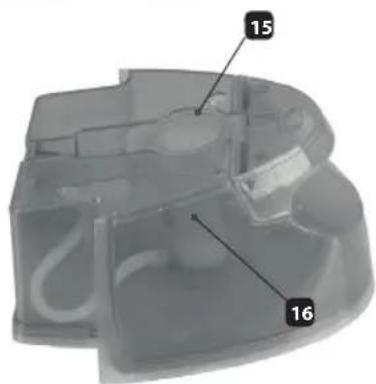
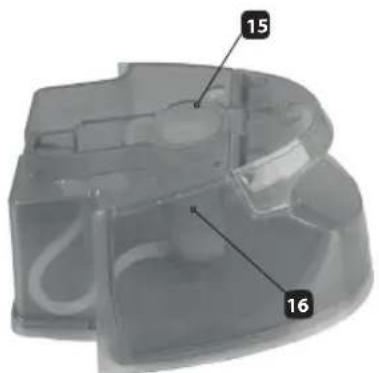
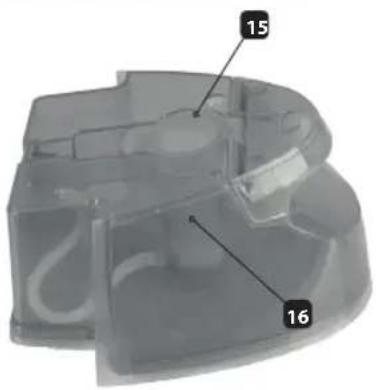
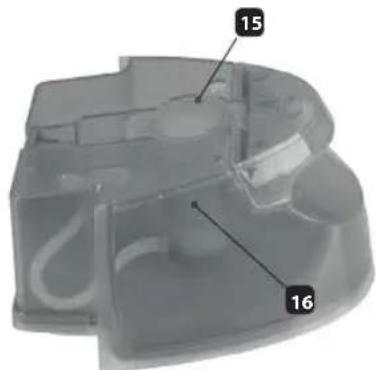
- Water inlet
- Limescale filter
TECHNICAL DATA
- power: 2400 W
- supply voltage: 220-240V, \~ 50Hz
- steam jet: 50 g / min
- steam pressure: 2,5 bar
GETTING STARTED
Before using the iron for the first time, fully unwind the power cord (1) and the steam cord (2).
You may notice an odour from the unit on first use. This is normal and will cease after a short period of time.
Place the unit on a stable, hard, horizontal and heat-resistant surface.
Do not place the device on an ironing board cover or soft surface.
The main house (9) must at all times be positioned underneath the iron (12). Otherwise, the steam will not be able to reach the iron (12) freely.
Make sure that the device is unplugged and cold, the temperature dial (5) is on "MIN" and the continuous steam button (6) is on "W".
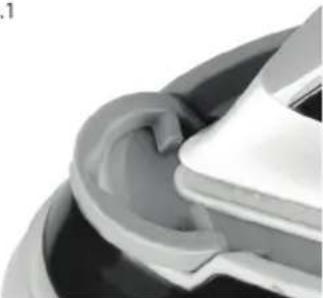
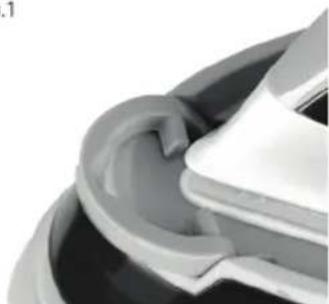
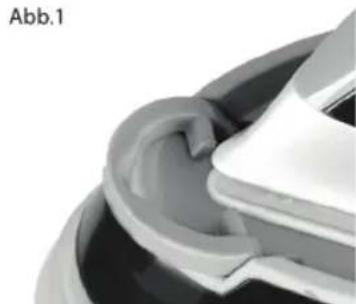
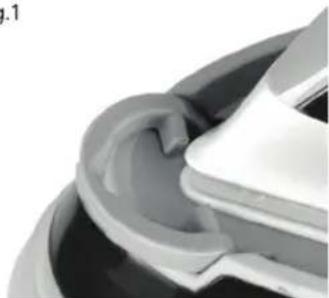
Make sure that the iron (12) is not locked - Fig. 1
When using the unit for the first time, iron a piece of cloth to make sure that the device is working properly.
Do not use steam on the first use.
Caution: The soleplate (13) heats up very quickly but takes longer to cool down. Take care not to touch the hot soleplate.
Fig.1
natural_image
Close-up of a mechanical component with curved surfaces and a flat top (no visible text or symbols)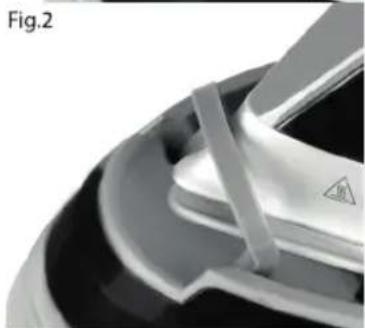
natural_image
Close-up of a car's side profile showing the roof and window (no text or symbols visible)FILLING THE WATER TANK
The device is designed to be used with normal tap water. In hard water areas it is recommended to use distilled water.
Warning: Do not fill the tank (10) with hot water.
Warning: Never put descaling, fragrant, alcohol-based or detergent products in the device, as this may damage the device or make it unsafe to use.
Turn the temperature dial to "MIN" and remove the plug from the mains socket.
Remove the water tank (10) from the main house (9).
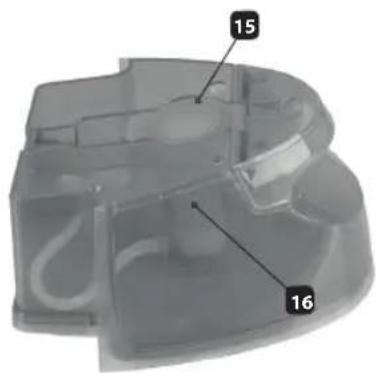
Open the water inlet (15) and fill the tank with a maximum of 1.2 litres of water using a jug, ensuring you do not exceed the MAX fill line.
Close the water inlet (15) and slide the tank (10) back into the main house (9).
CAUTION. Exert caution when filling the tank (10) during ironing.
NOTE: Before you remove the tank (10) from the main house (9) and open it make sure there is no steam inside. To do so, press the shot of steam button (7) until no more steam escapes.
Then follow the instructions above.
TEMPERATURE SETTING
Always refer to the garment manufacturer's recommendations for the correct temperature setting. If the type of the fabric is unknown, start with the lowest temperature and increase it gradually until a satisfactory result is reached.
To increase the temperature, turn the temperature dial (5) clockwise until the desired temperature is selected. To reduce the temperature, turn the temperature dial (5) counter clockwise.
Once the indicator light (4) has stopped flashing, the unit is ready for use.
The temperature dial will maintain the selected temperature, which will be indicated by the indicator light turning on and off (4).
STEAM IRONING
Caution: Avoid touching the steam cord (2) when the device is in use, as it gets hot.
Caution: The steam ejecting from the steam holes (14) is hot. Contact can result in burns.
Steam ironing is only possible when the temperature setting is high; the temperature dial must be on "ooo".
- Place the unit on a stable, hard, horizontal and heat-resistant surface.
- Fill the tank (10) according to the instructions in the "FILLING THE WATER TANK" section.
- Make sure that the iron (12) is not locked - Fig.2
- Plug the unit into a power point according to the parameters specified on the device.
- Set the required temperature as recommended in the "TEMPERATURE SETTING" section.
- Once the indicator light (4) has stopped flashing, the unit is ready for use.
- Steam ironing:
- steam shot - you can use the shot of steam button (7) to instantly produce a powerful shot of steam. The steam will be ejected as long as the button is pressed. Releasing the button will stop the steam from escaping.
- continuous steam - to enable the continuous steam function, set (6) on "W", to disable steaming, turn the continuous steam button (6) to "W".
- Once you have finished ironing, turn (6) to "W" and the temperature dial (5) to "MIN" and unplug the unit from the power point.
Caution: When not in use, the iron (12) should rest on the main house (9).
Warning: Avoid a long period of ironing on one specific area, as this may cause damage to the fabric.
VERTICAL STEAMING
- Hold the iron (12) about 20 cm away from the garment, then press and hold the shot of steam button (7) or turn the continuous steam button (6) to "
- Move the iron (12) up and down in front of the garment without touching it with the soleplate (13). To smooth out creases in garments, work in short series.
■ IRONING WITHOUT STEAM
To iron without steam you do not need to fill the steam tank (10).
- Place the unit on a stable, hard, horizontal and heat-resistant surface.
- Make sure that the device is unplugged and cold, the temperature dial (5) is on "MIN" and the continuous steam button (6) is on "W".
- Make sure that the iron (12) is not locked - Fig. 1
- Plug the unit into a power point according to the parameters specified on the device.
- Set the required temperature as recommended in the "TEMPERATURE SETTING" section.
- Once the indicator light (4) has stopped flashing, the unit is ready for use.
- Once you have finished ironing, turn the temperature dial (5) to "MIN" and unplug the unit from the power point.
| Rodzaj tkaniny Ustawienia temperatury Funkoja parowania | ||
| Nylon, synthetic fabrics (e.g. acrylic, viscose, polyamide, polyester ...), silk, etc. | O | NO |
| Wool OO NO | ||
| Cotton, bed linen OOO YES |
■ IRON LOCKING MECHANISM
The device has a locking mechanism which keeps the iron safely in place when stored or in transport.
CAUTION. Before storage or transport ensure the unit is turned OFF (temperature dial in "MIN"), unplugged from the power point and cold. The water tank (10) must be empty.
- Place the iron (12) in the main house (9) and lock it (8) - Fig. 1.
- Before next use, the iron needs to be unlocked - Fig. 2.
CLEANING AND MAINTENANCE
Before cleaning the appliance, remove the plug from the socket and wait for the appliance to cool down completely.
- The appliance must not be Fig.3 immersed in water.
- It must not be cleaned with sharp, abrasive cloth or sponges, as it may be destroyed.
- Wipe the appliance with a moist cloth, and then wipe it dry with a clean cloth.
- Slide out the reservoir and pour out water from it.
natural_image
3D rendered mechanical component before and after assembly, showing internal components and motion arrows (no text or symbols)Anti-Calc FILTER
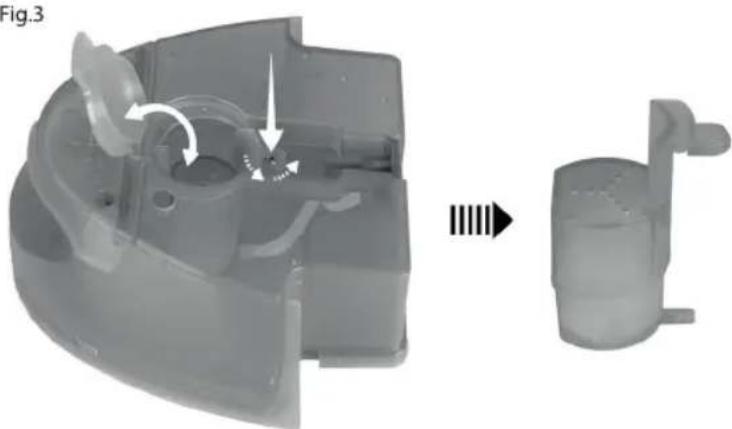
The unit is fitted with an anti-calc filter (16) preventing limescale in the water tank (10).
The filter (16) should be cleaned every 2-4 weeks, depending on the frequency of use and hardness of water in the area.
- Remove the tank (10) from the main house (9) and then remove the filter (12) - Fig. 3.
- Soak the filter (16) in white vinegar for at least 4 hours.
- Then rinse the filter (16) with tap water and install it in the tank (10).
- Install the tank (10) in the main house (9).
STORAGE
- Before storage, turn the device off (temperature dial on "MIN"), unplug from the power point and check if it has cooled down.
- The water tank (10) must be empty and the device dry.
- Place and lock the iron (12) on the main house (9) - Fig. 2.
- The power cord (1) and steam cord (2) can be coiled and placed in the pocket (11).
NOTE. Do not coil the power cord (1) and the steam cord (2) too tightly, as this may lead to damage.
- Store in a cool and dry place.
| Problem Possible cause Solution | ||
| The iron (12) does not heat up. The temperature indicator (4) is off | The device is not plugged in to a power point. | Plug the unit into a power point according to the parameters specified on the device and set the temperature with the dial (5). |
| The temperature dial has not been rotated to the desired setting (the temperature is too low). | Use the dial (5) to adjust the temperature to the requirements for the fabric ironed. | |
| The fuse has blown. Contact the servicing department. | ||
| No steam is being produced The steaming function is off. Turn on the steaming function. | ||
| The soleplate (13) is dripping water | Water has condensed inside the ceramic soleplate. | Wait for the iron to heat up. |
| There is a buzzing sound in the steam cord (2) | The steam cord (2) is tangled. Untangled the steam cord (2). | |
| The main house (9) is positioned higher than the iron (12) | Reposition the main house (9) so that the iron (12) is at all times positioned higher. | |
ENVIRONMENTAL PROTECTION
- The appliance is made of materials which can be recycled.
- It should be handed over to the applicable collection point for the recycling of electrical and electronic equipment.
WARRANTY
- This appliance is designed for domestic use only.
- It cannot be used for professional purposes or for other than the intended use.
- Improper use will nullify the guarantee
BEZPEČNOSTNÍ DOPORUČENÍ
natural_image
3D rendered mechanical component with labeled parts (15 and 16), no readable text or symbols beyond labelsPOUŽÍVÁNÍ PŘÍSTROJE
natural_image
Close-up of a mechanical component with curved surfaces and a dark base (no visible text or symbols)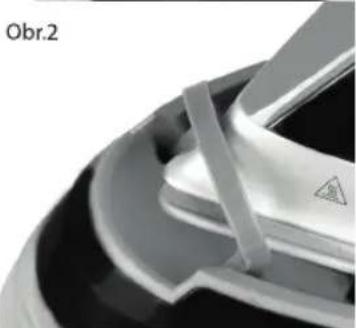
natural_image
Close-up of a car wheel rim with a warning symbol and label 'Obr.2' (no other text or symbols visible)natural_image
3D rendered mechanical component with internal parts and directional arrows, no visible text or symbolsSKLADOVÁNÍ
natural_image
Close-up of a mechanical component with curved surfaces and a dark base (no visible text or symbols)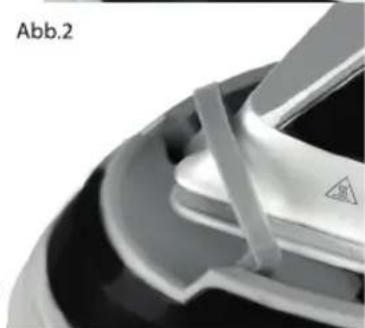
natural_image
Close-up of a car's front wheel and side panel (no visible text or symbols)BEFÜLLEN DES WASSERTANKS MIT WASSER
natural_image
3D mechanical component diagram showing a piston assembly and its side view with internal flow arrows (no text or symbols)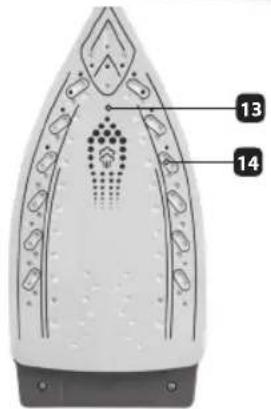
natural_image
3D rendered mechanical component with numbered annotations (15 and 16), no readable text or symbols beyond labelsnatural_image
Close-up of a mechanical component with curved surfaces and a textured base (no visible text or symbols)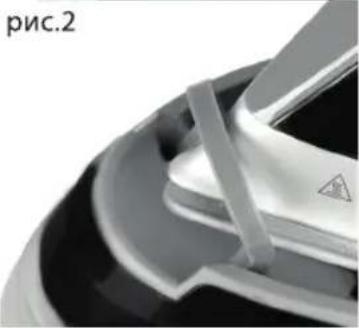
natural_image
Close-up of a white plastic component with a triangular warning symbol, no visible text or symbolsnatural_image
3D mechanical component diagram showing a piston assembly and its side view (no text or symbols)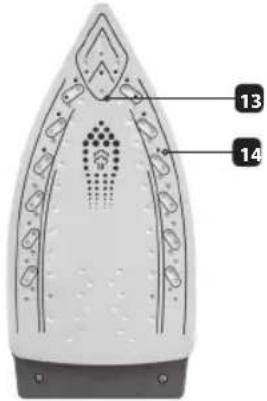
natural_image
3D rendered mechanical component with numbered annotations (15 and 16), no readable text or symbols beyond labels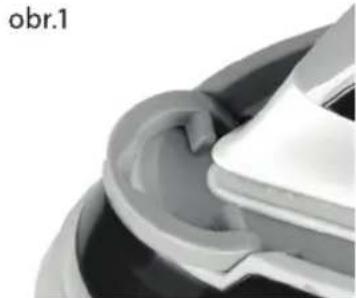
natural_image
Close-up of a mechanical component with curved surfaces and a white top (no visible text or symbols)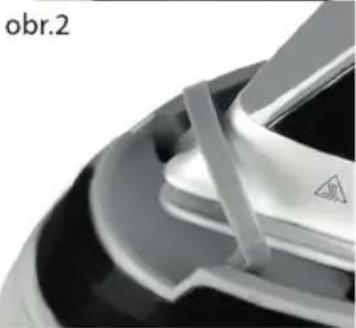
natural_image
Close-up of a car's side profile showing the roof and window (no text or symbols visible)ŽEHLENIE S POUŽITÍM PARY
natural_image
3D mechanical component diagram showing a housing with internal tubing and a side view of a cylindrical housing (no text or symbols)UCHOVÁVANIE
- Predtým, ako zariadenie odložíte, najprv ho vypnite (termostat na polohe „MIN”), odpojte od el. napätia a skontrolujte, či je už vychladnuté.
natural_image
3D rendered mechanical component with labeled parts (15 and 16), no readable text or symbols beyond labels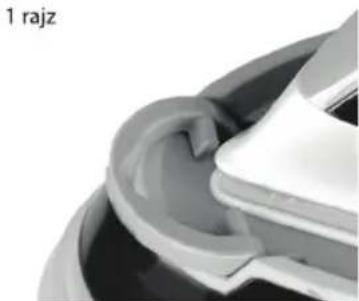
natural_image
Close-up of a mechanical component with a curved surface and a white top (no visible text or symbols)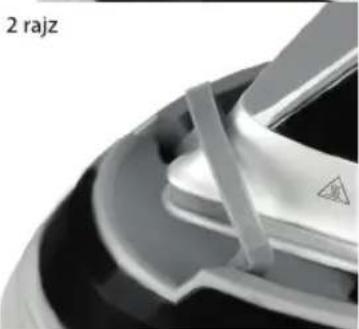
natural_image
Close-up of a car's side profile showing the roof and seat (no text or symbols visible)A VÍZTARTÁLY VÍZZEL TÖRTÉNŐ FELTÖLTÉSE
natural_image
3D rendering of a mechanical device with internal components and directional arrows indicating motion (no text or symbols)Anti-Calc SZÜRÖ
Fig.1
natural_image
Close-up of a mechanical component with curved surfaces and a flat top (no visible text or symbols)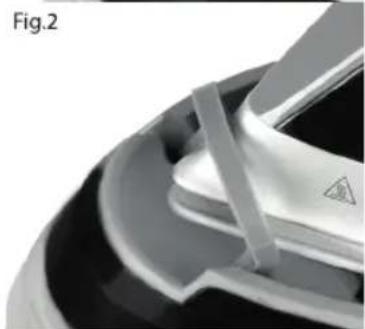
natural_image
Close-up of a car's side profile showing the roof and seat (no text or symbols visible)natural_image
3D mechanical component diagram showing a disassembly process with arrows indicating motion and structural changes (no text or symbols)
- EN
- TECHNICAL DATA
- GETTING STARTED
- The main house (9) must at all times be positioned underneath the iron (12). Otherwise, the steam will not be able to reach the iron (12) freely.
- FILLING THE WATER TANK
- TEMPERATURE SETTING
- STEAM IRONING
- VERTICAL STEAMING
- ■ IRONING WITHOUT STEAM
- ■ IRON LOCKING MECHANISM
- CLEANING AND MAINTENANCE
- Anti-Calc FILTER
- STORAGE
- NOTE. Do not coil the power cord (1) and the steam cord (2) too tightly, as this may lead to damage.
- ENVIRONMENTAL PROTECTION
- WARRANTY
- BEZPEČNOSTNÍ DOPORUČENÍ
- POUŽÍVÁNÍ PŘÍSTROJE
- SKLADOVÁNÍ
- BEFÜLLEN DES WASSERTANKS MIT WASSER
- ŽEHLENIE S POUŽITÍM PARY
- UCHOVÁVANIE
- A VÍZTARTÁLY VÍZZEL TÖRTÉNŐ FELTÖLTÉSE
- Anti-Calc SZÜRÖ
Brand : Eldom
Model : ALTA DA300
Category : Iron