CM1001D - Coffee maker Zelmer - Free user manual and instructions
Find the device manual for free CM1001D Zelmer in PDF.

| Product Type | Filter Coffee Machine (Drip Coffee Maker) |
| Model | Zelmer CM1001D |
| Water Tank Capacity | 1.8 L (max. 12 cups) |
| Dimensions (Approx.) | 320 x 260 x 380 mm (estimated) |
| Weight (Approx.) | 2.5 kg (estimated) |
| Power Supply | 220-240 V ~ 50/60 Hz, 1050 W (typical) |
| Cord Length | Adjustable via storage compartment (approx. 0.8 m) |
| Material | Plastic housing, glass carafe |
| Control Panel | Digital display with buttons: HOUR, MIN, PROG, AUTO, 2-4 CUPS, strength, ON/OFF, AUTO CLEAN, AUTO OFF |
| Brewing Functions | Regular brew, strong brew, 2-4 cup slow brew, delayed start (up to 24h), keep warm (1-4 h adjustable) |
| Special Features | Sneak-A-Cup® (pause & serve), permanent nylon filter, charcoal water filter, auto shut-off |
| Filter Type | #4 cone paper filter or permanent nylon filter (included) |
| Water Filtration | Charcoal filter (replace every 60 brews or 2 months) |
| Descaling | Automatic cleaning cycle with vinegar or citric acid solution |
| Safety Features | Auto shut-off after keep warm, overheat protection (internal), grounded plug |
| Cleaning & Maintenance | Detachable filter holder, removable carafe lid, wipe exterior with damp cloth; descale every 4-6 months |
| Certifications | CE, LVD, EMC directives compliant |
| Warranty | Standard 2-year manufacturer warranty (check local terms) |
| Spare Parts Availability | Carafe, filter holder, water filter, permanent filter available from Zelmer service centers |
Frequently Asked Questions - CM1001D Zelmer
User questions about CM1001D Zelmer
0 question about this device. Answer the ones you know or ask your own.
Ask a new question about this device
Download the instructions for your Coffee maker in PDF format for free! Find your manual CM1001D - Zelmer and take your electronic device back in hand. On this page are published all the documents necessary for the use of your device. CM1001D by Zelmer.
USER MANUAL CM1001D Zelmer
natural_image
Black and white photo of a Zeimer air fryer with digital display, accompanied by two coffee cups and a tray (no visible text or symbols on main objects)| [6HBG] | INSTRUKCJA UŻYTKOWANIAEKSPRES PRZELEWOWYTyp CM1001D 2–14 | HU HASZNÁLATI UTASÍTÁSÁTFOLYÓS KÁVÉFŐZŐCM1001D Típus 41–53 | BG ИНСТРУКЦИЯ ЗА УПОТРЕБАПРЕЛИВНА ЕСПРЕСО-МАШИНА Тип CM1001D 80–92 |
 | NÁVOD K OBSLUZEKÁVOVARTyp CM1001D 15–27 | RO INSTRUCTIUNI DE UTILIZAREFILTRU DE CAFEATíp CM1001D 54–66 | UA ІНСТРУКЦІЯ З КОРИСТУВАННЯКРАПЕЛЬНА КАВОВАРКА-ЭКСПРЕС Тип CM1001D 93–105 |
 | NÁVOD NA OBSLUHUPRELIEVACÍ KÁVOVARTyp CM1001D 28–40 | RU ИНСТРУКЦИЯ ПО ЭКСПЛУАТАЦИИКАПЕЛЬНАЯ КОФЕВАРКА-ЭКСПРЕСС Тип CM1001D 67–79 | EN USER MANUALFILTER COFFEE MACHINEType CM1001D 106–118 |
natural_image
Hand pouring water from a glass coffee maker with a hand holding a spoon (no text or symbols visible)natural_image
Hand pouring liquid into a black square water tower (no text or symbols visible)natural_image
Close-up of a hand pressing down on a black square kitchen air conditioner cover (no text or symbols visible)natural_image
Hand pressing down on a black air fryer device with a circular label (no visible text or symbols)natural_image
Hand inserting a coffee maker into a clear glass, showing the lid and control panel (no text or symbols visible)natural_image
Close-up of a hand holding a small electronic device with a power plug, next to a cylindrical device (no visible text or symbols)natural_image
Hand washing a water tap with a black bandage (no text or symbols visible)natural_image
Hand holding a black cable with an open electrical outlet, next to a dark device (no text or symbols visible)natural_image
Close-up of hands holding a black butterfly-shaped object with scissors, no visible text or symbolsnatural_image
Close-up of hands using a black-handled tool to cut a white object, with a checkered pattern on the handle (no text or symbols visible)natural_image
Close-up of hands using a black tool to adjust a small object, with an arrow indicating rotation (no text or symbols visible)natural_image
Close-up of a hand adjusting a black mechanical component with a gear mechanism (no visible text or symbols)natural_image
Hand holding a plug with a cable, next to an open electrical outlet (no text or symbols visible)natural_image
Hand placing a lid on a black appliance with a circular control panel and indicator lights (no visible text or symbols)natural_image
Hand pouring water from a glass coffee maker with a hand holding a spoon (no text or symbols visible)natural_image
Hand pouring liquid into a black electric cooker (no text or symbols visible)natural_image
Hand pressing a black Kettminder coffee maker with a hand adjusting its lid (no visible text or symbols)natural_image
Hand pouring liquid into a black coffee maker with a lid, showing a white arrow indicating the process (no text or symbols visible)natural_image
Hand using a black blender to add liquid into a container (no text or symbols visible)natural_image
Close-up of a hand pouring food into an air fryer with a spoon (no visible text or symbols)natural_image
Hand pressing down on a black rectangular device with a circular control panel (no visible text or symbols)natural_image
Hand holding a black plug with a power outlet, next to a battery cover (no text or symbols visible)natural_image
Hand pressing down on a black square appliance with a circular dial, showing a curved arrow indicating rotation (no text or symbols visible)natural_image
Hand pouring liquid into a clear glass coffee maker (no text or symbols visible)natural_image
Hand pouring liquid into a black air fryer with a spoon (no visible text or symbols)NALEWANIE BEZPOŚREDNIE (Sneak-A-Cup®)
natural_image
Hand pouring liquid into a clear glass coffee maker using a portable kitchen (no text or symbols visible)natural_image
Hand pouring liquid into a black industrial container with a downward arrow indicating flow (no text or symbols visible)natural_image
Hand opening a black coffee maker with a digital display, showing the lid and control panel (no visible text or symbols)natural_image
Hand pouring water from a glass coffee maker with a metal faucet (no text or symbols visible)natural_image
Hand pouring liquid into a black coffee maker (no text or symbols visible)natural_image
Close-up of a hand pressing down on a black square kitchen air conditioner cover (no text or symbols visible)natural_image
Close-up of a hand using a black blender with a handle, showing the lid and spout (no text or symbols visible)⑦ Uzavřete víko.
natural_image
Hand pressing down on a black rectangular device with a circular label and arrow indicating rotation (no visible text or symbols)natural_image
Hand inserting a coffee maker into a clear glass, showing the lid and control panel (no text or symbols visible)natural_image
Close-up of a hand holding a small electronic device with a power plug, next to a cylindrical device (no visible text or symbols)natural_image
Hand washing a bag with a faucet above it (no text or symbols visible)natural_image
Hand holding a black cable with a power outlet, next to a dome-shaped object (no text or symbols visible)natural_image
Close-up of hands holding a small black object with scissors, possibly a butterfly or plant (no text or symbols visible)natural_image
Close-up of hands using a black-handled tool to cut a white object, with a checkered pattern on the end (no text or symbols visible)natural_image
Close-up of hands using a black-handled tool to adjust a small object, with an arrow indicating rotation (no text or symbols visible)natural_image
Close-up of a hand adjusting a mechanical component with visible gears and shafts (no text or symbols)natural_image
Hand holding a plug inserted into an electrical outlet, with a device on the ground nearby (no text or symbols visible)natural_image
Hand placing a lid on a black appliance with a circular control dial, showing no visible text or symbols.natural_image
Hand pouring liquid into a glass coffee maker with a handle, no text or symbols visiblenatural_image
Hand pouring liquid into a black electric cooker (no text or symbols visible)natural_image
Hand pressing a black Zatimaker with a hand adjusting its lid (no visible text or symbols)natural_image
Hand pouring liquid into a black coffee maker with a lid, showing a downward arrow (no text or symbols visible)natural_image
Hand using a black blender to add liquid into a container (no text or symbols visible)natural_image
Close-up of a hand pouring food into an air fryer with a spoon (no visible text or symbols)natural_image
Hand pressing down on a black square appliance with a circular control panel (no visible text or symbols)natural_image
Hand holding a black plug with a cable, next to an open electrical outlet (no text or symbols visible)natural_image
Hand pressing down on a black square appliance with a circular control dial (no visible text or symbols)natural_image
Hand pouring liquid into a black coffee maker (no text or symbols visible)natural_image
Hand pouring liquid into an air fryer oven (no text or symbols visible)natural_image
Hand pouring liquid into a black coffee maker with a clear lid (no text or symbols visible)natural_image
Hand placing a lid into a black appliance with a white arrow indicating the process (no text or symbols visible)natural_image
Hand opening a coffee maker with a glass lid, showing the interior and handle (no text or symbols visible)natural_image
Hand pouring liquid into a glass coffee maker with a handle, no text or symbols visiblenatural_image
Hand pouring liquid into a black coffee maker (no text or symbols visible)⑤ Do spotrebiča nasadte fi Itračnú násadu.
natural_image
Hand placing a black lid into a black coffee maker with a white arrow indicating the process (no text or symbols visible)natural_image
Hand pouring liquid into a black blender with a handle, no visible text or symbols⑦ Zatvorte veko.
natural_image
Hand pressing down on a black rectangular device with a circular label and arrow indicating rotation (no text or symbols visible)natural_image
Hand inserting a coffee maker into a digital display case (no visible text or symbols)natural_image
Hand holding a tool near a cylindrical object with a downward arrow indicating motion (no text or symbols visible)natural_image
Hand washing a black-and-white striped soap film with a metallic faucet above (no text or symbols visible)⑫ Vypnite espresso, odpojte ho od zdroja napätia, aby mohol vychladnút.
natural_image
Hand holding a black cable with an arrow pointing to an electrical outlet (no text or symbols visible)natural_image
Close-up of hands holding a black plastic tool with a small object nearby (no text or symbols visible)natural_image
Close-up of hands using a black-handled tool to cut a white object with a checkered pattern (no text or symbols visible)natural_image
Close-up of hands using a black tool to adjust a small object, with an arrow indicating rotation (no text or symbols visible)natural_image
Close-up of a hand adjusting a black mechanical component with visible gears and shafts (no text or symbols)natural_image
Hand holding a plug with a power outlet, next to a black dome-shaped object (no text or symbols visible)natural_image
Hand placing a lid on a black appliance with a circular control dial, showing no visible text or symbols.natural_image
Hand pouring water from a glass coffee maker with a spoon, no text or symbols visiblenatural_image
Hand pouring liquid into a black electric oven with a clear glass container (no text or symbols visible)natural_image
Hand inserting a coffee maker into a black kettle, no visible text or symbols on the device itselfnatural_image
Close-up of a hand pressing down on a black coffee maker's lid with a downward arrow indicating compression (no text or symbols visible)natural_image
Hand pouring liquid into a black blender with a downward arrow indicating the process (no text or symbols visible)natural_image
Close-up of a hand pouring granular powder into an air fryer oven (no visible text or symbols)natural_image
Hand pressing down on a black square appliance with a circular control dial (no visible text or symbols)natural_image
Hand holding a black plug inserted into a wall socket, with an arrow indicating the electrical outlet (no text or symbols visible)natural_image
Hand pressing down on a black rectangular device with a circular dial and 'POT' label (no text or symbols on device)⑮ Espresso udržiava stálu teplotu pripravenej kávy po dobu 1-4 hodín, po ktorej uplynutí sa spotrebič automaticky vypne. (Pozri kapitolu UDRŽIAVANIE TEPLOTY KÁVY – FUNKCIA AUTO OFF).

natural_image
Hand pouring liquid into a black coffee maker (no text or symbols visible)natural_image
Hand pouring liquid from a black air fryer into a square oven (no text or symbols visible)
natural_image
Hand pouring liquid into a clear glass coffee maker using a black electric stove (no text or symbols visible)② Do spotrebiča nasadte fi Itračnú násadu. Zatvorte veko.
natural_image
Hand placing a black lid into a black oven with a white arrow indicating the process (no text or symbols visible)natural_image
Hand inserting a coffee maker into a digital coffee receiver (no visible text or symbols)natural_image
Hand pouring water from a glass coffee maker with a metal faucet (no text or symbols visible)natural_image
Hand pouring liquid into a black coffee maker (no text or symbols visible)natural_image
Close-up of a hand pressing down on a black coffee maker's lid with a white arrow indicating the process (no text or symbols visible)natural_image
Hand pressing down on a black rectangular device with a circular label and arrow indicating rotation (no visible text or symbols)natural_image
Hand inserting a coffee maker into a clear glass container, no visible text or symbols on the device itselfnatural_image
Close-up of a hand holding a small electronic device with a black cable, next to a dark cylindrical device (no visible text or symbols)natural_image
Hand washing a black-and-white striped band with a metallic faucet above (no text or symbols visible)natural_image
Hand holding a black cable with an arrow pointing to a white electrical outlet (no text or symbols visible)natural_image
Close-up of hands holding a black plastic tool with a small object nearby (no text or symbols visible)natural_image
Close-up of hands using a black-handled tool to cut a white object with a checkered pattern (no text or symbols visible)natural_image
Close-up of hands using a black adjustable tool to adjust a small object, with an arrow indicating rotation (no text or symbols visible)natural_image
Close-up of a hand adjusting a black mechanical component with visible gears and shafts (no text or symbols)natural_image
Hand holding a plug with a power outlet, next to a dome-shaped device (no text or symbols visible)natural_image
Hand placing a lid on top of a black appliance with a circular control panel (no visible text or symbols)natural_image
Hand pouring liquid into a glass coffee maker with a spoon, no text or symbols visiblenatural_image
Hand pouring liquid into a black electric cooker (no text or symbols visible)natural_image
Hand operating a Zelnifer coffee maker with a black lid and control panel (no visible text or symbols on the device itself)natural_image
Hand pouring liquid into a black coffee maker with a lid, showing a downward arrow (no text or symbols visible)natural_image
Hand pouring liquid into a black industrial machine (no text or symbols visible)natural_image
Close-up of a hand pouring food into an air fryer with a spoon (no visible text or symbols)natural_image
Hand pressing down on a black rectangular device with a circular control dial (no visible text or symbols)natural_image
Hand holding a black cable with an arrow pointing to an electrical outlet (no text or symbols visible)natural_image
Hand pressing down on a black square appliance with a circular control dial (no visible text or symbols)natural_image
Hand pouring liquid into a black coffee maker (no text or symbols visible)natural_image
Hand pouring food into an air fryer (no visible text or symbols)
natural_image
Hand pouring liquid into a black coffee maker with a clear glass lid (no text or symbols visible)natural_image
Hand placing a black lid into a kitchen appliance with a white arrow indicating the component (no text or symbols visible)natural_image
Hand inserting a coffee maker into a clear glass container (no text or symbols visible)natural_image
Hand pouring liquid into a clear glass coffee maker with a handle, no text or symbols visiblenatural_image
Hand pouring liquid into a black coffee maker (no text or symbols visible)natural_image
Hand placing a lid into a black square oven on a digital kitchen (no text or symbols visible)natural_image
Hand pressing down on a black rectangular device with a circular label and arrow indicating rotation (no visible text or symbols)natural_image
Hand inserting a coffee maker into a digital display case (no visible text or symbols)natural_image
Close-up of a hand holding a small electronic device with a black connector, next to a cylindrical device (no visible text or symbols)natural_image
Hand washing a glass-colored soap can with a metal faucet (no text or symbols visible)natural_image
Hand holding a black cable connected to an electrical outlet (no text or symbols visible)natural_image
Close-up of hands holding a black butterfly-shaped object with scissors, no visible text or symbolsnatural_image
Close-up of hands using a black plastic tool to cut a white object, with a checkered pattern on the handle (no text or symbols visible)natural_image
Close-up of hands using a tool to adjust a mechanical component, showing a curved arrow indicating rotation (no text or symbols visible)natural_image
Close-up of a hand inserting a plastic component into a black plastic housing (no text or symbols visible)natural_image
Hand holding a plug with a cable, next to an open electrical outlet (no text or symbols visible)natural_image
Hand placing a lid on a black appliance with a circular control panel, showing no visible text or symbols.natural_image
Hand pouring liquid from a glass coffee maker into a water tap, with no visible text or symbolsnatural_image
Hand pouring liquid into a black electric cooker (no text or symbols visible)natural_image
Hand operating a Zelnifer coffee maker with a black lid and control panel (no visible text or symbols on the device itself)i ^A
natural_image
Hand pouring liquid into a black coffee maker with a lid, showing a white arrow indicating the process (no text or symbols visible)natural_image
Hand using a black blender to add liquid into a container (no text or symbols visible)natural_image
Close-up of a hand pouring liquid from a black air fryer into a container, with no visible text or symbols.i
natural_image
Hand pressing down on a black rectangular device with a circular control dial (no visible text or symbols)natural_image
Hand holding a black plug with a cable, next to an open electrical outlet (no text or symbols visible)natural_image
Hand pressing down on a black rectangular device with a circular dial and control knob (no visible text or symbols)⑮ Expresorul mentine temperatura cafelei timp de 1-4 ore, apoi se opreşte automat. (Vezi capitolul MENTINEREA TEMP. CAFELEI – OPTIUNEA AUTO OFF).

natural_image
Hand pouring liquid into a black electric coffee maker (no text or symbols visible)natural_image
Hand pouring liquid into a black air fryer (no text or symbols visible)TURNARE DIRECTĂ (Sneak-A-Cup®)
natural_image
Hand pouring liquid into a clear glass coffee maker using a black oven (no text or symbols visible)natural_image
Hand pouring liquid into a black coffee maker with a lid, showing a white arrow indicating the process (no text or symbols visible)natural_image
Hand opening a black coffee maker with a digital display, showing the lid and control panel (no visible text or symbols)natural_image
Hand pouring water from a glass coffee maker with a metal faucet (no text or symbols visible)natural_image
Hand pouring liquid into a black coffee maker (no text or symbols visible)natural_image
Close-up of a hand pressing down on a black electric oven with a lid, showing the lid being removed (no text or symbols visible)natural_image
Hand using a black blender to press down a cup, showing the lid and side panel (no text or symbols visible)⑦ Закройте крышку.
natural_image
Hand pressing down on a black cylindrical device with a circular label and arrow indicating rotation (no visible text or symbols)natural_image
Hand operating a Zalmer coffee maker with a digital display, no visible text or symbols on the device itself.natural_image
Hand holding a tool near a cylindrical object, with a downward arrow indicating motion (no text or symbols visible)natural_image
Hand reaching into a black-and-white striped bag with a metallic faucet above (no text or symbols visible)natural_image
Hand holding a black cable with an arrow pointing to an electrical outlet (no text or symbols visible)natural_image
Close-up of hands holding a black butterfly-shaped tool, no visible text or symbolsnatural_image
Close-up of hands using a black plastic tool to cut a white object with a checkered pattern (no text or symbols visible)natural_image
Close-up of hands using a black adjustable tool to adjust a small object, with an arrow indicating rotation (no text or symbols visible)natural_image
Close-up of a hand adjusting a black mechanical component with visible gears and shafts (no text or symbols)natural_image
Hand holding a plug inserted into an electrical outlet, with a device on the ground nearby (no text or symbols visible)natural_image
Hand placing a lid on a black appliance with a digital display (no visible text or symbols)natural_image
Hand pouring water from a glass coffee maker with a hand holding a spoon (no text or symbols visible)
natural_image
Hand pouring liquid into a black electric coffee maker (no text or symbols visible)natural_image
Hand inserting a coffee maker into a black kettle, no visible text or symbols on the device itselfnatural_image
Close-up of a hand pressing down on a black appliance lid with a white arrow indicating the process (no text or symbols visible)natural_image
Close-up of a hand pouring powder from a black air fryer into a square oven (no text or symbols visible)natural_image
Hand pressing down on a black rectangular device with a circular control panel (no visible text or symbols)natural_image
Hand holding a black plug with a cable, next to an open electrical outlet (no text or symbols visible)natural_image
Hand pressing down on a black box with a circular dial indicator (no text or symbols visible)natural_image
Hand pouring liquid into a black electric cream maker (no text or symbols visible)natural_image
Hand pouring food into a black air fryer (no text or symbols visible)natural_image
Hand pouring liquid into a clear glass coffee maker using an electric mixer (no text or symbols visible)natural_image
Hand pouring liquid into a black oven with a downward arrow indicating flow (no text or symbols visible)natural_image
Hand inserting a coffee maker into a digital coffee receiver (no text or symbols visible)natural_image
Hand pouring liquid into a glass coffee maker with a handle, no text or symbols visiblenatural_image
Hand pouring liquid into a black coffee maker (no text or symbols visible)natural_image
Close-up of a hand pressing down on a black coffee maker's lid (no visible text or symbols)natural_image
Hand using a black blender with a hand operating the lid (no visible text or symbols)⑦ Затворете капака.
natural_image
Hand pressing down on a black electronic device with a circular logo, no visible text or symbolsnatural_image
Hand opening a coffee maker with a digital display (no visible text or symbols)natural_image
Close-up of a hand holding a small electronic device with a black cable, next to a cylindrical device (no visible text or symbols)natural_image
Hand washing a glass soap can with a metallic faucet (no text or symbols visible)natural_image
Hand holding a black cable with an open electrical outlet, next to a dark container (no text or symbols visible)natural_image
Close-up of hands holding a small black object with scissors, possibly a tool or tool, against a plain background (no text or symbols visible)natural_image
Close-up of hands using a black plastic grater to cut a white object with a checkered pattern (no text or symbols visible)natural_image
Close-up of hands using a black-handled tool to adjust a mechanical component, with an arrow indicating rotation (no text or symbols visible)natural_image
Close-up of a hand adjusting a black plastic mechanical component with a circular base and gear mechanism (no visible text or symbols)natural_image
Hand holding a black plug inserted into a white electrical outlet, with a cable attached to a dark base (no text or symbols visible)② На цифровия дисплей ще се появи 12:00, знака „:" ще мига.
natural_image
Hand placing a lid on top of a black appliance with a circular control dial (no visible text or symbols)natural_image
Hand pouring liquid into a glass coffee maker with a spoon, no text or symbols visiblenatural_image
Hand pouring liquid into a black coffee maker with a clear glass lid (no text or symbols visible)natural_image
Hand pressing a black Zelnzer coffee maker with a hand adjusting its lid (no visible text or symbols)natural_image
Close-up of a hand pressing down on a black appliance with a white arrow indicating the process (no text or symbols visible)natural_image
Hand using a black blender to press or adjust its contents, no visible text or symbolsnatural_image
Hand pressing down on a black rectangular device with a circular control dial (no visible text or symbols)natural_image
Hand holding a black plug inserted into a white electrical outlet, with a dome-shaped base nearby (no text or symbols visible)natural_image
Hand pressing down on a black box with a curved arrow indicating rotation (no text or symbols visible)natural_image
Hand pouring liquid into a black electric coffee maker (no text or symbols visible)natural_image
Hand pouring liquid from a black air fryer into a square oven (no text or symbols visible)natural_image
Hand pouring liquid into a black electric oven with a clear lid (no text or symbols visible)natural_image
Hand placing a lid into a black appliance with a white arrow indicating the process (no text or symbols visible)natural_image
Hand inserting a coffee maker into a clear glass, no visible text or symbols on the device itselfnatural_image
Hand pouring water from a glass coffee maker with a handle, no text or symbols visiblenatural_image
Hand pouring liquid into a black coffee maker (no text or symbols visible)natural_image
Hand placing a lid into a black square oven on a kitchen grater (no text or symbols visible)natural_image
Hand using a black blender to press down a cup, showing the lid and side panel (no text or symbols visible)⑦ Закрийте кришку.

natural_image
Hand pressing down on a black rectangular device with a circular label and arrow indicating rotation (no visible text or symbols)natural_image
Hand inserting a coffee maker into a glass container, no visible text or symbols on the device itselfnatural_image
Close-up of a hand holding a small cable with a black connector, next to a cylindrical device (no visible text or symbols)natural_image
Hand pouring liquid into a black-and-white striped bag with a metallic faucet (no text or symbols visible)natural_image
Hand holding a black cable with an arrow pointing to an electrical outlet (no text or symbols visible)natural_image
Close-up of hands holding a black plastic object with scissors, no visible text or symbolsnatural_image
Close-up of hands using a black-handled tool to cut a white object with a checkered pattern (no text or symbols visible)natural_image
Close-up of hands using a black tool to adjust a small object, with an arrow indicating rotation (no text or symbols visible)natural_image
Close-up of a hand adjusting a black mechanical component with visible gears and tubing (no text or symbols)natural_image
Hand holding a plug inserted into an electrical outlet, with a device on the ground nearby (no text or symbols visible)natural_image
Hand placing a lid on a black industrial machine cover with a circular dial indicator (no visible text or symbols)natural_image
Hand pouring liquid into a glass coffee maker with a hand holding a spoon (no text or symbols visible)
natural_image
Hand pouring liquid into a black electric cooker (no text or symbols visible)natural_image
Hand operating a Zelnifer coffee maker with a black lid and glass inside, no visible text or symbols on the device itself.natural_image
Hand pouring liquid into a black coffee maker with a lid, showing a downward arrow (no text or symbols visible)natural_image
Hand pouring liquid into a black coffee maker with a hand operating the top part (no text or symbols visible)natural_image
Close-up of a hand pouring food into an air fryer oven (no visible text or symbols)natural_image
Hand pressing down on a black rectangular device with a circular control panel (no visible text or symbols)natural_image
Hand holding a black plug with a cable, next to an open electrical outlet (no text or symbols visible)natural_image
Hand pressing down on a black appliance lid with a curved arrow indicating rotation (no text or symbols visible)natural_image
Hand pouring liquid into a black electric coffee maker (no text or symbols visible)natural_image
Hand pouring food into an air fryer (no text or symbols visible)
natural_image
Hand pouring liquid into a black coffee maker with a clear lid (no text or symbols visible)natural_image
Hand placing a black lid into a black oven on a portable kitchen (no text or symbols visible)natural_image
Hand operating a black coffee maker with a digital display, showing the lid and handle (no visible text or symbols)Congratulations on your choice of our appliance, and welcome among the users of Zelmer products.
In order to achieve best possible results we recommend using exclusively original Zelmer accessories. They have been specially designed for this product.
Please read this user manual carefully. Pay special attention to important safety instructions. Keep this user manual for future reference.
Operational safety guidelines

Danger! / Warning! Health hazard
Never use this electrical appliance, if there is any visible damage, the power cable is damaged, the appliance has fallen or has been damaged in any other way. If you suspect the appliance has been damaged, it may only be checked, repaired or adjusted by a qualified technician of an authorized service center.
the non-detachable part of the cord is damaged, it should be replaced by the producer or at a proper service point or by a qualified person in order to avoid any hazards.
The appliance can only be repaired by qualified service personnel. Improper servicing may cause a serious hazard to the user. In case of defects please contact a qualified service center.
Before cleaning the espresso machine, and in case of any problems during coffee making, always turn off the appliance and pull the plug out of the socket first.
Do not place your hands underneath steam, hot water or poured coffee, as it may lead to scalds and burns.
This appliance is not intended for use by persons (including children) with reduced physical, sensory or mental capabilities, or lack of experience and knowledge, unless they have been given supervision or instruction concerning use of the appliance by a person responsible for their safety.
Children should be supervised to ensure that they do not play with the appliance.

Warning! Risk of property damage
Always place the appliance on a flat, even surface.
Will the water tank only with cold, fresh water. Do not exceed the maximum level marked on the tank.
Do not allow the power cord to come into contact with any hot parts of the appliance.
Before unplugging, always switch off the appliance by pressing the ON/OFF button. Do not unplug by pulling on cord. To unplug, grasp the plug, not the cord.
Always switch off and unplug the appliance before cleaning and if you do not intend to use it for a long period of time.
Do not use an extension cord with the appliance unless it has been checked by a qualified technician or service personnel.
Plug the appliance to a grounded AC electrical outlet with the voltage corresponding to the voltage indicated on the rating plate.
Do not let the cord hang over a table or shelf or touch a hot surface.
Do not submerge the machine in water or any other liquids.
The appliance is not intended for use with any external time switches or a separate remote control system.
The wiring supplying power to the appliance must be provided with a suitable safety device. Additionally, the wiring system can be provided with a shut off switch to cut the power supply in case of emergency.

Product information and operating tips
This appliance is intended for household use only.
Read this user manual carefully and save it for future reference.
Make sure that you understand the above information.
Technical data
Technical specifications are given on the rating plate of the appliance.
Water tank capacity: max. 1.8 l.
The coffee maker is a class 1 device equipped with a grounded cord and plug.
This appliance complies with the requirements of the current standards.
The appliance meets the requirements of the following directives:
– The Low Voltage Directive (LVD) – 2006/95/EC.
- The Electromagnetic Compatibility (EMC) Directive - 2004/108/EC.
The product has CE Mark on its rating plate.
Coff ee Maker Features
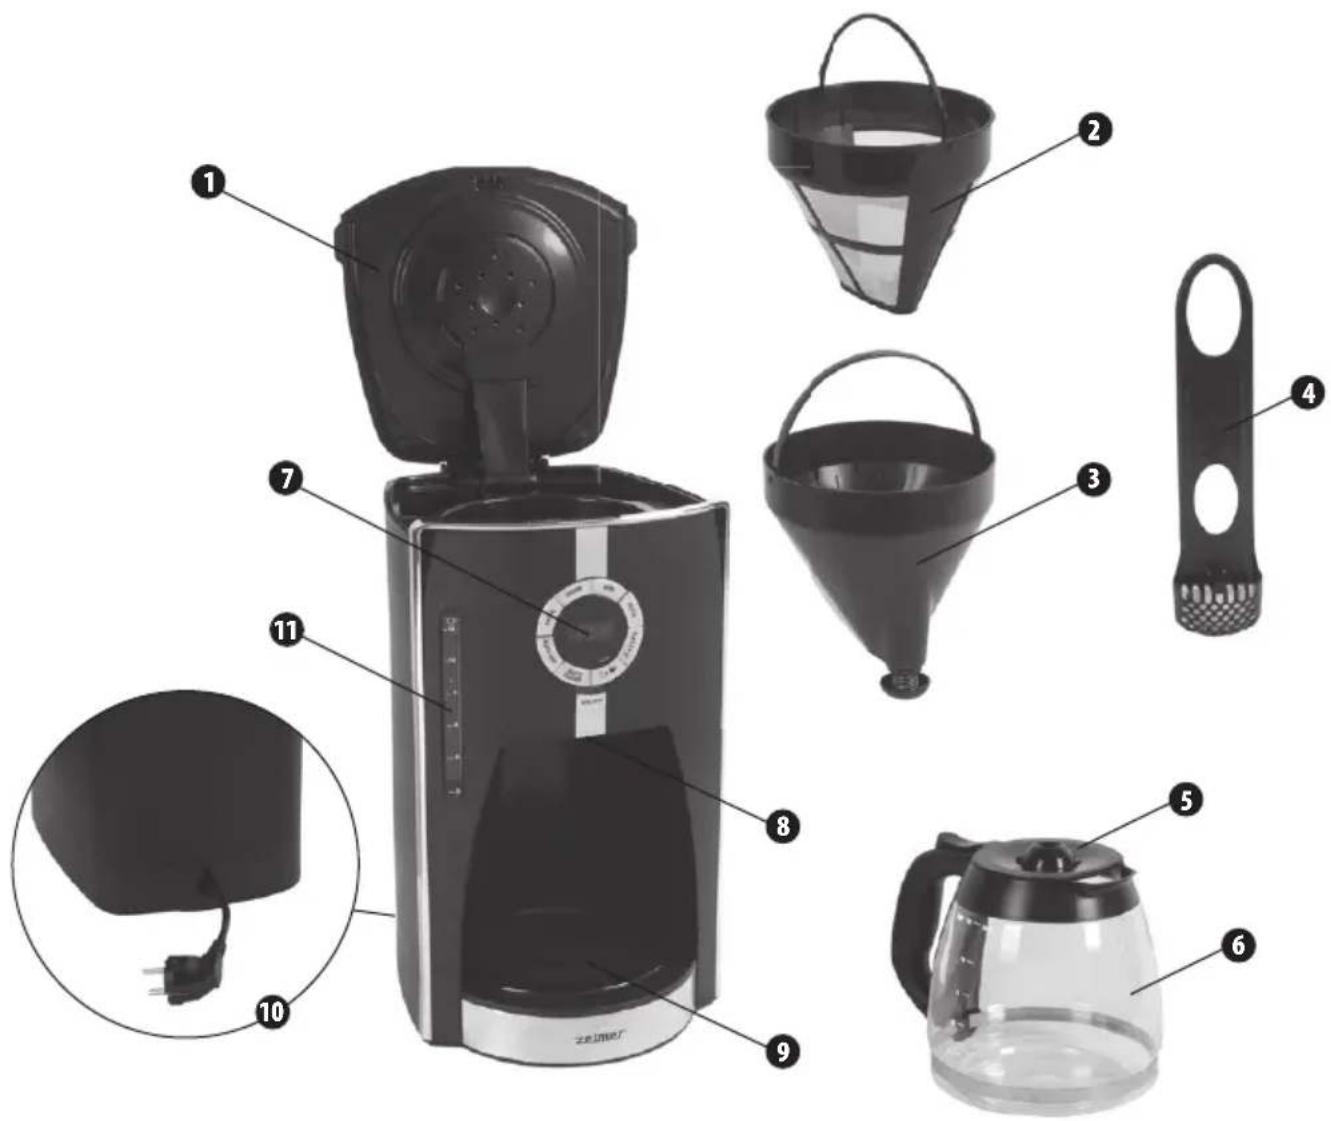
1 Hinged lid
2 Permanent fi Iter
3 Removable fi Iter holder
4 Water fi Iter with charcoal fi Iter
5 Jug lid
6 Glass jug for up to 12 cups / 1800 ml
7 Control panel
8 Sneak-A-Cup® feature
9 Hotplate (keep warm function)
10 Cord storage compartment
11 Water tank with water level indicator
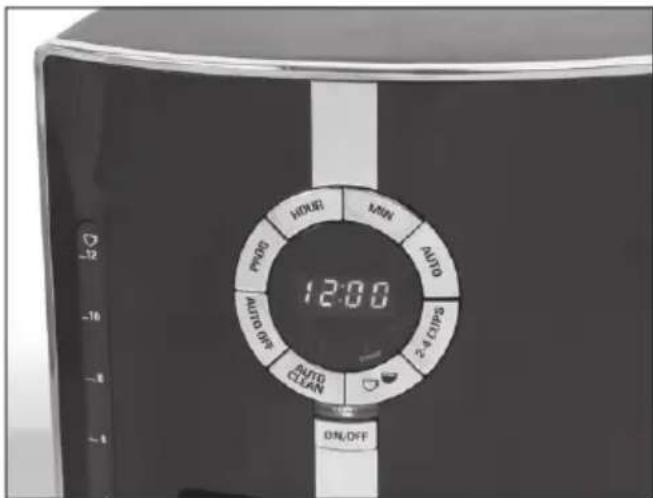
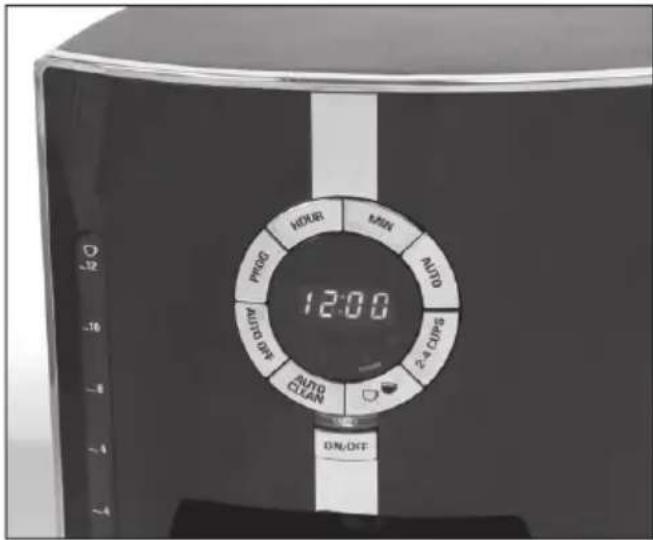
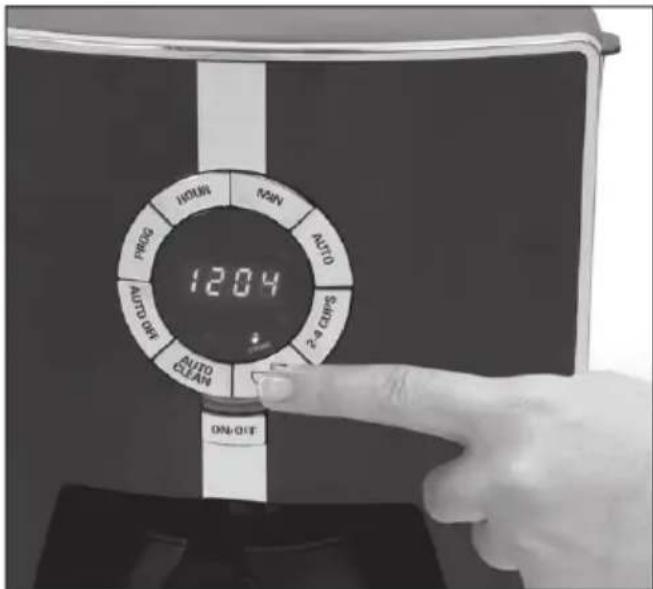
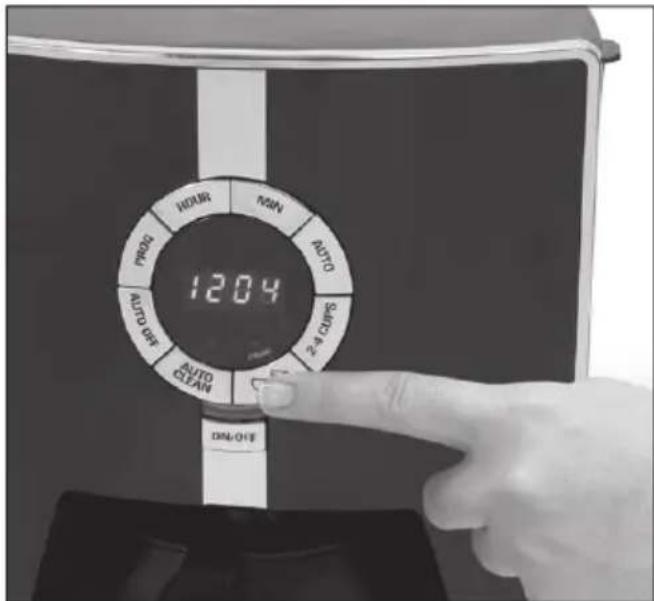
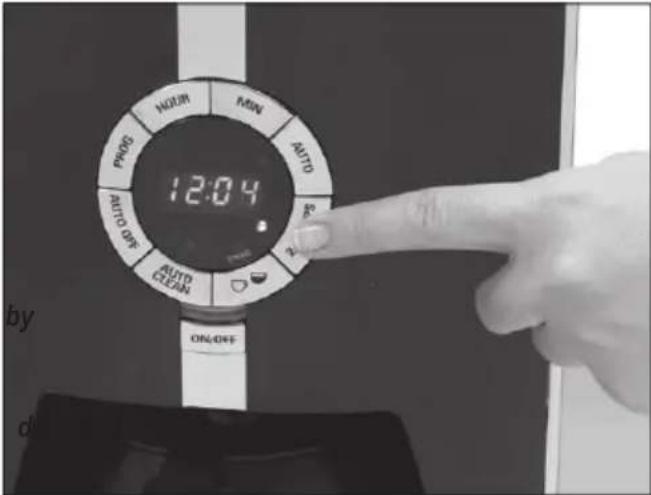
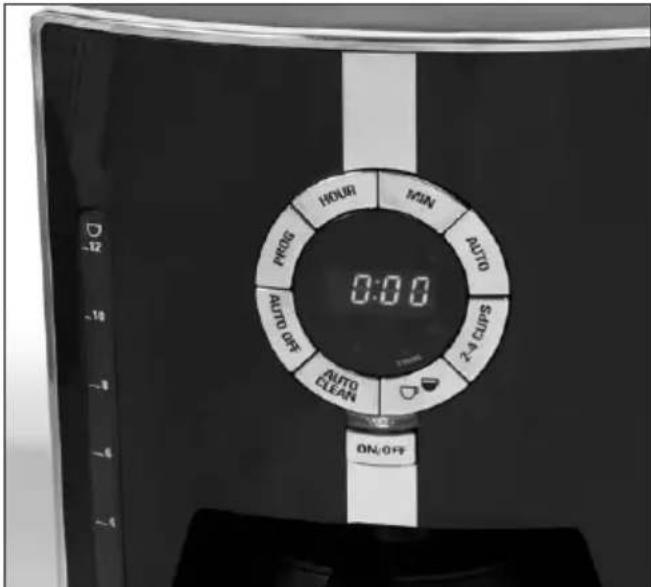
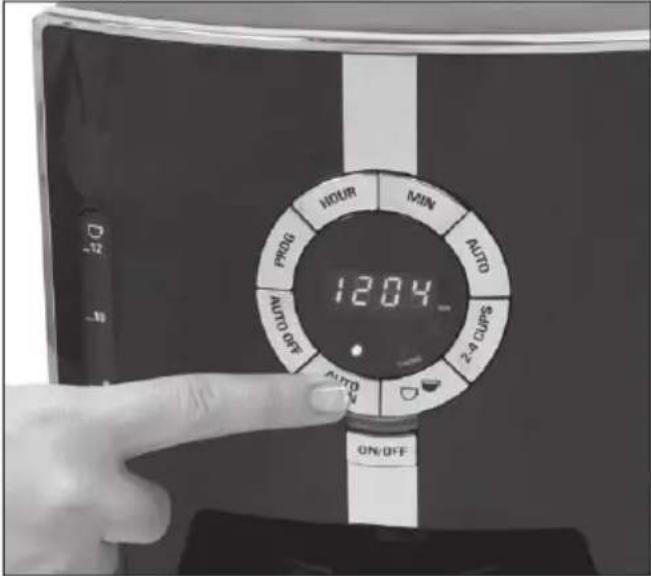
CONTROL PANEL
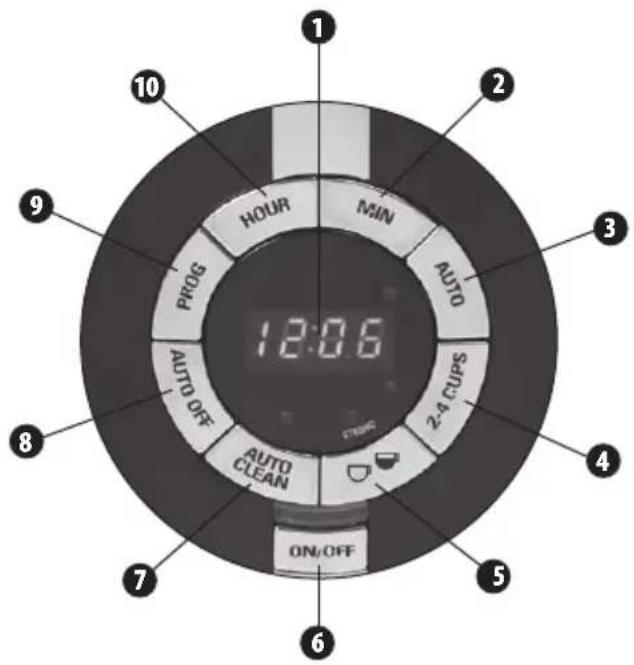
1 Digital display
2 Minute adjustment button (MIN)
3 AUTO button (delayed brewing)
4 Brew button (2-4 cups)
5 Coffee strength adjustment button
6 ON/OFF button
7 AUTO CLEAN button
8 Auto switch-off button
9 Programming button (PROG)
10 Hour adjustment button (HOUR)
Before first use
① Dispose of packaging materials and remove labels from the device.
② Clean all detachable parts as indicated in the CLEANING & MAINTENANCE section of this user manual.
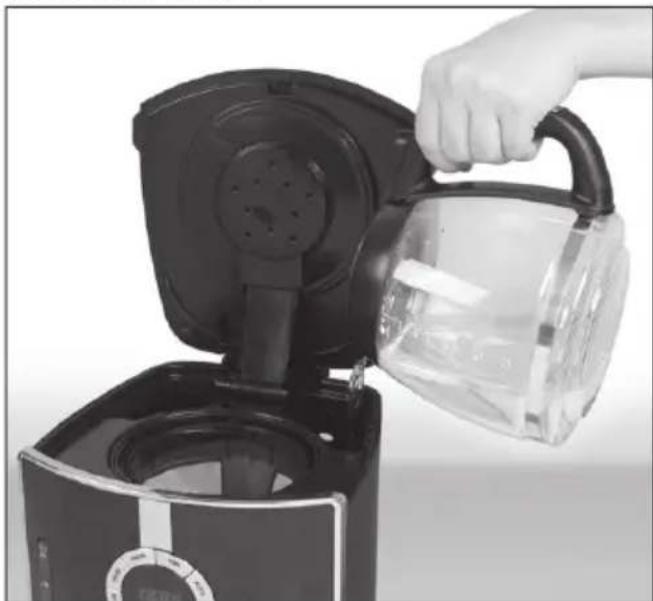
③ Lift up the hinged lid of the jug and fi ll it with fresh, cold water up to the MAX level (12 cups).
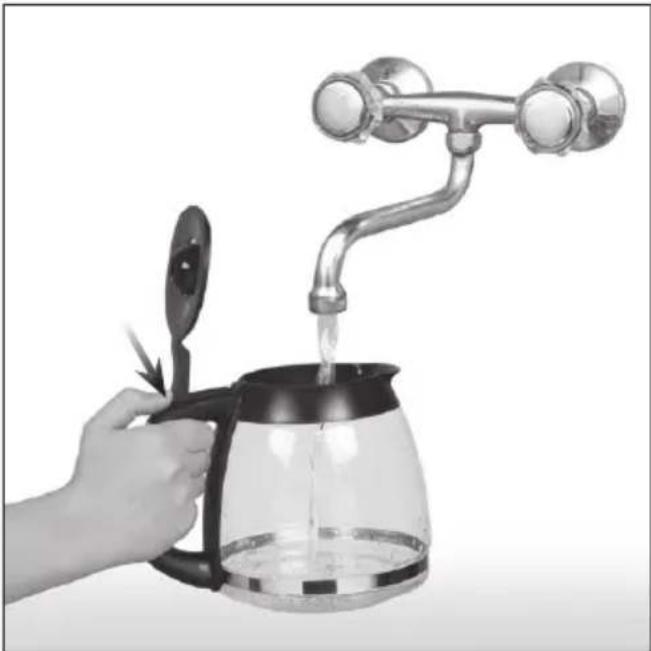
natural_image
Hand pouring liquid into a glass coffee maker with a handle, no text or symbols visible④ Transfer the water from the jug into the water tank on the appliance.

natural_image
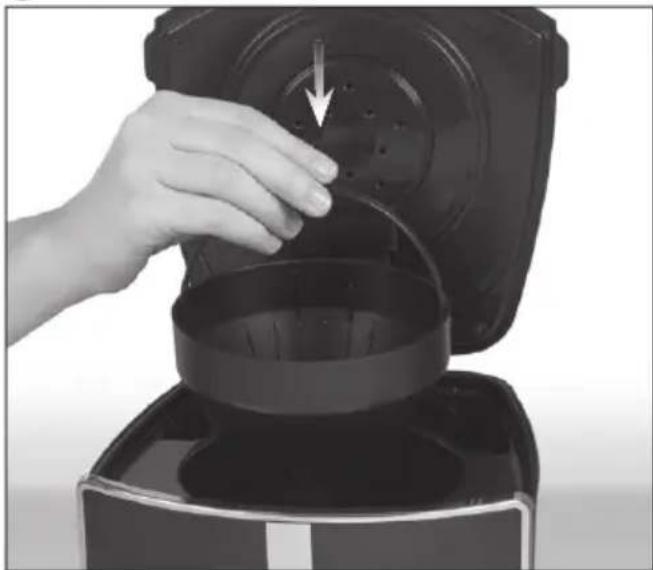
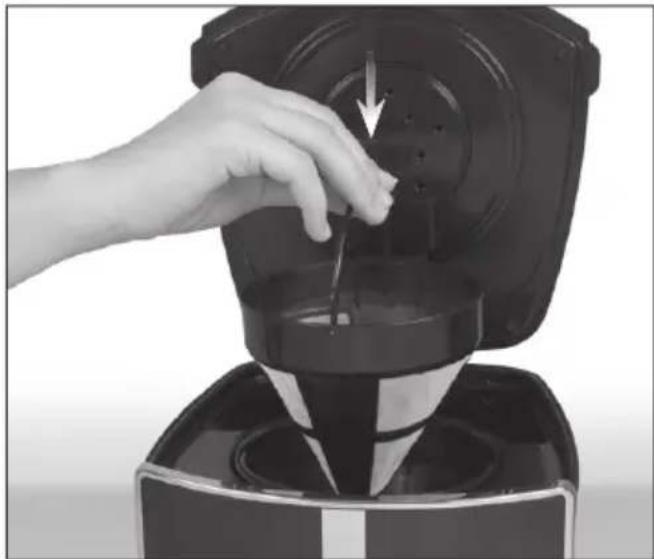
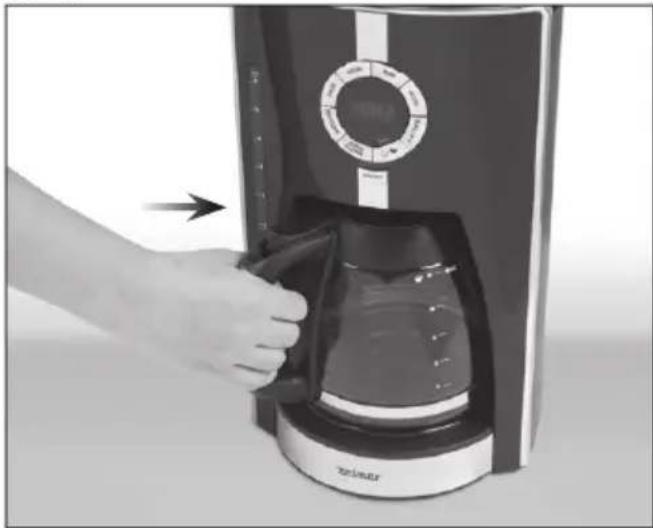
Hand pouring liquid into a black coffee maker (no text or symbols visible)⑤ Insert the filter holder in the appliance.
natural_image
Hand pouring liquid into a black coffee maker with a downward arrow indicating flow (no text or symbols visible)⑥ Place the permanent nylon fi liter or a paper fi liter in the fi liter holder.
natural_image
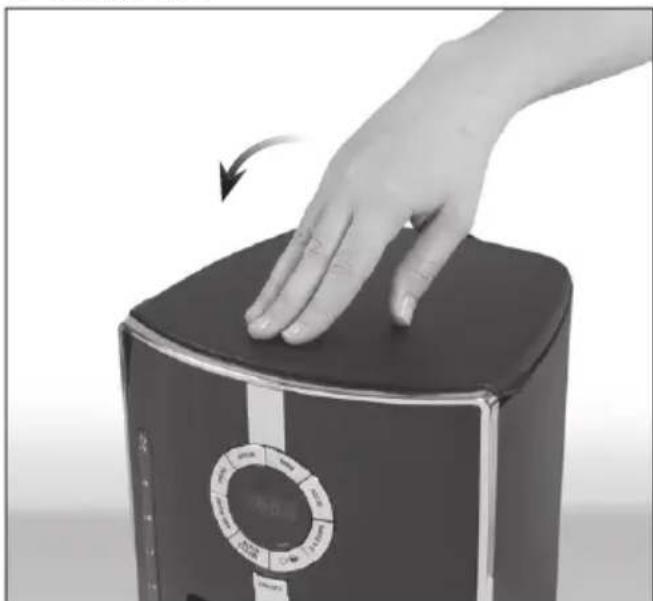
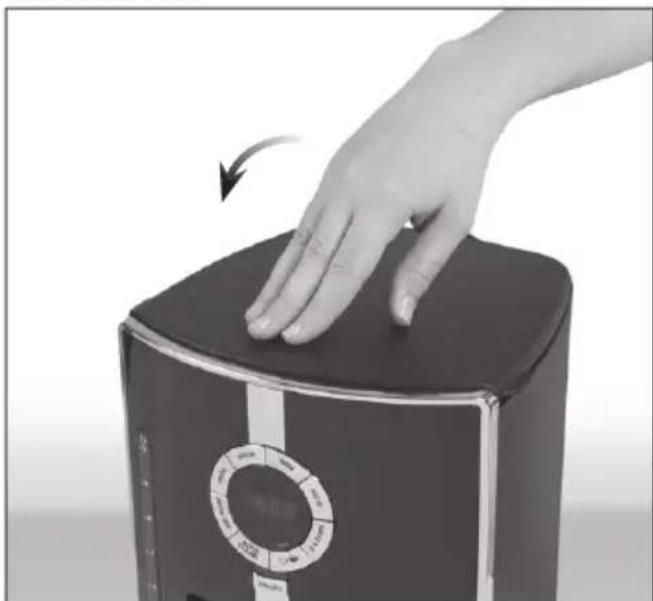
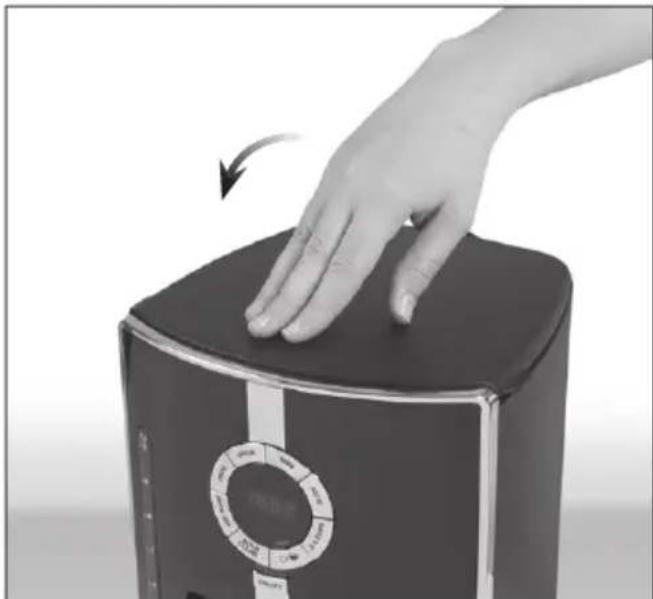
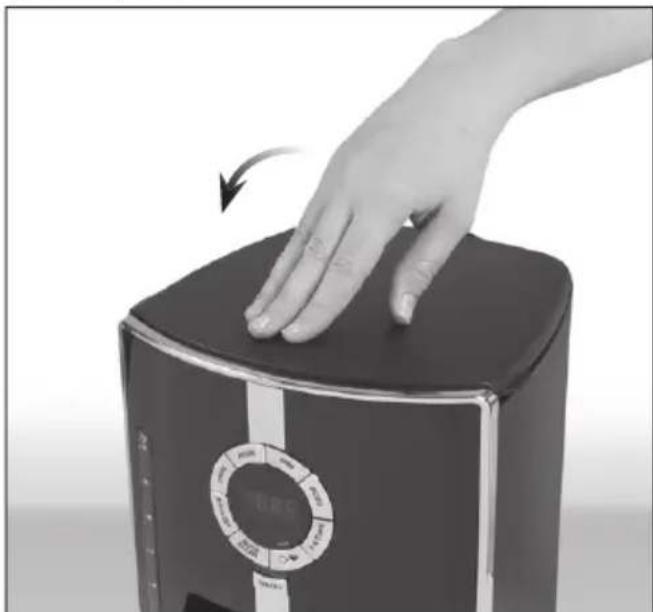
Close-up of a hand using a black blender to press or brush the lid (no visible text or symbols)⑦ Close the lid.
natural_image
Hand pressing down on a black rectangular device with a circular control knob (no visible text or symbols)⑧ Make sure that the jug lid is in place. Put the empty jug on the hotplate.
natural_image
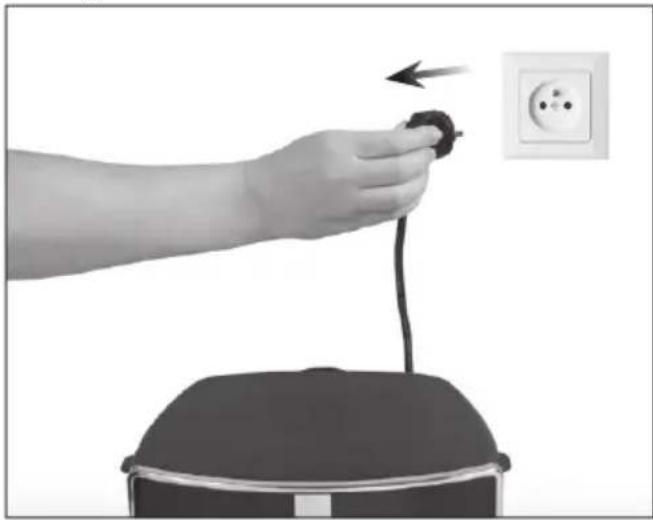
Hand inserting a coffee maker into a digital display unit (no visible text or symbols)⑨ Pull the power cord out of the storage compartment at the back of the appliance and insert the plug into a wall socket.
natural_image
Hand holding a small electronic device next to a cylindrical device (no visible text or symbols)i The power cord may be adjusted to the required length.
• To increase the length of the hold of the cord (do not grasp the plug) and gently pull it down and than all the way out until you feel resistance.
- To reduce the cord, push excess cord into the storage compartment at the back of the appliance. After adjusting the length, lock the cord by pulling it all the way up into the cut-out section of the housing.
⑩ For the first use, operate the coffee maker with water only, following the brewing instructions described below in section BREWING COFFEE.
This process will allow you to remove and debris generated during production and assembly of your appliance.
⑪ Discard the water after brewing. Rinse permanent fi liter or dispose of paper fi liter.
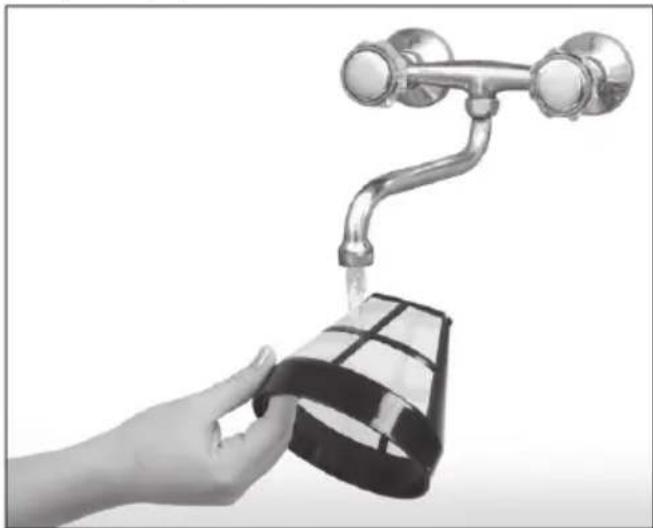
natural_image
Hand washing a water bottle with a metallic faucet (no text or symbols visible)⑫ Switch of the appliance, unplug and allow to cool.
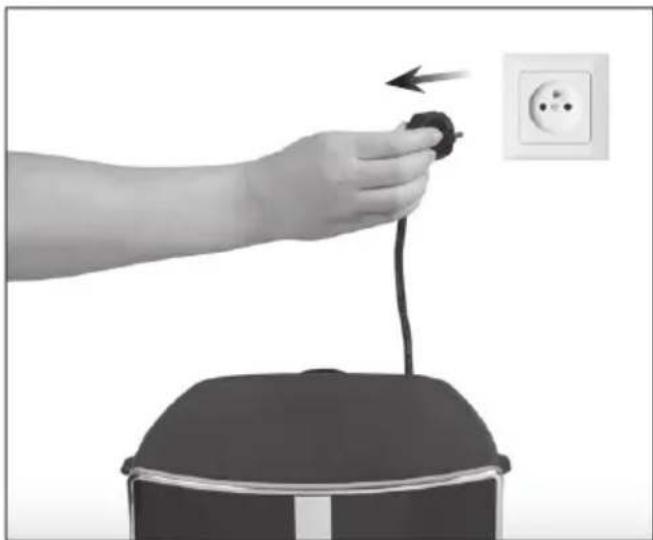
natural_image
Hand holding a black cable with an arrow pointing to an electrical outlet (no text or symbols visible)Preparing the appliance for operation
WATER FILTER
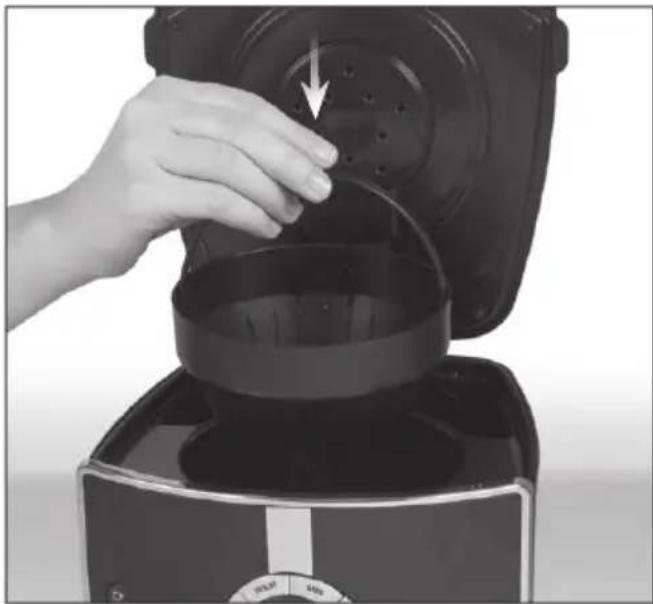
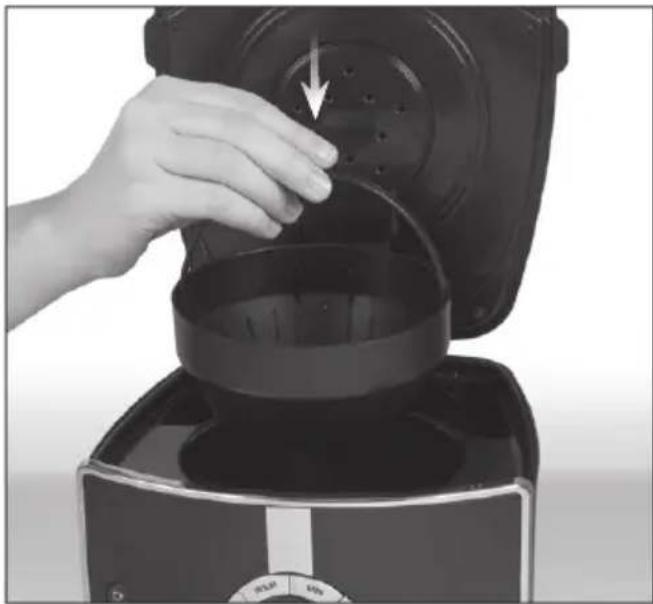
① Unpack the charcoal fi Iter.
② Open the water filter basket.
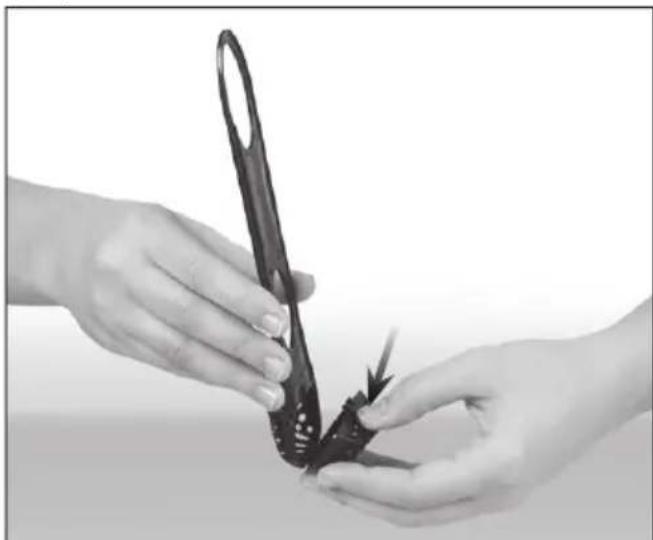
natural_image
Close-up of hands holding a black butterfly-shaped object with scissors, no visible text or symbols③ Place the charcoal filter in the basket.
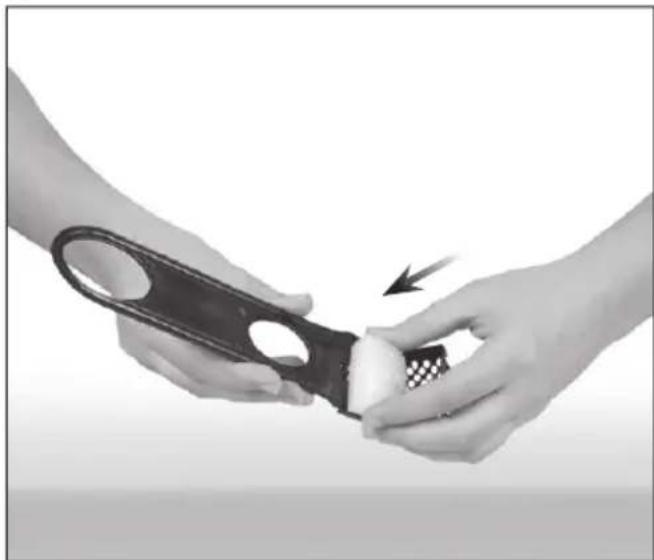
natural_image
Close-up of hands using a black-handled tool to cut a white object, with a checkered pattern on the handle (no text or symbols visible)④ Close the filter basket.
natural_image
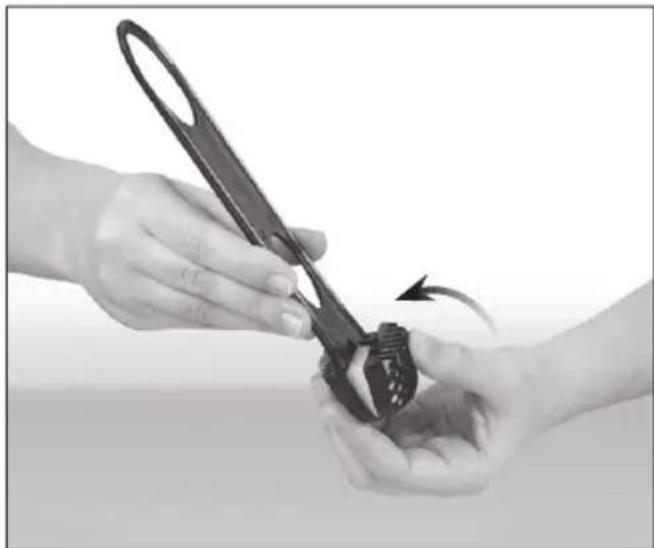
Close-up of hands using a black-handled tool to adjust a small object, with an arrow indicating rotation (no text or symbols visible)⑤ Install the water filter (with charcoal filter on) in an opening located in the bottom right corner of the water tank.
natural_image
Close-up of a hand inserting a plug into a black plastic device with visible internal components (no text or symbols)The charcoal fi Iter should be replaced every 60 brews or every 2 months after opening.
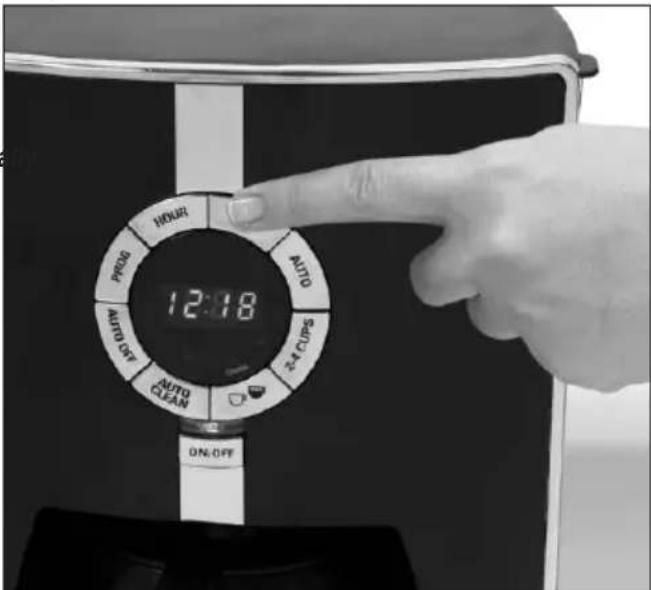
SETTING THE TIME
① Plug the appliance into a suitable power outlet (see rating plate).
natural_image
Hand holding a plug inserted into a wall socket, with an outlet showing three outlets (no text or symbols visible)② The display will show 12:00. The „:” symbol will fl ash.
it is not necessary to set the time unless you intend to use the DELAYED BREWING feature.
③ Set the time by pressing the (HOUR) and (MIN) buttons until correct time is displayed.
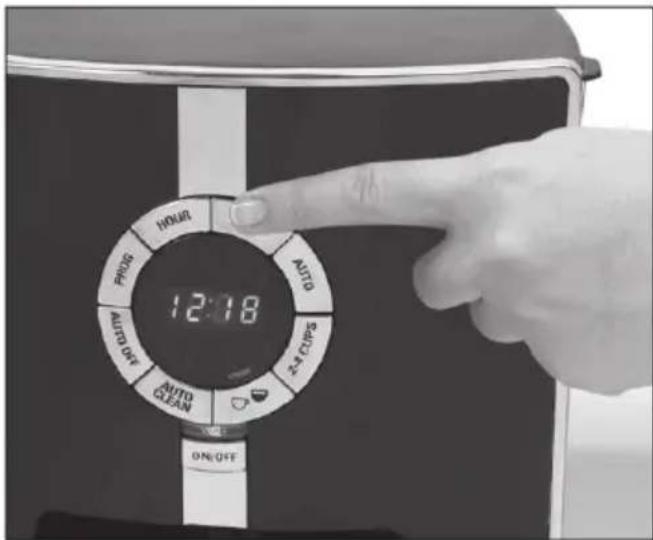
Settings can also be adjusted by pressing and holding down buttons without having to press them repeatedly.
It may be necessary to set the time again after unplugging the appliance or even a short power outage.
Brewing coff ee
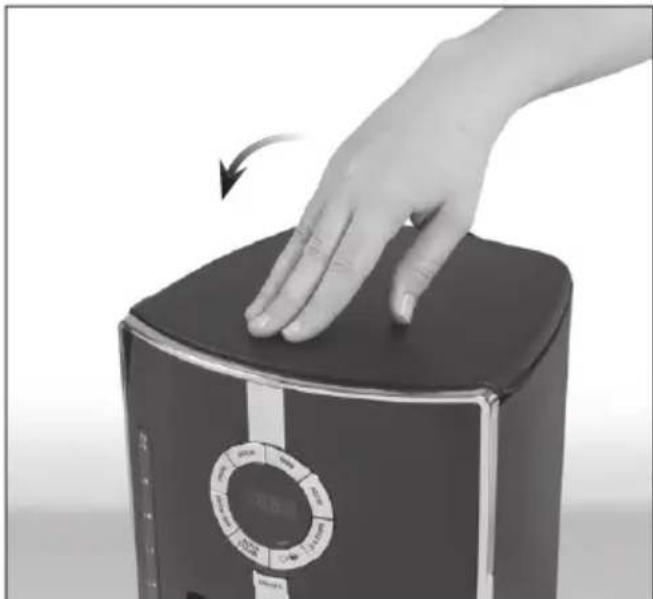
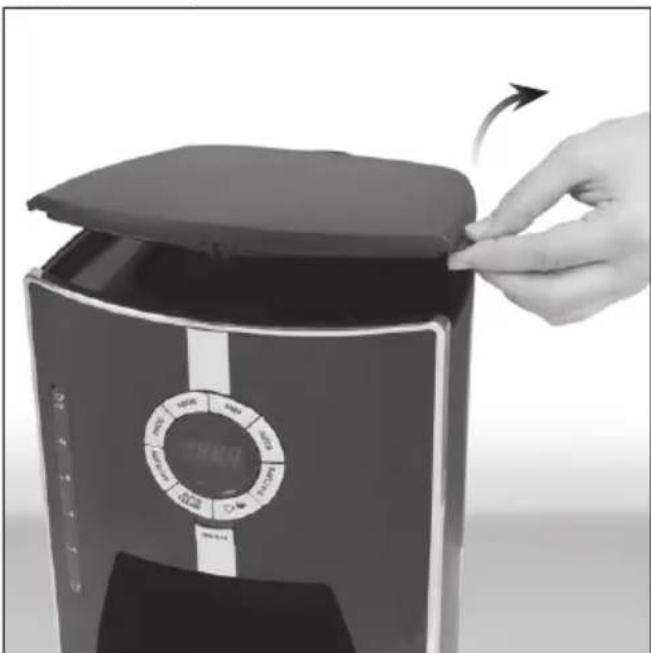
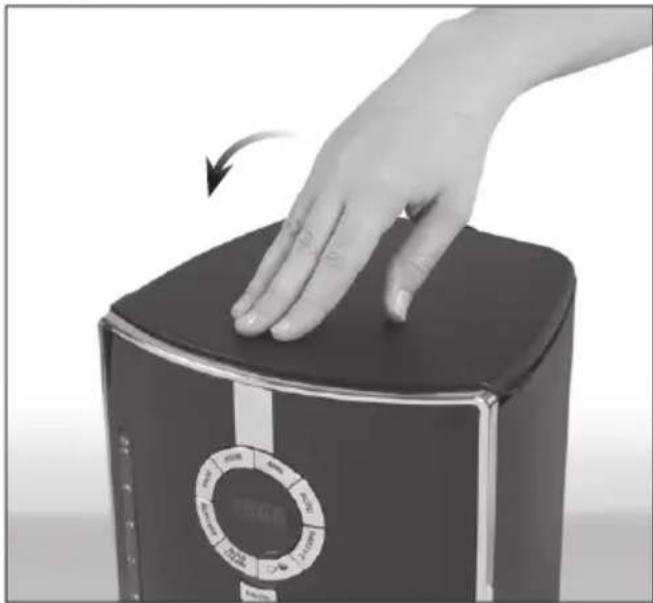
① Open the hinged lid.
natural_image
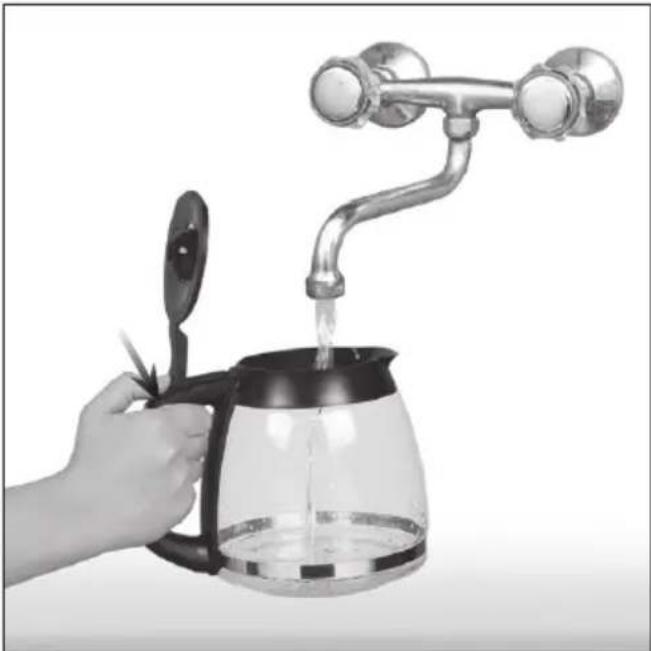
Hand placing a lid on a black appliance with a circular control panel, showing no visible text or symbols.② Fill the jug with the desired amount of fresh, cold water.
natural_image
Hand pouring liquid from a glass coffee maker with a metal faucet (no text or symbols visible)There are two holes at the back of the appliance for draining excess water. Be careful not pour too much water into the tank. The excess water will be discharged through the openings onto the table top or other working surface.
③ Pour the water from the jug into the tank on the device.
natural_image
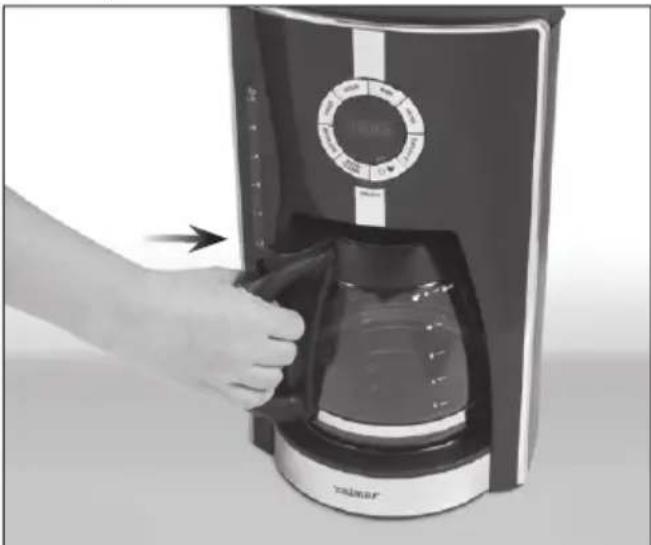
Hand pouring liquid into a black electric cooker (no text or symbols visible)④ With the lid closed, place the jug on the hotplate under the coffee spout.

natural_image
Hand inserting a coffee maker into a black model, showing the lid and control panel (no text or symbols visible)
make sure the jug is properly positioned under the coffee spout to avoid spillage.
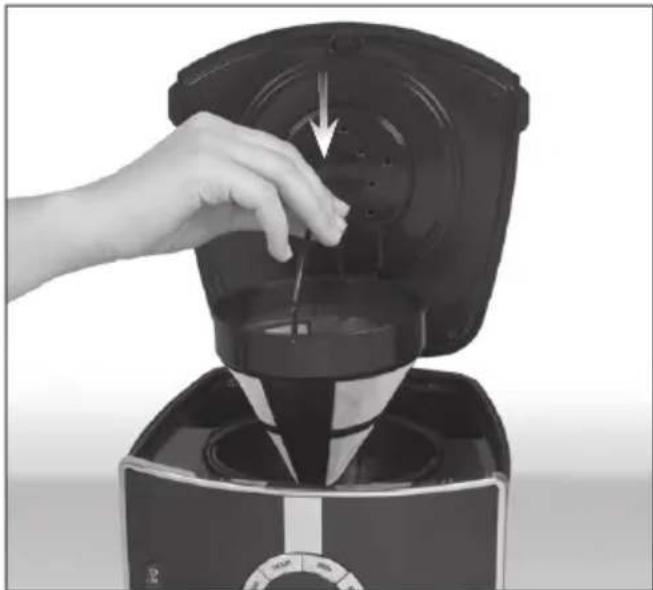
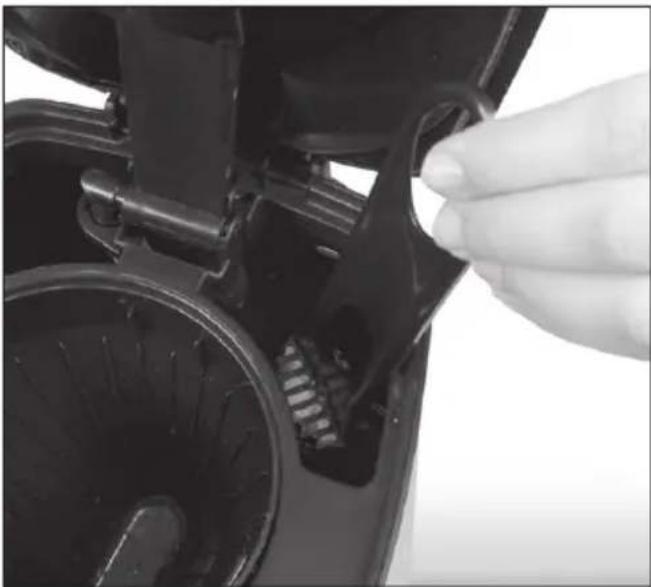
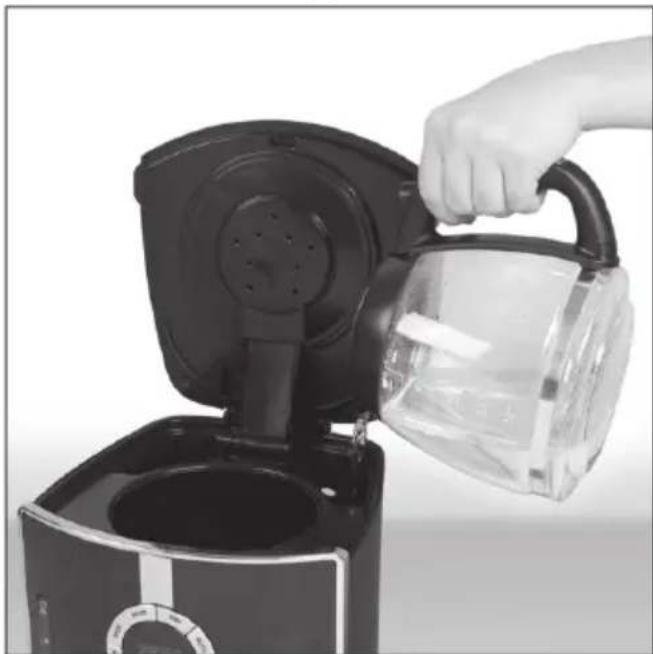
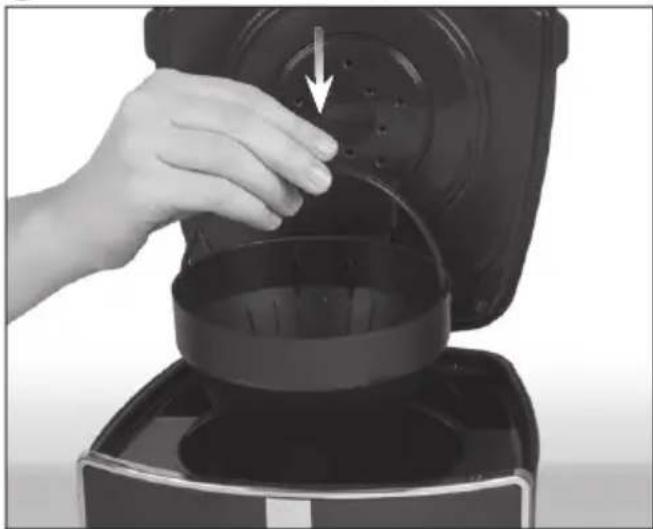
⑤ Insert the filter holder in the appliance.

natural_image
Hand pouring liquid into a black coffee maker with a downward arrow indicating flow (no text or symbols visible)⑥ Place the permanent or paper filter in the holder.
natural_image
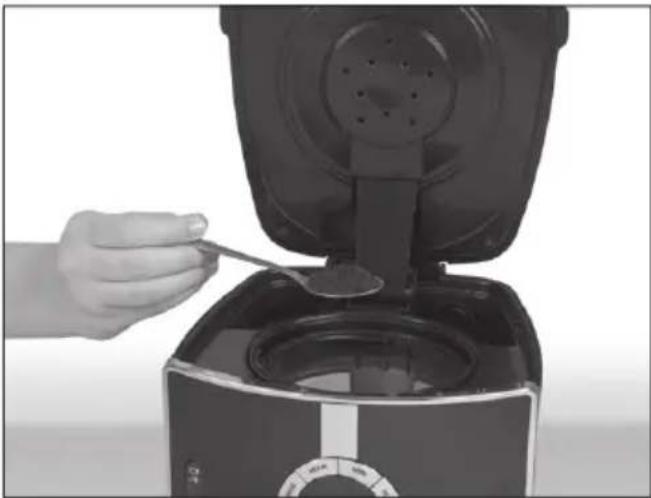
Close-up of a hand using a black blender to press or remove liquid from a container (no text or symbols visible)⑦ Spoon the required amount of ground coffee, depending on your preference.
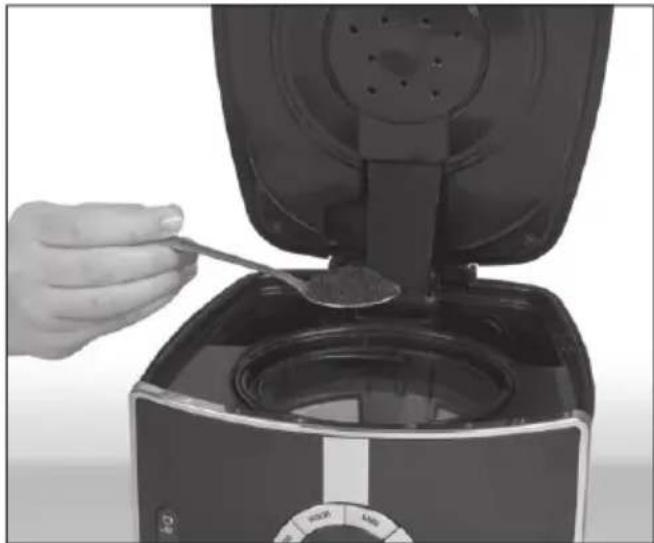
natural_image
Hand pouring granular substance from a black air fryer into a square oven (no text or symbols visible)
se only coffee suitable for use with this type of coffee makers. The amount of add will depend on your individual preference.
coffee
⑧ Close the lid.
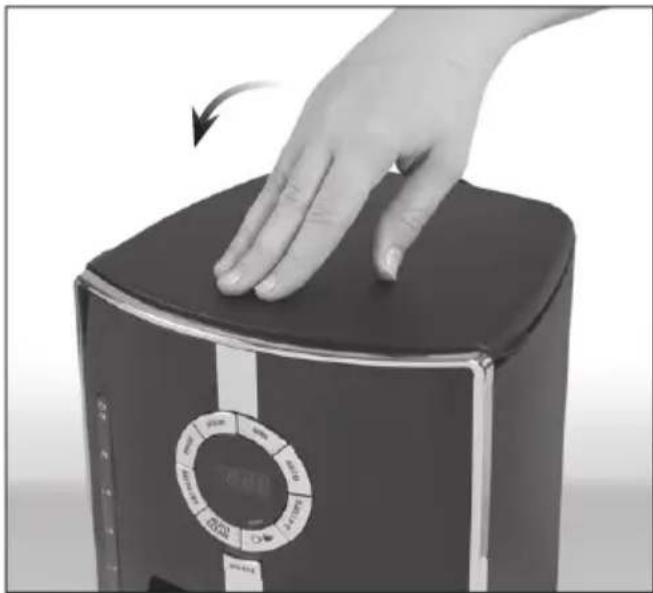
natural_image
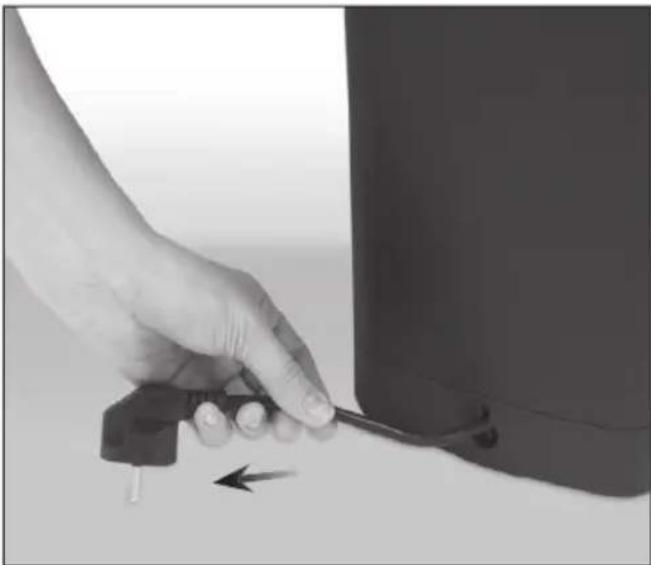
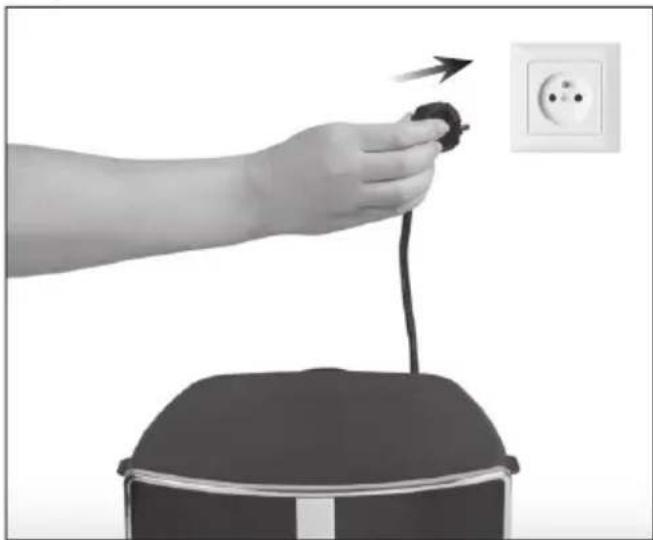
Hand pressing down on a black rectangular device with a circular control dial (no visible text or symbols)⑨ Insert the plug into the wall socket.
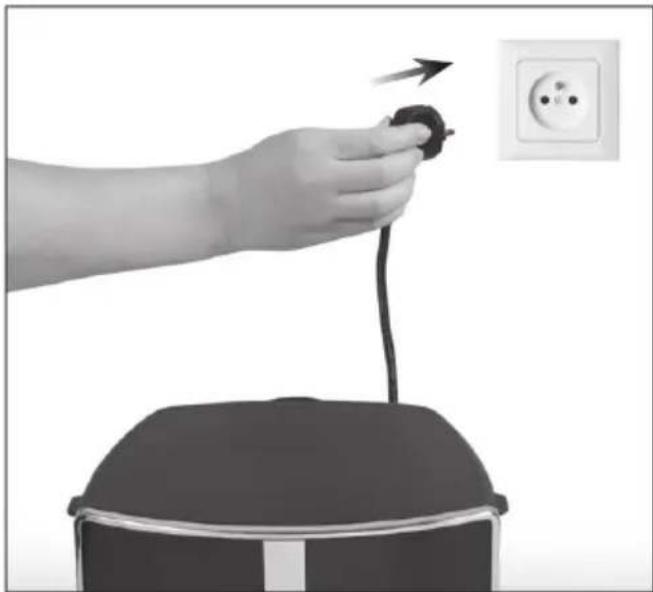
natural_image
Hand holding a black plug with a cable, next to an open electrical outlet (no text or symbols visible)⑩ Press the strength adjustment button once to select strong coffee. The STRONG indicator light will come on, indicating that this option has been selected.
⑪ Press the strength adjustment button again to select normal coffee strength. The STRONG indicator light will turn off.
The default setting is NORMAL.
⑫ Press the ON/OFF button. The indicator light will come on and brewing will start.
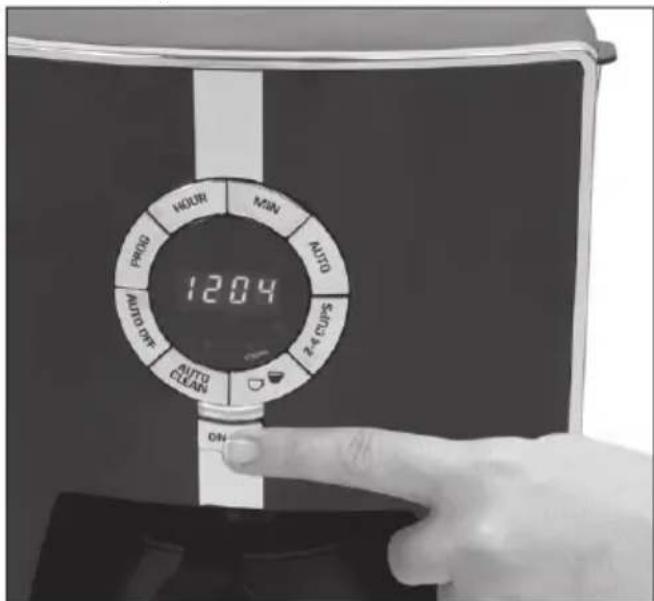
⑬ The brewing process ends when the coffee stops dripping into the jug.
You will hear a short beep indicating the end of the brewing process.
⑭ Remove paper fi liter from the fi liter holder as soon as the coffee grounds have cooled, and then close the lid.
natural_image
Hand pressing down on a black rectangular device with a circular dial indicator (no visible text or symbols)⑮ The coffee maker will keep your coffee warm for 1-4 hours and will switch off automatically after this time (see section KEEP WARM FEATURE – AUTO OFF).

If the AUTO OFF function has not been modified, the appliance will switch off automatically two hours after brewing.

You can switch off the appliance any time pressing the ON/OFF button.

Always unplug the appliance if you intend to use it for an extended period of time.
BREWING 2-4 CUPS OF COFFEE
This function makes the brewing process slower for better, more intensive coffee flavour.
① Fill the water tank with water in the amount required to brew 2-4 cups of coffee.
natural_image
Hand pouring liquid into a black electric cream maker (no text or symbols visible)② Spoon the desired amount of ground coffee into paper or permanent filter.
natural_image
Hand pouring powder into an air fryer (no text or symbols visible)③ Press 2-4 cups button. The indicator light over the button will come on once the function has been selected.

e strength adjustment option not available in this mode. The default coffee strength is NORMAL.
④ Press the ON/OFF button. The indicator light will come on and brewing will start.


ess 2-4 cups button again to cancel this function.
KEEP-WARM FEATURE WITH AUTO OFF
Once the coffee has brewed, the hotplate will keep its temperature for 14 hours, and then the appliance will switch-off automatically.
If the AUTO OFF function has not been modified, the appliance will switch off automatic 2 hours after brewing.
The AUTO-OFF may be adjusted between 1 and 4 hours, i.e. the time after which the appliance will switch off automatically. The countdown will start after completion of the brewing process. Press the AUTO OFF button to advance the time by 1 hour. New settings are saved 2 seconds after entering.
DELAYED BREWING
① To activate the delayed brewing feature, proceed as described in section BREWING COFFEE, points 1-9.
② Make sure that the correct time of day has been set (see SETTING THE TIME).
③ Press the PROG button.
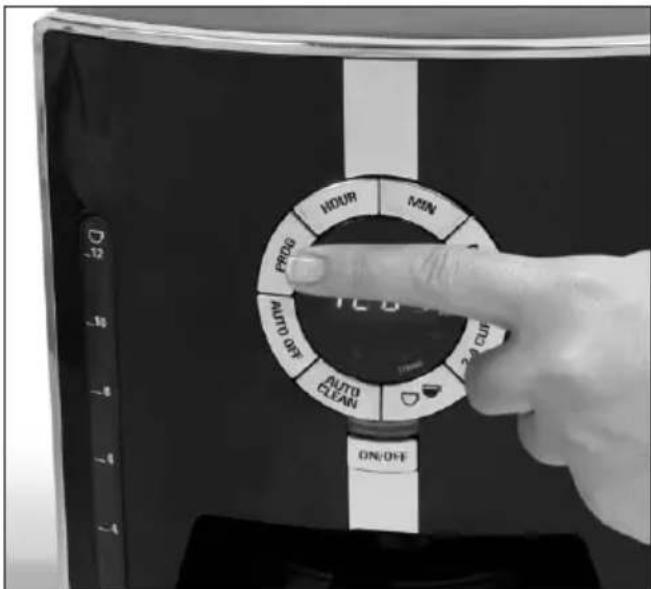
④ The display will show 0:00 or the last saved time setting.
⑤ Set the time you want the coffee maker to start brewing using HOUR and MIN buttons.
If the start time is not set before the clock stops flashing, the display will go back to the current time. To change the setting, press PROG button again and set the start time for brewing.
⑥ Press the AUTO button to confirm your delayed brewing settings. The relevant indicator light will come on.
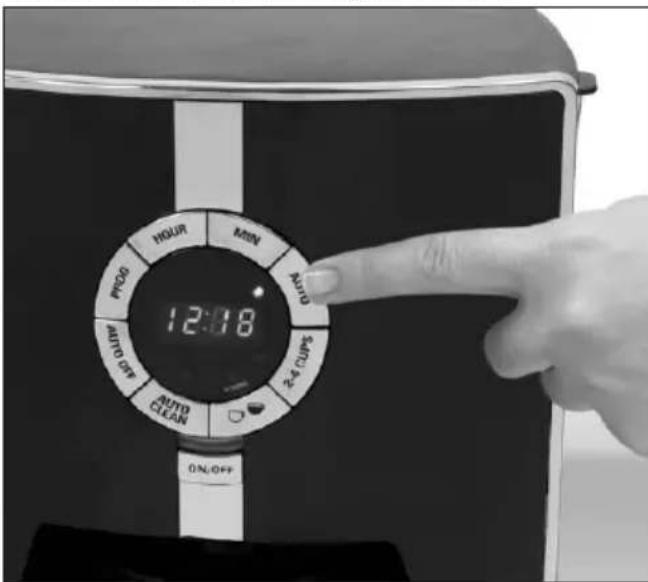
To check the time setting for delayed brewing, press and hold the PROG button. The current time will reappear on the display button is released.
once t
To change the time settings, press the AUTO button – the settings will be cancelled.
To set up the delayed brewing feature, follow the instructions given in section DELAYED BREWING, points 3-6.
To start brewing right away, simply press the ON/OFF button.
ADDITIONAL FUNCTIONS
Sneak-A-Cup®
The Sneak-A-Cup® feature allows you to pour a cup of coffee when the brewing is still in progress. When you remove the jug from the appliance, coffee stops dripping from the spout. To continue brewing, simply replace the pot on the hotplate within 30 seconds.

fee may overflow from the filter you fail to replace the jug within 30 seconds.
BREWING TIPS
Ostir the coffee in the jug to get the full flavour.
you sneak a cup of coffee when brewing is still in progress, it may have different intensity of flavour than the coffee available after the entire process has been completed.
you are not sure how much coffee you should add, start with one spoon of medium ground coffee.
Never reuse paper filters. Paper may absorb the smell of coffee and cause your coffee to smell musty in subsequent brewing. Paper filters may become damaged during use, letting coffee grounds pass into the freshly brewed coffee.
Once opened, store your coffee bag in an airtight container away from direct sunlight. It is best to grind the coffee right before brewing.
you leave the jug containing coffee on the hotplate, remove coffee grounds from the filter holder as soon as they have cooled to avoid bitter aftertaste.
you want your coffee to have a special flavour, avoid using flavoured or packed coffee. It is recommended to buy flavouring syrup and add it directly to freshly ground coffee right before adding milk, cream or sugar.
Binse the jug and filter holder with warm water immediately after use. This will help to preserve good taste of your coffee in subsequent brewings.
Keep the appliance clean at all times. Failure to clean your appliance may affect the taste of coffee.
When making ice coffee, brew double-strength coffee using twice the amount of ground coffee you normally use. Adding ice to the coffee will reduce its strength.
Cleaning and maintenance

ways unplug the appliance and allow cool before cleaning.
After each brewing, discard the paper filter together with the grounds or clean the permanent filter.
When cleaning, use only delicate cloths with a mild detergent or warm water only.

arp cloths or sponges may scratch surface of the appliance.
Never use harsh, abrasive or alcohol-based cleaners.

Before first use it is recommended to rinse the appliance with water containing a small amount of vinegar.
DESCALING
Build-up of mineral deposits is a natural process occurring in all appliances which heat water. Therefore, the coffee maker will need periodic descaling. It is recommended to descale the appliance every 4 6 months, depending on how often you use it.
DESCALING SOLUTIONS
The following agents are normally used for removing mineral deposits from the coffee maker:
vinegar solution
Fill the water tank with the following solution: 1/3 of vinegar, 2/3 of water.
- citric acid solution.
Dissolve one sachet of citric acid in 0.5 litre of water.
Special liquids or tablets.

move the water filter with charcoal before descaling.
filter
① Lift off the lid and pour one of the above solutions into the water tank.

natural_image
Hand pouring liquid into a clear glass coffee maker using an electric kettle (no text or symbols visible)it to
the
② Insert the filter holder in the appliance. Close the lid.
natural_image
Hand placing a black lid into a black oven on a portable kitchen (no text or symbols visible)③ Place the jug in the appliance and insert the plug into the socket.
natural_image
Hand inserting a coffee maker into a digital coffee receiver (no text or symbols visible)④ Press the AUTO CLEAN button to start cleaning. The indicator light above the AUTO CLEAN button will come on.
⑤ Part of the descaling solution will be dispensed into the jug. The remaining amount will be retained in the appliance for 30 minutes until the end of the cleaning process.

The cleaning process takes between 45-60 minutes.
⑥ After descaling you will hear three sound signals and the device will switch off.

After descaling, it is recommended to re the cleaning process 2-3 times using fresh water, as described in section "Before First Use."
Troubleshooting
If the appliance is not operating properly, the following tips may be helpful. If not, do not attempt to repair the appliance on your own and contact an authorised service centre.
| PROBLEM POSSIBLE | CAUSE SOLUTION | |
| The appliance does not work. | The appliance is not plugged. | Make sure that the appliance is plugged into a working outlet and that it has been switched on by pressing the ON/OFF button. |
| The appliance leaks. | Too much water in the water tank. Do not exceed the maximum capacity of the water tank. | |
| The lid has not been closed properly. Press the lid down tightly to close it. | ||
| The jug is not properly positioned under the fi lter holder. | Make sure that the jug is properly positioned at the centre of the hotplate, right under the fi lter holder outlet. | |
| The appliance does not brew coffee. | The water tank is empty. | Make sure that the water tank is fi lled with enough water to brew the desired number of coffee cups. |
| The lid won’t close. | The fi lter holder is not fi xed properly. | Remove the fi lter holder and put it back into the appliance. |
| Coffee spills over the filter holder. | The jug was removed while brewing and not replaced within 30 seconds. | If the jug is removed when brewing is in progress, make sure to replace it within 30 seconds (see Sneak-A-Cup® section). |
| The jug is not positioned centrally on the hotplate. | Pull out the jug and replace it so that it rests centrally in the hollow section of the hotplate. | |
| The freshly brewed coffee contains coffee grounds. | The permanent or paper filter is not properly inserted. | Place a paper or permanent filter in the filter holder and insert the holder into the appliance. |
| It takes very long to brew coffee. Coffee does not taste well. | The appliance requires cleaning. Coffee type was not suitable for use with filter coffee makers. | Follow the cleaning instructions. Only use coffee suitable for use with filter coffee makers. |
| No coffee comes out or it comes out very slow. | No water in the water tank. Fill the water tank with water. | |
| Paper or permanent filter is not positioned correctly. Check if the filter is positioned correctly. | ||
| Coffee is too finely ground and clogs the filter. Use coffee suitable for this type of coffee maker. | ||
| Appliance is clogged by mineral deposits. Follow the instructions in the DESCALING section. | ||
Ecology – environment protection
Each user can protect the natural environment. It is neither difficult nor expensive.
In order to do it: put the cardboard packing into recycling paper container; put the polyethylene (PE) bags into container for plastic.
When worn out, dispose the appliance to particular disposal centre, because of the dangerous elements of this appliance, which can be hazardous for natural environment.
Do not dispose into the domestic waste disposal!!!
The manufacturer/importer does not accept any liability for any damages resulting from unintended use or improper handling.
The manufacturer/importer reserves his rights to modify the product any time in order to adjust it to law regulations, norms, directives or due to construction, trade, aesthetic or other reasons, without notifying in advance.