
FS 40 R - Fan ECG - Free user manual and instructions
Find the device manual for free FS 40 R ECG in PDF.


| Product type | Pedestal fan |
| Model | FS 40 R |
| Brand | ECG |
| Power supply | 220–240 V ~ 50 Hz |
| Power consumption | 50 W |
| Fan diameter | 40 cm |
| Noise level | ≤ 64.3 dB |
| Speed settings | 3 (Low, Medium, High) |
| Modes | Normal, Natural, Sleep |
| Timer | 0.5 – 7.5 hours (in 0.5h steps) |
| Oscillation | Horizontal (left-right) |
| Tilt adjustment | Vertical (up/down) with click lock |
| Remote control | Yes, requires 2× AAA batteries (not included) |
| Control panel | On-unit control panel with LED indicators |
| Safety features | Thermal protection (do not cover); safety grills |
| Cleaning | Wipe with soft dry cloth; use vacuum for grills |
| Storage | Keep in original packaging; protect from dust and moisture |
| Warranty | Warranty void if tampered or misused |
| Included accessories | Remote control, assembly hardware |
Frequently Asked Questions - FS 40 R ECG
User questions about FS 40 R ECG
0 question about this device. Answer the ones you know or ask your own.
Ask a new question about this device
Download the instructions for your Fan in PDF format for free! Find your manual FS 40 R - ECG and take your electronic device back in hand. On this page are published all the documents necessary for the use of your device. FS 40 R by ECG.
USER MANUAL FS 40 R ECG
natural_image
Black and white photo of a standing electric fan with three blades, mounted on a stand (no text or symbols visible)FS 40 R
CZ
STOJANOVÝ VENTILÁTOR
NÁVOD K OBSLUZE
SK
STOJANOVÝ VENTILÁTOR
NÁVOD NA OBSLUHU
PL
WENTYLATOR STOJACY
INSTRUKCJA OBSŁUGI
HU
ÁLLVÁNYOS VENTILÁTOR
HASZNÁLATI ÚTMUTATÓ
DE
STANDVENTILATOR
BEDIENUNGSANLEITUNG
GB
PEDESTAL FAN
INSTRUCTION MANUAL
HR/BIH
VENTILATOR SA STALKOM
UPUTE ZA UPORABU
SI
STOJEČI VENTILATOR
NAVODILA
SR/MNE
VENTILATOR SA STALKOM
UPUTSTVO ZA UPOTREBU
ET
PÕRANDAVENTILAATOR
KASUTUSJUHEND
LT
VENTILIATORIUS SU STOVU
INSTRUKCIJŲ VADOVAS
LV
VENTILATORS UZ STATİVA
ROKASGRĀMATA
A
B
C
BEZPEČNOSTNÍ POKYNY
Do not immerse in water! – Neponořovat do vody!
Do not immerse in water! – Neponárat do vody!
line
| Czas (s) | Wysokie | Średnia | Niskie | | -------- | ------- | ------- | ------ | | 0 | 0 | 0 | 0 | | 6 | 0 | 1 | 0 | | 10 | 0 | 1 | 0 | | 15 | 0 | 0 | 0 | | 20 | 0 | 1 | 0 | | 25 | 0 | 1 | 0 | | 30 | 0 | 1 | 0 | | 35 | 0 | 1 | 0 | | 40 | 0 | 1 | 0 | | 45 | 0 | 1 | 0 | | 50 | 0 | 1 | 0 | | 55 | 0 | 1 | 0 | | 60 | 0 | 1 | 0 | | 65 | 0 | 1 | 0 | | 70 | 0 | 1 | 0 | | 75 | 0 | 1 | 0 | | 80 | 0 | 1 | 0 |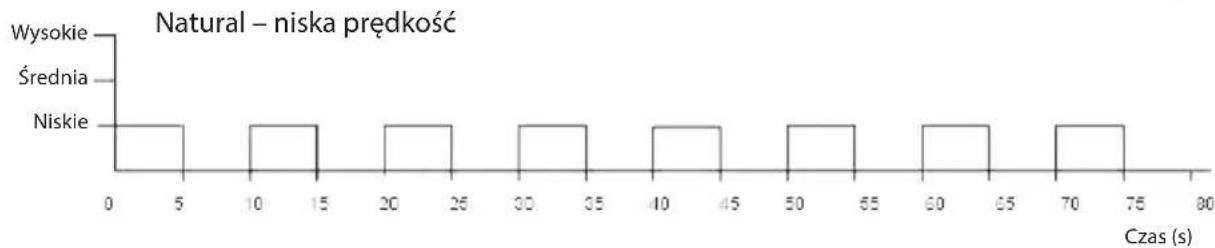
bar
| Category | Value | | ---------- | ----- | | Wysokie | 0 | | Średnia | 0 | | Niskie | 0 |Read carefully and keep for future use!
Warning: The safety measures and instructions contained in this manual do not include all conditions and potential situations. The user must be aware that common sense, caution, and care are factors that cannot be integrated into a product. These factors must be therefore secured by the user/users using and operating this device. We are not liable for any damages caused during shipping, by incorrect use, voltage fluctuation or the modification or adjustment of any part of the appliance. To protect against the risk of fire or electric shock, basic precautions must be taken while using electrical appliances, including the following:
- Make sure the voltage in your outlet corresponds to the voltage provided on the appliance label and that the socket is correctly grounded. The outlet must be installed in accordance with applicable electrical codes according to EN.
- Never use the appliance if the power cable is damaged, if the appliance fell or does not operate properly. All repairs, including cord replacements, must be carried out at a professional service centre! Do not remove the protective covers from the appliance; there is a risk of electric shock!
- Protect the device against direct contact with water and other liquids, to prevent potential electric shock.
- Do not use the appliance outdoors or in wet environments or touch the power cord or the appliance with wet hands. Risk of electric shock.
- Pay closer attention when using the fan near children!
- Place the fan out of the reach of other objects so as to ensure free circulation of air necessary for its correct operation. Never cover the fan openings!
-
Do not use this fan with a program, timer, independent remote control system or any other device, which switches the fan on automatically. Risk of fire if the fan is covered or incorrectly positioned.
-
Do not use the appliance in the immediate vicinity of places, where heat is accumulated (near the stove, heater etc.).
- Never place the fan on a soft surface such as a bed, sofa, etc. It must be placed on a firm, level surface.
- If an unusual smell or smoke begins to come from the appliance, disconnect the appliance immediately and visit a service centre.
- Do not turn the appliance on or off by plugging or unplugging the power cord. Always switch off the fan using the main switch first, then pull the power cord out of the outlet.
- Leaving the fan cord connected to outlet unattended is not recommended. Disconnect the cord from the electrical outlet prior to any maintenance. Do not remove the power cord from the outlet by yanking the cord. Unplug the power cord from the outlet by grasping the plug.
- Do not allow the power cord to touch hot surfaces or run the cord over sharp edges.
- Do not stick your fingers or some objects in the fan openings.
- Use the fan only in accordance with instructions in this user manual. The manufacturer is not liable for any damage caused by the improper use of this appliance.
-
This appliance is intended for household use and similar areas, including:
-
kitchenettes in shops, offices, and other workplaces
- appliances used by guests in hotels, motels and other residential areas.
-
in bed and breakfast establishments
-
This appliance may be used by children under 8 years of age and older and persons with reduced physical, sensory or mental capabilities or lack of experience and knowledge if supervised or instructed to use the appliance in a safe manner and understand the potential hazards. Children must not play with the appliance. Cleaning and maintenance operations must not be carried out by children unless supervised by an adult.
Make sure that the power cable or extension cord can not be accidentally pulled out of the socket during operation. Only carry the appliance by holding the body of the fan.
Do not immerse in water!
Warning: To prevent overheating, do not cover the fan.
DANGER FOR CHILDREN: Children must not play with the packaging material. Do not let children play with the plastic bags. Risk of suffocation.
DESCRIPTION (Page 2)
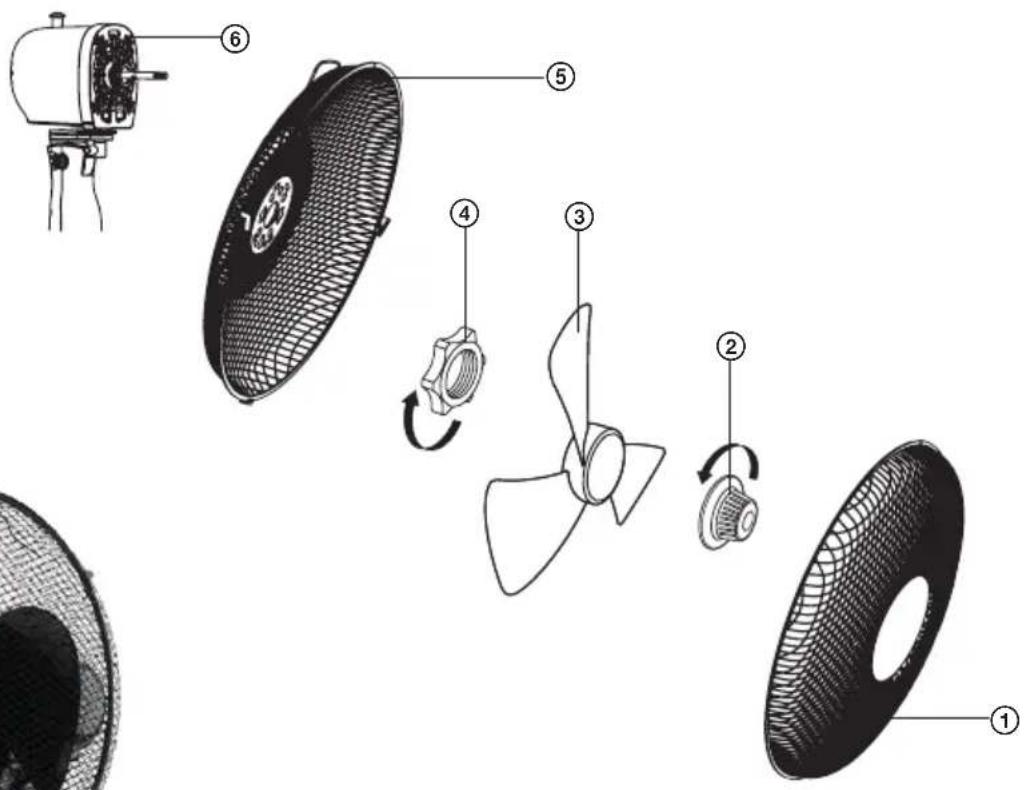
A Fan
- Front grille
- Safety nut of the fan blade
- Fan blade
- Safety nut of the fan grill
- Rear grille
- Motor body with shaft
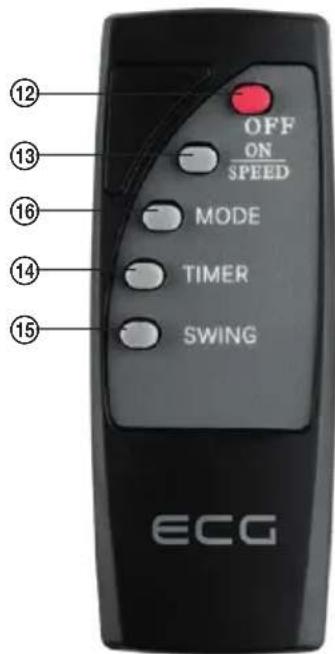
B Control panel and remote control
BUTTONS (those on the panel are identical to the buttons on the remote control)
- OFF - turn off fan
- ON/SPEED – turning on the fan and adjusting the fan speed
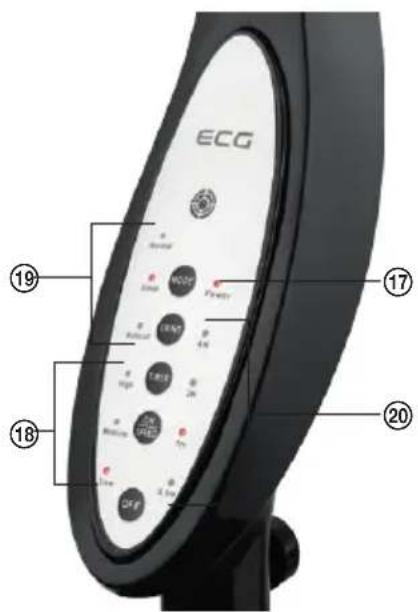
C INDICATORS (only the control panel)
- POWER – power indicator
-
LOW/MEDIUM/HIGH – information about the selected fan speed
-
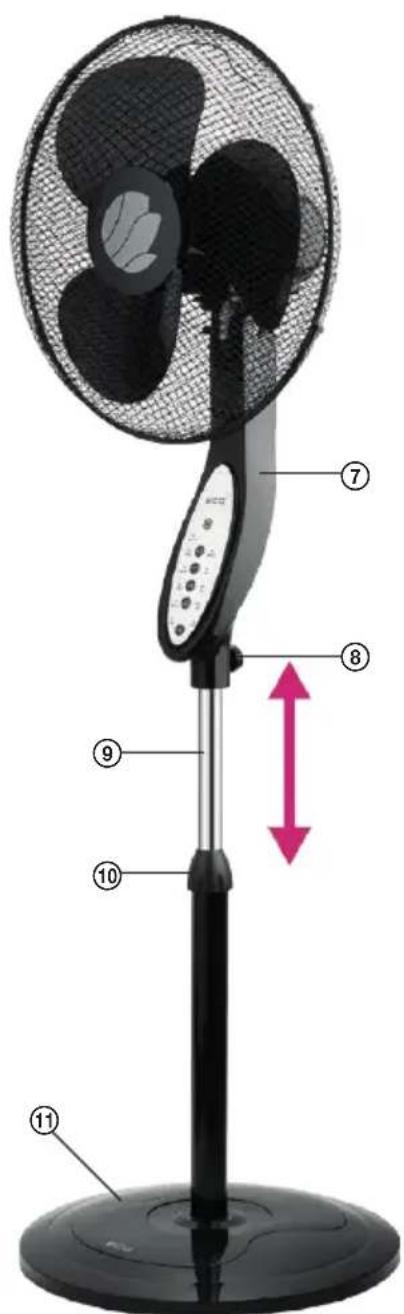
Fan body with power cable and control panel
- Safety screw of the fan body
- Telescopic pole
- Fixed pedestal with lock nut
-
Stand
-
TIMER - timer
- SWING – horizontal oscillation
-
MODE – fan mode setting
-
NATURAL/SLEEP/NORMAL – information about the selected mode
- 0.5H/1H/2H/4H – information about timer setting
ASSEMBLY
Warning: The fan may be used only if it is properly and completely assembled, including the base and the guard grille.
- Attach the pedestal to the base. Attach it firmly with the included nut and screw from the bottom side of the base.
- Attach the rear grille on the motor body so that the projections on the motor fit into the corresponding hole in the grille. (The grille handle must be at the top of the fan.) Secure it with a nut. Tighten it clockwise.
- Attach the blade unit to the motor shaft and secure it with a nut. ATTENTION: Tighten the nut counterclockwise.
- Attach the front grille to the rear grille. For safety reasons, both grilles must be secured by means of clips on the sides of the grilles and fixed with the included nut and screw screwed into the hole at the bottom of the grille.
- Fit the body of the fan on the telescopic pole of the pedestal and secure it using the fixed screw.
- Pull up the telescopic pole to the required height and secure it with a lock nut.
USE
Make sure prior to each use that the fan is in good condition and the power cord is not damaged. The appliance must not be used when the power cord is damaged. The function of the fan can be controlled using either the buttons on the control panel or the remote control. You have to point the remote control at the control panel. Insert two AAA batteries into the remote control prior to use (AAA batteries not included). Pay attention to correct polarity of the batteries.
Warning: Carry the appliance only by holding the fan body.
Ventilation:
- Plug the fan into an electrical outlet and switch it on by pressing ON-SPEED button on the remote control or on the panel of the device. The fan starts at lowest speed.
- Select the desired speed by repeatedly pressing the ON-SPEED. The indicator of the control panel shows the selected speed: LOW (minimal), MEDIUM (medium), HIGH (maximum).
- To turn off the fan, press on the remote control or panel of the device the OFF button. Then unplug the power cord.
- NORMAL – the device runs according to current setting and constant fan rotations.
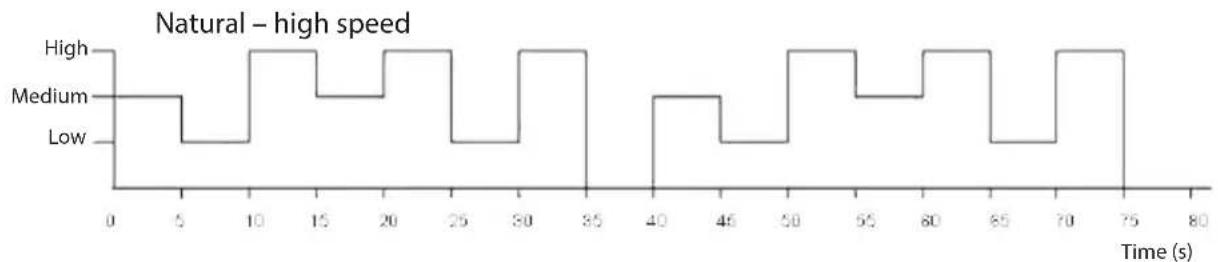
- NATURAL – the motor works automatically in alternating cycle of high – medium – low speed as shown by the following diagram.
line
| Time (s) | High | Medium | Low | | -------- | ---- | ------ | --- | | 0 | 0 | 0 | 0 | | 5 | 0 | 0 | 0 | | 10 | 1 | 0 | 0 | | 15 | 1 | 0 | 0 | | 20 | 1 | 0 | 0 | | 25 | 0 | 0 | 0 | | 30 | 1 | 0 | 0 | | 35 | 1 | 0 | 0 | | 40 | 0 | 0 | 1 | | 45 | 0 | 0 | 1 | | 50 | 1 | 0 | 0 | | 55 | 1 | 0 | 0 | | 60 | 1 | 0 | 0 | | 65 | 1 | 0 | 0 | | 70 | 1 | 0 | 0 | | 75 | 1 | 0 | 0 | | 80 | 0 | 0 | 0 |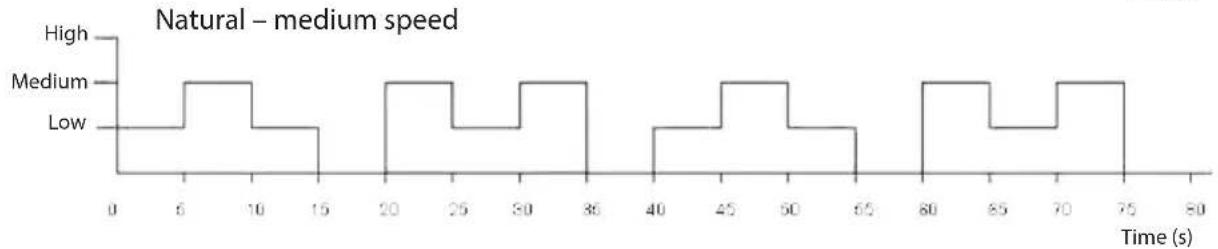
line
| Time (s) | High | Medium | Low | | -------- | ---- | ------ | --- | | 0 | | | | | 6 | | | | | 10 | | | | | 15 | | | | | 20 | | | | | 25 | | | | | 30 | | | | | 35 | | | | | 40 | | | | | 45 | | | | | 50 | | | | | 55 | | | | | 60 | | | | | 65 | | | | | 70 | | | | | 75 | | | | | 80 | | | |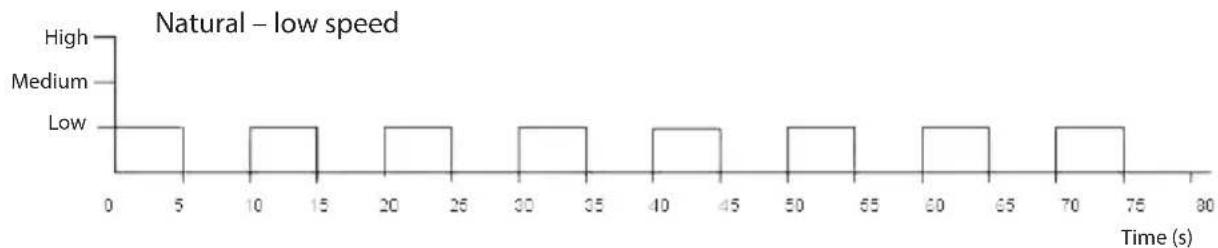
line
| Time (s) | Value | | -------- | ----- | | 0 | Low | | 5 | Low | | 10 | Low | | 15 | Low | | 20 | Low | | 25 | Low | | 30 | Low | | 35 | Low | | 40 | Low | | 45 | Low | | 50 | Low | | 55 | Low | | 60 | Low | | 65 | Low | | 70 | Low | | 75 | Low | | 80 | Low |- SLEEP – the motor works the first half hour in the NATURAL mode at maximum rotations, the next half hour in the NATURAL mode at medium rotations and then it switches into the NATURAL mode at minimum rotations and remains so until switched off.

flowchart
graph TD
    A["Low"] --> B["Medium"]
    B --> C["Natural – high speed"]
    B --> D["Natural – medium speed"]
    B --> E["Natural – low speed"]
Time1 hour0.5 hou
- Horizontal oscillation (left - right): it is controlled by the "SWING" button on the remote controller or on the control panel. The proper indicator lights up on the panel. If you want the movement stopped, press the button again. The indicator "SWING" switches off.
• Vertical tilt (up/down): To set it, grasp the head of the motor and tilt it in the desired direction. You will hear a click indicating the locking of the head in the chosen position. - Timer: This feature allows you to set the time after which the fan is automatically turned off. Set the timer by repeatedly pressing the button TIMER on the remote control or on the panel of the device. Each time you press the button, you extend the set time from half an hour to a maximum of 7.5 hours. The LEDs on the panel show the set time (0,5h, 1h, 2 h, 4 h).
The time is given as a sum of LEDs (for example if the timer is set for 5,5 hour the LEDs show 0,5h+1h+4h).
- If you want to deactivate the timer, set the maximum time and press TIMER once again (all LEDs turn off).
- To turn off the fan, press on the remote control or panel of the device the OFF button. Then unplug the power cable from the socket.
When you are not using the device, always unplug the power cord from the electrical outlet.
CLEANING AND MAINTENANCE
- Before cleaning pull out the plug of the power cord from the outlet!
- Use soft, dry cloth for cleaning. Do not use solvent, thinners or other aggressive solvent containing cleaners.
- Make sure that no liquid enters the device.
- Protect the appliance from water and high humidity!
- Do not immerse the fan into water!
- If the fan is not used for long time, it is necessary to protect it from dust and moisture. We recommend that you store it in its original packaging.
- In the event of a malfunction or an unusual odor, unplug the appliance from the power supply and have it checked by an authorized service center.
- You can use vacuum cleaner with a dust nozzle to clean the grilles.
- Check it once a week and using a vacuum cleaner clean the back grill of the fan.
We recommend to keep the packaging for possible transportation or storage of the fan.
TECHNICAL DATA
Nominal voltage: 220–240 V\~50 Hz
Nominal input power: 50 W
Noise level: 64.3 dB
Fan diameter: 40 cm
Remote control: 2× AAA batteries (not included)
WARRANTY: The following situations void the warranty:
Incorrect or inappropriate handling of the device, failure to observe safety measures applicable to the device, the use of force, alterations or repairs made by a party other than an authorized service centre.
Components subject to normal wear and tear are not covered under the warranty.
USE AND DISPOSAL OF WASTE
Wrapping paper and corrugated paperboard – deliver to scrapyard. Packing foil, PE bags, plastic elements – throw into plastic recycling containers.
DISPOSAL OF PRODUCTS AT THE END OF LIFETIME
Disposal of electric and electronic equipment (valid in EU member countries and other European countries with an implemented recycling system)
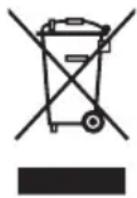
The represented symbol on the product or package means the product shall not be treated as domestic waste. Hand over the product to the specified location for recycling electric and electronic equipment. Prevent negative impacts on human health and the environment by properly recycling your product.
Recycling contributes to preserving natural resources. For more information on the recycling of this product, refer to your local authority, domestic waste processing organization or store, where you purchased the product.
This product complies with EU directive requirements on electromagnetic compatibility and electrical safety.
08/05

The instruction manual is available at website www.ecg-electro.eu.
Changes in text and technical parameters reserved.
SIGURNOSNE UPUTE
line
| Vreme (s) | Brzo | Srednje | Sporo | | --------- | ---- | ------- | ----- | | 0 | 0 | 0 | 0 | | 6 | 0 | 0 | 0 | | 10 | 0 | 0 | 0 | | 15 | 0 | 0 | 0 | | 20 | 0 | 0 | 0 | | 25 | 0 | 0 | 0 | | 30 | 0 | 0 | 0 | | 35 | 0 | 0 | 0 | | 40 | 0 | 0 | 0 | | 45 | 0 | 0 | 0 | | 50 | 0 | 0 | 0 | | 55 | 0 | 0 | 0 | | 60 | 0 | 0 | 0 | | 65 | 0 | 0 | 0 | | 70 | 0 | 0 | 0 | | 75 | 0 | 0 | 0 | | 80 | 0 | 0 | 0 |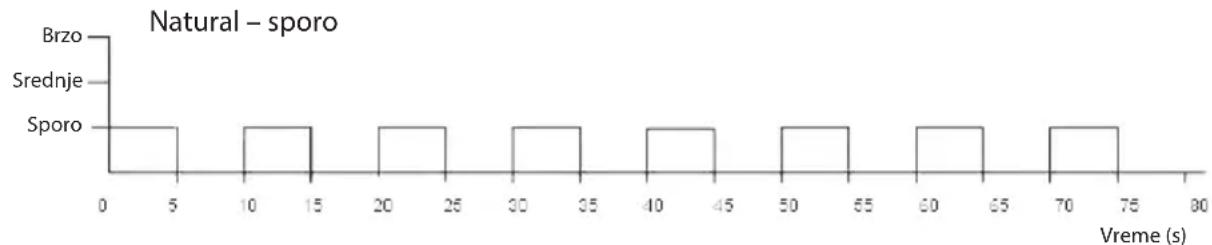
bar
| Category | Vreme (s) | | -------- | --------- | | Brzo | 0 | | Srednje | 15 | | Sporo | 20 | | Sporo | 30 | | Sporo | 40 | | Sporo | 50 | | Sporo | 60 | | Sporo | 70 | | Sporo | 80 |- SLEEP – Prvih pola sata motor radi u režimu NATURAL na najvećoj brzini, a zatim sledećih pola sata u režimu NATURAL pri srednjoj brzini okretanja i na kraju se prebacuje na režim NATURAL s najmanjom brzinom duvanja i tako nastavlja da radi do isključivanja.

flowchart
graph TD
    A["Brzo"] --> B["Natural – brzo"]
    C["Srednje"] --> D["Natural – srednje"]
    E["Sporo"] --> F["Natural – sporo"]
Vreme1 sat0,5 sata
- Horizontalne oscilacije (levo-desno): Upravlja se tasterom „SWING“ na daljinskom upravljaču ili na upravljačkoj ploči uređaja. Na upravljačkoj ploči će zasvetliti odgovarajući indikator. Ako želite da zaustavite kretanje, ponovo pritisnite taster. Indikator „SWING“ će se isključiti.
- Vertikalno podešavanje ugla (gore/dole): Podesite ugao držeći glavu motora i zakrenite je u željenom smeru. Glava je učvršćena kada se začuje zvuk škljocanja.
- Tajmer: Ova funkcija vam omogućuje da odredite vreme nakon kojeg će se ventilator automatski isključiti. Tajmer možete postaviti uzastopnim pritiskanjem tastera TIMER na daljinskom upravljaču ili na upravljačkoj ploči uređaja. Svakim pritiskom na taster produžavate zadato vreme u koracima od po pola sata do maksimalnog vremena od 7,5 sati. Svetla kontrolnih lampica na upravljačkog ploči označavaju postavljeno vreme (0,5h, 1h, 2h, 4h).
Vreme se prikazuje kao zbir vrednosti označenih pojedinim kontrolnim lampicama. Na primer, ako je tajmer podešen na 5,5 sati, onda svetle lampice 0,5h, 1h i 4h, a njihov zbir daje 5,5h.
- Ako želite da isključite tajmer, postavite ga na najduže vreme i još jednom pritisnite taster TIMER (sve lampice se ugase).
250 69 Klíčany, Czech Rep. e-post: ECG@kbexpert.cz
LT
K+B Progres, a.s.
U Expertu 91 tel.: +420 272 122 111
250 69 Klíčany, Czech Rep. el. paštas: ECG@kbexpert.cz
LV
K+B Progres, a.s.
U Expertu 91 tel.: +420 272 122 111
250 69 Klíčany, Czech Rep. e-pasts: ECG@kbexpert.cz

- FS 40 R
- BEZPEČNOSTNÍ POKYNY
- Do not immerse in water! – Neponořovat do vody!
- Do not immerse in water! – Neponárat do vody!
- Read carefully and keep for future use!
- Do not immerse in water!
- DESCRIPTION (Page 2)
- A Fan
- B Control panel and remote control
- C INDICATORS (only the control panel)
- ASSEMBLY
- USE
- Ventilation:
- CLEANING AND MAINTENANCE
- TECHNICAL DATA
- USE AND DISPOSAL OF WASTE
- DISPOSAL OF PRODUCTS AT THE END OF LIFETIME
- SIGURNOSNE UPUTE
- LT
- LV
Brand : ECG
Model : FS 40 R
Category : Fan