
FT 40a - Fan ECG - Free user manual and instructions
Find the device manual for free FT 40a ECG in PDF.


| Product Type | Table Fan |
| Model | FT 40a |
| Brand | ECG |
| Fan Diameter | 40 cm |
| Number of Speeds | 3 |
| Speed Settings | Low, Medium, High |
| Oscillation | Yes, with automatic rotation control |
| Tilt Adjustment | Yes, adjustable angle via vertical setting nut |
| Power Supply | 220–240 V ~ 50 Hz |
| Power Consumption | 50 W |
| Noise Level | 58.3 dB |
| Construction | Plastic blades, metal grille, sturdy base |
| Safety Features | Thermal overload protection, double insulation |
| Cleaning | Wipe with dry cloth; removable grilles for deep cleaning |
| Maintenance | Disconnect before cleaning; do not immerse in water |
| Assembly Required | Yes, front grille, rear grille, propeller, base |
| Included Accessories | Shaped base with screws, instruction manual |
| Weight | Approximately 2.5 kg (estimated) |
| Dimensions (Height) | Approximately 50 cm (estimated) |
| Warranty | Standard manufacturer warranty (check manual) |
| Intended Use | Household and similar indoor areas |
Frequently Asked Questions - FT 40a ECG
User questions about FT 40a ECG
0 question about this device. Answer the ones you know or ask your own.
Ask a new question about this device
Download the instructions for your Fan in PDF format for free! Find your manual FT 40a - ECG and take your electronic device back in hand. On this page are published all the documents necessary for the use of your device. FT 40a by ECG.
USER MANUAL FT 40a ECG
natural_image
White electric fan with three blades and mesh grille, mounted on a base (no visible text or symbols)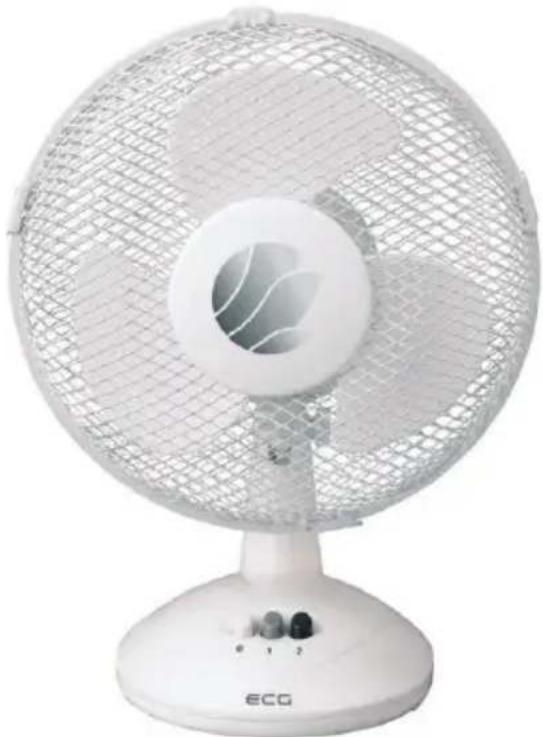
natural_image
White ECG electric fan with mesh grille and visible blades (no text or symbols)FT 23a/FT 30a/FT 40a
CZ
STOLNÍ VENTILÁTOR
NÁVOD K OBSLUZE
SK
STOLOVÝ VENTILÁTOR
NÁVOD NA OBSLUHU
PL
WENTYLATOR BIURKOWY
INSTRUKCJA OBSŁUGI
HU
ASZTALI VENTILÁTOR
HASZNÁLATI ÚTMUTATÓ
DE
TISCHVENTILATOR
BEDIENUNGSANLEITUNG
GB
TABLE FAN
INSTRUCTION MANUAL
HR/BIH
STOLNI VENTILATOR
UPUTE ZA UPORABU
SI
NAMIZNI VENTILATOR
NAVODILA
SR/MNE
STONI VENTILATOR
UPUTSTVO ZA UPOTREBU
ET
LAUAVENTILAATOR
KASUTUSJUHEND
LT
STALINIS VENTILIATORIUS
INSTRUKCIJŲ VADOVAS
LV
GALDA VENTILATORS
ROKASGRÄMATA
POPIS / POPIS / OPIS / LEÍRÁS / BESCHREIBUNG / DESCRIPTION / OPIS / OPIS / OPIS / KIRJELDUS / APRAŠYMAS / APRAKSTS
A
B
CZ
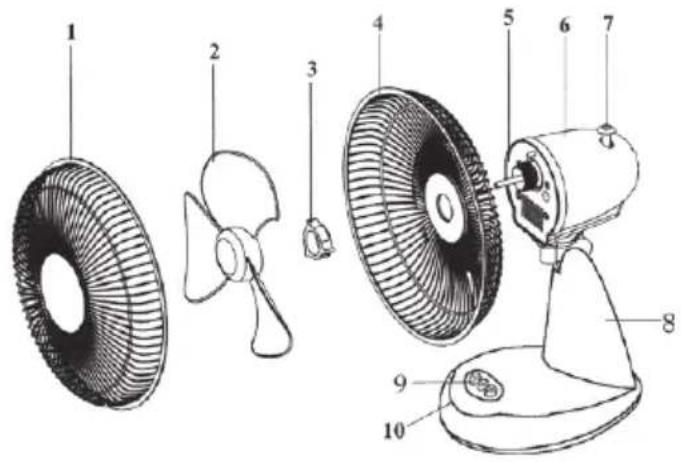
A FT 23a
- Front grille
- Propeller
- Nut for attaching rear grille
- Rear grille
- Motor shaft
- Motor cover
- Automatic rotation control
- Stand
- Speed switch (0, 1, 2)
- Base
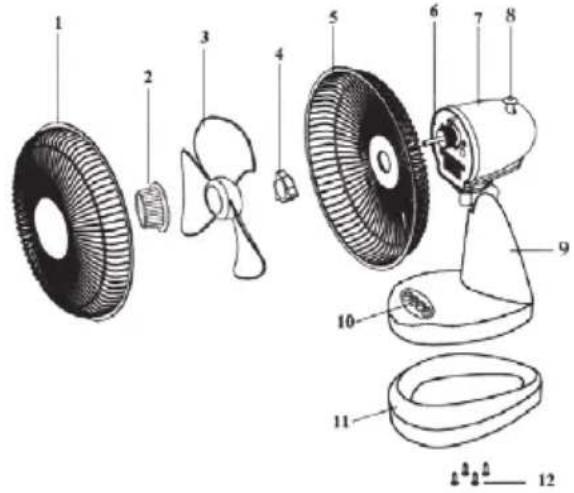
B FT 30a/FT 40a
- Front grille
- Nut for attaching the propeller
- Propeller
- Nut for attaching rear grille
- Rear grille
- Motor shaft
- Motor cover
- Automatic rotation control
- Stand
- Base with speed switch (0, 1, 2, 3)
- Base with screws (12)
HR/BIH
A FT 23a
- Prednja mrežica
- Kolo ventilatora
- Matica za pričvršćivanje stražnje mrežice
- Stražnja mrežica
- Osovina motora
- Poklopac motora
- Tipka automatskog okretanja
- Stalak
- Regulator brzine (0, 1, 2)
- Postolje
B FT 30a/FT 40a
- Prednja mrežica
- Matica za pričvršćivanje kola ventilatora
- Kolo ventilatora
- Matica za pričvršćivanje stražnje mrežice
- Stražnja mrežica
- Osovina motora
- Poklopac motora
- Regulator automatskog okretanja
- Stalak
- Baza s regulatorom brzine (0, 1, 2, 3)
- Stalak s vijcima (12)
SI
A FT 23a
- Prednja mrežica
- Kolo ventilatora
- Matica za pričvršćivanje stražnje mrežice
-
Stražnja mrežica
-
Osovina motora
- Poklopac motora
- Tipka automatskog okretanja
- Stalak
- Regulator brzine (0, 1, 2)
- Postolje
- Prednja mrežica
- Matica za pričvršćivanje kola ventilatora
- Kolo ventilatora
- Matica za pričvršćivanje stražnje mrežice
- Stražnja mrežica
- Osovina motora
- Poklopac motora
- Regulator automatskog okretanja
- Stalak
- Baza s regulatorom brzine (0, 1, 2, 3)
- Stalak s vijcima (12)
B FT 30a/FT 40a
SR/MNE
A FT 23a
- Prednja mrežica
- Kolo ventilatora
- Matica za pričvršćivanje stražnje mrežice
- Stražnja mrežica
- Osovina motora
- Poklopac motora
- Tipka automatskog okretanja
- Stalak
- Regulator brzine (0, 1, 2)
- Postolje
B FT 30a/FT 40a
- Prednja mrežica
- Matica za pričvršćivanje kola ventilatora
- Kolo ventilatora
- Matica za pričvršćivanje stražnje mrežice
- Stražnja mrežica
- Osovina motora
- Poklopac motora
- Regulator automatskog okretanja
- Stalak
- Baza s regulatorom brzine (0, 1, 2, 3)
- Stalak s vijcima (12)
ET
A FT 23a
Do not immerse in water! – Neponořovat do vody!
Read carefully and save for future use!
Warning: The safety measures and instructions, contained in this manual, do not include all conditions and situations possible. The user must understand that common sense, caution and care are factors that cannot be integrated into a product. Therefore, these factors shall be ensured by the user/s using and operating this appliance. We are not liable for any damages caused during shipping, by incorrect use, voltage fluctuation or the modification or adjustment of any part of the appliance. To protect against the risk of fire or electric shock, basic precautions must be taken while using electrical appliances, including the following:
- Make sure the voltage in your outlet corresponds to the voltage provided on the appliance label and that the socket is correctly grounded. The outlet must be installed according to a valid electrotechnical standard EN.
- Never use the appliance if the power cable is damaged, if the appliance fell or does not operate properly. All repairs, including cord replacements, must be carried out at a professional service centre! Do not remove the protective covers from the appliance; there is a risk of electric shock!
- Protect the device against direct contact with water and other liquids, to prevent potential electric shock.
- Do not use the appliance outdoors or in wet environments or touch the power cord or the appliance with wet hands. Risk of electric shock.
- Pay closer attention when using the fan near children!
- Place the fan out of the reach of other objects so as to ensure free circulation of air necessary for its correct operation. Never cover the fan openings!
- Do not use this fan with a program, timer, independent remote control system or any other device, which switches the fan on
automatically. Risk of fire if the fan is covered or incorrectly positioned.
- Do not use the appliance in the immediate vicinity of places, where heat is accumulated (near the stove, heater etc.).
- Never place the fan on a soft surface such as a bed, sofa, etc. It must be placed on a firm, level surface.
- If an unusual smell or smoke begins to come from the appliance, disconnect the appliance immediately and visit a service centre.
- Do not turn the appliance on or off by plugging or unplugging the power cord. Always switch off the fan using the main switch first, and then pull the power cord out of the outlet.
- Leaving the fan cord connected to outlet unattended is not recommended. Disconnect the cord from the electrical outlet prior to any maintenance. Do not remove the power cord from the outlet by yanking the cord. Unplug the power cord from the outlet by grasping the plug.
- Do not allow the power cord to touch hot surfaces or run the cord over sharp edges.
- Do not stick your fingers or some objects in the fan openings.
- Use the fan only in accordance with instructions in this user manual. The manufacturer is not liable for any damage caused by the improper use of this appliance.
-
This appliance is intended for household use and similar areas, including:
-
kitchenettes in shops, offices and other work places
- appliances used by guests in hotels, motels and other residential areas.
-
appliances used in bed and breakfast residences
-
This appliance may be used by children under 8 years of age and older and persons with reduced physical, sensory or mental capabilities or lack of experience and knowledge if supervised or instructed to use the appliance in a safe manner and understand the potential hazards. Children shall not play with the appliance.
Cleaning and maintenance operations must not be carried out by children unless supervised by an adult.
Make sure that the power cable or extension cord can not be accidentally pulled out of the socket during operation.
Use the handle to carry the appliance.
Do not immerse in water!
Warning: To prevent overheating, do not cover the fan.
DANGER FOR CHILDREN: Children must not play with the packaging material. Do not let children play with the plastic bags. Risk of suffocation.
Installation FT 23a – see fig. A
- Unscrew the rear grille attachment nut (3) by turning it counterclockwise.
- Place the rear grille (4) against the motor cover (6) with the handle up. Make sure the guide pins of the motor cover are properly inserted into the grille holes.
- Screw the nut for attaching the back grille (3) firmly by turning it clockwise.
- Remove the plastic protector from the motor shaft (5).
- Insert the propeller (2) onto the motor shaft (5) by gently sliding it onto the motor shaft guide pin.
- Attach the front grille (1) to the back grille (4).
- Turn the clamps in the grille frames and join the grilles firmly together.
Installation FT 30a/FT 40a – see fig. B
- Unscrew the nut that attaches the propeller (2) from the motor (6) shaft by turning it clockwise.
- Continue by unscrewing the nut that attaches the back grille (4) by turning it counter-clockwise.
- Place the rear grille (5) against the motor cover (7) with the handle up. Make sure the guide pins of the motor cover are properly inserted into the grille holes.
- Screw the nut for attaching the back grille (4) firmly to the motor by turning it clockwise.
- Remove the plastic protector from the motor shaft (6).
- Insert the propeller (3) onto the motor shaft (6) by gently sliding it onto the motor shaft guide pin.
- Screw the nut for attaching the propeller (2) to the motor shaft by rotating it counter-clockwise and tighten firmly.
- Attach the front grille (1) to the back grille (5).
- Turn the clamps in the grille frames and join the grilles firmly together.
Base installation
This fan includes a shaped base (11), which must be installed prior to using the fan for the first time. The shaped base comes with 4 screws (in a small bag taped to the bottom side of the shaped base).
Remove the bag of screws and place the shaped base on the base pins and snap on. Make sure the shaped base is secured by the pins on the fan base and screw the 4 included screws into the holes in the middle of the base. Do not tighten the screws too tightly.
HEAT PROTECTION
Heat protection is activated if an actuating unit is overloaded. The fan switches off automatically. In this case, refer to a professional service centre.
USE
The FT 30a/FT 40a fan has 3 speeds, fan 23a has 2 speeds. Its rotating head ensures smooth rotation. It is quiet, with a low energy consumption, reliable and safe and at the same time, ensures effective air circulation.
0 - Fan is off.
1 - Fan is running at low speed.
2 - The fan runs at a higher speed.
3 - The fan runs at highest speed (only the FT 30a/FT 40a fan).
- The fan can rotate during operation.
- For the fan head to rotate, push the automatic rotation control down.
- To stop the rotation of the fan head, pull the automatic rotation control up.
- The fan head can be set up or down. Loosen the vertical setting nut, adjust the desired angle of the fan and tighten the nut again.
CLEANING AND MAINTENANCE
- The fan must be switched off and the cord disconnected from the outlet prior to cleaning.
- Wipe the surface of the fan with a clean and dry cloth. If the fan is very dirty, it can be dismantled and the individual parts (except the power cable) can be cleaned with a cloth or sponge slightly moistened detergent solution. Then wipe dry thoroughly all parts. Make sure that no water gets into the motor during cleaning.
- When dismantling the fan, proceed in reverse order of the assembly.
- Store the ventilator in a dry and clean place away from children.
We recommend to keep the packaging for possible transportation or storage of the fan.
- Protect the appliance from water and high humidity!
- Do not immerse the fan in water!
- Do not use thinner, petrol or other aggressive cleaning agents for cleaning.
- You can use vacuum cleaner with a dust nozzle to clean the grilles.
TECHNICAL DATA
FT 23a
Diameter: 23 cm
Number of speeds: 2
Nominal voltage: 220–240 V\~50 Hz
Nominal input power: 21 W
Noise level: 50.1 dB
FT 30a
Diameter: 30 cm
Number of speeds: 3
Nominal voltage: 220–240 V\~ 50Hz
Nominal input power: 40 W
Noise level: 54.3 dB
FT 40a
Diameter: 40 cm
Number of speeds: 3
Nominal voltage: 220–240 V\~ 50Hz
Nominal input power: 50 W
Noise level: 58.3 dB
USE AND DISPOSAL OF WASTE
Wrapping paper and corrugated paperboard – deliver to scrapyard. Packing foil, PE bags, plastic elements – throw into plastic recycling containers.
DISPOSAL OF PRODUCTS AT THE END OF LIFETIME
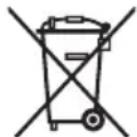
Disposal of electric and electronic equipment (valid in EU member countries and other European countries with an implemented recycling system)
The represented symbol on the product or package means the product shall not be treated as domestic waste. Hand over the product to the specified location for recycling electric and electronic equipment. Prevent negative impacts on human health and the environment by properly recycling your product.
Recycling contributes to preserving natural resources. For more information on the recycling of this product, refer to your local authority, domestic waste processing organization or store, where you purchased the product.
This product complies with EU directive requirements on electromagnetic compatibility and electrical safety.

08/05

The instruction manual is available at website www.ecg-electro.eu.
Changes in text and technical parameters reserved.
GB
SIGURNOSNE UPUTE
250 69 Klíčany, Czech Rep. e-post: ECG@kbexpert.cz
LT
K+B Progres, a.s.
U Expertu 91 tel.: +420 272 122 111
250 69 Klíčany, Czech Rep. el. paštas: ECG@kbexpert.cz
LV
K+B Progres, a.s.
U Expertu 91 tel.: +420 272 122 111
250 69 Klíčany, Czech Rep. e-pasts: ECG@kbexpert.cz
- FT 23a/FT 30a/FT 40a
- POPIS / POPIS / OPIS / LEÍRÁS / BESCHREIBUNG / DESCRIPTION / OPIS / OPIS / OPIS / KIRJELDUS / APRAŠYMAS / APRAKSTS
- CZ
- A FT 23a
- B FT 30a/FT 40a
- HR/BIH
- SI
- SR/MNE
- ET
- Do not immerse in water! – Neponořovat do vody!
- Read carefully and save for future use!
- Do not immerse in water!
- Installation FT 23a – see fig. A
- Installation FT 30a/FT 40a – see fig. B
- Base installation
- HEAT PROTECTION
- USE
- CLEANING AND MAINTENANCE
- TECHNICAL DATA
- FT 23a
- FT 30a
- FT 40a
- USE AND DISPOSAL OF WASTE
- DISPOSAL OF PRODUCTS AT THE END OF LIFETIME
- SIGURNOSNE UPUTE
- LT
- LV
Brand : ECG
Model : FT 40a
Category : Fan