
VS120W - Scelleuse sous vide GORENJE - Free user manual and instructions
Find the device manual for free VS120W GORENJE in PDF.

| Product Type | Vacuum Sealer |
| Brand | Gorenje |
| Model | VS120W |
| Dimensions (W x D x H) | 400 x 200 x 100 mm (approx.) |
| Weight | 1.5 kg (approx.) |
| Power Supply | 220-240 V, 50/60 Hz |
| Power Consumption | 120 W |
| Vacuum Pressure | -0.8 bar (approx.) |
| Sealing Width | 30 cm |
| Functions | Vacuum & Seal, Pulse Control, Dry/Moist Food Modes |
| Bag Compatibility | Standard vacuum bags and rolls up to 30 cm wide |
| Accessories Included | Drip tray, bag cutter, roll holder, 3 vacuum bags (sample) |
| Maintenance | Clean drip tray after each use; wipe exterior with damp cloth |
| Safety Features | Automatic shut-off after sealing, overheat protection |
| Spare Parts Available | Sealing strip, foam gasket, drip tray |
| Repairability | User-replaceable sealing strip; other repairs by qualified service center |
| Warranty | 2 years (depending on region) |
Frequently Asked Questions - VS120W GORENJE
User questions about VS120W GORENJE
0 question about this device. Answer the ones you know or ask your own.
Ask a new question about this device
Download the instructions for your Scelleuse sous vide in PDF format for free! Find your manual VS120W - GORENJE and take your electronic device back in hand. On this page are published all the documents necessary for the use of your device. VS120W by GORENJE.
USER MANUAL VS120W GORENJE
natural_image
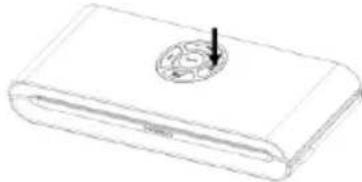
White rectangular electronic device labeled 'gorenje' with a circular logo on the top (no additional text or symbols visible)VS 120W
| Navodila za uporabo | SI |
| Upute za uporabu | BIH HR |
| Uputstvo za upotrebu | BIH SRB MNE |
| Упатства за употреба | MK |
| Instruction manual | GB |
| Instrucțiuni de utilizare | RO |
| Instrukcja obsługi | PL |
| Návod na obsluhu | SK |
| Használati útmutató | H |
| Інструкції з експлуатації | UA |
| Návod k obsluze | CZ |
| Инструкции за употреба | BG |
| Gebrauchsanleitung | D |
| Brugsanvisning | DK |
| Bruksanvisning | SV |
| Bruksanvisning | NO |
| Käyttöohje | FI |
| Руководство по эксплуатации | RUS |
SL Navodila za uporabo ....1
natural_image
Close-up of scissors cutting through plastic film strips (no text or symbols visible)natural_image
Line drawing of a closed book with a circular cover and two arrows pointing to its pages (no text or symbols)Slika 5
natural_image
Technical line drawing of a mechanical component with a circular feature and a cross-sectional view (no text or symbols)
NAPOMENA: ovaj uređaj proizvodi u vrećici vrlo visok tlak vakuma tijekom postupka vakumiranja. Da bi izbjegli gnječenje nešto osjetljivijih namirnica u slučaju previsokog tlaka vakuma, pomno pratite stanje tlaka vakuma u vrećici, i kada je željeni nivo tlaka postignut smjesta pritisnite tipku “SEAL” (zavari). Uređaj odmah zaustavlja vakumsku crpku i prelazi na postupak zavarivanja vrećice.
- Vakumsko pakiranje je završeno. Istovremeno pritisnite gumbe za otpuštanje na obje strane uređaja, čime otvarate pokrov, i izvadite zavarenu vakumiranu vrećicu – Slika 4.
NAPOMENA:
- Za postizanje što optimalnijih rezultata, između dva postupka napravite stanku i dozvolite uređaju da se ohladi 1 minutu prije ponovne uporabe. Nakon svakog kruga vakumiranja i zavarivanja preporučujemo da obrišete možebitne ostatke tekućine ili namirnica iz otvora vakumske komore.
- Nemojte više vrećica serijsko zavarivati jednu vrećicu odmah iza druge, da ne bi došlo do pregrijavanja grijača, odnosno trake za zavarivanje. Uređaj se neće pokrenuti nakon pritiska tipke “seal” (zavari) ukoliko nije prošlo najmanje 15 sekundi od prethodnog zavarivanja.
When using this electrical appliance, always observe the safety precautions including the following:
READ ALL INSTRUCTIONS!
- Before using this appliance, carefully read the entire instruction manual and save it for future reference.
- Before plugging the power cord into or disconnecting from a wall outlet, make sure that the appliance cover is in unlocked position. Always unplug the appliance from the power outlet when not in use or before cleaning.
- This appliance is not a toy. Close attention is necessary when used by or near children. Store this appliance in a safe place out of reach of children.
- Do not use any bags or attachments not recommended or approved by the appliance manufacturer, and do not use this appliance for any other purpose except its intended use.
- Stop using the appliance immediately if the cord is damaged. Have the cord replaced by a professional.
- Keep the appliance and the power cord away from moving parts.
- Do not touch the hot sealing element located on edge of the top cover of the appliance. It is hot and touching it may result in severe burns.
- Do not try to repair this appliance yourself.
- Do not hit or drop the appliance. Do not use the appliance if it has been dropped or if it appears to be damaged.
- Avoid doing the following: pulling or carrying by the cord, using the cord as a handle, closing a door on the cord, or pulling the cord around sharp edges or corners. Do not operate the appliance if the cord or the plug is wet.
- Keep away from hot cookers, ovens, electric burners or any other hot surfaces or sources of heat. Do not use this appliance on a wet or hot surface or near a heat source.
- Use of an extension cord with this unit is not recommended. However, if one is used, it must have a rating equal to or exceeding the rating of this appliance.
- When disconnecting, to avoid any injury, please hold the plug rather than the cord.
- Before plugging in or operating the appliance, make sure your hands are dry and safe to operate the appliance.
- When the appliance is "ON" or during operation, always keep it on
a stable surface such as a table or a counter.
- There is no need to use any lubricants, such as lubricating oils or water, on this appliance.
- Do not immerse any part of this appliance, power cord or plug in water or any other liquid.
- Do not use this appliance outdoors or on a wet surface. It is intended for indoor household use only.
- This appliance is not intended for use by persons (including children) with reduced physical, sensory or mental capabilities, or lack of experience and knowledge, unless they have been given supervision or instruction concerning use of the appliance by a person responsible for their safety.
- Children should be supervised to ensure that they do not play with the appliance.
- If the supply cord is damaged, it must be replaced by the manufacturer, the manufacturer's service agent or a similarly qualified person, in order to avoid hazard.
CAUTION:
SAVE THESE INSTRUCTIONS.
CONSTRUCTION AND FUNCTIONS
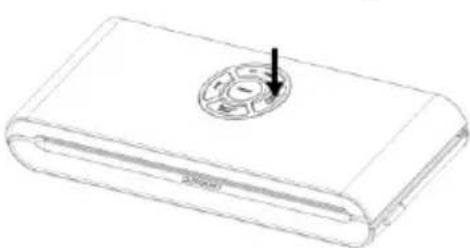
1. VACUUM & SEAL :
This button has two functions, depending on appliance status:
- In stand-by, it starts the automatic operation of vacuuming the bag and automatic sealing of the bag when vacuuming is complete;
-
FOOD(DRY/MOIST): Used for choosing the best bag sealing time
-
Dry setting: for dry bags and items without moisture, with a shorter heat sealing time;
- Moist setting: for wet bags or foods with moisture, with extended heat sealing time.
-
Default setting is for dry bags and normal sealing time.
-
CANCEL: If pressed during operation (vacuuming or sealing), it stops the appliance.
-
SEAL: This button provides two functions:
-
Manual sealing of the open end of a bag, without air suction operation, to make a bag from a bag roll
- When the automatic “Vacuum &seal” function is in operation, this button stops the motor pump and immediately starts sealing the bag. This way, the user can control the vacuum pressure inside the bag and avoid crushing any delicate food or items.
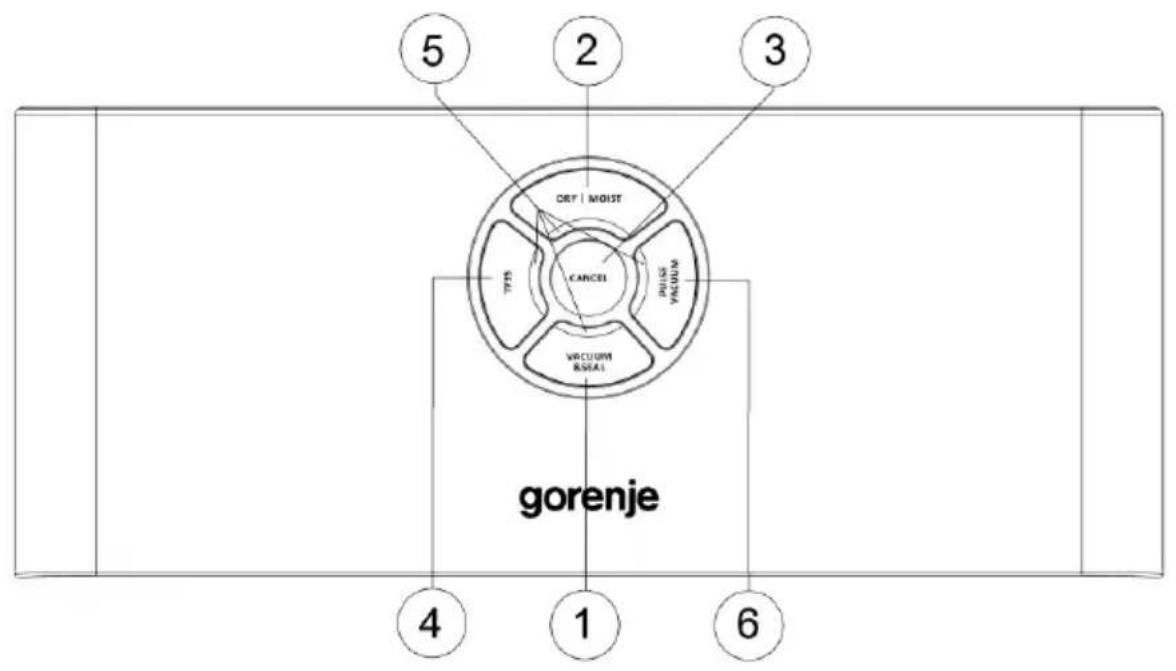
- LED Indicators: Indicate the status of vacuuming or sealing process and current appliance settings.
-
Vacuum container switch"PULSE VACUUM": To start vacuuming with vacuum food containers, jar lids, wine stoppers or other accessories through a hose.
-
Release button: There are two release buttons, one on each side. Press both release buttons to open the cover and release the vacuum pressure inside the appliance.
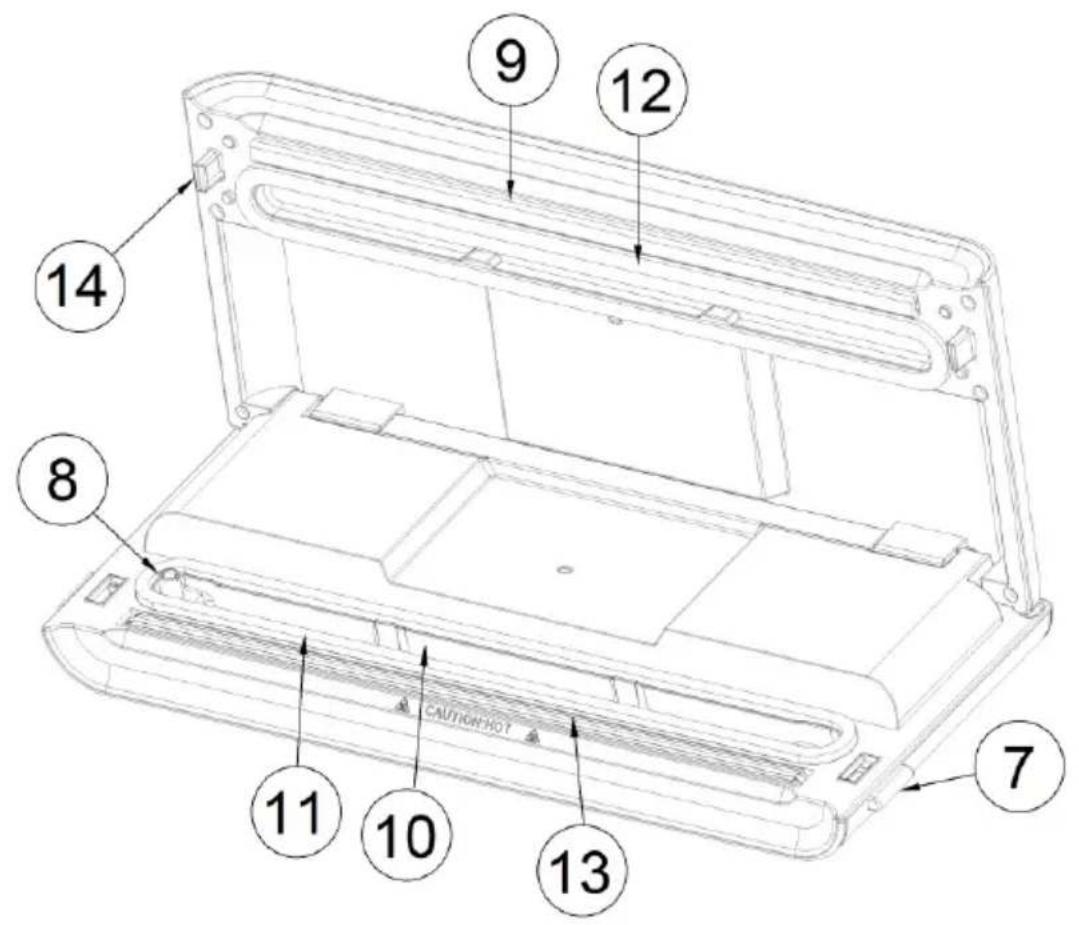
- Air intake: Air intake connecting the vacuum chamber and the pump. For vacuum food containers, wine stoppers etc., attach the hose to this air intake.
-
Sealing strip: Place the bag to be sealed over this strip.
-
Vacuum chamber: Position the open end of the bag inside the chamber. Air is drawn out of bag and any liquid overflow from the bag is caught in the chamber.
- Lower gasket: Aligns with the upper gasket to seal the vacuum chamber. Keep the gasket clean and dry, and replace it when deformed or damaged.
- Upper gasket: Aligns with the lower gasket to seal the vacuum chamber. Keep the gasket clean and dry, and replace it when deformed or damaged.
- Sealing element: Teflon-coated heating element. It heats up and seals the bag.
- Hook: Locks the cover to the base.
OPERATING INSTRUCTIONS
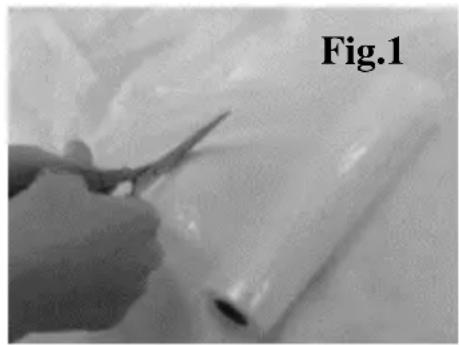
I. Making a bag with a bag roll
- Connect the unit to a power outlet.
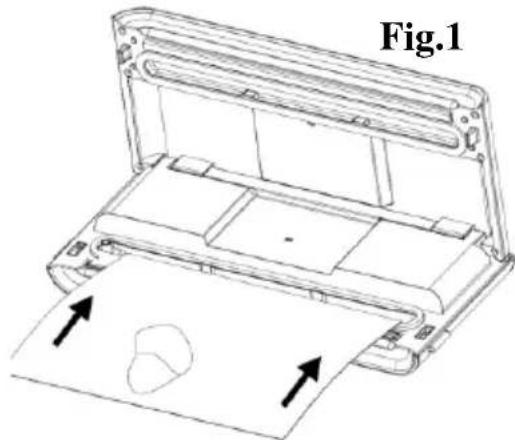
- Use scissors to cut a bag from the bag roll to desired length – Fig. 1.
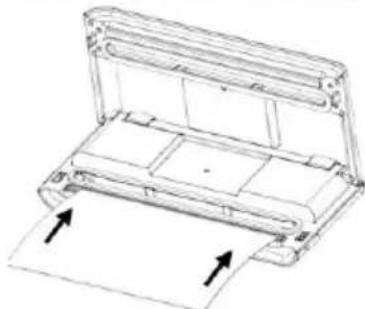
- Place one end of the bag on top of the sealing strip, but do not insert it into the vacuum chamber – Fig. 2.
natural_image
Close-up of a hand using scissors to cut or spread white plastic film, labeled 'Fig.1' in the corner (no other text or symbols visible)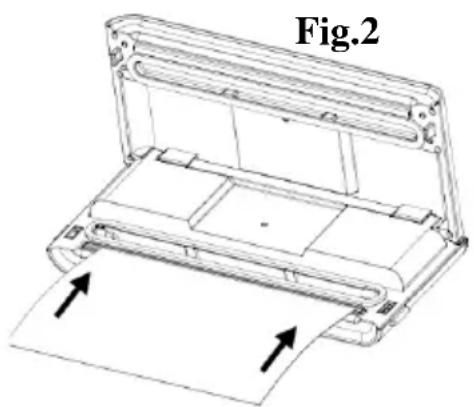
natural_image
Technical line drawing of a printer or printer with paper sheet and paper holder, labeled Fig.2 (no text or symbols on the diagram itself)-
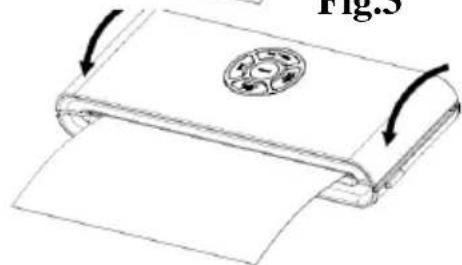
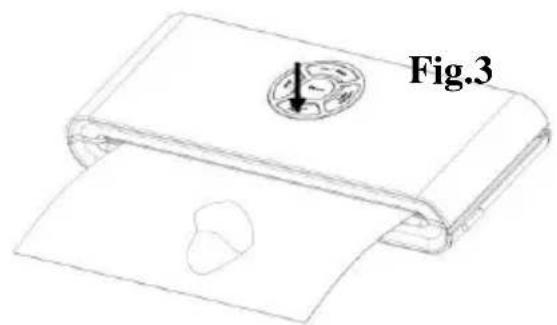
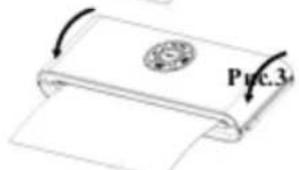
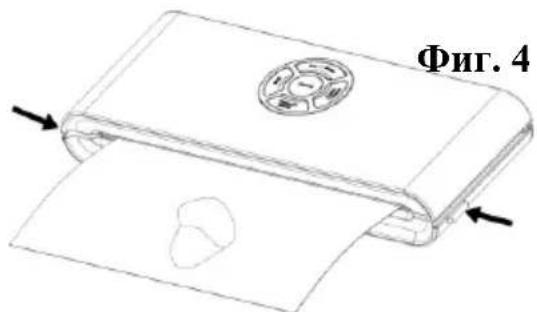
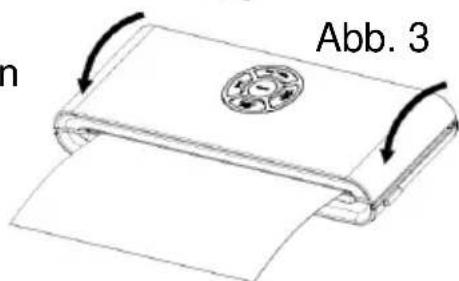
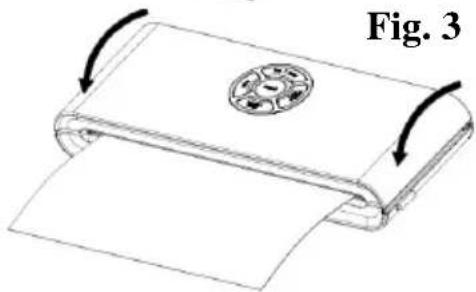
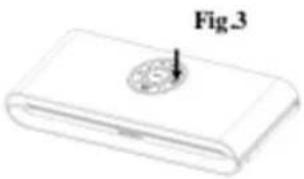
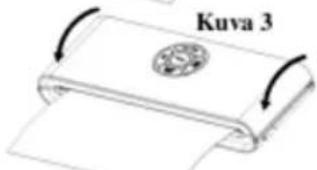
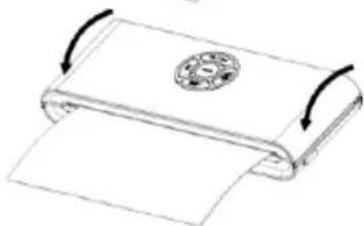
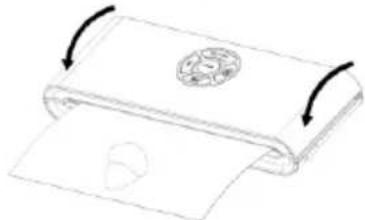
Close the upper lid and press tightly till you hear it click into place on both sides – Fig. 3.
-
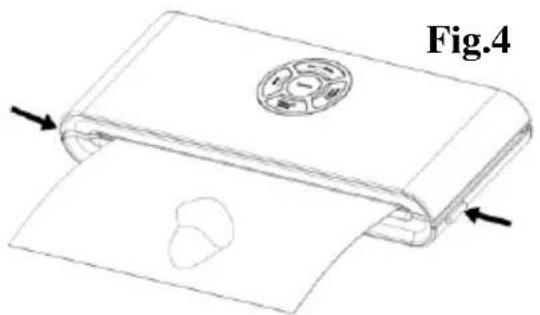
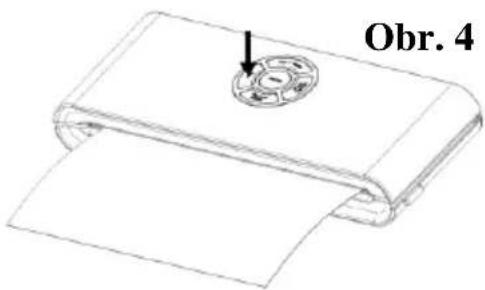
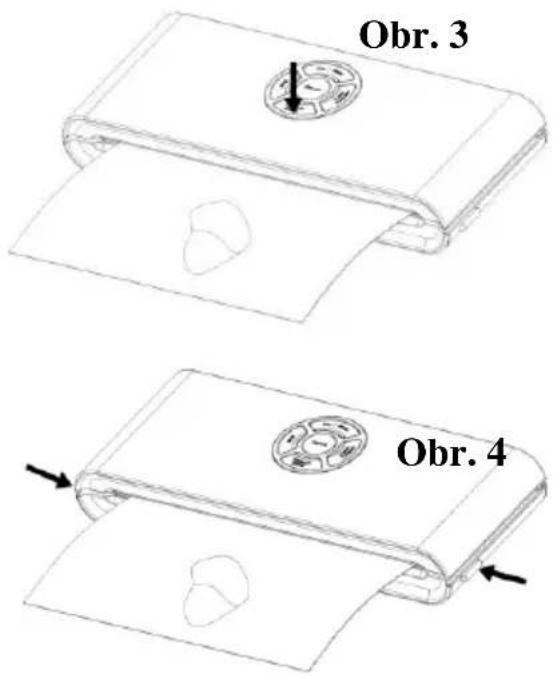
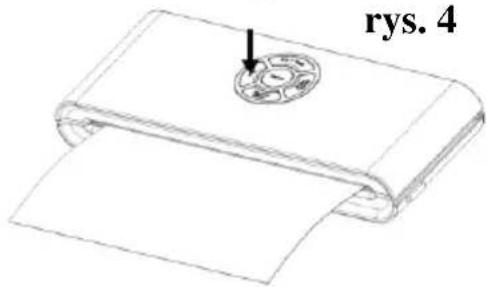
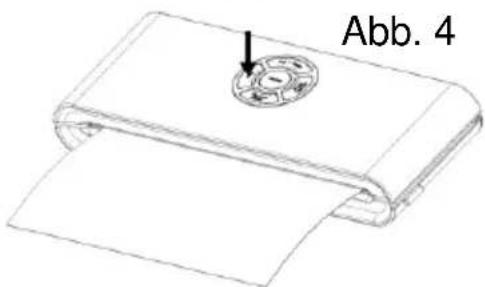
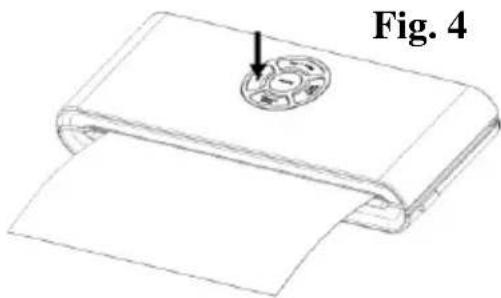
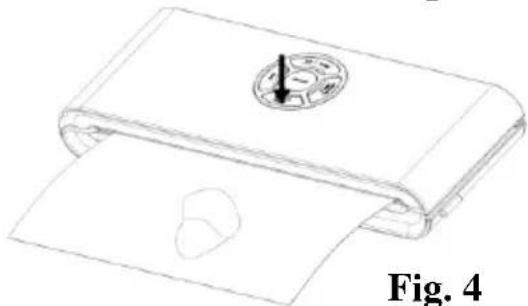
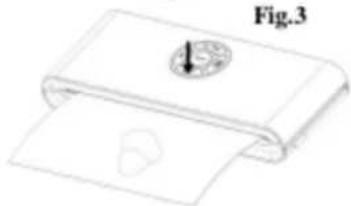
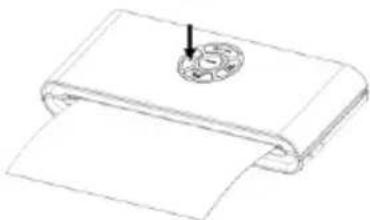
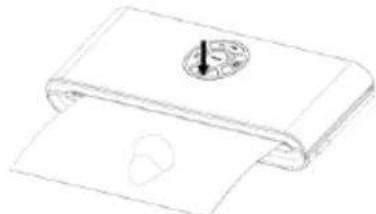
Press the seal button to start sealing the bag – Fig. 4
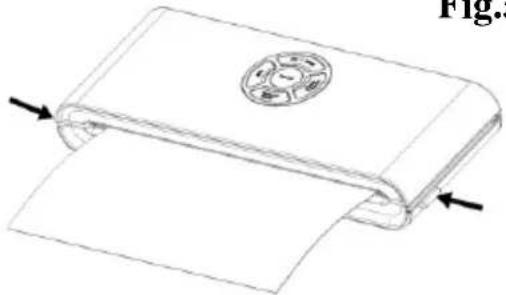
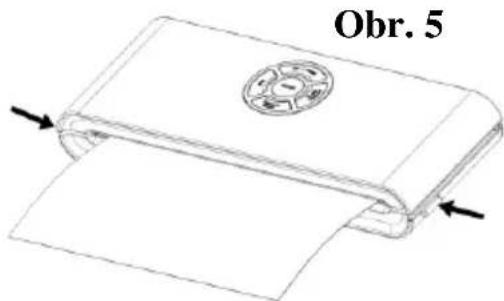
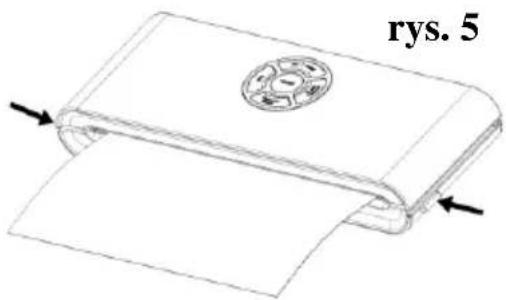
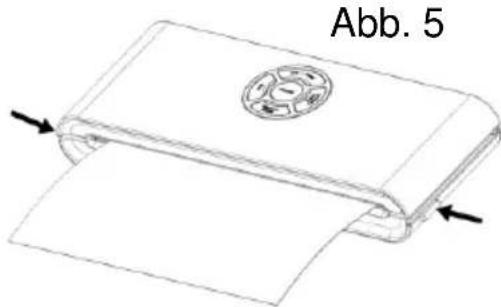
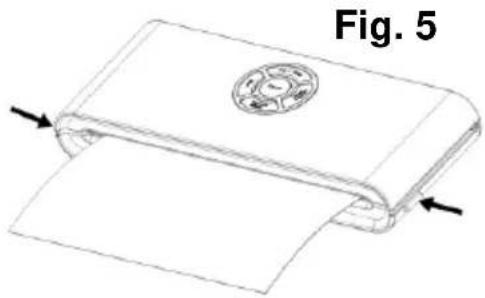
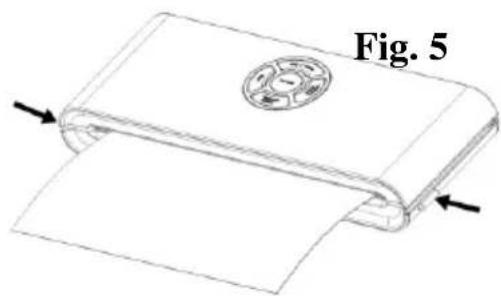
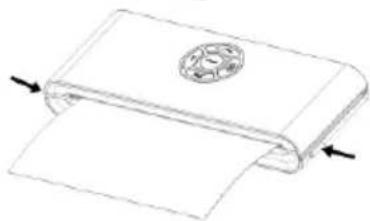
- Press the release button to open the cover and take the bag out of the machine. The bag is done and is ready for vacuum sealing – Fig. 5.
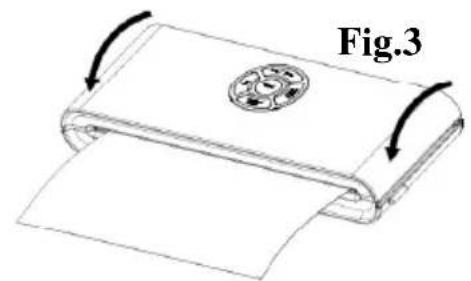
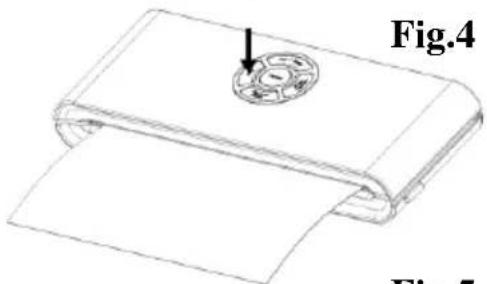
Fig.5
natural_image
Line drawing of a folded paper or document with a circular emblem on the cover, showing no text or symbols.II. Vacuum packaging with a bag
- Place the items inside the bag. Use only special-purpose vacuum bags supplied by the manufacturer, with vacuum channels.
- Clean and straighten the open end of the bag. Make sure there are no dust, wrinkles or ripples where the bag is to be sealed.
- Insert the open end of the bag into the vacuum chamber area. Make sure the air intake is not covered by the bag. – Fig. 1.
natural_image
Line drawing of a printer or printer with paper and two arrows indicating orientation (no text or symbols)
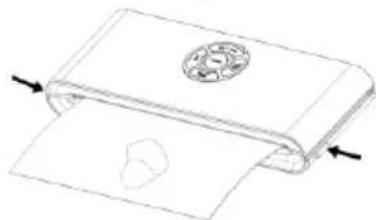
- Press the cover down on both sides using both hands until click sounds are heard on both sides – Fig.2
- Check the LED status of the "DRY/MOIST" button to confirm sealing time depending on the moisture of the items being packed (moist or dry) according to the type of food.
- Then press the Vacuum & Seal button. The unit will start the vacuuming and sealing operation automatically – Fig. 3.
NOTE: This product provides very high vacuum pressure during vacuum packaging in the bag. In order to avoid crushing any delicate item with high vacuum pressure, observe the status of the vacuum pressure inside the bag and press the “SEAL” button immediately when the desired vacuum pressure is achieved. The appliance will then stop the pump and proceed to bag sealing operation.
- The vacuum packaging is done. Simultaneously press the release buttons on the both sides of the appliance to open the cover and take out the sealed bags – Fig. 4.
NOTE:
- For best sealing effect, it is better to let the appliance cool down for 1 minute before using it again. Wipe out any excess liquid or food residue in the vacuum chamber after each vacuuming and sealing operation.
- Do not seal several bags one immediately after another to avoid overheating the sealing element. The appliance will not start if the “seal” button is activated within 15 seconds of the last activation.
- Your appliance can work only with the specific bags provided by us. Do not attempt to use any other bags not intended for vacuum packaging.
● To open a sealed bag, cut it straight across with scissors. - When vacuuming food with high moisture, the bag may be sealed twice to make sure the seal is tight. After completing the first seal, press the seal button again without opening the appliance cover.

This method is only suitable for the foods with high moisture content. When packing food with little moisture, there is no need to seal the bags twice. Liquids or foods in liquid cannot be vacuum sealed. When vacuuming the bags with very moist contents, please clean the bag mouth before vacuuming and sealing.
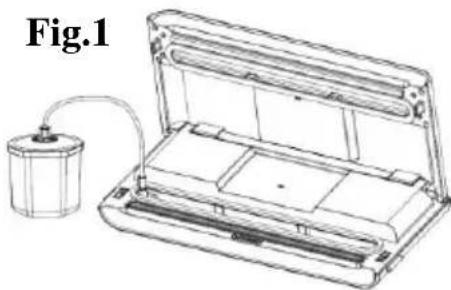
III. Vacuum packaging in a food container (optional)
-
Wipe the food container cover and base and make sure they are clean and dry.
-
Put the items into the food container and leave at least one inch of space between the food and the cover rim. Clean the cover rim of the food container and bottom seal gasket of the food container cover.
natural_image
Line drawing of a device with a cylindrical container connected to an open lid, labeled Fig.1 (no text or symbols on the diagram itself)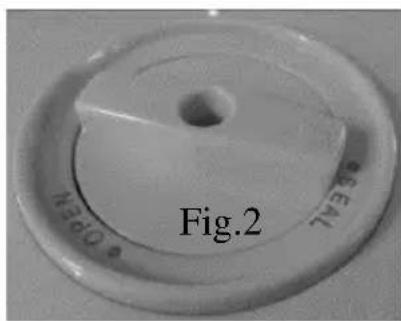
-
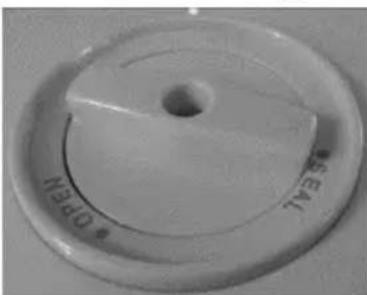
Open the appliance cover. Connect one end of the hose to the air intake in the vacuum chamber area and fit the other end of the hose into the center hole of the food container cover. Make sure the food container cover knob is turned to “SEAL” position – Fig. 1&2.
-
Press the food container switch"PULSE VACUUM" to start vacuuming – Fig. 3. To ensure there is no leaking of air between the cover and the food container, use your hand to push down the cover knob at the beginning of the vacuuming process.
-
Please press the food container cover steady when you pull off the hose accessory, press the release button to open the cover.
Fig.3
natural_image
Line drawing of a rectangular electronic device with a circular button on top (no text or symbols)Opening the food container after vacuum packaging
To open the food container, release the air first by turning the knob switch from "Seal" to "open" position.
Note:
● Make sure the food container cover knob is turned to SEAL position before vacuuming.
- At the beginning of the vacuuming process in a vacuum food container, slightly press down on the food container cover or on the hose adaptor for a few seconds to make sure the hose is attached tightly and to avoid air leaking through the gap between the cover and the food container top rim.
- To test the vacuum and seal, simply tug on the cover. It should not move.
Note:
After finishing the vacuum packing, please always leave the appliance cover open. Do not fasten the cover as this will deform the foam gaskets and affect the appliance function.
CLEANING AND MAINTENANCE
Vacuum sealer
- Always unplug the unit before cleaning.
- Do not immerse in water or any other liquid.
- Avoid using abrasive products or materials to clean the unit as they will scratch the surface.
- Use a mild dishwashing soap and a warm damp cloth to wipe away any food residue.
- Dry thoroughly before using again.
Note: The foam gaskets around the vacuum chamber should be dried thoroughly before re-assembling. When re-assembling the appliance, take care to prevent any damage, and assemble to original position to ensure a tight seal.
Accessories
Wash all vacuum accessories in warm water with a mild dishwashing soap, but do not immerse the cover in water.
- Vacuum container bases (not lids) are top rack dishwasher-safe. However, vacuum container covers should only be wiped with a damp cloth.
- Make sure the accessories are dried thoroughly before using them again.
- Vacuum containers and covers may not be used in a microwave oven or a freezer.
Storing Your Vacuum Sealer:
- Keep the unit on a flat surface and in a safe place out of reach of children.
- Make sure the lid of the appliance is unlocked when not in use and in storage. Keeping the cover locked will deform the foam gaskets which in turn will cause leaking.
This appliance is marked according to the European directive 2012/19/EU on Waste Electrical and Electronic Equipment (WEEE). This guideline is the frame of a European-wide validity of return and recycling on Waste Electrical and Electronic Equipment.
FOOD PRESERVATION GUIDELINES
| Classification | Food Items | Temperature | Normal Preservation | Vacuum Preservation |
| Refrigerator | Fresh Raw Meat | 5±3°C | 2~3 days | 8~9 days |
| Fresh fish/Seafood | 5±3°C | 1~3 days | 4~5 days | |
| Cooked Meat | 5±3°C | 4~6 days | 10~14 days | |
| Vegetables | 5±3°C | 3~5 days | 7~10 days | |
| Fruit | 5±3°C | 5~7 days | 14~20 days | |
| Eggs | 5±3°C | 10~15 days | 30~50 days | |
| Freezer | Meat | -16~-20°C | 3~5 months | >1 years |
| Fish | -16~-20°C | 3~5 months | >1 years | |
| Sea Food | -16~-20°C | 3~5 months | >1 years | |
| Normal conditions (room temperature) | Bread | 25±2°C | 1~2 days | 6~8days |
| Biscuits | 25±2°C | 4~6 months | >1 years | |
| Rice/ Flour | 25±2°C | 3~5 months | >1 years | |
| Peanuts/Legumes | 25±2°C | 3~6 months | >1 years | |
| Medical supplies | 25±2°C | 3~6 months | >1 years | |
| Tea | 25±2°C | 5~6 months | >1 years |
Guarantee & service
If you need information or if you have a problem, please contact the Gorenje Customer Care Centre in your country (you find its phone number in the worldwide guarantee leaflet). If there is no Customer Care Centre in your country, go to your local Gorenje dealer or contact the Service department of Gorenje domestic appliances.
For personal use only!
GORENJE WISHES YOU A LOT OF PLEASURE WHEN USING YOUR APPLIANCE
We reserve the right to any modifications !!
natural_image
Close-up of a hand using scissors to cut a white plastic sheet, labeled 'Fig.1' in the top right corner (no other text or symbols visible)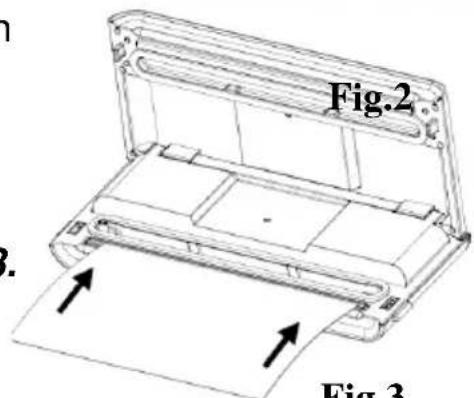
natural_image
Diagram of a mechanical device with rotating arrows indicating rotation, no text or symbols present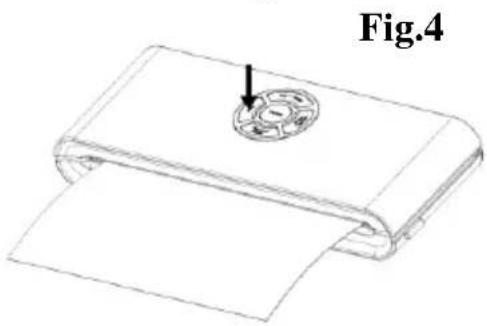
natural_image
Line drawing of a folded paper or sheet with a circular inset showing a hole, labeled 'Fig.4' (no text or symbols on the diagram itself)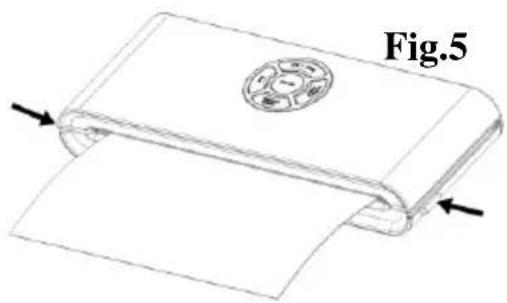
natural_image
Diagram of a folded paper or sheet with a circular inset, labeled Fig.5 (no text or symbols on the diagram itself)natural_image
Technical line drawing of a mechanical device with paper feed and two arrows indicating movement (no text or symbols)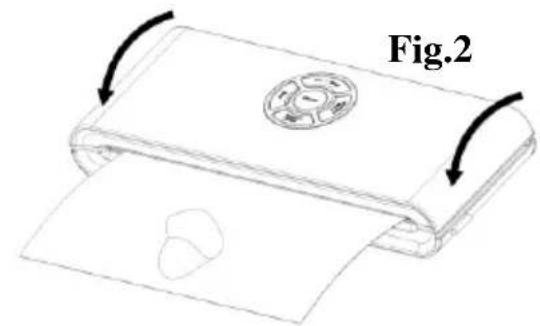
natural_image
Diagram of a folded paper or sheet with a circular inset, labeled Fig.4, showing two arrows pointing to the edges (no text or symbols on the diagram itself)natural_image
Line drawing of a portable electronic device with a cylindrical base and connecting tubing (no text or symbols)DÔLEŽITÉ BEZPEČNOSTNÉ POKYNY
natural_image
Close-up of a hand using scissors to cut a plastic sheet, labeled 'Obr.1' in the corner (no other text or symbols visible)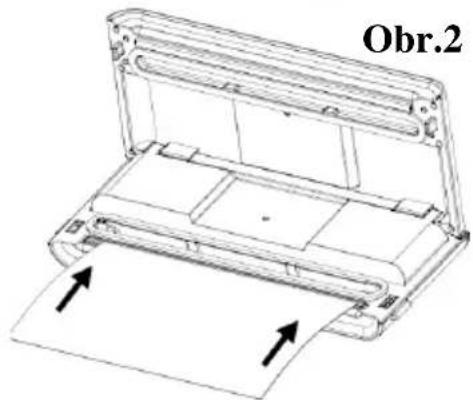
natural_image
Technical line drawing of a printer or printer with paper plane and two arrows indicating orientation (no text or symbols)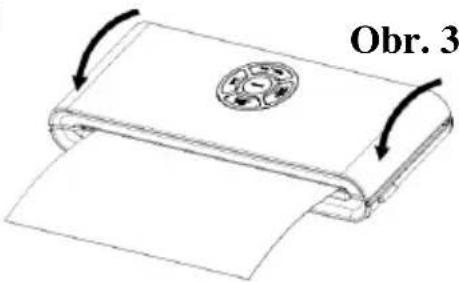
natural_image
Line drawing of a portable device with a cylindrical container and connecting rod (no text or symbols)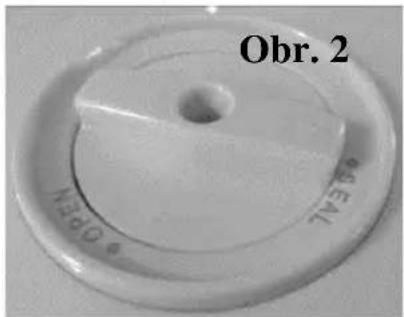
Obr. 3

natural_image
Line drawing of a closed book with a circular emblem on top, no text or symbols presentnatural_image
Line drawing of a portable electronic device with a cylindrical base and cable, no text or symbols presentnatural_image
Close-up of scissors cutting a plastic sheet (no text or symbols visible)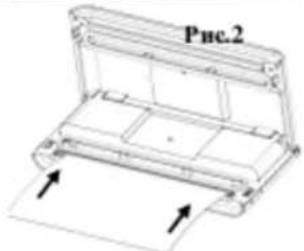
natural_image
Simple line drawing of a mechanical component with a circular feature and a label 'Рис.3' (no text or symbols on the object itself)natural_image
Line drawing of a portable device with a cylindrical container and connecting rod, labeled 'Рис.1' (no text or symbols on the device itself)natural_image
Technical line drawing of a portable electronic device with a cylindrical base and connecting pipe (no text or symbols)natural_image
Close-up of a hand using scissors to cut a transparent plastic sheet, labeled 'rys. 1' in the corner (no other text or symbols visible)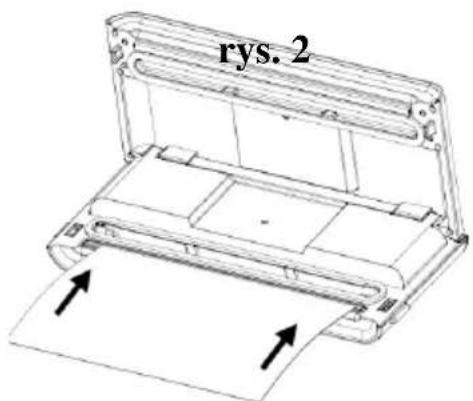
natural_image
Line drawing of a mechanical component with a circular feature and a curved base (no text or symbols)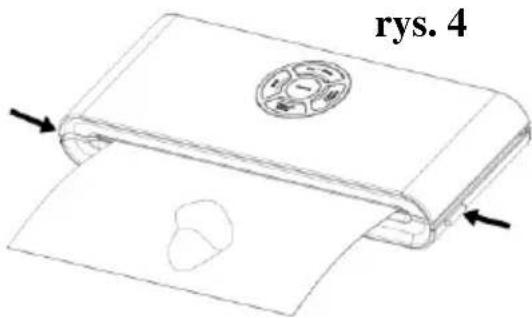
natural_image
Line drawing of a laboratory apparatus with a cylindrical container connected to a tray (no text or symbols)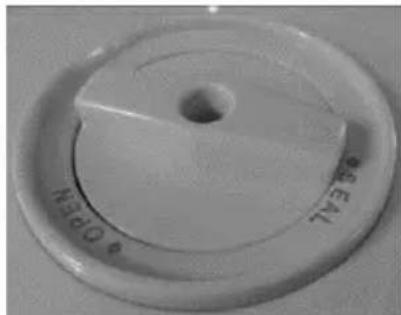
natural_image
Close-up of a circular mechanical component with a central hole and engraved 'OPEN' text (no other visible text or symbols)rys. 2
natural_image
Simple line drawing of a mechanical device with arrows indicating rotation and assembly (no text or symbols)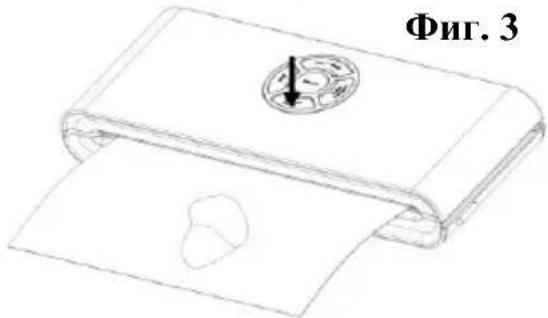
natural_image
Close-up of scissors cutting through plastic film strips, labeled 'Abb. 1' (no other text or symbols visible)
natural_image
Line drawing of an open electronic device with a cylindrical component connected to its side (no text or symbols)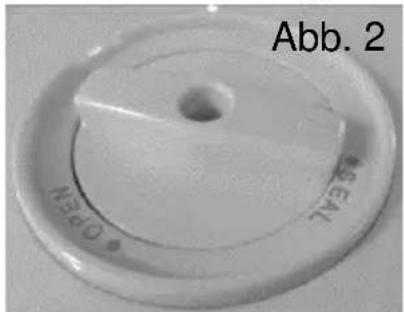
natural_image
Close-up of scissors cutting through plastic film strips (no text or symbols visible)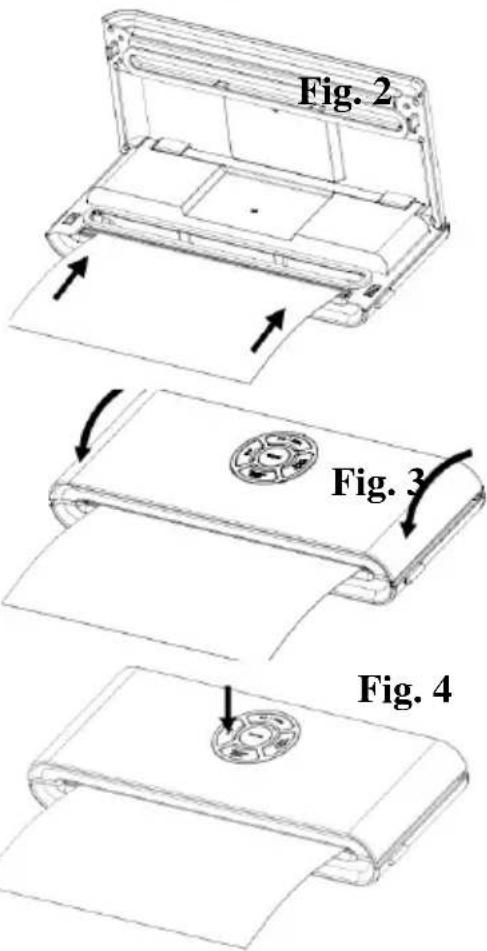
natural_image
Line drawing of a device with a cylindrical container connected to an open panel, labeled 'Fig. 1' (no text or symbols on the diagram itself)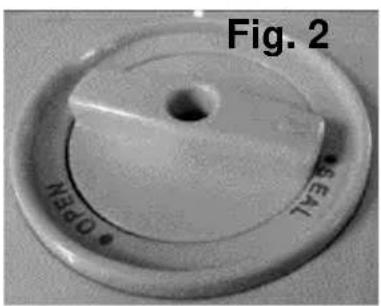
natural_image
Line drawing of a closed wallet with a circular dial on top (no text or symbols)RENG∅RING OG VEDLIGEHOLDELSE Vakuumforsegler
natural_image
Close-up of a hand using scissors to cut or spread white plastic film, labeled 'Fig.1' in the corner (no other text or symbols visible)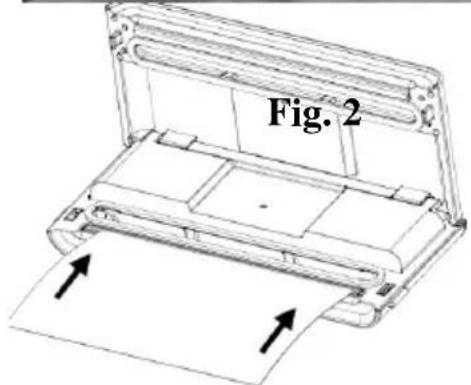
natural_image
Line drawing of a printer with paper and paper roll, labeled Fig. 1 (no text or symbols on the diagram itself)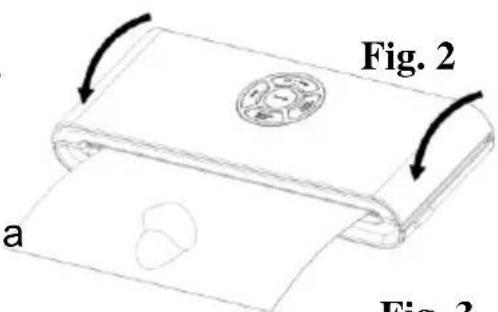
Fig. 3
natural_image
Line drawing of a mechanical device with a circular component and a cross-sectional view (no text or symbols)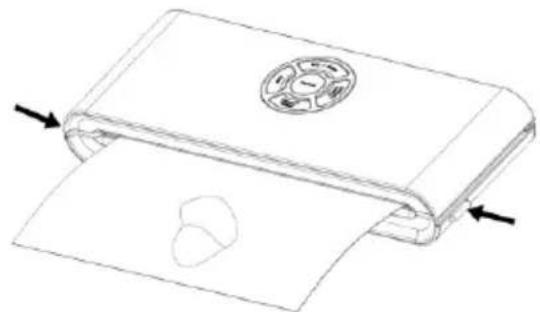
natural_image
Line drawing of a folded paper or document with a circular inset showing internal structure, no text or symbols presentOBS:
natural_image
Line drawing of a portable device with a cylindrical container connected to its side panel, labeled 'Fig. 1' (no text or symbols on the device itself)natural_image
Line drawing of a closed book with a circular emblem on top, no text or symbols presentnatural_image
Close-up of a hand holding scissors cutting through a white cylindrical object (no text or symbols visible)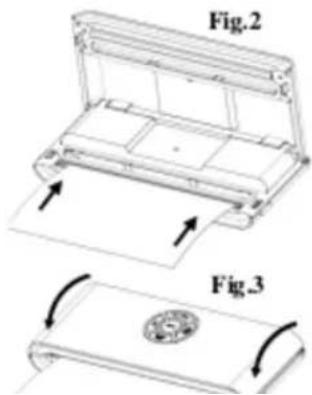
natural_image
Technical line drawing of a mechanical component with arrows indicating direction (no text or symbols)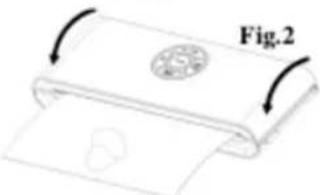
natural_image
Simple line drawing of a folded paper or sheet with a circular inset showing a pointer (no text or symbols)Fig.4
MERK!
- Forseglingseffekten blir best hvis du lar apparatet avkjøles i ett minutt før du bruker det på nytt. Tørk bort eventuell overskuddsvæske og matrester i vakuumkammeret etter hver vakuumerings- og forseglingsoperasjon.
natural_image
Line drawing of a portable device with a cylindrical container and connecting rod, labeled Fig.1 (no text or symbols on the device itself)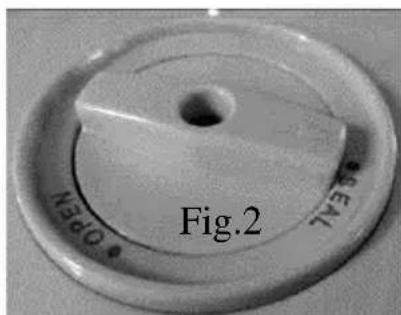
-
Åpne dekselet på apparatet. Koble den ene enden av slangen til luftinntaket i vakuumkammeret, og fest den andre enden av slangen til hullet midt i dekselet til vakuumbeholderen. Sørg for at bryteren på vakuumbeholderdekselet er i stillingen "SEAL" – Fig. 1 og 2.
-
Trykk på bryteren for vakuumbeholder «PULSE VACUUM» for å starte vakuumeringen – Fig. 3. For å være sikker på at det ikke er noen luftlekkasje mellom dekslet og vakuumbeholderen, trykker du ned bryteren på dekselet med hånden ved starten av vakuumeringen.
natural_image
Simple line drawing of a rectangular object with a circular hole and an arrow pointing to it, labeled 'Fig.3' (no text or symbols on the object itself)∅NSKER DEG LYKKE TIL MED DET NYE APPARATET
RAKENNE JA TOIMINNOT
1. VACUUM & SEAL (VAKUMOI & SAUMAA):
natural_image
Close-up of scissors cutting a transparent plastic sheet labeled 'Kuva 1' (no other text or symbols visible)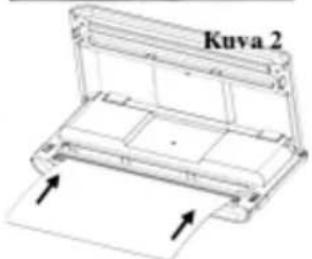
natural_image
Close-up of scissors cutting through plastic film (no text or symbols visible)Рис. 1
natural_image
Technical line drawing of a printer or printer with paper sheet and paper holder (no text or symbols)Рис. 2
natural_image
Simple line drawing of a mechanical device with a circular component and two curved arrows indicating rotation or movement (no text or symbols)Рис. 3
natural_image
Line drawing of a folded paper or document with a circular inset showing a magnified view (no text or symbols)Рис. 4
natural_image
Simple line drawing of a closed book with a circular cover and two arrows pointing to its pages (no text or symbols)Рис. 5
natural_image
Technical line drawing of a mechanical device with arrows indicating movement or force (no text or symbols)Рис. 1
natural_image
Simple line drawing of a folded paper or scroll with arrows indicating rotation (no text or symbols)Рис. 2
natural_image
Simple line drawing of a folded paper or scroll with a circular button on top (no text or symbols)Рис. 3
natural_image
Simple line drawing of a folded paper or document with a circular emblem on the cover, no text or symbols present.Рис. 4
natural_image
Line drawing of a portable electronic device with a cylindrical component connected to its side panel (no text or symbols)Рис. 1
natural_image
Close-up of a circular mechanical component with a central hole and engraved text (no readable symbols or numbers)Рис. 2
natural_image
Simple line drawing of a rectangular object with a circular emblem on top, no text or symbols present.Рис. 3