WAVE6 - Portable speaker IBIZA SOUND - Free user manual and instructions
Find the device manual for free WAVE6 IBIZA SOUND in PDF.

| Product Type | Portable Audio Speaker |
| Brand | Ibiza Sound |
| Model | WAVE6 |
| Dimensions | 260 x 250 x 560 mm |
| Weight | 4.5 kg |
| Max Output Power | 250 W |
| Speakers | 2 x 5.25" (13 cm) woofer |
| Frequency Response | 100 Hz - 18 kHz |
| Main Power Supply | 100-240 V~ 50/60 Hz via 9 V = 2 A adapter |
| Built-in Battery | Lithium 7.4 V = 4400 mAh |
| Bluetooth Range | 10 m (without obstacles) |
| Supported Audio Formats | MP3, WMA |
| Inputs | USB, micro-SD, AUX (LINE), MIC (jack) |
| Main Functions | USB/micro-SD/BT/AUX playback, Karaoke, Mic recording, Equalizer, Repeat, LED lighting |
| Remote Control | Yes (AAA batteries not included) |
| Intended Use | Indoor only |
| Operating Temperature | 5 °C to 35 °C |
| Maintenance and Cleaning | Clean with a soft dry cloth. Do not use chemicals. |
| Safety Instructions | Do not expose to water or moisture. Do not open the device. Avoid prolonged listening at high volume. |
| Spare Parts / Repairability | Power adapter included. Batteries not included. No user-replaceable parts. |
| General Information | CE compliant. Lithium battery not guaranteed. Recycle at waste disposal facility. |
Frequently Asked Questions - WAVE6 IBIZA SOUND
User questions about WAVE6 IBIZA SOUND
0 question about this device. Answer the ones you know or ask your own.
Ask a new question about this device
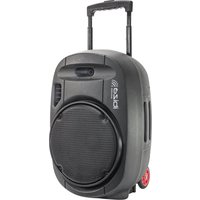
Download the instructions for your Portable speaker in PDF format for free! Find your manual WAVE6 - IBIZA SOUND and take your electronic device back in hand. On this page are published all the documents necessary for the use of your device. WAVE6 by IBIZA SOUND.
USER MANUAL WAVE6 IBIZA SOUND
natural_image
Black and red portable electronic device with two speakers and a digital display (no visible text or symbols)MANUAL
EN- Instruction Manual - p. 3
Congratulations to the purchase of your new speaker.
EXPLANATION OF SIGNS
UK
CA Accordance with the requirements of UK standards

The product is for indoor use only
IMPORTANT SAFETY INSTRUCTIONS AND DANGER WARNINGS
- Please read the manual carefully and keep it for future reference.
- The unit shall be connected to a power supply only of the type described.
• To reduce the risk of fire or electrical shock, do not expose this unit to rain or moisture. - Adequate care shall be taken so that foreign objects do not fall, or liquids are not spilled into the enclosure through openings.
- Do not remove the cover or back, as there are no user-serviceable parts inside.
- For indoor use only
- Do not place on the apparatus a naked flame source, such as lighted candles.
- The unit should only be used in moderate climates
- A minimum distance of 0.5m around the unit must be kept to ensure sufficient ventilation and avoid overheating.
- All safety instructions and warnings must be adhered to. They are part of the manual and must be kept with the manual.
- Any guarantee claims are rendered invalid if damage occurs due to non-observance of these operating instructions. We assume no liability for any consequent damage.
- We assume no liability for personal injury or damage to property caused by incorrect handling or disrespect of the safety instructions. Any guarantee claims expires in such cases.
- Unauthorized conversions and/or modifications of the appliance are not permitted for safety and licensing reasons (CE).
- The appliance may not be exposed to extreme temperatures ( < +5^ / > +35^ ), to strong vibrations or heavy mechanical strain during operation.
- To avoid injury or falls, only lift the device using the handle provided.
• To avoid injury or falls, do not use the device as a seat.
• To avoid hearing loss, do not expose yourself to high volume levels for long periods of time.
- Caution: Flashing lights can cause epileptic seizures in sensitive people.
• The device complies with current European legislation regarding human exposure to electromagnetic fields.
DISCONNECT DEVICE: The power outlet must be installed near the equipment and be easily accessible.
IMPORTANT NOTE ON LITHIUM-ION BATTERIES
PRIOR TO USING THE UNIT FOR THE FIRST TIME, PLEASE CHARGE FULLY THE BATTERY
- Charge the battery regularly after each use. Don't wait until it is discharged!
- DON'T allow the battery to discharge completely, otherwise it will lose 20% of its capacity or even be totally damaged! If the voltage becomes too low, the internal circuits are not powered anymore and it will become impossible to recharge the battery!
- If you don't use the unit for a longer period of time, it is recommended to charge it at 40% of its capacity and check/charge it once per month.
\*\* BATTERIES ARE NOT COVERED BY THE WARRANTY \*\*
We cannot be held responsible for damaged batteries further to the non-observance of these basic rules.
CHARGING THE BATTERY
Prior to using the unit for the first time, fully charge the built-in battery. Plug de DC connector of the supplied mains adaptor into the input socket (5) on top of the unit and the other end into an appropriate mains outlet. The built-in battery will start charging, no matter if the speaker is on or off. On the display, the battery charging symbol will run from 1 to 3 cells.
Once the battery is fully charged, it will display steadily 3 cells.
DESCRIPTION OF TOP PANEL
- USB input: Dual function- Play or Charge USB device
- MicroSD card input
- AUX input
- MIC input
- DC input to power/charge the speaker
- ON/OFF switch
- In BT/USB/MicroSD mode: press shortly =Previous song In AUX mode, this button has no function
- ▶ Play/pause: In USB/MicroSD/BT mode this button has the Play/Pause function In AUX mode, this button has no function
- ▶: In BT/USB/MicroSD mode: press shortly = Next song; In AUX mode: no function
- MODE switch to select among AUX/BT/USB/MicroSD mode.
- Repeat button: Repeat one song, repeat all songs
- BT button: in BT mode: press to disconnect the Bluetooth source. In any other mode: Long press to connect BT
- Press to cycle through 6 light effect modes and switch the LED illumination on and off
- MENU button: details see below
- Volume control
- LED display
MENU BUTTON (14)
This button allows to make various adjustments in conjunction with the VOLUME control (15). Press the MENU button:
- If b is displayed, rotate the VOLUME control (15) to adjust the low frequencies of the sound output
- If t is displayed, rotate the VOLUME control (15) to adjust the high frequencies of the sound output
- If MU is displayed, rotate the VOLUME control (15) to adjust the microphone volume
- If EC is displayed, rotate the VOLUME control (15) to adjust the echo effect of the microphone
- If Mb is displayed, rotate the VOLUME control (15) to adjust the low frequencies of the microphone
- If Mt is displayed, rotate the VOLUME control (15) to adjust the high frequencies of the microphone
- If U is displayed, rotate the VOLUME control (15) to adjust the master volume. You can adjust the master volume also directly any time by rotating the VOLUME wheel (15)
INSTRUCTIONS OF USE
- Press the ON/OFF button to switch the unit on.
- Press the MODE button to select an input source between AUX/BT/USB/MicroSD or plug in an auxiliary source, USB or micro-SD and the speaker will automatically switch to the source you just plugged in.
- To use BT mode, you must first pair your smartphone or any other Bluetooth-enabled device with the speaker. To select BT mode when a device has been paired, press the MODE button until BLUE is displayed.
BT PAIRING MODE:
- Press MODE button until BT is displayed.
- Put the cell phone within 3 meters;
- Activate the BT features on your cell phone so that the cell phone starts to search for the BT device. Please refer to the users' manual for details
- Select "WAVE6" from the device list found by the cell phone;
- Press RETURN key on the cell phone to exit from the cell phone menu and play music with the unit when there is no barrier between two cell phones within 10 meters. At this time, you can play music with the unit.
- Shortly press PLAY/PAUSE button to play or pause music. Short press "◀◀" or "▶◀" key to select the previous or next track.
TWS PAIRING MODE:
- Make sure both speakers are OFF.
- Go to your phone's Bluetooth interface and make sure that it is not connected to either of the speakers. If your phone is connected, choose to forget or remove the speakers from the list of available devices.
- Turn both speakers ON, press the MODE button on both speakers. The word « BLUE » should appear on both LCD screens and flash intermittently.
-
Press the « NEXT » button on either one of the speakers for 5 seconds. Both units will enter pairing mode.
-
One of the units will show the word « BLUE » on the LCD display. This is the master unit and will act as the left channel, while the other one will be the slave unit and will act as the right channel.
- Go to your phone's Bluetooth interface and select « WAVE6 » from the list of available devices. If pairing is successful, the word BLUE on the master unit will stop flashing.
- To disconnect the speakers, select any other mode on either one of the speakers.
AUX IN MODE:
Connect an audio lead from the AUX output of your audio device to the AUX input on the unit. Press MODE button until AUX is displayed. When a device is plugged into the AUX socket, it will disconnect all other audio devices. In AUX mode, all functions can be controlled by the external device.
USB MODE:
- After start-up, press MODE to select "USB" and insert the USB device. The unit will automatically read and play the music in the USB device.
- Press "▶II" key shortly to pause or play the track.
- Shortly press "◀" key to skip to the previous track.
- Shortly press "▶▶" key to skip to the next track.
USB CHARGING FUNCTION
If you don't use the USB input to play files from a USB media, you can connect your smartphone to this input to charge your battery. The socket supplies an output voltage of 5V=1A.
MICROSD MODE:
- After startup, press MODE to select "MicroSD" and insert the MicroSD card. The unit will automatically read and play the music in the MicroSD card.
- Press "▶II" key shortly to pause or play the music.
- Shortly press "◀◀" key to skip to the previous track.
- Shortly press "▶" key to skip to the next track.
CONNECTION OF A MICROPHONE
Connect the microphone to the MIC input and switch it on.
Note: If you are playing music from any other input, connecting the microphone will not mute the sound output.
KARAOKE FUNCTION
This feature is available with any input. Play a track through USB/MicroSD/Bluetooth/AUX, connect a microphone and sing along. Adjust the volume, echo, bass and treble via the MENU button (14) and the VOLUME wheel (15).
BUILT-IN RECORDING FUNCTION OF MICROPHONE SOUND
Connect a microphone to the MIC input. Plug a USB stick/micro-SD card into the correct input. Press the MODE key and select USB or micro-SD.
If you plug the USB stick/Micro-SD card into this speaker for the first time, the unit will create a folder called RECORD. All recordings will be automatically saved in this folder.
When you are ready to record, press the REC key. The recording will start when the screen displays 00:01.
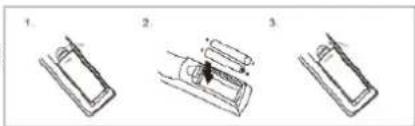
INSTALLING THE BATTERIES IN THE REMOTE CONTROL
Remove the battery cover from the back of the remote control as shown and insert 2x AAA size batteries ensuring correct polarity
natural_image
Three-step diagram showing a mechanical assembly or assembly process with no visible text or symbolsRECOMMENDATIONS FOR BATTERIES

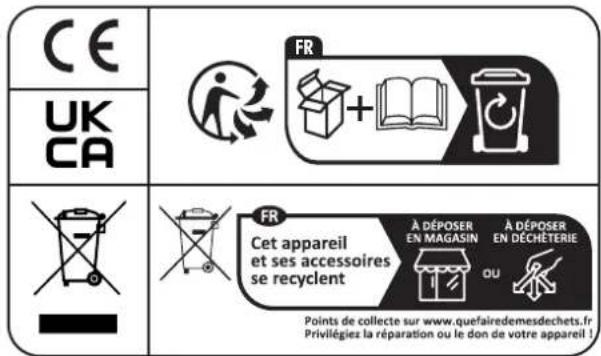
This symbol indicates that used batteries should not be disposed of with household waste but deposited in separate collection points for recycling.
WARNING
Danger of explosion if battery is incorrectly placed. Only replace by the same or equivalent type.
Keep new and old batteries out of the reach of children.
If the battery compartment doesn't close properly, stop using the product and keep it out of the reach of children.
DESCRIPTION OF THE REMOTE CONTROL
- MUTE: Mutes the sound output
- Mode button
- REC: Press to record your voice
- REC PLAY: Press to play your record
- Increase the volume
- Select previous file
-
Play/Pause
-
Select next file
- Reduce the volume
- Repeat one / repeat all
- Equalizer: Cycles through the various music styles: Normal - Rock - Classic - Jazz - Pop
- Number buttons for direct input of a file number. Press the number of the file to access it directly. For files numbers above 9, press 1+ the unit. Ex. For file number 15, press 1 + 5. For file number 38, press 3+8
TROUBLESHOOTING
| Problem Possible cause Solution | ||
| No sound output when power on | 1: No input sound source 1:Connect a AUX signal | |
| 2: Volume in the lowest position 2: Adjust volume | ||
| 3: USB/MicroSD not connected 3: Insert a USB/MicroSD Card | ||
| Distortion of sound | 1:Volume too loud 1: Turn volume lower | |
| 2: Audio file error 2: Check and change the audio file | ||
| 3: Adjust Bass/Treble by “MENU” and “Main volume” | ||
| No sound from the Microphone | 1:Microphone socket not fully plugged in 1: Completely plug in the microphone socket | |
| 2: Microphone switch is not on 2: Power on microphone | ||
| 3: Microphone volume too low 3: Adjust microphone volume | ||
| No sound from the USB/MicroSD card | 1:incompatible song format 1: songs format should be MP3/WMA | |
| 2: Illegal operation causes failures 2: Power off, then power on | ||
| 3:USB/MicroSD Card not inserted properly | 3: Insert USB/MicroSD card properly | |
| Speaker makes much noise | 1: Microphone too close to the speaker | 1: Do not let the microphone's head point at the speaker |
| 2: Microphone is switched on but not in use | 2: Turn off microphone if not in use | |
| 3: Microphone volume too loud | 3: Reduce the microphone volume | |
| 4: Mobile phone too close to the speaker 4: Keep mobile away from the speaker during calls | ||
| 5: Too close to the equipment which interferes with the speaker | 5: Keep the speaker away from other sources of interference | |
| Blue-connect Failure | 1: Blue-connect Disconnected | 1: Find the right device Name |
| 2: Blue-connect Connected but no voice | 2: Confirm if you are connected to the right device Name | |
| 3: Blue-connect effective distance too short | 3: Try to keep away from barriers, such as walls, glasses...etc | |
SPECIFICATIONS
Max. power 250W
Woofer 2 x 5.25"/13cm
Freq. range....100Hz-18kHz
BT frequency 2402-2480MHz
BT Max RF Power -0.85dBm
Power supply....9V=2A via supplied 100-240V\~50/60Hz mains adaptor
Built-in battery...... Lithium 7.4V= 4400mAh
Operating time on battery at medium power 2-4h
Dimensions 260 x 250 x 560mm
Weight 4.5kg

This marking indicates that this product should not be disposed with other household wastes throughout the EU. To prevent possible harm to the environment or human health from uncontrolled waste disposal, recycle it responsibly to promote the sustainable reuse of material resources. To return your used device, please use the return and collection systems or contact the retailer where the product was purchased. They can take this product for environmental safe
recycling.
ENCEINTE DE SOIREE RECHARGEABLE - 2 X 5.25"/13CM - 250W AVEC BLUETOOTH, USB, MICRO-SD, AUX ET EFFET LUMINEUX
INTRODUCTION
natural_image
Three-step diagram showing a mechanical assembly or assembly process with no visible text or symbolsRECOMMENDATIONS POUR LES PILES

natural_image
Three-step diagram showing a mechanical assembly with no visible text or symbolsOMSCHRIJVING VAN DE AFSTANDSBEDIENING
DESCRIPCION DEL MANDO A DISTANCIA
natural_image
Three-step diagram showing a mechanical assembly or assembly process with no visible text or symbolsMANUAL DE INSTRUÇÕES
MANUAL DE INSTRUCTIUNI
REKOMMENDATIONER FÖR BATTERIER

ZALECENIA DOTYCZĄCE BATERII

EU Declaration of Conformity
Hereby we, LOTRONIC SA
Avenue Zénobe Gramme, 9
1480 SAINTES
Belgique
+32.2.390.91.91
Certify and declare under our sole responsibility that the following product:

Trade name:
Product name: Portable speaker
Type or model: WAVE6
Conforms to the essential requirements of the RED directive 2014/53/EU, ErP directive 2009/125/EC, Commission Regulation (EC) 2019/1782, 2011/65/EU RoHS directive and the Commission Delegated Directive (EU) 2015/863
Place and date of issue:
Saintes ( Belgium ), on 28/03/2022
Manuel De Sousa
Quality Manager
CE
Download the manual in other languages
Any questions or problems?
Contact us

IBIZALIGHTSOUND
Follow us on Instagram

Join us on facebook
Assembled in PRC • Designed by LOTRONIC S.A. •
https://ibizashop.eu/
©Copyright LOTRONIC 2024