Multi-Tool MM12V - Electric multifunction tool DREMEL - Free user manual and instructions
Find the device manual for free Multi-Tool MM12V DREMEL in PDF.

| Product type | Cordless multifunction power tool |
| Brand | DREMEL |
| Model | Multi-Tool MM12V |
| Rated voltage | 12 V |
| No-load speed | 7,000–20,000 rpm |
| Oscillation angle | 1.6° (left/right) |
| Weight (without battery) | 0.79 kg |
| Operating temperature | -20 to +49 °C |
| Battery type | Lithium-Ion, recommended B12V |
| Recommended charger | GAL 12V-20 |
| Sound pressure level | 88 dB(A) |
| Sound power level | 96 dB(A) |
| Vibration (sanding) | 2.0 m/s² (K=1.5 m/s²) |
| Vibration (cutting) | 16.7 m/s² (K=1.5 m/s²) |
| Main functions | Cutting, sanding, scraping, grout removal |
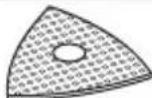
| Included accessories | Plunge-cut blade, sanding pad, abrasive sheet |
| Charger protection class | II (double insulation) |
| Maintenance | Regularly clean ventilation slots |
| Safety | PPE mandatory (goggles, mask, hearing protection) |
| Warranty | According to national legislation |
Frequently Asked Questions - Multi-Tool MM12V DREMEL
User questions about Multi-Tool MM12V DREMEL
0 question about this device. Answer the ones you know or ask your own.
Ask a new question about this device
Download the instructions for your Electric multifunction tool in PDF format for free! Find your manual Multi-Tool MM12V - DREMEL and take your electronic device back in hand. On this page are published all the documents necessary for the use of your device. Multi-Tool MM12V by DREMEL.
USER MANUAL Multi-Tool MM12V DREMEL
natural_image
3D rendering of a white handheld device with a black handle and control panel (no text or symbols visible)DE Originalbetriebsanleitung 7
EN Original instructions.... 27
FR Notice originale 46
ES Manual original.... 67
PT Manual original.... 87
IT Istruzioni originali.... 107
NL Oorspronkelijke gebruiksaanwijzing .. 127
DA Original brugsanvisning 148
SV Bruksanvisning i original 166
NO Original driftsinstruks 184
FI Alkuperäiset ohjeet 202
EL Πρωτότυπο οδηγιών χρήσης ..... 220
TR Orijinal işletme talimatı 241
PL Instrukcja oryginalna 259
CS Původní návod k používání ..... 280
SK Pôvodný návod na použitie ..... 299
HU Eredeti használati utasítás ..... 318
UK Оригінальна інструкція з
експлуатації 337
RO Instructiuni originale 358
BG Оригинална инструкция ..... 378
MK Оригинално упатство за работа ..... 399
SR Originalno uputstvo za rad ..... 420
SL Izvirna navodila 439
HR Originalne upute za rad 458
Algupärane kasutusjuhend ..... 476
LV Instrukcijas originalvalodā ..... 495
LT Originali instrukcija 515
2|

GAL 12V-20
4
A
B
(2)
natural_image
Close-up of a white plastic tool with a circular head and a labeled component (7), no visible text or symbols beyond the label.C
(6)
D
E
6|
Deutsch
Symbole
natural_image
Symbol of crossed-out flames and flames crossed out, representing fire resistance or fire resistance (no text present)natural_image
Pure electrical circuit lines without any symbolsnatural_image
Pure electrical circuit lines without any symbolsnatural_image
Pure electrical circuit lines without any symbolsnatural_image
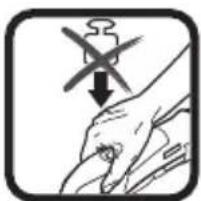
Illustration of a hand holding a tool with a cross symbol above, no text or symbols presentnatural_image
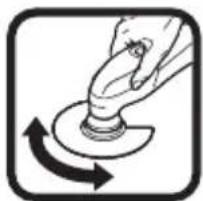
Illustration of a hand pressing down on a circular component with directional arrows (no text or symbols)natural_image
Symbol of a trash bin crossed out by two diagonal lines (no text or numbers present)① Read these instructions.
② Wear hearing protection.
③ Wear safety goggles.
④ Wear a dust mask.
⑤ Class II version
⑥ Do not dispose of power tools along with household waste.
28 | English
Safety Instructions
General Power Tool Safety Warnings
WARNING
Read all safety warnings, instructions, illustrations and specifications provided with this power tool. Failure to
follow all instructions listed below may result in electric shock, fire and/or serious injury.
Save all warnings and instructions for future reference.
The term "power tool" in the warnings refers to your mains-operated (corded) power tool or battery-operated (cordless) power tool.
Work area safety
▶ Keep work area clean and well lit. Cluttered or dark areas invite accidents.
▶ Do not operate power tools in explosive atmospheres, such as in the presence of flammable liquids, gases or dust. Power tools create sparks which may ignite the dust or fumes.
▶ Keep children and bystanders away while operating a power tool. Distractions can cause you to lose control.
Electrical safety
▶ Do not expose power tools to rain or wet conditions. Water entering a power tool will increase the risk of electric shock.
Personal safety
▶ Stay alert, watch what you are doing and use common sense when operating a power tool. Do not use a power tool while you are tired or under the influence of drugs, alcohol or medication. A moment of inattention while operating power tools may result in serious personal injury.
▶ Use personal protective equipment. Always wear eye protection. Protective equipment such as a dust mask, non-skid safety shoes, hard hat or hearing protection used for appropriate conditions will reduce personal injuries.
▶ Prevent unintentional starting. Ensure the switch is in the off-position before connecting to power source and/or battery pack, picking up or carrying the tool. Carrying power tools with your finger on the switch or energising power tools that have the switch on invites accidents.
▶ Remove any adjusting key or wrench before turning the power tool on. A wrench or a key left attached to a rotating part of the power tool may result in personal injury.
▶ Do not overreach. Keep proper footing and balance at all times. This enables better control of the power tool in unexpected situations.
▶ Dress properly. Do not wear loose clothing or jewellery. Keep your hair and clothing away from moving parts. Loose clothes, jewellery or long hair can be caught in moving parts.
If devices are provided for the connection of dust extraction and collection facilities, ensure these are connected and properly used. Use of dust collection can reduce dust-related hazards.
▶ Do not let familiarity gained from frequent use of tools allow you to become complacent and ignore tool safety principles. A careless action can cause severe injury within a fraction of a second.
Power tool use and care
▶ Do not force the power tool. Use the correct power tool for your application. The correct power tool will do the job better and safer at the rate for which it was designed.
▶ Do not use the power tool if the switch does not turn it on and off. Any power tool that cannot be controlled with the switch is dangerous and must be repaired.
▶ Disconnect the plug from the power source and/or remove the battery pack, if detachable, from the power tool before making any adjustments, changing accessories, or storing power tools. Such preventive safety measures reduce the risk of starting the power tool accidentally.
▶ Store idle power tools out of the reach of children and do not allow persons unfamiliar with the power tool or these instructions to operate the power tool. Power tools are dangerous in the hands of untrained users.
- Maintain power tools and accessories. Check for misalignment or binding of moving parts, breakage of parts and any other condition that may affect the power tool's operation. If damaged, have the power tool repaired before use. Many accidents are caused by poorly maintained power tools.
▶ Keep cutting tools sharp and clean. Properly maintained cutting tools with sharp cutting edges are less likely to bind and are easier to control.
▶ Use the power tool, accessories and tool bits etc. in accordance with these instructions, taking into account the working conditions and the work to be performed. Use of the power tool for operations different from those intended could result in a hazardous situation.
▶ Keep handles and grasping surfaces dry, clean and free from oil and grease. Slippery handles and grasping surfaces do not allow for safe handling and control of the tool in unexpected situations.
30 | English
Battery tool use and care
▶ Recharge only with the charger specified by the manufacturer. A charger that is suitable for one type of battery pack may create a risk of fire when used with another battery pack.
▶ Use power tools only with specifically designated battery packs. Use of any other battery packs may create a risk of injury and fire.
When battery pack is not in use, keep it away from other metal objects, like paper clips, coins, keys, nails, screws or other small metal objects, that can make a connection from one terminal to another. Shorting the battery terminals together may cause burns or a fire.
▶ Under abusive conditions, liquid may be ejected from the battery; avoid contact. If contact accidentally occurs, flush with water. If liquid contacts eyes, additionally seek medical help. Liquid ejected from the battery may cause irritation or burns.
▶ Do not use a battery pack or tool that is damaged or modified. Damaged or modified batteries may exhibit unpredictable behaviour resulting in fire, explosion or risk of injury.
▶ Do not expose a battery pack or tool to fire or excessive temperature. Exposure to fire or temperature above 130^ C may cause explosion.
▶ Follow all charging instructions and do not charge the battery pack or tool outside the temperature range specified in the instructions. Charging improperly or at temperatures outside the specified range may damage the battery and increase the risk of fire.
Service
▶ Have your power tool serviced by a qualified repair person using only identical replacement parts. This will ensure that the safety of the power tool is maintained.
▶ Never service damaged battery packs. Service of battery packs should only be performed by the manufacturer or authorized service providers.
Safety information for multifunction tools
▶ Hold the power tool by insulated gripping surfaces, when performing an operation where the cutting accessory may contact hidden wiring. Cutting accessory contacting a "live" wire may make exposed metal parts of the power tool "live" and could give the operator an electric shock.
▶ Use clamps or another practical way to secure and support the workpiece to a stable platform. Holding the workpiece by hand or against your body leaves it unstable and may lead to loss of control.
▶ Only use the power tool for dry sanding. Water entering a power tool will increase the risk of electric shock.
▶ Keep hands away from the sawing area. Do not reach under the workpiece. Contact with the saw blade can lead to injuries.
Clean the air vents on your power tool regularly. The motor's fan will draw the dust inside the housing and excessive accumulation of powdered metal may cause electrical hazards.
▶ Use suitable detectors to determine if there are hidden supply lines or contact the local utility company for assistance. Contact with electric cables can cause fire and electric shock. Damaging gas lines can lead to explosion. Breaking water pipes causes property damage.
▶ Hold the power tool firmly with both hands and make sure you have a stable footing. The power tool can be more securely guided with both hands.
▶ When changing the application tool, wear protective gloves. Application tools can become hot when used for prolonged periods of time.
▶ Do not treat the surface you will be working on with any fluids that contain solvents. Poisonous vapours may develop due to the materials heating up when being scraped.
▶ Take particular care when handling scrapers and blades. The accessories are very sharp. Danger of injury.
In case of damage and improper use of the battery, vapours may be emitted. The battery can set alight or explode. Ensure the area is well ventilated and seek medical attention should you experience any adverse effects. The vapours may irritate the respiratory system.
▶ Do not modify or open the battery. There is a risk of short-circuiting.
The battery can be damaged by pointed objects such as nails or screw-drivers or by force applied externally. An internal short circuit may occur, causing the battery to burn, smoke, explode or overheat.
▶ Only use the battery in the manufacturer's products. This is the only way in which you can protect the battery against dangerous overload.

natural_image
Symbol of crossed-out electrical circuitry with no text or numbersProtect the rechargeable battery against heat, e.g. including prolonged sun exposure, fire, water, and moisture. There is a risk of explosion and short circuit.
32 | English
Keep the magnet away from implants and other medical devices, e.g. pacemakers or insulin pumps. The magnet generates a field that can impair the function of implants and medical devices.
▶ Keep the power tool away from magnetic data carriers and magnetically sensitive equipment. The effect of the magnet can lead to irreversible data loss.
Safety instructions for chargers
This charger is not intended for use by children or persons with physical, sensory or mental limitations or a lack of experience or knowledge. This charger can be used by children aged 8 or older and by persons who have physical, sensory or mental limitations or a lack of experience or knowledge if a person responsible for their safety supervises them or has instructed them in the safe operation of the charger and they understand the associated dangers. Otherwise, there is a risk of operating errors and injuries.
▶ Supervise children during use, cleaning and maintenance. This will ensure that children do not play with the charger.
▶ Only charge Dremel Li-ion batteries with a capacity of 1,3 Ah or more. The battery voltage must match the battery charging voltage of the charger. Do not charge any non-rechargeable batteries. Otherwise there is a risk of fire and explosion.

Only use the charger in enclosed spaces and do not expose it to wet con- s. Water entering a charger increases the risk of electric shock.
▶ Keep the charger clean. Dirt poses a risk of electric shock.
▶ Always check the charge, including the cable and plug, before use. Stop using the charger if you discover any damage. Do not open the charger yourself, and have it repaired only by Dremel or by an authorised after-sales service centre using only original replacement parts. Damaged chargers, cables and plugs increase the risk of electric shock.
▶ Do not operate the charger on an easily ignited surface (e.g. paper, textiles, etc.) or in a flammable environment. There is a risk of fire due to the charger heating up during operation.
Products sold in GB only:
Your product is fitted with an BS 1363/A approved electric plug with internal fuse (ASTA approved to BS 1362).
If the plug is not suitable for your socket outlets, it should be cut off and an appropriate plug fitted in its place by an authorised customer service agent. The replacement plug should have the same fuse rating as the original plug.
The severed plug must be disposed of to avoid a possible shock hazard and should never be inserted into a mains socket elsewhere.
Product Description and Specifications

Read all the safety and general instructions. Failure to observe the safety and general instructions may result in electric shock, fire and/or serious injury.
Please observe the illustrations at the beginning of this operating manual.
Intended Use
The power tool is intended for sawing and cutting wood-based materials, plastic, plasterboard, non-ferrous metals and mounting elements (e.g. nails, clamps). It is also suitable for working on soft wall tiles, removing joints, and for dry sanding and scraping of small areas. It is ideal for working close to edges and flush with surfaces.
The battery charger is intended for charging the rechargeable Dremel Li-Ion batteries.
Product Features
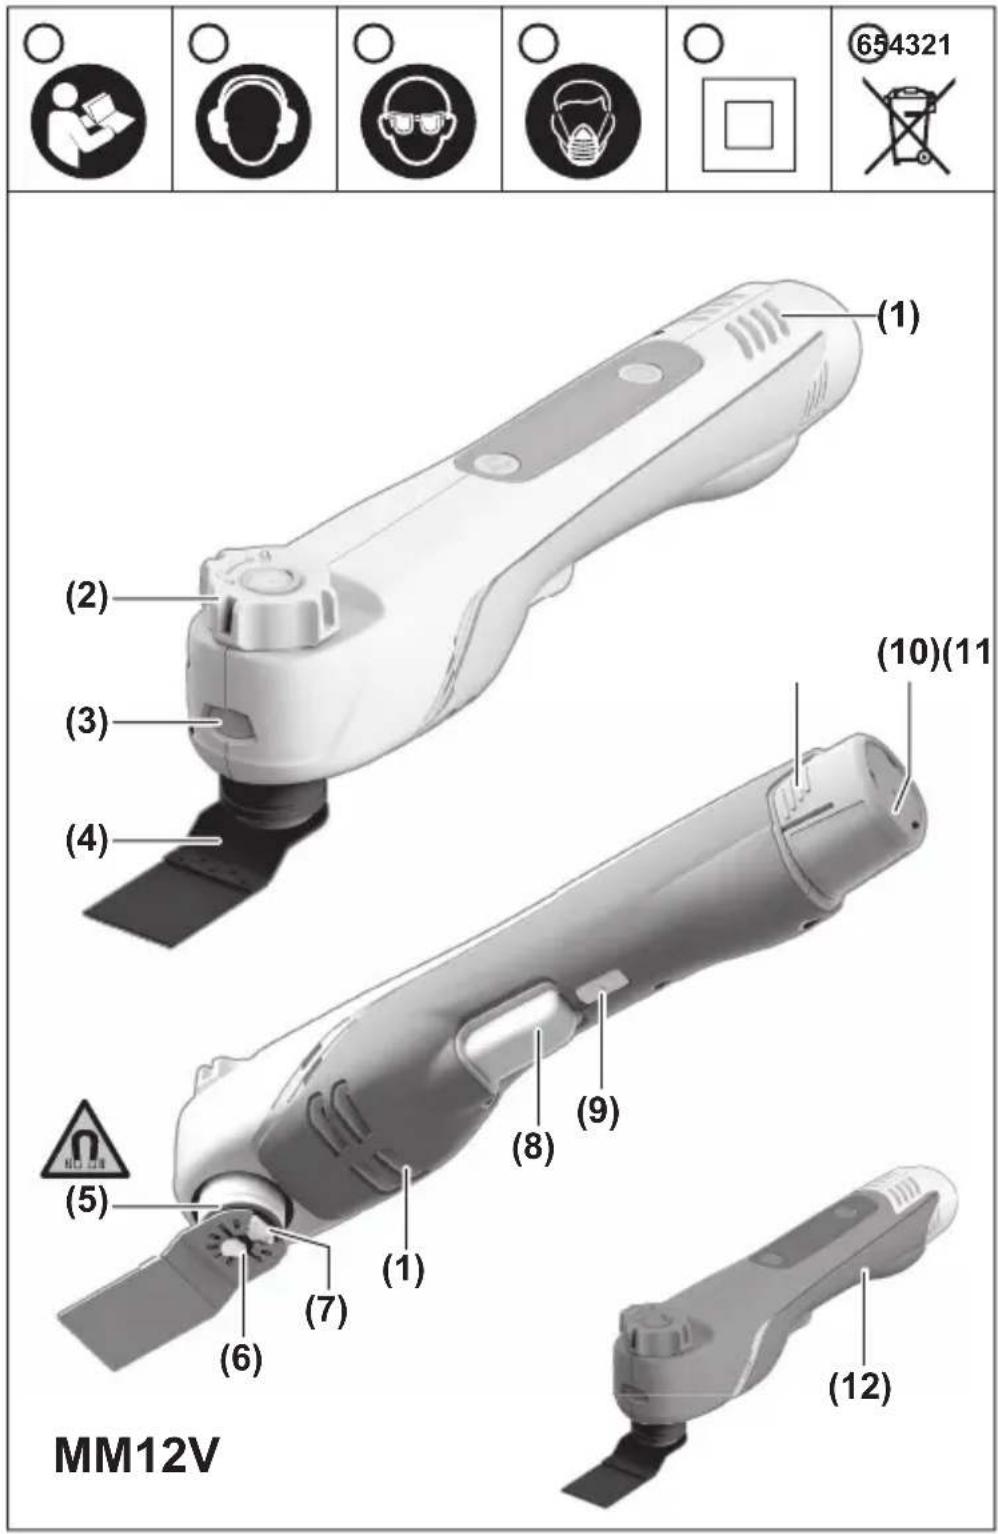
The numbering of the product features refers to the diagram of the power tool on the graphics page.
(1) Ventilation slots
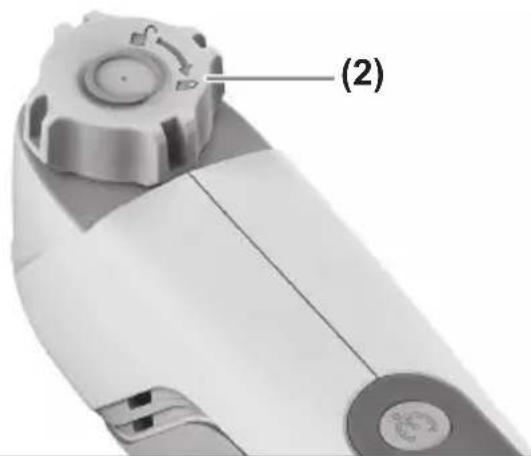
(2) Clamping knob
(3) Worklight
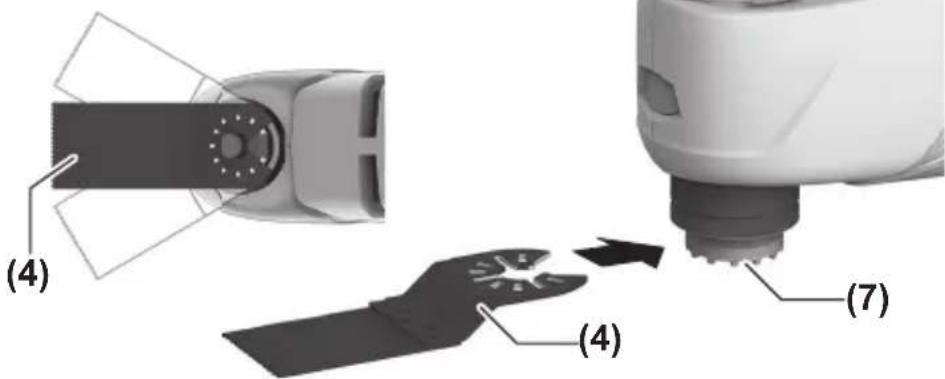
(4) Plunge cut saw blade
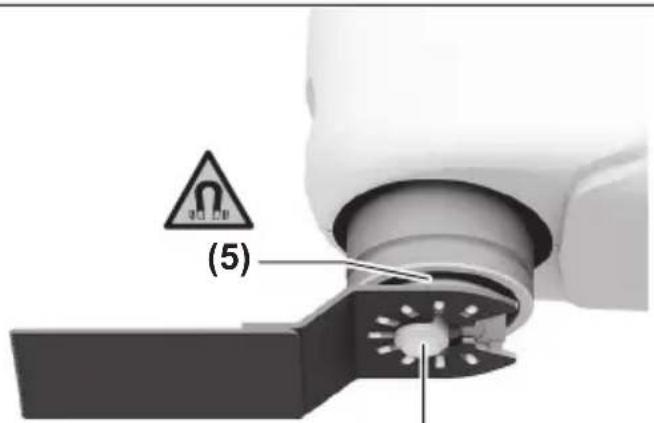
(5) Magnet
(6) Tension clamp
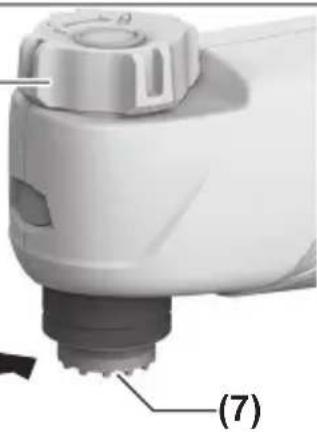
(7) Accessory holder
(8) On/off switch
(9) Lock-off button
(10) Rechargeable battery
(11) Battery release button
(12) Handle (insulated gripping surface)
34 | English
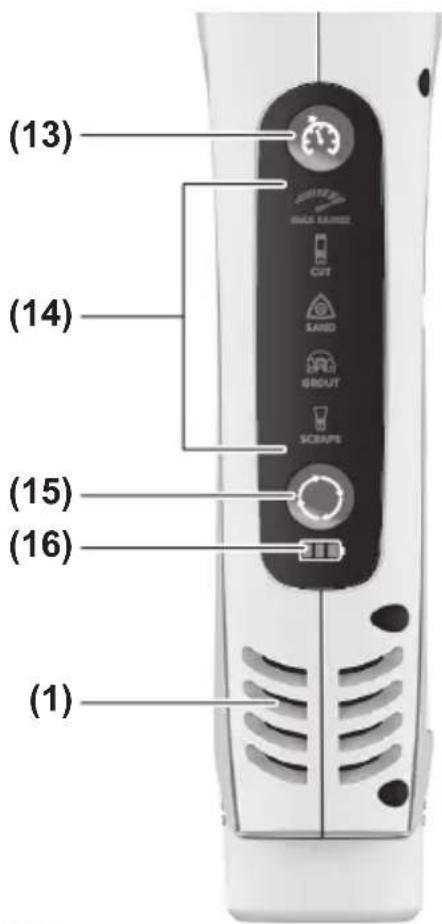
(13) On/off switch locking mechanism
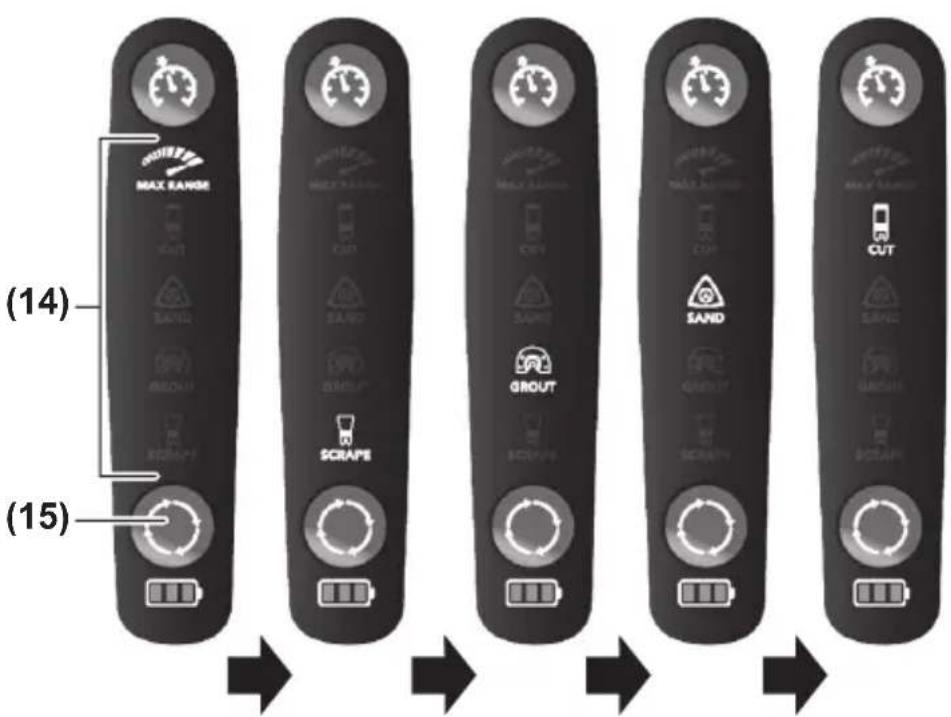
(14) Operating mode display
(15) Operating mode button
(16) Battery charge indicator
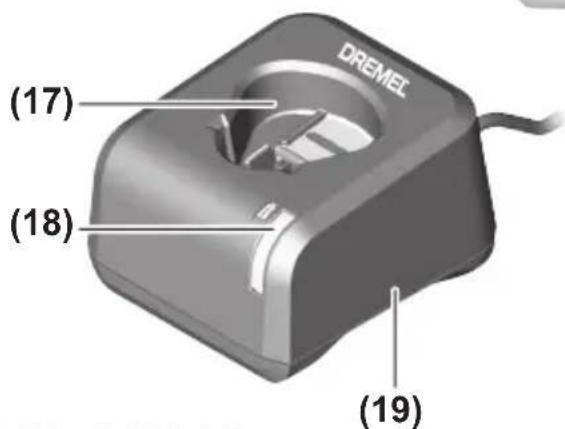
(17) Charging bay
(18) Green battery charge indicator
(19) Battery charger
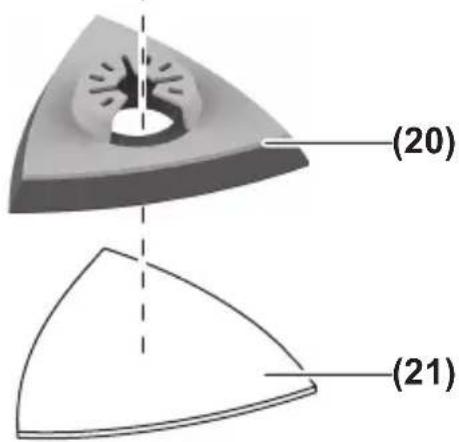
(20) Sanding plate
(21) Sanding sheet
Technical Data
| Cordless multifunction tool MM12V | ||
| Article number | F 013 CM1 201 | |
| Rated voltage V= 12 | ||
| No-load speed n0 | min-1 | 7000-20,000 |
| Oscillation angle on left/right ° 1.6 | ||
| WeightA) | kg 0.79 | |
| Recommended ambient temperature during charging | °C 0 to +35 | |
| Permitted ambient temperature during operationB) and during storage | °C -20 to +49 | |
| Recommended rechargeable batteries B12V ... | ||
| Recommended battery charger GAL 12V-20 | ||
A) Without rechargeable battery (you can find the battery weight at www.dremel.com.)
B) Limited performance at temperatures < 0 °C
Battery Charger GAL 12V-20
| Protection class | / II |
| Charging currentA) | 2.0 A |
| Battery charging voltage (automatic voltage detection) | 3.6-12 V— |
Battery Charger GAL 12V-20
Weight ^B)
0.25 kg
A) Depends on temperature and rechargeable battery type
B) Without mains connection cable
Noise/Vibration Information
Noise emission values determined according to EN 62841-2-4.
Typically, the A-weighted noise level of the power tool is: Sound pressure level 88 dB(A); sound power level 96 dB(A). Uncertainty K = 3 dB.
Wear hearing protection!
Vibration total values a_h (triax vector sum) and uncertainty K determined according to EN 62841-2-4 (sanding) EN 62841-2-11 (sawing):
Sanding: a_h = 2.0 m/s^2 ( K = 1.5 m/s^2 ),
Sawing: a_h = 16.7 m/s^2 (K = 1.5 m/s^2) .
The vibration level and noise emission value given in these instructions have been measured in accordance with a standardised measuring procedure and may be used to compare power tools. They may also be used for a preliminary estimation of vibration and noise emissions.
The stated vibration level and noise emission value represent the main applications of the power tool. However, if the power tool is used for other applications, with different accessories or is poorly maintained, the vibration level and noise emission value may differ. This may significantly increase the vibration and noise emissions over the total working period.
To estimate vibration and noise emissions accurately, the times when the tool is switched off or when it is running but not actually being used should also be taken into account. This may significantly reduce vibration and noise emissions over the total working period.
Implement additional safety measures to protect the operator from the effects of vibration, such as servicing the power tool and accessories, keeping their hands warm, and organising workflows correctly.
Rechargeable battery
Dremel sells some cordless power tools without a rechargeable battery. You can tell whether a rechargeable battery is included with the power tool by looking at the packaging.
36 | English
Charging the battery
▶ Use only the chargers listed in the technical data. Only these chargers are matched to the lithium-ion battery of your power tool.
Note: Lithium-ion rechargeable batteries are supplied partially charged according to international transport regulations. To ensure full rechargeable battery capacity, fully charge the rechargeable battery before using your tool for the first time.
Inserting the Battery
Push the charged battery into the battery holder until it clicks into place.
Removing the Battery
To remove the rechargeable battery, press the battery release buttons and pull the battery out. Do not use force to do this.
Battery charge indicator
The battery charge indicator indicates the state of charge for a few seconds when the on/off switch is pressed halfway.
| LED Capacity | |
| Continuous light 3×75–100% | |
| Continuous light 2×40–75% | |
| Continuous light 1×15–40% | |
| Flashing light 1×<15% | |
If the two exterior LEDs of the battery charge indicator flash, replace the rechargeable battery.
Temperature-dependent overload protection
In normal conditions of use, the power tool cannot be overloaded. In the event of overloading or exceeding of the permitted rechargeable battery temperature, the power tool automatically shuts off the electronics.
If the battery overheats, the left-hand and middle LEDs will flash simultaneously. Allow the battery and/or the power tool to cool.
The right-hand LED flashes in the event of an overload. Reduce the pressure and the load on the power tool.
Recommendations for Optimal Handling of the Battery
Protect the battery against moisture and water.
Only store the battery within a temperature range of -20^ to 49^ . Do not leave the battery in your car in the summer, for example.
A significantly reduced operating time after charging indicates that the battery has deteriorated and must be replaced.
Follow the instructions on correct disposal.
Battery Charger
Charging process
▶ Check the mains voltage! The voltage of the power source must match the voltage specified on the rating plate of the charger.
i Ensure that the charging bay and the battery contacts are free of coarse dirt. Ensure that the battery is fully inserted.
The charging process begins as soon as the mains plug for the charger is inserted into the mains socket and the battery is inserted into the charging bay.
The charging process is only possible when the temperature of the battery is within the permitted charging temperature range (0–45 °C).
Thanks to the intelligent charging process, the state of charge of the battery is automatically detected and then charged up with the optimal charge current depending on battery temperature and voltage.
A significantly reduced operating time after charging indicates that the battery has deteriorated and must be replaced.
When the charger is used continuously, or for several consecutive charge cycles without interruption, the charger may heat up. This is, however, harmless and does not indicate that the charger has a technical defect.
What the display elements mean
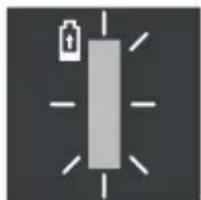
Flashing light battery charge indicator
natural_image
Simple diagram of a vertical rectangle with dashed lines and a battery icon, no text or symbols present.The charging process is indicated by the flashing of the battery charge indicator.
38 | English
Continuous light green battery charge indicator
natural_image
Pure electrical circuit lines without any symbolsA continuous light on the battery charge indicator signals that the battery is fully charged or that the temperature of the battery is not within the permitted charging temperature range (0–45 °C), and can therefore not be charged. The battery charges as soon as the permitted charging temperature range is reached. When there is no battery inserted, the continuous light of the
battery charge indicator signals that the mains plug is plugged into the plug socket and that the charger is ready to be used.
Troubleshooting
Battery is not being charged

natural_image
Pure electrical circuit lines without any symbolsBattery is not being charged and the battery charge indicator is lit up continuously.
Cause: The charger has identified an internal error.
Corrective measure: Ensure that all batteries are fully inserted. Remove the mains plug and reinsert. If the error occurs again, have the charger checked by an authorised after-sales service centre for Dremel power tools.
Cause: Battery temperature is outside of the charging range
Corrective measure: Wait until the battery temperature is back within the permitted charging temperature range (0–45 °C).
Cause: Battery is not correctly inserted.
Corrective measure: Insert the battery into the charger correctly.
Cause: The battery contacts and charging contacts are dirty
Corrective measure: Pull out the mains plug and (dry) clean the battery contacts and charging contacts.
Cause: Battery defective
Corrective measure: Replace the battery.
Indicators do not light up
None of the indicators are lighting up, battery will not be charged.
Cause: Plug socket, mains cable or battery charger defective
Remedy: Make sure that the charger is connected to a suitable plug socket that works. If the error occurs again, it may be necessary to have the charger checked by an authorised after-sales service centre.
Cause: Mains plug of the battery charger is not (correctly) plugged in
Corrective measure: Plug the mains plug (fully) into the plug socket.
Assembly
Before carrying out any work on the power tool (e.g. maintenance, tool change etc.), remove the battery from the power tool. There is risk of injury from unintentionally pressing the on/off switch.
Changing the Accessory
▶ Wear protective gloves when changing accessories. There is a risk of injury when touching the accessories.
Selecting an accessory
Please observe the accessories intended for your power tool.
| Accessory MM12V | ||
| Dremel oscillating accessories |  | |
 |  |  |
 |  |  |
 |  |  |
Fitting/Changing the Accessory (see figures A-C)
Remove the accessory if one has already been fitted.
To do this, turn the clamping knob (2) anticlockwise until you can remove the accessory from the tension clamp (6).
40 | English
Position the required accessory (e.g. plunge cut saw blade (4)) on the accessory holder (7) so that the depressed centre is facing downwards (see figure on the graphics page, text on the accessory should be legible from above).
Turn the accessory to a position which is convenient for the job at hand. Three positions offset by 30^ are possible for this (see figure B). Ensure that the accessory engages in all cams of the accessory holder (7).
The built-in magnet (5) holds the accessory in the required position in order to make it easier to mount.
To lock the accessory, turn the clamping knob (2) clockwise until it audibly clicks into place.
▶ Check that the accessory is seated securely. Accessories that are attached incorrectly or are not securely fixed in place may come loose during operation, thereby putting you at risk.
Choosing the Sanding Sheet
Different sanding sheets are available, depending on the material you are working with and the required surface removal rate:
Material Application Grit
 | For pre-sanding, e.g. of rough and uneven beams and boards | Coarse 60 |
| Dark sanding sheet: All wood materials (e.g. hardwood, soft-wood, chipboard, building boards), metal materials, fibre-glass, plastics | For surface sanding and lev-elling of slight irregularities | Medium 120 |
| For finish-sanding and fine sanding of wood | Fine 240 | |
 | For sanding down paint Coarse 80 | |
| For sanding undercoats (e.g. removing brushstrokes, paint drips and paint runs) | Medium 120 | |
| White sanding sheet: Paint, varnish, filler, putty | For final sanding of primers prior to painting | Fine 240 |
 | For smoothing, shaping and breaking edges | Coarse 60 |
| Diamond sanding sheet: Ma-sonry, stone, cement, thin-bed mortar | ||
Attaching/changing the sanding sheet on the sanding plate (see figure D)
The sanding plate (20) is fitted with a hook-and-loop fastening, allowing sanding sheets with a hook-and-loop backing to be secured quickly and easily.
Tap the hook-and-loop fastening of the sanding plate (20) before fitting the sanding sheet (21) to facilitate maximum adhesion.
Position the sanding sheet (21) so that it is flush with one side of the sanding plate (20), then place the sanding sheet on the sanding plate and press it on firmly.
To remove the sanding sheet (21), take hold of it by a corner and pull it away from the sanding plate (20).
You can use all sanding sheets, polishing and cleaning fleeces from the Delta 93 mm series in Dremel and Bosch's range of accessories.
Sanding accessories such as fleece/polishing felt are attached to the sanding plate in the same way.
The "SAND" operating mode is the maximum mode that should be used when working with sanding accessories such as sanding sheets and sanding plates. In other operating modes, the oscillation speed may be too high; this will considerably increase the wear on the accessory and can also lead to premature breakdown. Please take note of the information on the accessories or on the packaging of the accessory.
Dust/Chip Extraction
Dust from materials such as lead-containing coatings, some wood types, minerals and metal can be harmful to one's health. Touching or breathing-in the dust can cause allergic reactions and/or lead to respiratory infections of the user or bystanders.
Certain dust, such as oak or beech dust, is considered carcinogenic, especially in connection with wood-treatment additives (chromate, wood preservative). Materials containing asbestos may only be worked by specialists.
- Provide for good ventilation of the working place.
- It is recommended to wear a P2 filter-class respirator.
Observe the relevant regulations in your country for the materials to be worked.
▶ Avoid dust accumulation at the workplace. Dust can easily ignite.
Operation
Starting Operation
Setting the Operating Mode (see figure E)
Note: The operating mode can only be changed when the power tool is switched off.
42 | English
The power tool has the following operating modes, in which the maximum oscillation speed is optimised for the corresponding applications:

The "MAX RANGE" operating mode is suitable for applications where the maximum oscillation speed of the power tool is required.

The "SCRAPE" operating mode is suitable for scraping and removing layers of paint or adhesive, glued carpets and other surfaces.

The "GROUT" operating mode is suitable for removing grout (including damaged and cracked grout).

The "SAND" operating mode is suitable for sanding surfaces, corners and edges.
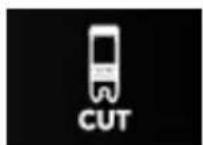
The "CUT" operating mode is suitable for sawing soft metals, wood, drywall and plastic.
After inserting the battery, the "MAX RANGE" operating mode is set. To change the operating mode, press the operating mode button (15) repeatedly until the required operating mode lights up in the operating mode display (14).
The function settings are saved when the power tool is switched off and only deleted when the battery is removed.
Caution: Please take note of the information concerning the maximum oscillation speed on the accessories or on the packaging of the accessories. For example, work with sanding tools in a mode no higher than the "SAND" operating mode.
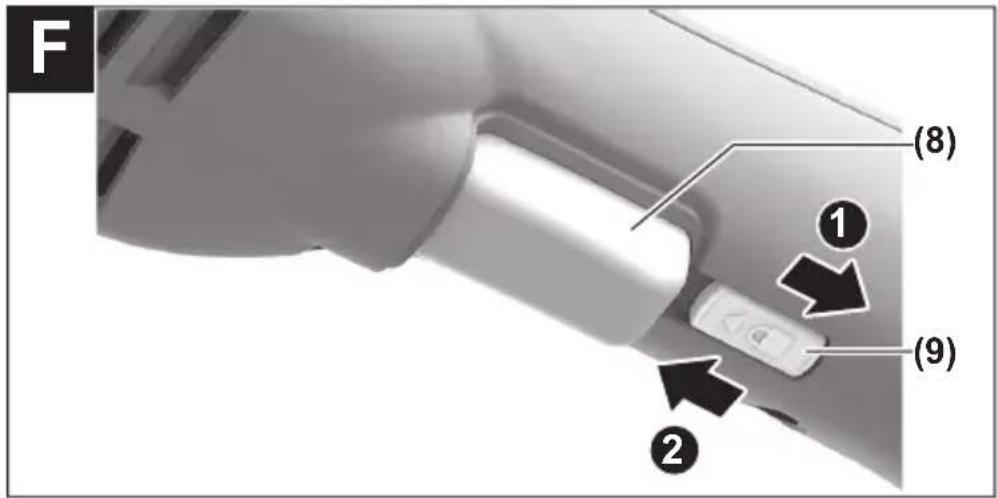
Switching On/Off (see figure F)
▶ Make sure that you are able to press the On/Off switch without releasing the handle.
To switch on the power tool, first push the lock-off function (9) away from the on/off switch ①. Then press the on/off switch (8) and keep it pressed.
To lock the on/off switch (8), press and hold it down fully, then press the locking mechanism (13) and release the on/off switch (8).
The Constant Electronic keeps the oscillation speed at no load and under load virtually consistent, guaranteeing uniform performance.
To switch off the power tool, release the on/off switch (8). If the on/off switch (8) is locked, press the switch first and then release it. Alternatively, you can press the operating mode button (15) or the locking mechanism (13) to release the locking mechanism.
Secure the power tool against unintentional switching on by pushing the lock-off function (9) in the direction of the on/off switch ②.
Note: If the power tool shuts down automatically because the battery is flat or overheated, switch the power tool off using the on/off switch (8).
Charge the battery or let it cool down before switching the power tool on again. Failure to do so can damage the battery.
The worklight (3) improves visibility in the immediate work area. It is automatically switched on and off with the power tool.
▶ Do not look directly into the worklight; it can blind you.
Controlling the Oscillation Speed
You can adjust the oscillation speed of the power tool when it is on by pressing in the on/off switch (8) to varying extents.
Slight pressure on the on/off switch (8) results in a low oscillation speed. As the pressure increases, the oscillation speed increases up to the maximum oscillation speed of the set operating mode.
The required oscillation speed is dependent on the material and the work conditions and can be determined using practical tests.
Note: If the oscillation speed is too high, this will considerably increase the wear on the accessories and can also lead to their premature breakdown.
Working Advice
Before carrying out any work on the power tool (e.g. maintenance, tool change etc.), remove the battery from the power tool. There is risk of injury from unintentionally pressing the on/off switch.
▶ Always wait until the power tool has come to a complete stop before placing it down.
Note: Do not keep the ventilation slots (1) on the power tool closed when working as this will reduce the service life of the power tool.
Operating principle
The oscillating drive causes the accessory to oscillate back and forth up to 20000 times per minute. This enables precise work in the tightest of spaces.
44 | English
natural_image
Illustration of a hand holding a device with a cross symbol above it (no text or labels)Use a consistent, low contact pressure when performing work; otherwise, the performance will be impaired and the accessory may jam.

natural_image
Illustration of a hand pressing down on a circular component with an arrow indicating rotation (no text or symbols)While working, move the power tool back and forth to prevent the accessory overheating and jamming.
Sawing
▶ Use only undamaged saw blades that are in perfect condition. Bent or dull saw blades can break, negatively influence the cut, or lead to kickback.
When sawing lightweight materials, take into account the statutory provisions and recommendations of the material manufacturers.
▶ Plunge cuts may only be applied to soft materials, such as wood, gypsum board, etc.
▶ Make sure that there are no power lines behind the workpiece to be cut.
Before using HCS saw blades to saw into wood, chipboard, building materials, etc., check these saw blades for foreign objects, such as nails, screws, etc. Remove the foreign objects as required or use bi-metal saw blades.
Cutting
Note: When cutting wall tiles, please bear in mind that the accessories are subject to high wear if used for extended periods.
Sanding
The material removal rate and the sanding result are primarily determined by the choice of sanding sheet, the oscillation speed and the contact pressure.
Only immaculate sanding sheets achieve good sanding performance and make the power tool last longer.
Be sure to apply consistent contact pressure in order to increase the lifetime of the sanding sheets.
Excessively increasing the contact pressure will not lead to increased sanding performance; rather, it will cause more severe wear of the power tool and premature failure of the sanding plate.
To sand corners, edges and hard-to-reach areas accurately, you can also work with the tips alone or with an edge of the sanding plate.
The sanding sheet may heat up significantly when used to sand specific points rather than entire surfaces. Reduce the oscillation speed and contact pressure and allow the sanding sheet to cool down at regular intervals.
Do not use a sanding sheet for other materials after it has been used to work on metal.
Use only original Dremel or Bosch sanding accessories.
Scraping
Select a high oscillation speed level for scraping.
Work on a soft surface (e.g. wood) at a flat angle and with low contact pressure. Failure to do so may cause the scraper to cut into the surface underneath.
Maintenance and Service
Maintenance and Cleaning
Before carrying out any work on the power tool (e.g. maintenance, tool change etc.), remove the battery from the power tool. There is risk of injury from unintentionally pressing the on/off switch.
▶ To ensure safe and efficient operation, always keep the power tool and the ventilation slots clean.
Regularly clean Riff accessories using a wire brush.
Service and Warranty
We recommend that all tool service be performed by a Dremel Service Centre.
This Dremel product is guaranteed in accordance with statutory/country-specific regulations; damage due to normal wear and tear, overload or improper handling are excluded from the warranty.
In case of a complaint, send the undismantled tool and/or charger and proof of purchase to your dealer.
Contact Dremel
For more information on service and warranty, the Dremel product range, support and hotline, go to www.dremel.com.
Disposal
Power tools, rechargeable batteries, accessories and packaging should be sorted for environmental-friendly recycling.
46 | Français
natural_image
Symbol of a trash bin crossed out by two diagonal lines (no text or numbers present)Do not dispose of power tools and batteries/rechargeable batteries into household waste!
Only for EU countries and United Kingdom:
Electrical and electronic equipment or used batteries that are no longer suitable for use must be collected separately and disposed of in an environmentally friendly manner. Use the designated collection systems. Incorrect disposal may cause harmful effects on the environment and human health, due to the potential presence of hazardous substances.
Français
Symboles
natural_image
Symbol of crossed-out flames and flames crossed out, enclosed in a square frame (no text or numbers)natural_image
Pure electrical circuit lines without any symbolsnatural_image
Pure electrical circuit lines without any symbolsnatural_image
Pure electrical circuit lines without any symbolsnatural_image
Illustration of a hand holding a tool with a cross symbol above, indicating no text or symbols present.natural_image
Illustration of a hand pressing down on a circular component with an arrow indicating rotation (no text or symbols)natural_image
Symbol of a trash bin crossed out by two diagonal lines (no text or numbers present)natural_image
Symbol of crossed flames and flames crossed out, commonly used to indicate fire resistance or fire safety (no text present)natural_image
Pure diagram of a vertical rectangle with dashed lines and a small icon, no text or symbols present.natural_image
Pure electrical circuit lines without any symbolsnatural_image
Simple icon of a battery with a minus sign and radiating lines, no text or symbols present.natural_image
Illustration of a hand holding a medical device with a cross symbol indicating no change or damage (no text or labels present)natural_image
Illustration of a hand pressing down on a circular component with an arrow indicating clockwise motion (no text or symbols)natural_image
Symbol of a trash bin crossed out by two diagonal lines (no text or numbers present)natural_image
Symbol of crossed-out flames and flames crossed out by a diagonal line, enclosed in a square frame (no text or numbers)natural_image
Pure electrical circuit lines without any symbolsnatural_image
Simple icon of a battery with an upward arrow and radiating lines, no text or symbols present.natural_image
Pure electrical circuit lines without any symbolsnatural_image
Illustration of a hand holding a device with a cross symbol above, no text or labels presentnatural_image
Illustration of a hand pressing down on a circular component with an arrow indicating clockwise motion (no text or symbols)natural_image
Symbol of a trash bin crossed out by two diagonal lines (no text or numbers present)natural_image
Symbol of crossed-out flames and a firecracker, commonly used in fire safety or fire resistance (no text present)natural_image
Pure electrical circuit lines without any symbolsnatural_image
Simple diagram of a battery icon with radiating lines and a vertical bar (no text or symbols)natural_image
Pure electrical circuit lines without any symbolsnatural_image
Illustration of a hand holding a medical device with a cross symbol (no text or labels)natural_image
Illustration of a hand pressing down on a circular component with an arrow indicating clockwise motion (no text or symbols)natural_image
Symbol of a trash bin crossed out by two diagonal lines (no text or numbers present)natural_image
Symbol of crossed-out flames and flames crossed out, enclosed in a square frame (no text or numbers)natural_image
Pure electrical circuit lines without any symbolsnatural_image
Pure electrical circuit lines without any symbolsnatural_image
Pure electrical circuit lines without any symbolsnatural_image
Illustration of a hand holding a tool with a crossed-out mark above it, no text or symbols present.natural_image
Illustration of a hand pressing a button on a circular base with an arrow indicating clockwise motion (no text or symbols)natural_image
Symbol of a trash bin crossed out by two diagonal lines (no text or numbers present)natural_image
Symbol of crossed-out flames and flames inside a square frame (no text or numbers)natural_image
Simple diagram with a vertical rectangle and a lock icon, no text or symbols presentOpladningen vises med en blinkende ladetilstandsindikator.
158 | Dansk
Grøn akku-ladetilstandsindikator med konstantlys
natural_image
Pure electrical circuit lines without any symbolsnatural_image
Simple icon of a battery with a minus sign and radiating lines, no text or symbols present.natural_image
Illustration of a hand holding a device with a cross symbol above, indicating no text or symbols present.natural_image
Illustration of a hand pressing down on a circular component with directional arrows (no text or symbols)natural_image
Symbol of a trash bin crossed out by two diagonal lines (no text or numbers present)natural_image
Symbol of crossed-out flames and a firecracker, commonly used in fire safety or fire resistance (no text present)natural_image
Pure diagram of a vertical rectangle with dashed lines and a small icon, no text or symbols present.natural_image
Pure electrical circuit lines without any symbolsnatural_image
Pure electrical circuit lines without any symbolsnatural_image
Illustration of a hand holding a tool with a cross symbol above it, no text or symbols present.natural_image
Illustration of a hand pressing down on a circular component with directional arrows (no text or symbols)natural_image
Symbol of a trash bin crossed out by two diagonal lines (no text or numbers present)natural_image
Symbol of crossed-out electrical circuitry (no text or numbers present)natural_image
Pure diagram of a vertical rectangle with dashed lines and a small icon, no text or symbols present.Ladingen signaliseres ved at ladeindikatoren blinker.
Kontinuerlig grønn ladeindikator
natural_image
Simple diagram with a battery icon and a vertical bar, no text or symbols presentNår ladeindikatoren lyser kontinuerlig, signaliserer det at batteriet er fulladet, eller at temperaturen til batteriet er utenfor det tillatte ladetemperaturområdet (0–45 °C), slik at batteriet ikke kan lades. Batteriet lades så snart det tillatte temperaturområdet er nådd.
Hvis batteriet ikke er satt inn, signaliserer det at ladeindikatoren
natural_image
Pure electrical circuit lines without any symbolsnatural_image
Illustration of a hand holding a tool with a cross symbol above, no text or labels presentnatural_image
Illustration of a hand pressing down on a circular component with directional arrows (no text or symbols)natural_image
Symbol of a trash bin crossed out by two diagonal lines (no text or numbers present)natural_image
Symbol of crossed-out flames and a firecracker, commonly used in safety or fire resistance (no text present)natural_image
Pure diagram of a vertical rectangle with dashed lines and a small icon, no text or symbols present.natural_image
Simple diagram with a battery icon and a vertical bar, no text or symbols presentnatural_image
Pure electrical circuit lines without any symbolsnatural_image
Illustration of a hand holding a tool with a crossed-out valve symbol (no text or labels)natural_image
Illustration of a hand pressing down on a circular component with an arrow indicating clockwise motion (no text or symbols)natural_image
Symbol of a trash bin crossed out by two diagonal lines (no text or numbers present)natural_image
Symbol of crossed-out flames and flames crossed out, enclosed in a square frame (no text or numbers)natural_image
Pure electrical circuit lines without any symbolsnatural_image
Pure electrical circuit lines without any symbolsnatural_image
Simple icon of a battery with a plus sign and radiating lines, no text or symbols present.natural_image
Illustration of a hand holding a tool with a cross symbol above it, no text or symbols present.natural_image
Illustration of a hand pressing down on a circular component with directional arrows (no text or symbols)natural_image
Symbol of a trash bin crossed out by two diagonal lines (no text or numbers present)natural_image
Symbol of crossed-out electrical circuitry with no text or numbersnatural_image
Pure electrical circuit lines without any symbolsnatural_image
Pure electrical circuit lines without any symbolsnatural_image
Simple diagram of a battery with a vertical bar and radiating lines, no text or symbols present.natural_image
Illustration of a hand holding a medical device with a cross symbol above it (no text or labels)natural_image
Illustration of a hand pressing a button on a circular base with directional arrows (no text or symbols)natural_image
Symbol of a trash bin crossed out by two diagonal lines (no text or numbers present)natural_image
Pure electrical circuit lines without any symbolsnatural_image
Simple icon of a battery with a lock symbol, no text or labels presentnatural_image
Pure electrical circuit lines without any symbolsnatural_image
Illustration of a hand pressing down on a circular component with an arrow indicating rotation (no text or symbols)natural_image
Symbol of a trash bin crossed out by two diagonal lines (no text or numbers present)natural_image
Symbol of crossed-out electrical circuit lines without any text or labelsNabiječka GAL 12V-20
natural_image
Pure diagram of a vertical rectangular shape with dashed centerlines and a small lock icon, no text or symbols present.natural_image
Simple icon of a battery with a minus sign and radiating lines, no text or symbols present.natural_image
Simple diagram of a battery with a minus sign and radiating lines, no text or symbols present.natural_image
Illustration of a hand holding a device with a cross symbol above, indicating no text or symbols present.natural_image
Illustration of a hand pressing down on a circular component with an arrow indicating rotation (no text or symbols)natural_image
Symbol of a trash bin crossed out by two diagonal lines (no text or numbers present)natural_image
Symbol of crossed-out flames and flames inside a square frame (no text or numbers)natural_image
Pure electrical circuit lines without any symbolsnatural_image
Simple icon of a battery with a plus sign and radiating lines, no text or symbols present.natural_image
Simple diagram of a battery and a vertical bar with radiating lines, no text or symbols present.natural_image
Illustration of a hand pressing down on a circular component with an arrow indicating clockwise motion (no text or symbols)natural_image
Symbol of a trash bin crossed out by two diagonal lines, representing waste sorting or anti-smoking (no text present)natural_image
Symbol of crossed-out flames and flames crossed out, enclosed in a square frame (no text or numbers)natural_image
Pure diagram of a vertical rectangular shape with dashed centerlines and a small lock icon, no text or symbols present.natural_image
Pure electrical circuit lines without any symbolsnatural_image
Simple diagram of a battery with a minus sign and radiating lines, no text or symbols present.natural_image
Illustration of a hand holding a device with a warning symbol (no text or labels)natural_image
Illustration of a hand pressing down on a circular component with an arrow indicating rotation (no text or symbols)natural_image
Symbol of a trash bin crossed out by two diagonal lines (no text or numbers present)natural_image
Pure diagram of a vertical bar with dashed lines and a lock icon, no text or symbols presentnatural_image
Pure electrical circuit lines without any symbolsnatural_image
Pure electrical circuit lines without any symbolsnatural_image
Illustration of a hand holding a small object with a cross symbol above, indicating no text or symbols present.natural_image
Illustration of a hand pressing down on a circular component with an arrow indicating rotation (no text or symbols)natural_image
Symbol of a trash bin crossed out by two diagonal lines (no text or numbers present)natural_image
Symbol of crossed-out flames and flames crossed out, commonly used to indicate fire resistance or fire resistance (no text present)natural_image
Pure diagram of a vertical rectangle with dashed lines and a lock icon, no text or symbols presentnatural_image
Pure electrical circuit lines without any symbolsnatural_image
Simple icon of a battery with a minus sign and radiating lines, no text or symbols present.Cauză: Acumulator defect
natural_image
Illustration of a hand holding a device with a cross symbol above, indicating no text or symbols present.natural_image
Illustration of a hand pressing down on a circular component with directional arrows (no text or symbols)natural_image
Symbol of a trash bin crossed out by two diagonal lines (no text or numbers present)natural_image
Symbol of crossed-out electrical circuitry with no text or numbersnatural_image
Pure electrical circuit lines without any symbolsnatural_image
Pure electrical circuit lines without any symbolsnatural_image
Pure electrical circuit lines without any symbolsnatural_image
Illustration of a hand holding a device with a crossed-out symbol above, no text or symbols presentnatural_image
Illustration of a hand pressing down on a circular component with an arrow indicating rotation (no text or symbols)natural_image
Symbol of a trash bin crossed out by two diagonal lines (no text or numbers present)natural_image
Pure electrical circuit lines without any symbolsnatural_image
Pure electrical circuit lines without any symbolsnatural_image
Pure electrical circuit lines without any symbolsnatural_image
Illustration of a hand holding a device with a cross symbol indicating no change or error (no text or symbols present)natural_image
Illustration of a hand pressing down on a circular component with an arrow indicating rotation (no text or symbols)natural_image
Symbol of a trash bin crossed out by two diagonal lines (no text or numbers present)Zaštitite akumulatore od izvora toplote, npr. od trajnog sunčevog zračenja, vatre, prljavštine, vode i vlage. Postoji opasnost od eksplozije i kratkog spoja.
Magnet ne približavajte implantatima ili drugim medicinskim uređajima, kao što su pejsmejkeri ili insulinske pumpe. Zbog magneta se obrazuje polje, koje može da ugrozi funkciju implantata ili medicinskih uređaja.
natural_image
Pure electrical circuit lines without any symbolsPostupak punjenja se signalizuje treperenjem prikaza statusa napunjenosti.
Trajno svetlo prikaza statusa napunjenosti akumulatora
natural_image
Pure electrical circuit lines without any symbolsnatural_image
Pure electrical circuit lines without any symbolsAkumulator se ne puni i prikaz statusa napunjenosti svetli neprekidno.
Uzrok: Punjač je ustanovio internu grešku
Rešenje: Uverite se da su svi akumulatori potpuno utaknuti. Izvucite mrežni utikač i ponovo ga umetnite. Ako se greška ponovo pojavi, prekontrolišite punjač u ovlašćenom korisničkom servisu za Dremel električne alate.
Uzrok: Temperatura akumulatora je van dozvoljenog opsega temperature tokom punjenja.
Rešenje: Sačekajte da temperatura akumulatora ponovo bude u dozvoljenom opsegu temperature tokom punjenja (0–45 °C).
Uzrok: Akumulator nije pravilno postavljen
Rešenje: Postavite akumulator pravilno u punjač.
Uzrok: Kontaktni akumulatora i kontakti za punjenje su prljavi
Rešenje: Izvucite utikač i očistite kontakte akumulatora i kontakte za punjenja (suvo).
Uzrok: Neispravan akumulator
Rešenje: Zamenite akumulator.
Indikatori ne svetle
natural_image
Illustration of a hand holding a device with a cross symbol above it, no text or symbols present.Radite sa niskim i ravnomernim potiskom, inače se radni učinak pogoršava i namenski alat može da blokira.
natural_image
Illustration of a hand pressing down on a circular component with an arrow indicating rotation (no text or symbols)Tokom rada pomerajte električni alat napred i nazad, da se namenski alat ne pregreje isuviše i da ne blokira.
Testerisanje
▶ Upotrebljavajte samo neoštećene, besprekorne listove testere. Izvijeni ili tupi listovi testere mogu se slomiti, negativno uticati na presek ili prouzrokovati povratan udarac.
Pazite kod testerisanja lakših građevinskih materijala na zakonske odredbe i preporuke proizvođača materijala.
Prilikom testerisanja sa uranjanjem smeju da se obrađuju samo meki materijali kao što su drvo, gips-karton ili slično!
▶ Uvek se uverite da se iza radnog komada koji sečete ne nalazi električni vod.
Prekontrolišite pre testerisanja sa HCS listovima testere u drvetu, šper ploči, građevinskim materijalima itd. da li nemaju strana tela kao eksere, zavrtnje ili slično. U datom slučaju uklonite strana tela ili koristite bimetalne listove testere.
Presecanje
Napomena: kod presecanja zidnih pločica imajte na umu da su električni alati prilikom duže upotrebe izloženi velikom trošenju materijala.
Brušenje
natural_image
Symbol of a trash bin crossed out by two diagonal lines (no text or numbers present)Ne bacajte električne alate i akumulatore/baterije u kućno djubre!
Samo za EU-zemlje:
Električni i elektronski uređaji ili istrošeni akumulatori i baterije koji više ne mogu da se koriste moraju da se skupljaju zasebno i odlože u otpad u skladu sa ekološkim propisima. Koristite naznačene sisteme za sakupljanje. Zbog mogućih opasnih materija koji se nalaze u uređaju, nepravilno odlaganje u otpad može da bude opasno za okolinu i zdravlje.
Slovenščina
Simboli
natural_image
Symbol of crossed-out flames and flames crossed out, enclosed in a square frame (no text or numbers)natural_image
Pure diagram of a vertical rectangle with dashed lines and a small lock icon, no text or symbols present.Utripanje prikaza stanja napolnjenosti, pomeni, da polnjenje poteka.
Prikaz stanja napolnjenosti akumulatorske baterije neprekinjeno sveti zeleno
natural_image
Simple icon of a battery with a vertical bar and radiating lines, no text or symbols present.natural_image
Simple diagram with a vertical bar and radiating lines, no text or symbols presentAkumulatorska baterija se ne polni, prikaz stanja napolnjenosti pa neprekinjeno sveti.
Vzrok: polnilnik je zaznal interno napako
natural_image
Illustration of a hand holding a tool with a crossed-out hammer symbol (no text or labels)natural_image
Illustration of a hand pressing down on a circular component with an arrow indicating rotation (no text or symbols)Med delom premikajte električno orodje sem ter tja, da se nastavek ne segreje premočno ali se zagozdi.
Žaganje
natural_image
Symbol of a trash bin crossed out by two diagonal lines (no text or numbers present)natural_image
Symbol of crossed-out flames and flames crossed out, commonly used to indicate fire resistance or fire safety (no text present)natural_image
Pure diagram of a vertical rectangle with dashed lines and a small icon, no text or symbols present.Treperenje pokazivača stanja napunjenosti signalizira proces punjenja.
natural_image
Simple diagram with a battery icon and a vertical bar, no text or symbols presentnatural_image
Pure electrical circuit lines without any symbolsnatural_image
Illustration of a hand holding a tool with a cross symbol, no text or labels presentRadite s manjim i jednoličnim pritiskom, inače će se pogoršati radni učinak i radni alat može ponovno blokirati.

natural_image
Illustration of a hand pressing down on a circular object with directional arrows (no text or symbols)natural_image
Symbol of a trash bin crossed out by two diagonal lines (no text or numbers present)Električni alat i aku-baterije/baterije ne bacajte u kućni otpad!
Samo za zemlje EU:
Električni i elektronski uređaji ili iskorišteni akumulatori/baterije koji više nisu uporabivi, moraju se odvojene sakupljati i zbrinuti na ekološko prihvatljiv način. Koristite predviđene sustave prikupljanja otpada. Nepravilno zbrinjavanje može biti štetno za okoliš i zdravlje zbog opasnih tvari koje može sadržavati.
Eesti
Sümbolid
natural_image
Simple diagram of a vertical rectangle with dashed lines and a lock icon, no text or symbols present.natural_image
Pure electrical circuit lines without any symbolsnatural_image
Pure electrical circuit lines without any symbolsnatural_image
Illustration of a hand pressing down on a circular component with an arrow indicating clockwise motion (no text or symbols)natural_image
Symbol of a trash bin crossed out by two diagonal lines (no text or numbers present)natural_image
Symbol of crossed-out flames and flames crossed out, commonly used to indicate fire resistance or fire safety (no text present)natural_image
Pure diagram of a vertical rectangle with dashed lines and a small icon, no text or symbols present.Mirgojošs akumulatora uzlādes indikators signalizē, ka notiek uzlāde.
natural_image
Pure electrical circuit lines without any symbolsnatural_image
Simple icon of a battery with a minus sign and radiating lines, no text or symbols present.natural_image
Illustration of a hand holding a tool with a cross symbol above it, no text or symbols present.natural_image
Illustration of a hand pressing down on a circular component with an arrow indicating rotation (no text or symbols)natural_image
Symbol of a trash bin crossed out by two diagonal lines (no text or numbers present)Neizmetiet nolietotos elektroinstrumentus, akumulatorus un baterijas sadzīves atkritumu tvertnē!
Tikai EK valstim.
natural_image
Symbol of crossed-out electrical circuitry with no text or numbersnatural_image
Pure electrical circuit lines without any symbolsnatural_image
Simple icon of a battery with a lock symbol, no text or labels presentnatural_image
Pure electrical circuit lines without any symbolsAkumuliatorius nejkraunamas, ikrovos büklès indikatorius šviečia nuolat.
natural_image
Illustration of a hand holding a device with a cross symbol above it, no text or labels present.natural_image
Illustration of a hand pressing down on a circular component with directional arrows (no text or symbols)natural_image
Symbol of a trash bin crossed out by two diagonal lines (no text or numbers present)534 | Legal Information and Licenses
Legal Information and Licenses
CMSIS_5 V5.0.0-Apache 2.0
Copyright © 2009-2020 Arm Limited.
All rights reserved.
Licensed under the Apache License, Version 2.0 (the "License"); you may not use this file except in compliance with the License.
You may obtain a copy of the License at http://www.apache.org/licenses/LICENSE-2.0
Unless required by applicable law or agreed to in writing, software distributed under the License is distributed on an "AS IS" BASIS, WITHOUT WARRANTIES OR CONDITIONS OF ANY KIND, either express or implied.
See the License for the specific language governing permissions and limitations under the License.
CMS32M55xx_DemoCode_v1.0.9-BSD 3-Clause
Copyright © 2024 Cmsemicon.
All rights reserved.
Apache License
Version 2.0, January 2004
http://www.apache.org/licenses/
TERMS AND CONDITIONS FOR USE, REPRODUCTION, AND DISTRIBUTION
- Definitions.
"License" shall mean the terms and conditions for use, reproduction, and distribution as defined by Sections 1 through 9 of this document.
"Licensor" shall mean the copyright owner or entity authorized by the copyright owner that is granting the License.
"Legal Entity" shall mean the union of the acting entity and all other entities that control, are controlled by, or are under common control with that entity. For the purposes of this definition,
"control" means (i) the power, direct or indirect, to cause the direction or management of such entity, whether by contract or otherwise, or (ii) ownership of fifty percent (50%) or more of the outstanding shares, or (iii) beneficial ownership of such entity.
"You" (or "Your") shall mean an individual or Legal Entity exercising permissions granted by this License.
"Source" form shall mean the preferred form for making modifications, including but not limited to software source code, documentation source, and configuration files.
"Object" form shall mean any form resulting from mechanical transformation or translation of a Source form, including but not limited to compiled object code, generated documentation, and conversions to other media types.
"Work" shall mean the work of authorship, whether in Source or Object form, made available under the License, as indicated by a copyright notice that is included in or attached to the work (an example is provided in the Appendix below).
"Derivative Works" shall mean any work, whether in Source or Object form, that is based on (or derived from) the Work and for which the editorial revisions, annotations, elaborations, or other modifications represent, as a whole, an original work of authorship. For the purposes of this
License, Derivative Works shall not include works that remain separable from, or merely link (or bind by name) to the interfaces of, the Work and Derivative Works thereof.
"Contribution" shall mean any work of authorship, including the original version of the Work and any modifications or additions to that Work or Derivative Works thereof, that is intentionally submitted to Licensor for inclusion in the Work by the copyright owner or by an individual or Legal Entity authorized to submit on behalf of the copyright owner. For the purposes of this definition,
"submitted" means any form of electronic, verbal, or written communication sent to the Licensor or its representatives, including but not limited to communication on electronic mailing lists, source code control systems, and issue tracking systems that are managed by, or on behalf of, the Licensor for the purpose of discussing and improving the Work, but excluding communication that is conspicuously marked or otherwise designated in writing by the copyright owner as "Not a Contribution".
"Contributor" shall mean Licensor and any individual or Legal Entity on behalf of whom a Contribution has been received by Licensor and subsequently incorporated within the Work.
-
Grant of Copyright License. Subject to the terms and conditions of this License, each Contributor hereby grants to You a perpetual, worldwide, non-exclusive, no-charge, royalty-free, irrevocable copyright license to reproduce, prepare Derivative Works of, publicly display, publicly perform, sublicense, and distribute the Work and such Derivative Works in Source or Object form.
-
Grant of Patent License. Subject to the terms and conditions of this License, each Contributor hereby grants to You a perpetual, worldwide, non-exclusive, no-charge, royalty-free, irrevocable (except as stated in this section) patent license to make, have made, use, offer to sell, sell, import, and otherwise transfer the Work, where such license applies only to those patent claims licensable by such Contributor that are necessarily infringed by their Contribution(s) alone or by combination of their Contribution(s) with the Work to which such Contribution(s) was submitted. If You institute patent litigation against any entity (including a cross-claim or counterclaim in a lawsuit) alleging that the Work or a Contribution incorporated within the Work constitutes direct or contributory patent infringement, then any patent licenses granted to You under this License for that Work shall terminate as of the date such litigation is filed.
-
Redistribution. You may reproduce and distribute copies of the Work or Derivative Works thereof in any medium, with or without modifications, and in Source or Object form, provided that You meet the following conditions:
- You must give any other recipients of the Work or Derivative Works a copy of this License; and
- You must cause any modified files to carry prominent notices stating that You changed the files; and
- You must retain, in the Source form of any Derivative Works that You distribute, all copyright, patent, trademark, and attribution notices from the Source form of the Work, excluding those notices that do not pertain to any part of the Derivative Works; and
- If the Work includes a "NOTICE" text file as part of its distribution, then any Derivative Works that You distribute must include a readable copy of the attribution notices contained within such NOTICE file, excluding those notices that do not pertain to any part of the Derivative Works, in at least one of the following places: within a NOTICE text file distributed as part of the Derivative Works; within the Source form or documentation, if provided along with the Derivative Works; or, within a display generated by the Derivative Works, if and wherever such third-party notices normally appear. The contents of the NOTICE file are for informational purposes only and do not modify the License.
536 | Legal Information and Licenses
You may add Your own attribution notices within Derivative Works that You distribute, alongside or as an addendum to the NOTICE text from the Work, provided that such additional attribution notices cannot be construed as modifying the License. You may add Your own copyright statement to Your modifications and may provide additional or different license terms and conditions for use, reproduction, or distribution of Your modifications, or for any such Derivative Works as a whole, provided Your use, reproduction, and distribution of the Work otherwise complies with the conditions stated in this License.
- Submission of Contributions. Unless You explicitly state otherwise, any Contribution intentionally submitted for inclusion in the Work by You to the Licensor shall be under the terms and conditions of this License, without any additional terms or conditions. Notwithstanding the above, nothing herein shall supersede or modify the terms of any separate license agreement you may have executed with Licensor regarding such Contributions.
- Trademarks. This License does not grant permission to use the trade names, trademarks, service marks, or product names of the Licensor, except as required for reasonable and customary use in describing the origin of the Work and reproducing the content of the NOTICE file.
- Disclaimer of Warranty. Unless required by applicable law or agreed to in writing, Licensor provides the Work (and each Contributor provides its Contributions) on an "AS IS" BASIS, WITHOUT WARRANTIES OR CONDITIONS OF ANY KIND, either express or implied, including, without limitation, any warranties or conditions of TITLE, NON-INFRINGEMENT, MERCHANTABILITY, or FITNESS FOR A PARTICULAR PURPOSE. You are solely responsible for determining the appropriateness of using or redistributing the Work and assume any risks associated with Your exercise of permissions under this License.
- Limitation of Liability. In no event and under no legal theory, whether in tort (including negligence), contract, or otherwise, unless required by applicable law (such as deliberate and grossly negligent acts) or agreed to in writing, shall any Contributor be liable to You for damages, including any direct, indirect, special, incidental, or consequential damages of any character arising as a result of this License or out of the use or inability to use the Work (including but not limited to damages for loss of goodwill, work stoppage, computer failure or malfunction, or any and all other commercial damages or losses), even if such Contributor has been advised of the possibility of such damages.
- Accepting Warranty or Additional Liability. While redistributing the Work or Derivative Works thereof, You may choose to offer, and charge a fee for, acceptance of support, warranty, indemnity, or other liability obligations and/or rights consistent with this License. However, in accepting such obligations, You may act only on Your own behalf and on Your sole responsibility, not on behalf of any other Contributor, and only if You agree to indemnify, defend, and hold each Contributor harmless for any liability incurred by, or claims asserted against, such Contributor by reason of your accepting any such warranty or additional liability.
END OF TERMS AND CONDITIONS
BSD 3-Clause
Copyright © 2024 Cmsemicon.
Redistribution and use in source and binary forms, with or without modification, are permitted provided that the following conditions are met:
-
Redistributions of source code must retain the above copyright notice, this list of conditions and the following disclaimer.
-
Redistributions in binary form must reproduce the above copyright notice, this list of conditions and the following disclaimer in the documentation and/or other materials provided with the distribution.
-
Neither the name of the copyright holder nor the names of its contributors may be used to endorse or promote products derived from this software without specific prior written permission.
THIS SOFTWARE IS PROVIDED BY THE COPYRIGHT HOLDERS AND CONTRIBUTORS "AS IS" AND ANY EXPRESS OR IMPLIED WARRANTIES, INCLUDING, BUT NOT LIMITED TO, THE IMPLIED WARRANTIES OF MERCHANTABILITY AND FITNESS FOR A PARTICULAR PURPOSE ARE DISCLAIMED. IN NO EVENT SHALL THE COPYRIGHT HOLDER OR CONTRIBUTORS BE LIABLE FOR ANY DIRECT, INDIRECT, INCIDENTAL, SPECIAL, EXEMPLARY, OR CONSEQUENTIAL DAMAGES (INCLUDING, BUT NOT LIMITED TO, PROCUREMENT OF SUBSTITUTE GOODS OR SERVICES; LOSS OF USE, DATA, OR PROFITS; OR BUSINESS INTERRUPTION) HOWEVER CAUSED AND ON ANY THEORY OF LIABILITY, WHETHER IN CONTRACT, STRICT LIABILITY, OR TORT (INCLUDING NEGLIGENCE OR OTHERWISE) ARISING IN ANY WAY OUT OF THE USE OF THIS SOFTWARE, EVEN IF ADVISED OF THE POSSIBILITY OF SUCH DAMAGE.
Cmsemicon - Letter of Declaration
Our company's software, which includes MCU program compiler software (CMS_IDE, SCMCU_IDE), MCU mass production burn-in software (cms writer, scmcu writer, CMS WriterPro), and Cmsemicon. CMS32-Series PACK, is public and can be obtained through our FAE or downloaded for free from our website: https://www.mcu.com.cn/. China Micro Semicon Co., Limited will not hold the user responsible regardless of the method used (given by FAE or downloaded from the official website), and the software can be used securely and without cost.
Hereby declare!
Warranty Disclaimer
This product contains Open Source Software components which underly Open Source Software Licenses. Please note that Open Source Licenses contain disclaimer clauses. The text of the Open Source Licenses that apply are included in this manual under "Legal Information and Licenses".
538
CE
| de | EU-Konformitätserklärung | Wir erklären in alleiniger Verantwortung, dass die genannten Produkte allen einschlägigen Bestimmungen der nachfolgend aufgeführten Richtlinien und Verordnungen entsprechen und mit folgenden Normen übereinstimmen. Technische Unterlagen bei: * | |
| Akku-Multi-funktions-werkzeug | Sachnummer | ||
| en | EU Declaration of Conformity | We declare under our sole responsibility that the stated products comply with all applicable provisions of the directives and regulations listed below and are in conformity with the following standards. Technical file at: * | |
| Cordless multifunc-tion tool | Article number | ||
| fr | Déclaration de conformité UE | Nous déclarons sous notre propre responsabilité que les produits décrits sont en conformité avec les directives, règlements normatifs et normes énumérés ci-dessous. Dossier technique auprès de: * | |
| Outil multi-fonctions sans fil | N° d'article | ||
| es | Declaración de conformidad UE | Declaramos bajo nuestra exclusiva responsa-bilidad, que los productos nombrados cumplen con todas las disposiciones correspondientes de las Directivas y los Reglamentos menciona-dos a continuación y están en conformidad con las siguientes normas. Documentos técnicos de: * | |
| Herramien-ta multi-funcional accionada por acumu-lador | N° de artículo | ||
| pt | Declaração de Conformidade UE | Declaramos sob nossa exclusiva responsabili-dade que os produtos mencionados cumprem todas as disposições e os regulamentos indicados e estão em conformidade com as seguintes normas. Documentação técnica pertencente à: * | |
| Ferramen-ta multifun-ções sem fio | N.° do produto | ||
| it | Dichiarazione di conformità UE | Dichiariamo sotto la nostra piena responsabilità che i prodotti indicati sono conformi a tutte le disposizioni pertinenti delle Direttive e dei Regolamenti elencati di seguito, nonché alle seguenti Normative. Documentazione Tecnica presso: * | |
| Utensile multifun-zione a batteria | Codice prodotto | ||
| € | 539 | ||
| nl | EU-conformiteits-verklaring | Wij verklaren op eigen verantwoordelijkheid dat de genoemde producten voldoen aan alle desbetreffende bepalingen van de hierna genoemde richtlijnen en verordeningen en overeenstemmen met de volgende normen.Technisch dossier bij: * | |
| Accumulti-tool | Product-nummer | ||
| da | EU-overensstemmelses-erklæring | Vi erklærer som eneansvarlige, at det beskrevne produkt er i overensstemmelse med alle gældende bestemmelser i følgende direktiver og forordninger og opfylder følgende standarder.Tekniske bilag ved: * | |
| Batteri-drevetmultifunk-tionsværktøj | Typenummer | ||
| sv | EU-konformitetsförklaring | Vi förklarar under eget ansvar att de nämnda produkterna uppfyller kraven i alla gällande bestämmelser i de nedan angivna direktiven och förordningarnas och att de stämmer överens med följande normer.Teknisk dokumentation: * | |
| Sladdlöstmultifunk-tionsverk-tyg | Produkt-nummer | ||
| no | EU-samsvarserklæring | Vi erklærer under eneansvar at de nevnte produktene er i overensstemmelse med alle relevante bestemmelser i direktivene og forordningene nedenfor og med følgende standarder.Teknisk dokumentasjon hos: * | |
| Batteri-drevetmultiverk-tøy | Produkt-nummer | ||
| fi | EU-vaatimustenmukaisuus-vakuutus | Vakuutamme täten, että mainitut tuotteet vastaavat kaikkia seuraavien direktiivien ja asetusten asiaankuuluvia vaatimuksia ja ovat seuraavien standardien vaatimusten mukaisia.Tekniset asiakirjat saatavana: * | |
| Akkumoni-toimityö-kalu | Tuotenumero | ||
| el | Δήλωση πιστότητας ΕΕ | Δηλώνουμε με αποκλειστική μας ευθύνη, ότι τα αναφερόμενα προϊόντα αντιστοιχούν σε όλες τις σχετικές διατάξεις των πιο κάτω αναφερόμενων οδηγιών και κανονισμών και ταυτίζονται με τα ακόλουθα πρότυπα.Tεχνικά έγγραφα στη: * | |
| Εργαλείοπολλαπλήςλειτουργίαςμπαταρίας | Αριθμόςευρετηρίου | ||
| tr | AB Uygunluk beyanı | Tek sorumlu olarak, tanımlanan ürünün aşağıdaki yönetmelik ve direktiflerin geçerli | |
| Akülü çokfonksiyon-lu el aleti | Ürün kodu bütün hükümlerine ve aşağıdaki standartlarauygun olduğunu beyan ederiz.Teknik belgelerin bulunduğu yer: * | ||
| pl | Deklaracja zgodności UE | ||
| Akumulatorowenarzędziewielofunk-cyjne | Numerkatalogowy | ||
| cs | EU prohlášení o shodě | ||
| Akumuláto-rové multi-funkčnínářadí | Objednací číslo | ||
| sk | EÚ vyhlásenie o zhode | ||
| Akumulá-torové mult-tifunkčnénáradie | Vecné číslo | ||
| hu | EU konformitási nyilatkozat | ||
| Akkusmultifunk-cionálisszerszám | Cikkszám | ||
| uk | Заява провідповідність ЄС | ||
| Акумуля-торний ба-гатофунк-ціональ-ний інстру-мент | Товарнийномер | ||
| ro | Declarație deconformitate UE | ||
CE
541
| Sculă electrică multifunc-țională cu acumulator | Număr de identificare | enumerate în cele ce urmează și sunt în conformitate cu următoarele standarde.Documentație tehnică la:* | |
| bg | EC декларация за съответствие | С пълна отговорност ние декларираме, че посочените продукти отговарят на всички валидни изисквания на директивите и разпоредбите по-долу и съответства на следните стандарти.Техническа документация при:* | |
| Акумула-торен мул-тифунк-ционален електроин-струмент | Каталожен номер | ||
| mk | EU-Изјава за сообразност | Со целосна одговорност изјавуваме, дека опишаните производи се во согласност со сите релевантни одредби на следните регулативи и прописи и се во согласност со следните норми.Техничка документација кaj:* | |
| Батериски мулти-функцио-нален алат | Број на дел/ артикл | ||
| sr | EU-izjava o usaglašenosti | Na sopstvenu odgovornost izjavljujemo, da navedeni proizvodi odgovaraju svim dotičnim odredbama naknadno navedenih smernica u uredaba i da su u skladu sa sledećim standardima.Tehnička dokumentacija kod:* | |
| Akumula-torski multifunk-cionalni alat | Broj predmeta | ||
| sl | Izjava o skladnosti EU | Izjavljamo pod izključno odgovornostjo, da je omenjen izdelek v skladu z vsemi relevantnimi določili direktiv in uredb ter ustreza naslednjim standardom.Tehnična dokumentacija pri:* | |
| Akumula-torsko več-namensko orodje | Številka artikla | ||
| hr | EU izjava o sukladnosti | Pod punom odgovornošću izjavljujemo da navedeni proizvodi odgovaraju svim relevantnim odredbama direktiva i propisima navedenima u nastavku i da su sukladni sa sljedećim normama. Tehnička dokumentacija se može dobiti kod:* | |
| Akumula-torski više-namjenski alat | Kataloški br. | ||
| et | EL-vastavusdeklaratsioon | Kinnitame ainuvastutajatena, et nimetatud tooted vastavad järgnevalt loetletud direktiivide | |
542
CE
| Akuga multifunk-tsionaalne tööriist | Tootenumber ja määruste köikidele asjaomastele nõuetele ja on kooskõlas järgmiste normidega.Tehnilised dokumendid saadaval: * | ||
| Iv | Deklarācija par atbilstibu ES standartiem | Mēs ar pilnu atbildību paziņojam, ka šeit aplūkotie izstrādājumi atbilst visiem tālāk minētajās direktīvās un rikojumos ietvertajām saistošajām nostādnēm, kā arī sekojošiem standartiem.Tehniskā dokumentācija no: * | |
| Akumula-tora daudz-funkciju instru-ments | Izstrādājuma numurs | ||
| It | ES atitikties deklaracija | Atsakingai pareiškiame, kad išvardyti gaminiai atitinka visus privalomus žemiau nurodytų direktyvų ir reglamentų reikalavimus ir šiuos standartus.Techninė dokumentacija saugoma: * | |
| Akumulia-torinis dau-giafunkcis įrankis | Gaminio numeris | ||
| MM12V F 013 CM1 201 | 2006/42/EC EN 62841-1:2015+2014/30/EU A11:20222011/65/EU EN 62841-2-4:2014EN IEC 55014-1:2021EN IEC 55014-2:2021EN IEC 63000:2018 | ||
| * Bosch Power Tools B.V.(PT-RT/ETQ-EA)Konijnenberg 604825 BD BredaThe Netherlands | |||
Jean-Paul Rob de BruijnMeeuwissen Approval ManagerGeneral Manager  Bosch Power Tools B.V., Konijnenberg 60,4825 BD Breda, The Netherlands17.07.2025 Bosch Power Tools B.V., Konijnenberg 60,4825 BD Breda, The Netherlands17.07.2025 | |||
Declaration of Conformity
Cordless multifunction tool Article number
MM12V F 013 CM1 201
We declare under our sole responsibility that the stated products comply with all applicable provisions of the regulations listed below and are in conformity with the following standards.
Technical file at: Robert Bosch Ltd. (PT/SOP-GB), Broadwater Park, North Orbital Road, Uxbridge UB9 5HJ, United Kingdom
The Supply of Machinery (Safety) Regulations 2008
The Electromagnetic Compatibility Regulations 2016
The Restriction of the Use of Certain Hazardous Substances in Electrical and Electronic Equipment Regulations 2012
EN 62841-1:2015+A11:2022
EN 62841-2-4:2014
EN IEC 55014-1:2021
EN IEC 55014-2:2021
EN IEC 63000:2018

BOSCH
Bosch Power Tools B.V.,
4825 BD Breda, Netherlands,
represented (in terms of the above regulations) by
Robert Bosch Limited, Broadwater Park,
North Orbital Road, Uxbridge UB9 5HJ,
United Kingdom
Steve Neumann
Regional Business Director UK & Ireland
Martin Sibley
Business Operations and
Aftersales Director


Robert Bosch Ltd. Broadwater Park, North Orbital Road, Uxbridge UB9 5HJ,
United Kingdom, as authorised representative acting on behalf of
Bosch Power Tools B.V., 4825 BD Breda, Netherlands
Place of issue: Uxbridge Date of issue: 17/07/2025
Bosch Power Tools B.V.
Konijnenberg 60
4825 BD Breda
The Netherlands
1 609 92A D43 (2025.08) T / 545
All rights reserved.www.dremel.com