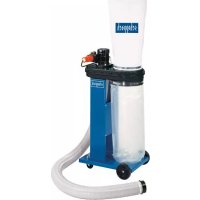
ha 200s - Industrial vacuum cleaner SCHEPPACH - Free user manual and instructions
Find the device manual for free ha 200s SCHEPPACH in PDF.

| Product type | Industrial vacuum cleaner |
| Brand | Scheppach |
| Model | HA 200S |
| Dimensions (L x W x H) | 435 x 345 x 230 mm |
| Weight | 5.5 kg |
| Power supply | 230-240 V / 50 Hz |
| Power consumption | 1250 W |
| Rotation speed | 28 000 min⁻¹ |
| Air flow rate | 120 m³/h |
| Vacuum | 20 000 Pa |
| Filter area | 0.175 m² |
| Filter volume | 5 l |
| Hose length | 2 000 mm |
| Suction connection diameter | 35 mm |
| Protection class | II |
| Functions | Suction, exhaust, blowing |
| Delivery contents | Suction device, hose ∅ 40 mm, connector ∅ 35, flat nozzle, screw-on nozzle, blowing nozzle, filter bag, 2 clamps, instruction manual |
| Intended use | Suction of wood chips and similar materials (non-professional use) |
| Safety | Mandatory wearing of hearing protection, dust mask and eye protection |
| Maintenance | Clean with a damp cloth, do not use cleaning products |
| Repairability | Electrical work reserved for the manufacturer or a qualified specialist |
| Warranty | Free replacement of defective parts (labor not included) |
| Operating temperature | Above 0 °C |
Frequently Asked Questions - ha 200s SCHEPPACH
User questions about ha 200s SCHEPPACH
0 question about this device. Answer the ones you know or ask your own.
Ask a new question about this device
Download the instructions for your Industrial vacuum cleaner in PDF format for free! Find your manual ha 200s - SCHEPPACH and take your electronic device back in hand. On this page are published all the documents necessary for the use of your device. ha 200s by SCHEPPACH.
USER MANUAL ha 200s SCHEPPACH
natural_image
Black industrial air purifier device with attached hoses and connectors, no visible text or symbols on the device itself.
Absauganlage
Original Instructions
natural_image
Close-up of a hand using a power drill to clean or store floor tiles (no visible text or symbols)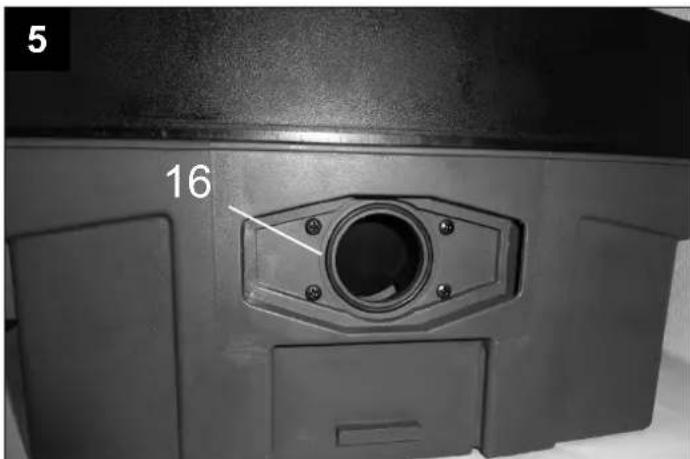
| D | Kofferabsaugung 6 - 8 | DK | Udsugningsanlæg | 22 - 24 | |
| GB | Suction device 9 - 11 | SE | Suganordning | 25 - 27 | |
| FR | Dispositif d'aspiration 12 - 15 | CZ | Odsávací zařízení | 28 - 31 | |
| I | Impianto di aspirazione | 16 - 18 | SK | Suganordning | 32 - 34 |
| NL | Afzuiginstallatie | 19 - 21 | PL | Urządzenie ssące | 35 - 37 |
Lieferumfang
Absauganlage
Absaugschlauch ∅ 40 mm
Schlauchkupplung ∅ 35 mm
Druckdifferenz Pa 20000
Suction hose ∅ 40 mm
Hose coupling ∅ 35
Suction nozzle, flat / bore-suction nozzle
Suction-blowing nozzle
Filter bag
2 hose clamps ∅ 100 mm
Operating instructions
Technical Data
Installation dimensions L x B x H mm....435 x 345 x 230
Suction connector, connection D mm 35
Hose length mm 2000
Air flow rate m3/h 120
Pressure difference Pa 20000
Filter surface m2 0,175
Filter volume I 5
Weight kg....5,5
Drive:
Electric motor 230 - 240 V / 50 Hz
Input power P 1 1250W
Engine speed 1/min 28000
Technical modifications reserved!
Explanation of symbols

Wear ear protection.

Wear a dust mask.

Wear eye protection.

Protection class II

The parts and sections of these operating instructions concerning your safety are marked with this symbol.

Please read the operating instructions before using this electric tool.
General information
Keep these operating instructions in a safe place and pass them on to persons who use the device.
Important information
Read the operating instructions carefully. Most accidents with the suction unit happen due to
failure to observe the basic safety instructions. Accidents can be avoided through early detection of potential dangers and the thorough adherence to the safety instructions. Use the suction system only in accordance with the recommendations of the manufacturer.
Attention! This device is only designed for the use in dry locations. Do not use it in wet or damp environments.
The parts and sections of these operating instructions concerning your safety are marked with this symbol: ⚠
General safety notes ⚠
Pass the safety notes on to all persons who use and work with this machine.
- Observe all safety and hazard notes on the machine.
- Keep all safety and hazard notes on the machine in readable condition.
- Check the mains supply line. Do not use any defective cables.
- Make sure the machine is placed on solid ground in a level and stable manner.
- Protect the machine from humidity.
- Keep children away from the machine that is connected to the mains.
- The operator of the machine must be at least 18 years old.
• Trainees must be at least 16 years old and
may use the machine only under supervision.
• Installation, repair and maintenance work on the electric installation may only be carried out by experts.
- Observe the direction of the engine's rotation – see electrical connection.
- To resolve malfunctions of the machine, switch the machine off. Pull out the mains plug.
- Any person who is not familiar with the machine is not allowed to operate it.
- Maintenance work, replacement of bag, filter and hose may only be carried out when the mains plug is unplugged.
- In rooms with a risk of explosion, only special "explosion-proof" devices may be used.
- Use original accessories only.
- Prior to each use, check the device for proper function.
- Do not use the device at the temperatures below 0 C°. Risk of damage to the housing.
- Switch off the motor when you leave your workplace. Pull out the mains plug. Disconnect the machine from any external power supply even with the slightest change of the machine's location! Before starting the machine again, you have to connect it properly to the mains supply!
Caution! If the power cable is damaged, it must be replaced by the manufacturer, the manufacturer's customer service or by a
Intended Use
- The machine is designed and built according to the state-of-the-art and the safety-related standards. Nevertheless, the use of the machine might involve risks such as personal injury, danger to life for the user or third parties, or damage to the machine and other material property.
- The machine is to be used only in a technically flawless condition as well as in accordance with the manufacturer's instructions and in a safety and risk-conscious manner while adhering to the operating instructions! In particular, failures which may impair the safety must be resolved immediately (by you or an expert)!
- The extraction unit is used to suck off splinters or chips which are created while processing wood or wood-based materials.
- Please note that our devices are not intended for commercial and industrial use or for use in craftsman's businesses. We do not assume any liability if the device is used in
commercial or industrial companies or in craftsman's businesses.
- Check the filter for damages at regular intervals. Replace damaged filters!
- Do not suck in any foreign objects, such as screws, nails, pieces of plastic or wood, when using the cleaning jets.
- The machine may be operated only with original parts and original accessories of the manufacturer.
- Sucking up sawdust and wood chips in the commercial sector is not permitted.
- Any other use above or beyond this is considered improper use. The manufacturer is not liable for damages resulting from this. The user shall bear this risk alone.
- The safety, work and maintenance instructions of the manufacturer as well as the dimensions indicated in the Technical Data section must be adhered to.
- The relevant accident prevention regulations and other generally recognised safety stan-
dards must be observed.
- The machine may be used, maintained or repaired only by persons who are familiar with the machine and the risks involved. Unauthorised modifications on the machine exclude any liability of the manufacturer for resulting damages.
- The machine may be used only with the original accessories of the manufacturer.
- The suction device is used for sucking up, blowing off and blowing out substances that are not dangerous to health.
- Don't use the suction device for sucking up liquids.
- Do not suck in any hot or burning dusts.
- Do not suck in any dusts that are dangerous to health (e.g. asbestos)
- Keep the suction device away from humidity and rain.
Remaining risks
The machine is built according to the state of the art and the recognised safety standards. However, when working on and with the machine, residual risks may arise.
- Health hazards through wood chips. Always wear personal protective equipment such as eye protection and dust masks.
- When closing or replacing the dust collecting bag, you might breathe in dust. If you
do not observe the notes in the operating instructions regarding the disposal (e.g. use of dust masks P2), you may breathe in dust.
- Health hazards through noise. When you work on and with the machine, the permitted noise level is exceeded. Always wear personal protective equipment such as ear protection.
- Danger through electrical current, if impro-
per connection cables are used.
• Furthermore, in spite of all precautions there might be remaining risks that are not obvious.
- Remaining risks can be reduced if the sections “Safety instructions” and “Intended use” as well as the operating instructions are observed in their entirety.
Equipment
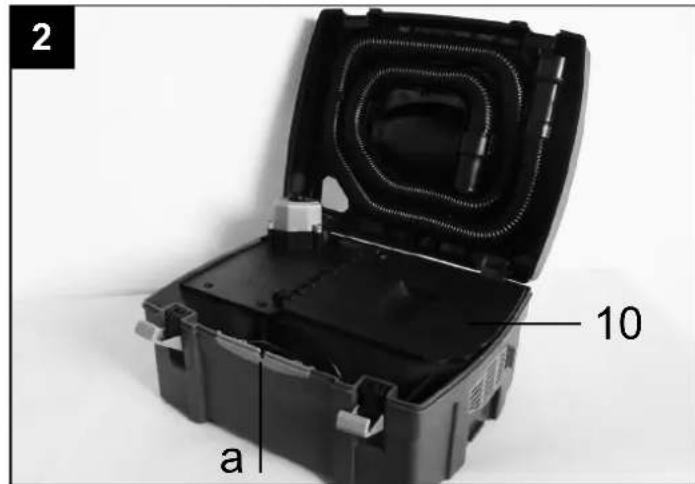
1 Case
2 On/off switch
3 Clamp for case cover
4 Carrying handle
5 Power cable
6 Suction hose
7 Suction/blowing nozzle
8 Suction nozzle, flat
9 Borehole-suction nozzle
10 Lid for dust bag
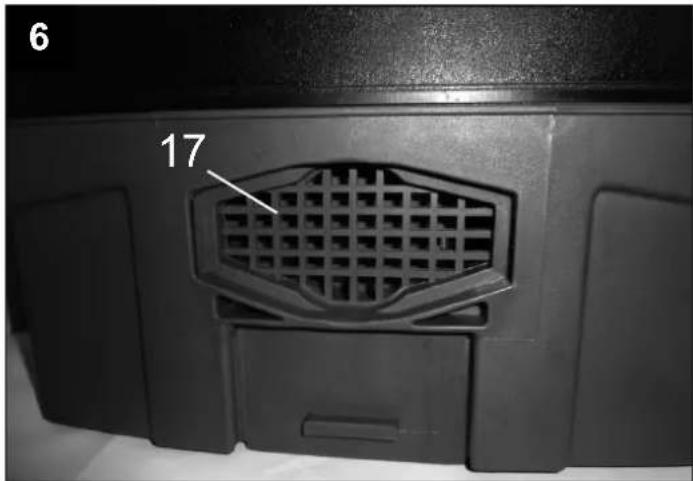
11 Dust bag
12 Dust filter
13 Clamping bracket
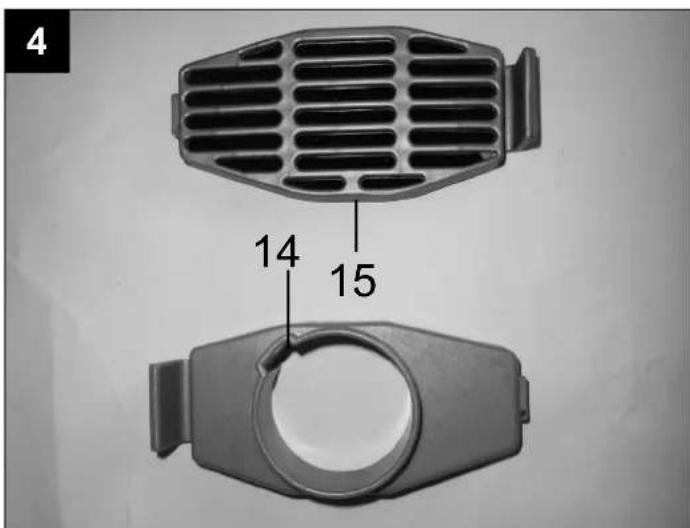
14 Suction nozzle
15 Suction grating
16 Connector for suction
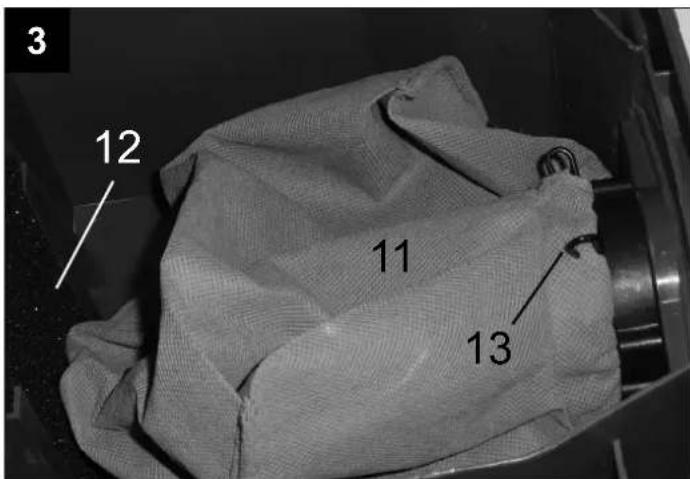
17 Connector for blowing
Assembly
■ INSERTING/REPLACING THE DUST BAG, FIG. 2/3
Open both clamps (3) and fold the case cover backwards.
Open the lid for the dust bag (10), press the clamping bracket (12)
on the dust bag and push it over the suction
nozzle. Close the lid again until it clicks into place. When you empty a full dust bag, clean the dust bag chamber with a moist cloth or brush before you inserting it again.
Pass the connection cable through the notch (a) on the front. Close the case cover and lock it with both clamps.
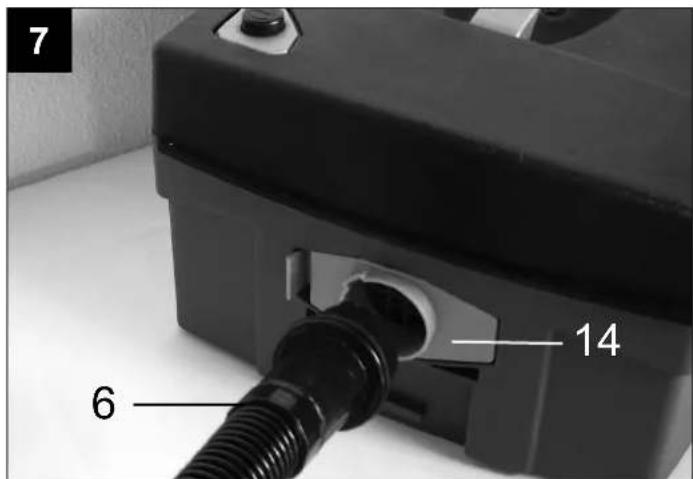
■ SUCTION FUNCTION FIG. 4-7
Remove the power plug for all conversions.
When using the suction function, always insert a dust bag. The connection nozzle (14) must be inserted on the side of the dust bag.
(16) Insert the suction grating with filter on the opposite side.
Make sure both parts click into place. Insert the suction hose (6) with the lug into
the connection nozzle (14) and lock in it place by rotating it slightly.
Attach a jet nozzle onto the suction hose; connect the mains plug and press the on button.
■ FUNCTION: BLOWING OUT, OFF AND UP FIG. 4-7
The conversion of the device for blowing out can be done in a few simple steps. Remove the connection nozzle (14) from the suction side and insert on the opposite side.(17) Insert suction grating with filter on the suction
side. Connect the suction hose and attach the blowing nozzle (7). Keeping the hole on the jet nozzle closed will increase the blowing pressure.
Do not point the air flow at persons or animals.
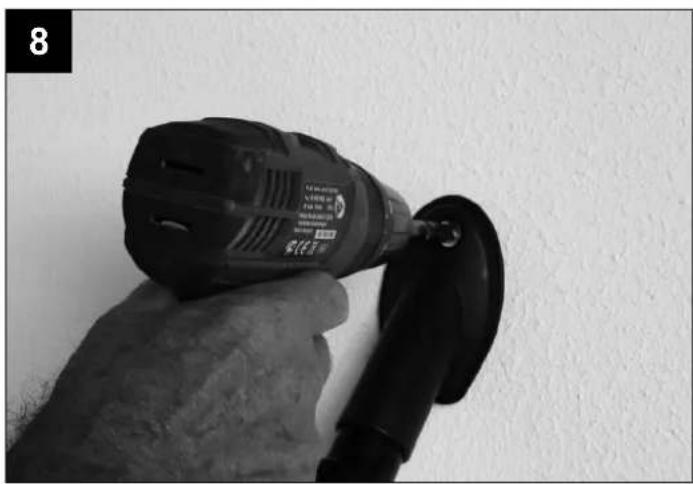
■ NOTES ON THE USE OF BOREHOLE-SUCTION NOZZLE FIG.8
Attach the drill suction nozzle (9) to the suction hose.
Switch on the suction device and place the drill suction nozzle onto the borehole. Due
to the vacuum, the nozzle sticks to level surfaces.
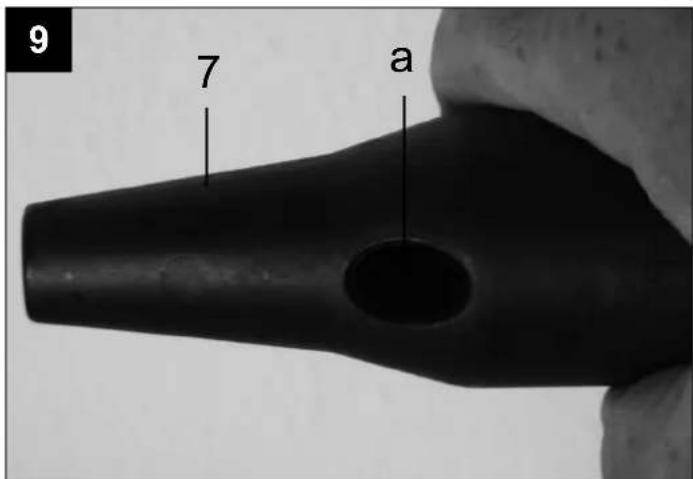
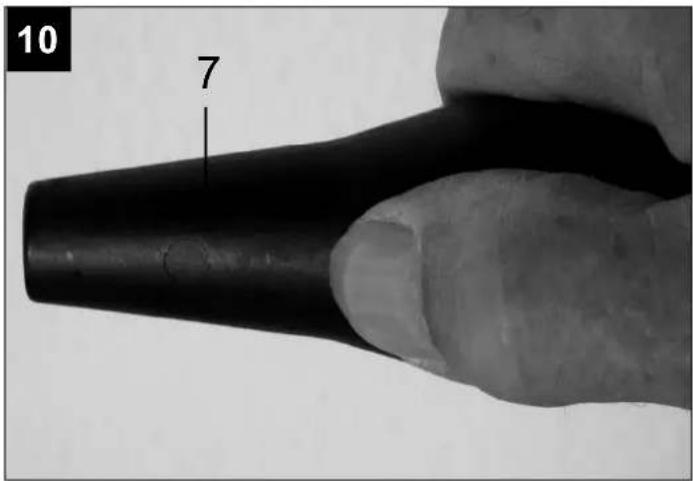
■ USE OF THE INFLATION NOZZLE FIG. 9-10
The suction-blowing nozzle (7) can be used for suction or inflating of suitable objects. Set the suction device to blowing mode. Place the suction-blowing nozzle onto the suction hose.
Switch the suction device on. By covering the borehole (a) on the nozzle, you can regulate the airflow
Electrical Connection ⚠️
Connections and repair work on the electrical equipment may be carried out only by a qualified electrician.
The installed electric motor is connected and ready for use. The connection complies with the relevant VDE and DIN regulations.
The connection to the mains supply provided by the customer as well as the extension cables must comply with these regulations.
Important notes
Faulty electric connecting cables The electric connecting cables often have insulation damages.
Possible reasons are::
- Pressure marks if connecting cables are fed through window or door gaps.
- Kinks due to improper fastening or passing
of the connecting cable.
- Cutting points due to driving over connecting cables.
- Insulation damages due to ripping cables out of the wall socket.
- Cracks due to aging of the insulation. Electric connection cables that are damaged in this way may not be used and due to insulation damages, they constitute a danger to life. Check electric cables for damages regularly. Make sure the connection cable is not connected to the power supply while checking it. Electric connection cables must comply with the relevant VDE and DIN regulations. Only use connection cables with the H05VV-F marking.
The norm stipulates that there must be a type designation imprint on the connection cable.
AC motor
- The mains voltage must correspond to the mains voltage indicated on the type plate.
- Extension cables must have a minimum cable cross section of 1.0 square millimetres.
- The mains supply must be secured by a suitable fuse.
In case of questions, please indicate the following information:
- Motor manufacturer
- Type of motor's current
• Data on the machine type plate - Data on the switch type plate If you return a motor, always send back the entire drive unit with switch.
Cleaning, Maintenance and Repair

WARNING
Always pull the mains plug out of the mains socket before carrying out any work on the electric tool itself (e.g. transport, installation, conversion, cleaning and maintenance work)!
- Caution! Pull out the mains plug.
- Keep the suction device and the air vents clean.
- Prior to starting your work, check the filling level of the dust bag.
- Clean the suction device with a brush or moist cloth.
- Do not use cleaning agents.
Ved at holde for dysens hul (a) kan
luftstrømmen reguleres
El-tilslutning ⚠️
■ FUNKTION: BLÅSA UT OCH UPP FIG. 4-7
■ FUNKTION: BLÅSA UT OCH UPP FIG. 4-7
Only for EU countries.
Do not dispose of electric tools together with household waste material! In observance of European directive 2012/19/EU on wasted electrical and electronic equipment and its implementation in accordance with national law, electric tools that have reached the end of their life must be collected separately and returned to an environmentally compatible recycling facility.
FR

Apparent defects must be notified within 8 days from the receipt of the goods. Otherwise, the buyeris rights of claim due to such defects are invalidated. We guarantee for our machines in case of proper treatment for the time of the statutory warranty period from delivery in such a way that we replace any machine part free of charge which provably becomes unusable due to faulty material or defects of fabrication within such period of time. With respect to parts not
manufactured by us we only warrant insofar as we are entitled to warranty claims against the upstream suppliers. The costs for the installation of the new parts shall be borne by the buyer. The cancellation of sale or the reduction of purchase price as well as any other claims for damages shall be excluded.