
DirectPrecision 1400 Vision - Saw CECOTEC - Free user manual and instructions
Find the device manual for free DirectPrecision 1400 Vision CECOTEC in PDF.

| Product Type | Circular Saw |
| Brand | Cecotec |
| Model | DirectPrecision 1400 Vision |
| Power Consumption | 1400 W |
| Voltage | 230-240 V~, 50 Hz |
| No-load Speed | 4800 min⁻¹ |
| Cutting Depth at 90° | 65 mm |
| Cutting Depth at 45° | 43 mm |
| Blade Diameter | 185 mm |
| Blade Bore | 20 mm |
| Blade Thickness | 2.4 mm |
| Weight | 4.1 kg |
| Protection Class | II (double insulation) |
| Sound Pressure Level | 90.3 dB(A) |
| Sound Power Level | 107.3 dB(A) |
| Vibration Emission | 4.295 m/s² |
| Box Contents | Circular saw, 2 blades, parallel guide, manual |
| Depth Adjustment | Yes, tool-free |
| Miter Angle Adjustment | 0° to 45° |
| Parallel Guide | Included |
| Dust Extraction | Connector for vacuum cleaner |
| Safety | Oscillating guard, switch lock |
| Warranty | Contact Cecotec after-sales service |
Frequently Asked Questions - DirectPrecision 1400 Vision CECOTEC
User questions about DirectPrecision 1400 Vision CECOTEC
0 question about this device. Answer the ones you know or ask your own.
Ask a new question about this device
Download the instructions for your Saw in PDF format for free! Find your manual DirectPrecision 1400 Vision - CECOTEC and take your electronic device back in hand. On this page are published all the documents necessary for the use of your device. DirectPrecision 1400 Vision by CECOTEC.
USER MANUAL DirectPrecision 1400 Vision CECOTEC
natural_image
3D rendering of a circular saw with visible blades and mounting brackets (no text or symbols)Instruction manual
| SAFETY INSTRUCTIONS | 4 |
| ESPAÑOL | 164 |
| ENGLISH | 172 |
| FRANÇAIS | 179 |
| DEUTSCH | 187 |
| ITALIANO | 195 |
| PORTUGUÉS | 203 |
| NEDERLANDS | 211 |
| POLSKI | 219 |
| ČEŠTINA | 227 |
| MAGYAR | 234 |
| EAAHNIKA | 242 |
| TÜRKÇE | 250 |
| العربية | 257 |
| CATALÀ | 263 |
| FIGURES | 271 |
NOTA
EU01_121352 DirectPrecision 1400 Vision
EU01_121354 DirectPrecision 1800 Vision TCT
EU01_121353 DirectPrecision 1600 Vision
EN • The coding in this manual is generic and applies to all code variants of the appliance.
Read these instructions thoroughly before using the appliance. Keep this instruction manual for future reference or new users. The following symbols are used in this manual and/or on the tool. Make sure you understand their meaning before using the tool.
| Symbol Meaning | |
| WARNING: indicates a potentially hazardous situation. | |
| READ THE MANUAL: indicates that the user must read the instruction manual before using the tool. | |
| CLASS II TOOL: indicates that the tool has double insulation. | |
 | Wear hearing protection |
 | Wear safety goggles |
 | Wear dust mask |
 | Wear protective gloves |
General power tool safety instructions
⚠ WARNING. Read all hazard warnings, instructions, figures and technical specifications supplied with the power tool. Failure to follow the instructions below may result in an electric shock, fire and/or serious injury. Keep all safety warnings and instructions for future reference. The term "power tool" in the following warnings refers to mains-operated (corded) power tools and battery-operated (cordless) power tools.
Work area safety
a. Keep the work area clean and well lit. Cluttered or dark areas may cause accidents.
b. Do not operate power tools in explosive atmospheres, such as in the presence of flammable liquids, gases or dust. Power tools can produce sparks that ignite dust or fumes.
c. Keep children and bystanders away while operating a power tool. Distractions can cause you to lose control.
Electrical safety
a. Power tool plugs must match the outlet. Never modify the plug in any way. Do not use adapters on grounded power tools. Unmodified plugs and sockets reduce the risk of electric shock.
b. Avoid body contact with grounded surfaces, like pipes, radiators, stoves and refrigerators. There is an increased risk of electric shock if your body is earthed or grounded.
c. Do not expose power tools to rain or wet conditions. Water entering a power tool will increase the risk of electric shock.
d. Do not misuse the cord. Never use the cord for carrying, pulling or unplugging the power tool. Keep cord away from heat, oil, sharp edges or moving parts. Damaged or entangled cords increase the risk of electric shock.
e. When operating a power tool outdoors, use an extension cord suitable for outdoor use. Use of a cord suitable for outdoor use reduces the risk of electric shock.
f. If operating a power tool in a damp location is unavoidable, use a residual current device (RCD) protected supply. Use of an RCD reduces the risk of electric shock. The application of a differential fuse reduces the risk of exposure to electric shock.
Personal safety
a. Stay alert, watch what you are doing and use commonsense when operating a power tool. Do not use the power tool if you are tired, or after consuming drugs, alcohol or medication. Failure to exercise caution when operating the power tool can result in serious injury.
b. Use personal protective equipment. Always wear eye protection. Protective equipment such as dust mask, non-skid safety footwear, helmet or hearing protection, used under appropriate conditions, will reduce personal injuries.
c. Avoid unintentional start-up. Ensure that the power tool is switched off before connecting it to the mains and/or when mounting the battery, picking it up and transporting it. Carrying the power tool by the on/off switch or powering the power tool while it is switched on may result in an accident.
d. Remove adjustment tools or spanners before connecting the power tool. An adjusting tool or spanner attached to a rotating part can cause injury when the power tool is operated.
e. Avoid risky postures. Keep proper footing and balance at all times. This will allow you to better control the power tool in the event of an unexpected situation.
f. Wear appropriate working clothes. Do not wear loose clothing or jewellery. Keep your hair and clothing away from moving parts. Loose clothing, long hair and jewellery can get caught in moving parts.
g. If devices are provided for the connection of dust extraction and collection facilities, ensure these are connected and properly used. The use of such equipment reduces the risks from dust.
h. Do not let familiarity gained from frequent use of tools allow you to become complacent and ignore tool safety principles. A careless action can cause serious injury within a fraction of a second.
Power tool use and maintenance
a. Do not overload the power tool. Use the correct power tool for your application. With the right power tool you can work better and safer within the specified power range.
b. Do not use the power tool if the switch is faulty. Power tools that cannot be switched on or off are dangerous and must be repaired.
c. Disconnect the mains plug and/or remove the detachable battery from the power tool before making any adjustments, changing accessories or storing the power tool. Such preventive safety measures reduce the risk of the power tool starting up accidentally.
d. Keep unused power tools out of the reach of children. Do not allow persons who are unfamiliar with the power tool or who have not read these instructions to operate the power tool. Power tools used by inexperienced persons are dangerous.
e. Check the power tool and its accessories. Check if the moving parts are misaligned or stuck, if there are broken
pieces or any other condition that may affect the power tool's operation. In case of damage, the power tool must be repaired before use. Many accidents are caused by poorly maintained power tools.
f. Keep tools clean and sharp. Properly maintained tools are better guided and controlled.
g. Use the power tool, accessories, etc. according to these instructions, taking into account the working conditions and the work to be carried out. The use of power tools for work other than that for which they are intended can be dangerous.
h. Keep handles and gripping surfaces dry, clean and free of oil and grease. Slippery handles and grasping surfaces do not allow safe handling and control of the tool in unexpected situations.
Service
a. Your power tool may only be repaired by a qualified expert, using only original spare parts. This is the only way to maintain the safety of the power tool.
Safety instructions for circular saws
Cutting procedures
- DANGER: Keep hands away from the cutting area and the blade. Keep the non-dominant hand on the auxiliary handle or on the engine housing. If both hands are holding the saw, they cannot be cut by the blade.
-
Do not reach under the workpiece. The guard cannot protect you from the blade below the workpiece.
-
Adjust the cutting depth to the thickness of the workpiece. Less than the entire surface of the blade teeth should protrude below the workpiece.
- Never hold the workpiece in your hands or on your legs during cutting. Secure the workpiece to a stable platform. It is important to have adequate support during work to minimise exposure of the body, jamming of the blade or loss of control.
- Hold the power tool by the insulated gripping surfaces when performing an operation where the cutting accessory may contact hidden wiring. Contact with "live" conductors can cause exposed metal parts to become "live" and shock you.
- When making longitudinal cuts, always use a parallel fence or a straight fence. This improves cutting accuracy and reduces the possibility of blade jamming.
- Always use blades with shaft holes of the correct size and shape (diamond/round). Blades that do not match the mounting mechanism of the saw will be off-centre and cause loss of control.
- Never use damaged or incorrect washers or bolts. The washers and blade bolts were specially designed for your saw for optimum performance and safe operation.
Causes of and warnings about backlash
- Kickback is a sudden reaction to a jammed, blocked or misaligned saw blade, causing the saw to rise uncontrollably and fly out of the workpiece towards the operator.
- When the blade is jammed or blocked by the slot closure, the
blade stops and the reaction of the motor propels the unit quickly towards the operator.
- If the blade is twisted or misaligned during cutting, the teeth on the back edge of the blade can dig into the top surface of the wood, causing the blade to slip out of the groove and jump towards the operator.
Kickback is the result of saw misuse and/or incorrect operating procedures or conditions, and can be avoided by taking the proper precautions as outlined below:
- Hold the saw firmly with both hands and position the arms so that they can withstand the kickback forces. Place the body on both sides of the blade, but not in line with it. Kickback may cause the saw to jump backwards, but kickback forces can be controlled by the operator if proper precautions are taken.
- If the blade jams or if cutting is interrupted for any reason, release the trigger and hold the saw still in the material until the blade comes to a complete stop. Never attempt to remove the saw from the workpiece or pull the saw backwards with the blade still running; otherwise, kickback may occur. Determine the cause of the blade jamming and take corrective action.
- When resuming work with the saw on the workpiece, centre the saw blade in the cut so that the saw teeth do not dig into the material. If the blade is jammed, the saw blade could pull out of the workpiece or kickback when restarting the saw.
- When using large panels, use supports to minimise the risk of the blade jamming and kicking back. Large panels tend to bend under their own weight. The panel shall be supported
on both sides from below both near the cut line and near the edge of the panel.
- Do not use dull or damaged saw blades. Dull or poorly positioned saw blades result in a narrow cut causing excessive friction, blade binding and kickback.
- The depth adjustment and blade bevel lock levers must be secure and firm before cutting. If the blade adjustment shifts while cutting, it can cause the blade to jam and back up.
Lower protection function
- Check that the bottom guard is securely closed before each use. Do not start the saw if the bottom guard does not move freely and close immediately. Never hold or tie the bottom guard in the open position. If the saw is accidentally dropped, the bottom guard may bend. Lift the bottom guard with the retractable handle and ensure that it moves freely and does not touch the blade or any other workpiece at all angles and depths of cut.
- Check the operation of the bottom guard spring. If the guard and spring are not functioning properly, they must be repaired before use. Damaged parts, sticky deposits or build-up of debris may cause the underride guard to malfunction.
- The bottom guard can be retracted manually only for special cuts such as "plunge cuts" and "compound cuts". Lift the bottom guard by retracting the handle and as soon as the blade is inserted into the material, the bottom guard should be released. For all other sawing operations, the bottom guard should operate automatically.
- Always make sure that the bottom guard covers the blade before placing it on a bench or floor. An unprotected blade can cause the saw to move backwards, cutting whatever is in its path. Note the time it takes for the blade to stop after the switch is released.
Additional safety information
- Keep your hands away from the chip ejection. You may sustain injuries to rotating parts.
- Do not work overhead with the saw. Thus, you do not have sufficient control over the power tool.
- Use suitable scanning devices to detect hidden conductors or pipes, or consult your utility companies. Contact with electrical conductors can lead to fire or electrocution. Damage to a gas pipe can cause an explosion. The perforation of a water pipe can cause material damage.
- When working, hold the power tool firmly with both hands and ensure a safe position. By using both hands the power tool is guided more safely.
- Do not use the power tool in a fixed position. It is not designed to operate with a saw table.
- When working with the machine, always hold it firmly with both hands and maintain a safe posture. The power tool is guided more safely with both hands.
-
In a "plunge cut", which is not made at right angles, secure the saw guide plate against lateral movement. Sideways movement can lead to jamming of the saw blade and thus to kickback.
-
Secure the workpiece. A workpiece held securely in a clamping device or vice is much safer than one held by hand.
- Always wait until the machine has come to a complete stop before setting it down. The inserted accessory may bind and cause a loss of control over the power tool.
- Do not use HSS steel saw blades. Saw blades of this type can easily break.
- Do not cut ferrous metals. Red-hot shavings can ignite the dust extraction system.
- Wear a dust mask.
- Never operate the machine with a damaged cable. Do not touch the damaged cable and disconnect the mains plug when the cable is damaged during work. Damaged cords increase the risk of electric shock.
d. airport airport airport airport airport airport airport airport airport airport airport airport airport airport airport airport airport airport airport airport airport airport airport airport airport airport airport airport airport airport airport airport airport airport airport airport airport airport airport airport airport airport airport airport airport airport airport airport airport airport airport airport airport airport airport airport airport airport airport airport airport airport airport airport airport airport airport airport airport airport airport airport airport airport airport airport airport airport airport airport airport airport airport airport airport airport airport airport airport airport airport airport airport airport airport airport airport airport airport airport Airport airport airport airport airport Airport airport Airport airport Airport Airport Airport Airport Airport Airport Airport Airport Airport Airport Airport Airport Airport Airport Airport Airport Airport Airport Airport Airport Airport Airport Airport Airport Airport Airport Airport Airport Airport Airport Airport Airport Airport Airport Airport Airport Airport Airport Airport Airport Airport Airport Airport Airport Airport Airport Airport Airport Airport Airport Airport Airport Airport Airport Airport Airport Airport Airport Airport Airport Airport Airport Airport Airport Airport Airport Airport Airport Airport Airport Airport Airport Airport Airport Airport Airport Airport Airport Airport Airport Airport Airport Airport Airport Airport Airport Airport Airport Airport Airport Airport Airport Airport Airport Airport Airport Airport Airport Airport Airport airports
1. Parts and components
Fig.
- Handle
- Power switch
- Lock button for on/off switch
- Locking lever for cutting depth adjustment
- Power cord
- Base
- Locking lever for mitre adjustment
- Locking screw for rip fence
- Mitre angle scale
- Additional handle
- Blade guard
- Saw blade
- Spanner for saw blade
- Sawdust extractor connection
- Motor housing
- Parallel stop
- Screw for securing the saw blade
- Clamp
- Retracting guard
- Lever for rocker protector
Note:
The graphics in this manual are schematic representations and may not exactly match the product.
2. Before use
- This appliance comes in a packaging designed to protect it during transport. Remove the appliance from its box. You can keep the original box and other packaging elements in a safe place. This will help you prevent damage to the appliance when transporting it in the future. In case the original packaging is disposed of, make sure all packaging materials are recycled accordingly.
- Check that all parts and components are included and in good condition. If any of them are missing or damaged, please contact Cecotec's Official Technical Support Service immediately.
Box content:
- Circular saw
• Discs x2
- Parallel guide
ENGLISH
- Instruction manual
- Do not remove the product's serial number in order to keep proper traceability if technical assistance is required.
3. Assembly
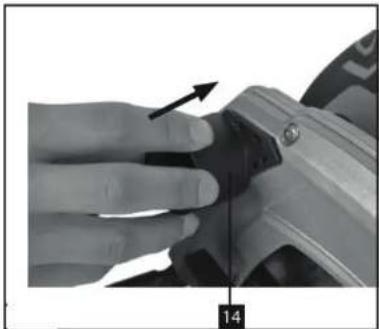
Assembly of the connection for extraction
Slide the connector into the device as shown in figure 2.
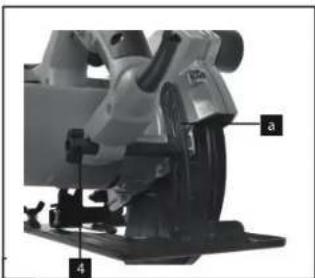
Adjusting the cutting depth
Fig. 3
● Release the handle on the back of the guard to adjust the cutting depth (4).
- Place the saw base flat on the surface of the workpiece to be cut. Raise the saw until the desired cutting depth (a) is reached.
● Re-secure the handle to set the cutting depth (4). Ensure it is securely fastened.
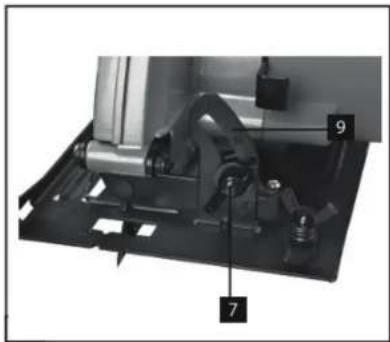
Miter angle setting
Fig. 4
- The standard preset angle between the saw base (6) and the blade (12) is 90°. You can adjust this angle to make angled cuts.
● Release the locking lever for mitre adjustment (7) on the front of the saw base. - Adjust the cutting angle to about 45°, observing the cutting angle scale (9) while doing so.
● Re-secure the locking lever for mitre adjustment (7). Make sure it is securely fastened.
Dust and chip removal
- Connect a suitable hoover to the chip extraction connector (14) of the circular saw (hoover not included). This will provide excellent dust extraction at the workpiece, protecting both the equipment and your health. It will also keep the work area cleaner and safer.
● The dust created when working can be dangerous.
Important! The hoover used must be suitable for the workpiece material.
- Check that all parts are correctly connected.
ENGLISH
Rip fence
Fig. 5
- Use the rip fence (16) to make parallel cuts.
- Loosen the locking screw for the rip fence (B) on the saw base (b).
● To assemble, slide the rip fence (16) into the guide (a) on the saw base (b). - Adjust the required spacing and then tighten the locking screw (8) again.
- Use of the parallel stop: Place the rip fence (16) flat on the edge of the workpiece and start cutting.

Important! Make a test cut on a piece of scrap wood
4. Operation
The machine is designed for longitudinal and transverse cuts in wood with straight cutting lines, as well as mitre cuts in wood while resting firmly on the workpiece. With suitable saw blades, thin-walled non-ferrous metals, e.g. profiles, can also be cut. Working with ferrous metals is not allowed.
● Always hold the circular saw firmly.
- The swinging guard (19) retracts automatically when it comes into contact with the workpiece.
- Do not apply excessive force! Gently and evenly push the circular saw forward.
- Place the scrap piece on the right side of the circular saw so that the wide part of the base (6) supports the whole area.
- If you follow a line, guide the circular saw along the corresponding groove.
- Secure small pieces of wood firmly before cutting. Never hold them in your hand.
● Always follow the safety instructions and wear protective goggles.
- Do not use defective, cracked or broken saw blades.
- Avoid using flanges whose holes do not match those of the saw blade.
- Do not slow down the saw blade by hand or by applying lateral pressure.
- Ensure that the swing guard does not jam and returns to its initial position after each use.
- Before using the circular saw, check the function of the oscillating guard with the plug disconnected.
- Make sure that all safety devices, such as the swing guard, flanges and adjusting devices, are in good condition and properly secured.
- Connect a suitable dust extraction system to the sawdust extraction connector (14). Ensure it is properly connected.
- Do not lock the movable swing guard in the retracted position while the saw is in use.
ENGLISH

saw.
Use of the circular saw
- Adjust the cutting depth, cutting angle and stop.
- Make sure the power switch (2) is not pressed down. Only then should you connect the plug to a suitable socket.
- Do not switch on the circular saw until you have fitted a saw blade.
- Place the saw's base plate flat on the workpiece to be cut. The saw blade must not be in contact with the workpiece.
● Hold the circular saw firmly with both hands.
On/Off
Fig. 6.
To switch on:
-
Press the lock button (3) and the on/off switch (2) at the same time.
-
Allow the saw blade to accelerate to full speed. Then gently slide the blade along the cutting line, applying only gentle pressure.
To switch off:
- Release the lock-off button and the on/off switch.
- If you release the handle, the equipment will automatically switch off, preventing accidental operation.
- Make sure that ventilation openings are not covered or blocked while working with the tool.
- Do not decelerate the saw blade after switching it off by pressing it sideways.

⚠️ Important! Do not leave the machine until the saw blade has come to a complete stop. Important! Make a test cut on a piece of scrap wood.
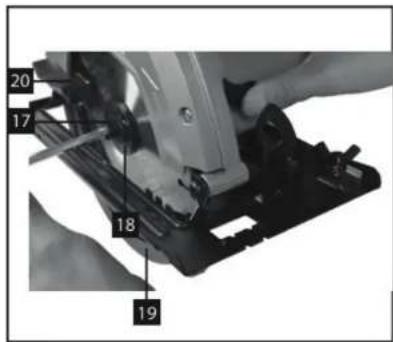
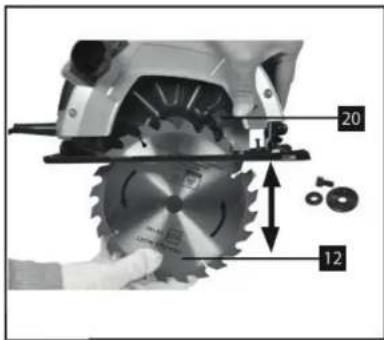
Changing the saw blade
Fig. 7

Important! Always unplug the power cord before performing any work on the circular saw.
ENGLISH
- Use only saw blades of the same type as the one supplied with this circular saw. Consult your dealer for advice.
- Use the blade spanner (13) to change the blade.
- Important. The hand-held circular saw must not be operated with the saw blade key (13) inserted in it.
Steps to change the blade:
- Loosen the saw blade retaining screw (17) using the specific spanner (13).
- Slide back and secure the swing guard (19) with the corresponding lever (20).
- Remove the flange (18) and the saw blade (12) downwards.
- Clean the flange and insert the new saw blade, making sure to follow the direction of rotation indicated by the arrows on the guard and blade.
- Tighten the saw blade clamping screw (17) firmly and check that it turns freely.
- Before turning the saw on, confirm that the blade is correctly installed, that the moving parts operate smoothly and that all screws are tightened securely.
5. Cleaning and maintenance
Always disconnect the mains plug before starting any cleaning work.
Cleaning
- Keep all safety devices, ventilation slots and the motor housing as free of dirt and dust as possible. Clean the tool with a clean cloth or blow it clean using low-pressure compressed air.
We recommend cleaning the device immediately after each use. - Clean the equipment regularly with a damp cloth and a little soft soap. Do not use cleaning agents or solvents, as they may damage the plastic parts of the equipment. Ensure that no water enters the device.
Carbon brushes
- In case of excessive sparking, have the carbon brushes checked only by a qualified electrician.
Important! Carbon brushes must not be replaced by anyone other than a qualified electrician.
Maintenance
- There are no parts inside the equipment that require additional maintenance.
- Troubleshooting
| Problem | Possible cause | Possible solution |
| The saw does not switch | Plug disconnected or switch not | Check the plug and switch |
ENGLISH
| on. | activated. | connection. |
| The saw blade does not rotate. | Incorrectly installed blade or loose screw. | Secure the blade correctly and tighten the screw. |
| Irregular cut | Blade blunt or misaligned. | Replace or realign the blade. |
| Excessive spark generation. | Worn carbon brushes. | Contact the official Cecotec Technical Support Service. |
| Excessive vibration. | Damaged or poorly balanced saw blade. | Replace the saw blade. |
| Ineffective dust extraction. | Extraction connector clogged. | Clean the extraction connector. |
| Motor overheating. | Prolonged use or blocked ventilation. | Let the engine cool down and make sure the vents are clear. |
7. Recycling of electrical and electronic equipment

This symbol indicates that, according to the applicable regulations, the product and/or battery must be disposed of separately from household waste. When this product reaches the end of its shelf life, you should dispose of the batteries/accumulators and take them to a collection point designated by the local authorities. For detailed information on how to properly dispose of electrical and electronic appliances and/or batteries, consumers should contact their local authorities. Compliance with the above guidelines will help protecting the environment.
Information regarding national packaging recycling systems and their marking can be found on our website.
8. Copyright
The intellectual property rights over the texts in this manual belong to CECOTEC INNOVACIONES, S.L. All rights reserved. The content of this publication may not either in part or in its entirety, be reproduced, stored in a retrieval system, transmitted or distributed by any means (electronic, mechanical, photocopying, recording or similar) without prior authorisation from CECOTEC INNOVACIONES, S.L.
9. Simplified EU Declaration of Conformity
Cecotec Innovaciones hereby declares that this appliance complies with the essential requirements and other relevant provisions of the regulations applicable in the European Union. This appliance has been designed, manufactured and tested in compliance with required safety and quality standards. The full text of the EU Declaration of Conformity can be found on the following website: https://cecotec.es/es/information/declaration-of-conformity
ENGLISH
- Technical specifications
| Reference | EU01.121352 | EU01.121353 | EU01.121354 |
| Product name | DirectPrecision 1400 Vision | DirectPrecision 1600 Vision | DirectPrecision 1800 Vision TCT |
| Mains voltage | 230-240 V-/50 Hz | ||
| Power absorbed | 1400 W | 1600 W | 1800 W |
| No-load speed | 4800 min ^-1 | 5000 min ^-1 | 5000 min ^-1 |
| Cutting depth at 90° | 65 mm | 63 mm | 63 mm |
| Cutting depth at 45° | 43 mm | 41 mm | 41 mm |
| Saw blade | 0.185 mm | 0.185 mm | 0.185 mm |
| Blade holder | 0.20 mm | 0.20 mm | 0.20 mm |
| Thickness of sheet | 2.4 mm | 2.4 mm | 2.4 mm |
| Protection | II | II | II |
| Weight | 4.1 kg | 4.2 kg | 5.7 kg |
| Sound and vibrationSound and vibration values were measured in accordance with EN 60745.Total vibration values (vector sum of three directions) determined in accordance with EN 60745. | |||
| Sound pressure level L_w | 96.30 dB(A) | 100.4 dB(A) | 96 dB(A) |
| Uncertainty K_w | 3 dB(A) | 3 dB(A) | 3 dB(A) |
| Noise power level L_w | 107.30 dB(A) | 108.4 dB(A) | 106 dB(A) |
| Uncertainty K_w | 3 dB(A) | 3 dB(A) | 3 dB(A) |
| Vibration emission value a_w | 4,295 | 1.729 m/s ^2 | 3.41 m/s ^2 |
| K uncertainty | 1.5 m/s ^2 | 1.5 m/s ^2 | 1.5 m/s ^2 |
Important!
The vibration value varies according to the area of application of the power tool and may exceed the specified value in exceptional circumstances.
Keep noise emissions and vibrations to a minimum.
Technical specifications may change without prior notice to improve product quality. Made in China | Designed in Spain
11. Technical support and warranty
Cecotec shall be liable to the end user or consumer for any lack of conformity that exists at the time of product delivery under the terms, conditions and deadlines established by applicable regulations. Repairs should be carried out by qualified personnel.
If you detect any problem with the product or have any queries, please contact Cecotec's Official Technical Support Service at +34 96 321 07 28.
FRANÇAIS
FRANÇAIS
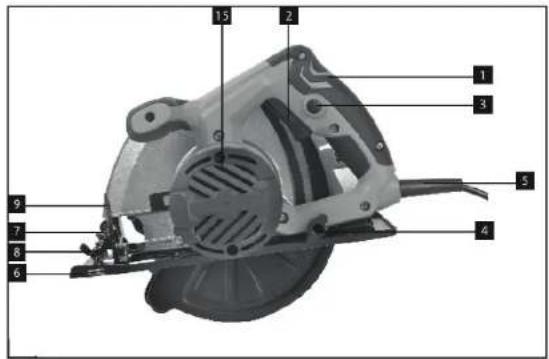
FIG 2
natural_image
Close-up of a hand adjusting a mechanical component with an arrow indicating direction (no text or symbols visible)FIG 3
natural_image
Close-up of a mechanical power saw with labeled parts (a and 4), no visible text or symbols beyond labels
natural_image
Close-up of a sewing machine's blade and base mount (no visible text or symbols)FIG 4
natural_image
Mechanical assembly diagram showing a motor and housing components (no text or labels visible)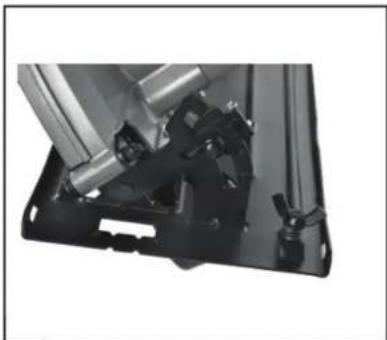
natural_image
Close-up of a mechanical assembly with metal components and a black base (no visible text or symbols)FIG 5
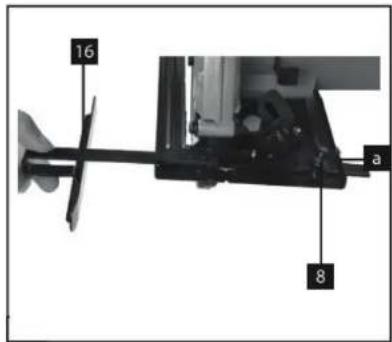
FIG 6
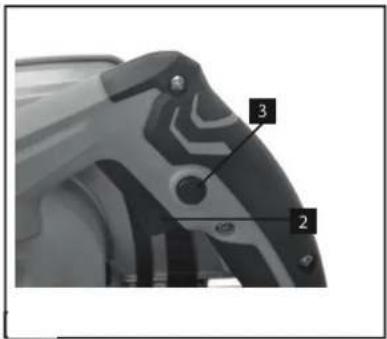
FIG 7
www.cecotec.es

- NOTA
- Work area safety
- Electrical safety
- Personal safety
- Power tool use and maintenance
- Service
- Safety instructions for circular saws
- Cutting procedures
- Causes of and warnings about backlash
- Lower protection function
- Additional safety information
- Parts and components
- Fig.
- Note:
- Before use
- Box content:
- ENGLISH
- Assembly
- Adjusting the cutting depth
- Fig. 3
- Miter angle setting
- Fig. 4
- Dust and chip removal
- Rip fence
- Operation
- Use of the circular saw
- On/Off
- To switch on:
- To switch off:
- Changing the saw blade
- Steps to change the blade:
- Cleaning and maintenance
- Cleaning
- Carbon brushes
- Maintenance
- Recycling of electrical and electronic equipment
- Copyright
- Simplified EU Declaration of Conformity
- Technical support and warranty
- FRANÇAIS
Brand : CECOTEC
Model : DirectPrecision 1400 Vision
Category : Saw