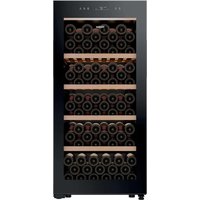
USER MANUAL HWS127GGH1 HAIER
WARNING: Risk of fire/flammable material.
The symbol indicates there is a risk of fire since flammable materials are used. Take care to avoid causing a fire by igniting flammable material.
HWS129GFH1 HWS113GDFH1 HWS127GGH1 HWS111GDGH1
Thank You
EN
Thank you for purchasing a Haier Product.
Please read these instructions carefully before using this appliance. The instructions contain important information which will help you get the best out of the appliance and ensure safe and proper installation, use and maintenance.
Keep this manual in a convenient place so you can always refer to it for the safe and proper use of the appliance.
If you sell the appliance, give it away, or leave it behind when you move house, make sure you also pass this manual so that the new owner can become familiar with the appliance and safety warnings.



Legend
Warning - Important Safety information
General information and tips
Environmental information
Disposal
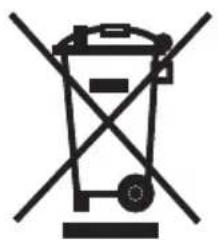
Help protect the environment and human health. Put the packaging in applicable containers to recycle it. Help to recycle waste of electrical and electronic appliances. Do not dispose appliances marked with this symbol with the household waste. Return the product to your local recycling facility or contact your municipal office.

WARNING!
Risk of injury or suffocation!
Refrigerants and gases must be disposed of professionally. Ensure that the tubing of the refrigerant circuit is not damaged before being properly disposed of. Disconnect the appliance from the mains supply. Cut off the mains cable and dispose of it. Remove the trays and drawers as well as the door catch and seals, to prevent children and pets from getting closed in the appliance.
Old appliances still have some residual value. An environmentally friendly method of disposal will ensure that valuable raw materials can be recovered and used again.
Cyclopentane, a flammable substance not harmful to ozone, is used as an expander for the insulation foam.
By ensuring this product is disposed of correctly, you will help prevent potential negative consequences for the environment and human health, which could otherwise be caused.
For more detailed information about recycling of this product, please contact your local council, your household waste disposal service or the shop where you purchased the product, handled by the professionals.
EN
Content
1-Safety information. 4 2-Safety tips. 7 3-Maintenance 11 4-Accessories 13 5- Product description 14 6-Installation 15 7-Use 19 8-Energy saving tips. 24 9-Equipment 25 10-Care and cleaning 26 11- Troubleshooting 27 12-Technical data 30 13-Customer Service 31 14-Wine bottle stacking. 32
This appliance is intended to be used exclusively for the storage of wine. Before switching on the appliance for the first time, read the following safety hints:

WARNING!
Before first use
Make sure there is no transport damage. - Remove all packaging and keep out of children's reach and dispose of them in an environmentally friendly manner. - Wait at least 0.5 hours before installing the appliance in order to ensure the refrigerant circuit is fully efficient. - Handle the appliance always with at least two persons because it is heavy.
Installation
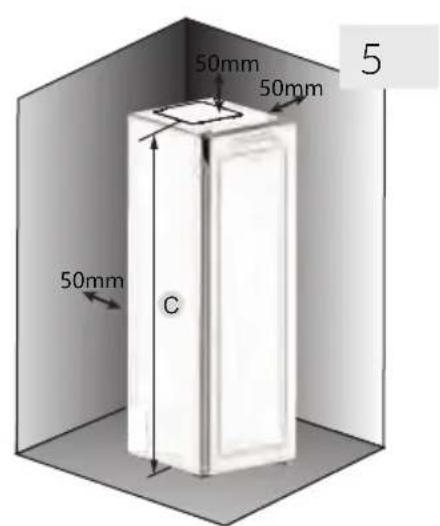
The appliance should be placed in a well-ventilated place. Ensure a space of at least 50 mm above and around the appliance. ▸ WARNING: Keep ventilation openings, in the appliance enclosure or in the built-in structure, clear of obstruction. - Never place the appliance in a damp area or location where it might be splashed with water. Clean and dry water splashes and stains with a soft clean cloth. - Do not install your wine cellar in any location not properly insulated or heated e.g. garage etc. Your wine cellar was not designed to operate in ambient temperature below 10°C. - Do not install the appliance in direct sunlight or in the near of heat sources (e.g. stoves, heaters). - Install and level the appliance in an area suitable for its size and use. - Make sure that the electrical information on the rating plate agrees with the power supply. If it does not, contact an electrician. The appliance is operated by a 220-240 VAC/50 Hz power supply. Abnormal voltage fluctuation may cause the appliance to fail to start, or damage to the temperature control or compressor, or there may be an abnormal noise when operating. In such case, an automatic regulator shall be mounted. Do not use multi-plug adapters and extension cables.

WARNING!
▸ WARNING: Do not locate multiple portable socket outlets or portable power supplies at the rear of the appliance. ▸ WARNING: When positioning the appliance, ensure the supply cord is not trapped or damaged.
Do not step on the power cable. - Use a separate earthed socket for the power supply which is easy accessible. The appliance must be earthed. - Only for UK: The appliance's power cable is fitted with 3-cord (grounding) plug that fits a standard 3-cord (grounded) socket. Never cut off or dismount the third pin (grounding). After the appliance is installed, the plug should be accessible.
▸ WARNING: Do not damage the refrigerant circuit.
Daily use
This appliance can be used by children aged 8 years and above and persons with reduced physical, sensory, or mental capabilities, or lack of experience and knowledge, if they have been given supervision or instruction concerning use of the appliance in a safe way and understand the hazards involved. Children shall not play with the appliance. Children aged 3 to 8 years are allowed to load and unload refrigerating appliances, but are not allowed to clean or install them. Keep children under 3 years of age away from the appliance unless they are constantly supervised. Cleaning and user maintenance shall not be made by children without supervision. The appliance must be positioned so that the plug is accessible. If coal gas or other inflammable gas is leaking in the vicinity of the appliance, turn off the valve of the leaking gas, open the doors and windows, and do not unplug the power cable of the appliance. Wait at least 7 minutes to reconnect the power after it has been disconnected. Do not lift the appliance by its door handles. The keys must be kept out of the reach of children and not in the vicinity of the appliance to prevent children from being locked inside.

WARNING!
- Note that the appliance is set for operation within the specific ambient range between 10 and 38°C. The appliance may not work properly if it is left for a long period at a temperature above or below the indicated range.
- Do not place unstable articles (heavy objects, containers filled with water) on top of the appliance, to avoid personal injury caused by falling or electric shock caused by contact with water.
- Open and close the door only with the handles. The gap between the door and the cabinet is very narrow. Do not put your hands in these areas to avoid pinching your fingers. Open or close the appliance doors only when there are no children standing within the range of door movement.
- Do not store or use inflammable, explosive, or corrosive materials in the appliance or in the vicinity.
- Do not store explosive substances such as aerosol cans with a flammable propellant in this appliance.
- Do not store medicines, bacteria, or chemical agents in the appliance. This appliance is a household appliance. It is not recommended to store materials that require strict temperatures.
- Do not set unnecessarily low temperature in the wine cabinet compartment. Minus temperatures may occur at high settings. Attention: Bottles can burst.
- Do not touch the inside surface of the appliance compartment when in operation, especially with wet hands, as your hands may freeze onto the surface. For proper wine cooling, do not overload the appliance.
- Unplug the appliance in the event of a power interruption or before cleaning. Allow at least 7 minutes before restarting the appliance, as frequent starting may damage the compressor. WARNING: Do not use electrical devices inside the appliance, unless they are of the type recommended by the manufacturer. To avoid risks, a damaged power cord must be replaced by the customer service (see warranty card). To prolong the service life of the appliance, avoid turning it off.
- Never place the appliance horizontally on the ground. After tilting the appliance more than 45 degrees, wait for 24 hours before plugging it in.

WARNING!
Maintenance / cleaning
Make sure children are supervised if they carry out cleaning and maintenance. - Disconnect the appliance from the electrical supply before undertaking any routine maintenance. Allow at least 7 minutes before restarting the appliance, as frequent starting may damage the compressor. Hold the plug, not the cable, when unplugging the appliance. - Do not clean the appliance with hard brushes, wire brushes, detergent powder, petrol, amyl acetate, acetone and similar organic solutions, acid or alkaline solutions. Please clean with special refrigerator/freezer detergent to avoid damage. Eventually use warm water and baking soda solution - about a tablespoon of baking soda to a litre/quarter of water. Rinse thoroughly with water and wipe dry. Do not use cleaning powders or other abrasive cleaners. Do not wash removable parts in a dishwasher. WARNING: Do not use mechanical devices or other means to accelerate the defrosting process, other than those recommended by the manufacturer. If the supply cord is damaged, it must be replaced by the manufacturer, its service agent or similarly qualified persons in order to avoid a hazard. - Do not try to repair, disassemble or modify the appliance by yourself. In case of repair please contact our customer service. If the illuminating lamps are damaged, they must be replaced by the manufacturer, its service agent or similarly qualified persons in order to avoid a hazard. - Eliminate the dust on the back of the unit at least once in the year to avoid hazard by fire, as well as increased energy consumption.
Safety Tips
EN
- Do not spray or flush the appliance during cleaning.
- Do not use water spray or steam to clean the appliance.
- Do not clean the cold glass door with hot water. Sudden temperature change may cause the glass to break. If you leave your appliance out of use for an extended period, leave it open to prevent odour and unpleasant smells building up inside.

WARNING!
The appliance contains the flammable refrigerant ISOBUTANE (R600a). Make sure the refrigerant circuit is not damaged during transportation or installation. Leaking refrigerant may cause eye injuries or ignite. If a damage has occurred, keep away open fire sources, thoroughly ventilate the room, do not plug or unplug the power cords of the appliance or any other appliance. Inform the customer service.
In case of eyes get into contact with the refrigerant, rinse it immediately under running water and call immediately the eye specialist.
WARNING: The refrigeration system is under high pressure. Do not tamper with it. Since the flammable refrigerants are used, please, install, handle and service the appliance strictly according to the instruction and contact the professional agent or our after-sales service to dispose of the appliance.
Intended use
This appliance is intended to be used in household and similar applications such as
- staff kitchen areas in shops, offices and other working environments;
- farm houses and by clients in hotels, motels and other residential type environments;
- bed and breakfast type environments;
- catering and similar non-retail applications.
To ensure the safe preservation of wine, please comply with this instruction for use. The details on the most appropriate part in the compartment of the appliance where specific types of food shall be stored, considering the distribution of temperature that can be present in the different compartments of the appliance are in the other part of the manual.
Changes or modifications to the device are not allowed. Unintended use may cause hazards and loss of warranty claims.
Disposal
The symbol on the product or on its packaging indicates that this product may not be treated as household waste. Instead it shall be handed over to the applicable collection point for the recycling of electrical and electronic equipment. By ensuring this product is disposed of correctly, you will help prevent potential negative consequences for the environment and human health, which could otherwise be caused by inappropriate waste handling of this product. For more detailed information about recycling of this product, please contact your local city office, your household waste disposal service or the shop where you purchased the product.
Since the flammable insulation blowing gases are used, please contact the professional agent or our after-sale service to dispose of the appliance.
WARNING!
Risk of injury or suffocation!
Refrigerants and gases must be disposed of professionally. Ensure that the tubing of the refrigerant circuit is not damaged before being properly disposed of. Disconnect the appliance from the mains supply. Cut off the mains cable and dispose of it. Remove the trays and drawers as well as the door catch and seals to prevent children and pets from getting closed in the appliance.
WARNING: Disconnect the appliance from the power supply before cleaning. - Do not clean the appliance with hard brushes, wire brushes, detergent powder, petrol, amyl acetate, acetone and similar organic solutions, acid or alkaline solutions. Please clean with special refrigerator detergent to avoid damage. - Clean the appliance when only little or no wine is stored. It is only necessary to clean it when it is dirty. Clean the inside and housing of the appliance with a sponge damped in warm water and neutral detergent. Rinse with clean warm water and dry with soft cloth. Do not clean any of the parts of the appliance in a dishwasher. - Allow at least 7 minutes before restarting the appliance as frequent starting may damage the compressor.
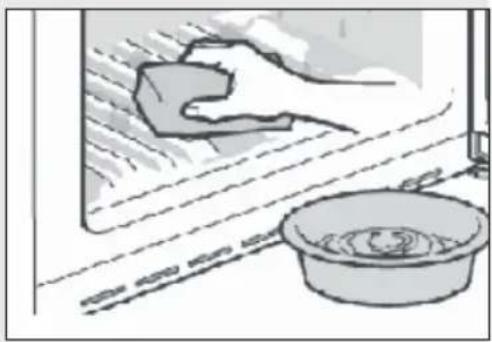
Clean the door gasket:
The door gaskets should be cleaned every 3 months to assure a proper seal. As below: Remove: Grasp the door gasket and pull
it out according to the direction of arrow to remove the whole door gasket in order.
Dip the brush with water or food grade alcohol, clean up the door gasket groove firstly by pulling back and forth the brush. Then wipe door gasket surface with a towel dipped with water or
food grade alcohol. Finally, wash the door gasket clean and wipe it dry with a clean towel.
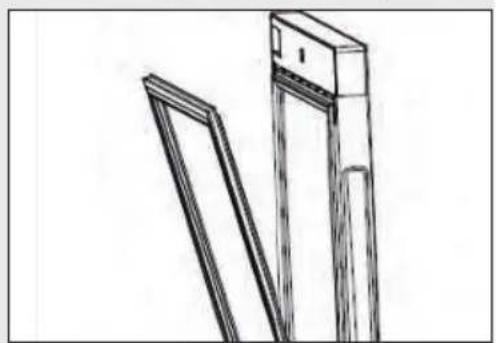
Installation door gasket after cleaning:
Before installation, make sure that there is no water on the door gasket. Insert the door gasket into the groove, and press the door gasket tightly from the top to the bottom by hand until the whole door gasket is inserted into the groove.
Cleaning the shelves:
All shelves can be taken out for cleaning. Take out all bottles. Pull the wine rack forward to the stop, then lift it up at an angle to remove it.
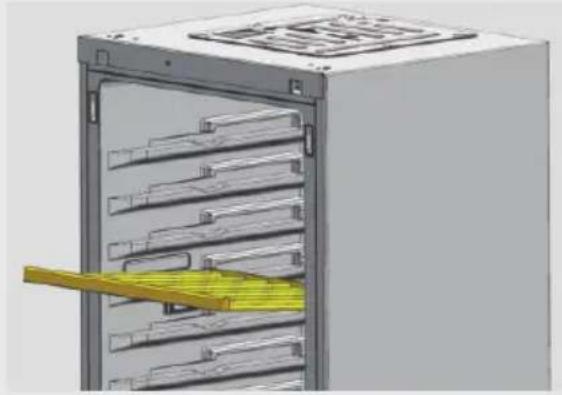
Clean the shelf with a soft towel. Wait until the shelves are dry before putting them back in.
WARNING:
Wait at least 7 minutes to reconnect the power after the power has been disconnected.
Check the accessories and literature in accordance with this list: without isolation.
| Name | Service Card | Shelf | Hinge-Cover | Energy Label | Key |
| HWS129GFH1 | 1 | 4 | 1 | 1 | 2 |
| HWS113GDFH1 | 1 | 3 | 1 | 1 | 2 |
| HWS127GGH1 | 1 | 4 | 1 | 1 | 2 |
| HWS111GDGH1 | 1 | 3 | 1 | 1 | 2 |
Product description
EN

Notice
Due to technical changes and different models, some of the illustrations in this manual may differ from your model.

HWS113GDFH1 HWS129GFH1

HWS111GDGH1 HWS127GGH1
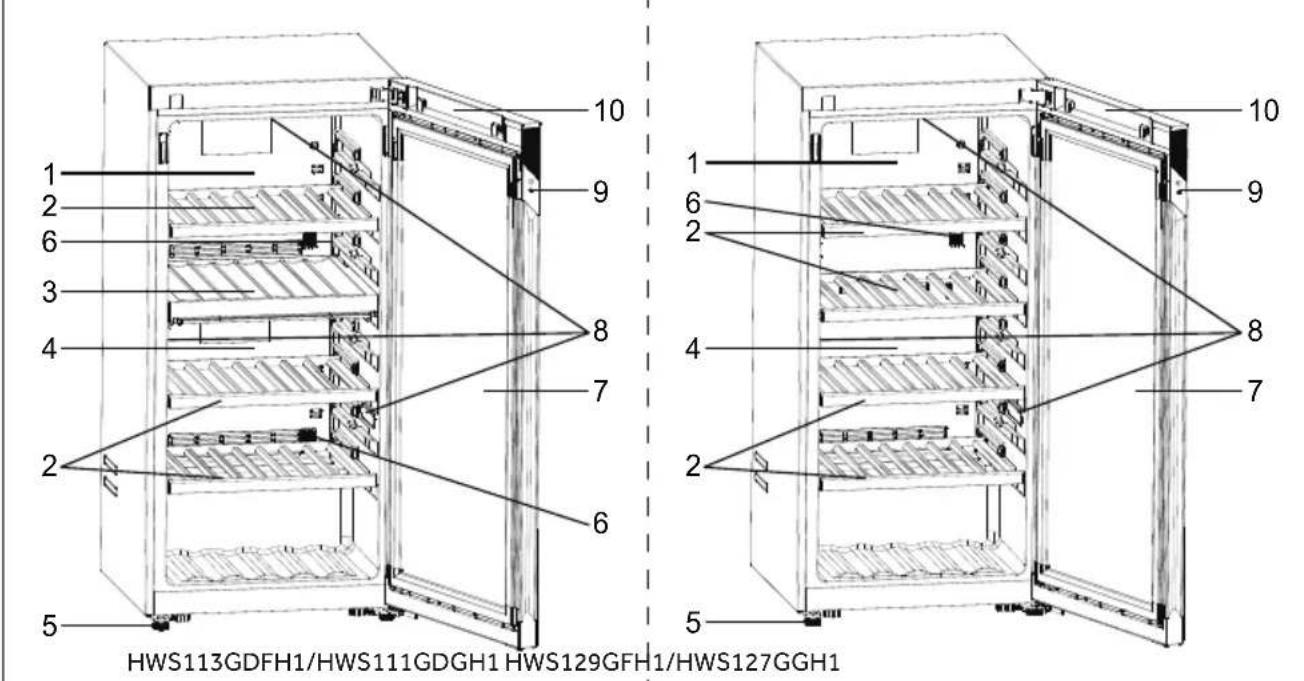
The HWS127GGH1 has only one component 8 (LED light).
- Upper air duct
6. Filter
2. Shelf
- Door
3. Partition
- LED light
- Lower air duct
- Lock
5.5. Support I
- Display
1. Unpacking
Take the appliance out of the packaging. Remove all packaging materials, including the foam base and all adhesive tape holding the accessories.
2. Environmental conditions
The room temperature should always be between 10°C and 38°C, since it can influence the temperature inside the appliance and its energy consumption. Do not install the appliance near other heat-emitting appliances (ovens, refrigerators) without isolation.
3. Space requirements
Required space to open the door (Fig. 1,2,3,4); For safety and energy reasons, the required ventilation distance of 50 mm in all directions must be observed (Fig. 5).
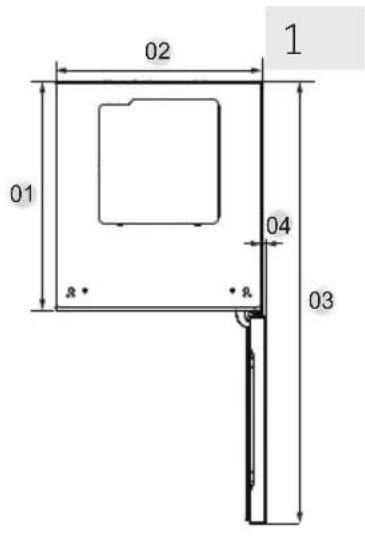
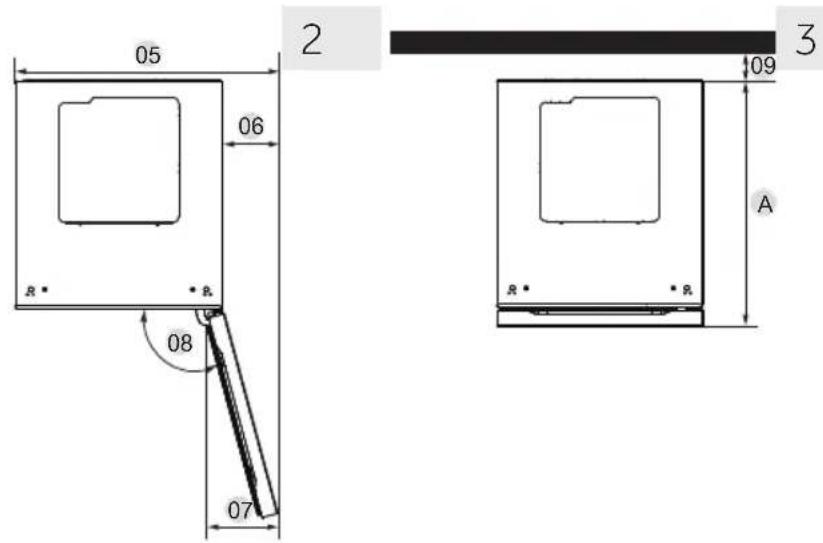
| Measurement: mm | HWS129GFH1 HWS113GDFH1 HWS111GDGH1 HWS127GGH1 |
| Depth A | 594 |
| Width B | 597 |
| Height C | 1265 |
| Overall Height D | 1270 |
| 01 | 532 |
| 02 | 595 |
| 03 | 1150 |
| 04 | 11 |
| 05 | 756 |
| 06 | .161 |
| 07 | 200 |
| 08 | 105° |
| 09 | 50 |


WARNING!
- Keep ventilation openings in the appliance or in the in-built structure clear of obstruction. This refrigerating appliance is not intended to be used as a built-in appliance.
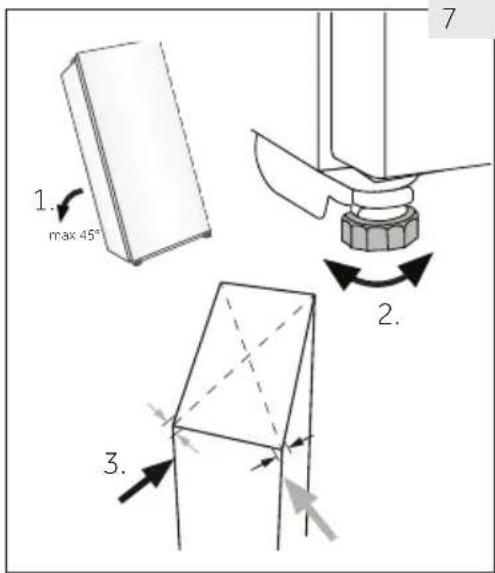
5. Aligning the appliance
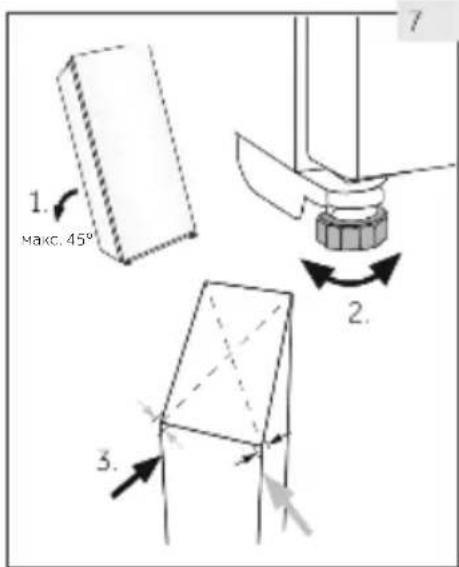
The appliance should be placed on a flat and solid surface.
- Tilt the appliance slightly backwards (Fig. 7).
- Set the adjustable front feet to the desired level by turning them.
- The stability can be checked by alternately bumping on the diagonals. The slight swaying should be the same in both directions. Otherwise the frame can warp; possible leaking door seals are the result. A low tendency to the rear facilitates the closing of the door.
6. Fine tuning of the door
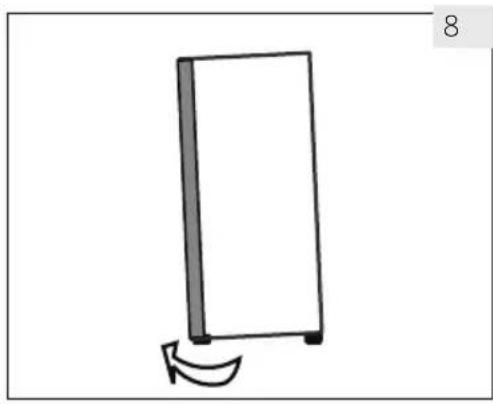
The appliance closes more easily if the levelling feet on the front are used:
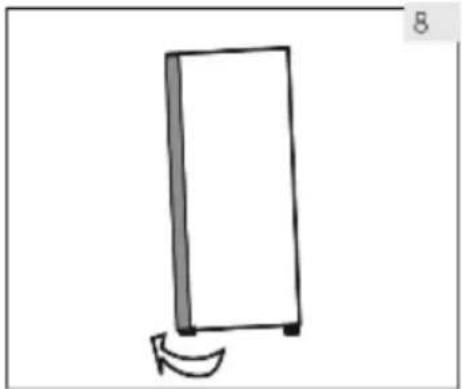
Rotate the adjustable feet (Fig. 8) to turn them up or down:
- Turning the feet clockwise raises the appliance.
- Turning the feet counterclockwise lowers the appliance.
7. Waiting time
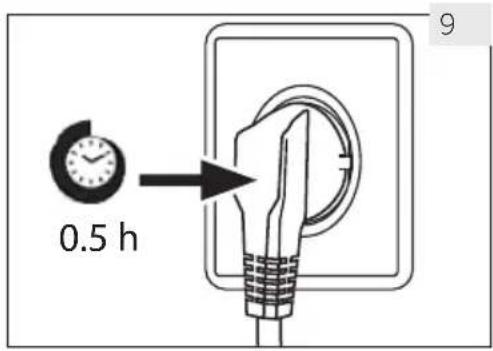
The maintenance-free lubrication oil is located in the capsule of the compressor. This oil can get through the closed pipe system during transport if the appliance is tilted. Before connecting the appliance to the power supply, wait 0.5 hours (Fig. 9) so that the oil runs back into the capsule.
8. Electrical connection
Before each connection check if:
• power supply, socket and fusing are appropriate to the rating plate. • the power socket is earthed and no multi-plug or extension. • the power plug and socket fit properly.
Connect the plug to a properly installed household socket.

WARNING!
To avoid risks, a damaged power cord must be replaced by the customer service (see warranty card).
9. Door Reversibility
Before connecting the appliance to the power supply, you should check whether the door swing must be changed from right (as delivered) to left, if this is required by the installation location and the usability.

WARNING!
The appliance is heavy. You need two persons to carry out the door reversibility. Before any operation, first unplug the appliance from the mains. Do not tilt the appliance more than 45° to prevent damage to the cooling system.
Installation
EN
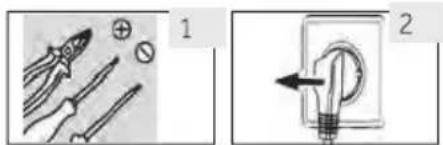
- Prepare the necessary tools.
- Unplug the power cord.
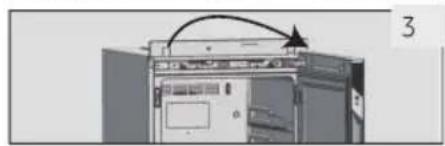
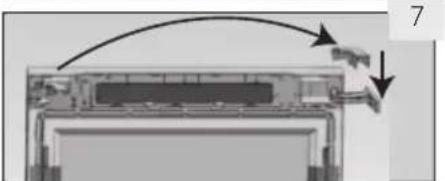
- Remove the front cover and small cover of the box, and remove the small cover to the other side.
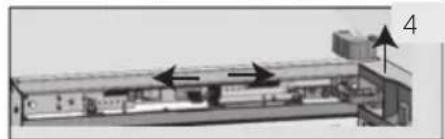
- Unplug the connection terminal of the door signal line and the body signal line, and remove the upper hinge cover. Remove the upper hinge and unscrew the shaft from the upper hinge, turning it 180° vertically and screw it to the upper hinge in the direction as shown in the picture.
- Remove the front cover and the small cover of the door, then take off the small cover from the right side and install it on the left side.
- Remove the shaft sleeve and rubber plug block and install them on the other side.
- Adjust the outlet position of the door signal line to the other side of the door, insert the upper hinge into the door, and insert the door signal line into the slot of the upper hinge. Remove the upper hinge cover from the instruction manual bag and install it.
Note: The signal line only needs to show the color mark.
- Remove the CAM and door stop from the bottom of the left side of the door and install it on the right side.
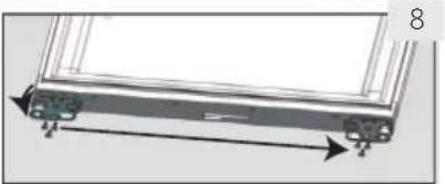
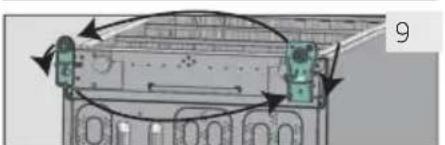
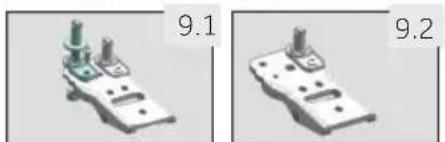
- Remove the foot assembly on the left side of the bottom of the box and the right caster assembly, as shown in the figure, move the shaft and CAM on the caster assembly from the left side to the right side, and fix it through the nut, and install it on the left side of the box. Note: Apply grease to the shaft of the caster assembly.
- Install the door on the box body with hinges, connect the terminals of the door signal line, move the magnetic control switch to the other side, and install the front cover of the door and the box body.
- Finished
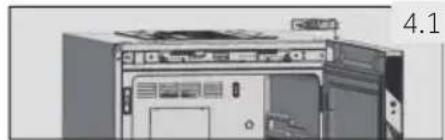
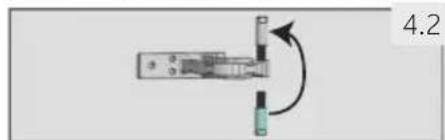
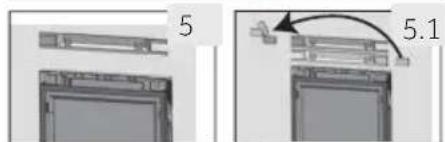
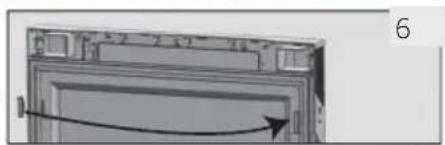
1. Before first use
Remove all packaging materials. This includes the foam base and all adhesive tape holding the wine cellar accessories inside and outside. Keep them out of children's reach and dispose them in an environmentally friendly manner. Clean the inside and outside of the appliance with water and a mild detergent before putting any wine in it. After the appliance has been levelled and cleaned, wait for at least 2 hours before connecting it to the power supply. If your wine cellar has been tilted for any reason, wait 24 hours before plugging it in. See section INSTALLATION. Once you have plugged the unit into an electrical outlet, let the unit run for at least 30 minutes to acclimatize itself before making any adjustments. The temperature is automatically set to 12°C. If desired, you can change the temperature manually. Please see TEMPERATURE.
2. Touch keys
The buttons on the control panel are touch keys, which respond when lightly touched with the finger.
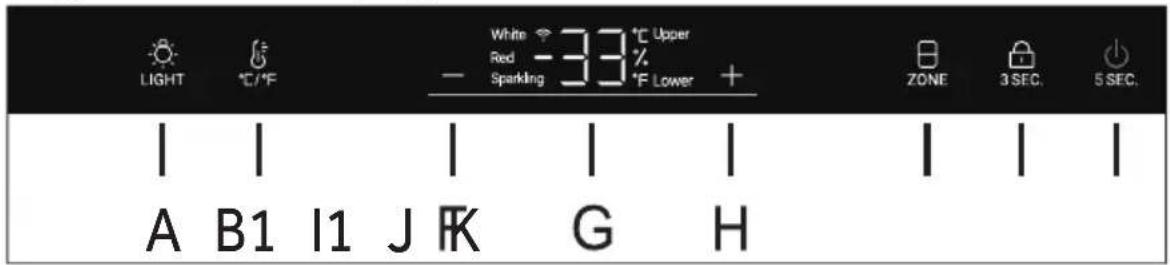
3. Description for control panel
HWS129GFH1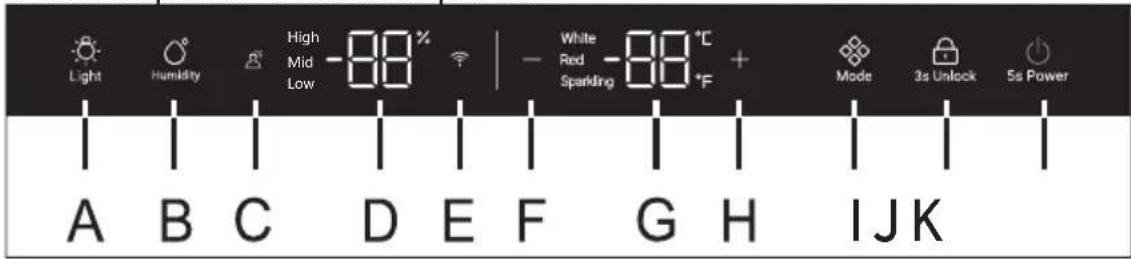
A Light button B Humidity selection button C Motion Glow function button D Humidity display E WiFi button
F Temperature adjust button: down G Temperature display H Temperature adjust button: up I Mode selection button J Lock button K Power button
HWS113GDFH1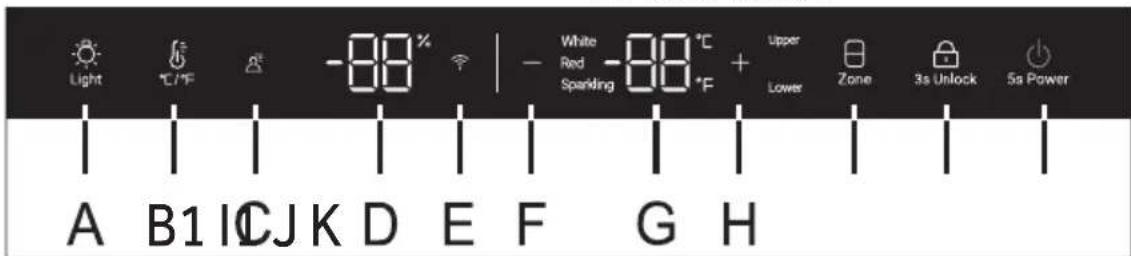
A Light button B1 °C / °F conversion button C Motion Glow function button D Humidity display E WiFi button
F Temperature adjust button: down G Temperature display H Temperature adjust button: up 11 Temperature Zone selection button J Lock button K Power button
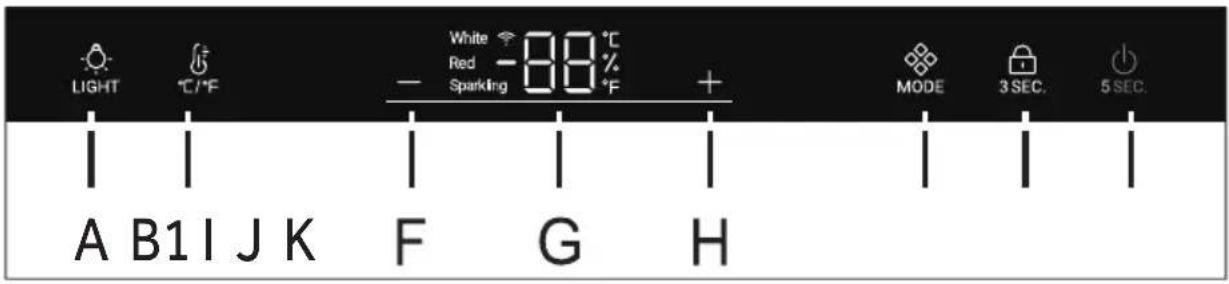
HWS127GGH1
A Light button
B1 °C / °F conversion button
F Temperature adjust button: down G
Temperature display
H Temperature adjust button: up I
Mode selection button
J Lock button
K Power button
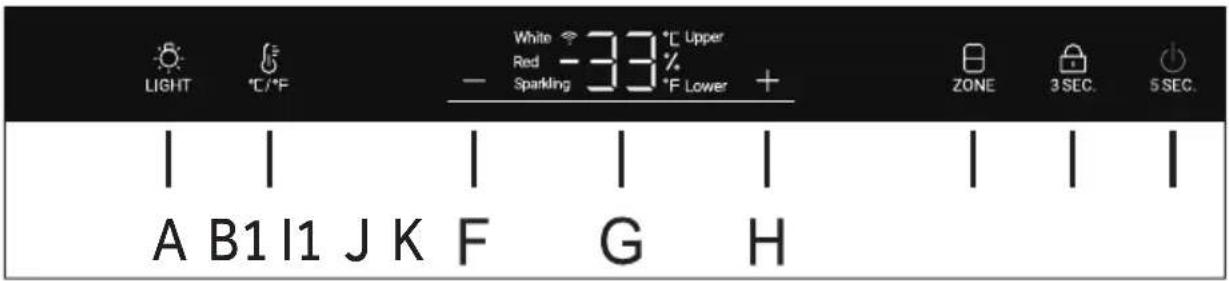
HWS111GDGH1
A Light button
B1 °C / °F conversion button
F Temperature adjust button: down G
Temperature display
H Temperature adjust button: up
Lock button
K Power button
4. Automatically locking function
In the lock screen state, press the lock button for 3s, the display screen will display
the button on the display screen cannot be operated (except the light button)
5. Power function
and 1, and the Wine Cellar will not work.
6. Temperature setting

Notice
Presettings
- Once you have plugged the unit into an electrical outlet, let the unit sit for at least 30 minutes to acclimatize itself before making any adjustments.
- When the appliance is switched on after disconnection from the main power supply, it may take several hours for the correct temperatures to be reached. The exact time varies depending on the environment and the temperature setting.
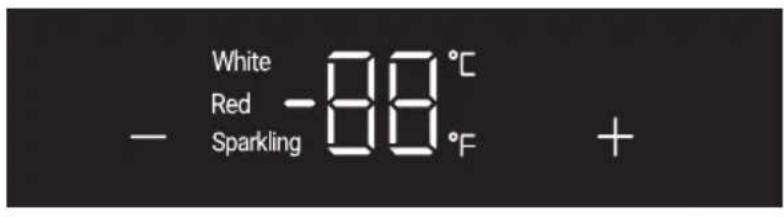
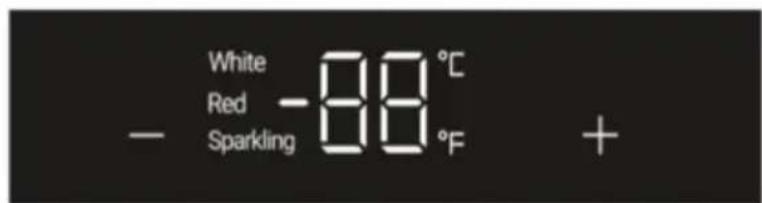
Press the + or - button, the display will start to flash. Press the + or - button to set the desired temperature. The temperature setting range: 5 - 20°C (41 - 68°F). Stop pressing the key for 3 seconds, the temperature is confirmed.
7. Mode or Zone function
Press the MODE button, the temperature
In the unlocking state, the icon is fully on. If the current display is in the upper temperature zone, the upper icon will be on and the lower icon will be off. At this time, press the button, the lower icon will be on and the upper icon will be off.
Recommended temperature settings
The following drinking temperatures are recommended for the different types of wine.
| Red wine | +13°C to +20°C (+55°F to + 68°F) | Sparkling wine | +5°C to +8°C (+41°F to 47°F) |
| White wine | +9°C to +12°C (+48°F to +54°F) | | |
If you store wine for a long time, it should be stored at a temperature between +10°C and +12°C (50°F and +54°F).
8. Standby-mode
The display screen lights up automatically when any button is touched or the door is opened. When the Motion Glow function is on, if somebody approaches the door, the
performed, the display screen and the light will be turned off automatically after 30 seconds.

Notice: Influences on temperatures
The temperature inside the appliance is influenced by the following factors:
Ambient temperature
Amount of stored bottles
Frequency of door opening
The location of the appliance
The default setting is 12°C
When the display stops flashing, it goes back to showing the current temperature inside the wine cellar. It will take some time to reach the set temperature.
9. Lighting mode setting
Press the button. When the lights in the cabinet are on, the lights will light up gradually. When the button is pressed once again, the lights will turn off gradually.
(for HWS129GFH1 and HWS113GDFH1).
10. °C / °F function
Press the button to switch between Fahrenheit and Celsius (except HWS129GFH1). For HWS129GFH1, press and hold for 3 seconds to switch between Fahrenheit and Celsius.
11. Wi-Fi function
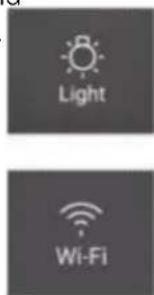
Press the Wi-Fi button for 3 seconds. The Wi-Fi button starts to flash quickly and automatically enters the configuration mode.
Press the button for 3 seconds. The Wi-Fi button starts to flash quickly and automatically enters the configuration mode (for HWS127GGH1 and HWS111GDGH1).
12. Motion Glow function
Press the Motion Glow function button once again to turn off the function.
13. Humidity (for HWS129GFH1)
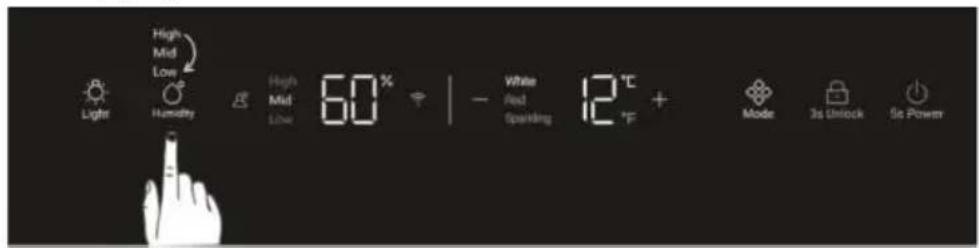
In the unlocked state, click the humidity button to choose the humidity level inside the cabinet as high, medium, or low.
Generally, the humidity display range is between 50% and 70%.
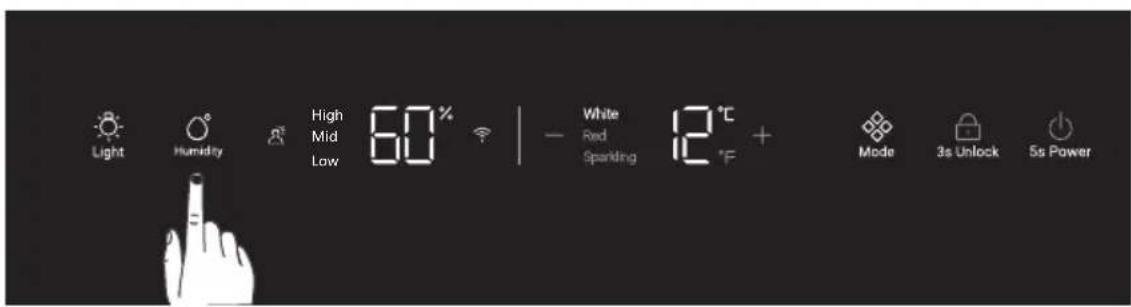
The wine cellar is equipped with a professional humidity sensor. For long-term storage conditions, proper humidity in the wine cellar can prevent the cork from drying out and also avoid mold growth on the wine labels due to excessive humidity.
If you adjust the humidity in the wine cellar, it will take a few days to a week to reach the set value. The humidity control in the wine cellar is effective when the ambient temperature is between 20°C and 27°C.
Please adhere to the following regarding the air humidity inside the wine cellar:
- for wine storage
- The humidity inside the wine cellar depends on the ambient temperature and ambient air humidity, the loading capacity of the wine cellar, and the temperature of the wine cellar, as well as the duration and frequency of door openings.
- The display on the wine cellar will show changes in the air humidity inside the wine cellar with a delay, displaying the integrated humidity value inside the box over more than 2 hours.
Note: If you use your wine cellar in a very dry or hot environment (air humidity < 30% or ambient temperature < 17°C or ambient temperature > 30°C), it is recommended to add a source of humidity inside the wine cellar.
14. Power-Off Memory function
In case of power outage, the wine cellar will save the set temperature. After power recovery, it will run based on the temperature set before the power outage.
15. Door opening alarm
If the door is kept open for 3 minutes, the buzzer will sound until the door is closed or any button is touched.
16. WIFI mode setting
CONNECTIVITY
WIRELESS PARAMETERS
| Technology | WIFI | Bluetooth® Wireless Technology |
| Standard | IEE 802.11 b/g/n | 2,4GHz Wi-Fi:16dm;Bluetooth®Low Energy 5dbm;Bluetooth®(BR/EDR)10dbm. |
| Frequency Band(s) [MHz] | 2401-2483 | 2402-2480 |
| Maximum power [mW]Band(s) [MHz] | 100 | 10 |
How to activate WIFI module:
Press the light button for 3 seconds to activate the WIFI (for HWS127GGH1 and HWS111GDGH1)
Press the WIFI button for 3 seconds to activate the WIFI (for HWS129GFH1 and HWS113GDFH1)
- The WIFI module is switched on, the WIFI icon starts to blink.
- If the wine cellar is enrolled but the WIFI is off, the icon will blink. If the wine cellar is enrolled and connected, the WIFI icon is always on. To reset the WIFI, press the light for 3 seconds (for HWS127GGH1 and HWS111GDGH1). To reset the WIFI, press the WIFI for 3 seconds (for HWS129GFH1 and HWS113GDFH1).
IN APP PAIRING PROCEDURE
The Bluetooth® word mark and logos are registered trademarks owned by Bluetooth SIG, Inc. and any use of such marks by Candy Hoover Group SRL is under license. Other trademarks and trade names are those of their respective owners.
Step 1
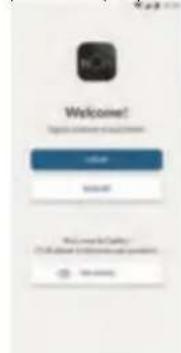
Download the hOn app on the stores


GET IT ON
Google Play

Download on the
App Store
Step 2
Log in or sign up
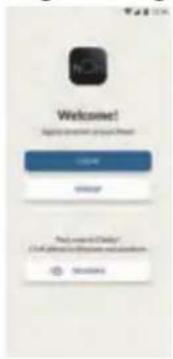
Step 3
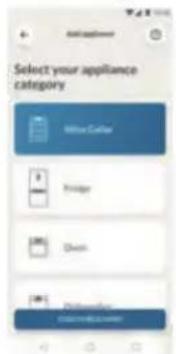
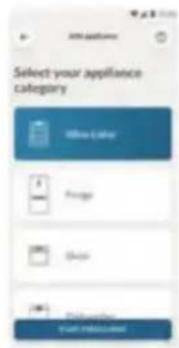
Add a new appliance selecting the wine cellar from the list
list
Step 4
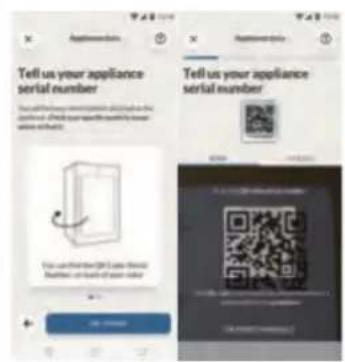
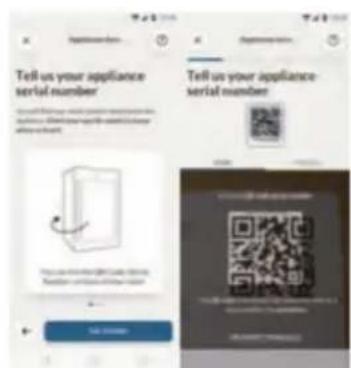
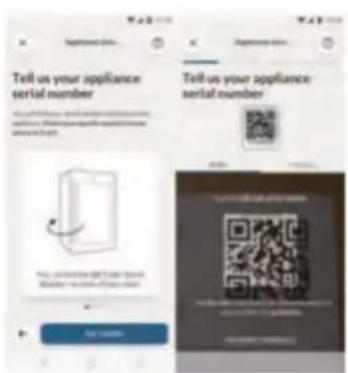
Scan the QR or insert manually the serial number
Step 5
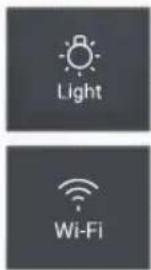
Press the light button on the product for 3s to activate the WIFI (for HWS127GGH1 and HWS111GDGH1). Press the WIFI button on the product for 3s to activate the WIFI (for HWS129GFH1 and HWS113GDFH1).
Step 6
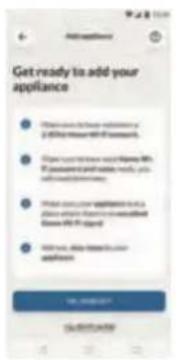
The WIFI icon will blink, the pairing process is in progress. You will have 5 minutes to complete the pairing process.
When the process is completed the WIFI icon will stop blinking and it will remain always on. NOTE
Energy saving tips

Energy saving tips
Make sure the appliance is properly ventilated (see INSTALLATION). - Do not install the appliance in direct sunlight or near heat sources (e.g., stoves, heaters). - Avoid unnecessarily low temperature in the appliance. The energy consumption increases the lower the temperature is set. - Open the appliance door as little and as briefly as possible. Do not exceed the designed number of bottles to avoid obstructing the air flow. - Keep door seals clean so that the door always closes correctly. The most energy-saving configuration requires drawer, food box, and shelves to be positioned in the appliance as in factory-fresh condition, and food to be placed without blocking the air outlet of the duct. At 10°C, the maximum thermostat setting of 10°C should be used, and the test laboratory needs to conduct the test under this thermostat setting.
1. Shelf
- The shelves are designed for easy storage and easy removal of the wine. They can be cleaned with a soft towel.
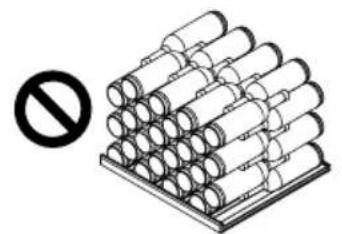
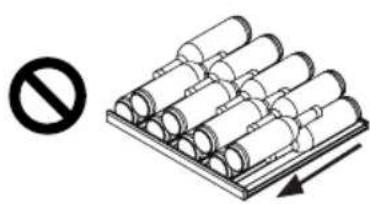
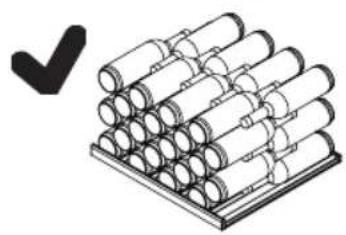
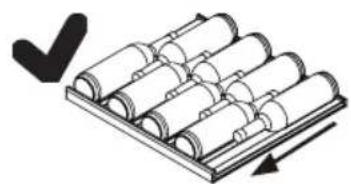
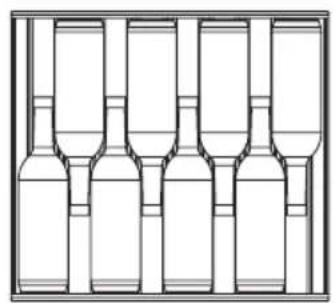
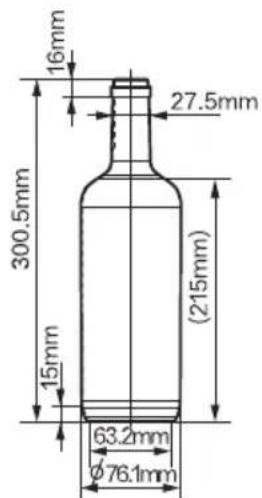
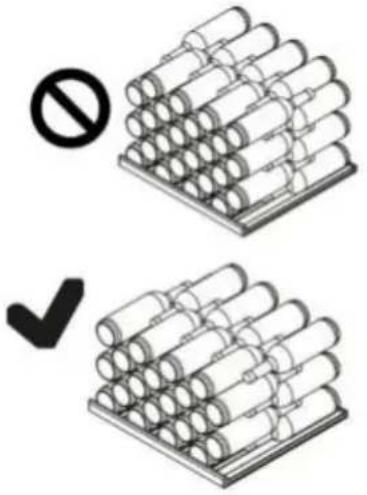
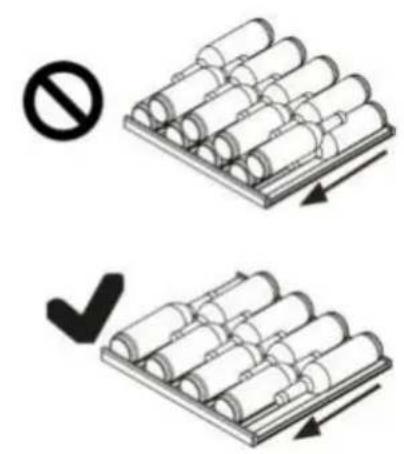
- Regular bottles with a diameter of 76mm can be stacked.
The quantity can vary from the depicted number of bottles if they are stacked in a different way.
Advice for the layout of your wine cellar
We recommend that the number of wine bottles should not exceed four layers on each shelf, and the bearing capacity of the wine shelves should not exceed 50 kg. Before placing the bottles inside the wine cellar, confirm whether or not the wine shelves are completely stable. In addition, confirm whether or not any bottle protrudes from the shelves in order to prevent bottles hitting the glass door upon closing.
2. The light
The LED interior light comes on when the door is opened. To turn on the light while the door is closed, touch the button. To turn the lights off, touch the button again. To increase energy efficiency, the lights should be turned off when the wine cellar is not being viewed.
3. The lock
To lock the wine cellar, close the door and put the key in the lock:
Lock the door by turning the key clockwise; unlock the door by turning the key counterclockwise.
Care and cleaning
EN
1. Defrosting
The defrosting of the wine cellar is done automatically; no manual operation is needed.
2. Replacing the LED lamp
The lamp uses LED as its light source, featuring low energy consumption and long service life. If there is any abnormality, please contact the customer service. See CUSTOMER SERVICE.

WARNING!
Do not replace the LED lamp yourself. It must only be replaced by either the manufacturer or the authorised service agent.
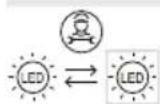
Do not replace the LED lamp yourself. It must only be replaced by either the manufacturer or the authorised service agent.
3. Non-use for a longer period
Unplug the power cord.
Clean the appliance and door gaskets as described above.
Keep the door open to prevent the creation of bad odours inside.
4. Moving the appliance
- Remove all bottles and unplug the appliance.
- Secure shelves and other moveable parts in the wine cellar with adhesive tape.
- Do not tilt the wine cellar more than 45 degrees to avoid damaging the refrigerating system.
5. Air exchange with activated carbon filter
The way in which wines continue to mature depends on the ambient conditions. The quality of the air is therefore decisive for preserving the wine. An activated carbon filter has been fitted in the lower area of the rear wall of the appliance to ensure that the air throughput remains at an optimum quality.

Notice
We recommend that you replace the filter once a year. Filters can be obtained from your dealer.
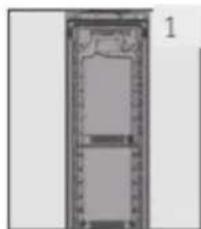
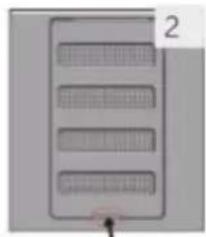
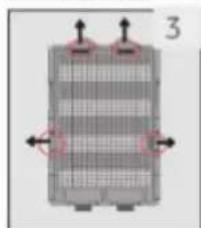
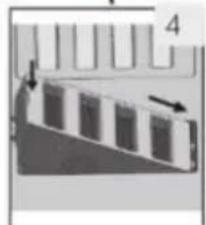
Changing the filter:
2. Insert the screwdriver into the position shown in the cable frame and lift out the activated carbon cover; 3. Open the guard clamp outwards, remove the activated carbon and replace it; 4. Insert the activated carbon shield into the air duct cover plate in the direction shown, and then press down to fasten the shield on the air duct cover plate.
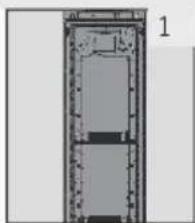
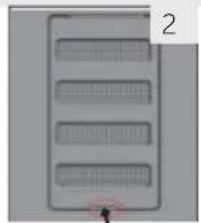
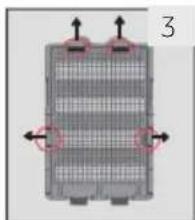

Many occurring problems could be solved by yourself without specific expertise. In case of a problem please check all shown possibilities and follow below instructions before you contact an after sales service. See CUSTOMER SERVICE.
WARNING!
Before maintenance, deactivate the appliance and disconnect the mains plug from the mains socket. Electrical equipment should be serviced only by qualified electrical experts, because improper repairs can cause considerable consequential damages. A damaged supply should only be replaced by the manufacturer, its service agent or similarly qualified persons in order to avoid a hazard.
| Error Code | Cause | Solution |
| L2 | Low temperature alarm when the temperture control sensor is low for HWS129GFH1 or HWS127GGH1 or the upper tem-perture zone of HWS113GDFH1 or HWS111GDGH1 | 1. Check the ambient temperature.
2. Check the Compressor connec-tor.
3. Check the resistance of the tem-perature control sensor. |
| L3 | Low temperature alarm when the lower temperture zone con-trol sensor is low for HWS113GDFH1 or HWS111GDGH1 | 1. Check the ambient temperature.
2. Check the Compressor connec-tor.
3. Check the resistance of the tem-perature control sensor. |
Troubleshooting
| Problem | Possible Cause | Possible Solution |
| The compressor does not work. | ·Mains plug is not connected in the mains socket. | ·Connect the mains plug. |
| The appliance runs frequently or runs for a too long period of time. | ·The outdoor temperature is too high.
·The appliance has been off power for a period of time.
·A door of the appliance is not tightly closed.
·The door has been opened too frequently or for too long.
·The door gaskets are dirty, worn, cracked or mismatched.
·The required air circulation is not guaranteed.
·The temperature is set too low. | ·In this case, it is normal for the appliance to run longer.
·Normally, it takes a while for the appliance to cool down completely.
·Close the door and ensure the appliance is located on a level ground and there is no food or container jarring the door.
·Do not open the door too frequently.
·Clean the door gasket or replace them by the customer service.
·Ensure adequate ventilation.
·The problem will resolved itself when the desired temperature has been reached. |
| The inside of the wine cellar is dirty and/or smells.. | ·The inside of the wine cellar needs cleaning. | ·Clean the inside of the wine cellar. |
| It is not cold enough inside the appliance. | ·The temperature is set too high.
·Bottles have been added recently.
·A door of the appliance is not tightly closed.
·The door has been opened too frequently or for too long.
·The door gaskets are dirty, worn, cracked or mismatched. | ·Reset the temperature.
·Allow time for recently added bottles to reach desired temperature.
·Close the door.
·Do not open the door too frequently.
·Clean the doorgasket or replace them by the customer service.. |
| It is too cold inside the appliance. | ·The temperature is set too low. | ·Reset the temperature. |
| Moisture formation on the inside of the refrigerator compartment. | ·The climate is too warm and too-damp.
·A door of the appliance is not tightly closed.
·The door has been opened too frequently or for too long. | ·Increase the temperature.
·Close the door.
·Do not open the door/drawer too frequently. |
| Problem Possible Cause | Possible Solution | |
| Moisture accumulates on the wine cellar;s outside surface. | ·The climate is too warm and too damp
·The door is not closed tightly.The cold air in the appliance and the warm air outside it condensates. | ·This is normal in damp climate and will change when the humidity decreases.
·Ensure that the door is shut tightly and that the gaskets seal properly. |
| The appliance makes abnormal sounds | ·The appliance is not located on level ground.
·The appliance touches some object around it. | ·Ajust the feet to level the appliance.
·Remove objects around the appliance. |
| A slight sound can be heard, similar to that of running water. | ·This is normal - | |
| The interior lighting or cooling system does not work. | ·Mains plug is not connected to the mains socket.
·The power supply is not intact.
·The LED-lamp is out of order. | ·Connect the mains plug.
·Check the electrical supply to-the room.Call the local electricity company.
·Please call the service for changing |
| The sides of the cooler and door strip get warm | ·This is normal. - | |
| The door does not shut properly | ·The appliance is not level.
·The door is blocked. | ·Level the appliance with the leveling feet.
·Check for blockages like bottles or shelves. |
To contact the technical assistance, visit our website:
https://corporate.haier-europe.com/en/
Under the section "website", choose the brand of your product and your country. You will be redirected to the specific website where you can find the telephone number and form to contact the technical assistance.
Technical data
EN
Product fiche according to regulation EU No. 2019/2016
| Brand | Haier | Haier |
| Model name / identifier | HWS129GFH1HWS113GDFH1 | HWS127GGH1HWS111GDGH1 |
| Category | Wine Cellar | Wine Cellar |
| Energy efficiency class | F | G |
| Annual energy consumption (kWh/annum)1) | 99/113 | 156/156 |
| Storage room 1/2 1/2 | | |
| Storage volume (L) | 226/220 226/220 | |
| Climate class:
This appliance is intended to be used
at an ambient temperature
between 10 °C and 38 °C. | SN N ST | SN N ST |
| Airborne acoustical noise emissions (dB(A) re 1pW) | B(35) | C(37) |
| Type of appliance | Freestanding | Freestanding |
| This appliance is intended to be used exclusively for the storage of wine. | Yes | Yes |
| Dimensions (W/D/H in mm) | 597/594/1270 | 597/594/1270 |
Explanations:
1) based on standard test results for 24 hours. The actual power consumption depends on the actual environment, the amount of bottling, the set temperature, the door opening and closing, etc. 2) The nominal power consumption is the value obtained according to the standard test when the wine cabinet does not turn on the internal light. - extended temperate: 'this refrigerating appliance is intended to be used at ambient temperatures ranging from 10°C to 32°C' ; - temperate: 'this refrigerating appliance is intended to be used at ambient temperatures ranging from 16°C to 32°C' ; - subtropical: 'this refrigerating appliance is intended to be used at ambient temperatures ranging from 16°C to 38°C' ; - tropical: 'this refrigerating appliance is intended to be used at ambient temperatures ranging from 16°C to 43°C' ;
Standards and directives
C
This product meets the requirements of all applicable EC directives with the corresponding harmonised standards, which provide for CE marking.
We recommend our Haier Customer Service and the use of original spare parts.
If you have a problem with your appliance, please first check section TROUBLESHOOTING.
If you cannot find a solution there, please contact
your local dealer or
- the Service & Support area at www.haier.com where you can find telephone numbers and FAQs and where you can activate the service claim.
To contact our Service, ensure that you have the following data available.
The information can be found on the rating plate.
Model Serial No.
Also check the Warranty Card supplied with the product in case of warranty.
For general business enquiries please find our addresses in Europe below:
Europe's Haier add
| Country* | Postal address Country ress | | Postal add |
| Italy | Haier Europe Trading SRL Via De Cristoforis, 12 21100 Verese ITALY | Fræ | Haier Europe Trading SRL Via De Cristoforis, 12 21100 Verese ITALY |
| Spain | Haier Iberia SL Pg. Garcia Faria, 49-51 08019 Barcelona SPAIN | Belgium-FR Belgium-NL Netherlands Luxembourg | Haier Benelux SA Anderlecht Route de Lennik 451 BELGIUM |
| Portugal |
| Germany | Haier Deutschland GmbH Hewlett-Packard-Str. 4 D-61352 Bad Homburg GERMANY | Poland Czechia Hungary Greece Romania Russia | Haier Poland Sp. zo.o. Al. Jerozolimskie 181B 02-222 Warszawa POLAND |
| Austria |
| United Kingdom | Haier Appliances UK Co. Ltd. One Crown Square Church Street East Woking, Surrey, GU21 6HR UK |
AVAILABILITY OF SPARE PARTS: Thermostats, temperature sensors, printed circuit boards and light sources are available for a minimum period of seven years after placing the last unit of the model on the market. Door handles, door hinges, trays and baskets for a minimum period of seven years and door gaskets for a minimum period of 10 years, after placing the last unit of the model on the market.
Minimum guarantee is: 2 years for EU Countries, 3 years for Turkey, 1 year for UK, 1
year for Russia, 3 years for Sweden, 2 years for Serbia, 5 years for Norway, 1 year for
Morocco, 6 months for Algeria, Tunisia no legal warranty required.
For further information about the product, please consult https://eprel.ec.europa.eu/ or scan the QR on the energy label supplied with the appliance.
Wine bottle stacking
EN
The bottle arrangement is based on a graphic representation of a standard Bordeaux bottle (0.75 l). Due to the different bottle specifications, the actual bottle loading quantity could be different.
HWS129GFH1 (129 bottles, 3 shelves)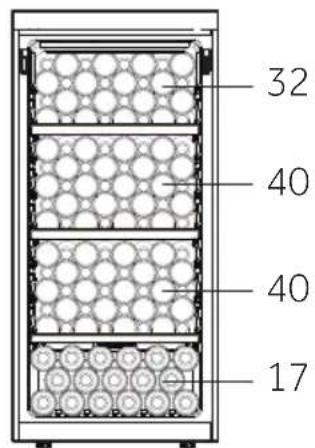
HWS129GFH1 (121 bottles, 4 shelves)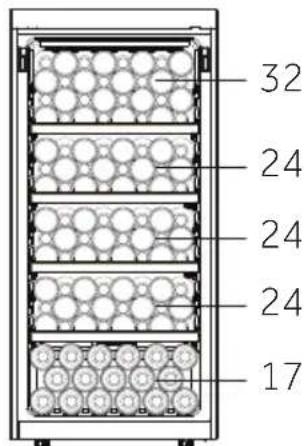
HWS113GDFH (113 bottles)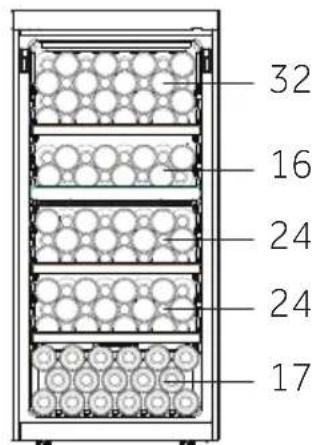
HWS127GGH1 (127 bottles, 3 shelves)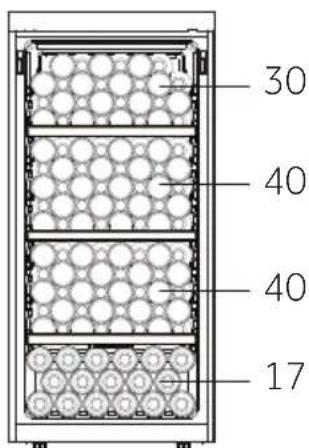
HWS127GGH1 (121 bottles, 4 shelves)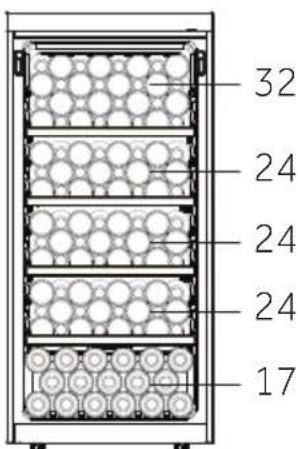
HWS111GDGH1 (111 bottles)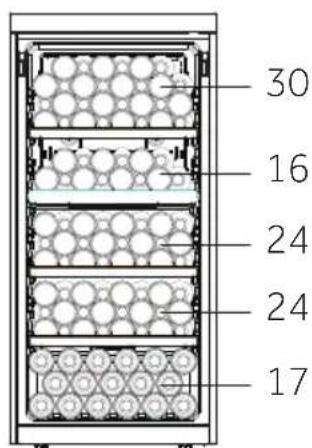

User Manual
Wine Climate Cabinet
HWS129GFH1 HWS113GDFH1 HWS127GGH1 HWS111GDGH1
HWS129GFH1 (129 bottles, 3 shelves)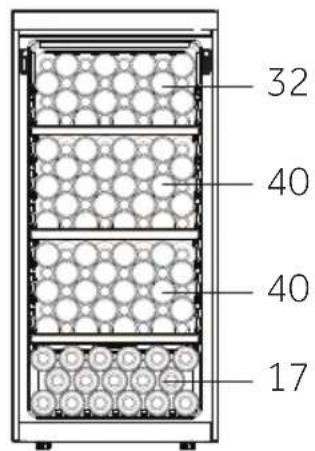
HWS129GFH1 (121 bottles, 4 shelves)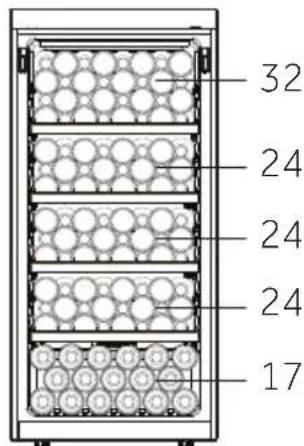
HWS113GDFH (113 bottles)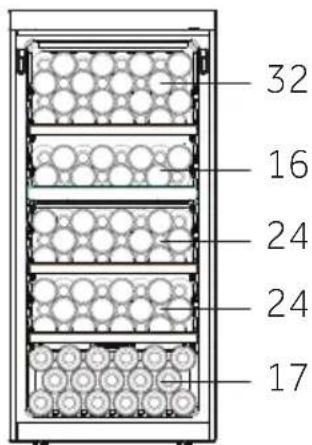
HWS127GGH1 (127 bottles, 3 shelves)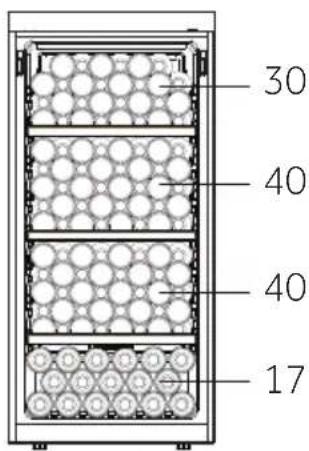
HWS127GGH1 (121 bottles, 4 shelves)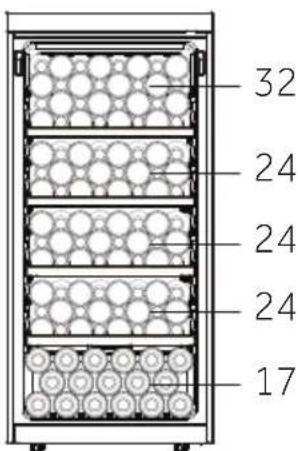
HWS111GDGH1 (111 bottles)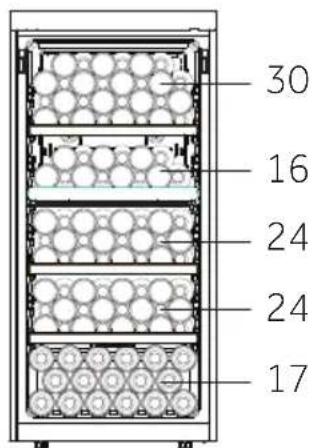

HWS129GFH1 HWS113GDFH1 HWS127GGH1 HWS111GDGH1
HWS111GDGH1 HWS127GGH1
F Temperature adjustment button: down G Temperature display H Temperature adjustment button: up 11 Temperature zone selection button J Lock button K Power button
How to activate the Wi-Fi module:
HWS129GFH1 (129 bottles, 3 shelves)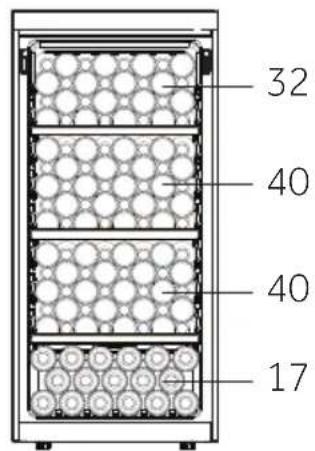
HWS129GFH1 (121 bottles, 4 shelves)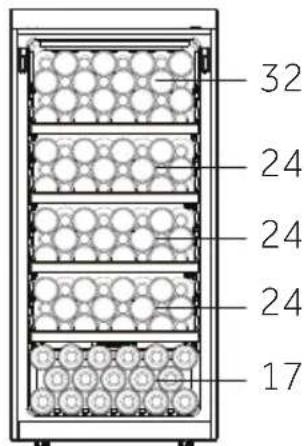
HWS113GDFH (113 bottles)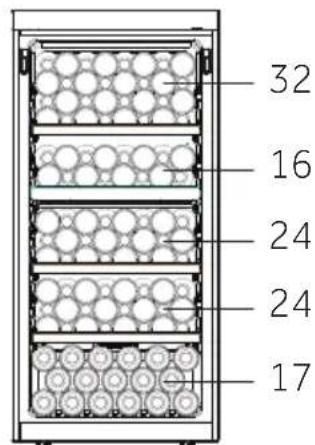
HWS127GGH1 (127 bottles, 3 shelves)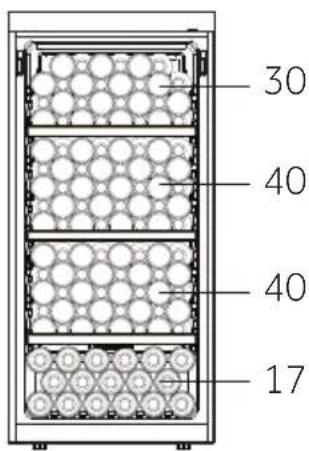
HWS127GGH1 (121 bottles, 4 shelves)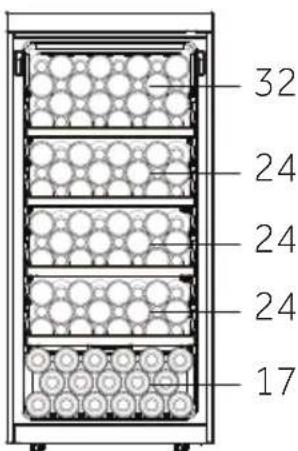
HWS111GDGH1 (111 bottles)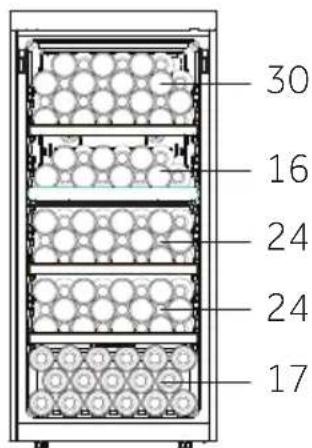

User manual
Wine cellar
HWS129GFH1
HWS113GDFH1
HWS127GGH1
HWS111GDGH1
HWS129GFH1 HWS111GDGH1
HWS127GGH1
HWS113GDFH1/HWS111GDGH1 HWS129GFH1/HWS127GGH1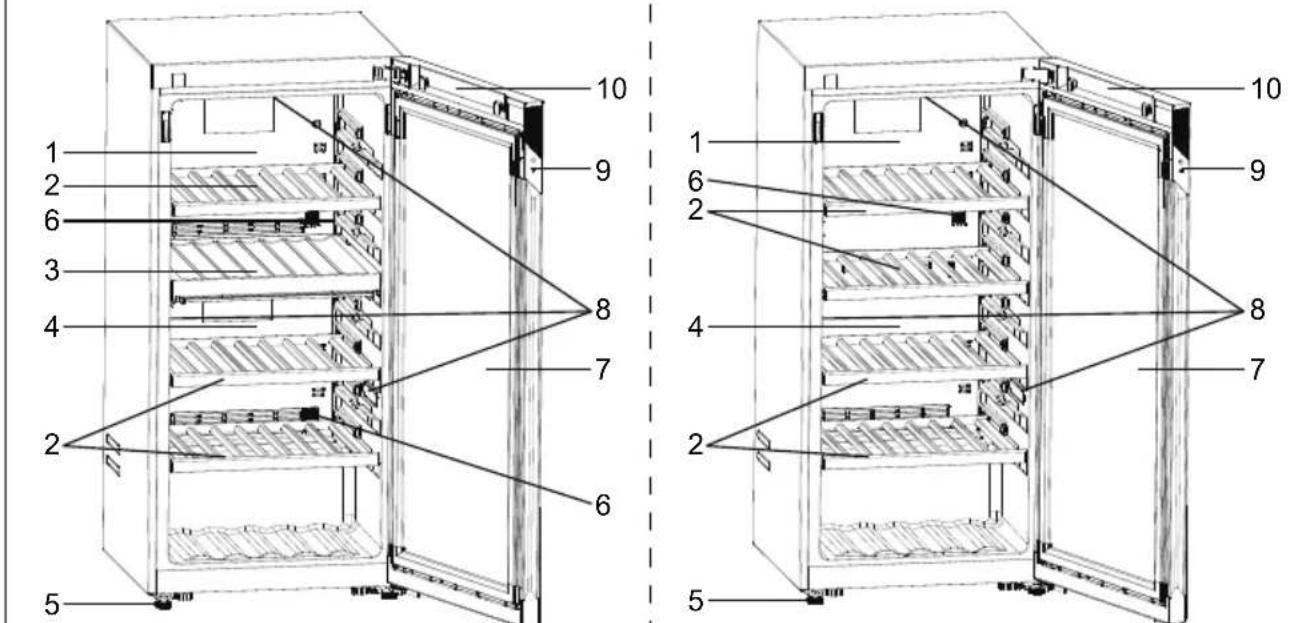
The HWS127GGH1 has only one component 8(LED light)
HWS129GFH1 (129 bottles, 3 shelves)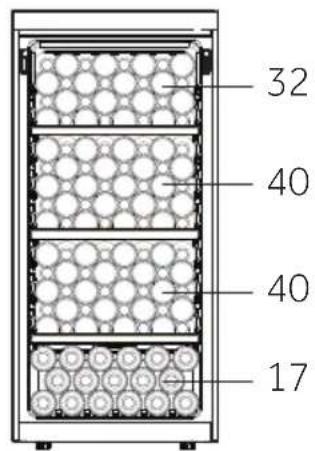
HWS129GFH1 (121 bottles, 4 shelves)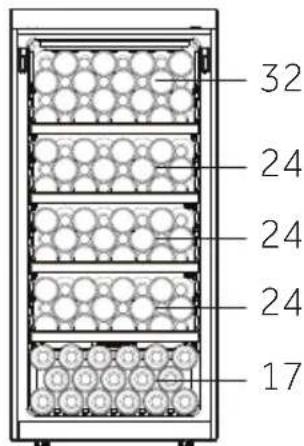
HWS113GDFH (113 bottles)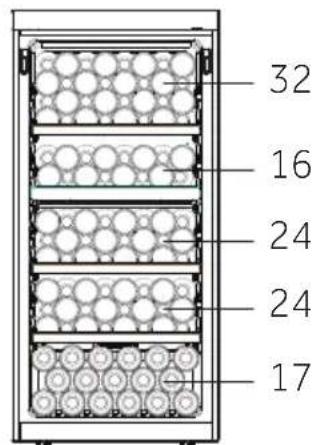
HWS127GGH1 (127 bottles, 3 shelves)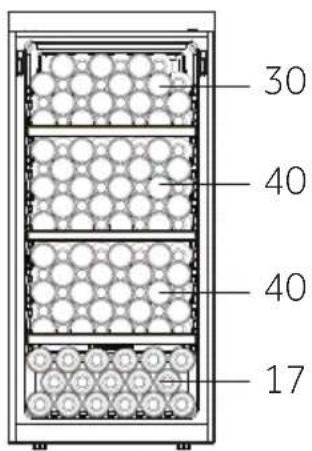
HWS127GGH1 (121 bottles, 4 shelves)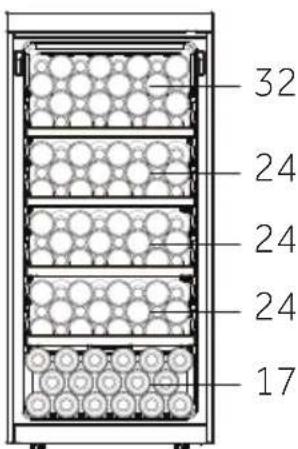
HWS111GDGH1 (111 bottles)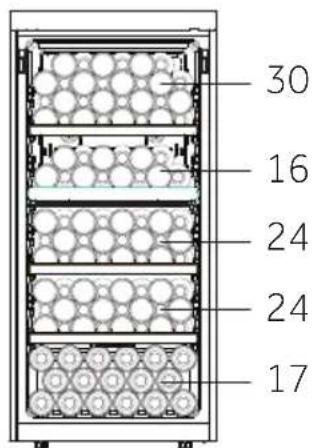

Haier
User manual
Wine cellar
HWS129GFH1 HWS113GDFH1 HWS127GGH1 HWS111GDGH1
HWS127GGH1 The HWS127GGH1 has only one component 8(LED light)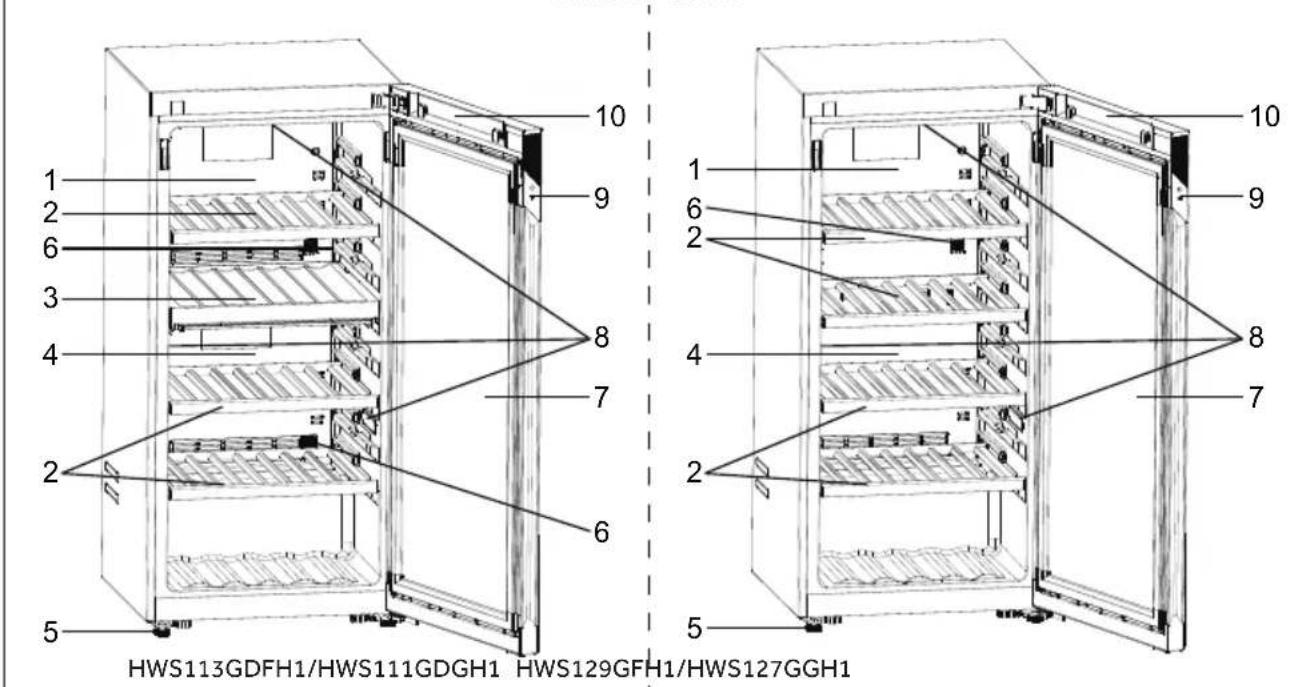
(or HWS127GGH1 and HWS111GDGH1)
HWS129GFH1 (129 bottles, 3 shelves)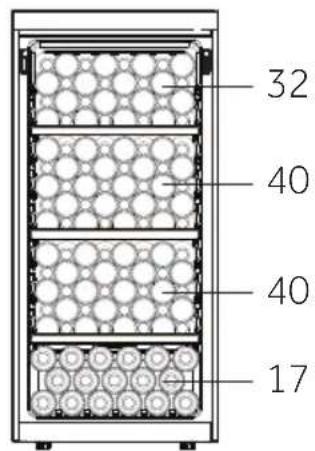
HWS129GFH1 (121 bottles, 4 shelves)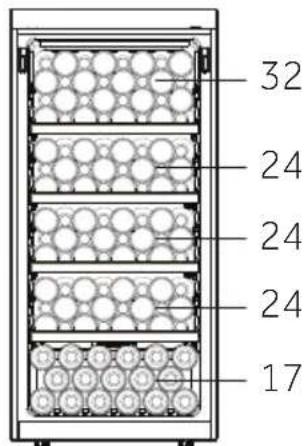
HWS113GDFH1 (113 bottles)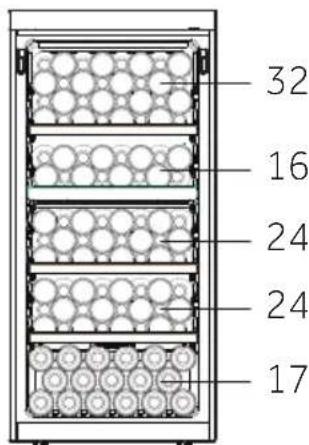
HWS127GGH1 (127 bottles, 3 shelves)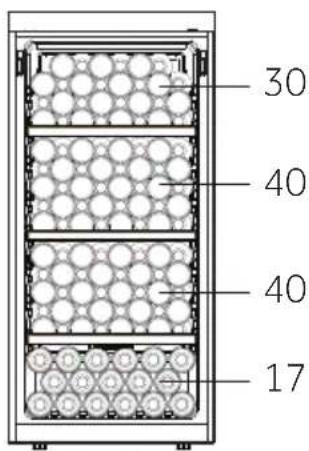
HWS127GGH1 (121 bottles, 4 shelves)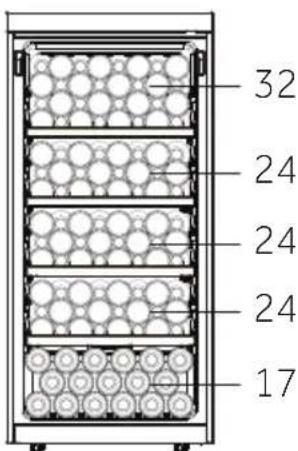
HWS111GDGH1 (111 bottles)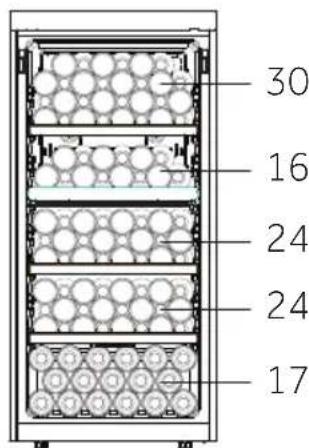

Instruction manual
Wine cooler
HWS129GFH1 HWS113GDFH1 HWS127GGH1 HWS111GDGH1
| Light | °C/°F | g | -88% | -White
Red
Sparkling | -88°C
°F | +Upper
Lower | Zone | 3s Unlock | 5s Power |
HWS113GDFH1 HWS129GFH1
| Light | Humidity | High
Mid
Low | - | White
Red
Sparkling | °C
°F | + | Mode | 3s Unlock | 5s Power |
| LIGHT | °C/°F | White = 88% Sparkling = 75% Lower + | ZONE | 3 SEC. | 5 SEC. |
HWS111GDGH1 HWS127GGH1
| LIGHT | C/F | White
Red
Sparkling | C
% | + | MODE | 3SEC | 5SEC |
The HWS127GGH1 has only one component 8(LED light)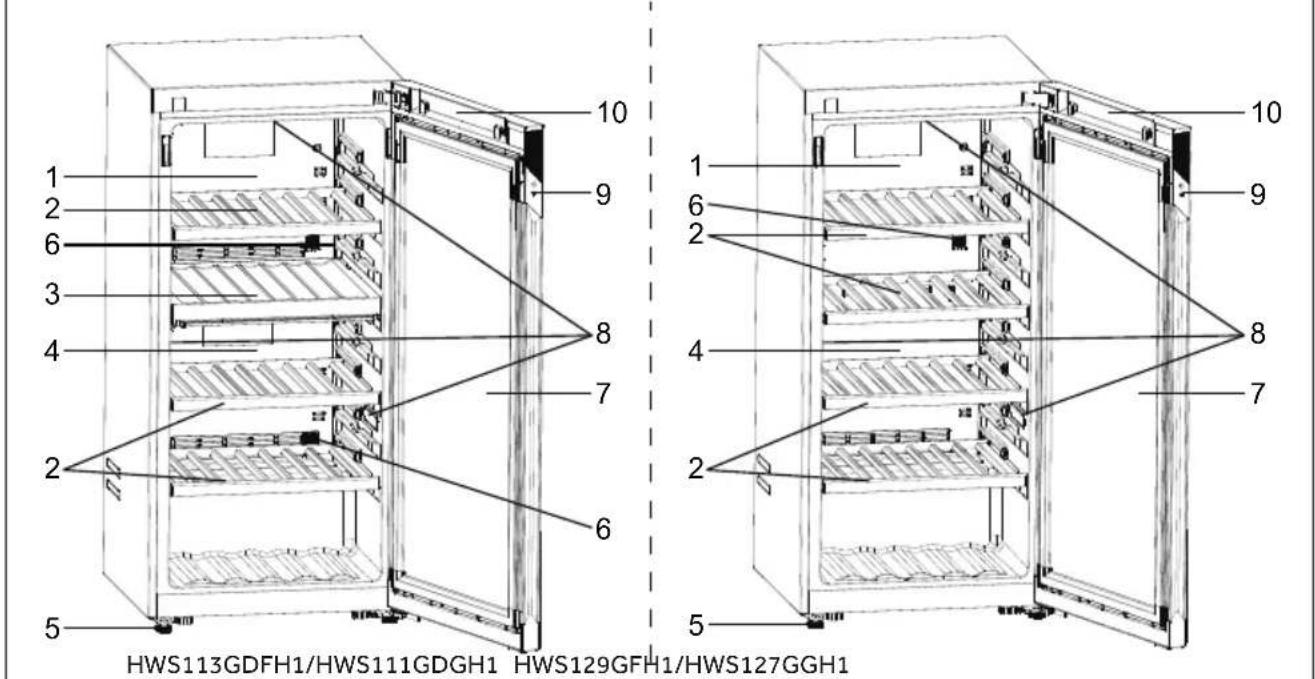
Download on the App Store
Step 2
HWS129GFH1 (129 bottles, 3 shelves)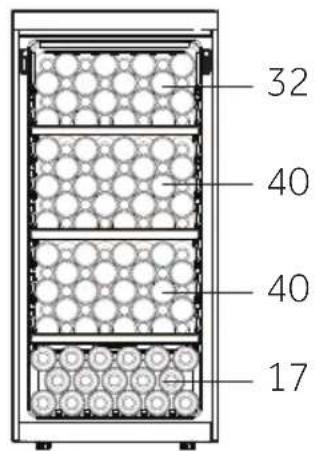
HWS129GFH1 (121 bottles, 4 shelves)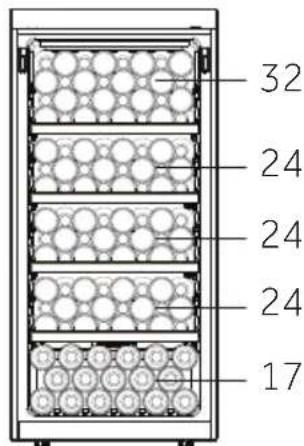
HWS113GDFH (113 bottles)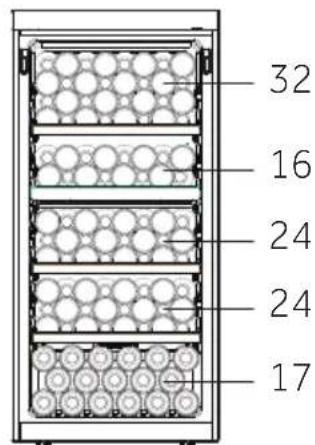
HWS127GGH1 (127 bottles, 3 shelves)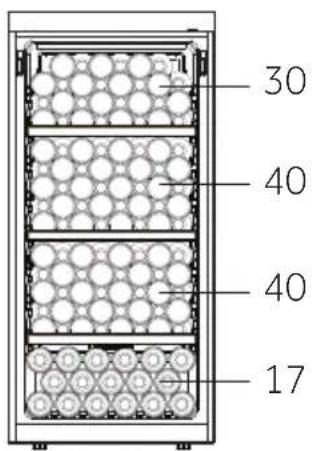
HWS127GGH1 (121 bottles, 4 shelves)
HWS111GDGH1 (111 bottles)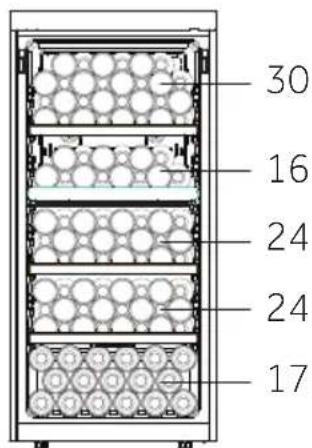

User Manual
Wine Cellar
HWS129GFH1 HWS113GDFH1 HWS127GGH1 HWS111GDGH1
(for HWS129GFH1 and HWS113GDFH1).
10. °C/°F Function
13. Humidity (for HWS129GFH1)
(for HWS127GGH1 and HWS111GDGH1)
Download on the App Store
Step 2
Do not replace the LED lamp yourself. It must only be replaced by either the manufacturer or the authorized service agent.
HWS129GFH1 (129 bottles, 3 shelves)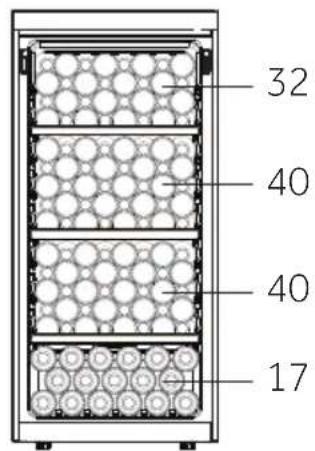
HWS129GFH1 (121 bottles, 4 shelves)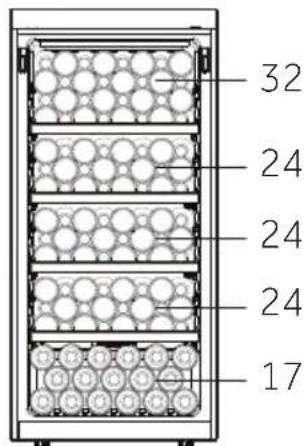
HWS113GDFH1 (113 bottles)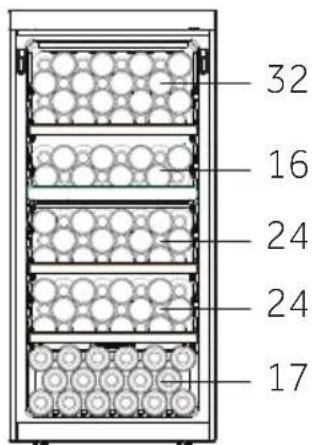
HWS127GGH1 (127 bottles, 3 shelves)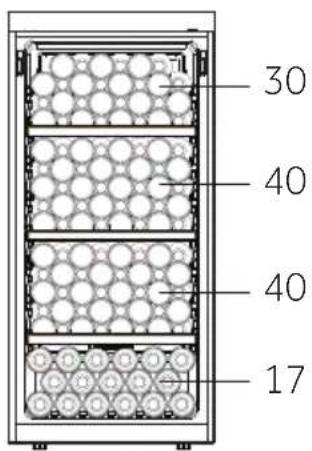
HWS127GGH1 (121 bottles, 4 shelves)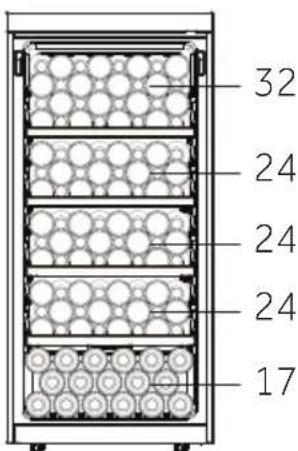
HWS111GDGH1 (111 bottles)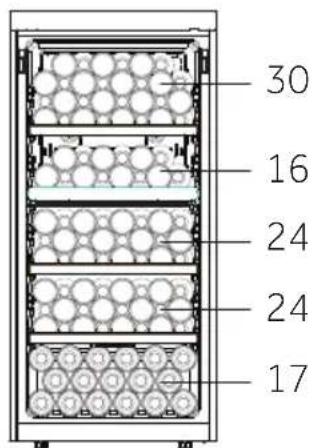

HWS129GFH1 HWS113GDFH1 HWS127GGH1 HWS111GDGH1
The default setting is 12°C
13. Humidity (for HWS129GFH1)
HWS129GFH1 (129 bottles, 3 shelves)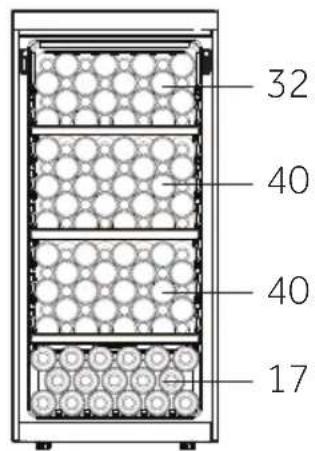
HWS129GFH1 (121 bottles, 4 shelves)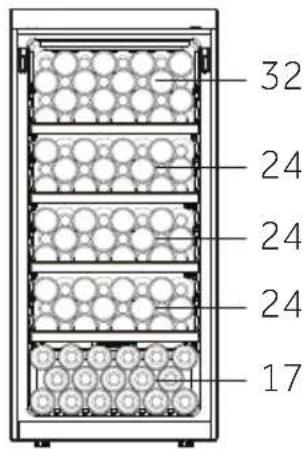
HWS113GDFH1 (113 bottles)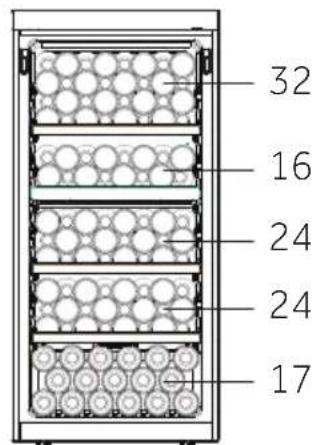
HWS127GGH1 (127 bottles, 3 shelves)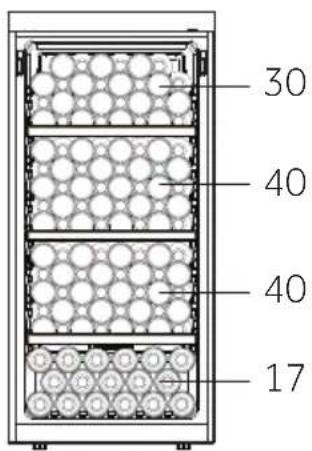
HWS127GGH1 (121 bottles, 4 shelves)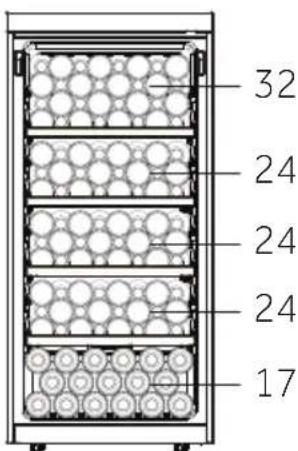
HWS111GDGH1 (111 bottles)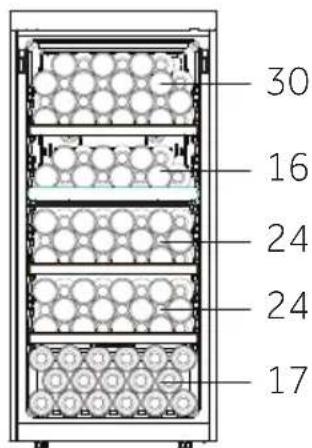

Haier
(except HWS129GFH1 and HWS113GDFH1).
10. °C/°F function
Press the button to switch between Fahrenheit and Celsius. (except HWS129GFH1).
into configuration mode (for HWS127GGH1 and HWS111GDGH1)
12. Motion Glow function
When the Motion Glow function is activated and someone approaches the door, the light turns on. When the person leaves, it will turn off after 30 seconds.
To turn off the function, press the Motion Glow button again.
13. Humidity (for HWS129GFH1)
Download on the App Store
Step 2
Log in or register
Step 3
HWS129GFH1 (129 bottles, 3 shelves)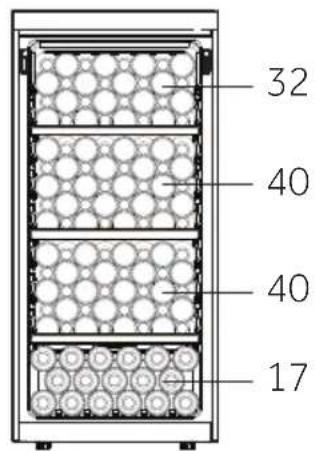
HWS129GFH1 (121 bottles, 4 shelves)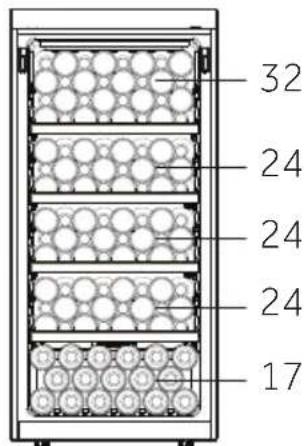
HWS113GDFH (113 bottles)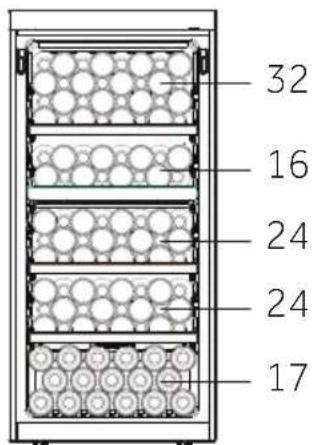
HWS127GGH1 (127 bottles, 3 shelves)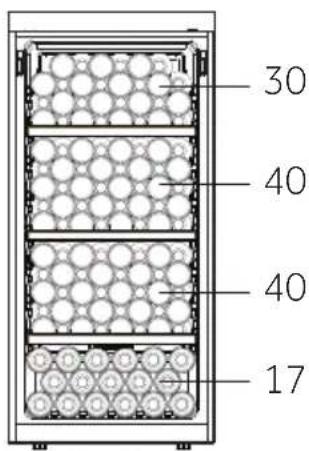
HWS127GGH1 (121 bottles, 4 shelves)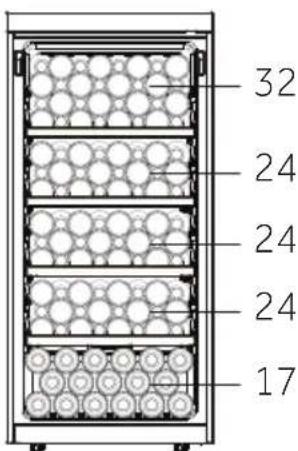
HWS111GDGH1 (111 bottles)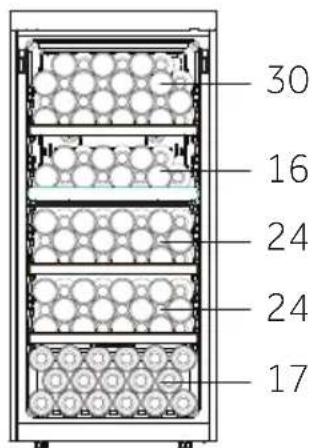

User manual
Wine cellar
HWS129GFH1
HWS113GDFH1
HWS127GGH1
HWS111GDGH1
HWS129GFH1 HWS111GDGH1
HWS127GGH1
HWS113GDFH1/HWS111GDGH1 HWS129GFH1/HWS127GGH1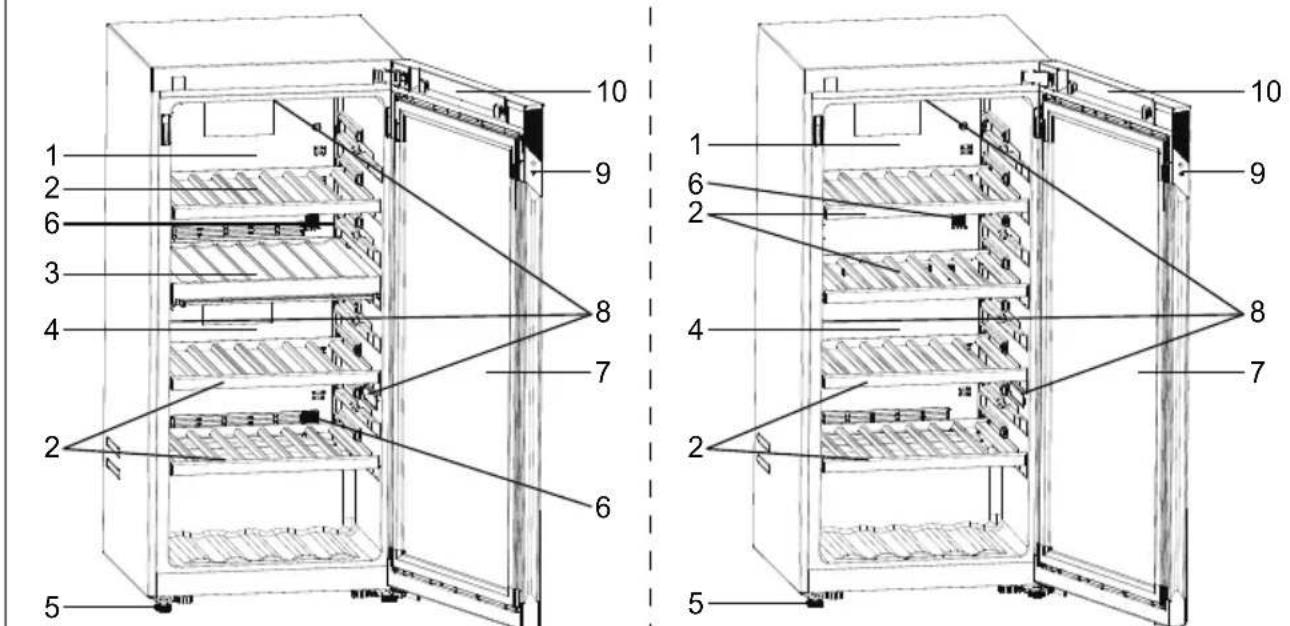
The HWS127GGH1 has only one component 8(LED light)
- Horní přepážka vzduchovodu
- přepážka
- Police
- Spodní přepážka vzduchovodu
- Nastavitelné nohy
- Filtr s aktivním uhlím
- Dveře
- Žárovka LED
- Zámek
- Displej
1. Vybalení
13. Vlhkost (pro HWS129GFH1)
HWS129GFH1 (129 lahví, 3 police)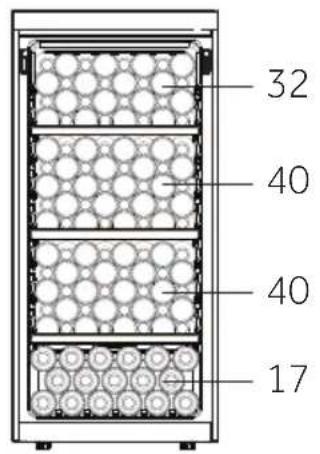
HWS129GFH1 (121 bottles, 4 shelves)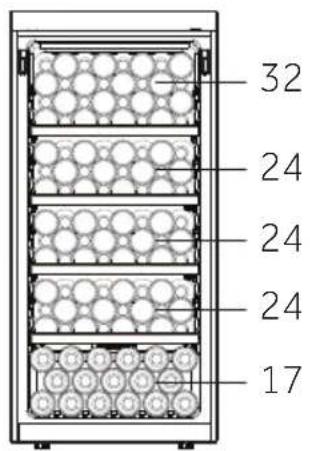
HWS113GDFH1 (113 bottles)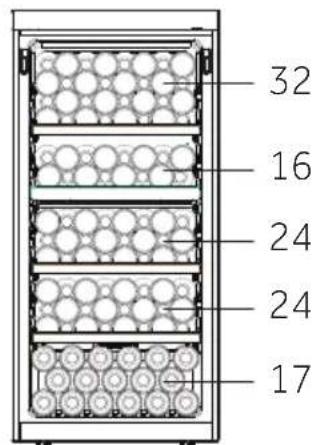
HWS127GGH1 (127 bottles, 3 shelves)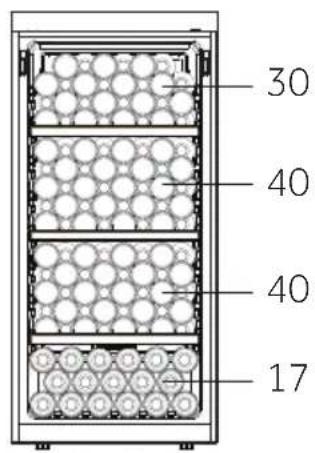
HWS127GGH1 (121 bottles, 4 shelves)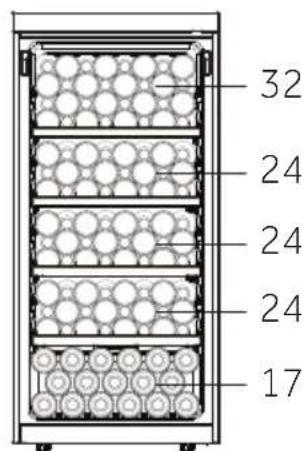
HWS111GDGH1 (111 bottles)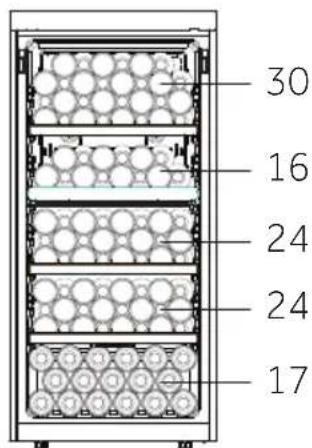

HWS129GFH1 HWS113GDFH1 HWS127GGH1 HWS111GDGH1
Thank you for purchasing a Haier product.
Before using this appliance, please read these instructions carefully. The instructions contain important information that will help you get the most out of your appliance and ensure safe and correct installation, use, and maintenance.
13. Humidity (for HWS129GFH1)
How to activate the WiFi module:
Press the light button for 3 seconds to activate WiFi (for HWS127GGH1 and HWS111GDGH1).
Press the WiFi button for 3 seconds to activate WiFi (for HWS129GFH1 and HWS113GDFH1).
The WiFi module is on, the WiFi icon starts blinking. If the wine cellar is registered but WiFi is off, the icon will blink. If the wine cellar is registered and connected, the WiFi icon stays lit. To reset WiFi, press the light button for 3 seconds (for HWS127GGH1 and HWS111GDGH1). To reset WiFi, press the WiFi button for 3 seconds (for HWS129GFH1 and HWS113GDFH1).
IN APP PAIRING MODE
Download on the App Store
Step 2
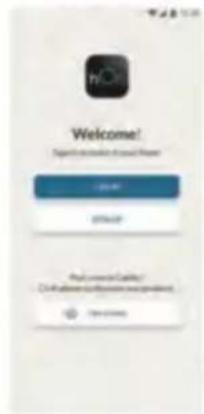
Step 3
- Add a new appliance and select the wine cellar from the list
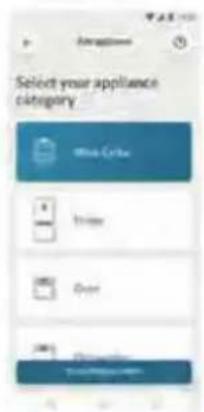
Step 4
HWS129GFH1 (129 bottles, 3 shelves)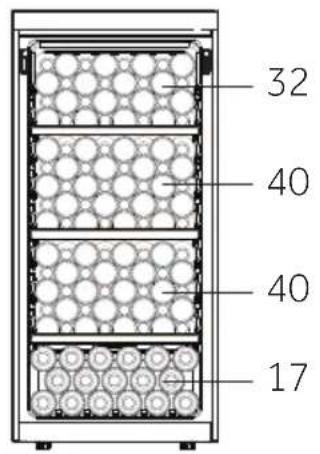
HWS129GFH1 (121 bottles, 4 shelves)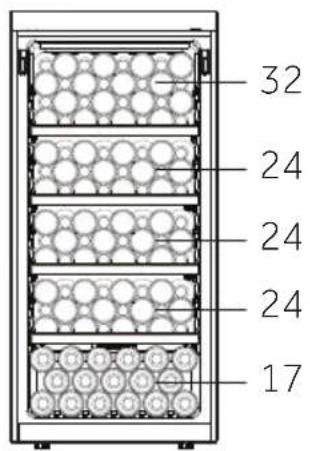
HWS113GDFH (113 bottles)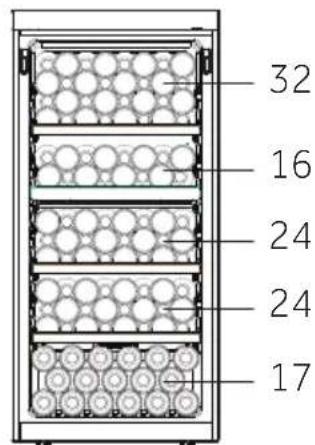
HWS127GGH1 (127 bottles, 3 shelves)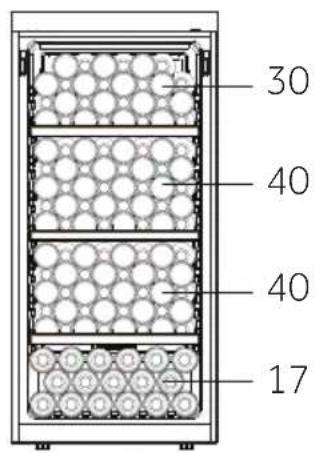
HWS127GGH1 (121 bottles, 4 shelves)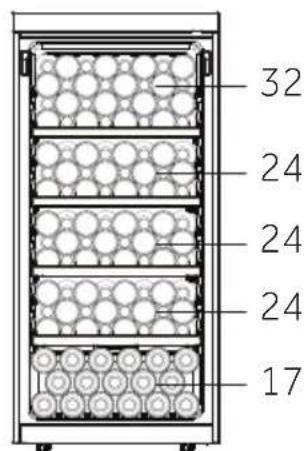
HWS111GDGH1 (111 bottles)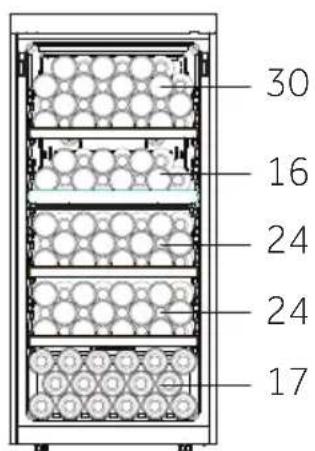

HWS129GFH1 HWS113GDFH1 HWS127GGH1 HWS111GDGH1
HWS111GDGH1 HWS127GGH1
HWS113GDFH1/HWS111GDGH1 HWS129GFH1/HWS127GGH1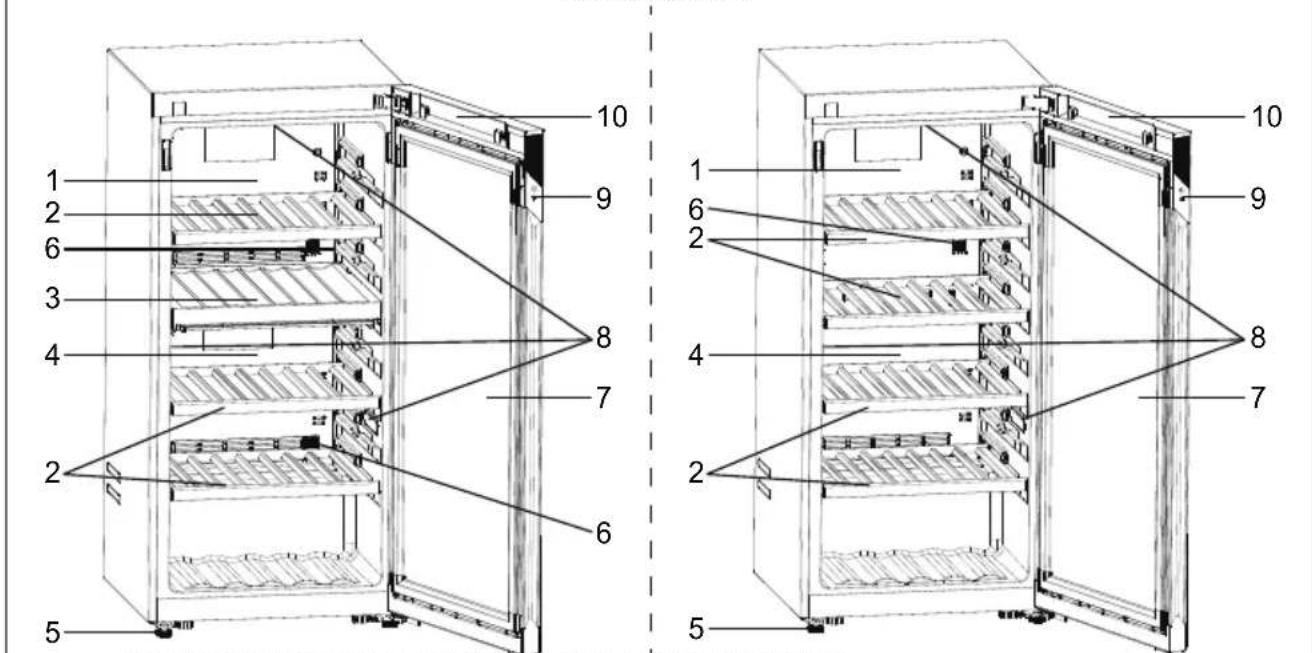
The HWS127GGH1 has only one component 8 (LED light)
13. Humidity (for HWS129GFH1)
HWS127GGH1 and HWS111GDGH1)
HWS129GFH1 (129 bottles, 3 shelves)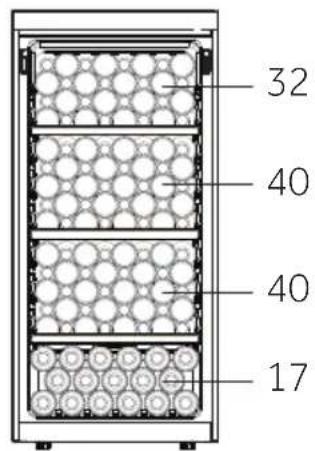
HWS129GFH1 (121 bottles, 4 shelves)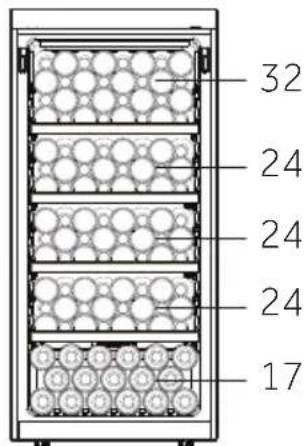
HWS113GDFH1 (113 bottles)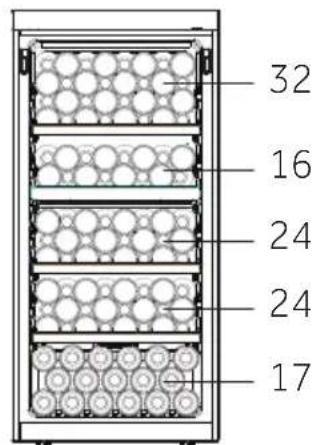
HWS127GGH1 (127 bottles, 3 shelves)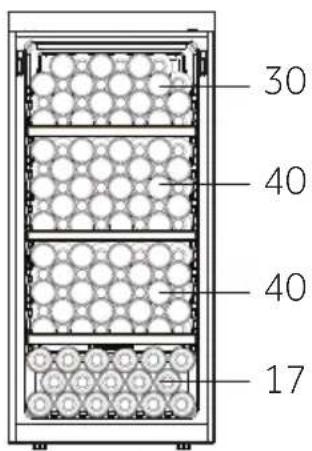
HWS127GGH1 (121 bottles, 4 shelves)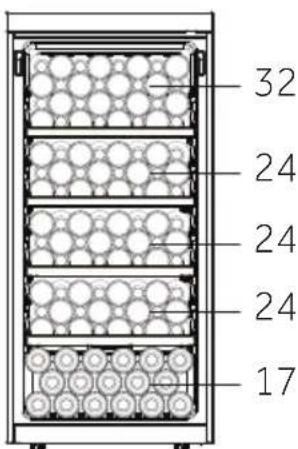
HWS111GDGH1 (111 bottles)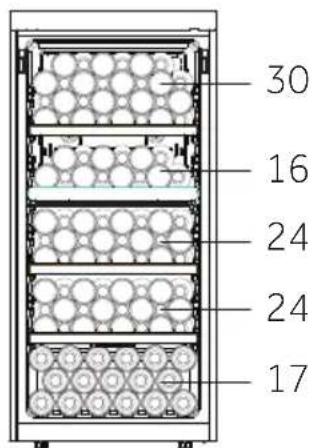

Haier
User manual
Wine cooler
HWS129GFH1 HWS113GDFH1 HWS127GGH1 HWS111GDGH1
Thank you
Thank you for purchasing a Haier product.
Press and hold the button for 3 seconds to turn on the device. The device with the indicator light will blink and then stay on. The device will beep once to confirm the operation, and then it will be ready for use.
13. Ukraine (for HWS129GFH1)
PARAMETERS OF DEVICE CONNECTION
| Tekylovovia | WIFI | Bluetooth® |
| Вашикý | IEEE 802.11 b/g/n | Bluetooth® v4.2, BR/EDR.
Bluetooth® Low Energy |
| Zǔvn ŠоухотήtmHz | 2401-2483 | 2402-2480 |
| Měviotn loxúç [mW] Zǔvn(-εç) [MHZ] | 100 | 10 |
PRODUCT INFORMATION
CONNECTING TO WI-FI NETWORK:
Press the button φ for 3 seconds to activate the Wi-Fi (for HWS127GGH1 and HWS111GDGH1)
Use
Press the Wi-Fi button for 3 seconds to activate the Wi-Fi (except for HWS129GFH1 and HWS113GDFH1)
The Wi-Fi module is activated, the Wi-Fi indicator starts blinking - If the maintenance person is registered, but the Wi-Fi is deactivated, the indicator will blink. If the maintenance person is registered and connected, the Wi-Fi indicator is solid - To reset the Wi-Fi, press the light button for 3 seconds (for HWS127GGH1 and HWS111GDGH1) - To reset the Wi-Fi, press the Wi-Fi button for 3 seconds (except for HWS129GFH1 and HWS113GDFH1)
PAIRING PROCEDURE IN THE APP
Step 1
Download on the App Store
Step 2
HWS129GFH1 (129 bottles, 3 shelves)
HWS129GFH1 (121 bottles, 4 shelves)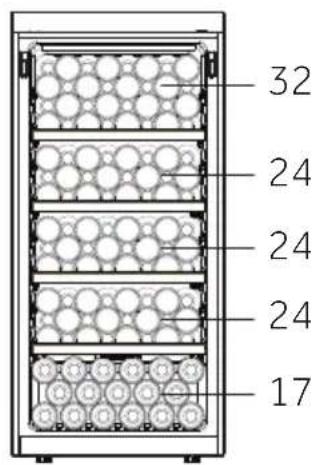
HWS113GDFH1 (113 bottles)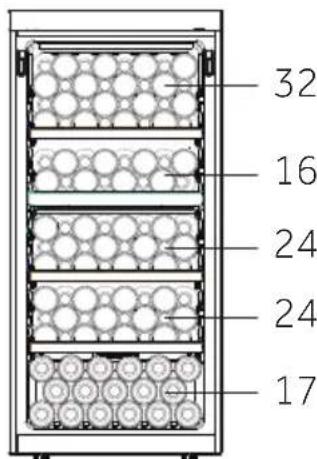
HWS127GGH1 (127 bottles, 3 shelves)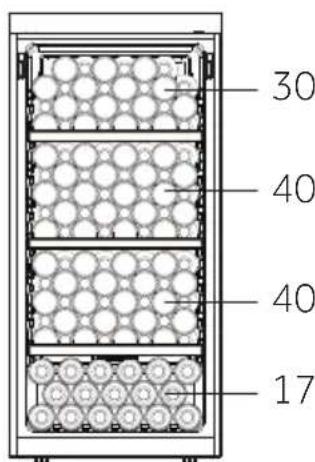
HWS127GGH1 (121 bottles, 4 shelves)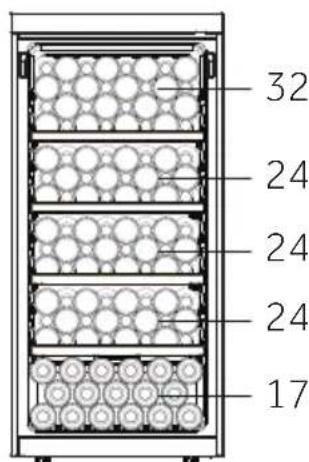
HWS111GDGH1 (111 bottles)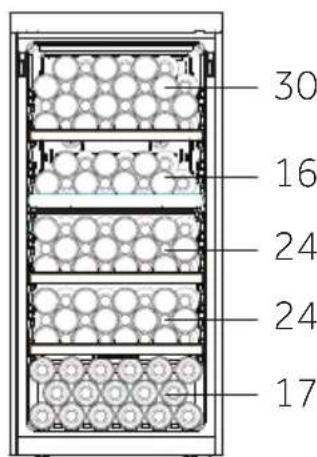
Download on the App Store
Step 2
Log in or register
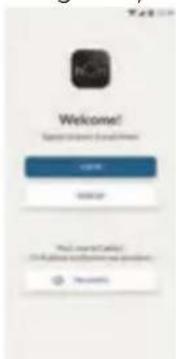
Step 3
- Add a new device by selecting from the list wine cellar
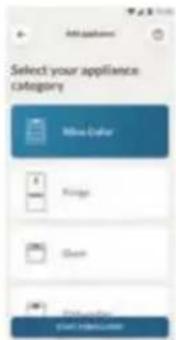
Step 4
- Scan the QR code or enter the serial number manually
Step 5
Standards and directives
HWS129GFH1 (129 bottles, 3 shelves)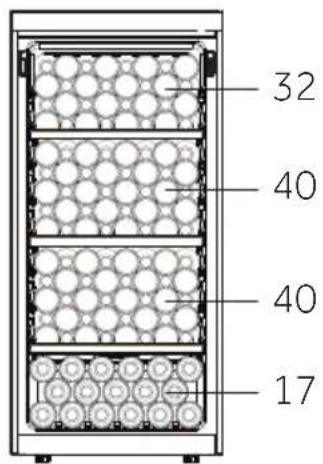
HWS129GFH1 (121 bottles, 4 shelves)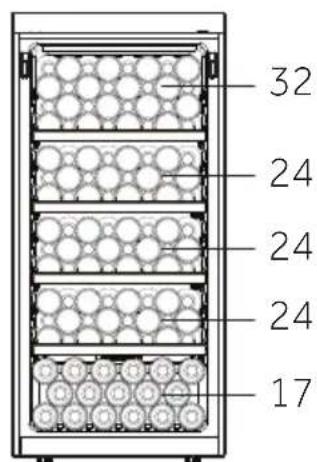
HWS113GDFH1 (113 bottles)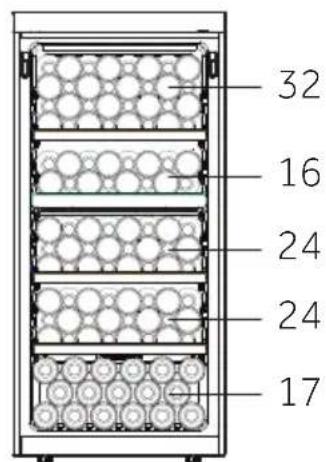
HWS127GGH1 (127 bottles, 3 shelves)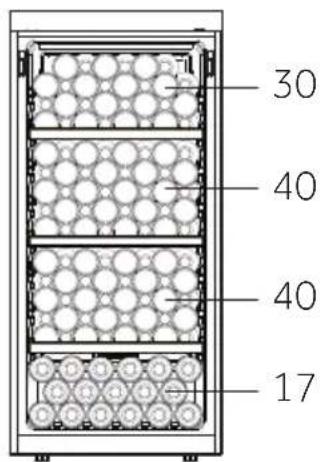
HWS127GGH1 (121 bottles, 4 shelves)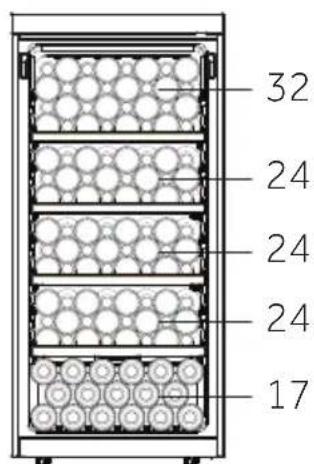
HWS111GDGH1 (111 bottles)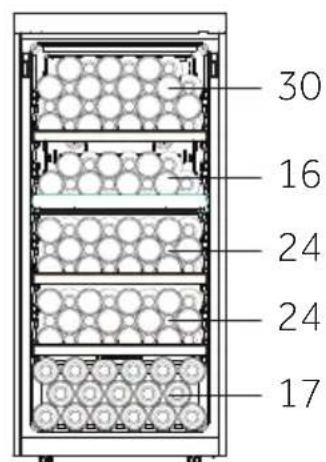
HWS129GFH1 HWS113GDFH1 HWS127GGH1 HWS111GDGH1
The appliance must be placed on a flat and stable surface.
- Tilt the appliance backwards (Fig. 7).
- Adjust the adjustable front feet of the appliance by turning them.
- Stability can be checked by pressing alternately on the diagonals. In both directions, the appliance should not rock. Otherwise, the frame may warp, causing the doors to misalign. The slight backward tilt ensures proper closing of the doors.
Locking bolt
Bolt for securing
HWS111GDGH1
A Button for lighting
B1 Button for conversion of °C/°F
F Button for adjusting the
temperature: lower
G Temperature display
H Button for adjusting the
temperature: upper
I1 Button for selecting temperature zone
J Button for locking
K Button for unlocking
4. Function for automatic locking
In the locked state, press the lock button for more than 3 seconds, the display shows 3, 2, and 1, the displays turn off, the lock button lights up half, if there is action, the display will lock automatically after 30 seconds. In the locked state, all buttons are enabled, the button on the display cannot be controlled (except the lighting button).
5. Function for unlocking
In the off state, press and hold the unlock button for more than 5 seconds, the display shows 5, 4, 3, 2, and 1, and the unit starts to work.
6. Temperature setting

Note
Preliminary settings
Before switching on the electrical contact, leave it to work for about 30 minutes to adapt to the environment, before making any settings. When the device is switched on, the display of the stored values may need up to several hours to reach the correct temperatures. The exact time varies depending on the ambient environment and the temperature setting.
Press the button to set the desired temperature. Press the button to set the lower temperature. Temperature setting range: 5 - 20°C (41 - 68°F) . Press and hold the button for 3 seconds, the temperature is increased.
7. Mode and Zone function
Press the temperature button from low (8°C or 47°F ) to high (12°C
In the off state, the zone is manually switched on. If the current display is in the upper temperature zone, the upper zone is on, and the lower zone is off. During this time, press the button, the lower zone will be on, and the upper zone will be
Preliminary temperature settings
8. Standby mode
The display screen lights up automatically when the button is pressed or the door is opened. When the Motion function is enabled, if someone approaches the door, the display screen and lights will turn on (for
If no action is performed, the display screen and lights will turn off automatically after 30 seconds.

Note
Temperature adjustment
The temperature is affected by the following factors:
Ambient temperature, number of stored bottles, frequency of door opening, location of the device
The setting by default is 12°C
When the display stops flashing, it returns to showing the current temperature inside the wine cellar. It takes some time to reach the set temperature.
9. Setting the lighting
Press the button; the lights turn on gradually. When pressed again
Pressing the button again turns them off gradually. If the function
Motion is activated, the light is to be controlled by the light
button for HWS129GFH1 and HWS113GDFH1).
10. Function ° C / F
Press the button to switch between Fahrenheit and Celsius
(for HWS129GFH1) Press the button for
3 seconds to switch between Fahrenheit and Celsius for HWS129GFH1)
11. Wi-Fi function
Press the Wi-Fi button for 3 seconds; the Wi-Fi button
will start flashing quickly and automatically enter configuration mode.
The button is pressed for 3 seconds, the Wi-Fi button is set to fast mode
automatically enters programming mode (for HWS127GGH1 and
HWS111GDGH1)
12. Motion Glow function
When the Motion Glow function is activated, the light turns on when you approach the door. It stays on for 30 seconds, then turns off. Press the Motion Glow function button again to turn off the function.
13. Humidity (for HWS209GFH1)
In standby mode, when the temperature is set between 10 and 14 degrees Celsius (suitable for the wine period), press the humidity button to select the humidity level inside the compartment as high, medium, or low.
The wine cooler is equipped with a professional humidity sensor. The conditions for long-term storage and the appropriate humidity in the wine cooler can prevent the cork from drying out and also prevent the formation of mold on the wine labels. Excessive humidity is not recommended.
If you adjust the humidity in the wine cooler, it may take several hours to reach the set value. The humidity control in the wine cooler is effective when the ambient temperature is between 20°C and 27°C
Please note the following regarding the humidity of the air inside the wine cooler:
-For storing wine. -The humidity inside the wine cooler depends on the ambient temperature and humidity of the surrounding air, the capacity of the wine cooler, the temperature of the wine cooler, as well as the duration and frequency of door openings. -The display of the wine cooler shows the humidity of the air inside after a delay, showing the integrated humidity value inside the compartment after 2 hours. Note: If you use the wine cooler in a very dry or hot environment (humidity <30% or ambient temperature <17°C or ambient temperature >30°C), it is recommended to add water inside the cooler.
14. Function for delaying or postponing the shutdown
In case of postponing the shutdown, the wine cooler will continue to maintain the set temperature. After the shutdown is restored, it will operate based on the temperature set before the shutdown.
15. Alarm for open door
If the door is left open for more than 3 minutes, an audible alarm will sound until the door is closed or a button is pressed.
16. Steps to activate WiFi mode
Connection
Basic parameters
| Texhoologry | WIFI | Bluetooth® |
| Стандэр | IEE 802.11 b/g/n | Bluetooth® v4.2, BR/EDR. |
| Чебтын(ни) диапазон(и) [MHz] | 2401-2483 | 2402-2480 |
| Марсимална мошност [mW] диапазон(и) [MHz] | 100 | 10 |
Product information
How to activate the WiFi module:
Press the button for 3 seconds to activate WiFi (for HWS127GGH1 and HWS111GDGH1)
Press the button for WiFi for 3 seconds to activate WiFi (except HWS129GFH1 and HWS113GDFH1)
·The WiFi module is turned on and the WiFi icon starts to blink. - If the WiFi connection is registered, but WiFi is off, the icon will blink.
The Bluetooth® word mark and logos are registered trademarks owned by Bluetooth SIG, Inc., and any use of such marks by Candy Hoover Group SRL is under license. Other trademarks and trade names are those of their respective owners.
- If the WiFi connection is registered and connected, the WiFi icon lights up constantly. To turn off WiFi, press the light button for 3 seconds (for HWS127GGH1 and HWS111GDGH1)
- To turn off WiFi, press WiFi for 3 seconds (except HWS129GFH1 and HWS113GDFH1)
Download on the App Store
Button 2
Enter the password
Button 3
Add new shelf, select display from list
Step 4
Scan the QR code to display the serial number
Step 5
Press the button on the device for 3 seconds to activate Wi-Fi (except HWS127GGH1 and HWS111GDGH1). Press the button for Wi-Fi on the device for 3 seconds to activate Wi-Fi (except HWS129GFH1 and HWS113GDFH1).
Step 6
- The Wi-Fi icon will start blinking. You have 5 minutes to complete the pairing process. When the process is complete, the Wi-Fi icon will stop blinking and will light up constantly. NOTE

Energy saving tips
● Make sure the device is installed in a way that ensures good ventilation (see section "Installation"). Do not install the device in direct sunlight or near heat sources (e.g., ovens, heaters). ● Set the temperature of the device as low as possible. Energy consumption increases the lower the set temperature is. ● Open the device door as rarely and as briefly as possible. Do not exceed the recommended number of bottles to avoid obstructing the air circulation. ● Keep the door seals clean so that the door closes properly. The most energy-efficient configuration is to place the device as close as possible to the final position, and to install it in a way that does not block the air vents.
1. Shelves
- The shelves are designed for easy storage and easy removal of the wine. They can be cleaned with a soft cloth.
- Ordinary bottles with a diameter of 76 mm can be placed one on top of another.
- The quantity may vary from the illustrated number of bottles if they are arranged in a different way.
Tips for arranging your wine display
We recommend that the number of wine bottles does not exceed four rows per shelf, and the total capacity of the shelves does not exceed 50 kg. Before placing the bottles in the wine display, check that the shelves are properly installed. Also check that no bottle protrudes from the shelves to prevent bottle impact when closing the glass door.
2. Connection
Connect the light fixture to the gate. Press the light button, the light turns on.
Press the light button again, the light turns off. To increase the effectiveness, the light should be turned off when the gate is not being used.
3. Locking
To lock the gate, close the gate and insert the key into the lock:
Lock the gate by turning the key clockwise. Unlock the gate by turning the key counterclockwise.
1. Commissioning
The commissioning of the gate is done automatically: no manual control is required.
2. Replacing the LED lamp
The lamp uses an LED light source, which is characterized by low energy consumption and long service life. In case of malfunction, please contact the customer service department. See "SERVICE".
Do not replace the LED lamp yourself. It must be replaced only by the manufacturer or an authorized service representative.
DC 12 V, maximum power 1W*3.
3. Instructions for use over a long period of time
Disconnect the power cable.
Clean the device and the gate as described above.
The door is opened to prevent the development of anaphylaxis inside.
5. Air exchange filter activated carbon
The type, according to which the wine matures, depends on the conditions of the surrounding environment. Therefore, the quality of the air is crucial for the aging of the wine. The filter with activated carbon is mounted in the upper part of the rear wall of the device, to provide optimal quality over a long time.

Care
We recommend that you change the filter every two years. The filters can be removed from your device.
Changing the filter
- Remove the outer part.
- Place the screwdriver in the position shown in the frame of the cable, and lift the cover of the activated carbon.
- Open the front bracket, remove the activated carbon and replace it.
- Place the cover of the activated carbon in the cover of the air duct in the shown direction and press it down, to secure the cover on the cover of the air duct.
Many of the problems that arise can be solved by you yourself without the need for a specialist. In case of a problem, please check all the shown possibilities and follow the instructions step by step, before you contact the customer service department. See the section "CUSTOMER SERVICE".

WARNING!
Before cleaning the surface, unplug the device and remove the plug from the contact. The electrical equipment must be serviced only by qualified experts, because an incorrect repair can cause significant consequences. If the power cord is damaged, it must be replaced by the manufacturer, its service representative or a person with similar qualification, to avoid a potential danger.
HWS129GFH1 (129 bottles, 3 shelves)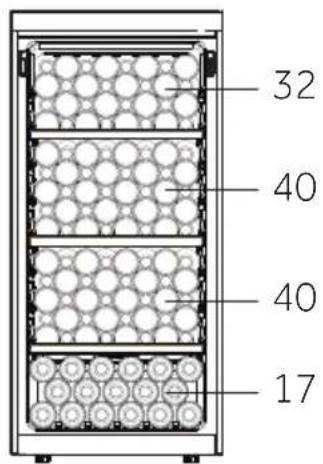
HWS129GFH1 (121 bottles, 4 shelves)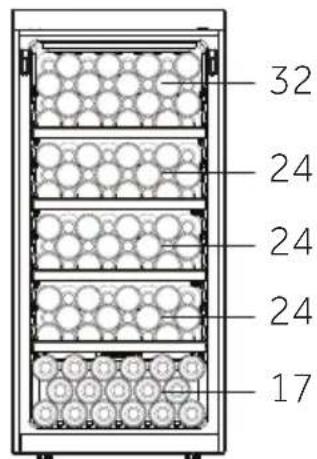
HWS113GDFH1 (113 bottles)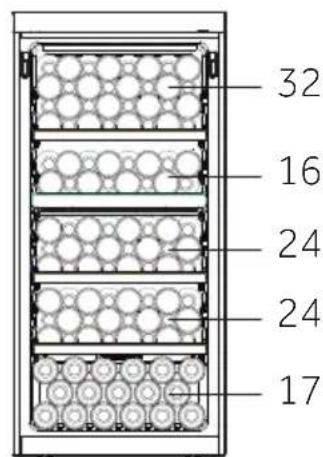
HWS127GGH1 (127 bottles, 3 shelves)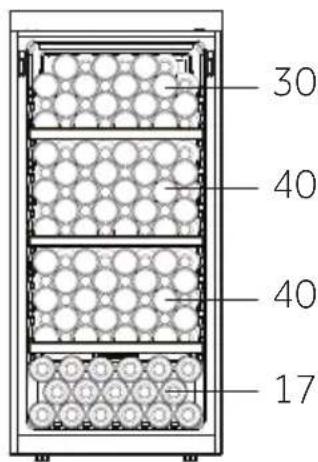
HWS127GGH1 (121 bottles, 4 shelves)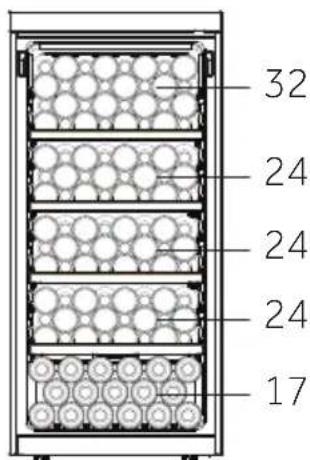
HWS111GDGH1 (111 bottles)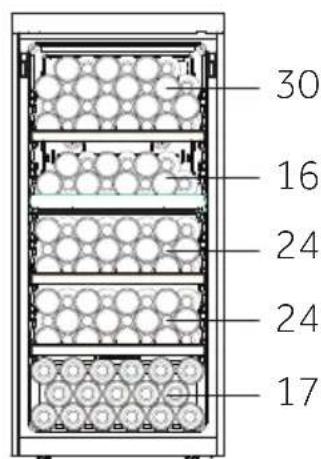

Haier