
DCMED411N - Electric brush cutter DEWALT - Free user manual and instructions
Find the device manual for free DCMED411N DEWALT in PDF.

| Product type | Cordless electric brushcutter |
| Brand | DeWalt |
| Model | DCMED411N |
| Rated voltage | 54 V DC |
| Battery type | Lithium-ion (Li-ion) |
| Maximum no-load speed | 4800 min⁻¹ |
| Weight (without battery) | 5.6 kg |
| Compatible batteries | DCB546, DCB547, DCB548, DCB549 |
| Compatible chargers | DCB094K, DCB116, DCB117 |
| Speed modes | ECO, Standard, Turbo |
| Charge level indicator | Yes, 4 white LEDs (red when overheating) |
| Overload indicator | Yes, amber then red |
| Adjustable cutting depth | Yes, up to 3.5 cm recommended |
| Auxiliary handle | Yes, adjustable |
| Shoulder strap | Included, adjustable |
| Front wheel | Yes, height-adjustable |
| Protective guard | Yes, optional extension available |
| Maintenance | Lubrication every 50 h, cleaning with dry air |
| Safety | Switch lock, blade stop, variable speed trigger |
| Intended use | Professional lawn and garden maintenance |
| Included accessories | Blade, shoulder strap, wrench, locking pin, protective guard |
| Blade type | Metal blade (replaceable) |
| Warranty | Consult the retailer |
Frequently Asked Questions - DCMED411N DEWALT
User questions about DCMED411N DEWALT
0 question about this device. Answer the ones you know or ask your own.
Ask a new question about this device
Download the instructions for your Electric brush cutter in PDF format for free! Find your manual DCMED411N - DEWALT and take your electronic device back in hand. On this page are published all the documents necessary for the use of your device. DCMED411N by DEWALT.
USER MANUAL DCMED411N DEWALT
English (original instructions) 20
www.2helpU.com/DoC/or www.2helpU.com/DoC/index/xxx*
*For direct access, replace "xxx" with the product's model number given on the product rating label or packaging.
- Instruction Manual
Declaration of Conformity (DoC)
Product Emission Data (PED): Information about Noise, Vibration and Dust (not applicable for all products)

WARNING: Read all safety warnings, instructions, illustrations, and specifications in this manual, including the battery and charger sections provided in an original tool manual or the separate Batteries and Chargers manual. Manuals can be obtained by contacting
Customer Service (refer to the back page of this manual).
Technical Data
DCMED411
Voltage V DC 54
Type 1
Battery type Li-Ion
Maximum speed/min 4800
Weight (without battery pack) kg 5.6
Definitions: Safety Guidelines
The definitions below describe the level of severity for each signal word. Please read the manual and pay attention to these symbols.
RANGER: Indicates an imminently hazardous situation which, if not avoided, will result in death or serious injury.
WARNING: Indicates a potentially hazardous situation which, if not avoided, could result in death or serious injury.
AUTION: Indicates a potentially hazardous situation which, if not avoided, may result in minor or moderate injury. NOTICE: Indicates a practice not related to personal injury which, if not avoided, may result in property damage.
Notes risk of electric shock.
Notes risk of fire.
GENERAL POWER TOOL SAFETY WARNINGS
WARNING: Read all safety warnings, instructions, illustrations and specifications provided with this power tool. Failure to follow all instructions listed below may result in electric shock, fire and/or serious injury.
SAVE ALL WARNING AND INSTRUCTIONS FOR FUTURE REFERENCE
The term "power tool" in the warnings refers to your mains-operated (corded) power tool or battery-operated (cordless) power tool.
1) Work Area Safety
a) Keep work area clean and well lit. Cluttered or dark areas invite accidents.
b) Do not operate power tools in explosive atmospheres, such as in the presence of flammable liquids, gases or dust. Power tools create sparks which may ignite the dust or fumes.
c) Keep children and bystanders away while operating a power tool. Distractions can cause you to lose control.
2) Electrical Safety
a) Power tool plugs must match the outlet. Never modify the plug in any way. Do not use any adapter plugs with earthed (grounded) power tools. Unmodified plugs and matching outlets will reduce risk of electric shock.
b) Avoid body contact with earthed or grounded surfaces, such as pipes, radiators, ranges and refrigerators. There is an increased risk of electric shock if your body is earthed or grounded.
c) Do not expose power tools to rain or wet conditions. Water entering a power tool will increase the risk of electric shock.
d) Do not abuse the cord. Never use the cord for carrying, pulling or unplugging the power tool. Keep cord away from heat, oil, sharp edges or moving parts. Damaged or entangled cords increase the risk of electric shock.
e) When operating a power tool outdoors, use an extension cord suitable for outdoor use. Use of a cord suitable for outdoor use reduces the risk of electric shock.
f) If operating a power tool in a damp location is unavoidable, use a residual current device (RCD) protected supply. Use of an RCD reduces the risk of electric shock.
3) Personal Safety
a) Stay alert, watch what you are doing and use common sense when operating a power tool. Do not use a power tool while you are tired or under the influence of drugs, alcohol or medication. A moment of inattention while operating power tools may result in serious personal injury.
b) Use personal protective equipment. Always wear eye protection. Protective equipment such as a dust mask, non-skid safety shoes, hard hat or hearing protection used for appropriate conditions will reduce personal injuries.
c) Prevent unintentional starting. Ensure the switch is in the off-position before connecting to power source and/or battery pack, picking up or carrying the tool. Carrying power tools with your finger on the switch or energising power tools that have the switch on invites accidents.
d) Remove any adjusting key or wrench before turning the power tool on. A wrench or a key left attached to a rotating part of the power tool may result in personal injury.
e) Do not overreach. Keep proper footing and balance at all times. This enables better control of the power tool in unexpected situations.
f) Dress properly. Do not wear loose clothing or jewellery. Keep your hair and clothing away from moving parts. Loose clothes, jewellery or long hair can be caught in moving parts.
g) If devices are provided for the connection of dust extraction and collection facilities, ensure these are
connected and properly used. Use of dust collection can reduce dust-related hazards.
h) Do not let familiarity gained from frequent use of tools allow you to become complacent and ignore tool safety principles. A careless action can cause severe injury within a fraction of a second.
4) Power Tool Use and Care
a) Do not force the power tool. Use the correct power tool for your application. The correct power tool will do the job better and safer at the rate for which it was designed.
b) Do not use the power tool if the switch does not turn it on and off. Any power tool that cannot be controlled with the switch is dangerous and must be repaired.
c) Disconnect the plug from the power source and/or remove the battery pack, if detachable, from the power tool before making any adjustments, changing accessories, or storing power tools. Such preventive safety measures reduce the risk of starting the power tool accidentally.
d) Store idle power tools out of the reach of children and do not allow persons unfamiliar with the power tool or these instructions to operate the power tool. Power tools are dangerous in the hands of untrained users.
e) Maintain power tools and accessories. Check for misalignment or binding of moving parts, breakage of parts and any other condition that may affect the power tool's operation. If damaged, have the power tool repaired before use. Many accidents are caused by poorly maintained power tools.
f) Keep cutting tools sharp and clean. Properly maintained cutting tools with sharp cutting edges are less likely to bind and are easier to control.
g) Use the power tool, accessories and tool bits, etc. in accordance with these instructions, taking into account the working conditions and the work to be performed. Use of the power tool for operations different from those intended could result in a hazardous situation.
h) Keep handles and grasping surfaces dry, clean and free from oil and grease. Slippery handles and grasping surfaces do not allow for safe handling and control of the tool in unexpected situations.
5) Battery Tool Use and Care
a) Recharge only with the charger specified by the manufacturer. A charger that is suitable for one type of battery pack may create a risk of fire when used with another battery pack.
b) Use power tools only with specifically designated battery packs. Use of any other battery packs may create a risk of injury and fire.
c) When battery pack is not in use, keep it away from other metal objects, like paper clips, coins, keys, nails, screws or other small metal objects, that can make a connection from one terminal to another. Shorting the battery terminals together may cause burns or a fire.
d) Under abusive conditions, liquid may be ejected from the battery; avoid contact. If contact accidentally occurs, flush with water. If liquid contacts eyes, additionally seek medical help. Liquid ejected from the battery may cause irritation or burns.
e) Do not use a battery pack or tool that is damaged or modified. Damaged or modified batteries may exhibit unpredictable behaviour resulting in fire, explosion or risk of injury.
f) Do not expose a battery pack or tool to fire or excessive temperature. Exposure to fire or temperature above 130^ may cause explosion.
g) Follow all charging instructions and do not charge the battery pack or tool outside the temperature range specified in the instructions. Charging improperly or at temperatures outside the specified range may damage the battery and increase the risk of fire.
6) Service
a) Have your power tool serviced by a qualified repair person using only identical replacement parts. This will ensure that the safety of the power tool is maintained.
b) Never service damaged battery packs. Service of battery packs should only be performed by the manufacturer or authorised service providers.
Edger SafetyWarnings
a) Do not use the machine in bad weather conditions, especially when there is a risk of lightning. This decreases the risk of being struck by lightning.
b) Thoroughly inspect the area for wildlife where the machine is to be used. Wildlife may be injured by the machine during operation.
c) Thoroughly inspect the area where the machine is to be used and remove all stones, sticks, wires, bones, and other foreign objects. Thrown objects can cause personal injury.
d) Before using the machine, always visually inspect to see that the cutter or blade and the cutter or blade assembly are not damaged. Damaged parts increase the risk of injury.
e) Follow instructions for changing accessories. Improperly tightened blade securing nuts or bolts may either damage the blade or result in it becoming detached.
f) Wear eye protection and ear protection. Adequate protective equipment will reduce personal injury.
g) While operating the machine, always wear safety footwear. Do not operate the machine when barefoot or wearing open sandals. This reduces the chance of injury to the feet from contact with the moving blade.
h) While operating the machine, always wear long trousers. Exposed skin increases the likelihood of injury from thrown objects.
i) Keep bystanders away while operating the machine. Thrown debris can result in serious personal injury.
j) Always use two hands when operating the machine. Hold the machine with both hands to avoid loss of control.
k) Hold the machine by the insulated gripping surfaces only, because the cutting line or blade may contact hidden wiring. Cutting line or blades contacting a "live" wire may make exposed metal parts of the machine "live" and could give the operator an electric shock.
1) Always keep proper footing and operate the machine only when standing on the ground. Slippery or unstable surfaces may cause a loss of balance or control of the machine.
m) Keep all parts of the body away from the cutting line or blade when the machine is operating. Before you start the machine, make sure the cutting line or blade is not contacting anything. A moment of inattention while operating the machine may result in injury to yourself or others.
n) Maintain control of the machine and do not touch blades and other hazardous moving parts while they are still in motion. This reduces the risk of injury from moving parts.
o) Carry the machine with the machine switched off and away from your body. Proper handling of the machine will reduce the likelihood of accidental contact with the moving blade.
p) Only use replacement cutting lines, cutting heads and blades specified by the manufacturer. Incorrect replacement parts may increase the risk of breakage and injury.
q) The rated rotational speed of the blade must be at least equal to the maximum rotational speed marked on the machine. Blades running faster than their rated rotational speed can break and fly apart.
r) When clearing jammed material or servicing the machine, make sure the switch is off and the battery pack is removed. Unexpected actuation of the machine while clearing jammed material or servicing may result in serious personal injury.
s) When clearing jammed material or servicing the machine, make sure the switch is off and the lock-off is in the locked position. Unexpected actuation of the machine while clearing jammed material or servicing may result in serious personal injury.
IMPORTANT SAFETY INSTRUCTIONS
WARNING: To reduce risk of injury:
- Before any use, be sure everyone using this unit reads and understands all safety instructions and other information contained in this manual.
- Save these instructions and review frequently.
WARNING: When using electric gardening appliances, basic safety precautions should always be followed to reduce risk of fire, electric shock, and personal injury, including the following.
- Avoid Dangerous Environment - Don't use appliances in damp or wet locations.
- Don't Use In Rain.
- Keep Children Away - All visitors should be kept at a distance from work area.
- Dress Properly - Do not wear loose clothing or jewelry. They can be caught in moving parts. Use of rubber gloves and substantial footwear is recommended when working outdoors. Wear protective hair covering to contain long hair.
- Use Safety Glasses - Always use face or dust mask if operation is dusty.
- Use Right Appliance - Do not use appliance for any job except that for which it is intended.
- Don't grasp the exposed cutting blades or cutting edges when picking up or holding the appliance.
- Don't Force Appliance - It will do the job better and with less likelihood of a risk of injury at the rate for which it was designed.
- Don't Overreach - Keep proper footing and balance at all times.
- Stay Alert - Watch what you are doing. Use common sense. Do not operate appliance when you are tired.
- Disconnect Appliance - Remove the battery when not in use, before servicing, when changing accessories such as blades, and the like.
-
Store Idle Appliances Indoors - When not in use, appliances should be stored indoors in dry, and high or locked-up place - out of reach of children.
-
Maintain Appliance With Care - Keep cutting edge sharp and clean for best performance and to reduce the risk of injury. Follow instructions for lubricating and changing accessories. Inspect appliance power source periodically, and if damaged, have it repaired by an authorized service facility. Keep handles dry, clean, and free from oil and grease.
- Check Damaged Parts - Before further use of the appliance, a guard or other part that is damaged should be carefully checked to determine that it will operate properly and perform its intended function. Check for alignment of moving parts, binding of moving parts, breakage of parts, mounting, and any other condition that may affect its operation. A guard or other part that is damaged should be properly repaired or replaced by an authorized service center unless indicated elsewhere in this manual.
SAVE THESE INSTRUCTIONS
Additional SafetyWarnings
WARNING: To reduce the risk of rebound (ricochet) injury, work going away from any nearby solid object such as wall, steps, large stone, tree, etc.
- GUARDING - Do not use this appliance if the gear case guard is damaged. For greater coverage and to reduce the possibility of projectiles, install the included extended coverage guard.
- FLAP - Do not use this appliance without the flap attached and in good working order.
- BLADE - Keep blade area clean.
- KEEP FACE, HANDS AND FEET CLEAR OF CUTTING AREA AT ALL TIMES. The rotating blade performs a cutting function use care when edging around screens and desirable plantings.
- KEEP ALL BYSTANDERS AWAY - at a safe distance from work area, especially children. MAKE SURE that other persons and pets are at least 100^ (30 m) away.
- WHEN USING THE EDGER - stones, pieces of metal and other objects can be thrown out at high speed by the line. The appliance and guard are designed to reduce the danger. To reduce the risk of rebound (ricochet) injury, work going away from any nearby solid object such as wall, steps, large stone, tree, etc.
BEFORE LANDSCAPING OR TRENCHING, check for buried electrical cables. - USE GREAT CARE when working close to solid objects and where necessary, do trimming by hand.
- DAMAGE TO UNIT - If you strike or become entangled with a foreign/hard object, or if there appears to be excessive vibration. Stop appliance immediately, remove the battery, check for damage and have any damage repaired before further operation is attempted.
- DO NOT OPERATE portable electric appliances in gaseous or explosive atmospheres. Motors in these appliances normally spark, and the sparks might ignite fumes.
- STAY ALERT - Do not operate this unit when you are tired, ill, or under the influence of alcohol, drugs, or medication.
DO NOT immerse appliance in water or squirt it with a hose. - DO NOT allow any liquid to get inside it. If appliance does get wet, allow to dry for a minimum of 48 hours.
DO NOT clean with a pressure washer.
DO NOT store the appliance on or adjacent to fertilizers or chemicals.
DO NOT charge appliance in rain, or in wet locations. -
REPLACEMENT PARTS: When servicing use only identical replacement parts.
-
Ensure the strap latch is locked in position before using the shoulder strap.
- Keep any ventilation openings clear of debris.
- Clean the tool and preform any maintenance before storing.
- Do not simultaneously wear multiple belt harnesses or multiple shoulder harnesses.
- When wearing a harness, be sure no other wearable interferes with the release and removal of the harness.
Residual Risks
In spite of the application of the relevant safety regulations and the implementation of safety devices, certain residual risks cannot be avoided. These are:
Impairment of hearing.
- Risk of personal injury due to flying particles.
- Risk of burns due to accessories becoming hot during operation.
- Risk of personal injury due to prolonged use.
SAVE THESE INSTRUCTIONS
Battery Type
These battery packs may be used:
| Battery(kg) |
| DCB5461.08 |
| DCB547/G1.46 |
| DCB5481.46 |
| DCB5492.12 |
Refer to the battery/charger manual for more information.
The following chargers can be used: DCB094K, DCB116, DCB117.
Markings on Tool
The following pictograms are shown on the tool or the accessories:


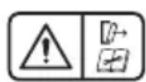
Read instruction manual before use.
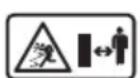
Ensure the distance from main handle to auxiliary handle is further than 9.8'' (250 mm).
Always wear head, hearing and eye protection.
Wear protective footwear.
Do not expose the tool to rain or high humidity or leave outdoors while it is raining.
WARNING: Electric shock or cutting hazard. Disconnect battery before maintenance.
WARNING: Hazard caused by ejected parts. Beware of thrown objects - keep bystanders away.
Date Code Position (Fig. A)
The production date code 25 consists of a 4-digit year followed by a 2-digit week and is extended by a 2-digit factory code.
Description (Fig. A)
WARNING: Never modify the power tool or any part of it.
Damage or personal injury could result.
Variable speed trigger
2 Lock-off lever
3 Main handle
4 Speed control button/Wake-up button
5 Battery state of charge LED
6 Overload indicator LED
7 Speed settings LEDs
8 Auxiliary handle
9 Pole
10 Strap mount
11 Wheel
12 Cut depth knob
13 Blade
14 Gear case
15 Gear case guard
16 Extended coverage guard
17 Guard screws
18 Locking rod
19 Single shoulder strap
20 Wrench
21 Flap
22 Battery housing
23 Battery pack
24 Battery release button
25 Date code
Included in some packages.
nOtE: Check for damage to the tool, parts or accessories which may have occurred during transport.
Intended Use
The DEWALT DCMED411 edger has been designed for the purpose of professional lawn and garden maintenance. It is recommended for use with DEWALT accessories.
DO nOt use this appliance for any job except that for which it is intended.
DO nOt use under wet conditions or in the presence of flammable liquids or gases.
DO nOt let children come into contact with the tool. Supervision is required when inexperienced operators use this tool.
ASSEMBLY AND ADJUSTMENTS
WARNING: To reduce the risk of serious personal injury, turn tool off and disconnect battery pack before making any adjustments or removing/installing attachments or accessories. An accidental start-up can cause injury.
WARNING: Use only DEWALT batteries and chargers.
WARNING: Avoid storing or using the tool and battery pack in environments where temperatures may drop below 4^ (39.2^) or rise above 40^ (104^) . This includes areas like outdoor sheds or metal buildings during extreme weather conditions.
Inserting and Removing the Battery Pack from the Tool (Fig. B)
nOtE: Make sure your battery pack 23 is fully charged.
To Install the Battery Pack into the Tool Handle
- Align the battery pack with the rails inside the tool's handle (Fig.B).
- Slide it into the handle until the battery pack is firmly seated in the tool and ensure that you hear the lock snap into place.
To Remove the Battery Pack from the Tool
- Press the battery release button 24 and firmly pull the battery pack out of the tool handle.
- Insert battery pack into the charger.
State of Charge Indicator (Fig. A, C)
The DCMED411 is equipped with a state of charge indicator. This will display the current level of charge in the battery during use. It does not indicate tool functionality and is subject to variation based on product components, temperature and end-user application.
The state of charge indicator LEDs will illuminate, indicating the percent of charge in the battery.
- When all four state of charge indicator LEDs 5 illuminate, the battery is fully charged.
- When one state of charge indicator LEDs 5 illuminates, charge is low and then it will flash when the battery is discharged. Remove the battery and charge it.
State of Charge Indicator LED Status
| LEVEL OF CHARGE | CHARGE INDICATOR LED COLOR | |
| 100% - 75% White | ||
| 50% - 75% White | ||
| 20% - 50% White | ||
| ≤20% White | ||
| Low battery shutdown White and blinking. | ||
| Battery too hot All four, red and blinking. |
Overloaded Battery Warning (Fig. A, C)
All four state of charge indicator LEDs will illuminate red and then blink when the battery has reached a high temperature. To clear the overloaded battery warning, allow the battery to cool down then restart the trimmer and begin cutting again, this time with less force. Allow the trimmer to cut at its own pace.
Overload LED (Fig. A, C)
The DCMED411 has an overload LED 6. The overload LED 6 will illuminate amber and then blink when the motor or module is overloaded during operation. To clear the overload LED 6, restart the DCMED411 and begin working again, this time with less force. Allow the DCMED411 to work at its own pace.
The overload LED 6 will illuminate red and then blink when the module has reached a high temperature. To clear the overload LED 6, allow the DCMED411 to cool down then restart the DCMED411 and begin working again, this time with less force. Allow the DCMED411 to work at its own pace.
Attaching the Auxiliary Handle (Fig. A, D)
WARNING: The auxiliary handle 8 needs to be installed no closer than 9.8'' (250 mm) away from the main handle. Follow the below diagram to calculate where to install the auxiliary handle 8:
a. Main handle height.
b.Blade circle.
c. Flat and level surface.
d. Distance between auxiliary handle and main handle.
e. Distance between auxiliary handle and cutting edge circle.
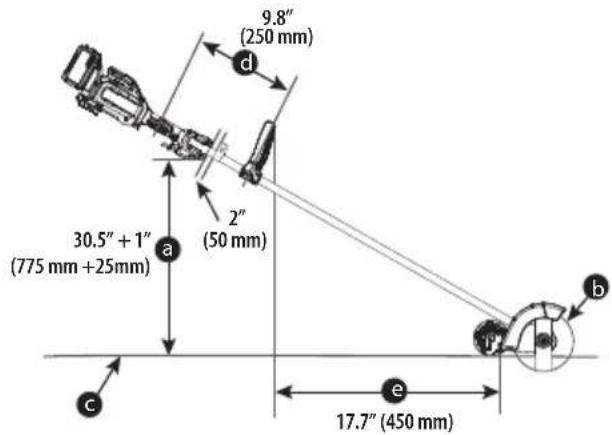
- Place the auxiliary handle 8 on top of the handle base 27 so the pole 9 is between them. Hold the auxiliary handle in place and slide the handle bolts 28 and washers 29 into the handle from the top, threading them into the nuts 30 on the handle base.
- Tighten the handle bolts with a 3mm hex wrench (not supplied). Ensure the handle is securely attached.
- Repeat for the other side of the auxiliary handle.
Attaching and Adjusting the Shoulder Strap (Fig. E, I)
WARNING: The shoulder strap should only be slung over one shoulder and not across the body. See Fig. 1.
A shoulder strap 19 is recommended for any tool with a total weight exceeding 6kg (13 lbs.). (Total weight includes the tool, attachment, and battery.) Attach the strap to the tool as shown in Fig. E and adjust for proper balance and support.
- Snap the shoulder strap latch 31 onto the strap mount 10 located on the pole 9, just in front of the on/off trigger as shown in Fig. E.
- Adjust the shoulder strap 19 so it fits over your shoulder and provides proper balance and support.
Blade (Fig. F, G)
WARNING: To reduce the risk of serious personal injury, turn unit off and remove the battery pack before making any adjustments or removing/installing attachments or accessories, or prior to cleaning. An accidental start-up can cause injury.
WARNING: Wait for blade to come to a complete stop. The blade 13, spacer 32 and a hex head nut 33 should be attached to your edger in the order shown. Please check that the blade has been properly mounted before using your edger. The edger blade has two wear indicators that show when blade needs to be replaced.
nOtE: To increase blade life, keep initial cutting depth at minimum and increase depth setting as blade wears.
Blade Replacement
WARNING: Use gloves and proper eye protection. Turn the edge on its side. Be careful of sharp edges of blade.
WARNING: Blade rotates momentarily after the switch is released.
- Remove battery.
- Remove edge attachment from the powerhead. Reverse the steps under Assembling the Edge Attachment to the Powerhead.
Removing the Cutting Blade (Fig. F)
- Align the shaft bushing hole 34 with the locking rod slot 35 and insert a locking rod 18 into the bushing hole as shown in Fig. F. Hold the locking rod in position.
- While holding the locking rod, remove the hex head nut 33 by turning it clockwise (left-hand threads) with the wrench 20 as shown in Fig. F.
- Remove the blade spacer 32 and the blade 13 as shown in Fig. F. Examine all pieces for damage and replace if necessary.
Installing the New Cutting Blade (Fig. G)
- Install new blade 13 on shoulder of the blade shaft bushing 36 as shown in Fig. G.
- Align the shaft bushing hole 34 with the locking rod slot 35 and insert a locking rod 18 into the bushing hole.
- Hold the locking rod in position.
- Install the blade spacer 32 on the blade so that the wide flat side faces the blade.
- Install hex head nut 33 with the flange against the blade spacer and securely tighten with the wrench 20.
- Tighten the nut counterclockwise (left-hand threads) against the blade while holding the locking rod:
- If using a torque wrench and a socket tighten to: 12-18 Nm, 106-160 in-lb, 9-13 ft-lb.
- Without a torque wrench, use the wrench 20 to turn the nut until the blade retainer is snug against the shaft bushing. Ensure that the blade is installed correctly, then rotate the nut an additional 1/4 to 1/2 turn counterclockwise.
- Remove the locking rod from the locking rod slot.
Cut Depth Adjustment (Fig. A, H)
WARNING: To reduce the risk of serious personal injury, turn unit off and remove the battery pack before making any adjustments or removing/installing attachments or accessories, or prior to cleaning. An accidental start-up can cause injury.
The front wheel can be adjusted to allow a deeper or shallower cut, and to increase the life of the blade.
- Wait for blade to come to complete stop.
- Remove battery.
- Loosen the cut depth knob 12
- Slide the wheel up or down to the desired height.
nOtE: Lowering the wheel will decrease the cutting depth. Raising the wheel will increase the cutting depth. The recommend depth for edging is 1.4'' (3.5 cm).
nOtE: Thick overgrowth may drag on the guard. Reduce the cut depth to the minimum to help reduce this effect.
5. Tighten knob firmly.
OPERATION
WARNING: To reduce the risk of serious personal injury, turn unit off and remove the battery pack before making any adjustments or removing/installing attachments or accessories, when replacing line, or prior to cleaning. An accidental start-up can cause injury.
Proper Hand Position (Fig. J)
WARNING: To reduce the risk of serious personal injury, ALWAYS use proper hand position as shown.
WARNING: To reduce the risk of serious personal injury, ALWAYS hold securely in anticipation of a sudden reaction.
WARNING: Hold the tool using only the designated gripping surfaces: The powerhead handle and the auxiliary handle.
WARNING: Do not use the pole as a gripping surface.
Proper hand position requires one hand on the main handle 3 and one hand on the auxiliary handle 8.
Switching On (Fig. C, K)
WARNING: Grip tool firmly when switching on.
AUTION: Always wear safety glasses and hearing protection. Wear a filter mask if the operation is dusty. Always wear gloves, long pants and substantial closed toe footwear. Keep long hair and loose clothing away from openings and moving parts.
- The speed control button/wake-up button 4 must be pressed before use to wake up the appliance.
nOtE: The appliance will enter sleep mode after sixty seconds of inactivity. The appliance can also be forced into sleep mode by pressing and holding the speed control button/wake-up button 4 for two seconds. - To turn the appliance on, push the lock-off lever 2 forward, and then squeeze the variable speed trigger switch 1 as shown in Fig. K.
- To turn the appliance off, release the variable speed trigger switch and lock-off lever.
WARNING: Never attempt to lock the trigger switch in the on position.
Adjusting Motor Speed (Fig. C)
The DCMED411 is equipped with a speed indicator 7. The speed indicator 7 will display the chosen speed. There are three speed setting LEDs, ECO mode 40, standard mode 41 and turbo mode 42. The speed indicator 7 helps you to optimize the appliance's performance and runtime needed for each job.
- The speed control button/wake-up button 4 must be pressed before use to wake up the appliance.
nOtE: The tool defaults to ECO mode 40. - Press the speed control button/wake-up button 4, located on the appliance handle, until the desired speed LED is illuminated.
nOtE: Operate in ECO mode 40 or standard mode 41 for larger projects that require more runtime to complete. - Choose turbo mode 42 as needed to cut through heavier growth and for applications that need higher RPM.
nOtE: Runtime will be reduced.
Speed Setting LED Colors
| SPEED SPEED SETTING LED COLOR | ||
| -40 | ECO Mode White | |
| -41 | Standard Mode | White |
| -42 | Turbo Mode White | |
Usage
WARNING: Objects such as stones can be ejected from the edge. Make sure there are no objects in front of the edge that can be damaged by a flying object during operation.
- Set cut depth at 1.4^ (3.5 cm) and set edge guide to the down position, refer to Assembly and Adjustments instructions.
- Before starting the edger, line up the tool so the edge guide rests against the edge of the paved surface. The wheel should be on the paved surface when edging.
NOTE: When there is heavy overgrowth of grass over the paved surface it may drag on the guard. An initial cut may be required with the edgeger on the grass side. This will require lifting up the edge guide and may require reducing the depth of cut (refer to To Change Position of the Edge Guide instructions).
- To avoid kickback of edger, tilt the handle down so the blade is above the ground.
- Turn switch ON and allow blade to spin without moving tool.
-
Slowly lift the handle to lower the blade, finding the edge of the paved surface and start edging. Then move the tool forward slowly along edge of paved surface, keeping the edge guide pressed lightly against the pavement edge.
-
For the first edging each season, it is best to move forward slowly because grass is thickest then. Subsequent edging will be completed more rapidly. If the tool slows down, back it up until the blade comes up to normal speed. During edging some sparks may be generated from hitting stones. This is normal. Do not attempt to edge when the grass or soil is wet or moist—for electrical safety and to prevent clogging of the blade chamber. If you must edge under conditions that cause the blade chamber to become clogged, release trigger, wait for blade to come to complete stop. Remove battery pack and remove clogged material with a stick. To continue to operate the tool in a clogged condition will seriously overload the motor.
AUTION: Do not attempt to unclog the blade chamber by dropping or tapping the tool on the ground. This can damage the unit. Keep hands clear of edge guide and blade when cleaning as these wear to a very sharp point during edging.
Landscaping/Trenching
WARNING: Before landscaping or trenching, inspect and ensure there are no exposed or buried cables, pipes or other objects that may create a hazard or interfere with operating the edgeger. Set depth to only that required for the job. Do not overload.
If tool slows, pull back slightly and wait until blade comes up to normal speed.
Storage
ANGER: Remove the battery. Wait for blade to come to complete stop.
Remove and clean any debris from the outside of the edger and inside of guard before storage. Refer to MAINTENANCE section. If necessary, the edger may be stored by hanging on a hook by its handle.
AAUTION: Do not hang edge on the switch trigger. NOTICE: Do not store the tool on or adjacent to fertilizers or chemicals. Such storage can cause rapid corrosion.
Preventing Corrosion
Fertilizers and other garden chemicals contain agents that greatly accelerate the corrosion of metals. If you use the tool in areas where fertilizers or chemicals have been used, the tool should be cleaned immediately afterwards. Wipe all exposed parts with a damp cloth. You may lubricate only metal parts with a light petroleum based oil.
When cleaning, DO NOT immerse tool in water or squirt it with a hose.
MAINTENANCE
Your power tool has been designed to operate over a long period of time with a minimum of maintenance. Continuous satisfactory operation depends upon proper tool care and regular cleaning.
WARNING: To reduce the risk of serious personal injury, turn tool off and disconnect battery pack before making any adjustments or removing/installing attachments or accessories. An accidental start-up can cause injury.
The charger and battery pack are not serviceable.
Please refer to the back page of this manual for service centre contact information, or visit www.2helpU.com.
The blade 13 is not serviceable. DO NOT sharpen the blade 13. Have maintenance of the blade 13 performed by authorised service centre.
Please refer to the back page of this manual for service centre contact information, or visit www.2helpU.com.
Applying Grease (Fig. L)
The DCMED411 edgeer needs to be greased after every 50 hours of use.
- Apply a small amount (3-5 grams) of DEWALT 30301914 grease 37 into the motor grease zerk 38 as shown in Fig. L.
Cleaning
WARNING: Electrical shock and mechanical hazard. Disconnect the plug from the power source and/or remove the battery pack, if detachable, from the product before cleaning.
WARNING: To ensure safe and efficient operation, always keep the product and the ventilation slots (if applicable) clean. Ventilation slots can be cleaned using a dry, soft non-metallic brush and/or a suitable vacuum cleaner. Do not use water or any cleaning solutions.
WARNING: Blow dirt and dust out of the main housing with dry air as often as dirt is seen collecting in and around the ventilation slots. Wear approved eye protection and approved dust mask when performing this procedure.
WARNING: Never use solvents or other harsh chemicals for cleaning the non-metallic parts of the product. These chemicals may weaken the materials used in these parts. Use a cloth dampened only with water and mild soap. Never let any liquid get inside the product. Never immerse any part of the product into a liquid.
- Stop the machine, wait until the blade stops, disconnect the battery pack, and then use a suitable tool to clear blockages of the cutting accessory or cutting head.
Optional Accessories
WARNING: Since accessories, other than those offered by DEWALT, have not been tested with this product, use of such accessories with this tool could be hazardous. To reduce the risk of injury, only DEWALT-recommended accessories should be used with this product.
Consult your dealer for further information on the appropriate accessories.
Installing the Extended Coverage Guard (Fig. A, M)
NOTE: The gear case guard 15 that is part of the gear case 14 complies with the applicable standards for edgers. For greater coverage to reduce the possibility of projectiles install the extended coverage guard 16.
- Align the extended coverage guard 16 with the gear case guard 15 as shown in Fig. M.
- Install the three guard screws 17 and tighten them using a 4mm hex wrench (not supplied).
Protecting the Environment
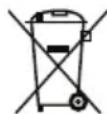


Products/batteries are recyclable, but if marked with the crossed-out bin, they must not be disposed of with normal household waste.
Run the batteries down completely and separate them, and separate any light sources from the product if possible. It is the user's responsibility to delete personal data from the product. Then take the waste to an official waste collection centre or a participating retailer who will often accept it free of charge. Packaging should be discarded based on the marked material code. Operating and safety instructions should only be discarded once the applicable product is no longer in use.
Please check with your local community/municipality for waste management guidance. For further information, visit www.2helpU.com and scan the above QR code.
RECORTADA DE BORDES DE EJE RECTO
DCMED411
www.2helpU.com/DoC/or www.2helpU.com/DoC/index/xxx*
www.2helpU.com/DoC/ of www.2helpU.com/DoC/index/xxx*
WAARSCHUWING: Lees alle
BEWAAR ALLE WAARSCHUWINGEN INSTRUCTIES ALS TOEKOMSTIG REFERENTIEMATERIALAAL
www.2helpU.com/DoC/or www.2helpU.com/DoC/index/xxx*
*For direkt atkomst, ersatt "xxx" med Produkten modellnummer som anges på Produkten markskylt eller forpackning.
DÜZ SAFT KENAR KESME MAKINESI
DCMED411
www.2helpU.com/DoC/ veya www.2helpU.com/DoC/index/xxx*
Oo8nIawvE KIVduVIO npKayiac.