
NeoFlow SVC259441NFGO - Vacuum Cleaner GORENJE - Free user manual and instructions
Find the device manual for free NeoFlow SVC259441NFGO GORENJE in PDF.
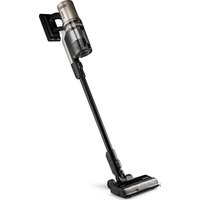


| Product type | Cordless vacuum cleaner |
| Brand | Gorenje |
| Model | NeoFlow SVC259441NFGO |
| Power supply | Rechargeable battery with mains adapter |
| Battery type | Lithium-ion (removable) |
| Dust container capacity | Approx. 0.5 L |
| Main filter | Washable with lukewarm water |
| Outlet filter | Non-washable, replace every 6 months |
| Power modes | ECO (economy), AUTO (adaptive), BOOST (max) |
| Display | Digital: charge level, remaining runtime, full container indicator |
| Included accessories | Motorized floor brush, 2-in-1 brush, crevice tool, small motorized brush for textiles, flexible hose, wall mount, adapter |
| Usage | Domestic, dry indoor only |
| Safety | Automatic shutdown in case of blockage, do not vacuum liquids |
| Maintenance | Regular emptying of container, cleaning of filter and brushes |
| Warranty | 2 years (battery warranty 12 months) |
| Net weight | Approx. 2.5 kg |
| Noise level | Approx. 75 dB(A) |
Frequently Asked Questions - NeoFlow SVC259441NFGO GORENJE
User questions about NeoFlow SVC259441NFGO GORENJE
0 question about this device. Answer the ones you know or ask your own.
Ask a new question about this device
Download the instructions for your Vacuum Cleaner in PDF format for free! Find your manual NeoFlow SVC259441NFGO - GORENJE and take your electronic device back in hand. On this page are published all the documents necessary for the use of your device. NeoFlow SVC259441NFGO by GORENJE.
USER MANUAL NeoFlow SVC259441NFGO GORENJE
DA Brugsanvisning. 78
NO Bruksanvisning 82
SV Bruksanvisning. 86
SQ Manual udhëzues. 90
When using the vacuum cleaner always observe the following basic safety precautions: Carefully read this instruction manual and only use the appliance in accordance with the instructions herein. Before using the appliance for the first time, remove all protective film or plastics. // Never leave the appliance unattended during use. // Before using the appliance, carefully assemble all of its parts. // Only use the appliance indoors and in dry areas. // Only use the appliance with the parts recommended by the manufacturer. // Do not use the appliance if it has been dropped, if it is damaged, if it has been kept outdoors, or if it has been dropped or immersed in a liquid. // Regular cleaning can extend the appliance's useful life. // Make sure your hair, loose parts of your garments, fingers or other parts of the body do not come into contact with the vents or moving parts of the appliance. // The appliance complies with all required standards regarding electricity, and radio interference regulations. // The appliance is not intended to be used by children and persons with impaired physical or mental abilities. This appliance may be used by children aged 8 years and more, and by persons with reduced physical, sensory or mental capabilities or lack of experience and knowledge, if they are supervised during the use of the appliance or if they have been provided relevant instructions regarding the use of the appliance in a safe way, and they understand the hazards involved. Keep children under supervision while they are using the appliance and make sure they do not play with it. // Children should not perform any cleaning or maintenance tasks on the appliance, unless they are older than 8 years, and they do so under supervision. // Switch off the appliance after use.
Danger
Do not immerse the main unit/appliance housing or the charging base in water or any other liquid and do not rinse them under running water.
Special warnings
Before connecting the appliance or the charging base with the power cord to the power mains, make sure the indicated voltage matches the voltage of the power mains in your home. // Do not use a damaged vacuum cleaner or a damaged charging base (or adapter - depending on your vacuum cleaner model). // If the charging base (or adapter) is damaged, replace it only with an original spare part in order to avoid danger. // A transformer is integrated into the adapter. Removal and replacement of adapter with another one are not allowed as this may lead to a dangerous situation. // Only charge the vacuum cleaner with the supplied adapter and charging base. The adapter may heat up during charging. This is a normal occurrence. (Depending on your model, if it has an adapter.) // Switch off the appliance during charging. // Never use the vacuum cleaner without filters or filtering unit in place. // The exhaust vents may not be blocked during vacuum cleaning. // Only use the appliance for household purposes and indoors. // Keep the suction vents clean and free in order to ensure optimum and unimpeded suction power of the appliance. It is highly recommended to regularly clean the open parts of the suction hose, and to remove dust, hair, or anything else that may block the airflow. // Before cleaning the support or the charging base, unplug it from the power socket. // Never use the vacuum cleaner to clean up embers or filings, cigarette butts, matches, liquids (e.g. water, carpet cleaning foam), or sharp or pointed objects (broken glass
etc.). // Keep the suction tube or the open part of the appliance away from your face and body. // Never use the appliance to vacuum construction material (such as fine sand, lime, cement powder, toner dust etc.). This can cause damage to the appliance.
Problems and solutions
| Problem | Possible reason | Solution |
| Not working. | The battery is dead. The handy VC is not assembled correctly. | Charge. Assemble the handy VC correctly. |
| Suction power has decreased. | The dust cup is full. Block in filter. Block in the air inlet tunnel or on the roller of electrical brush. | Pour out the dust. Clean or change filter. Clean the electrical brush. |
| The VC is not charging. | The charger is not connected on socket. The connector of charger is not connected to the hole of base body. The handy VC is not assembled to the body. | Connect the charger on socket. Connect the charger with base body of VC. Assemble the handy VC on body. |
| Use very short time after charging. | Not enough charging time. The battery is aging. | Charge according to instruction. Change the battery. |
Environment
Do not throw away the appliance with the normal household waste at the end of its life. Hand it in at an official collection point for recycling. By doing this, you help to preserve the environment.
This appliance is marked according to the European directive 2012/19/EU on Waste Electrical and Electronic Equipment (WEEE). This guideline is the frame of a European-wide validity of return and recycling on Waste Electrical and Electronic Equipment.
Guarantee & service
If you need information or if you have a problem, please contact the Gorenje Customer Care Centre in your country (the phone number is in the worldwide guarantee leaflet). If there is no Customer Care Centre in your country, go to your local Gorenje dealer or contact the Service department of Gorenje domestic appliances.
Note: The warranty on the battery of vacuum cleaner is 12 months.
For personal use only!
For easier transport, some appliance parts are separately and securely placed in the main packaging unit. // Before first use, read and follow the assembly and safety instructions. // The appliance is intended for dry vacuuming in a home environment and for household use.

PARTS
1 Housing with motor 2 Battery 3 Vacuum hose 4 Motorised floor brush for vacuuming all surfaces 5 2-in-1 brush 6 Narrow nozzle 7 Wall bracket 8 Battery charging adapter 9 Motorised brush for textile surfaces

ASSEMBLY
If the vacuum cleaner's battery is not yet installed in the housing, insert it properly. To do so, follow the illustrated instructions in the battery section. Connect the upper part of the hose to the motor unit, and the lower part to the floor brush. The installation is correct when the appliance is secured in the slots (it clicks into place at all settings). Due to its sensitivity, we recommend not leaving the appliance without supporting it against something. The latch on the brush allows for a short-term freestanding installation, but it is necessary to be extremely careful, as the vacuum cleaner can fall and be damaged at any moment.

USE
The vacuum cleaner is not intended for vacuuming liquids, glass, ashes, fire, or sharp objects, which could all damage the appliance. Each included attachment is intended for different uses. The attachments provide versatility in the cleaning of your home.
The motorised floor brush is used for vacuuming all types of floor surfaces (vacuuming dry floors). Avoid carpets with long fibres, as they can get tangled in the brush roller and damage the vacuum cleaner. The brush is adapted for both the handheld unit and the fixed hose. The roller is designed so that hair and other debris gathers towards the centre of the brush during vacuuming. This reduces the risk of the roller getting damaged. For even easier use and subsequent cleaning, a comb is added to the inner part of the brush, which collects long hair in real time and removes it from the brush. The 2-in-1 brush attachment with bristles (suitable for door and window frames, drawers, etc.). The smaller motorised brush is designed for cleaning textile surfaces. Flexible hose
Attach the flexible hose to the vacuum's motor unit. The hose can be stretched and used for various vacuuming purposes, making sure that the motor unit is safely placed when used so that it does not fall to the floor. Only certain attachments can be used with this hose.
CHARGING
The adapter for the vacuum cleaner charging cable is included in the pack. Charge the vacuum cleaner at least 1 metre away from any heat sources. The appliance cannot be switched on while charging. The vacuum cleaner can be charged on the wall bracket or independently. Follow the illustrated instructions for mounting the adapter in the wall bracket. Pull the front lower part out of the upper part. Insert the charging pin into the hole and insert the lower part of the bracket back. Mount the wall bracket high enough so that the vacuum cleaner has good contact with the adapter when charging. The vacuum cleaner can be charged on the handheld unit or independently of the vacuum cleaner. Press the button on the battery and pull it out of the handheld unit.
When the battery is charged, all the lights will be illuminated, and in the case of a digital display, the charge percentage is displayed with numbers. The lights are off when in use, and in the case of a digital display, the remaining charge is displayed as a percentage value (depending on the model you have purchased).
APPLIANCE DISPOSAL
If you want to replace the appliance or no longer need it, please also consider environmental protection.
Before disposing of the vacuum cleaner, the battery must be removed. For safe removal of the battery, ensure that the battery is completely discharged. If the appliance does not have a removable battery, please follow the instructions in the pictorial booklet. Follow the illustrated instructions to properly dispose of the battery.

OPERATION
The display shows various functions:
- By pressing the button on the left, you turn on and off the vacuum cleaner.
- By pressing the button on the right, you change the level of suction power.
- When selecting the power, the display shows the remaining vacuuming time before the battery runs out.
The vacuum cleaner has multiple selectable speeds:
ECO (battery-saving mode, maximum runtime on a single charge),
BOOST (short runtime on a single charge, highest suction power),
The AUTO function activates immediately after switching on the vacuum cleaner (the AUTO function allows the vacuum cleaner to adjust the speed and power of the vacuum cleaner depending on the floor or on the amount of dirt).
The appliance has a digital battery charge display. During use or while charging, it digitally displays the battery level. - Icon on the display indicating a full dust container. The full container icon lights up when the vacuum cleaner detects that there is no more airflow. When this icon lights up, the vacuum cleaner turns off to prevent damage to the appliance. Remove any foreign objects from the brush, hose, or container. After removing the foreign object, the light will no longer be illuminated when you switch the vacuum cleaner back on.
DUST CONTAINER AND FILTERS
Emptying the dust container and cleaning the inlet filter
Quick cleaning during vacuuming:
Remove the motor unit from the hose. By pressing the lower part of the dust container, you open the opening to empty the dust from it. This option is used when you notice that the dust container is full during vacuuming.
Removing the container from the vacuum cleaner's motor unit:
Remove the hose from the motor unit. To clean the dust container, press the button on the front of the dust container. First, lift the dust container at the part where the opening button is located. Pull the filter ring out of the container. Pull the handle on the filter to safely remove it from the ring. You can wipe, shake out, or rinse the container and filter ring with lukewarm water, but be careful, as improper handling may damage parts of the vacuum cleaner. Shake and gently brush the filter to remove all the dirt that has accumulated during vacuuming. The filter can be rinsed with lukewarm water and gently squeezed. The filter contains a microfilter and can be damaged if not used properly. Before reuse, it must be thoroughly dried (for at least 24 hours before using again). Before reassembling the dust container, check that all components are completely dry. Moist parts can cause damage to the vacuum cleaner. To install the internal components of the dust container, reassemble the vacuum cleaner in the reverse order used for disassembly. When fitting the dust container, make sure to first attach it at the lower part, where you will find a small connector for this purpose, and then secure it back onto the motor unit at an angle. It has been installed correctly when you hear a slight click. Never vacuum without the dust filter inserted.
Cleaning the outlet filter
Rotate the display anti-clockwise. When the display lid opens, be careful not to damage the display, as this will mean the vacuum cleaner will no longer work. Remove the filter from the internal part of the motor unit. The filter can be wiped or shaken out. Not suitable for washing. Ensure that all parts are completely dry before reinstalling the dust container on the appliance. To install the internal parts of the dust container, reassemble the vacuum cleaner. Never vacuum without the dust filter inserted. Follow the illustrated instructions for detailed instructions.
REPLACING THE FILTER
If you notice that the filter is damaged, replace it immediately. With regular use, it is recommended to replace the filter every 6 months to ensure the longest lifespan for the vacuum cleaner.
FLOOR BRUSH
On the back of the brush, there is a button that you press to pull the roller out of the brush. The roller is designed so that hair and other debris gathers towards the centre of the brush during vacuuming. This reduces the risk of the roller getting damaged. // Since most of the hair collects in the centre of the roller, it will be easier to clean. // Wipe the underside of the housing with a cloth. // Clean the brush's suction hose. // Tap the roller on the brush to loosen debris, and carefully cut away tangled dirt and hair using scissors along the designated groove. // Do not pull on hair or threads, as this could damage the bristles on the roller. // // Reinsert the roller into the brush. // The roller is correctly installed when you hear a soft click and the side pin is securely fastened to the brush housing.
SMALL MOTORISED BRUSH
On the side of the brush, there is a small button that you twist to release and slide the brush out of the slot. // Tap the roller on the brush to loosen any debris, and carefully cut away tangled dirt and hair that has accumulated on the brush using scissors. // Do not pull on hair or threads, as this could damage the bristles on the roller. // // Reinsert the roller into the brush. // The roller is correctly positioned when a slight click is heard. Then, turn the button to securely attach the roller to the brush housing.
TROUBLESHOOTING
| Common failure | Possible cause | Solutions |
| The vacuum doesn't work | Product has powered off or battery is low | Please charge the product before use |
| Product suction port is blocked | Cleaning product suction mouth | |
| Suction is too weak | Dust barrel & filter assembly is dusty/full | Clean the dustbin and filter material |
| Rolling brush is wrapped around the hair and other objects | Clean roller brush | |
| Tube has an obstruction | Carefully clean and check for blockages | |
| Different motor operation sound | The tube is partially blocked | Carefully clean and clear |
| Filter assembly is blocked | Thoroughly clean the filters | |
| Product can not be charged | Charger not properly connected | Please check connections |
| Mains supply is not switched on | Check the mains supply is switched on | |
| Situation remains | Check with a service centre | |
| E1 | Brush failure | Check with a service centre |
| E2 | Motor failure | Check with a service centre |
| E3 | Battery pack failure | Check if the battery pack is properly installed and reinstall it |
| E5 | Circuit board hardware failure | Check with a service centre |
General notes
Do not immerse the appliance, the charging base, or the power supply in water or any other liquid, and do not rinse them under water.
Special safety instructions
Before connecting the appliance to the charging base or the power supply, make sure that the indicated voltage matches the voltage of the power supply. // Do not use a damaged vacuum cleaner, a damaged charging base (or adapter - depending on the model). // If the charging base (or adapter) is damaged, replace it only with an original spare part to prevent hazards. // The adapter contains a transformer. It is not allowed to cut off the adapter and replace it with another one, as this may lead to a dangerous situation. // Charge the vacuum cleaner only with the adapter from the charging base or from the socket. The adapter may heat up during use. This is normal. (Depending on the model, if there is an adapter). // Unplug the device during charging. // Never use the vacuum cleaner if it is without a filter or if the filter is not in place. // The suction openings must not be blocked during operation of the device. // Use the device only for household purposes and in enclosed spaces. // Keep the suction openings clean to ensure optimal and unobstructed suction. It is strongly recommended to clean the openings regularly to remove dust, hair, and other debris.
MOrIIO Da 6bOKIPA Bb3dUxONOToka. // IpeDN Da NOuNCTBaTe CToKata NIN 3aPeXJaUaTa OCHOBA, IN3TeTneTe OT KOHTa. // HnKora He IN3NoJ3BaIte npaxOcMyKaUkata 3a Cb6InpaHe HA BbJIeHN, YrApKN, KInbPntEH NKeUKN, TeuHOCTN (BODa, PnHa OT IpEnapat 3a NouchTbaHe), INIIOCTPNpEIMETN (ChyNeHn CTbKNa n Dp.). // DpbXTe Tpb6aTa N OTkpNTaT a cact OT ypeDa DAJIeY OT BaIHTe NIIe N TAn. // He IN3NoJ3BaIte UpeDa 3a Cb6InpaHe Ha CToNTeJIHm MaTePnAII (PcBk, ZIMeHT, npax OT ToHEp n Dp.). TOBa MoKe Da NOBpeDn UpeDa.
PpO6IeMn nppeHnna
| ПюбLEM | Възможна ручина | Реценье |
| He paBOTи. | БаTERЯТа e ИЗTOSUЕнa. РьЧАТа прахOCуКачka He e сгЛоб�а правILnO. | ЗаpeDEte. СгЛобЕte рьчНа прахOCуКачka правILnO. |
| СилATA Na ВсмУКВанe e habаляla. | ТорБИЧКATA 3a пax e ПьЛнa. ФиNTьрьT e БлOKИран. БлOKИран e канДьT 3a ВхОДЯшь 3dДух иПи рОлььT Na eЛЕКТПУССКАТа YeТКa. | ОтстpanETe пaxa. ПочSTeTe иПсmehete ФиNTьрa. ПочSTeTe eЛЕКТПУССКАТa ЧETКa. |
| ПрахOCуКaчКATA не ce 3apexДа. | ЗарДНOTO устpoICTBO He e CBbP3aHOb С КонтAKТа Na eЛЕKТПУССКАТа МрExa. КонЕТOPьТ Na 3apЯДноTO устpoICTBO He e CBbP3aH C ИЗВODa Na 6a3aТа 3a 3apexДанe. РьЧНATA прахOCуКaчka He e ГロБенa с КорпуСa. | СВьржTe 3apЯДноTO устpoICTBO c КонТakTA Na eЛЕKТПУССКАТа МрExa. СВьржTe 3apЯДноTO устpoICTBO c Бa3aТа 3a 3apexДaHе Na прахOCуКaчКATA. СгЛobeTe рьчНа прахOCуКaчKa с КорпуСa. |
| РавOTи 3a MнOrO КратKO Bpeme спeД 3apexДaнeto. | Времeto 3a 3apexДaHе He e OCTaTbUHOb. Врeme. БаTERЯТa OCTAPЯВa. | СмeнeTeЯ с鞘peДиHCTpyKцИnte. ЗарeDEte 6aTeperiyA.To. |
OkoJHa cpeDa
He n3XbPnIe ypea c obuayHnTe DOMaKnHcN OTnaDbCn B Kpa Ha JxN3HeHMy CnKbl. IpeaIte roB cb6nPaTeHnKKT 3a peunKnPahe. PoTo3n NaUnH ige nomOrHeTe 3a ONa3BaHe Ha OKoJHaTa Cpea.
To3n ypei nMa MapKnpoBka cbrIaCHO Ebponecka dneKTHBa 2012/19/EU OTHoCHO n3XbprJHeTO Ha n3NoTBAHO eKeKtpnuecko n eKeKtpoHNO obOpudBaHe (WEEE). Ta3n MapKnpoBka npedctabnaBa o6o3NaueHne 3a BaIIndHocT BcraJa EbponaHa Bb3MOxHOCTTA 3a Bp7aHe n peuKnipaHe Ha n3NoTBAHO eKeKtpnuecko n eKeKtpoHNO obOpudBaHe.
TapaHua n cepBn3
Ako Imate Hjka ot DoIbHnITeHa HOpMaun Bb3HnKHe np6lem npu ynoTpe6aTa Ha ypea, MoJ, obpheTe ce KbM ueHTbpa 3a obcnykBaHe Ha KJIeHTn Ha Gorenje BbB BaWata cTpaHa (TelefoHHnT Homep e B rapaHOnHHaTa KNXKA 3a MeKdyHapOHa rapaHua Ha ypea). Ako BbB BaWata cTpaHa Hma YeHTbp 3a obcnykBaHe Ha KJIeHTn, OTudete npn MeCTHn IpeDcTabTeHa Gorenje nn Ce CbByxte Cbc CneuaHn3npaHna cepBn3 Ha DomaknHckn ypei Gorenje.
3a6eJekka: IapauHcIyTa 3a 6atepIyTa Ha npaxocMykaKkata e 12 MeceIa.
Camo 3a JnUHa yNoTppe6a!
C ueynechrahe Ha TpaHcnpotpaheto Hn Kaon yactn Ha ypea ca pa3noJoxhen B OCHOBnnaKet OTdEHHo No 6eOanen HauH. // Ppei npba ynotpeba npoyete n cpeBaTe IHCTpykunte 3a crnoBaahe n 6eOanachoct. // YpebTe npedHa3Hauhen 3a cyxo n3cmykbaHe n ynotpeba B domaHa cepda.

YACTN
1 Kopnyc c motop 2 BaTePnA 3 Tpbba Ha npaxocmykaKaata 4 MOTOpN3nPaHa YeTka 3a N3CMYKBaHE HA BCRAKaBn NOBbPxHOCTN 5 YeTka 2B1 6 Teceh hakpaHHK 7 CToiKa 3a cTeHa 8 AanTep 3a 3apexdahe Ha 6atepmaTa 9 MOTOpn3nPaHa YeTka 3a TEKCTINHH NOBbpxHOCTN

CTIO6BAHE
Ako batepnaHa npaxocmykaKata He e Buee nHCTanipana B KOpnyca, nocTabete r npabnHoo. 3a ceta cneBaIte uHIOCTpnpAHTE HNCTpykunB pa3dena 3a batepnaT. // Cbpxte Tropata Yact Ha Tpb6ata KbM MOTOPHg 6JOK nOJIHATA YACT KBM YETKA 3a NOID. IHCTanipaheto e npabuHHO, kORATO ypeBt E 3akpenen B XJNE6OBete (UpaKaBA Ha MCTO pnp BCNUH NACTOKN). // Iopadn HerOBaT aYBCNTBHeNHOCT npenopbUBAme ypeBt Da He Ce OCTABr 6e3 Da 6Be NoDpHn Ha Heo. // 3aKnHouBaUNr MEXAH3bM Ha YETKA TPOBIIBA KpATKOTPAHOCAMCToTeH OToE, Ho e Heo6xOIMOn N3KJIIOHTENHO BHINMAHHe, Tb KaTO npaxocmykaKATA MoKe Da NaHHe N da CE NOBpeDu BB BCEKN MOMENT.
The wall bracket must be mounted at a distance of no more than 1 meter from any flammable surface. // The kit includes a wall mounting adapter. // Follow the illustrated instructions for mounting the wall bracket. Remove the front part of the bracket. Insert the mounting screw into the hole and replace the front part of the bracket. // Mount the wall bracket sufficiently high so that the vacuum cleaner can make good contact with the adapter during charging. // Keep the main attachments on the designated hooks so that they are within reach when needed.

USE
The vacuum cleaner is not intended for vacuuming liquids, dust, sand, cement, or sharp objects - these can damage it. // The included attachment is intended for various surfaces. The attachment provides additional convenience for home use.
The motorized brush for floors is used for vacuuming all types of hard floors (vacuuming dry surfaces). Avoid vacuuming liquids, as they can get into the brush roller and damage the vacuum cleaner. The brush is suitable for both carpets and hard floors. // The roller is designed so that when vacuuming, hair and other fibers collect towards the center of the brush. This reduces the risk of damage to the roller. // For both functions, use the attachments as follows: to the inner part of the brush, a nozzle is added that collects dust and debris during the cleaning process. - The crevice nozzle is intended for vacuuming hard-to-reach places (corners, edges, gaps, spaces behind radiators, etc.). - The 2-in-1 brush with bristles (for cleaning doors and windows, upholstery, etc.). - The small motorized brush is intended for cleaning textile surfaces. - The brush mark
Attach the brush mark to the motor block. // The mark can be removed and used for different vacuum cleaner models, as long as the motor block is safely positioned during use, so that it does not fall to the floor. // Only original attachments can be used with the mark.

CHARGING
The charging adapter for the vacuum cleaner is included in the package. // Charge the vacuum cleaner at least 1 meter away from any flammable surface. // The device must not be switched on during charging. // The vacuum cleaner can be charged on the wall bracket or independently.
Follow the illustrated instructions for mounting the adapter on the wall bracket. // Remove the front part of the bracket. Insert the charging screw into the hole and replace the front part of the bracket. // Mount the wall bracket sufficiently high so that the vacuum cleaner can make good contact with the adapter during charging. // The vacuum cleaner can be charged on the wall bracket or independently. // Press the button on the battery and remove it from the wall bracket.
The battery charge indicator lights up when the device is charging, and in case of a fault, the charge indicator shows a fault. The indicator lights go out during use, and in case of a fault, the remaining charge is shown as a percentage (depending on the model you purchased).
BATTERY REMOVAL
If you need to replace the battery or no longer need it, please think about protecting the environment.
Before removing the battery, the battery must be removed. // With the battery completely removed, make sure it is fully discharged. If the device has a replaceable battery, please follow the instructions in the illustrated manual. // Follow the illustrated instructions to remove the battery in the correct way.

OPERATION
TROUBLESHOOTING
APPENDIX
MANUEL D'INSTRUCTIONS FR
- DANGER
- SPECIAL WARNINGS
- ENVIRONMENT
- GUARANTEE & SERVICE
- PARTS
- ASSEMBLY
- USE
- CHARGING
- APPLIANCE DISPOSAL
- OPERATION
- DUST CONTAINER AND FILTERS
- CLEANING THE OUTLET FILTER
- REPLACING THE FILTER
- FLOOR BRUSH
- SMALL MOTORISED BRUSH
- GENERAL NOTES
- SPECIAL SAFETY INSTRUCTIONS
- OKOJHA CPEDA
- TAPAHUA N CEPBN
- YACTN
- CTIO6BAHE
- BATTERY REMOVAL
- APPENDIX
- MANUEL D'INSTRUCTIONS FR
Brand : GORENJE
Model : NeoFlow SVC259441NFGO
Category : Vacuum Cleaner