
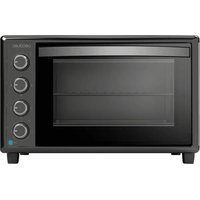
Rock’nGrill Smart - Oven CECOTEC - Free user manual and instructions
Find the device manual for free Rock’nGrill Smart CECOTEC in PDF.

| Product type | Electric contact grill |
| Reference | 03067 |
| Power | 2000 W |
| Voltage | 220-240 V ~ 50/60 Hz |
| Adjustable temperature | 150 °C to 230 °C (in 10 °C increments) |
| Automatic programs | Ribeye steak, Sausages, Fish, Sandwich, Hamburger |
| Contact grill function | Yes (simultaneous cooking on both sides) |
| Open grill function at 180° | Yes (horizontal position for cooking on two plates) |
| Removable plates | Yes, dishwasher safe |
| Drip tray | Yes, removable, hand washable |
| Indicator lights | Preheat, temperature, connection |
| Safety | Automatic shutdown in case of malfunction, safety lock |
| Plate material | Non-stick |
| Cleaning | Plates in dishwasher, tray by hand, body wiped with damp cloth |
| Origin | Made in China, designed in Spain |
Frequently Asked Questions - Rock’nGrill Smart CECOTEC
User questions about Rock’nGrill Smart CECOTEC
0 question about this device. Answer the ones you know or ask your own.
Ask a new question about this device
Download the instructions for your Oven in PDF format for free! Find your manual Rock’nGrill Smart - CECOTEC and take your electronic device back in hand. On this page are published all the documents necessary for the use of your device. Rock’nGrill Smart by CECOTEC.
USER MANUAL Rock’nGrill Smart CECOTEC
natural_image
Exterior view of a black rectangular kitchen grater with digital display and control buttons (no visible text or symbols)Safety instructions 5
-
Parts and components 26
-
Before use 26
-
Operation 27
-
Cleaning and maintenance 30
-
Technical specifications 31
-
Disposal of old electrical appliances 31
-
Technical support and warranty 31
SOMMAIRE
Read these instructions thoroughly before using the appliance. Keep this instruction manual for future reference or new users.
- Make sure that the mains voltage matches the voltage stated on the rating label of the appliance and that the wall outlet is grounded.
– This product is designed only for household use. - The appliance will be very hot during and immediately after operating. Use gloves or other convenient protection accessories in order to avoid burns and injuries.
-
Always use the grill on a flat, dry, stable and heat-resistant surface.
-
On surfaces where heat may cause a problem, an insulating mat is recommended.
- Do not immerse the cord, plug, or any non-removable part of the appliance in water or any other liquid, nor expose the electrical connections to water. Make sure your hands are dry before handling the plug or switching on the appliance.
- Do not twist, bend, strain, or damage the power cord in any way. Protect it from sharp edges and heat sources. Do not let it touch hot surfaces. Do not let the cord hang over the edge of the working surface or countertop.
- Do not use outdoors, near a gas or electric hob, in heated ovens or near open flames.
- Do not operate de device after it has been dropped or after it malfunctions.
- Check the power cord regularly for visible damage. If the cord is damaged, it must be replaced by the official Technical Support Service of Cecotec in order to avoid any type of danger.
- Do not use an extension cord with this appliance.
– Extreme caution must be taken when moving the appliance. - Always turn off and disconnect the appliance from the power supply when not in use or if it is not going to be used for a long period of time and before cleaning it. Pull from the plug, not the cord, to disconnect it from the outlet.
- Do not use accessories not provided or suggested by Cecotec, as these could cause damage to the product or result in risk.
- This appliance cannot be used by children or persons with reduced physical, sensory or mental capabilities or lack of experience and knowledge.
INSTRUCTIONS DE SÉCURITÉ
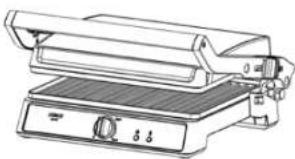
- Handle
- Control panel
- Top plate
- Lower plate
- Plate release button
- Safety lock
- Fat-drip tray
B. 180° button
Control panel
Fig. 2
- Preheating light indicator
- Temperature light indicator
- Grilling level indicator
- Medium
- Medium-Well
- Well done
- Temperature buttons +/-
- Display
- Food-type button
- Manual temperature button
- On/off button
2. BEFORE USE
- Take the product out of the box.
- Remove all packaging material. Save the original box.
Make sure all parts and components are included and in good conditions. If any visible
signs of damage are observed, contact the Technical Support Service immediately. - Clean the plates with a soft, dampened cloth.
- Dry thoroughly all parts of the device with a cloth or paper towel.
- For optimal results, cover both plates with some oil.
Warning
A slight odour and smoke might appear when operating the device for the first time. This is due to manufacturing material residues and does not affect the appliance's operating.
3. OPERATION
- Connect the product's plug to a power supply. The product will beep, and all the lights will flash once. The power switch light will flash once. The power light indicator will continue to blink.
- Press the power button, the product will beep. The product will begin to warm up and the display will light up accordingly as it reaches optimum operating temperature (220 °C). This heating process will take about 5 minutes.
- When the warm up is completed, the product will beep 3 times. The preheating light indicator will switch off and the temperature light indicator will light up.
- Put the food inside the grill and select the desired temperature manually or select a programme.
- The display screen will show the minute countdown left for the food to be cooked (only when a programme is selected).
- When food is cooked, the product will beep 3 times and stop heating. The power button will flash continuously, the rest of the light indicators will turn off (only when a programme is selected).
- Use the handle to open the grill and use a heatproof spatula to remove food.
- Once you have finished cooking, disconnect the plug from the wall outlet and leave the unit open until it cools down.
Warning
Never use metal tongs or a knife to remove food as these can cause damage to the non-stick coating.
Cooking programmes
Steak:
- Press the Steak button, the product will beep.
- The 3 grilling level indicators will flash.
- Select the desired grilling level with the + and - buttons.
- The grill will start automatically after 10 seconds approx.
- Once the steak is placed on the grill, the steak light will light up, and the product will beep 3 times when the steak is finished. All the light indicators except for the power button will turn off.
Sausages:
- Press the Sausage button, the product will beep.
- The 3 grilling level indicators will flash.
- Select the desired grilling level with the + and - buttons.
- The grill will start automatically after 10 seconds approx.
ENGLISHENGLISH
- Once the sausages are cooked, the sausage programme light indicator will flash and the product will beep 3 times. All the light indicators except for the power button will turn off.
Fish:
- Press the Fish button, the product will beep.
- The 3 grilling level indicators will flash.
- Select the desired grilling level with the + and - buttons.
- The grill will start automatically after 10 seconds approx.
- Once the Fish programme is finished, the corresponding light indicator will flash and the product will beep 3 times. All the light indicators except for the power button will turn off.
Sandwich:
- Press the Sandwich button, the product will beep.
- The 3 grilling level indicators will flash.
- Select the desired grilling level with the + and - buttons.
- The grill will start automatically after 10 seconds approx.
- Once the Sandwich programme is finished, the corresponding light indicator will flash and the product will beep 3 times. All the light indicators except for the power button will turn off.
Hamburger:
- Press the Hamburger button, the product will beep.
- The 3 grilling level indicators will flash.
- Select the desired grilling level with the + and - buttons.
- The grill will start automatically after 10 seconds approx.
- Once the Hamburger programme is finished, the corresponding light indicator will flash and the product will beep 3 times. All the light indicators except for the power button will turn off.
Manual programme:
- Press the manual button, the product will beep once.
- The screen will display 200 °C.
- Use the + and - buttons to set the temperature according to personal preference.
- The temperature ranges from 150 °C to 230 °C in 10 °C intervals.
Note
To exit a grilling programme once it has started, press the power button.
Smart programme:
| Smart programme | Temperature Medium Well Well done | |||
| Steak | 230 °C | 2 min 30 s | 3 min 30 s | 5 min |
| Sausages | 220 °C | 3 min | 5 min | 7 min |
| Fish | 200 °C | - | 4 min 30 s | 6 min |
| Sandwich | 210 °C | 2 min 30 s | 3 min 30 s | 4 min 30 s |
| Hamburger | 220 °C | 3 min 4 min 5 min | ||
Note
The device features a safety protection system that turns off the grill automatically when malfunction o abnormal operation is detected.
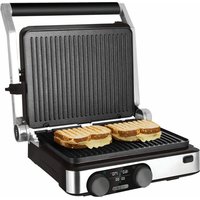
Using the contact grill
The device can be used as a contact grill for grilling boneless pieces of meat in a fast and efficient way, as both sides of food are cooked at the same time.
- Open the grill and place boneless pieces of meat, burgers or any other thin cuts of meat to be cooked on the bottom plate.
- Close the grill and press down the top plate by the handle. The top plate must be fully lowered for the cooked food to have grill marks.
- When food is cooked, use the handle to open the grill and use a heatproof spatula to remove food.
- Once you have finished cooking, disconnect the plug from the wall outlet and leave the unit open until it cools down.
Fig. 3
Warning
Never use metal tongs or a knife to remove food as these can cause damage to the non-stick coating.
Using the grill toaster
- Once the device has preheated, set the desired grilling temperature or programme.
- Place the sandwich, bread or quesadilla on the bottom plate, towards the back.
- Close the grill and press down the top plate by the handle. The top plate must be fully lowered for sandwiches, bread and other similar foods to be cooked properly and evenly.
- When the sandwich or bread is cooked, use the handle to open the grill and use a heatproof spatula to remove food.
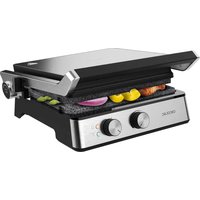
Using the device as an open grill
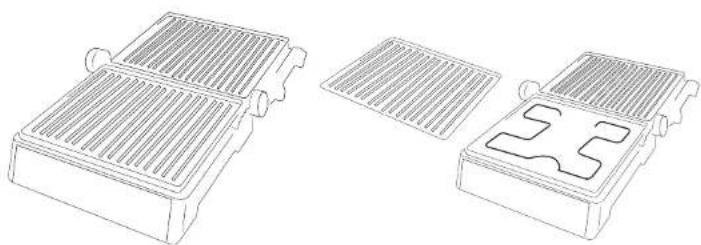
- The grill can be used in a completely opened, flat position.
ENGLISHENGLISH
- The top plate is opened and leveled with the lower plate.
- This position allows cooking greater variety of food without mixing flavour, for example, fish on one plate and meat on the other. It also allows cooking different types of food for different cooking times.
Fig. 4
- Hold the grill's handle with your left hand, hold pressed the 180° opening button with your right hand and lift the top plate by the handle until completely opened.
- Use the grill in this position to cook burgers, steak, poultry, fish or vegetables.
- Place the food to cook over the top or bottom plate.
Note
It is not recommended to use the grill to cook bone-in chicken.
- To close the grill back to its original position, just hold from the handle and bring the top plate back to the closed position.
Removing the cooking plates
- Always allow the device to cool completely down before touching its body or plates.
- Open the grill until left in a completely flat position.
- Press the plate release button located on the left part of the unit.
- Hold the plate with your hand and pull from it to remove it.
- Repeat these steps with the other plate.
Fig. 5
Storage
- Disconnect the appliance from the power supply.
- Make sure the grill has cooled down before storing it.
4. CLEANING AND MAINTENANCE
- Always turn off and unplug the appliance after each use and before cleaning.
- Allow the appliance to cool down before cleaning and storing.
- If there is food stuck to the plates, pour some drops of soapy water for food rests to soften and then use a non-abrasive sponge or paper towel to remove them.
- Use a soft, damp cloth to clean the product's outside surface.
- Do not immerse the appliance in water or other liquid.
- Do not use abrasive cleaners or scouring pads to clean the product.
- Do not wash the device in the dishwasher
- Remove and empty the fat-drip tray after each use and wash the tray in warm, soapy
water. Rinse and dry thoroughly with a clean, soft cloth and replace.
- The plates are removable and dishwasher safe.
5. TECHNICAL SPECIFICATIONS
Product: Rock'n Grill Smart
Product reference: 03067
Power: 2000 W
Voltage and frequency: 220 V–240 V, 50/60 Hz
Made in China | Designed in Spain
6. DISPOSAL OF OLD ELECTRICAL APPLIANCES

The European directive 2012/19/EU on Waste Electrical and Electronic Equipment (WEEE), specifies that old household electrical appliances must not be disposed of with the normal unsorted municipal waste. Old appliances must be collected separately, in order to optimise the recovery and recycling of the materials they contain and reduce the impact on human health and the environment.
The crossed out "wheeled bin" symbol on the product reminds you of your obligation to dispose of the appliance correctly.
Consumers must contact their local authorities or retailer for information concerning the correct disposal of old appliances and/or their batteries.
7. TECHNICAL SUPPORT AND WARRANTY
This product is under warranty for 2 years from the date of purchase, as long as the proof of purchase is submitted, the product is in perfect physical condition, and it has been given proper use, as explained in this instruction manual.
The warranty will not cover the following situations:
The product has been used for purposes other than those intended for it, misused, beaten, exposed to moisture, immersed in liquid or corrosive substances, as well as any other fault attributable to the customer.
The product has been disassembled, modified, or repaired by persons, not authorised by the official Technical Support Service of Cecotec.
Faults deriving from the normal wear and tear of its parts, due to use.
The warranty service covers every manufacturing defects of your appliance for 2 years, based on current legislation, except consumable parts. In the event of misuse, the warranty will not
apply.
If at any moment you detect any problem with your product or have any doubt, do not hesitate to contact Cecotec Technical Support Service at +34 963 210 728.
1. PIÈCES ET COMPOSANTS
Img.1
Product: Rock'nGrill Smart
Made in China | Designed in Spain
6. RECYKLING SPRZĘTU AGD

Fig./Img./Abb./Rys./Obr.1
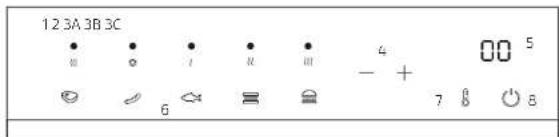
Fig./img./Abb./Rys./Obr.2
natural_image
Line drawing of a stainless steel grater with control panel (no text or symbols)Fig./Img./Abb./Rys./Obr.3
natural_image
Technical line drawings of three different electronic components or modules (no text or symbols present)Fig./Img./Abb./Rys./Obr. 4 Fig./Img./Abb./Rys./Obr. 5
www.cecotec.es
- SOMMAIRE
- INSTRUCTIONS DE SÉCURITÉ
- Control panel
- BEFORE USE
- Warning
- OPERATION
- Cooking programmes
- Steak:
- Sausages:
- ENGLISHENGLISH
- Fish:
- Sandwich:
- Hamburger:
- Manual programme:
- Note
- Using the contact grill
- Fig. 3
- Using the grill toaster
- Using the device as an open grill
- Fig. 4
- Removing the cooking plates
- Fig. 5
- Storage
- CLEANING AND MAINTENANCE
- TECHNICAL SPECIFICATIONS
- DISPOSAL OF OLD ELECTRICAL APPLIANCES
- TECHNICAL SUPPORT AND WARRANTY
- PIÈCES ET COMPOSANTS
- RECYKLING SPRZĘTU AGD
Brand : CECOTEC
Model : Rock’nGrill Smart
Category : Oven