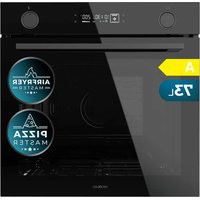
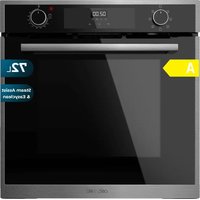
USER MANUAL Bake&Toast 6090 Gyro CECOTEC
natural_image
Two modern kitchen ovens, one open and one closed, displayed against a solid teal background (no visible text or symbols)
Safety instructions 7
-
Parts and components 31
-
Before use 31
-
Operation 32
-
Cleaning and maintenance 35
-
Technical specifications 36
-
Disposal of old electrical and electronic appliances 36
-
Technical support and warranty 36
-
Copyright 36
SOMMAIRE
EN • The coding in this manual is generic and applies to all code variants of the appliance.
Read these instructions thoroughly before using the appliance. Keep this instruction manual for future reference or new users.
- All safety instructions must be closely followed when using the appliance.
- This appliance can be used by children aged 8 years and above and persons with reduced physical, sensory, or mental capabilities or lack of experience and knowledge if they have been given supervision or instruction concerning use of the appliance in a safe way and understand the hazards involved. Children must not play with the appliance. Cleaning and user maintenance should not be carried out by unsupervised children.
- Keep this appliance and its power cable out of reach of children under the age of 8.
- This symbol means: CAUTION: hot surface. Accessible surfaces may reach high temperatures when the appliance is in operation.
- The appliance is not intended to be operated by means of an external timer or a separate remote-control system.
- Make sure that the mains voltage matches the voltage stated on the rating label of the appliance and that the wall outlet is earthed.
- Do not immerse the cable, plug, or any non-removable part of the appliance in water or any other liquid. Do not expose the electrical connections to water. Make sure your hands are dry before handling the plug or switching on the appliance.
- Unplug the appliance from the main power supply when not in use.
- Warning: Never immerse the appliance in water. Do not touch the water!
- Check the power cable regularly for visible damage. There are no user-serviceable parts inside the appliance. If the cable is damaged, it must be repaired by the official Cecotec Technical Support Service to avoid any type of danger.
- WARNING: Do not operate the appliance if its cable, plug, or body show visible damage, do not work properly, or have been dropped.
- Do not twist, bend, pull, or damage the power cable. Protect it from sharp edges and heat sources. Do not allow the cable to touch hot surfaces. Do not let the cable hang over the edge of the working surface or worktop.
- Turn off and unplug the appliance from the mains supply when not in use and before cleaning it. Pull from the plug, not the cable, to disconnect it from the outlet.
- Supervise children to prevent them from playing with the appliance. Close supervision is necessary when the appliance is being used by or near children.
- Place the appliance on a dry, stable, flat, heat-resistant surface.
- Do not cover the appliance while in use.
- Do not leave the appliance unattended while in use. Unplug it from the power supply when you finish using it and before leaving the room.
- Do not try to repair the appliance by yourself. Contact the official Cecotec Technical Support Service.
- To ensure the correct operation of the appliance, cleaning and maintenance tasks must be carried out according to this instruction manual. Turn off and unplug the appliance before moving and cleaning it.
- No liability is accepted for any eventual damage or personal injuries derived from misuse or non-compliance with this instruction manual.
INSTRUCTIONS DE SÉCURITÉ
The graphics in this manual are schematic representations and may not exactly match the appliance.
2. BEFORE USE
- This appliance is packaged in a way as to protect it during transport. Take the appliance out of its box and remove all packaging materials. You can keep the original box and other packaging elements in a safe place. This will help you prevent damage to the appliance when transporting it in the future. In case the original packaging is disposed of, make sure all packaging materials are recycled accordingly.
- Make sure all parts and components are included and in good conditions. If there is any piece missing or in bad conditions, contact the official Cecotec Technical Support Service immediately.
Box content
- Oven
- Baking tray
- Rack
- Extractor handle
ENGLISH
- Rotisserie fork
- Rotisserie-fork extractor
- Crumb tray
- Instruction manual
Before first use:
- Plug the oven power cord into a mains socket.
- Insert the baking tray and the rack.
- Turn the heat-zone selection knob to the ☐ position, then set the temperature to 230 °C by turning the thermostat knob and heat up the empty oven for about 10 minutes.
Note:
There may be some smoke and a burning smell at first. However, this does not affect the safety and operation of the appliance.
3. OPERATION
Temperature knob
Turn the temperature knob clockwise to select the desired temperature according to the food to be cooked. Temperature can be adjusted from 90 °C to 230 °C.
Heat-zone selection knob
Choose the heat zone based on the food to be cooked.
- Lower and upper heat
- Lower heat
- Upper heat/grill
You can check whether the heating elements are in operation by means of the indicator lights on the front.
Function knob
Select the appropriate function depending on the food being cooked.
- Rotisserie function: with this function you can bake a constantly rotating food. You will need to install the rotisserie fork first. The latter supports a weight of up to 3 kg. Fig. 2
- Convection: a special convection function that allows for continuous powerful airflow, this way generating better heat. This function is useful to preserve the original taste of food. Fig. 3
- Convection and rotisserie: both functions are enabled at the same time.
Timer knob
- Select the desired cooking time according to the food to be cooked.
- To set the cooking time, turn the timer knob clockwise. After the selected time has elapsed, the oven will automatically switch off and an acoustic signal will sound.
- The oven can be manually switched off during the cooking process by turning the timer knob counterclockwise to the Off position.
Accessories
Oven guides
- You can insert the baking tray and/or rack into three different guides, this way creating three different shelves: upper, middle, and lower.
- For example, when cooking mac and cheese, if you want the top to be more cooked, insert the tray/rack into the top guides.
Warning:
Please note the following information about each accessory depending on the food to be cooked.
- Baking tray: to cook roast chicken, Salisbury steak, gratins, sponge cakes, and almost any other oven-cooked foods.
- Rack: ideal for cooking baked potatoes and dry food.
- Baking tray and rack: use both for dripping food, boiled fish, etc. These accessories aren't completely square.
Note:
Be careful when removing hot liquids.
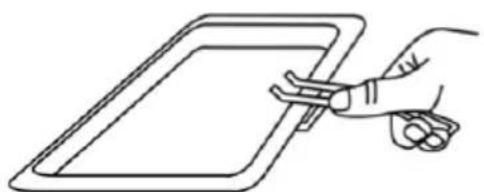
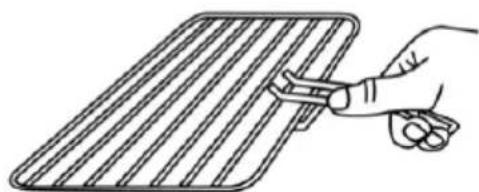
Extractor handle. Fig. 4
The extractor handle is used to remove accessories without having to touch them. To use the extractor handle, position the base of the latter underneath the tray/rack to be removed; the two hooks should stick from underneath the accessory. Once the extractor handle is firmly hooked to the accessory, proceed to removing the latter.
NOTE
Be very careful when extracting the accessory, as this is a high-temperature appliance that can give off steam and heat.
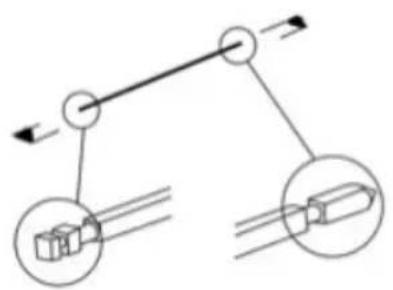
Rotisserie fork
Installing the rotisserie fork. Fig. 5
ENGLISH
- To insert the rotisserie fork, fit both ends of the rotisserie fork into the respective holes in the oven. Fig. 6
- Once installed, place the baking tray underneath to catch any juices that the food may release during cooking.
Removing the rotisserie fork
Use the rotisserie fork handle to pull out the rotisserie fork; then remove both the baking tray and the fork. To remove the rotisserie fork, apply a little pressure towards the side opposite the inlet hole. Fig. 7
Warnings:
- Beware of hot oil that may spill! Wear appropriate gloves.
- Always take the rotisserie fork out by the handle.
General warnings and advice:
- Always use the extractor handle to remove the baking tray or rack. Both the tray and the rack can reach high temperatures during and after coking: use caution and wear appropriate gloves when handling hot accessories.
- When the appliance is hot, do not pour water over the glass door, especially if it's cold. Otherwise, the glass may break.
- When unplugging the cable, always take hold of the plug itself. Do not pull from the cable.
- Do not place the unit close to a gas burner or other source of high temperature or do not direct an electric fan, etc, at the unit during use. Doing so could prevent correct temperature control.
- Do not wet the power cable or handle the appliance with wet hands.
- Always unplug the power cable after every use or whenever the appliance is left unattended.
- If the oven is placed too close to a wall or curtains, they may burn or stain. Keep the appliance away from curtains and similar objects. Do not put anything between the bottom of the body and the surface on which it is set, Otherwise, it could burn.
- Do not put anything on the oven while using it, the heat could cause deformation, cracking, etc.
- Any bottled or tinned food cannot be heated directly as the bottle or tin would break and scald someone.
- Be careful not to burn yourself during use or immediately after use. The metal parts and glass window of the door heat up during use. Be careful not to touch these parts when opening and closing the oven door.
- The plug must be properly connected to the socket. Insert the plug properly into the socket. If not properly plugged, the appliance may overheat. Never connect multiple plugs to the same outlet via, e.g., a multi-socket adapter.
- Warning: Accessible surfaces may become very hot during use. Be careful not to burn yourself.
Most common food baking reference chart
| Food type Quantity or thickness Temperature (°C) Timer (min.) |
| Sandwich 2-3 pcs 200 | 2-3 | | |
| Toast 2-4 pcs 230 2-5 | | | |
| Hamburgers 2-3 pcs 200 | 3-5 | | |
| Fish / 200 7-10 | | | |
| Ham 2 cm | 200 7-12 | | |
| Sausages | 3-4 pcs 200-230 | 8-10 | |
| Pies / 150 | 20-30 | | |
| Steak | 1-2 cm | 230 10-15 | |
| Chicken | Half a chicken | 175-200 | 30-40 |
Note
As ingredients differ in origin, size, shape, and brand, we cannot guarantee the best setting for the ingredients that you are using. If necessary, change the times and/or temperature values to adjust the cooking to the type of ingredient.
4. CLEANING AND MAINTENANCE
- Do not touch any part of the appliance surface until it has cooled down completely.
- Turn off, unplug, and let the appliance cool down before cleaning.
- Do not immerse the appliance in water or other liquids.
- Use a soft cloth, water, and detergent to clean the appliance.
- Never use strong detergents, abrasive powders, or a metal brush to clean any part of the appliance.
- Do not pick up or carry the appliance while hot or during operation.
- Store the appliance in a cool, dry place when it will not be used for some time.
- The following components are dishwasher safe: rack, tray handle, baking tray, rotisserie handle, rotisserie fork, and crumb tray.
ENGLISH
5. TECHNICAL SPECIFICATIONS
Product: 03821 / 03822
Product: Bake&Toast 6090 White Gyro / Bake&Toast 6090 Black Gyro
Power: 2200 W
Voltage: 220-240 V
Frequency: 50/60 Hz
Capacity: 60L
Technical specifications may change without prior notification to improve product quality.
Made in China | Designed in Spain
6. DISPOSAL OF OLD ELECTRICAL AND ELECTRONIC APPLIANCES
This symbol indicates that, according to the applicable regulations, the product and/or batteries must be disposed of separately from household waste. When this product reaches the end of its shelf life, you should dispose of the cells/batteries/accumulators and take them to a collection point designated by the local authorities.
Consumers must contact their local authorities or retailer for information concerning the correct disposal of old machines and/or their batteries.
Compliance with the above guidelines will help protecting the environment.
7. TECHNICAL SUPPORT AND WARRANTY
Cecotec shall be liable to the end user or consumer for any lack of conformity that exists at the time of delivery of the product under the terms, conditions, and deadlines established by the applicable regulations.
It is recommended that repairs are carried out by qualified personnel.
If at any moment you detect any problem with your product or have any doubt, do not hesitate to contact the official Cecotec Technical Support Service at +34 963 210 728.
8. COPYRIGHT
The intellectual property rights over the texts in this manual belong to CECOTEC INNOVACIONES, S.L. All rights reserved. The contents of this publication may not, in whole or in part, be reproduced, stored in a retrieval system, transmitted, or distributed by any means (electronic, mechanical, photocopying, recording or similar) without the prior authorization of CECOTEC INNOVACIONES, S.L.
1. PIÈCES ET COMPOSANTS
Img. 1
Made in China | Designed in Spain
6. RECYKLING URZĄDZEŃ ELEKTRYCZNYCH I ELEKTRONICZNYCH
natural_image
Diagram of a mechanical or fluid system with directional arrows and a central black object (no text or symbols)

natural_image
Diagram of a mechanical or electrical component with multiple directional arrows and symbols, no readable text or labels present.
Fig./Img./Abb./Afb./Rys./Obr. 2 Fig./Img./Abb./Afb./Rys./Obr. 3
natural_image
Line drawing of a hand holding a tablet device (no text or symbols)
natural_image
Line drawing of a hand holding a tool interacting with a grid-like object (no text or symbols)
Fig./Img./Abb./Afb./Rys./Obr. 4
natural_image
Diagram of a mechanical linkage system with two circular components and directional arrows (no text or labels)
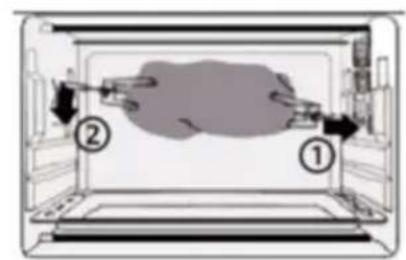
Fig./Img./Abb./Afb./Rys./Obr. 5 Fig./Img./Abb./Afb./Rys./Obr. 6

Fig./Img./Abb./Afb./Rys./Obr.7
www.cecotec.es