
SPBDM 1.5 A1 - Blood pressure monitor Sensiplast - Free user manual and instructions
Find the device manual for free SPBDM 1.5 A1 Sensiplast in PDF.

| Product type | Automatic arm blood pressure monitor |
| Measurement method | Oscillometric, non-invasive |
| Dimensions (L x W x H) | 125 x 94 x 50 mm |
| Weight (main unit without batteries) | Approximately 210 g |
| Power supply | 3 x 1.5 V AAA batteries (LR03) or USB-C power adapter (5 V, 1 A max.) |
| Measurement range - Systolic pressure | 60 to 250 mmHg |
| Measurement range - Diastolic pressure | 30 to 195 mmHg |
| Measurement range - Pulse | 40 to 199 beats/min |
| Cuff pressure accuracy | ±3 mmHg |
| Pulse accuracy | ±5 % |
| Memory | 2 x 120 measurements (2 users) |
| Compatible arm circumference | 22 to 42 cm |
| Display | LCD screen with date, time, values, WHO indicator, arrhythmia detection |
| Special functions | Detection of cardiac arrhythmias, movement indicator, cuff positioning control |
| Operating conditions | +5°C to +40°C, relative humidity 15-90% non-condensing |
| Storage conditions | -25°C to +55°C, relative humidity < 93% |
| Classification | Internal power supply, IP21, type BF |
| Package contents | Blood pressure monitor, cuff, tracking booklet, 3 AAA batteries, storage bag, instruction manual |
| Cleaning | Slightly damp cloth; disinfect cuff with 75% medical alcohol |
| Warranty | 3 years (conditions as per manual) |
Frequently Asked Questions - SPBDM 1.5 A1 Sensiplast
User questions about SPBDM 1.5 A1 Sensiplast
0 question about this device. Answer the ones you know or ask your own.
Ask a new question about this device
Download the instructions for your Blood pressure monitor in PDF format for free! Find your manual SPBDM 1.5 A1 - Sensiplast and take your electronic device back in hand. On this page are published all the documents necessary for the use of your device. SPBDM 1.5 A1 by Sensiplast.
USER MANUAL SPBDM 1.5 A1 Sensiplast
UPPER ARM BLOOD PRESSURE MONITOR OBERARM-BLUTDRUCKMESSGERÄT TENSIOMÈTRE DE BRAS SPBDM 1.5 A1
GB IE
UPPER ARM BLOOD PRESSURE MONITOR
Operating instructions
FR BE
TENSIOMÈTRE DE BRAS
Mode d'emploi
CZ
TLAKOMĚR
Návod k obsluze
SK
TLAKOMER NA RAMENO
Návod na obsluhu
DK
BLODTRYKSMÅLER TIL OVERARMEN
English Operating instructions Page 1
| Deutsch | Bedienungsanleitung | Seite | 33 |
| Français Mode d'emploi Page 69 | |||
| Nederlands | Gebruiksaanwijzing | Pagina 107 | |
| Češki Návod k obsluze Strana 141 | |||
| Polski Instrukcja obstugi Strona 173 | |||
| Slovaška Návod na obsluhu Strana 207 | |||
| Español | Instrucciones de uso | Página | 239 |
| Dansk | Betjeningsvejledning | Side | 273 |
| Italiano | Istruzioni per l’uso | Pagina | 305 |
| Magyar Használati utasítás Oldal 339 | |||
Contents
-
Introduction 2
-
Intended use 2
2.1. Contraindications .... 2
-
Package contents 3
-
Warnings and symbols used 3
-
Safety information 6
5.1. Safety instructions for handling batteries 10
-
Device description 12
-
Getting started 13
7.1. Inserting/replacing the batteries ..... 1 3
7.2. Mains power operation 13
7.3. Adjusting settings 14
- Taking a blood pressure reading 15
8.1. Putting on the cuff 16
8.2. Assuming the correct body posture ..... 17
8.3. Selecting the user and starting the reading 17
- Evaluating the blood pressure reading 19
9.1. General information about blood pressure 19
9.2. Guide values of the WHO 20
9.3. Risk indicator 21
9.4. Cardiac arrhythmias 2 2
-
Accessing/deleting readings 22
-
Troubleshooting 24
-
Cleaning 25
-
Storage 26
-
Disposal 26
14.1. Disposal of the device 26
14.2. Disposal of the packaging 26
14.3. Disposal of batteries 27
-
Technical data 27
-
Kompernass Handels GmbH warranty 30
16.1. Service 32
16.2. Importer....32
1. Introduction

Congratulations on the purchase of your new device.
You have selected a high-quality product. The instructions for use are part of this product. They contain important information about safety, usage and disposal. Before using the product, please familiarise yourself with all instructions regarding safety and use. Use the product only as described and for the specified applications. Keep these operating instructions as a reference and store them near the product. Please also pass on all documents to any future owner.
2. Intended use
This device is intended for non-invasive measurement of systolic and diastolic blood pressure values as well as pulse rate on the upper arm of adults.
The device is not intended for use on newborns and small children or on persons with severe cardiac arrhythmias.
The device is suitable for self-monitoring. No special expertise is required; patients can operate the device themselves.
The device is suitable for the arm circumference range indicated on the cuff.
This device is intended solely for use in private households. Not for commercial or industrial use.
2.1. Contraindications
During pregnancy, we recommend consulting a doctor before use. Preeclampsia patients may not use the device.
The device is not suitable for patients with implanted devices such as pacemakers or defibrillators. Do not use the device if you have metallic implants.
3. Package contents
The following components are included in delivery:
• Upper arm blood pressure monitor
● Pressure cuff with hose
- Bood pressure logbook
- 3 x alkaline batteries AAA (LRO3)
- Storage pouch
- Instructions for use
4. Warnings and symbols used
The following warnings and symbols are used in these operating instructions, on the packaging and on the device (where applicable):
 | DANGER! A warning with this symbol and the signal word "DANGER" indicates an imminently hazardous situation which will result in death or serious injury if not avoided. |
 | WARNING! A warning with this symbol and the signal word "WARNING" indicates a potentially hazardous situation which could result in death or serious injury if not avoided. |
 | CAUTION! A warning with this symbol and the signal word "CAUTION" indicates a potentially hazardous situation which could result in a minor or moderate injury if not avoided. |
 | ATTENTION! A warning with this symbol and the signal word "ATTENTION" indicates a potential situation that could result in property damage if not avoided. |
 | Note: A note identifies additional information that facilitates the use of the device. |
 | Read the instructions. |
 | DC current/voltage |
 | Protection class II: Protection by double or reinforced insulation between live and touchable parts. |
 | Medical device |
 | Authorised representative in the European Union |
 | Importer |
 | Type BF: The device, pressure cuff and hose have been designed to protect the patient from electric shock. |
| IP21 | Protected against solid objects greater than 12.5 mm and vertically falling drops of water. |
 | Date of manufacture |
 | Unique device identifier: Code for unique product identification |
 | Serial number |
 | Model number |
 | Temperature range |
 | Humidity limitation |
 | Atmospheric pressure range |
 | Do not dispose of electrical devices in the household waste! |
 | Dispose of the packaging in an environmentally-responsible manner. |
[KTXX] | The packaging is made of recyclable materials.Observe the labelling on the packaging material when sorting for disposal: The material is labelled with abbreviations (a) and numbers (b) with the following meanings: 1-7: plastics, 20-22: paper and cardboard, 80-98: composites. |
  ES/PT ES/PT | The packaging contains paper and/or cardboard components.The packaging contains plastic and/or metal components. |
 | This product satisfies the requirements of the applicable European and national regulations. |
 | Manufacturer |
  |     FR:The product, its pack aging and the operating instructions are recyclable. They are subject to an extended manufacturer responsibility and will be collected separately. FR:The product, its pack aging and the operating instructions are recyclable. They are subject to an extended manufacturer responsibility and will be collected separately. |
5. Safety information
WARNING!
■ This device is not intended for use by persons (including children) with limited physical, sensory or mental capabilities or lack of experience and/or knowledge unless they are supervised by a person who is responsible for their safety, or receive instructions from this person on how to use the device.
■ Children must be supervised to make sure that they do not play with the device.
■ Store the air hose out of the reach of children to avoid the risk of strangulation.
■ Do not use the device if you have electrical implants (e.g. pacemaker).
■ Do not use the device if you have metallic implants.
■ Do not use the device on newborns, children and pets.
■ The blood pressure monitor may not be used in connection with a high-frequency surgical device.
■ Use the device only on persons with an upper arm circumference within the specified range.
■ Do not place the cuff over wounds as this could lead to further injuries.
■ Avoid fitting and inflating the cuff on an arm with an intravascular access device, intravascular therapy or arteriovenous shunt (AV shunt) since a temporary interruption of the blood flow could lead to an injury.
■ Patients with who have had a mastectomy (breast amputation) or lymphadenectomy (lymph node removal) may not fit and inflate the cuff on the arm of the operated side of the body.
■ The readings you take yourself serve only for self-monitoring – they are not a replacement for a medical examination! Discuss your values with your doctor. Never use them as the basis for your own medical decisions (medications and or dosing)!
■ Cardiovascular disease can lead to incorrect readings or reduced accuracy of the readings. This also applies in the case of very low blood pressure, diabetes, circulatory disorders and cardiac arrhythmias as well as shivering or tremors.
■ Note that inflation of the cuff can temporarily interfere with the function of other medical devices that are being used at the same time for monitoring purposes on the same arm.

CAUTION!
■ Note that you may experience functional impairment of the arm wearing the cuff during the pressure build-up.
■ Check (by observing the relevant appendages, for example) that operation of the blood pressure monitor does not lead to prolonged impairment of the blood circulation.
■ The blood circulation must not be interrupted by the blood pressure reading for an unnecessarily long period. If the device malfunctions, switch off the device and remove the cuff from your arm.
■ Avoid mechanical construction, squeezing or kinking of the air hose during the reading. The resulting sustained cuff pressure can lead to circulatory problems and serious injuries.
■ Avoid sustained pressure in the cuff and frequently repeated readings. This can impair blood flow and result in injuries.

ATTENTION!
■ Only use accessories that are included in the scope of delivery or recommended by the manufacturer.
■ Protect the device from moisture, dust, high temperatures and direct sunlight.
If the device has been stored at a temperature near the limit values for the storage and transport temperature and then brought into an environment at 20 °C, wait about 2 hours for the device to reach room temperature before using it.
■ Avoid damage to the cuff and the air hose.
■ Do not open the device housing or attempt to disassemble or repair the device yourself. Doing so would disrupt the pressure calibration performed by the manufacturer. It is also unsafe and invalidates the warranty.
■ Do not allow the device to fall and do not subject it to any strong vibrations.
■ Because the device contains sensitive electronic components, avoid using it in the vicinity of a strong electromagnetic field (mobile telephone, microwave oven, etc.) since this could lead to inaccurate results.
■ Extreme temperature, humidity and elevation conditions can impair the performance of the monitoring device. Under these conditions, the upper arm blood pressure monitor may not comply with the indicated performance specifications.
■ Do not repair or adjust the device yourself, since proper functioning will then no longer be guaranteed.
5.1. Safety instructions for handling batteries

WARNING! Mishandling the batteries can cause fires, explosions, leakages or other hazards!
- Keep batteries out of the reach of children.
■ Make sure that no one can swallow the batteries.
■ If a battery is swallowed, seek medical assistance immediately.
■ Always use the stated battery type.
■ Never try to recharge non-rechargeable batteries.
■ Remove rechargeable batteries from the device before recharging them.
Do not throw batteries into a fire or water.
■ Never expose batteries to high temperatures or direct sunlight.
■ Never open or deform batteries.
■ Do not short-circuit the terminals.
■ Remove depleted batteries from the device and dispose of them safely.
■ Do not use different types of batteries together or mix new batteries with used batteries.
■ Always insert batteries into the device with the correct polarity.
■ If you do not intend to use the device for an extended period, remove the batteries.
- Check the condition of the batteries at regular intervals. Leaking batteries can cause injuries as well as damage to the device.
■ Always use protective gloves when handling leaking batteries! Clean the battery and device contacts and the battery compartment with a dry cloth. Do not let the chemicals get into contact with your skin and mucous membranes, especially your eyes. In case of contact with chemicals, wash the affected area with plenty of water and immediately seek medical attention.
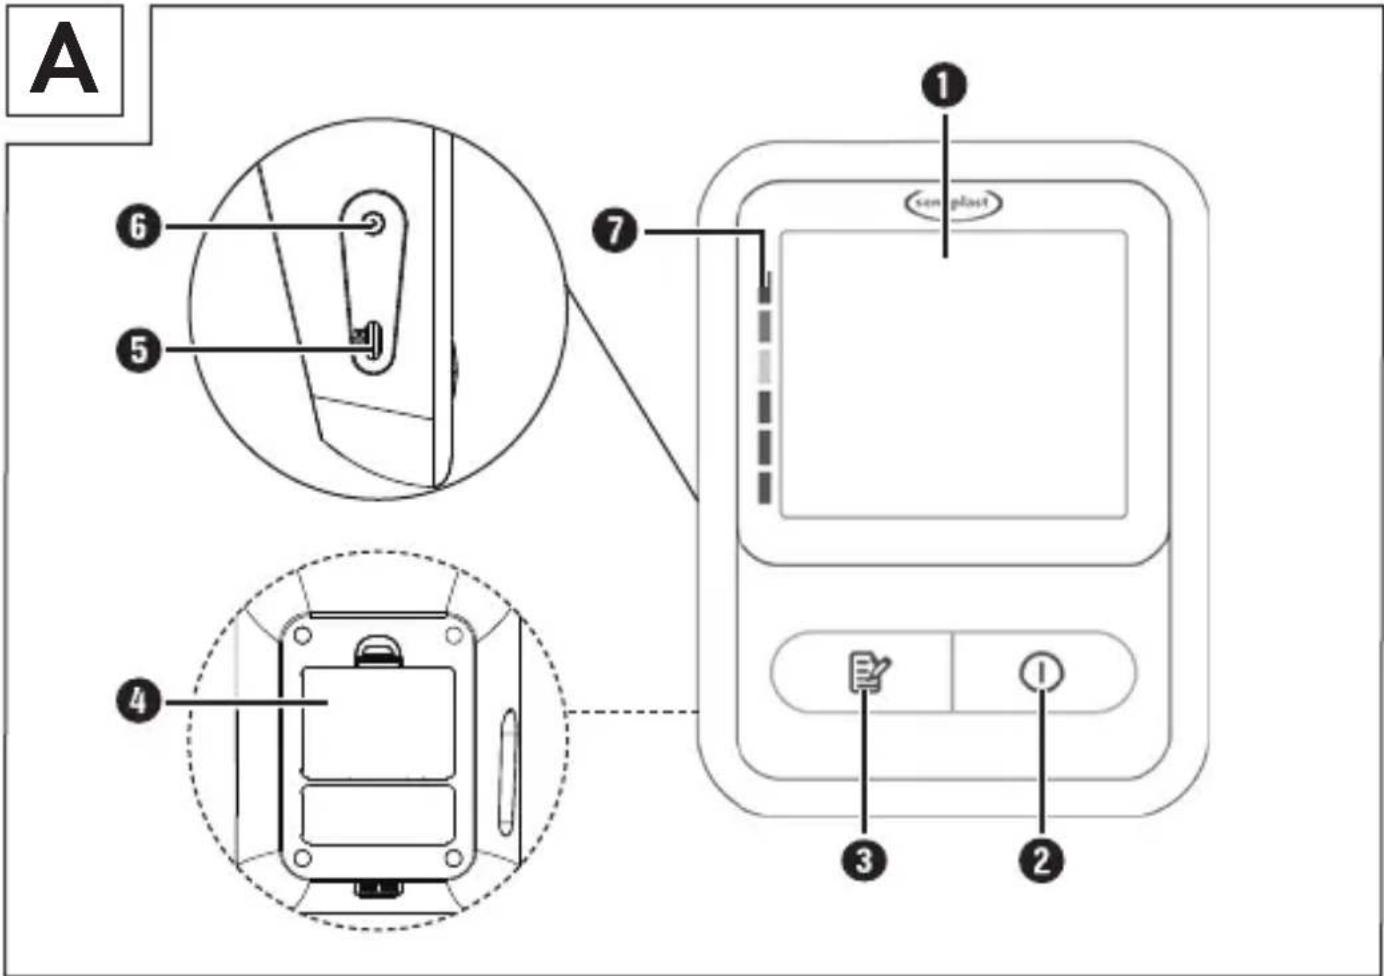
6. Device description
(See fold-out page for illustrations)
Figure A:
① Display
② Start/Stop button①
③ Memory button
4 Battery compartment cover (on the back side)
⑤ USB-C port
6 Air port
7 Risk indicator
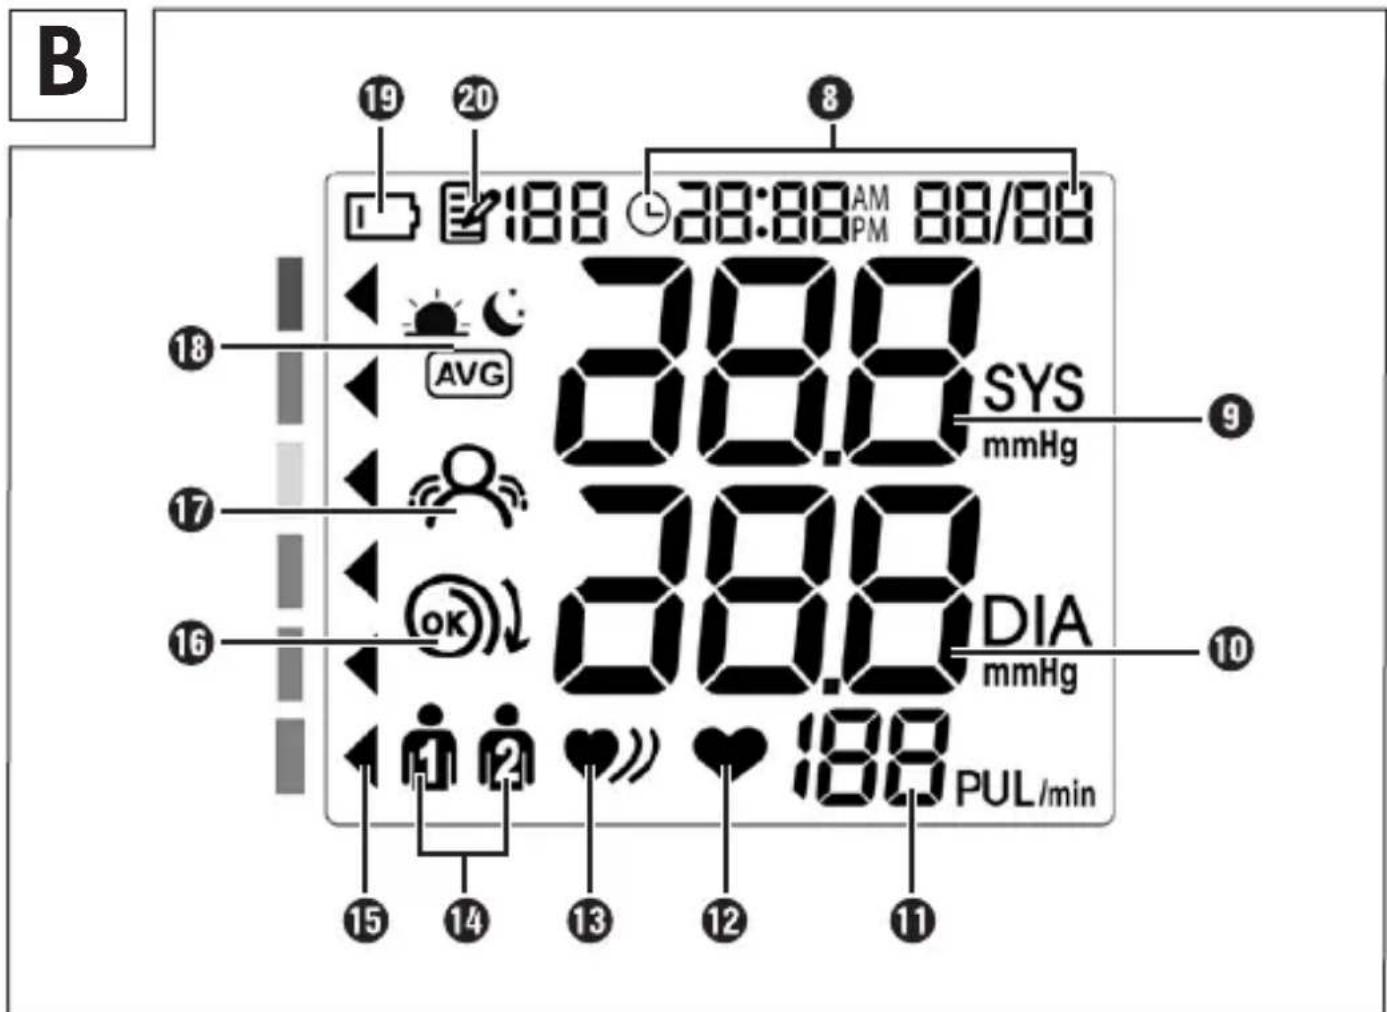
Figure B:
8 Time and date
9 Systolic pressure
⑩ Diastolic pressure
11 Pulse rate
12 Pulse symbol
13 Cardiac arrhythmia symbol ♥)
14 User memory
15 Blood pressure range indicator
16 Cuff fitting check OK
17 Motion indicator
19 Change batteries symbol
18 Memory indicator: Average value AVG, mornings 🎯, evenings 📄
20 Memory symbol with memory location number
Figure C:
21 Air hose
22 Air hose connector
23 Cuff
24 Storage pouch
7. Getting started
1) Remove all parts of the device and the operating instructions from the packaging.
2) Remove all packaging materials and any films and labels.
7.1. Inserting/replacing the batteries
Note
▶ Always insert 3 alkaline batteries of type AAA (LRO3) in the battery compartment.
1) Remove the battery compartment cover ④.
2) Remove the dead batteries if any are inserted.
3) Insert 3 new batteries as shown in the polarity diagram in the battery compartment.
4) Replace the battery compartment cover ④ so that it clicks into place
5) Change the batteries when the "Change batteries" symbol ⑲ flashes in the display ①. Otherwise the device cannot function.
Notes
If the batteries are almost empty, the text L0 appears in the display ① and the device switches off. Change the batteries immediately or use the device on mains power.
▶ After changing the battery, you must always set the date and time again. The stored readings are retained.
7.2. Mains power operation
In addition to or as an alternative to battery operation, the device can also be operated on mains power using direct current. For this, you will need a USB cable (either type A-C or type C-C, not included), which can be connected to the mains power via the USB-C port ⑤ and a mains adapter (not included). Use only a mains adapter with protection class II, an output voltage of 5 V and an output current of max. 1 A that is approved for medical devices.
1) Connect one end of the USB cable to the USB-C port ⑤ and the other end to the mains adapter.
2) Plug the mains adapter into a power outlet.
3) Switch on the device with the Start/Stop button ② ①.
A mains adapter can be used even when batteries are inserted. In this case, the power is supplied from the mains adapter and not from the batteries.
7.3. Adjusting settings
Upon first use and after every battery change, you must set the date and time. Apply the correct settings to the device before use to enable all functions, such as accessing saved readings with date and time.
■ After inserting the batteries, the display ① lights up briefly and shows all symbols. Use the Memory button ③ E to set the desired values and the Start/Stop button ② I to confirm your entries.
Note
▶ Every press of the Memory button ③ increases the value by 1 increment. If you hold the Memory button ③ pressed, the values are increased rapidly.
■ The order of the settings is: Hour format > Date > Time.
Hour format
The hour format 24h flashes. Press the Memory button ③ to switch to the 12-hour format 12h and/or confirm with the Start/Stop button ② .1
Date
■ The year value flashes. Set the year and then confirm your entry.
Note
The default is 2025. Pressing the Memory button ③ increases the value to a maximum of 2099. Then the value starts over at 2025.
The month value flashes. Press the Memory button ③ repeatedly, or hold it pressed, until the correct month is set. Confirm your entry. Do the same to set the day once the day value flashes.
i Note
▶ If you have selected the 12-hour format, the date display is Month/Day; for the 24-hour format, it is Day/Month.
Time
First, the hour value flashes 0:00 (24-hour format) or 12:00 (12-hour format), then the minutes value. Set the time and confirm each entry.
Note
If you have selected the 12-hour format, either AM or PM will appear next to the time to indicate morning or afternoon. Set the time accordingly.
i Note
▶ After 30 seconds of inactivity, the display ① switches off automatically to save power. Press the Start/Stop button ② to switch the device back on again.
■ The device is now ready to use.
8. Taking a blood pressure reading
- Avoid eating, smoking or exercising before taking a reading as these activities could interfere with the reading. Try to relax in a calm environment and rest for about 10 minutes before taking the reading.
■ If you are wearing heavy clothing, remove the clothing from the upper arm.
■ Select the arm on which you would like to take the blood pressure reading (normally the left arm) and take the reading on the same arm and in the same area.
■ Take blood pressure readings regularly every day at the same time since blood pressure varies over the course of the day.
■ Comparison blood pressure readings should be taken under the same conditions.
If the cuff 23 is positioned above the level of the heart, the resulting values will be too low. If it is positioned below the heart, the resulting values will be too high.
A loose cuff 23 leads to an incorrect blood pressure reading.
- With repeated readings, the arm compresses the blood vessels. This also leads to a falsified blood pressure reading. For this reason, always rest for 3–5 minutes between repeat readings or raise the arm for 3 minutes to loosen up the blood vessels.
8.1. Putting on the cuff
WARNING!
▶ Do not place the cuff ^23 over wounds as this could lead to further injuries.
- Avoid fitting and inflating the cuff 23 on an arm with an intravascular access device, intravascular therapy or arteriovenous shunt (AV shunt).
▶ Patients who have had a mastectomy (breast amputation) or lymphadenectomy (lymph node removal) may not place the cuff ^23 on the arm of the operated side of the body.
▶ During the measurement, medical devices operating on the same arm may malfunction.
ATTENTION!
▶ Use only the original cuff 23, which satisfies the clinical test requirements.
1) Make sure that the air hose connector 22 is fully inserted into the air port 6 of the blood pressure monitor.
2) Remove thick articles of clothing, and do not wear any accessories. Bare your upper arm or wear a thin shirt for the reading.
3) Open the cuff 23 to form a ring and pass it over the upper arm, then pull on the end running through the metal loop and close the hook-and-loop fastener.
4) Do not wrap the cuff 23 too tightly; you should still be able to fit two fingers underneath it. The lower edge of the cuff 23 should be 2–3 cm from the inside of the elbow (see Fig. D).
Note
▶ After putting on the cuff ② , the ▷ mark on the outside of the cuff should be within the OK range on the cuff ② . Otherwise, the cuff ② is not suitable for you. The cuff ② is intended for an upper arm circumference between 22 and 42 cm.
5) After wrapping the cuff 23 around the upper arm, position the air hose 21 on the inside of the arm in line with the middle finger (see Fig. D). Make sure that your arm does not press on the air hose 21.
8.2. Assuming the correct body posture
■ During the reading, sit on a chair, place your feet flat on the ground and lay your arm on the table in a relaxed and slightly angled position (see Fig. E).
■ Make sure that the cuff ② is at heart level (see Fig. F).
■ To avoid interfering with the reading, remain calm during the reading and do not speak.
8.3. Selecting the user and starting the reading
The device has a memory function that can store 120 readings each for two different users. In other words, two people can save their readings separately from each other. If the device is used by multiple people, the user must be selected before each reading.
1) Press the Start/Stop button ② ① to switch on the device. The display ① lights up briefly and shows all symbols.
2) Soon afterwards, the active user memory 14 is indicated. The most recently selected user 🔒 or 2 flashes. If no selection has been made yet or if the memory has been deleted, user 🔒 is indicated.
3) Press the Memory button ③ to switch users.
4) Then press the Start/Stop button ② ① to confirm the user and start the reading.
The cuff ②3 is slowly inflated. The rising cuff pressure is shown on the display. Once a pulse is detected, the pulse symbol ⑫❤️ flashes.
(i) Note
▶ You can interrupt the reading at any time by pressing the Start/Stop button ② ①, and the cuff ②3 will automatically deflate.
The Ⓞ symbol for the cuff fitting check 16 appears in the display 1 when the cuff 23 is fitted correctly for the reading. If the cuff 23 is too loose, Er-03 appears together with the symbol Ⓞ and the reading is halted. Switch off the device, correct the cuff fitting and repeat the reading.
If you move or speak during the reading, the reading cannot be performed correctly. Er04 appears in the display ① with the symbol for the motion indicator ⑰, and the reading is halted. Switch off the device and repeat the reading.
When the reading has been completed successfully, the cuff ②3 quickly deflates. The values for the reading appear in the display ① as shown in Fig. 1:
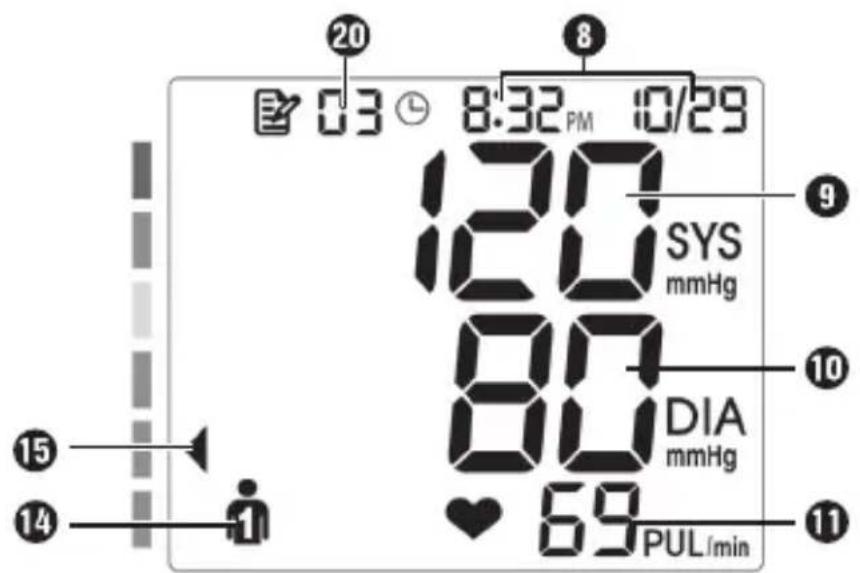
Fig. 1
Together with the blood pressure values ⑨+⑩ and pulse rate ⑪, the date and time ⑧, memory location number ⑳, selected user ⑭ and blood pressure range ⑮ are shown.
■ The values are shown for 30 seconds and saved for the selected user, then the device switches off automatically. You can also switch off the device manually by pressing the Start/Stop button ② ①.
5) Then remove the cuff 23.
9. Evaluating the blood pressure reading
The reading taken by the user is a self-check; it does not constitute a diagnosis or treatment. If you have abnormal blood pressure values, consult your doctor and follow your doctor's instructions regarding any necessary medications.
■ The pulse rate shown by this device is not suitable for use in diagnosing issues relating to cardiac rhythm.
If the user has a significant history of cardiac arrhythmias, the blood pressure measured in this way should be confirmed by a doctor.
9.1. General information about blood pressure
What is blood pressure?
Blood pressure is the force that blood exerts on the walls of the arteries. It is measured in millimetres of mercury (mmHg).
Blood pressure readings consist of two values:
- The higher value is the systolic pressure in the blood vessels when the heart contracts and pumps blood into the arteries.
- The lower value is the diastolic pressure, when the heart muscle relaxes and the heart fills again with blood.
Fluctuations in blood pressure are normal. Considerable differences between the values can arise even when performing two readings in succession. Single or irregular readings are therefore not a reliable indication of the actual blood pressure. A reliable evaluation is only possible when the blood pressure is measured regularly and under comparable conditions.
Why is blood pressure measured at home lower than when measured by the doctor?
People tend to be stressed or nervous when their blood pressure is checked in a medical environment, which often results in a higher value. Because their mood at home is more relaxed, the value is sometimes 20 to 30 mmHg lower.
In addition, if the measurement point is higher than the heart, such as if the cuff 23 is positioned incorrectly or because the device is sitting on table that is too high, the measured blood pressure value will be too low.
9.2. Guide values of the WHO
The World Health Organization (WHO) has defined the following general guide values – without taking gender and age into account – for evaluating blood pressure:
^1 Source: WHO, 1999; ^2 Source: National Health Service, 2023
| Evaluation | Colour of the risk indicator | Systolic (mmHg) | Diastolic (mmHg) | Reading |
| Stage 3 hypertension (severely high blood pressure) | Red | ≥ 180 ≥ 1 | 10 |  Consult a doctor Consult a doctor |
| Stage 2 hypertension (moderately high blood pressure) | Orange 160-179 100-109 | |||
| Stage 1 hypertension (high blood pressure) | Yellow 140 - 159 90-99 |  Regular checks by a doctor Regular checks by a doctor | ||
| High normal Green 130-139 85-89 | ||||
| Normal Green 120-129 80-84 |  Self-monitoring Self-monitoring | |||
| Optimal ^1 | Green < 120 < 80 | |||
| Blood pressure too low2 | Orange<90<60 |  Consult a doctor Consult a doctor | ||
Note
▶ Note that these are standard values that serve only as general guidelines. The individual blood pressure of different people can vary by sex, age, lifestyle and any pre-existing conditions.
It is therefore important to measure your blood pressure regularly and share the results with your doctor. Your doctor can then evaluate what values are normal for you and what values should be considered dangerous.
Excessively low blood pressure can also be hazardous to health and cause dizziness or fainting. Seek medical attention if you suddenly suffer from excessively low blood pressure.
9.3. Risk indicator
After taking the reading, the blood pressure range 15 appears on the left edge of the display based on the level of the blood pressure value. This respective risk indicator 7 gives you an indication of which range your blood pressure is in according to the WHO definition (see table).
Note
▶ If the systolic and diastolic values fall into two different ranges on the scale (e.g. systolic "high normal" and diastolic "normal"), the higher range (in this case "high normal") is always shown.
9.4. Cardiac arrhythmias
The device can identify any irregularities in the heart rate (arrhythmia) that arise during the reading. In this case, the cardiac arrhythmia symbol 13
♥) is shown at the end of the reading (the symbol is also shown when the measurement is accessed in the memory).
Arrhythmias occur when the electrical signals to the heart that coordinate the heartbeat do not function properly. This causes the heart to beat too quickly, too slowly or irregularly.
Cardiac arrhythmias can be a sign of heart disease, but they can also result from factors such as age, genetic predisposition, excessive consumption of stimulants such as alcohol, tobacco or coffee or from stress or lack of sleep. Only medical examinations can identify pathological causes of an arrhythmia.
If the symbol 13 ♥) appears after the reading, repeat the reading after one minute. Take care not to move or speak during the reading.
If the symbol 13 ♥) appears frequently, consult your doctor. Avoid self-diagnosis or self-treatment based on the reading results and follow the instructions of your doctor.
10. Accessing/deleting readings
The reading results are saved with the date and time in the selected user memory 14. After more than 120 readings for a user, the oldest readings are deleted.
■ While the device is switched off, press the Memory button ③ If no reading has been taken yet, "--" is shown. Otherwise, the data of the most recently selected user is shown.
To switch the user, press the Memory button ③ again.
■ Confirm the user selection with the Start/Stop button ② ①
Average values
The memory indicator 18 AVG is shown in the display 1 and the average values of all saved measurements of the user are shown.
On each additional press of the Memory button ③ the following are shown in succession:
The average values of the last 7 days of morning measurements (mornings: 05:00-09:00)
- TANG average values of the last 7 days of evening measurements (evenings: 18:00–20:00).
Single readings
If you press the Memory button ③ again, the AVG symbol disappears and the last single reading is shown. Each press of the Memory button ③ shows the further single readings, up to the oldest one. The corresponding memory location number ⑳ is shown in each case. You can hold the Memory button ③ pressed to advance rapidly.
■ Press the Start/Stop button ② ① to leave the memory menu.
Deleting the memory
To delete all the saved values of a user, select the respective user 📁 or 📋 in the memory menu.
Press and hold the Memory button ③ and the Start/Stop button ② at the same time for about 3 seconds.
"--" is shown for the memory location, systolic value, diastolic value and pulse. The values of the other user are retained.
■ Repeat the process for the other user to delete all values.
Entering values in the blood pressure logbook
Enter each individual value in your blood pressure logbook.
■ After every 30 blood pressure readings entered, check your average value.
■ Enter the average value in the specially provided field in your blood pressure logbook.
11. Troubleshooting
Error messages in the display
The display ① shows an error message in the following cases:
| Error code | Cause Solution | |
| Er01 | The pulse could not be determined correctly | Repeat the reading after 1 minute. Avoid moving and speaking during the reading. |
| Er02 | The determined blood pressure is outside of the measuring range | |
Er03  | Inflation not possible | Repeat the reading. Ensure that the cuff 23 and the air hose 21 are fitted and positioned correctly. Avoid moving and speaking during the reading. |
Er04  | Reading could not be performed | Repeat the reading after 1 minute. Avoid moving and speaking during the reading. |
| Er05 | Inflation pressure greater than 295 mmHg | Take another reading to check whether the cuff 23 can be inflated properly. Ensure than neither your arm nor any other heavy object is lying on the air hose 21 and that it is not kinked. |
| Er06 | System error Contact | Customer Service. |
| Lo | Battery voltage lower than the required operating voltage | Replace the batteries. |
Correcting small malfunctions yourself
If malfunctions (or abnormal states) arise during operation, you can check and correct these with the information in the following table:
| Malfunction Possible solution | |
| After inserting the batteries and switching on the device, the display 1 remains dark. | Check whether the device is supplied with power. |
| The air pump begins to operate, but the pressure in the cuff 23 does not rise. | Check whether the air hose connector 22 is leaking or whether the air hose 21 is fully inserted into the air port 6. |
| The measured blood pressure values are very irregular or the blood pressure is exceptionally high or low. | Fit the cuff 23 correctly. If your upper arm is covered by a sleeve or other articles of clothing, remove these. Take the blood pressure reading again. |
| The value obtained by you differs from the one obtained by your doctor. | Record the daily reading values and consult your doctor. |
| Once the device has pressurised, the air pressure in the cuff 23 increases only slowly or not at all. | The air hose connector 22 has come free of the air port 6. Re-insert the air hose connector 22. |
If the malfunction cannot be corrected despite these measures, please contact the Customer Service department.
12. Cleaning

DANGER!
▶ Never immerse the device in water or other liquids!

ATTENTION!
▶ Do not use abrasive or caustic cleaning agents or solvents. These can attack the surface and damage the device beyond repair.
- Clean the device, the cuff 23 and the air hose 21 with a slightly damp cloth. For disinfecting the cuff 23, we recommend cleaning it with a soft cloth that is saturated with 75% medical alcohol. Allow the device to dry completely before reusing it or putting it away. We recommend cleaning at least once per month.
■ Also wipe the storage pouch with the same damp cloth.
13. Storage
■ Remove the air hose 21 from the device. Bend the air hose 21 carefully to avoid kinking it, and insert it into the cuff 23.
■ If you do not intend to use the device for an extended period of time, remove the batteries.
■ Store the device in the storage pouch 24 in a dust-free and dry location. Note the storage and transport conditions (see 15. Technical data).
14. Disposal
14.1. Disposal of the device
The symbol of the crossed-out wheelie bin means that this device may not be disposed of in regular household waste at the end of its service life. The device must be deposited at an established collection point, recycling centre or disposal company.
Please delete all personal data before returning a device.
Before returning a device, please remove any batteries that are not permanently enclosed within the old device as well as any light sources that can be removed without destroying the device. Then dispose of these items separately.
14.2. Disposal of the packaging
The packaging is made from environmentally friendly material which can be disposed of at your local recycling plant.
Dispose of the packaging in an environmentally friendly manner.
14.3. Disposal of batteries
Batteries/rechargeable batteries must be treated as hazardous waste and must therefore be disposed of in an environmentally sound manner by appropriate bodies (retailers, specialist retailers, public municipal bodies, commercial disposal companies). Batteries may contain toxic heavy metals.
The heavy metals contained are identified by letters below the symbol:
Cd = cadmium, Hg = mercury, Pb = lead.
For this reason, do not dispose of batteries in domestic waste. Take them to a specialist collection point.
Only return batteries or rechargeable batteries when they are fully discharged.
15. Technical data
| Device name, model SPBDM 1.5 A1, FDBP-A16 | |
| Measurement method | Oscillometric, non-invasive blood pressure measurement on the upper arm |
| Measuring rangeRated cuff pressureMeasurement pressurePulse | 0-295 mmHgSystolic: 60-250 mmHgDiastolic: 30-195 mmHg40-199 beats/min. |
| Max. measurement deviation of the cuff pressure | ±3 mmHg |
| Max. measurement deviation of the pulse display | ±5% |
| Max. standard deviation as per clinical testing | Systolic: 8 mmHgDiastolic: 8 mmHg |
| Memory 2 users, 120 readings each | |
| Operating conditions | +5 °C to +40 °C ambient temperature15%-90% relative humidity (non-condensing)700-1060 hPA air pressure |
| Transport/storage conditions | -25 °C to +55 °C ambient temperature< 93% relative humidity (non-condensing) |
| Power supply | 3 x 1.5 V === AAA batteries (LR03)Mains operation with USB cable and mains adapter (not included):5.0 V === max. 1.0 A |
| Battery lifespan | About 150 measurement cycles, depending on the level of the blood pressure and the inflation pressure |
| Dimensions (L x W x H) | 125 x 95 x 55 mm |
| Weight | Approx. 210 g (main device without batteries) |
| Classification | Internal supply, IP21, no AP or APG, continuous operation, application portion type BF |
Information on electromagnetic compatibility
■ The device is suitable for operation in all environments as indicated in these instructions for use, including domestic environments.

WARNING!
This device corresponds to the standard EN 60601-1-2 and is subject to special precautionary measures with regard to electromagnetic compatibility. Please note that portable and mobile HF communication devices (including peripheral devices such as antenna cables and external antennas) may influence the performance of this device. Avoid strong electromagnetic interference during use, such as in the vicinity of mobile telephones, microwave ovens, etc. Keep all parts of the upper arm blood pressure monitor SPBDM 1.5 A1, including all supplied cables, at least 30 cm away from such devices.
■ Using this upper arm blood pressure monitor directly next to or stacked with other devices should be avoided as this can result in faulty operation. If such use is necessary, this device and the other devices should be observed to ensure that they are functioning properly.
The use of accessories, adapters and cables that are not specified or provided by the manufacturer can lead to increased electromagnetic emissions or reduced immunity to electromagnetic interference and can result in faulty operation of the device.
- Failure to follow this instruction can result in reduced device performance.
■ This upper arm blood pressure monitor cannot be used in an MRI environment.
■ The device complies with the following standards, laws and regulations:
-Medical Device Regulation (EU) 2017/745
-Medical Device Law Implementation Act (MPDG)
-EN 60601-1
-EN 60601-1-2
-EN 60601-1-11
-EN IEC 80601-2-30
Reporting of undesired events for users/patients in EU countries
If users/patients are of the opinion that they have suffered a serious incident in connection with the product, such users/patients are requested to report the incident to the manufacturer and/or the manufacturer's authorised agent as well as to the competent authority of the Member State in which the users/patients are located.
16.KompernassHandelsGmbHwarranty
Dear Customer,
This appliance has a 3-year warranty valid from the date of purchase. If this product has any faults, you, the buyer, have certain statutory rights. Your statutory rights are not restricted in any way by the warranty described below.
Warranty conditions
The warranty period starts on the date of purchase. Please keep your receipt in a safe place. This will be required as proof of purchase.
If any material or manufacturing fault occurs within three years of the date of purchase of the product, we will either repair or replace the product for you or refund the purchase price (at our discretion). This warranty service requires that you present the defective appliance and the proof of purchase (receipt) within the three-year warranty period, along with a brief written description of the fault and of when it occurred.
If the defect is covered by the warranty, your product will either be repaired or replaced by us. The repair or replacement of a product does not signify the beginning of a new warranty period.
Warranty period and statutory claims for defects
The warranty period is not prolonged by repairs effected under the warranty. This also applies to replaced and repaired components. Any damage and defects present at the time of purchase must be reported immediately after unpacking. Repairs carried out after expiry of the warranty period shall be subject to a fee.
Scope of the warranty
This appliance has been manufactured in accordance with strict quality guidelines and inspected meticulously prior to delivery.
The warranty covers material faults or production faults. The warranty does not extend to product parts subject to normal wear and tear or to fragile parts which could be considered as consumable parts such as switches or parts made of glass.
The warranty does not apply if the product has been damaged, improperly used or improperly maintained. The directions in the operating instructions for the product regarding proper use of the product are to be strictly followed. Uses and actions that are discouraged in the operating instructions or which are warned against must be avoided.
This product is intended solely for private use and not for commercial purposes. The warranty shall be deemed void in cases of misuse or improper handling, use of force and modifications / repairs which have not been carried out by one of our authorised Service centres.
Warranty claim procedure
To ensure quick processing of your case, please observe the following instructions:
■ Please have the till receipt and the item number (IAN) 487612_2501 available as proof of purchase.
■ You will find the item number on the type plate on the product, an engraving on the product, on the front page of the operating instructions (below left) or on the sticker on the rear or bottom of the product.
If functional or other defects occur, please contact the service department listed either by telephone or by e-mail.
- You can return a defective product to us free of charge to the service address that will be provided to you. Ensure that you enclose the proof of purchase (till receipt) and information about what the defect is and when it occurred.

You can download these instructions along with many other manuals, product videos and installation software at www.lidl-service.com.
This QR code will take you directly to the Lidl service page (www.lidl-service.com) where you can open your operating instructions by entering the item number (IAN) 487612_2501.
16.1. Service

Service Great Britain
Tel.: 0800 404 7657
E-Mail: kompernass@lidl.co.uk

Servicelreland
Tel.: 1800 101010
E-Mail: kompernass@lidl.ie
IAN 487612_2501
16.2. Importer
Please note that the following address is not the service address.
Please use the service address provided in the operating instructions.
KOMPERNASS HANDELS GMBH
BURGSTRASSE 21
44867 BOCHUM
GERMANY
www.kompernass.com
Inhaltsverzeichnis
1. Einführung 34
KOMPERNASS HANDELS GMBH
BURGSTRASSE 21
44867 BOCHUM
DEUTSCHLAND
www.kompernass.com
Table des matières
KOMPERNASS HANDELS GMBH
BURGSTRASSE 21
44867 BOCHUM
ALLEMAGNE
www.kompernass.com
Inhoud
2.1. Contra-indications 108
2.1. Contra-indications
Lever batterijen/accu's in ontladen toestand in.
KOMPERNASS HANDELS GMBH
BURGSTRASSE 21
44867 BOCHUM
DUITSLAND
www.kompernass.com
Obsah
natural_image
Simple line drawing of a trash bin with crossed lines indicating no waste or restriction (no text or symbols)natural_image
Symbol of a trash bin crossed with a diagonal line, representing no waste or discharge (no text or labels)KOMPERNASS HANDELS GMBH
BURGSTRASSE 21
44867 BOCHUM
NĚMECKO
www.kompernass.com
Spis treści
KOMPERNASS HANDELS GMBH
BURGSTRASSE 21
44867 BOCHUM
NIEMCY
www.kompernass.com
Obsah
natural_image
Simple line drawing of a trash bin with two crossed lines indicating no waste or prohibition (no text or symbols)natural_image
Symbol of a trash bin crossed out by two diagonal lines (no text or numbers present)KOMPERNASS HANDELS GMBH
BURGSTRASSE 21
44867 BOCHUM
NEMECKO
www.kompernass.com
Índice
natural_image
Symbol of a trash bin crossed with a diagonal line, representing no waste or discharge (no text or labels)natural_image
Symbol of a trash bin crossed out by two diagonal lines (no text or numbers present)KOMPERNASS HANDELS GMBH
BURGSTRASSE 21
44867 BOCHUM
ALEMANIA
www.kompernass.com
Indholdsfortegnelse
1. Indledning 274
2. Anvendelsesområde 274
2.1. Kontraindikationer 274
3. Pakkens indhold 275
4. Anvendte advarsler og symboler 275
natural_image
Symbol of a trash bin crossed with a diagonal line, representing no waste or discharge (no text or labels)natural_image
Symbol of a trash bin crossed out by two crossed lines (no text or numbers present)KOMPERNASS HANDELS GMBH
BURGSTRASSE 21
44867 BOCHUM
TYSKLAND
www.kompernass.com
Indice
1. Introduzione 306
2. Uso conforme 306
natural_image
Symbol of a trash bin crossed out by two diagonal lines (no text or numbers present)natural_image
Symbol of a trash bin crossed out by two diagonal lines (no text or numbers present)KOMPERNASS HANDELS GMBH
BURGSTRASSE 21
44867 BOCHUM
GERMANIA
www.kompernass.com
Tartalomjegyzék
1. Bevezető 340
natural_image
Symbol of a trash bin crossed out by two diagonal lines (no text or numbers present)natural_image
Symbol of a trash bin crossed out by two diagonal lines (no text or numbers present)Cd = kadmium, Hg = higany, Pb = ólom.
KOMPERNASS HANDELS GMBH
BURGSTRASSE 21
44867 BOCHUM
NÉMETORSZÁG
www.kompernass.com


FAMIDOC TECHNOLOGY CO., LTD.
Add.: No. 212 Yilong Road, Changan Town, Dongguan,
Guangdong Province, 523853, P.R. China
TEL.: +86-769-89272488, FAX: +86-769-89272498
Website: www.famidoc.com

SHANGHAI INTERNATIONAL HOLDING CORP. GMBH (EUROPE)
KOMPERNASS HANDELS GMBH
BURGSTRASSE 21 • 44867 BOCHUM
GERMANY • www.kompernass.com
- UPPER ARM BLOOD PRESSURE MONITOR OBERARM-BLUTDRUCKMESSGERÄT TENSIOMÈTRE DE BRAS SPBDM 1.5 A1
- UPPER ARM BLOOD PRESSURE MONITOR
- TENSIOMÈTRE DE BRAS
- TLAKOMĚR
- TLAKOMER NA RAMENO
- BLODTRYKSMÅLER TIL OVERARMEN
- Contents
- Introduction
- Intended use
- Contraindications
- Package contents
- Warnings and symbols used
- Safety information
- WARNING!
- CAUTION!
- ATTENTION!
- Safety instructions for handling batteries
- Device description
- Figure A:
- Figure B:
- Figure C:
- Getting started
- Inserting/replacing the batteries
- Note
- Notes
- Mains power operation
- Adjusting settings
- Hour format
- Date
- i Note
- Time
- Taking a blood pressure reading
- Putting on the cuff
- Assuming the correct body posture
- Selecting the user and starting the reading
- Note
- Evaluating the blood pressure reading
- General information about blood pressure
- What is blood pressure?
- Why is blood pressure measured at home lower than when measured by the doctor?
- Guide values of the WHO
- Risk indicator
- Cardiac arrhythmias
- Accessing/deleting readings
- Average values
- Single readings
- Deleting the memory
- Entering values in the blood pressure logbook
- Troubleshooting
- Error messages in the display
- Correcting small malfunctions yourself
- Cleaning
- DANGER!
- Storage
- Disposal
- Disposal of the device
- Disposal of the packaging
- Disposal of batteries
- Technical data
- Information on electromagnetic compatibility
- Reporting of undesired events for users/patients in EU countries
- 16.KompernassHandelsGmbHwarranty
- Warranty conditions
- Warranty period and statutory claims for defects
- Scope of the warranty
- Warranty claim procedure
- Service
- Service Great Britain
- Servicelreland
- Importer
- Inhaltsverzeichnis
- Einführung 34
- Table des matières
- Inhoud
- Contra-indications
- Obsah
- Spis treści
- Índice
- Indholdsfortegnelse
- Indledning 274
- Anvendelsesområde 274
- Pakkens indhold 275
- Anvendte advarsler og symboler 275
- Indice
- Introduzione 306
- Uso conforme 306
- Tartalomjegyzék
- Bevezető 340
- FAMIDOC TECHNOLOGY CO., LTD.
- SHANGHAI INTERNATIONAL HOLDING CORP. GMBH (EUROPE)
- KOMPERNASS HANDELS GMBH
Brand : Sensiplast
Model : SPBDM 1.5 A1
Category : Blood pressure monitor