
PBRM 39 D3 - Lawn mower PARKSIDE - Free user manual and instructions
Find the device manual for free PBRM 39 D3 PARKSIDE in PDF.


User questions about PBRM 39 D3 PARKSIDE
0 question about this device. Answer the ones you know or ask your own.
Ask a new question about this device
Download the instructions for your Lawn mower in PDF format for free! Find your manual PBRM 39 D3 - PARKSIDE and take your electronic device back in hand. On this page are published all the documents necessary for the use of your device. PBRM 39 D3 by PARKSIDE.
USER MANUAL PBRM 39 D3 PARKSIDE
natural_image
Black-and-white photo of a park lawn mower with visible blades and wheels (no text or symbols)
Translation of the original instructions
NL BE
Benzine grasmaaier
Before reading, unfold the page containing the illustrations and familiarise yourself with all functions of the device.
FR BE
Service-Center....22
Importeur.... 22
Scope of delivery/accessories......24
Overview.... 25
Description of functions....25
Technical data....25
Safety information....26
Meaning of the safety information...... 26
Pictograms and symbols...... 27
Safety information for lawn mowers..... 28
Residual risks....30
Preparation....30
Safety devices....31
Control elements....31
Fitting the bar....31
Fitting the bail bar.... 31
Fitting the starter cable guide....31
Fitting the starter handle....31
Setting the cutting height....31
Fitting the wheels....32
Attaching the grass catcher....32
Removing the grass catcher....32
Emptying the grass catcher....32
Mulching kit....32
Filling with petrol....33
Filling with engine oil....33
Checking the oil level....33
Operation.... 33
Before use....33
Working instructions.... 33
Switching on and off....34
Transport....34
Cleaning, maintenance and storage..... 35
Cleaning....35
Maintenance.... 35
Storage.... 37
Troubleshooting.... 38
Disposal/environmental protection......39
Disposal information for green waste....39
Service.... 39
Guarantee.... 39
Repair service.... 40
Service Centre.... 41
Importer.... 41
Spare parts and accessories.... 41
Translation of the original EU declaration of conformity.... 42
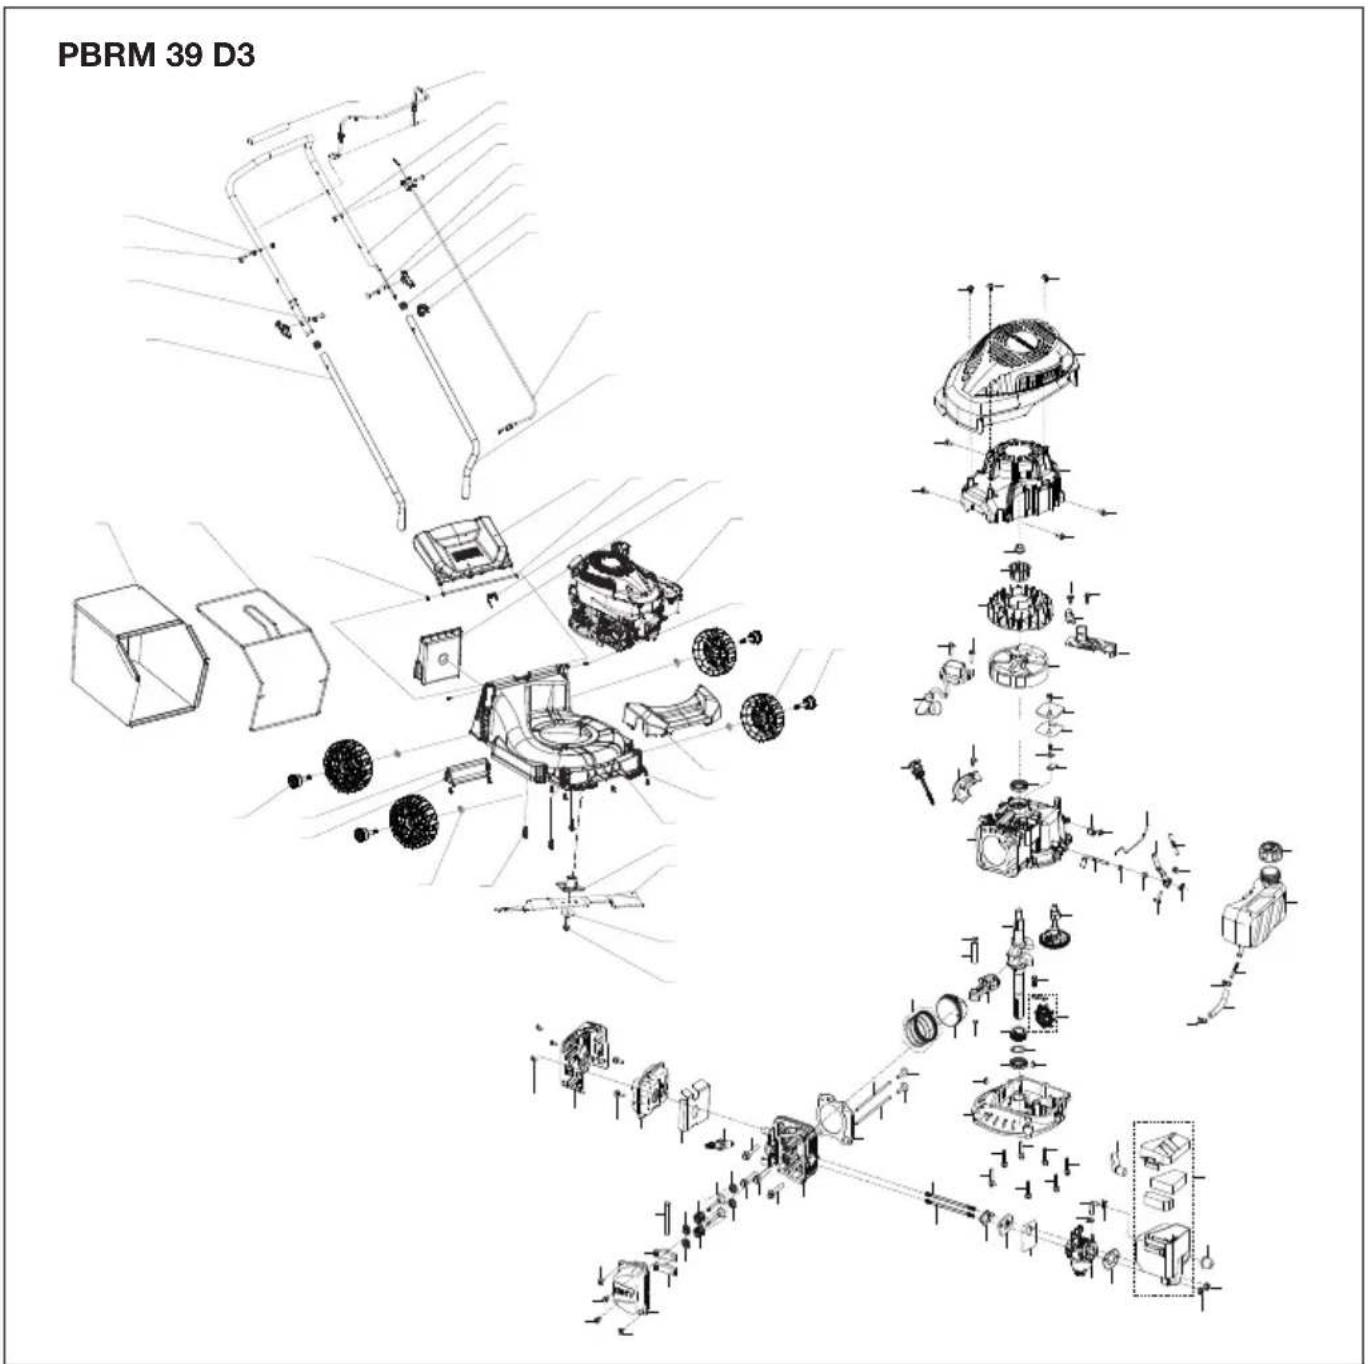
Exploded view.... 231
Introduction
Congratulations on purchasing your new petrol lawnmower (hereinafter referred to as product or device).
You have chosen a high-quality device. This device was quality-tested and subjected to a final inspection during production, therefore ensuring proper functioning of your device.

The instruction manual forms part of this device. It contains important information on safety, use and disposal. Read the instruction manual carefully. Familiarise yourself with the controls and how to use the device correctly. Use the device only as described and for the stated fields of application. Store the instruction manual carefully and ensure that all documents are handed over in the event that the device is passed on to another user.
Proper use
This device is only intended for the following use:
- Lowing lawns and grassed areas in residential applications.
Use of the device in the rain or a damp environment is prohibited.
The device is intended for use by adults. Children under the age of 16 may not use the device, except under supervision.
Any other use that is not expressly permitted in this instruction manual may pose a serious hazard to the user and result in damage to the device. The operator or user of the machine is responsible for any accidents or personal injury and/or material damage to third parties or their property. The machine is intended to be used by do-it-yourselfers. It was not designed for heavy commercial use. The warranty is void in the case of commercial use. The manufacturer is not liable for damage caused by improper use or incorrect operation.
Scope of delivery/accessories
Unpack the device and check that everything is present.
Dispose of the packaging material properly.
- Petrol Lawnmower
- 2x Lower bar
- 2x Wing nut
- 2x Screw (Upper bar)
• 2x Washer (Upper bar)
• 2x Phillips screw (Lower bar) - 4x Washer (Wheels)
- 4x Wheel bolt
- Screwdriver*
- Spark plug wrench
- Cable holder
- Starter cable guide
- Mulching kit
- Grass catcher
• Translation of the original instructions
*The screwdriver supplied can be used as both a slotted and a Phillips screwdriver. You can change the screw variant by repositioning the handle.
Overview

The illustrations for the device can be found on the front and back fold-out page.
1 Upper bar
2 Bail bar
3 Bowden cable
4 Machine cable
5 Cable holder
6 Engine cover with ventilation holes (finger protection)
7 Air filter cover
8 Air filter housing
9 Recessed grip
10 Exhaust guard
11 Wheel
12 Device housing
13 Auxiliary handle (Grass catcher)
14 Grass catcher
15 Lower bar
16 Handle
17 Impact protection
18 Starter cable guide
19 Starter handle with starter cable
20 Mulching kit
21 Spark plug wrench
22 Screwdriver
23 Petrol pump (primer)
24 Petrol tank
25 Tank cover
(Fig. A)
26 Phillips screw
27 Holder (Lower bar)
(Fig. B)
28 Screw (Upper bar)
29 Wing nut
30 Washer
(Fig. C)
31 Wheel bolt
32 Washer
33 Holder (Wheel bolt)
(Fig. F)
34 Oil dipstick
(Fig. G)
35 Filler plugs
(Fig. H)
36 Spark plug
37 Spark plug connector
(Fig. I)
38 Air filter fine
39 Air filter rough
(Fig. J)
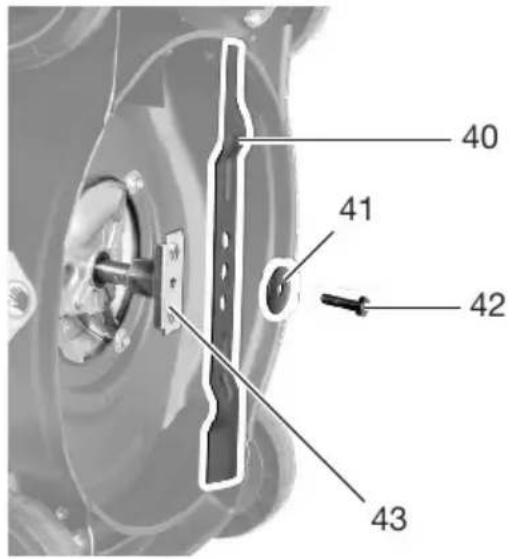
40 Blade
41 Clamping disk
42 Blade bolt
43 Motor spindle
Description of functions
The machine has a plastic housing with a petrol engine and a grass catcher. The cutting tool rotates parallel to the 3-stage cutting plane.
Please refer to the descriptions below for information on how the operating elements work.
Technical data
Petrol Lawnmower ...... PBRM 39 D3
Engine displacement .... 127.1 cm ^3 (cc)
No-load rotation speed n_0 ..... 3000 min ^-1
Power 2.0 kW / 2.7 PS
max. speed 3600 min ^-1
Volume Petrol tank 0.8 l (800 ml)
Volume Engine oil tank ....0.4 l (400 ml)
Cutting width .... ∅ 390 mm (39 cm)
Cutting height 30 - 66 mm
Volume Grass catcher ....35 I
Weight (incl. grass catcher, empty tank) 16.0 kg
Sound pressure level ( L_pA ) 82.6 dB; K_pA=3 dB
Sound power level ( L_WA )
– Guaranteed ....96 dB
- Measured .....93.5 dB; K_WA=1.81 dB
Vibration ( a_h ) at upper bar
......4.7 m/s ^2 ; K= 2.4 m/s ^2
The carbon dioxide (CO2) emission value determined by an EU type-approval procedure for this machine is: 1227.14 g/kWh
CAUTION! Hearing damage! Wear ear protection.
Levels of noise and vibration were determined according to the standards and regulations in the declaration of conformity.
The specified total vibration value was determined according to the following standard: ISO 5395-1:2013
The specified noise emission values were determined in accordance with the following standard: ISO 5395-1:2013 Annex F
The values have been determined according to a standardised test procedure and can be used to compare one tool with another. The specified total vibration value and the stated specified noise emission value can also be used for a provisional assessment of the load.
WARNING! The vibration and noise emissions may deviate from the specified values during actual use of the device, depending on how the device is being used. Safety measures for the protection of the operator are to be determined that are based on an estimate of the actual vibration load under the real operating conditions (for this, all parts of the operating cycle are to be taken into account, for example, times in which the device is turned off, and those during which it is turned on but running without a load).
Keep noise and vibration to a minimum!
- Only use machines that are in perfect working order.
- Maintain and clean the machine regularly.
- Adapt your working method to the machine.
- Do not overload the machine.
- Have the machine inspected thoroughly, wherever possible.
- Switch off the machine when it is not in use.
- Wear gloves.
WARNING! During prolonged work, the vibration in the operator's hands can lead to circulatory disorders (Raynaud's syndrome). Raynaud's syndrome is a vascular disease in which the small blood vessels in the fingers and toes seize up. The affected areas are no longer supplied with sufficient blood and therefore appear extremely pale. Frequent use of vibrating products can cause nerve damage in people whose blood circulation is impaired (e.g. smokers, diabetics). If you notice any unusual impairment, stop work immediately and consult a doctor.
Pay attention to the following instructions to reduce dangers:
- Keep your body and especially your hands warm in cold weather.
- Take regular breaks and move your hands while doing so to promote blood circulation.
- Keep machine vibration to a minimum by regular maintenance and fixed parts on the machine.
• Take rest periods when needed and limit working time to the minimum necessary.
Safety information
This section deals with the basic safety instructions for using the device.
Meaning of the safety information
⚠️ DANGER! If you do not observe this safety instruction, an accident will occur. The result of which is severe bodily injury or death.
⚠ WARNING! If you do not observe this safety instruction, an accident may occur. The result of which is likely severe bodily injury or death.
⚠️ CAUTION! If you do not observe this safety instruction, an accident will occur. The result of which is likely minor or moderate bodily injury.
NOTICE! If you do not observe this safety instruction, an accident will occur. The result of which is possible damage to property.
Pictograms and symbols
Symbols on the device

Attention! Read the instruction manual

Guaranteed sound power level LWA in dB(A)


Risk of injury due to ejected parts! Keep persons in the vicinity away from the device

Sharp cutting unit! Keep away from feet and hands.

Switch off the engine before maintenance work and unplug the spark plug connector.


Caution - Hot surfaces! Risk of burn injury

Keep persons in the vicinity away from the device

Caution - Toxic vapours!
Do not operate machine in closed rooms.


Caution – Petrol is flammable! Do not refuel while the engine is running.


Use of the device in the rain or a damp environment is prohibited. Attention! Overtravel of the cutting unit


Switch off the engine when you leave the machine.

Keep nearby persons and children away from the device.

Open flames, fire, open ignition sources and smoking are prohibited.

Caution - Hot surfaces! Risk of burn injury

Danger! Keep hands and feet at a safe distance

Cutting circle

x3 Press the petrol pump 3 times.

Filling with engine oil


Fuel to be used
Symbol on upper bar
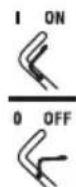
Switch on the machine (ON): Pull up the bail bar Switch off the machine (OFF): Let go of the bail bar
Symbol on fuel cap

max. 10% ethanol
Symbol on the hangtag

Press the fuel pump

Switch on the machine (ON): Pull up the bail bar

Pull the starter cord
Symbols used in the instruction manual

Highly flammable

Toxic

Environmentally hazardous

Use protective gloves
Safety information for lawn mowers
⚠ WARNING! Risk of injury. Failure to follow the safety instructions and guidelines may result in fire and/or serious injuries. Read all safety instructions and guidelines carefully.
Notes
- Read the instruction manual carefully. Familiarise yourself with the adjustment settings and how to use the machine correctly.
- In case of uncertainties, allow yourself to be given instruction concerning use of the machine and prohibited operations.
- Pay attention, be aware of what you are doing and take the utmost care when working. Do not use the machine if you are tired or ill or you are under the influence of drugs, alcohol or other medication. A moment of inattention whilst using the machine can result in serious injuries.
- This machine is not intended for use by people with restricted physical, sensory or mental capabilities; those who do not have sufficient experience in using the machine or knowledge of the machine must not use it unless they are supervised by an individual responsible for their safety, or receive instructions from this person on how to use the machine.
-
Children must be supervised to ensure that they do not play with the machine.
-
Never allow children or other people who are unfamiliar with the instruction manual to use the machine. Local regulations may specify the minimum age of the user.
- Never mow if there are people, particularly children or animals, nearby. Distractions can cause you to lose control of the machine.
- Remember that the user is responsible for accidents involving other people or their property.
- Observe noise protection rules and other local regulations.
Preparation
- Slip-resistant shoes and long trousers must always be worn during mowing. Do not mow barefoot or in light sandals. Loose clothing, jewellery or long hair may get caught in moving parts. Wearing suitable clothing reduces the risk of injuries.
- Check the terrain where you will be using machine and remove all objects (e.g. stones, sticks, wires, toys) which may be drawn into the machine and ejected.
- Warning. Petrol is highly flammable. Fire or explosions can lead to severe burns:
- Only store petrol in the containers provided for this purpose;
- Only refuel outdoors and do not smoke while refuelling;
- Petrol has to be added before starting the engine. Do not open the fuel cap or add petrol while the engine is running or when the machine is hot;
- If there was an accidental petrol spill, do not attempt to start the engine. Instead, remove the machine from the surface contaminated with petrol. Do not try to ignite the engine until all petrol vapours have evaporated;
- If the fuel tank or other tank caps are damaged, replace them for safety reasons.
- Replace defective mufflers.
- Before use, always perform a visual inspection to check whether the cutting tools, fastening bolts and the entire cutting unit are worn out or damaged. Worn or damaged tools and bolts must only be replaced as a set to prevent imbalance.
- Take care when using machines with several cutting tools since the movement of
one blade can lead to rotation of the other blades.
- Only use spare parts and accessories which are supplied and recommended by the manufacturer. Using externally produced parts can cause injury, and void any warranty claims.
Operation
-
Never let the internal combustion engine run in a confined space, as dangerous carbon monoxide can accumulate.
-
Use the machine only in daylight or with good artificial lighting. Working in areas without lighting can result in accidents.
-
Do not work with the machine if there is a risk of lightning strike. Danger of electric shock.
-
Attention! The exhaust gases from the lawnmower contain toxic substances.
-
Avoid operating the machine in poor weather conditions, especially when there is a lightning hazard.
-
Whenever possible, do not use the machine on wet grass.
-
Always ensure that you are standing securely, especially on slopes, nearby rubbish dumps, ditches or dykes. This will help you to have better control of the machine in unexpected situations.
• Always move crosswise across slopes, never up or down.
• Take special care when changing the direction of travel on slopes.
- Do not mow on overly steep slopes (max. 10-15°).
-
Only guide machine at walking pace.
-
Take special care when turning the machine around or pulling it towards you.
-
Stop the cutting tool if the machine needs to be tipped over, for transport across areas other than grass and when the machine is moved from and to the area to be mowed.
-
Never use the machine with damaged protective equipment or protective grating or without installed protective equipment, e.g. without impact protection and/or grass collection equipment. This ensures the safety of the machine is not adversely affected.
-
Do not change the controller settings of the engine and do not overturn it. This could damage the machine.
-
Before starting the engine, release all blades and drives. Turn on the machine with care in accordance with the manufacturer instructions. Ensure your feet are at a sufficient distance from the cutting tool. There is a risk of injury.
-
When starting or switching on the engine, the machine must not be tilted, unless it is required to lift the machine in the process. In this event, tilt the machine only as far as absolutely necessary and lift it only on the side facing away from the user.
-
Do not start the engine if you are standing in front of the ejector opening.
-
Switch on the engine as instructed and only when your feet are at a safe distance away from the cutting tools.
-
Never place your hands or feet on or below rotating parts. Always keep away from the ejector opening. A moment of inattention when using the machine can result in serious injuries.
-
Never lift or carry the machine when the engine is running.
-
Shut off the engine, disconnect the spark plug connector. Make sure that all moving parts have come to a complete stop and remove the ignition key, if present:
- before removing obstructions, or loosening blockages from the ejector opening;
- before checking or cleaning the apparatus or performing any work on it;
- if a foreign object has been hit. Check for damages to the machine and perform any required repairs before starting and working with the machine again;
- if the machine starts to vibrate abnormally strong, an immediate inspection is required.
- when leaving the machine;
- before refuelling.
-
Never leave the machine unattended at the workplace.
-
Do not work with a damaged or incomplete machine or one which has been converted without the permission of the manufacturer. Using the machine for anything other than its intended use can lead to dangerous situations.
-
The throttle valve must be closed when the engine comes to a stop. If the engine has a petrol shut-off valve, it must be closed after mowing.
Cleaning, maintenance and storage
- Make sure that all nuts, bolts and screws are properly tightened, and that the machine is in safe working order. Many accidents are caused by poorly maintained machines.
- Never store the machine with fuel in its petrol tank inside a building, where fuel vapours may be coming in contact with fire or sparks.
- Allow the engine to cool down before you store the machine in an enclosed space. Possible fire hazard.
- To avoid risk of fire, keep engine, exhaust and the area around the petrol tank free of grass, leaves or leaking grease (engine oil).
- Check the grass catcher regularly for wear or loss of function.
- Replace worn or damaged parts in the interests of safety. Replace defective mufflers.
- If you need to drain the petrol tank, you must do so outside.
- Handle your machine with care. Keep the tools sharpened and clean in order to be able to work better and safer. Follow the maintenance instructions.
- Do not try to repair the machine by yourself unless you have professional training. All work not specified in this instruction manual may only be carried out by customer service centres authorised by us.
- Store the machine in a dry place and out of reach of children. Machines can be dangerous if operated by inexperienced persons.
- Do not manipulate or disable the lawnmower's safety systems or protective devices. The user should not change or tamper with any sealed engine speed control settings.
Additional safety instructions
- Only use accessories recommended by PARKSIDE. Unsuitable accessories may cause electric shock or fire.
-
Only mow when visibility is good. Keep third parties away from you.
-
Check the machine regularly and ensure that all start locks and pushbuttons are working properly before each use.
- Be careful when making adjustments to the product and avoid pinching fingers between the moving blade and the fixed part of the machine.
- CAUTION! The lawn mower must not be operated without either the complete grass catcher or the self-closing separating protective device for the discharge opening being fitted.
- It is necessary to keep the lawn mower in good working order.
Residual risks
There will always be residual risks even if you operate this device according to the instructions. The following hazards may occur in connection with the type and design of this device:
- Eye damage if no suitable eye protection is worn.
- Hearing damage if suitable ear protection is not worn.
- Health injuries resulting from the effect of hand/arm vibration in the event that the tool is used over a longer period of time or is not used and maintained properly.
- Cutting injuries
- Injuries caused by moving parts or hot surfaces.
WARNING! Danger due to electromagnetic field generated while the tool is in operation. Under certain circumstances, this field may negatively affect active or passive medical implants. In order to reduce the danger of serious or fatal injuries, we recommend that individuals who wear medical implants should consult their doctor and the manufacturer of the implant before operating the tool.
Preparation
⚠ WARNING! Risk of injury due to unintentional start-up. Only work on the machine when the blade is switched off and stationary. Do not start the engine until the machine is fully prepared for use.
Only carry out work that you know you are capable of. If in doubt, consult an expert or our service centre directly.
Safety devices
The following safety devices are provided to protect the user and the device:
Bail bar (2)
The machine stops when you let go of the bail bar.
Exhaust guard (10)
It prevents hands or flammable materials from coming into contact with the hot exhaust.
Impact protection (17)
It protects the operator from ejected parts and unintentional blade contact when mowing without a grass catcher (14).
Control elements
Familiarise yourself with the operating elements before using the device for the first time.
Blade stopping device
Notes
- Regularly examine the blade stopping device.
- The blade must stop within 7 seconds.
Procedure
- Let go of the bail bar (2). The engine switches off and the blade is braked.
Fitting the bar
Notes
- Make sure that the Bowden cable (3) is not squeezed when assembling the bar.
Fitting the lower bar
(Fig. A)
- Insert the lower bars (15) into the holder on the machine housing (12). When viewed in the direction of travel, the lower bar (15) with pre-assembled starter cable guide (18) must be inserted into the right-hand receptacle on the machine housing (12).
- Fasten the lower bars (15) with one Phillips screw (26) each. You can use the screwdriver (22) supplied for this purpose.
Fitting the upper bar
(Fig. B)
-
Place the upper bar (1) on the lower bar (15).
-
Push a screw (28) through the drill holes on both sides of the bar rods so that it protrudes outwards.
- Screw the wing nut (29) onto the screw (28) and washer (30).
- The starter handle with starter rope (19) must be attached to the starter rope guide (18) on the right-hand side of the machine when viewed in the direction of travel.
- Attach the machine cable (4) to the lower bar (5) using the cable holder (15).
Fitting the bail bar
- First insert the double-bent end of the bail bar (2) into the holder of the upper bar (1). To do this, use the second holder from the top.
- Hook the Bowden cable (3) into the holder of the bail bar (2).
- Now insert the other side of the bail bar (2) into the corresponding holder on the upper bar (1). Make sure that the same position is used as on the other side.
Fitting the starter cable guide
Tools required
- Spanner (not included)
Procedure
- Insert the starter cable guide (18) through the holder provided on the upper bar (1). The thread of the starter cable guide (18) should protrude outwards.
- Screw the enclosed cap nut onto the starter cable guide (18).
- Tighten the cap nut with a spanner.
- Check that the starter rope guide (18) is firmly seated and correctly aligned.
Fitting the starter handle
- Slowly pull the starter handle with starter rope (19) towards the upper bar (1).
- Hook the starter handle with starter rope (19) into the starter rope guide (18).
Setting the cutting height
Lawn care
Regular mowing stimulates the grass to an increased leaf formation, while at the same time killing weeds. As a result, the lawn becomes denser after each mowing and the outcome is a healthier lawn in general. The first cut takes place roughly in April when the
grass is about 70-80 mm high. During the main growing season, the lawn is mowed at least once a week.
Selecting the correct cutting height
A high cutting height should be selected for the first mowing of the season. The correct cutting height is between 25 and 40 mm for an ornamental lawn and about 40 to 60 mm for a utility lawn.
- The machine has 3 cutting heights: 30 - 66 mm
- The cutting height of this machine is determined by the wheel fitting (see Fitting the wheels, p. 32).
Fitting the wheels
Notes
- First mount the bars (1+15) as mounting the wheel first makes access to the Phillips screw (26) for bar mounting difficult.
- The cutting height is set by positioning the wheels.
Procedure (Fig. C)
- Select the same mount (33) for all four wheels, see Setting the cutting height, p. 31.
- When fitting the wheel, please note that the wheel bolts (31) with the "R" markings must be used in the right-hand direction of travel and the wheel bolts with the "L" markings in the left-hand direction of travel.
- Attach each of the four wheels (11) to the desired mount (31) using the wheel bolt (32) and a washer (33).
- The wheel bolts (31) on the left ("L") of the mower are tightened anticlockwise to ensure they do not loosen by themselves during operation.
Attaching the grass catcher
⚠ WARNING! Risk of injury. Do not operate the machine without an impact guard or grass catcher.
Procedure (Fig. D)
- Lift the impact protection (17).
- Hold the grass catcher (14) by the handle (16).
- Hook the grass catcher (14) into the attachment on the machine housing (12).
- Fold the impact guard (17) onto the grass catcher (14). It holds the grass catcher (14) in the correct position.
Removing the grass catcher
(Fig. D)
- Lift the impact protection (17).
- Hold the grass catcher (14) by the handle (16).
- Unhook the grass catcher (14).
- Fold the impact protection (17) back onto the machine housing (12).
Emptying the grass catcher
(Fig. A/D)
- See Removing the grass catcher, p. 32.
- Grip the grass catcher (14) by the handle (16) and auxiliary handle (13) for a better grip.
- Empty the cut grass into a suitable container.
- See Attaching the grass catcher, p. 32.
Mulching kit
Difference between mowing lawns and mulching lawns
When using the mulching kit (20), the grass clippings are not collected in a catcher but are instead shredded and spread across the lawn. The nutrients contained in the clippings are thus left to be broken down by soil organisms and form a nutrient cycle. Mulched lawns therefore need to be fertilised much less frequently. As a basic rule, the lawn has to be mowed relatively often so that only small amounts of mulch remain on the lawn. It is therefore best to mulch the lawn at least once a week and to adjust the mower so that only about 40 % of the total height of the lawn is left as mulch. If the mulch remains visible on the lawn (for example when cutting the lawn for the first time of the year or during strong growth), the grass catcher (14) should be used.
Inserting the mulching kit
Procedure (Fig. E)
- Remove the grass catcher (14), if fitted.
- Lift the impact protection (17).
- Slide in the mulching kit (20).
- Fold the impact protection (17) back onto the mulching kit (20).
Removing the mulching kit
(Fig. E)
-
Lift the impact protection (17).
-
Remove the mulching kit (20).
- Fold the impact protection (17) onto the machine housing (12).
Filling with petrol

Highly flammable

Toxic

Environmentally hazardous
⚠ WARNING! Risk of injury. Petrol is flammable and harmful to health and the environment.
Notes
- Only store petrol in the containers provided for this purpose.
- Only refuel in the open air and never while the engine is running or hot.
- Carefully open the fuel cap so that over-pressure can be released.
- Do not smoke while refuelling.
- Avoid skin contact and inhalation of fumes.
- Remove spilled petrol.
- Keep petrol away from sparks, open flames and other ignition sources.
- Dispose of any petrol remnants in an environmentally friendly way (see Disposal/environmental protection, p. 39).
- Do not use a petrol/oil mixture.
- Use lead-free normal or premium-grade petrol. If using organic fuel, do not mix more than 10% ethanol.
- Only use clean, fresh petrol.
- Do not store petrol for longer than one month, as its quality will deteriorate.
Procedure (Fig. G)
- Unscrew the fuel cap (25).
- Add petrol up to the lower edge of the filler neck (35). Do not fill the petrol tank fully, so that the petrol has space to expand.
- Wipe petrol residues off the fuel cap (25).
- Close the fuel cap (25) again.
Filling with engine oil
Note
Place the machine on level ground.
Procedure (Fig. F)
- Unscrew the oil tank cap with oil dipstick (34).
- Fill the oil tank with engine oil. The oil tank holds 0.4 l (400 ml) engine oil. Use branded oil.
- Close the oil tank cap with oil dipstick (34) again.
Checking the oil level
Note
Check the oil level before each use of the machine and top up the engine oil before reaching the lower mark.
Procedure (Fig. F)
- Unscrew the oil tank cap with oil dipstick (34).
- Wipe the oil tank cap with oil dipstick (34) with a clean cloth.
- Screw the oil tank cap with oil dipstick (34) back in completely.
- Unscrew the oil tank cap with oil dipstick (34) and read the oil level on the oil dipstick after removing it.
The oil level must be in the marked field (maximum: 0.4 l (400 ml) engine oil in the oil tank).
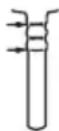
- Wipe away any spilt engine oil.
- Close the oil tank cap with oil dipstick (34) again.
Operation
Before use
Carry out the following steps before operating the machine:
- Removing the transport locks
- Fitting the bar, p. 31
• Fitting the starter handle, p. 31 - Attaching the grass catcher, p. 32
- Setting the cutting height, p. 31
• Filling with petrol, p. 33
• Filling with engine oil, p. 33
Working instructions
⚠ WARNING! Risk of injury. The blade will keep rotating for a few seconds after the machine has been switched off. Do not touch the running blade.
⚠ WARNING! Risk of injury. Do not operate the machine without an impact guard or grass catcher.
Notes
- Before using the machine, always check whether all screws, nuts, bolts and other fasteners are tightly secured and that the safety devices and protective covers are in place. Worn or damaged labels must be replaced.
- Observe noise protection rules and other local regulations.
- Move the machine at walking speed and in lines which should be as straight as possible. For a flawless mowing result, the lines should always overlap by a few centimetres.
• Always move across slopes crosswise. - Do not move the machine backwards.
- If the blades come into contact with a foreign object, turn the motor off immediately. Wait until the blade comes to a stop and check the machine for damage. Only continue working if the machine is undamaged.
- If possible, mow the lawn when dry so as to protect the turf.
- Adjust the cutting height so that the machine is not overloaded. If this not done, the motor may become damaged.
- Switch off the machine during longer breaks or when transporting it and wait until the blade has stopped moving.
- Clean the machine after each use (Cleaning, maintenance and storage, p. 35).
Switching on and off
⚠ WARNING! Risk of injury. Petrol is flammable. Start the engine at least 3 m away from where you refuelled. Possible fire hazard.
⚠️ CAUTION! Risk of injury. Stand behind the machine when starting it.
Notes
- Place the machine on solid, level ground, avoiding high grass wherever possible. Make sure that the cutting tool does not touch either other objects or the ground.
- For your own safety, stand behind the machine when you start it.
- Check the petrol and oil level regularly (see Checking the oil level, p. 33) and top up in good time.
Cold start
Note
If the fuel pump (23) is pressed too often, too much petrol will enter the carburettor and the engine will be difficult to start.
Procedure
- Press the fuel pump (primer) 3 times (23).
- Pull the bail bar (2) towards the bar (1) and hold it in this position.
- Pull the starter handle with starter rope (19) several times.
- If the engine starts slowly, release the starter handle into the starter rope guide (18).
Warm start
Note
There is no need to press the fuel pump (23) for a warm start.
Procedure
- See Cold start, p. 34, from action step 2.
Stopping the engine
- Let go of the bail bar (2). The engine switches off and the blade is braked.
Mowing
- Start the engine (see Switching on and off, p. 34).
- Hold the upper bar (1) and bail bar (2) with both hands when mowing.
Transport
Notes
- Switch off the engine, remove the spark plug connector and wait for the blade to come to a standstill.
- Do not transport the machine upside down and do not tilt it as otherwise fuel might leak out.
- Keep a safe distance from other people during transport.
- To prevent fuel loss, damage or injury, the machine must be secured against tipping over and slipping during transport in vehicles.
-
Be aware of the weight of the machine and do not overstrain yourself.
-
Before transporting between two locations, empty the fuel tank with a petrol suction pump. Do not empty the fuel tank indoors, near fire or when smoking. Gas vapours can cause explosions or fire.
- Wear gloves during transport and avoid coming into contact with dangerous parts (e.g. hot engine, blades).
- Ensure that the machine does not hit any obstacles during transport or that they cannot fall onto the machine. Do not place any objects on the machine and do not lean anything against the machine.
Cleaning, maintenance and storage
WARNING! Electric shock! Risk of injury due to unintentional start-up. Maintenance and cleaning work must always be carried out with the engine switched off and the spark plug connector (37) removed.
You should have any repair and maintenance work that is not described in these instructions carried out by our Service Centre. Only use original replacement parts.
⚠ WARNING! Risk of burns. Allow the machine to cool down before carrying out any maintenance or cleaning work. Elements of the engine are hot.
General Information

Use protective gloves
- Place an underlay under the machine.
- Make sure that a second person is holding the machine as there is a risk of it tipping backwards.
- Never tilt the machine to the side or forwards when the petrol or oil tank is filled! This could damage the engine, voiding the warranty.
Cleaning and maintenance work on the underside of the machine
- Fold in the upper bar (1).
- Tilt the machine back so that the spark plug (36) faces upwards.
Cleaning
⚠ WARNING! Electric shock! Never spray down the device with water.
Note
Risk of damage. Chemical substances may attack the plastic parts of the machine. Do not use any cleaning agents or solvents.
Cleaning after operation
- Do not use any water to clean the engine, it could contaminate the fuel system.
- Keep the ventilation slits, motor housing and handles of the machine clean. Use a damp cloth or brush to do this.
- Clean the engine cover with ventilation holes (finger protection) in particular (6).
- To avoid the risk of fire, keep the engine and exhaust free of plant residues or leaking lubricant.
- Do not use any hard or sharp objects for cleaning. This could damage the machine.
- Remove any plant remains that have become stuck to the wheels, ventilation opening, ejector opening and blade area using a piece of wood or plastic.
Maintenance
⚠ WARNING! Risk of injury. Improper maintenance can cause severe injury.
Notes
- Check the machine before each use for obvious defects such as loose, worn or damaged parts. Ensure that all nuts, bolts and screws are firmly in place.
- Check the covers and protective devices for damage and correct fit. Replace these if necessary.
We are not liable for damage cause by our devices if this is caused by improper repair, the use of non-original parts or incorrect use.
Changing the engine oil
Notes
- Change the engine oil when the petrol tank is empty and the engine is warm.
- Perform the first engine oil change after about 5 operating hours and then every 50 operating hours or annually.
- Dispose of the used oil in an environmentally-responsible way (see Disposal/environmental protection, p. 39).
Procedure (Fig. F)
-
Remove the spark plug connector (37) (see Spark plug maintenance, p. 36).
-
Open the oil filler flap with oil dipstick (34).
- Pump out the engine oil with an oil pump (not included in delivery).
- Top up the engine oil (see Filling with engine oil, p. 33).
Spark plug maintenance
Note
Worn spark plugs, or a spark plug gap that is too large, will lead to a reduction in engine power.
Tools and aids required (not included)
- Wire brush
- Feeler gauge (available from specialist dealers)
Accessories required
- Spark plug wrench (21)
Procedure (Fig. H)
- Remove the spark plug connector (37) from the spark plug (36) by pulling and turning it at the same time.
- Unscrew the spark plug (36) with the spark plug wrench (21).
- Check the spark plug gap with the help of a feeler gauge. The spark plug gap must be 0.7 to 0.8 mm.
- Reset the gap if necessary, by carefully bending the ground/side electrode of the spark plug.
- Clean the spark plug (36) with a soft wire brush.
- Screw ∪ the cleaned and adjusted spark plug back in (recommended tightening torque 20 Nm).
- Replace a damaged spark plug with a replacement spark plug.
Cleaning the air filter
Note
The two-part air filter consists of
• Air filter fine (38)
• Air filter rough (39)
Never operate the machine without an air filter. Otherwise, dust and dirt will get into the engine and cause damage.
Removing the air filters (Fig. I)
- Open the air filter housing (8) by holding down the release and opening the air filter cover (7).
- Remove both air filters (38/39).
Cleaning/replacing the air filters
- Clean both air filters (38/39) in a soap solution.
- Allow the air filters (38/39) to dry. Add a few drops of fresh engine oil into the air filters (38/39).
- Replace defective air filters (38/39) with a new two-part air filter.
Inserting the air filters (Fig. I)
- Insert both air filters (38/39) into the air filter housing (8).
- Close the air filter housing (8) again by closing the air filter cover (7). This will lock into place audibly.
Replacing blades
If the blade is blunt, it can be re-sharpened by a specialist company. If the blade is damaged or unbalanced, it must be replaced.
⚠ WARNING! Risk of injury from blades.
Wear gloves when handling the blade.
Notes
- The oil and petrol tanks must be empty.
- Once you have loosened the blade screw (42) you have to replace the clamping disk (41).
- Tightening torque (blade): 45 Nm
Tools required (not included)
- Spanner
Permissible blades
- RATO 73101-G20
Procedure (Fig. J)
- Remove the spark plug connector (37).
- Tilt the machine back so that the spark plug (36) faces upwards.
- Turn the machine on its side. NOTICE! The machine may only be turned on its side when the petrol and oil tanks are empty!
- Use sturdy gloves and keep hold of the blade (40).
- Use a spanner to turn the blade bolt (42) anticlockwise from the motor spindle (43).
- Reassemble the new blade (40) in reverse order. Make sure that the blade (40) is positioned correctly and resting flush on the engine spindle (43). The clamping disk (42) must be positioned between the blade screw (40) and blade (41).
- Tighten the blade (45 Nm).
Adjusting the carburettor
The carburettor has been preconfigured for ideal performance at the factory. If any re-adjustments are necessary, have the adjustments made by a specialist workshop.
Service intervals
Carefully perform the maintenance tasks listed in the following table on a regular basis. Regular servicing of your device will extend its life. Additionally, you will achieve optimum cutting performance and prevent accidents.
| Maintenance work | Before each use | After each use | After 5 operating hours | After 8 operating hours | After 50 operating hours | Annually |
| Check and tighten the screws, nuts and bolts | √ | |||||
| Checking the oil level, p. 33 | √ | √ | ||||
| Clean the operating elements/area surrounding the muffler | √ | √ | ||||
| Changing the engine oil, p. 35 | √ √ √ | |||||
| Cleaning the air filter, p. 36* | √ | |||||
| Spark plug maintenance, p. 36 | √ | √ | ||||
| Clean/check/sharpen blade | √ | |||||
| Clean the air cooling system* | √ |
Replace more frequently in a high dust environment or in case of heavy contamination
Storage
⚠ WARNING! Risk of fire. Do not store the machine with the grass catcher full. If the weather is too hot, the grass will begin to ferment under heat.
Notes
- Clean and maintain the machine prior to storage.
• Always keep the machine clean, dry and out of the reach of children. - Allow the engine to cool down before you store the machine in an enclosed space.
- Never store the machine with petrol in the tank inside a building where petrol vapours may come into contact with open flames or sparks or ignite.
- Use suitable, permissible containers for storing the fuel.
- Do not wrap the machine in nylon bags, as moisture and mould could form.
Folding up the device
Please observe the following for space-saving storage of the machine:
Procedure
- Unhook the starter handle with starter rope (19).
- Loosen the wing nuts (29) that connect the upper bar (1) to the lower bar (15).
- Fold the upper bar (1) downwards. Make sure that the Bowden cable (3) is not pinched in the process.
Storage during the winter break
Notes
- Failure to follow the storage instructions may leave fuel remnants in the carburettor, which in turn can cause start-up problems or permanent damage.
- The petrol tank does not have to be emptied if you add a fuel additive to the petrol.
• Always empty the tank outdoors.
Procedure
- Start the engine and allow it to run until it goes out due to a lack of petrol.
- Change the oil (see Changing the engine oil, p. 35).
- Dispose of used oil and petrol residues in an environmentally-responsible way (see Disposal/environmental protection, p. 39).
Preserving the engine
- Unscrew the spark plug (36) (see Spark plug maintenance, p. 36).
- Pour a tablespoon of engine oil into the engine compartment through the spark plug opening.
- Pull the starter handle with starter rope (19) slowly several times with the bail bar (2) pulled to distribute the oil inside the engine.
- Screw the spark plug (36) tight again.
Troubleshooting
The following table will assist you in fixing faults:
| Problem Mögliche Ursache Fehlerbehebung | ||
| Machine does not start | Not enough petrol in the petrol tank | Filling with petrol |
| Incorrect starting sequence | Follow the instructions for starting the engine (see Operation, p. 33) | |
| Spark plug connector (37) not fitted correctly | Fitting the spark plug (see Spark plug maintenance, p. 36) | |
| Spark plug contaminated with soot (36) | Cleaning, adjusting or replacing the spark plug (see Spark plug maintenance, p. 36) | |
| Carburettor, carburettor jets dirty, incorrect carburettor mix setting | Have the fault rectified by a specialist workshop | |
| Engine starts, but machine does not run at full power | Dirty air filter (38/39) | Replace the air filter (38/39) (see Cleaning the air filter, p. 36) |
| Carburettor, carburettor jets dirty, incorrect carburettor mix setting | Have the fault rectified by a specialist workshop | |
| Motor switches off | Carburettor, carburettor jets dirty, incorrect carburettor mix setting | Have the fault rectified by a specialist workshop |
| Spark plug contaminated with soot (36) | Cleaning, adjusting or replacing the spark plug (see Spark plug maintenance, p. 36) | |
| Engine overheated | Ventilation openings on the engine cover (6) blocked | Clean the ventilation openings on the engine cover (6) |
| Incorrect spark plug (36) | Replacing the spark plug (36) (see Spark plug maintenance, p. 36) | |
| Not enough engine oil in the engine | Replenishing the engine oil (see Filling with engine oil, p. 33) | |
| Engine giving off smoke | Dirty air filter (38/39) | Replace the air filter (38/39)(see Cleaning the air filter,p. 36) |
| Not enough engine oil in the engine | Replenishing the engine oil(see Filling with engine oil,p. 33) | |
| Output not satisfactory or motor is difficult to operate | Cutting height too low Set higher cutting height | |
| Blade (40) blunt Sharpen or replace blade (40) | ||
| Blade area blocked Clean the machine | ||
| Blade (40) not rotating | Blade (40) blocked by grass Remove grass | |
| Blade (40) incorrectly fitted Install blade (40) correctly | ||
| Abnormal sounds, clattering or vibrations | Blade (40) incorrectly fitted Install blade (40) correctly | |
| Blade (40) damaged Replace blade (40) | ||
Disposal/environmental protection
Dispose of the tool in accordance with the local regulations. For further information, please contact your local administration.
- Do not dispose of waste oil and petrol residues in the sewage system or down the drain. Dispose of waste oil and petrol remnants in an environmentally friendly way – take them to your local recycling centre.
- The tool, accessories and packaging should be properly recycled.
• Machines must not be disposed of with domestic waste. - Empty the oil and fuel tanks carefully and return your tool to a recycling centre.
- Dispose of empty oil and fuel containers in an environmentally friendly manner.
- The plastic and metal parts used on your tool can be properly sorted according to materials and grades and efficiently recycled.
- If you have any other questions, contact the service centre.
Disposal information for green waste
Do not throw cut grass into the rubbish bin; instead, take it for composting or spread it as a mulch below shrubs and trees.
Service
Guarantee
Dear Customer,
This product is provided with a 3 year guarantee from the date of purchase. In case of defects, you have statutory rights against the seller of the product. These statutory rights are not restricted by our guarantee presented below.
Terms of Guarantee
The guarantee period begins on the date of purchase. Please retain the original receipt. This document is required as proof of purchase. If a material or manufacturing defect occurs within three years of the date of purchase of this product, we will repair or replace – at our choice – the product for you free of charge. This guarantee requires the defective product and proof of purchase to be presented within the three-year period with a brief written description of what constitutes the defect and when it occurred. If the defect is covered by our guarantee, you will receive either the repaired product or a new product. No new guarantee period begins on repair or replacement of the product.
Guarantee Period and Statutory Claims for Defects
The guarantee period is not extended by the guarantee service. This also applies for replaced or repaired parts. Any damages and defects already present at the time of purchase must be reported immediately after
unpacking. Repairs arising after expiry of the guarantee period are chargeable.
Guarantee Cover
The product has been carefully produced in accordance with strict quality guidelines and conscientiously checked prior to delivery.
The guarantee applies for all material and manufacturing defects. This guarantee does not extend to cover product parts that are subject to normal wear and may therefore be considered as wearing parts (e.g. Blade) or to cover damage to breakable parts.
This guarantee shall be invalid if the product has been damaged, used incorrectly or not maintained. Precise adherence to all of the instructions specified in the operating manual is required for proper use of the product. Intended uses and actions against which the operating manual advises or warns must be categorically avoided.
The product is designed only for private and not commercial use. The guarantee will be invalidated in case of misuse or improper handling, use of force, or interventions not undertaken by our authorised service branch.
Processing in Case of Guarantee
To ensure efficient handling of your query, please follow the directions below:
- Please have the receipt and product number (IAN 478255_2410) ready as proof of purchase for all enquiries.
- Please refer for the product number to the type plate on the product, an engraving on the product, the title page of the operating instructions (bottom left) or the sticker on the back or underside of the product.
- Should functional errors or other defects occur, please initially contact the service centre specified below by telephone or use the contact form available on parkside-diy.com in the category Service.
- After consultation with our customer service, a product recorded as defective can be sent postage paid to the service address communicated to you, with the proof of purchase (receipt) and specification of what constitutes the defect and when it occurred. In order to avoid acceptance problems and additional costs, please be sure to use only the address communicated to you. Ensure that the consignment is not sent carriage forward
or by bulky goods, express or other special freight. Please send the appliance inc. all accessories supplied at the time of purchase and ensure adequate, safe transport packaging.

text_image
PDF ONLINE parkside-diy.comYou can view and download these and many other manuals on parkside-diy.com. This QR code will take you directly to parkside-diy.com. Select your country and search for the operating instructions via the search mask. You can open your operating instructions by entering the article number (IAN) 478255_2410.
Repair service
For repairs that are not covered by warranty, contact the service centre. They will gladly create a cost estimate for you.
- We can only work on devices which are sent in properly packed and with postage paid.
Note: Please send your device cleaned and with an indication of the defect to the address named for the service centre.
- The following are not accepted: devices sent in without prepaid postage, sent as bulky goods, sent as an Express shipment, or devices sent as any other form of special freight.
- We will dispose of defective devices you ship to us free of charge.
Service Centre

Service Great Britain
Tel.: 0800 051 8970
Contact form on
parkside-diy.com
IAN 478255_2410

Service Malta
Tel.: 800 65168
Contact form on
parkside-diy.com
IAN 478255_2410
Importer
Please note that the address below is not a service address. Contact the service centre named above first.
Spare parts and accessories
You can get spare parts and accessories from www.grizzlytools.shop. If you have any problems with your order, contact us via our online shop. If you have any other questions, contact: Service Centre, p. 41
| Position Name Order No. |
| 1 Upper bar 91106277 |
| 15 Lower bar 91106271 |
| 14 Grass catcher 91106279 |
| 20 Mulching kit 91106272 |
40/41/42/43 Blade set 91106269
Translation of the original EU declaration of conformity
Product: Petrol Lawnmower
Model: PBRM 39 D3
Serial number: 000001-046800
The object of the declaration described above is in conformity with the relevant Union harmonisation legislation:
2006/42/EC • 2014/30/EU • 2000/14/EC & 2005/88/EC • 2011/65/EU & (EU) 2015/863
The object of the declaration described above is in conformity with Directive 2011/65/EU of the European Parliament and of the Council of 8 June 2011 on the restriction of the use of certain hazardous substances in electrical and electronic equipment.
To ensure conformity, the following harmonised standards and national standards and regulations have been applied:
EN ISO 5395-1:2013/A1:2018 • EN ISO 5395-2:2013/A2:2017 EN ISO 14982:2009 • EN IEC 63000:2018
In accordance with the Directive 2000/14/EC relating to noise emission, the following is confirmed: Sound power level (L WA)
- Measured: 93.5 dB;
- Guaranteed: 96 dB
Followed conformity assessment procedure according to 2000/14/EC, Annex VI.
Notified body: TÜV SÜD Industrie Service GmbH • NB: 0036 • Westendstrasse 199 • 80686 München • Deutschland
This declaration of conformity is issued under the sole responsibility of the manufacturer:


Authorised representative of documentation
Sommaire
Introduction...... 43
Garantie (France)....61
Service-Center....64
Importateur.... 64
Service-Center....84
Importeur.... 84
text_image
QR code image containing encoded data, with a central logo or watermark symbolPDF ONLINE
parkside-diy.com
Service-Center....126
Importatore.... 126
Ricambi e accessori.... 126
Service-Center....145
Dovozce....145
Service-Center....164
Importér.... 164
text_image
QR code image with a central logo, likely linking to a digital resource or website.PDF ONLINE
parkside-diy.com
Service-Center....224
Importør...... 224
text_image
QR code image containing encoded data, with a central logo or watermark symbolPDF ONLINE
parkside-diy.com
text_image
7 38 39 8 OHVJ
text_image
40 41 42 43Explosionszeichnung • Exploded view • Vue éclatée • Vista esplosa • Vista explosionada • Explosietekening • Eksploderet tegning • Robbantott ábra • Widok rozłożony • Rozložený pohled • Rozložený pohlád
text_image
PBRM 39 D3informativ • informative • informatif • informatief • informativo • informatív • informacyjny • informační • informatívny

text_image
FR ©text_image
FSC www.fsc.org MIX Paper from responsible sources FSC® C186238