
PRMA 40-Li A1 - Lawn mower PARKSIDE - Free user manual and instructions
Find the device manual for free PRMA 40-Li A1 PARKSIDE in PDF.


| Product Type | Cordless Electric Lawn Mower |
| Model | PRMA 40-Li A1 |
| Brand | Parkside |
| Battery Voltage | 40 V |
| Battery Type | Li-Ion (interchangeable with Parkside 40V series) |
| Cutting Width | 40 cm |
| Cutting Height Adjustment | Central lever, 5 positions (25-75 mm) |
| Grass Collection Bag Capacity | 50 L |
| Handle Type | Foldable, adjustable ergonomic handle |
| Weight | Approx. 15 kg (without battery) |
| Dimensions (L x W x H) | 140 x 45 x 105 cm (folded) |
| Motor Type | Brushless electric motor |
| Cutting System | Steel blade with safety brake |
| Mulching Function | Yes (mulch plug included) |
| Side Discharge | Yes (optional) |
| Wheel Size | Front: 15 cm, Rear: 20 cm |
| Safety Features | Two-hand operation, blade brake, safety key |
| Sound Pressure Level | ≤ 82 dB(A) |
| Vibration Level | ≤ 2.5 m/s² |
| IP Rating | IPX4 (splash-proof) |
| Recommended Lawn Area | Up to 400 m² |
Frequently Asked Questions - PRMA 40-Li A1 PARKSIDE
User questions about PRMA 40-Li A1 PARKSIDE
0 question about this device. Answer the ones you know or ask your own.
Ask a new question about this device
Download the instructions for your Lawn mower in PDF format for free! Find your manual PRMA 40-Li A1 - PARKSIDE and take your electronic device back in hand. On this page are published all the documents necessary for the use of your device. PRMA 40-Li A1 by PARKSIDE.
USER MANUAL PRMA 40-Li A1 PARKSIDE
TOSAERBA RICARICABILE PRMA 40-Li A1
IT MT
TOSAERBA RICARICABILE
Translation of the original instructions
IAN 311518

IT MT
Before reading, unfold the page containing the illustrations and familiarise yourself with all functions of the device.
DE AT CH
Service-Center......19
Intended purpose......20
General description......21
Extent of the delivery....21
Function description......21
Overview 21
Technical specifications......22
Symbols and icons ......22
Safety information....23
General notes on safety......23
Assembly....27
Mounting the lower bar......27
Mounting the upper bar 27
Mounting the grass collection box.....27
Mulch kit 28
Operation 28
Mounting/removing the grass collection box 28
Filling level indicator 28
Setting the cutting height .....28
Inserting/removing the rechargeable battery ....29
Switching on and off....29
Auto/Eco mode....29
Checking the charge status of the battery 29
Working with the device....30
Cleaning/maintenance ....30
General cleaning and maintenance work ....30
Replacing blades....31
Storage....31
Disposal/environmental protection ....31
Spare Parts/Accessories......31
Trouble Shooting......32
Guarantee 33
Repair Service....34
Service-Center....34
Importer 34
Translation of the original EC declaration of conformity .....52
Introduction
Congratulations on the purchase of your new device. With it, you have chosen a high quality product.
During production, this equipment has been checked for quality and subjected to a final inspection. The functionality of your equipment is therefore guaranteed.

The operating instructions constitute part of this product. They contain important information on safety, use and disposal.
Before using the product, familiarise yourself with all of the operating and safety instructions. Use the product only as described and for the applications specified.
Keep this manual safely and in the event that the product is passed on, hand over all documents to the third party.
Intended purpose
This device is intended only for cutting lawns and grassed areas in residential applications.
The device is intended to be used by do-it-yourselfers. It was not designed for heavy commercial use.
Any other use that is not expressly permitted in these instructions may result in damage to the device and pose a serious hazard to the user. The device is intended for use by adults. Children and people who are not familiar with these operating instructions may not use the device. The use of the device in the rain or a damp environment is prohibited.
The manufacturer is not liable for damage caused by improper use or incorrect operation.
General description

See the front fold-out pages for illustrations.
Extent of the delivery
Carefully remove the equipment from the packaging and check whether the following parts are complete:
- Cordless lawnmower and upper bar
- Lower bar
- Grass collection box
- Handle for grass collection box
- 2 cable holders
- 2 tightening levers with washers and screws for fastening the upper bar
- Mulch kit
- 2 20-V batteries
- Double charger
- Translation of the original instructions for use
Dispose of the packaging material correctly.
Function description
The cordless lawnmower has a cutting tool, which turns parallel to the cutting level. It is equipped with a high performance electric motor, robust plastic housing, safety switch, collision guard, and grass box. Additionally, the equipment is height adjustable to six levels and has smooth-running wheels. For the function of the operating parts, please refer to the descriptions below.
Overview

1 Upper bar
2 Tightening levers for fastening the upper bar
3 Lower bar
4 Impact protection
5 Tightening levers for fastening the lower bar
6 Carrying handle
7 Lever for cutting height adjustment 8 Cover
9 Rechargeable batteries
9a Release button on rechargeable battery
10 Ignition key 11 Wheels
12 Appliance housing
13 Grass collection box
14 Cable holder
15 Machine cable
16 Release button
17 Start handle
18 Mulch kit
19 Double charger

13aPlastictabs
13b Grass collection box rods
13c Handle for grass collection box

20 Auto/eco switch button
21 Button for the charge status display
22 Battery charge level indicator

18a Bracket on mulch kit

23 Blade
24 Blade bolt
25 Motor spindle
Technical specifications
Cordless lawn mower ......PRMA 40-Li A1
Motor voltage....40 V = (2× 20V)
Idle speed n_1 2900 min ^-1
Idle speed n_2 3300 min ^-1
Cutting circle 430 mm
Cut height .....25/35/45/55/65/75 mm
Protection class ....III
Protection type....IPX1
Weight (without battery and charger) 16.2 kg
Grass collection box volume....50 l
Sound pressure level (L_pA) .....79.4 dB(A); K_pA = 3 dB
Sound power level (L_WA)
measured......92 dB(A); K_WA=1.89 dB
guaranteed 96 dB(A)
Vibration (a_h) ...... 1,33 m/s ^2 ; K=1.5 m/s ^2
Noise and vibration values have been determined according to the standards and regulations mentioned in the declaration of conformity.
The stated vibration emission value was measured in accordance with a standard testing procedure and may be used to compare one power tool to another.
The stated vibration emission value may also be used for a preliminary exposure assessment.

Warning: The vibration emission value may differ during actual use of the power tool from the stated value depending on the manner in which the power tool is used.
Try to keep the exposure to vibrations as low as possible. Examples of measures to reduce vibration exposure are the wearing of gloves when using the tool and limiting the working hours. For this purpose all
parts of the operating cycle have to be considered (for example, times when the electric tool is switched off and times when it is switched on but running without any load).
Symbols and icons
Symbols on the equipment:

Caution!

Risk of electric shock!

Read the operating instructions carefully.

Risk of injury from parts being thrown up.

Keep nearby people away from the appliance.

Caution – sharp cutting blade! Keep feet and hands away. Risk of injury!

Caution! The lawnmower blade continues to run after switching off.
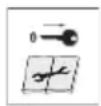
Switch off the motor and remove the ignition key before carrying out adjustments or cleaning work.

Wear ear and eye protection.

Do not expose the unit to rain.

Noise level specification L_WA in dB.
Do not dispose of electrical equipment in domestic waste.

Cutting circle

Battery charge level indicator und Auto/eco switch button on the upper bar.
Filling level indicator on the grass collection box

GO
Filling level indicator open: Grass box empty.

STOP
Filling level indicator closed: Grass box full.
Symbols in the manual:

Warning symbols with in- formation on damage and injury prevention.

Instruction symbols (the instruction is explained at the place of the exclamation mark) with information on preventing damage.

Help symbols with information on improving tool handling.

Read the operating instructions carefully.

Wear protective gloves.
Safety information
This section describes the basic safety rules when working with the device.
General notes on safety

IMPORTANT READ THE OPERATING IN- STRUCTIONS CAREFULLY. STORE THE OPERATING INSTRUCTIONS FOR LATER REFERRAL.

This equipment may cause serious injury in the case of improper use. In order to avoid injury to people and damage to property, the following safety information must be observed and users must familiarise themselves with all operating parts.
- Read the operating instructions carefully.
- This device must not be used by children. Children should be supervised to ensure that they do not play with the device. Cleaning and maintenance must not be carried out by children.
- This device can be used by individuals with reduced physical, sensory or mental abilities or a lack of experience and knowledge if they are supervised or have been instructed in the safe use of the device and understand the resulting hazards.
Preparation:
- Never allow children or other people who are unfamiliar with the operating instructions to use the device. Local regulations may specify the minimum age of the operator.
GB MT
- The device must never be used if people – especially children – or pets are nearby. Children must never play with the device.
- The operator or user is responsible for any accidents or personal injury and/or material damage to third parties or their property.
- Check the terrain on which the device will be used and remove any stones, sticks, wires or other foreign objects which may be drawn into the device and ejected.
- Wear suitable work clothing, such as solid shoes with non-slip soles as well as long, robust trousers. Never use the device barefooted or wearing open sandals. Avoid wearing loose clothing with hanging laces or belts.
- Before use, always perform a visual inspection to check whether the cutting blades, fastening bolts and the whole cutting unit are worn out or damaged. Do not use the device if its safety equipment (e.g. impact protection or grass collection box), parts of the cutting unit or bolts are missing, worn or damaged. Damaged or worn cutting blades and fastening bolts must only be replaced as a set to prevent imbalance.
- Seien Sie vorsichtig bei Ge - Take care when using devices with several cutting tools since the movement of one blade can lead to rotation of the other blades.
- Only use spare parts and accessories which are supplied and recommended by the manufacturer. Using externally produced parts results in the immediate loss of the warranty claim. - Worn or damaged information signs must be replaced.
Working with the Equipment:

Do not place feet or hands near or under rotating parts when working. Risk of injury!
- Switch the motor on as directed and only if your feet are a safe distance away from the cutting tools.
- Do not use the device in the rain, poor weather, damp environments or on wet lawn. Only work in daylight or where there is sufficient illumination.
- If you are tired or lacking in concentration or have consumed alcohol or tablets, do not work with the device. Always have a break on time. Work using common sense.
- Always ensure secure positioning, particularly on slopes, when working. Always move crosswise across slopes, never up or down. Take special care when changing the direction of travel on slopes. Do not work on overly steep slopes.
- Only operate the device at walking speed. Take special care when turning the device around, pulling it towards you or going backwards.
- Turn the device on with care in accordance with these operating instructions. Ensure your feet are at a sufficient distance from the rotating blades.
- Do not tilt the device when starting it up, unless this is required when starting up in long grass. In such an event, tilt the device by pushing down on the grip handle in such a way that the front wheels of the device raise slightly. Always check that both hands are in the working position before placing the device again on the ground.
- Never work without the grass collection box or impact protection. Always keep away from the ejector opening.
- Do not start the motor when standing in front of the discharge chute.

Caution! Danger! The blade continues to run after switching off. There is a risk of injury.
- The device must not be lifted or transported while the motor is running. Turn the device off if it needs to be tilted for transport, if surfaces other than lawn need to be traversed, and while the device is being brought to and from the mowing terrain.
- Always keep the grass ejector opening clean and free of debris. Only remove cut material when the device is at a standstill.
-
Never leave the device unattended at the workplace.
-
Do not work with a damaged or incomplete device or one which has been converted without the permission of the manufacturer. Never use the device if the protection equipment or shielding are damaged, or if the safety equipment (deflector and/or grass collection equipment) is missing.
- Do not overload your device. Only work within the power range indicated and do not modify the controller settings on the motor. Do not use low-performance machines for heavy work. Do not use the device for purposes for which it is not intended.
- Do not use the appliance near flammable liquids or gases. There is a risk of fire or explosion if this advice is not heeded.
-
Switch the device off, remove the safety key and take out the battery. Make sure that all movable parts are stationary:
-
whenever you leave the apparatus unattended and when it is not being used,
- before removing obstructions or loosening blockages from the discharge chute,
- before checking or cleaning the apparatus or performing any work on it,
-
if a foreign object has been hit by the device. Check for damage to the apparatus and carry out the necessary repairs before switching it on again and working with it,
-
if the apparatus starts to vibrate excessively, an immediate check is required.
- make sure that all nuts, bolts and screws are properly tightened.
- inspect the apparatus for any damage.
- have any necessary repairs carried out on damaged parts.
- Do not bring your feet or hands into the vicinity of rotating parts (or beneath them). Never stand in front of the grass ejector opening.
- Always pull the circuit breaker/ignition key if:
- you leave the apparatus unattended, before clearing blockages,
- if you are examining, cleaning or working on the apparatus,
- after a collision with a foreign object. Immediately examine the device for damage and, if necessary, have it repaired,
- if the apparatus starts to vibrate in an unusual way (check immediately!).
- When starting or turning the motor on, the lawnmower must not be tilted, unless it is required to lift the lawnmower in the process. In this event, tilt it only as far as absolutely necessary and lift it only on the side facing away from the user.
Maintenance and Storage:
- Give the motor time to cool off before you store the device in an enclosed space.
- During maintenance of the cutting blades, be aware of the fact that even if the power supply is switched off, the cutting blades can be set into motion.
- Make sure that all nuts, bolts and screws are properly tightened, and that the device is in safe working order.
- Do not try to repair the device by yourself unless you have professional training. All work not specified in these operating instructions may only be carried out by customer service centres authorised by us.
- Store the device in a dry place and out of reach of children.
- Handle your device with care. Keep the tools sharpened and clean in order to be able to work better and safer. Follow the maintenance instructions.
- Wear safety gloves when replacing the cutting equipment.
- Check the grass collection unit regularly for wear and tear and deformation. Replace worn or damaged parts in the interests of safety. When setting up the blades, take care that your fingers do not become caught between the rotating blades and stationary parts of the machine.
- Ensure that only replacement cutting tools approved by the manufacturer are used.
Electrical Safety:
- The plug of the charger must fit into the socket. The plug must not be modified in any way. Do not use any adapter plugs together with electric tools that have a protective earth. Unmodified plugs and matching sockets reduce the risk of electric shock.
- Avoid body contact with earthed surfaces such as pipes, radiators, cookers and refrigerators. There is an increased risk of electric shock if your body is earthed.
- Do not expose electric tools to rain or wet conditions. The penetration of water into an electric tool increases the risk of electric shock.

Observe the safety information and notes on charging and proper use as shown in the operating instructions for your battery and charger from the Parkside X 20 V Team series.
Assembly
- Only carry out work that you know you are capable of.
- If in doubt, consult an expert or our service centre directly.

Mounting the lower bar
- Fold the lower bar (3) upwards.
-
Turn the lower tightening levers (5) clockwise to fasten.
-
Lock the tightening levers (5) by pressing them in the direction of the lower bar (3). The tightening levers must be pulled tight and then positioned against the bar so that tightening can be carried out with medium force. If this fails, continue to turn the tightening lever clockwise, or loosen it by turning counter clockwise.

Mounting the upper bar
- Fasten the upper bar (1) with the enclosed screws (2b), the washers (2a) and the upper tightening levers (2) on the right and left of the lower bar (3). The release button (16) must be located on the right in the mowing direction. Two positions are possible.
- Turn the tightening levers (2) clockwise to fasten.
- Lock the tightening levers (2) by pressing them in the direction of the bar (3). The tightening levers must rest against the bar in such a way that tightening can be carried out with medium force. If this fails, continue to turn the tightening lever clockwise, or loosen it by turning counter clockwise (see small illustration).

Release the tightening levers (2+5) and fold the upper bar (1) and the lower bar (3) together so that the device takes up less space. Make sure not to pinch the machine cables while doing this.

Mounting the grass collection box
- Clip the handle (13c) of the grass collection box (13) into the upper side of the grass collection box (13).
GB MT
- Place the plastic tabs (13a) of the grass collection box (13) over the grass collection box rods (13b).
J Mulch kit
Attaching the mulch kit
- Remove the grass collection box, if used.
- Lift the impact protection.
- Slide the mulch kit (18) into place. The bracket (18a) snaps into place.
- Push in the bracket (18a) on the mulch kit and remove the mulch kit (18).
Removing the mulch kit
Operation

The device must only be adjusted when the motor is switched off and the blade is stationary. There is a risk of personal injury.

Switch off the apparatus, remove the ignition key (10) and wait for the blades to come to a standstill.
E Mounting/removing the grass collection box
- To mount the grass collection box (13), lift the impact protection (4) and suspend the grass collection box (13) from both receptors.
- Fold the impact protection (4) over the grass collection box (13). This will hold the grass collection box in the correct position.
- To remove the grass collection box (13), lift the impact protection (4) and remove the grass collection box (13).
Fold the impact protection (4) back over the device housing (12).
Work may not be carried out using the device without the impact protection or grass collection box. There is a risk of injury.
Filling level indicator
There is a filling level indicator (26) on the side of the grass collection box (13).

GO
Filling level indicator open: Grass collection box empty.

STOP
Filling level indicator closed: Grass collection box filled.

Setting the cutting height
The apparatus has 6 positions for adjusting the cutting height:
35 mm/25 mm - low cutting height
55 mm/45 mm - medium cutting height
75 mm/65 mm - large cutting height
- Hold the carrying handle (6) and lift the device or push the device down.
- Grip the lever (7) for adjusting the cutting height and move it past the ratchet mechanism to the desired cutting height.
The correct cutting height is between 25 and 45 mm for an ornamental lawn and about 45 - 65 mm for a utility lawn.

A high cutting height should be selected for the first mowing of the season.
Inserting/removing the rechargeable battery

Switch off the apparatus, remove the ignition key (10) and wait for the blades to come to a standstill.
- To remove the battery (9) from the device, press the release button (9a) on the battery and pull the battery out.
- To insert the battery (9), push the battery along the guide rail into the device. You will hear it click into place.
Switching on and off

The cordless lawnmower may only be used with two batteries of the Parkside X 20 V Team series.

-
Place the apparatus on a level surface.
-
Lift the cover (8) on the device housing and insert the charged batteries (9) along the guides into the device. You will hear them click into place.
-
Insert the ignition key (10) in the corresponding opening next to the rechargeable battery (9). The ignition key can only be inserted in one position. Take note of the guide groove on the opening next to the battery and on the ignition key (10) (see small image ).
-
Before switching the apparatus on, make sure that it is not touching any objects.

- To switch the apparatus on, press the release button
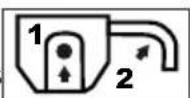
(16) and hold it down while pressing the starting lever (17). Let go of the release button.
- To switch the apparatus off, let go of the starting lever (17).

Due to the intelligent energy management system, the motor starts after a delay.

After switching off the equipment, the blade continues to turn for several seconds. Do not touch the moving blade. There is a risk of injury.

Auto/Eco mode
The cordless lawnmower automatically launches in the last mode used when turned on. You can switch between Auto and Eco mode by pressing the Auto/Eco switch button (20).
Auto mode: the cordless lawn mower adjusts the motor speed in accordance with the load.
Eco mode: the cordless lawn mower runs at the lowest speed for maximum battery life.
Checking the charge status of the battery
The battery charge status indicator (22) shows the state of charge of the battery (9).
Press the button for the charge level indicator (21) on the lower bar. The charge level of the battery is indicated by illumination of the corresponding LED lights.
3 LEDs illuminated (red, orange and green): Battery charged
2 LEDs illuminated (red and orange): Battery partially charged
1 LED illuminated (red): Battery needs to be charged
Working with the device

Observe noise protection rules and other local regulations.
Regular mowing stimulates the grass to an increased leaf formation, while at the same time killing weeds. Therefore, the lawn becomes denser after each mowing process, resulting in an evenly loadable lawn. The first cut takes place roughly in April when the grass is about 70 - 80 mm high. During the main growing season, the lawn is mowed at least once a week.
- Move the device at walking speed and in lines which should be as straight as possible. For a flawless mowing result, the lines should always overlap by a few centimetres.
- Adjust the cutting height so that the device is not overloaded. If this not done, the motor may become damaged.
- Always move across slopes crosswise. Take special care when going backwards and pulling the device.
- Clean the device after each use, as described in the section "Cleaning/storage".

After switching off the equipment, the blade continues to turn for several seconds. Do not touch the moving blade. There is a risk of injury.
Cleaning/maintenance

Have any work that is not described in these operating instructions performed by an authorised customer service centre. Only use original parts.

Wear gloves when handling the blade.

Switch off the apparatus, remove the ignition key (10) and wait for the blades to come to a standstill.
General cleaning and maintenance work

Never spray down the device with water. There is a risk of electric shock.
• Always keep the device clean. Use a brush or cloth for cleaning, but do not use any cleaning agents or solvents.
- After mowing, remove any plant remains that have become stuck to the wheels, ventilation opening, ejector opening and blade area using a piece of wood or plastic. Do not use any hard or sharp objects as these could damage the device.
- Check the device before each use for obvious defects such as loose, worn or damaged parts. Ensure that all nuts, bolts and screws are firmly in place.
- Check the covers and protective devices for damage and correct fit. Replace these if necessary.
H Replacing blades
If the blade is blunt, it can be re-sharpened by a specialist company. If the blade is damaged or unbalanced, it must be replaced.
- Turn the machine over.
- Use firm gloves and keep hold of the blade (23). Use a spanner (SW14) to turn the blade bolt (24) counter-clockwise from the motor spindle (25).
- Reassemble the new blade (23) in reverse order. Make sure that the blade (23) is positioned correctly (see illustration) and that the blade bolt (24) is tightened.
K Storage
Release the tightening levers (2+5) and fold the upper bar (1) and the lower bar (3) together so that the device takes up less space. Make sure not to pinch the machine cables while doing this.
- Store the device in a dry place out of reach of children.
- Give the motor time to cool off before you store the device in an enclosed space.
- Remove the rechargeable battery before storing the device for a long period of time (e.g. winter storage).
We are not liable for damage cause by our devices if this is caused by improper repair, the use of non-original parts or incorrect use.
Disposal/environmental protection
Remove the battery from the device and recycle the device, battery, accessories and packaging in an environmentally-friendly manner.
Electrical devices do not belong in domestic waste.
- Hand the device and the charger in to a recycling point.
• We will dispose of any defective devices that you send to us free of charge. - Do not throw cut grass into the rubbish bin; instead, take it for composting or spread it as a mulch below shrubs and trees.
Spare Parts/Accessories
Spare parts and accessories can be obtained at www.grizzly-service.eu
If you do not have internet access, please contact the Service Centre via telephone (see "Service-Center" Page 34). Please have the order number mentioned below ready.
Replacement blade....13700243
Grass collection box......91105345
Trouble Shooting
| Problem Possible Cause Fault Fixing | ||
| Appliance doesn't start | Rechargeable battery (A 9) discharged | Check the charge status, charge rechargeable bat- tery (observe the separate operating instructions for the battery and charger) |
| Rechargeable battery (9) not inserted | Insert rechargeable battery (observe the separate ope- rating instructions for the battery and charger) | |
| Defective release button (16) or start lever (17) | Repair by customer services | |
| Defective motor | ||
| Grass too long | Set a greater cut height. Lift the front wheels slightly by pressing down on the bow- type handle (1). | |
| Motor stops Blockage by foreign object Remove the foreign object | ||
| Result unsatisfactory or motor labours | Cut height too low Set a higher cut height | |
| Blade (23) blunt | Have the blade sharpened or replace it | |
| Blade area blocked Clean the equipment | ||
| Blade (23) assembled incorrectly | Install the blade correctly | |
| Blade fails to turn | Blade (23) blocked by grass | Remove the grass |
| Blade screw (24) loose | Tighten the blade screw | |
| Strange noises, rattling or vibrations | Blade screw (24) loose | Tighten the blade screw |
| Blade (23) damaged | Replace the blade | |
Guarantee
Dear Customer,
This equipment is provided with a 3-year guarantee from the date of purchase.
In case of defects, you have statutory rights against the seller of the product. These statutory rights are not restricted by our guarantee presented below.
Terms of Guarantee
The term of the guarantee begins on the date of purchase. Please retain the original receipt. This document is required as proof of purchase.
If a material or manufacturing defect occurs within three years of the date of purchase of this product, we will repair or replace – at our choice – the product for you free of charge. This guarantee requires the defective equipment and proof of purchase to be presented within the three-year period with a brief written description of what constitutes the defect and when it occurred.
If the defect is covered by our guarantee, you will receive either the repaired product or a new product. No new guarantee period begins on repair or replacement of the product.
Guarantee Period and Statutory Claims for Defects
The guarantee period is not extended by the guarantee service. This also applies for replaced or repaired parts. Any damages and defects already present at the time of purchase must be reported immediately after unpacking. Repairs arising after expiry of the guarantee period are chargeable.
Guarantee Cover
The equipment has been carefully produced in accordance with strict quality guidelines and conscientiously checked prior to delivery.
The guarantee applies for all material and manufacturing defects. This guarantee does not extend to cover product parts that are subject to normal wear and may therefore be considered as wearing parts (e.g. blade, blade bolt) or to cover damage to breakable parts (e.g. switch).
This guarantee shall be invalid if the product has been damaged, used incorrectly or not maintained. Precise adherence to all of the instructions specified in the operating manual is required for proper use of the product. Intended uses and actions against which the operating manual advises or warns must be categorically avoided.
The product is designed only for private and not commercial use. The guarantee will be invalidated in case of misuse or improper handling, use of force, or interventions not undertaken by our authorised service branch.
Processing in Case of Guarantee
To ensure quick handling of you issue, please follow the following directions:
- Please have the receipt and item number (IAN 311518) ready as proof of purchase for all enquiries.
- Please find the item number on the rating plate.
- Should functional errors or other defects occur, please initially contact the service department specified below by telephone or by e-mail. You will then receive further information on the processing of your complaint.
GB MT
- After consultation with our customer service, a product recorded as defective can be sent postage paid to the service address communicated to you, with the proof of purchase (receipt) and specification of what constitutes the defect and when it occurred. In order to avoid acceptance problems and additional costs, please be sure to use only the address communicated to you. Ensure that the consignment is not sent carriage forward or by bulky goods, express or other special freight. Please send the equipment inc. all accessories supplied at the time of purchase and ensure adequate, safe transport packaging.
Repair Service
For a charge, repairs not covered by the guarantee can be carried out by our service branch, which will be happy to issue a cost estimate for you.
We can handle only equipment that has been sent with adequate packaging and postage.
Attention: Please send your equipment to our service branch in clean condition and with an indication of the defect.
Equipment sent carriage forward or by bulky goods, express or other special freight will not be accepted.
We will dispose of your defective devices free of charge when you send them to us.
Service-Center
GB Service Great Britain Tel: 0800 4047 657
E-Mail: grizzly@lidl.co.uk
IAN 311518
MT Service Malta
Tel.: 80062230
E-Mail: grizzly@lidl.com.mt
IAN 311518
Importer
Please note that the following address is not a service address. Please initially contact the service centre specified above.
Service-Center......49
Importeur ....49
Fehlersuche....50
 Translation of the original EC declaration of conformity Translation of the original EC declaration of conformity | |
| We confirm, that the Cordless lawn mower Design Series PRMA 40-Li A1 Serial number 201902000001 - 201902019577 conforms with the following applicable relevant version of the EU guidelines: | |
| 2006/42/EC • 2014/30/EU • 2000/14/EC • 2005/88/EC • 2011/65/EU* | |
| In order to guarantee consistency, the following harmonised standards as well as national standards and stipulations have been applied: | |
| EN 55014-1:2017 • EN 55014-2:2015 • EN 62233:2008 EN 60335-1:2012/A13:2017 • EN 60335-2-77:2010 • EN 62321:2009 | |
| We additionally confirm the following in accordance with the 2000/14/EC emissions guideline: Guaranteed sound power level: 96 dB(A) Measured sound power level: 92 dB(A) Compliance evaluation process carried out in accordance with Appendix VI, 2000/14/EC Registered Office: TÜV SÜD Industrie Service GmbH (NB 0036) | |
| This declaration of conformity is issued under the sole responsibility of the manufacturer: | |
 Grizzly Tools GmbH & Co. KG Stockstädter Straße 20 63762 Großostheim Germany 26.02.2019 Grizzly Tools GmbH & Co. KG Stockstädter Straße 20 63762 Großostheim Germany 26.02.2019 |  Christian Frank Documentation Representative Christian Frank Documentation Representative |
Translation of the original EC declaration of conformity
* The object of the declaration described above satisfies the provisions of Directive 2011/65/EU of the European Parliament and the Council of 8 June 2011 on limiting the use of certain harmful substances in electrical and electronic appliances.


- TOSAERBA RICARICABILE PRMA 40-Li A1
- TOSAERBA RICARICABILE
- Introduction
- Intended purpose
- General description
- Extent of the delivery
- Function description
- Overview
- Technical specifications
- Cordless lawn mower ......PRMA 40-Li A1
- Symbols and icons
- Symbols on the equipment:
- Filling level indicator on the grass collection box
- Symbols in the manual:
- Warning symbols with in- formation on damage and injury prevention.
- Safety information
- General notes on safety
- IMPORTANT READ THE OPERATING IN- STRUCTIONS CAREFULLY. STORE THE OPERATING INSTRUCTIONS FOR LATER REFERRAL.
- Preparation:
- GB MT
- Working with the Equipment:
- Maintenance and Storage:
- Electrical Safety:
- Assembly
- Mounting the lower bar
- Mounting the upper bar
- Mounting the grass collection box
- J Mulch kit
- Attaching the mulch kit
- Removing the mulch kit
- Operation
- E Mounting/removing the grass collection box
- Work may not be carried out using the device without the impact protection or grass collection box. There is a risk of injury.
- Filling level indicator
- Setting the cutting height
- Inserting/removing the rechargeable battery
- Switching on and off
- Auto/Eco mode
- Checking the charge status of the battery
- Working with the device
- Cleaning/maintenance
- General cleaning and maintenance work
- H Replacing blades
- K Storage
- Disposal/environmental protection
- Spare Parts/Accessories
- Spare parts and accessories can be obtained at www.grizzly-service.eu
- Guarantee
- Terms of Guarantee
- Guarantee Period and Statutory Claims for Defects
- Guarantee Cover
- Processing in Case of Guarantee
- Repair Service
- Service-Center
- Importer
- Translation of the original EC declaration of conformity
Brand : PARKSIDE
Model : PRMA 40-Li A1
Category : Lawn mower