SRKM 860 A1 - Rice cooker SILVERCREST - Free user manual and instructions
Find the device manual for free SRKM 860 A1 SILVERCREST in PDF.

| Product type | Multifunction digital rice cooker |
| Brand | SilverCrest |
| Model | SRKM 860 A1 |
| Power supply | 220 – 240 V ~ 50 Hz, 860 W, protection class I |
| Cooking capacity | 0.4 – 1.5 L (2 – 8 CUP) of rice |
| Useful volume of the inner pot | 2.93 L |
| Maximum capacity of the inner pot | 4 L |
| Automatic cooking programs | Rice, White Rice, Sushi Rice, Grain Rice, Quinoa, Cereal, Pilaf, Congee, Pasta, Crispy, Turbo, Soup, Reheat, Baking, Cake, Steaming, Stew, Yogurt, Multifunction |
| Keep warm function | Up to 24 hours |
| Delayed cooking | Up to 24 hours (except certain programs) |
| Additional functions | Child safety lock, adjustable beep, removable rice spoon holder |
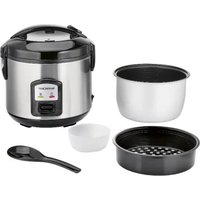
| Included accessories | Non-stick inner pot, steaming basket, rice spoon, soup spoon, measuring cup (160 ml / ¾ CUP), spoon holder |
| Materials | PFOA-free non-stick coating, food-safe plastic, stainless steel (steaming basket) |
| Cleaning and maintenance | Removable inner lid, valve, and condensation water tank can be washed by hand; pot, spoons, measuring cup, and steaming basket are dishwasher-safe; wipe the exterior with a damp cloth |
| Safety | Safety contact on heating plate, lid lock, child safety lock, automatic shut-off in case of overheating |
| Warranty | 3 years (conditions vary by country) |
| Weight | Approx. 3.5 kg (estimated) |
Frequently Asked Questions - SRKM 860 A1 SILVERCREST
User questions about SRKM 860 A1 SILVERCREST
0 question about this device. Answer the ones you know or ask your own.
Ask a new question about this device
Download the instructions for your Rice cooker in PDF format for free! Find your manual SRKM 860 A1 - SILVERCREST and take your electronic device back in hand. On this page are published all the documents necessary for the use of your device. SRKM 860 A1 by SILVERCREST.
USER MANUAL SRKM 860 A1 SILVERCREST
natural_image
White rice cooker with open lid and digital display showing 003, no visible text or symbols on the device itself.DIGITALER REISKOCHER SRKM 860 A1 DIGITAL RICE COOKER SRKM 860 A1 CUISEUR À RIZ NUMÉRIQUE SRKM 860 A1
GB Operating instructions DIGITAL RICE COOKER
For EU market: Imported for GB market by: HOYER Handel GmbH Lidl Great Britain Ltd Kühnehöfe 12 Lidl House - 14 Kingston Road 22761 Hamburg Surbiton - KTS 9NU GERMANY
Stand der Informationen - Status of information - Version des informations Stand van de informatie - Stan informacji - Stav informaci Stay informáci - Estado de las informaciones - Informationernes stand Versione delle informazioni - Az információ kelte 04/2024 ID: SRKM 860 A1 24 V1.2
IAN 451565_2310 IAN 451565_2310

Deutsch...... 2
English...... 40
Français 74
Nederlands.... 114
Polski 152
Česky 190
Slovenčina 224
Español.... 260
Dansk 296
Italiano 330
Magyar.... 368
Übersicht / Overview / Aperçu de l'appareil / Overzicht / Przegląd / Přehled / Prehlad / Vista general / Oversigt / Panoramica / Áttekintés

natural_image
Technical line drawing of a mechanical component with circular features and mounting holes (no text or symbols)
natural_image
Technical diagram of a mechanical device with lock and adjustment knobs (no text or symbols)Inhalt
natural_image
Diagram of a mechanical component with curved lines and circular features, no visible text or symbolsInnendeckel
- Overview 42
- Intended purpose 43
- Safety information 44
- Items supplied 47
- Operating panel and indications on the display 48
5.1 Operating panel.... 48
5.2 Indications on the display 49
- Before using for the first time 50
- Handling the rice cooker 50
7.1 Opening and closing the lid (when cold) 50
7.2 Opening lid safely (while hot).... 51
7.3 Holder for the rice spoon 51
7.4 Switching the acoustic signal off/on.... 51
7.5 Switching the child safety lock on/off 51
- Preparations before each use 52
- Cooking with the rice cooker 53
9.1 Preparing the cooking process.... 53
9.2 Cooking time.... 53
9.3 Setting cooking program and starting.... 54
9.4 Cancel cooking process.... 54
9.5 Cooking process complete 54
- Modes of operation 55
10.1 Keep Warm 55
10.2 Cooking with a delay time 55
10.3 Multifunction 56
- Cooking Rice 56
11.1 General procedure.... 57
11.2 Rice mode.... 57
11.3 White rice mode.... 57
11.4 Sushi rice mode 58
11.5 Grain rice mode 58
11.6 Quinoa mode.... 58
- Additional cooking programs 58
12.1 Cereals/grains program 58
12.2 Pilaf program 59
12.3 Congee program 59
12.4 Pasta program.... 60
12.5 Crispy program 60
12.6 Turbo program 60
12.7 Soup program 61
12.8 Reheating program 61
12.9 Baking program.... 62
12.10 Cake program 62
12.11 Steaming program....63
12.12 Stew program....64
12.13 Yogurt program 64
13. Recipes 65
14. Cleaning and storage 69
14.1 Disassembling the device 69
14.2 Cleaning the parts....69
14.3 Cleaning the housing and power cable.... 69
14.4 Storing the device 70
15. Disposal 70
16. Trouble-shooting 70
17. Technical specifications 71
18. Warranty of the HOYER Handel GmbH 72
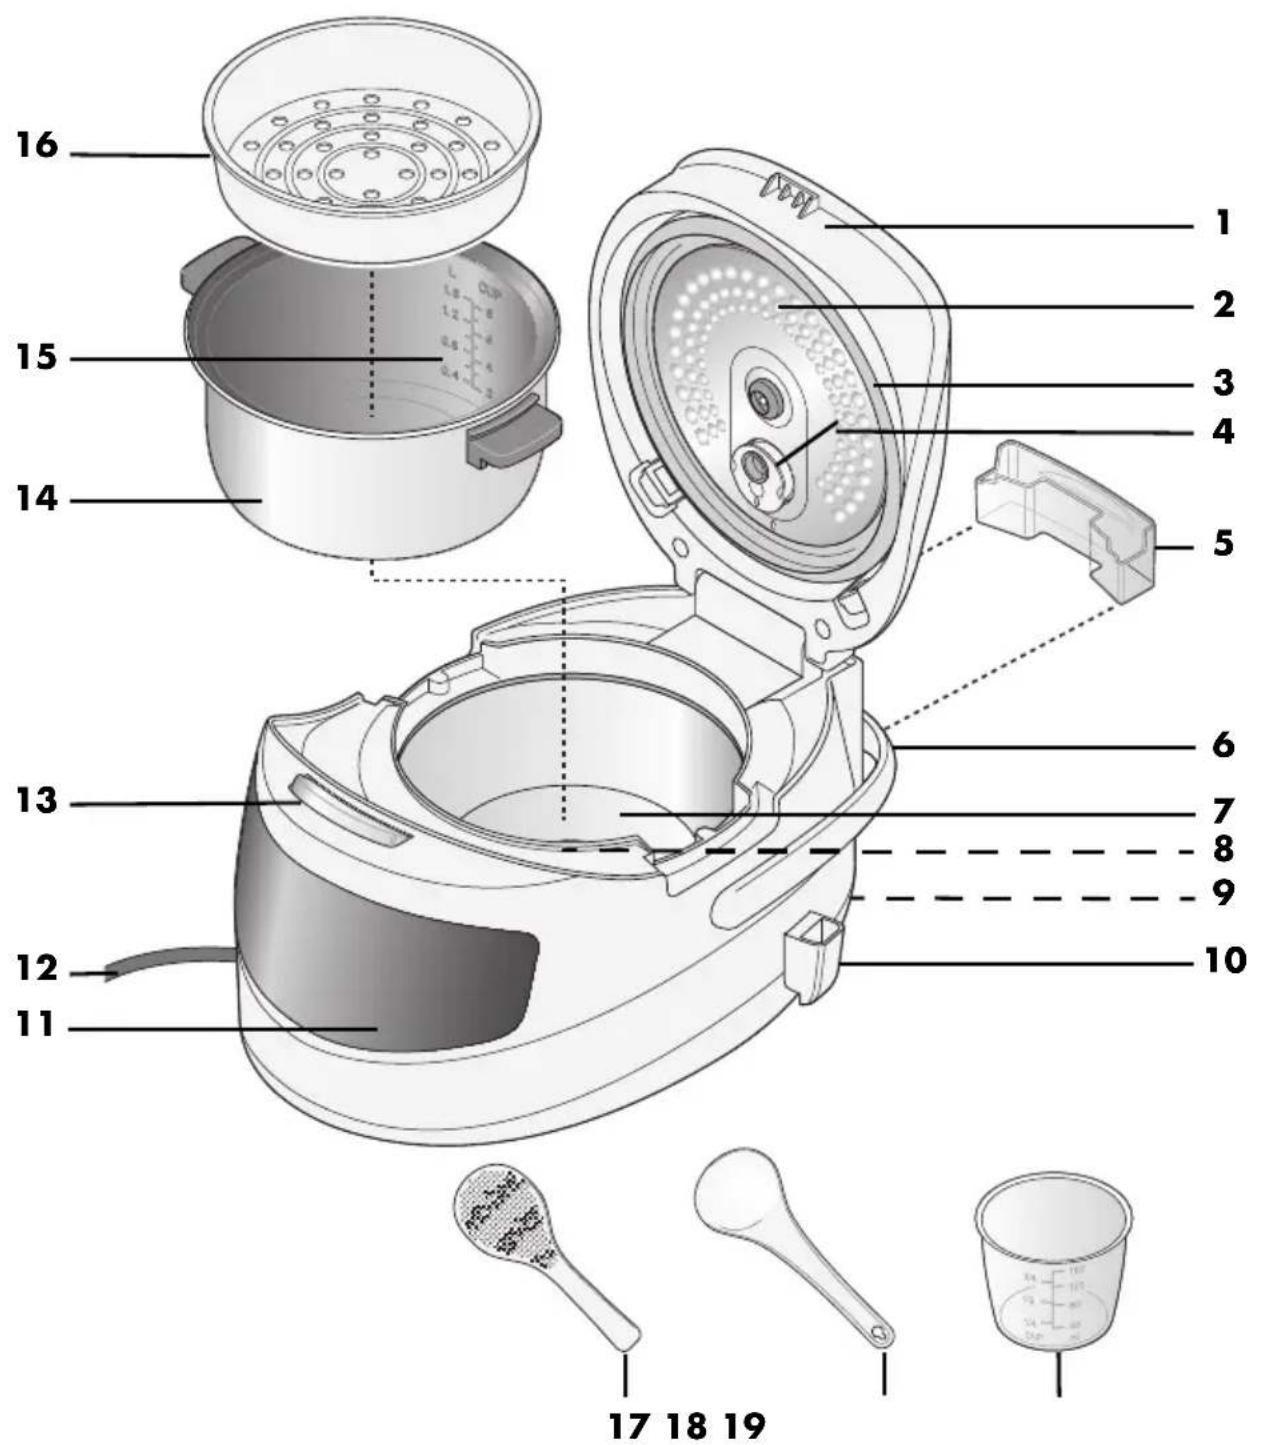
1. Overview
1 Lid
2 Inner lid, removable
3 Sealing ring
4 Steam outlet
5 Condensed water tank, removable
6 Movable handle
7 Heating plate
8 Safety contact in the centre of the heating plate
9 Port (for connecting the mains power cable)
10 Holder for the rice spoon, detachable
11 Operating panel with display
12 Mains power cable with mains plug
13 Lid release button
14 Pot (filling volume: 0.4 - 1.5 L / 2 - 8 CUP)
15 Scale (litre and CUP display)
16 Steamer insert
17 Rice spoon
18 Soup spoon
19 Measuring beaker (40 - 160 ml / 14 - 34 CUP)
Thank you for placing your trust in our products!
Congratulations on your new rice cooker.
For safe handling of the device and in order to get to know the entire range of features:
- Read these user instructions thoroughly prior to initial use.
- Above all, observe the safety information!
- The device should only be used as described in this copy of the user instructions.
- Keep this copy of the user instructions for reference.
- If you pass the device on to someone else, please include this copy of the user instructions. The user instructions are a part of the product.
We hope you enjoy your new rice cooker!
Symbols on your device

The food-safe material of devices with this symbol will not change the taste or smell of food.
2. Intended purpose
This rice cooker is a multifunctional device with various cooking programs to cook, steam, boil, prepare yogurt and bake cakes while saving time and energy.
The default cooking time settings for most programs can be adjusted manually.
The device is designed for private, domestic use. The device must only be used in dry, indoor areas.
This device must not be used for commercial purposes.
Foreseeable misuse

DANGER! Risk of injury from scalding!
- Do not lean over the rice cooker ... ... when you open the lid and the contents are still hot, and ... when hot steam escapes from the device.
- Ensure that no part of your body (e.g. hand or arm) is positioned over the steam outlet when steam is released or the lid is opened.
3. Safety information
Warnings
If necessary, the following warnings are used in these user instructions:

DANGER! High risk: failure to observe this warning may result in injury to life and limb.
WARNING! Moderate risk: failure to observe this warning may result in injury or serious material damage.
CAUTION: low risk: ignoring this warning may result in minor injuries or damage to property.
NOTE: circumstances and specifics that must be observed when handling the device.
Instructions for safe operation
- Children must not play with the device.
- This device can be used by children from the age of 8 and people with restricted physical, sensory or intellectual abilities or a lack of experience or knowledge if they are supervised or have been instructed in how to use this device safely and if they have understood the resulting dangers. Cleaning and user maintenance must not be carried out by children unless they are 8 years or older and are supervised.
- The device and the power cable must be kept away from children younger than 8 years.
- Parts of the surfaces of the device become very hot during operation. Only touch the control elements of the device during operation. After operation, only grip the pot using potholders or oven gloves.
- This device is equally intended for use in the home and in applications similar to the home, such as for example...
... in kitchens for staff in shops, offices and other commercial settings;
... on agricultural properties;
… by customers in hotels, motels and other residential facilities;
... in bed-and-breakfast establishments.
- Make sure that the steam outlet is not blocked before each use.
- If the mains power cable of this device becomes damaged, it must be replaced by an equivalent power cable. Contact the our customer service.
- The device, the mains power cable and the mains plug must not be immersed in water or any other liquids.
- If liquid gets into the device, disconnect the mains plug immediately. Have the device checked before reusing.
- Pull the mains plug out of the wall socket:
- when it is not supervised
- before you assemble or disassemble the device
- before changing accessories or attachments
- before cleaning
- Do not lean over the device ...
... when you open the lid and the contents are still hot, and ... when hot steam escapes from the device.
- Ensure that no part of your body (e.g. hand or arm) is positioned over the steam outlet when steam is released or the lid is opened.
- Make sure that no liquid overflows onto the device plug connection.
- Remember that the surface of the heating element remains hot after use.
- Prior to the replacement of accessories or attachments which move when in operation, the device must be switched off and disconnected from the mains power supply.
- Clean all parts and surfaces that will come into contact with food before using the device for the first time.
- Please take note of the chapter on cleaning (see “Cleaning and storage” on page 69).
- Misuse of the device may result in injury.

DANGER for children!
- Packing materials are not children's toys. Children should not be allowed to play with the plastic bags. There is a risk of suffocation.
- Keep the device out of the reach of children.

DANGER to and from pets and livestock!
Electrical devices can represent a danger to pets and livestock. In addition, animals can also cause damage to the device. For this reason you should keep animals away from electrical devices at all times.

DANGER for birds!
Birds breathe faster, distribute the air differently in their bodies and are significantly smaller than humans. For this reason, it may be dangerous for birds to inhale even the smallest smoke quantities, which develop while this device is in operation. When using this device, birds should be relocated into a different room.

DANGER! Risk of electric shock due to moisture!
- Liquid and food must always be placed in the pot, and never directly into the base unit.
- Protect the base unit from moisture, water drops and water splashes: failure to observe this instruction may result in an electric shock hazard.
- Never touch the device with wet hands.
- Make sure that the surface under the device is dry.

DANGER! Risk of electric shock!
- Do not use the device if the device or the mains power cable has any visible damage, or if the device has previously been dropped.
- Only connect the mains plug to a properly installed and easily accessible earthed wall socket whose voltage corresponds to the specifications on the rating plate. The wall socket must still be easily accessible after the device is plugged in.
- Ensure that the mains power cable cannot be damaged by sharp edges or hot points.
- When using the device, ensure that the mains power cable cannot be trapped or crushed.
- When removing the mains plug from the wall socket, always pull on the plug and never the cable.
-
Pull the mains plug out of the wall socket:
-
after every use
- when a malfunction occurs
- when you are not using the device
- before you clean the device
- during thunderstorms
- To avoid any risk, do not make modifications to the product.

FIRE HAZARD!
Before switching the device on, place it on a level, stable, dry, heat-resistant surface.
- The safety contact in the centre of the heating plate must be clean and move freely in order to avoid overheating.
- The device does not require constant supervision when in use but should be checked regularly. This applies in particular when very long cooking times are set.

DANGER! Risk of injury from burning!
- Only transport the device when it has cooled down.
- Wait for the device to cool down before cleaning.

DANGER! Risk of injury from hot food!
- If you have heated semi-liquid food, carefully shake the rice cooker before opening. This should prevent food from spraying out.
- If you have cooked meat with the skin on, the skin can swell up. Do not pierce the meat while the skin is swollen.
- Place the device in a stable position by using the handle, in order to prevent the hot liquid from spilling.

DANGER! Risk of injury from scalding!
- Do not move the device during operation.
WARNING! Risk of material damage!
- In order to avoid overheating, the device must never be covered. Heat can otherwise accumulate in the device.
- The device must never be operated when empty, in order to avoid overheating.
- Never operate the rice cooker without the pot.
- Ensure that there is never too much or too little water and food in the device. Please note the instructions regarding filling volume and the markings in the pot.
- Never place the device directly under a wall-mounted cupboard, as steam escapes from the top and could damage the furniture.
- Never place the device on hot surfaces (e.g. hot plates) or near to heat sources or open fire.
- Only use the original accessories.
The device is fitted with non-slip plastic feet. As furniture is coated with a variety of different varnishes and acrylics, and treated with different cleaning agents, it cannot be completely ruled out that components are contained in some of these substances that could damage and soften the plastic feet. If necessary, place a non-slip mat under the device. - Do not clean using sharp objects or abrasive cleaning agents.
4. Items supplied
1 rice cooker
1 holder 10 for the rice spoon
1 soup spoon 18
1 rice spoon 17
1 measuring beaker 19
l steamer insert 16
1 complete copy of the user instructions (on the Internet)
1 copy of the short manual (enclosed with the device)
Unpacking
- Remove all parts from the packaging.
- Check that all parts are present and intact.
5. Operating panel and indications on the display
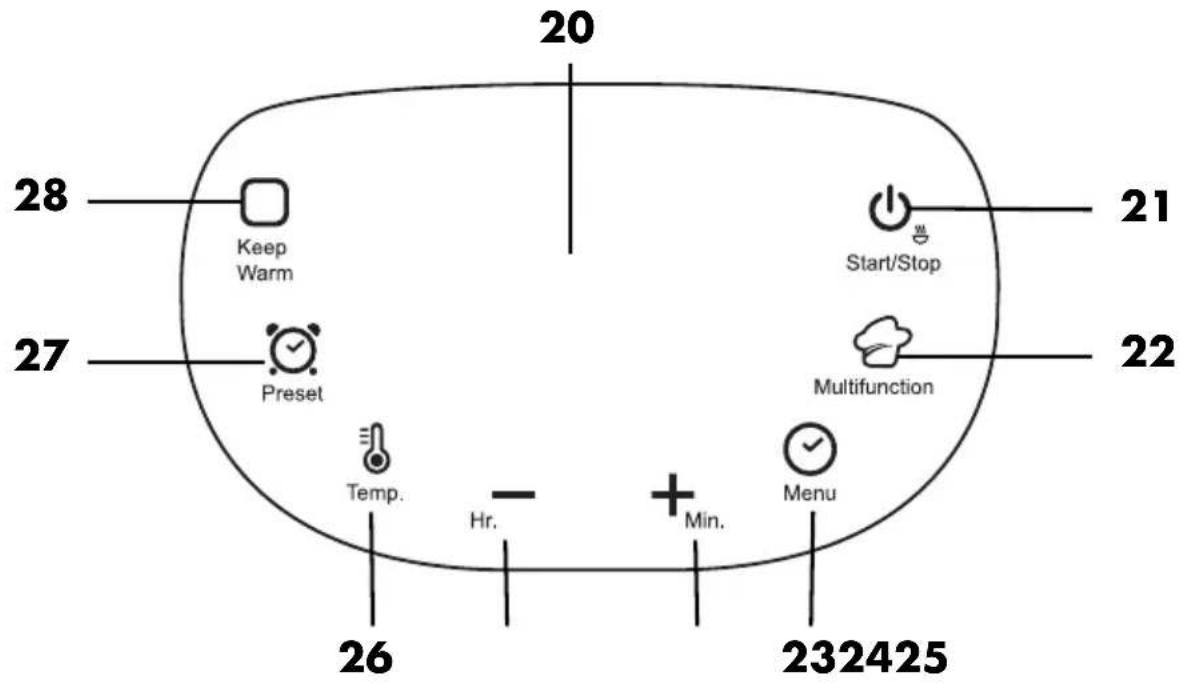
5.1 Operating panel
| No. / Display Function | ||
| 20 | Display Display of current settings and information about the cooking process | |
21  | Start/Stop Start/stop set program | |
22  | Multifunction Individually set cooking time (10 min. - 15 hrs.) | |
23  | Menu Program selection | |
24  | Min. Extend cooking time in 5 minute increments; Extend the cooking time in the Multifunction program in 1 minute increments; Switching the child safety lock on/off | |
25  | Hr. Extend the cooking time in 1 hour increments; Switching the acoustic signal off/on | |
| 26 [TASH] | Temp. Setting the temperature in the Multifunction program | |
| 27 [HGD8] | Preset Start program with a delay time | |
| 28 [4ZBT] | Keep Warm Keep warm program | |
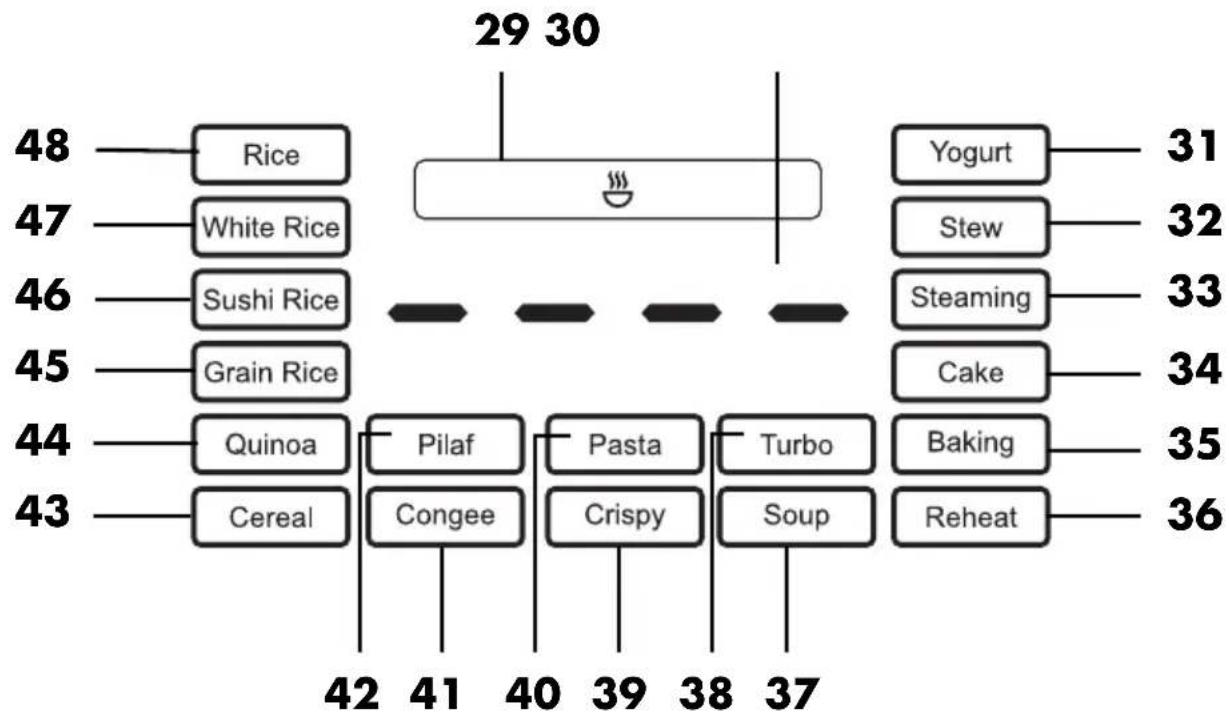
5.2 Indications on the display
flowchart
graph TD
    A["48 Rice"] --> B["29 30"]
    C["47 White Rice"] --> B
    D["46 Sushi Rice"] --> B
    E["45 Grain Rice"] --> B
    F["44 Quinoa"] --> G["42 41"]
    H["43 Cereal"] --> G
    I["40 Pilaf"] --> J["41 40"]
    K["Pasta"] --> L["40 39"]
    M["Turbo"] --> N["38 37"]
    O["Songy"] --> P["37 36"]
    Q["Yogurt"] --> R["31"]
    S["Stew"] --> T["32"]
    U["Steaming"] --> V["33"]
    W["Cake"] --> X["34"]
    Y["Baking"] --> Z["35"]
    AA["Reheat"] --> AB["36"]
| No. / Display | Meaning | Preset cooking time | Manually adjustable range for cooking time |
| 29 | Symbol bar | ||
| 30 | Time and temperature display | ||
| 31 Yogurt | Program for preparing yoghurt 8 hrs. 6 - 12 hrs. | ||
| 32 Stew | Program for preparing stew 2 hrs. 1 - 4 hrs. | ||
| 33 Steaming | Program for steaming vegetables 30 min. 10 min. - 1 hr. | ||
| 34 Cake | Program for baking cakes 50 min. 10 min. - 1 hr. | ||
| 35 Baking | Baking program 40 min. 10 min. - 1 hr. | ||
| 36 Reheat | Reheating 30 min. 10 min. - 1 hr. | ||
| 37 Soup | Program for preparing soup 1 hr. | 30 min. | 1 - 4 hrs. |
| 38 Turbo | Faster preparation due to higher heat | 30 min. 10 min. - 1 hr. | |
| 39 Crispy | Program for preparing crispy rice | 1 hr.30 min. | 1 - 2 hrs. |
| 40 Pasta | Program for preparing pasta | 30 min. | 10 min. - 1 hr. |
| 41 Congee | Program for preparing congee 1 hr. | 30 min. | 1 - 3 hrs. |
| 42 Pilaf | Program for preparing pilaf 1 hr. 5 min. | - 2 hrs. | |
| 43 Cereal | Program for preparing cereals 1 hr. | 30 min. - 1 hr.30 min. | |
| 44 Quinoa | Program for preparing quinoa Automatic program | ||
| 45 Grain Rice | Program for preparing grain rice Automatic program | ||
| 46 Sushi Rice | Program for preparing sushi rice Automatic program | ||
| 47 White Rice | Program for preparing white rice Automatic program | ||
| 48 Rice | Program for preparing standard rice Automatic program | ||
6. Before using for the first time
- Clean the device prior to its first use (see "Cleaning and storage" on page 69)!
- Remove the protective film from the operating panel 11.
NOTE because the device is slightly greased when delivered, slight smoke and odour may be produced during its first use. This is harmless and stops after a short amount of time. Please ensure sufficient ventilation in the meantime.
7. Handling the rice cooker
7.1 Opening and closing the lid (when cold)
- Press the release button 13. The lid 1 pops open.
NOTE: if necessary, hold the lid 1 with your other hand to prevent it from popping open uncontrollably.
- Fold down the lid 1 until you hear it click into place.
7.2 Opening lid safely (while hot)

DANGER! Risk of injury from scalding!
- Ensure that no part of your body (e.g. hand or arm) is positioned over the steam outlet when steam is released or the lid 1 is opened. There is a danger of being scalded by escaping steam.

DANGER! Risk of injury from hot food!
- If you have heated semi-liquid food, carefully shake the rice cooker before opening. This should prevent food from spraying out.
-
If you have cooked meat with the skin on, the skin can swell up. Do not pierce the meat while the skin is swollen.
-
Stop the cooking process and pull out the mains plug 12.
-
Carefully press down the release button 13 and open the lid 1.
- If necessary, hold the lid 1 with your other hand to prevent it from popping open uncontrollably. Protect your hand, e.g. with an oven glove. Hot steam will escape as soon as the lid 1 is opened!
7.3 Holder for the rice spoon
You can insert the holder 10 for the rice spoon into the plastic eyelet on the right-hand side of the device.
7.4 Switching the acoustic signal off/on
- To switch off the acoustic signal, press the - Hr. button for approx. 2 seconds in standby mode. The crossed-out loudspeaker will appear in the symbol bar 29.
- To switch the acoustic signal back on, press the - Hr. button again for approx. 2 seconds - The symbol of the crossed-out loudspeaker in the symbol bar 29 disappears.
7.5 Switching the child safety lock on/off
- To switch on the child safety lock, press the + Min. button for approx. 2 seconds in standby mode. The lock symbol will be displayed in the symbol bar 29.
- To switch the child safety lock off again, press the + Min. button again for approx. 2 seconds. The lock symbol in the symbol bar 29 will disappear.
NOTE: after activating the child safety lock, no buttons are usable.
8. Preparations before each use

DANGER!
- The inside of the device and the safety contact 8 in the centre of the heating plate 7 must be clean, freely movable and free of dirt to prevent overheating.
Before switching the device on, place it on a level, stable, dry, heat-resistant surface.
Attaching the condensed water tank
The condensed water tank 5 catches condensed water that runs off the lid 1 and into the upper ring on the device.
- Place the condensed water tank 5 into the holder on the back of the device.
NOTES:
- To slide the condensed water tank 5 in or out, the handle 6 must be folded forward.
- Empty the condensed water tank 5 after each use.
Sealing ring
After cooking, the lid 1 is sometimes difficult to remove from the device. To make the lid easier to remove, you can use a cloth with a drop of cooking oil to rub on the sealing ring 3 before cooking.
Steam outlet
The steam outlet 4 is located on the underside of the lid 1.
- Open the lid 1 by pressing the release button 13.
- Make sure that the steam outlet 4 is inserted correctly. The arrows in the inner lid 2 and on the steam outlet 4 point towards each other.

natural_image
Diagram of a mechanical component with concentric circles and directional arrows, no visible text or symbolsInner lid
Check that the inner lid is inserted correctly.
- Figure A: insert the two plastic tabs of the inner lid 2 into the two recesses at the top edge of the lid 1.
- Now press the inner lid 2 into the lid 1. The two lower plastic tabs snap into the lid.
9. Cooking with the rice cooker

DANGER!
- Please note that the inside of the device must remain clean and dry.

DANGER! Risk of injury from scalding!
- Ensure that no part of your body (e.g. hand or arm) is positioned over the steam outlet when steam is released or the lid is opened.

DANGER! Risk of injury from burning!
- Parts of the surfaces of the device become very hot during operation. During operation, only touch the operating panel 11 and the release button 13. After operation, only grip the pot 14 using potholders or oven gloves.
NOTES:
- Familiarise yourself with handling the rice cooker before you start cooking.
- The basic procedure is described in the following.
9.1 Preparing the cooking process
- Prepare the foods as described in the recipe, and place them in the pot 14.
- Wipe down the outside of the pot 14 if necessary. It must be clean and dry.
- Place the pot 14 into the device.
- Fold down the lid 1. The locking mechanism will click audibly.
- Plug the mains power cable 12 into the port 9 on the device. Plug the mains plug into a suitable wall earthed wall socket. The wall socket must still be eas-
ily accessible after the device is plugged in.
- As soon as the device is connected to the power supply, an acoustic signal will sound. Four bars appear in the display 20 and the Start/Stop button flashes. The device is in standby mode.
NOTES:
- You can read the quantities inside the pot 14 in L and CUP and on the measuring beaker 19 in ml and CUP.
- The L and CUP figures inside the pot 14 refer to the total amount of rice including the water contained.
General information on CUP
- 1 CUP corresponds to approx. one portion of rice as a main meal.
- 240 ml of liquid is required for 1 CUP of rice.
9.2 Cooking time
Cooking times depend on the freshness and quality of the food, the size of the pieces, and personal preference (al dente or well done).
The cooking times can be changed by pressing the + Min. and - Hr. buttons. In the
Multifunction program, the temperature can also be changed by pressing the Temp. button.
NOTES:
- Information on cooking times can be found in Chapter "Indications on the display" on page 49 and in the enclosed cooking time table.
- The larger the quantities you use, the longer the cooking times may be.
9.3 Setting cooking program and starting
NOTE: you can cancel the settings or a running program at any time using the Start/Stop button.
- Press the Menu button repeatedly to select the desired program on the display. The corresponding cooking program flashes.
The cooking time preset appears on the display 20.
NOTE: the cooking time and temperature cannot be changed in the following automatic programs:
- Q u i n o a
- Grain Rice
- Sushi Rice
- White Rice
-
Rice
-
To change the cooking time within the adjustable range, press the + Min. and - Hr. buttons.
- By keeping the buttons + Min. and - Hr. pressed, you can cycle through the values faster.
-
To start the program, press the Start/Stop button.
-
The selected program button may light up.
- The display 20 counts down the time.
NOTE: select the following programs by pressing the respective program button on the operating panel:
- Multifunction
- Preset
- Keep Warm
9.4 Cancel cooking process
Press the Start/Stop button to cancel a running program.
The device is then in standby mode. Four bars appear in the display 20 and the Start/Stop button flashes.
9.5 Cooking process complete
An acoustic signal sounds at the end of the cooking process. The device automatically switches to the keep warm program Keep Warm. The display 20 counts the warm time upwards from 0:00. You can read the number of minutes the food has been kept warm on the display.
- To end the program earlier, press the Start/Stop button.
- Press the release button 13 and carefully open the lid 1.
NOTE: if necessary, hold the lid with your other hand to prevent it from popping open uncontrollably. Protect your hand, e.g. with an oven glove. Hot steam will escape as soon as the lid is opened!
-
Remove the hot pot 14 using potholders or oven gloves.
-
Allow the device to cool down before you clean it.
-
Disconnect the mains plug 12 from the wall socket when you are finished using the device.
10. Modes of operation 10.1 Keep Warm
When a cooking program is finished, the device automatically switches to the Keep Warm program.
You can also start the program manually in order to keep hot food warm in the rice cooker.
NOTES:
- Keeping food warm for very long periods changes the flavour and appearance, vitamins are destroyed, and the food can go bad.
- In the Yogurt program, the device does ispy not automatically switch to the keep - Turbo warm program. - Yogurt
-
Place the hot food into the pot 14.
-
Wipe down the outside of the pot if necessary. It must be clean and dry.
-
Place the pot into the device.
-
Close the lid 1. The locking mechanism will click audibly.
-
Plug the mains power cable 12 into the port 9 on the device and connect it to a properly installed earthed wall socket.
-
As soon as the device is connected to the power supply, 4 bars appear on the display 20 and the Start/Stop button flashes. The device is in standby mode.
-
Briefly press the button Keep Warm to start the program.
- The Keep Warm symbol in the symbol bar 29 lights up.
- The display 20 counts the warm time upwards from 0:00.
- The program Keep Warm ends automatically after 24 hours.
-
To end the program, press the Start/Stop button again. The device is in standby mode.
-
Press the release button 13 and carefully open the lid 1.
-
Remove the hot pot 14 using potholders or oven gloves.
10.2 Cooking with a delay time
This function allows you to prepare the cooking process and then cook at a later point in time. The cooking process can be started with a delay time of up to 24 hours (1:00 to 24:00).
NOTES:
- The following programs cannot be started with a time delay:
- Cereal
- Pasta
do@sispy
- Turbo
- Yogurt
- Cake
- Baking
- Reheat
- Please note that some foods (e.g. fish) can go bad if they are left in the pot 14 at room temperature for multiple hours before they are cooked.
- Prepare the cooking process as described.
- Press the Preset button. The display 20 shows 1:00.
- Use the + Min. and - Hr. buttons to set the hours and minutes of the required delay time.
- Now press the Start/Stop button.
- The clock symbol in the symbol bar 29 lights up.
- The display 20 counts down the delay time.
-
After the delay time has elapsed, the heating and cooking phase will automatically begin.
-
Once the cooking process is complete, you will hear an acoustic signal. The rice cooker automatically switches to the keep warm program Keep Warm. The display shows you how long the keep warm mode has been running.
- To end the program, press the Start/Stop button again. The device is in standby mode.
- Press the release button 13 and carefully open the lid 1.
- Remove the hot pot 14 using potholders or oven gloves.
NOTES:
- You can cancel the process at any time using the Start/Stop button.
- If the set time delay is as long or shorter than the set cooking time, the device will start the cooking process immediately.
10.3 Multifunction
This program allows you to set the time and temperature values individually:
- Time: 10 minutes - 15 hours
-
Temperature: 35 - 160 °C
-
Prepare the cooking process as described.
- Press the button Multifunction. The display 20 shows 1:00.
- Use the + Min. and - Hr. buttons to select the desired cooking time.
- Press the Temp. button
- Use the + Min. and - Hr. buttons to set the desired temperature.
- Now press the Start/Stop button.
- The display 20 counts down the time.
- Once the cooking process is complete, you will hear an acoustic signal. The rice cooker automatically switches to the keep warm program Keep Warm.
The display shows you how long the keep warm mode has been running.
- To end the program, press the Start/Stop button again. The device is in standby mode.
- Press the release button 13 and carefully open the lid 1.
- Remove the hot pot 14 using potholders or oven gloves.
Searing
You can also use this program to sear food.
- Use the + Min. and - Hr. buttons to select the desired cooking time.
- Press the button Temp.
- Use the + Min. and - Hr. buttons to set the desired temperature (at least 100 °C).
- As with a non-stick frying pan, add a little oil to the food and stir occasionally.
11. Cooking Rice
With the rice cooker, you can easily cook any type of rice to perfection. Unlike conventional rice cookers, this device does not operate at maximum heat and high energy consumption during the entire cooking process, but adjusts the heat supply at various stages. This not only saves energy and preserves nutrients, but also gives the rice the perfect texture.
NOTE: the duration of the cooking process depends on the amount of water and rice.
11.1 General procedure
You can choose between five automatic programs by repeatedly pressing the Menu button:
- Rice
- White Rice
- Sushi Rice
- Grain Rice
-
Quinoa
-
Rinse the rice thoroughly by placing it in a bowl of water, stirring several times and draining off the cloudy water. Repeat this process once or twice until the water is clear.
-
Pour the rice into the pot 14 of the rice cooker.
-
Add water.
-
Select the required mode and close the lid 1 of the rice cooker.
-
Then press the Start/Stop button. The cooking process will now begin.
-
Preparation is complete as soon as 0:05 (5 minutes) appears on the display. You can now stir the rice with the supplied rice spoon 17. This releases excess moisture and makes the rice wonderfully fluffy.
-
After the 5 minutes have elapsed, you will hear an acoustic signal. The rice is fully cooked.
-
The rice cooker will now automatically switch to the keep warm program Keep Warm. The display 20 shows you how long the keep warm mode has been running.
-
To end the program, press the Start/Stop button again. The device is in standby mode.
-
Press the release button 13 and carefully open the lid 1.
-
Remove the hot pot 14 using potholders or oven gloves.
11.2 Rice mode
The Rice mode is perfect if you would like to prepare conventional (husked) rice. Generally speaking, all types of rice can be prepared using this mode. However, we recommend using the special programs for each individual variety.
- Press the Menu button repeatedly to select Rice mode on the display. Continue as described above (see "General procedure" on page 57).
TIP: we recommend a rice/water ratio of 1:1.25.
11.3 White rice mode
White Rice mode is perfect if you want to prepare husked long grain rice. This mode ensures that rice varieties such as Indian Basmati, Persian Sadri and Asian Jasmine are cooked to perfection, giving them the desired consistency.
- Press the Menu button repeatedly to select White Rice mode on the display. Continue as described above (see "General procedure" on page 57).
TIP: we recommend a rice/water ratio of 1:1.25.
11.4 Sushi rice mode
For round grain rice varieties such as sushi and sticky rice, we recommend the special program Sushi Rice. This program ensures that the rice has a particularly creamy and sticky consistency.
- Press the Menu button repeatedly to select Sushi Rice mode on the display. Continue as described above (see "General procedure" on page 57).
TIP: we recommend a rice/water ratio of 1:1.25.
11.5 Grain rice mode
Grain Rice mode is perfect for preparing brown rice, wholegrain basmati or wholegrain jasmine.
- Press the Menu button repeatedly to select Grain Rice mode on the display. Continue as described above (see "General procedure" on page 57).
TIP: we recommend a rice/water ratio of 1:2.
11.6 Quinoa mode
The rice cooker is perfect for preparing all types of quinoa.
- Press the button Menu repeatedly to select the program Quinoa on the display 20. Continue as described above (see "General procedure" on page 57).
TIP: we recommend a quinoa/water ratio of 1 : 2.
12. Additional cooking programs
12.1 Cereals/grains program
You can use this program to perfectly prepare different types of grain, such as millet, bulgur and buckwheat. We recommend a grain/water ratio of 1:2, although the ideal mixing ratio may vary depending on requirements.
- Press the button Menu repeatedly to select the program Cereal on the display 20.
- Pour the grain and water into the pot 14.
- Close the lid 1 and then press the Start/Stop button.
- Once the cooking process is complete, you will hear an acoustic signal. The rice cooker automatically switches to the keep warm program Keep Warm. The display shows you how long the keep warm mode has been running.
- To end the program, press the Start/Stop button again. The device is in standby mode.
- Press the release button 13 and carefully open the lid 1.
- Remove the hot pot 14 using potholders or oven gloves.
12.2 Pilaf program
Pilaf is a classic dish of rice cooked in a pot with meat, vegetables and spices.
- Add the ingredients to the pot 14 according to the recipe.
- Press the button Menu repeatedly to select the program Pilaf on the display 20.
- Close the lid 1 and then press the Start/Stop button.
- Once the cooking process is complete, you will hear an acoustic signal. The rice cooker automatically switches to the keep warm program Keep Warm. The display shows you how long the keep warm mode has been running.
- To end the program, press the Start/Stop button again. The device is in standby mode.
- Press the release button 13 and carefully open the lid 1.
- Remove the hot pot 14 using potholders or oven gloves.
12.3 Congee program
Congee, also known as rice porridge, is a traditional Asian dish that is prepared in many Asian countries. It is made by cooking rice in a large amount of water or broth until the rice breaks down to a thick, mushy consistency.
Congee is appreciated for its easy preparation and digestibility. It is considered soothing and calming, and is particularly popular when people are ill or recovering from illness. This dish can be enjoyed at any time of the day, whether for breakfast, lunch or dinner, and offers a wide range of variations to suit individual tastes.
- Add the ingredients to the pot 14 according to the recipe.
- Press the button Menu repeatedly to select the program Congee on the display 20.
- Close the lid 1 and then press the Start/Stop button.
- Once the cooking process is complete, you will hear an acoustic signal. The rice cooker automatically switches to the keep warm program Keep Warm. The display shows you how long the keep warm mode has been running.
- To end the program, press the Start/Stop button again. The device is in standby mode.
- Press the release button 13 and carefully open the lid 1.
- Remove the hot pot 14 using potholders or oven gloves.
12.4 Pasta program
Preparing pasta in the rice cooker is straightforward and offers a convenient method of preparing pasta dishes.
- Break the spaghetti into smaller pieces so that they fit into the pot 14.
- Add the pasta and water to the pot 14 according to the recipe.
- Press the button Menu repeatedly to select the program Pasta on the display 20.
- Use the + Min. and - Hr. buttons to select the desired cooking time.
NOTE: the set time is only counted down when the water is boiling.
- Close the lid 1 and then press the Start/Stop button.
- Once the cooking process is complete, you will hear an acoustic signal. The rice cooker automatically switches to the keep warm program Keep Warm. The display shows you how long the keep warm mode has been running.
- To end the program, press the Start/Stop button again. The device is in standby mode.
- Press the release button 13 and carefully open the lid 1.
- Remove the hot pot 14 using potholders or oven gloves.
12.5 Crispy program
Use this program to make crispy rice. The rice becomes crispy and lightly browned on the bottom.
- Pour the rice and water into the pot 14 according to the recipe.
- Press the button Menu repeatedly to select the program Crispy on the display 20.
- Close the lid 1 and then press the Start/Stop button.
- Once the cooking process is complete, you will hear an acoustic signal. The rice cooker automatically switches to the keep warm program Keep Warm. The display shows you how long the keep warm mode has been running.
- To end the program, press the Start/Stop button again. The device is in standby mode.
- Press the release button 13 and carefully open the lid 1.
- Remove the hot pot 14 using potholders or oven gloves.
12.6 Turbo program
This program is a special function designed to speed up the cooking process, especially when cooking rice. This function usually uses higher temperatures to cook the rice faster.
- Add the ingredients to the pot 14 according to the recipe.
- Press the button Menu repeatedly to select the program Turbo on the display 20.
- Close the lid 1 and then press the Start/Stop button.
-
Once the cooking process is complete, you will hear an acoustic signal. The rice cooker automatically switches to the keep warm program Keep Warm. The display shows you how long the keep warm mode has been running.
-
To end the program, press the Start/Stop button again.
The device is in standby mode.
-
Press the release button 13 and carefully open the lid 1.
-
Remove the hot pot 14 using potholders or oven gloves.
12.7 Soup program
Making soup in a rice cooker can be convenient. However, it requires a certain amount of experimentation to ensure that the soup is to your liking. Try different recipes and adjust the ingredients and seasonings until you create the perfect soup.
-
Add the ingredients to the pot 14 according to the recipe.
-
Press the button Menu repeatedly to select the program Soup on the display 20.
-
Close the lid 1 and then press the Start/Stop button.
-
Once the cooking process is complete, you will hear an acoustic signal. The rice cooker automatically switches to the keep warm program Keep Warm. The display shows you how long the keep warm mode has been running.
-
To end the program, press the Start/Stop button again. The device is in standby mode.
-
Press the release button 13 and carefully open the lid 1.
-
Remove the hot pot 14 using potholders or oven gloves.
12.8 Reheating program
You can use this program to reheat food.
- Pour the cold food into the pot 14.
- Press the button Menu repeatedly to select the program Reheat on the display 20.
- Close the lid 1.
- Set the keep warm time using the + Min. and - Hr. buttons.
NOTE: add a measuring beaker of water when reheating rice or dry food. Stir the food if necessary.
- Briefly press the Start/Stop button to start reheating.
- When the time has elapsed, you will hear an acoustic signal. The rice cooker automatically switches to the keep warm program Keep Warm. The display shows you how long the keep warm mode has been running.
- To end the program, press the Start/Stop button again. The device is in standby mode.
- Press the release button 13 and carefully open the lid 1.
- Remove the hot pot 14 using potholders or oven gloves.
12.9 Baking program
You can even use your new rice cooker for baking.
- Prepare the ingredients according to the recipe.
- Add the ingredients into the pot 14.
- Press the button Menu repeatedly to select the program Baking on the display 20.
- Close the lid 1 and then press the Start/Stop button.
- When the baking process is complete, you will hear an acoustic signal. The rice cooker automatically switches to the keep warm program Keep Warm. The display shows you how long the keep warm mode has been running.
- To end the program, press the Start/Stop button again. The device is in standby mode.
- Press the release button 13 and carefully open the lid 1.
- Remove the hot pot 14 using potholders or oven gloves.
12.10 Cake program
You can also use the rice cooker to bake delicious cakes.
- Grease the pot 14 with butter.
- Prepare the cake batter according to the recipe.
- Pour the batter into the pot 14.
NOTES:
- The maximum weight of all ingredients should not exceed 500 g.
-
To prevent or eliminate air bubbles when pouring the batter into the pot, shake the pot back and forth a little and tap the outside of the pot 14 gently with the flat of your hand.
-
Place the pot 14 in the device and close the lid 1.
- Press the button Menu repeatedly to select the program Cake on the display 20.
- Close the lid 1.
- Set the baking time according to the recipe using the + Min. and - Hr. buttons.
- Then press the Start/Stop button.
- When the baking process is complete, you will hear an acoustic signal.
- Open the lid 1 and test with a skewer to see if the cake is cooked. No batter should stick to the skewer.
- If this is the case, press the program button Cake again and continue the baking process.
- When the baking process is complete, you will hear an acoustic signal. The rice cooker automatically switches to the keep warm program Keep Warm. The display shows you how long the keep warm mode has been running.
- To end the program, press the Start/Stop button again. The device is in standby mode.
- Press the release button 13 and carefully open the lid 1.
- Remove the hot pot 14 using potholders or oven gloves.
12.11 Steaming program
The rice cooker can also be used as a steam cooker to gently cook a variety of foods.

DANGER! Risk of injury from burning!
- The steamer insert 16 becomes hot during use. Wait until it has cooled down before removing it from the pot 14, or use potholders or oven gloves.
NOTES:
- Fill the pot 14 with just a little water so that the holes at the bottom of the steamer insert 16 are above the surface of the water. The food should not be touching the water.
-
The larger the food to be steamed, the longer the cooking time.
-
Prepare the food.
- Pour 1 - 2 measuring beakers 19 of water into the pot 14.
- Press the button Menu repeatedly to select the program Steaming on the display 20.
- Place the food of your choice in the steamer insert 16 and place it in the pot 14.
- Close the lid 1.
- Use the + Min. and - Hr. buttons to select the desired cooking time.
- Then press the Start/Stop button.
- When the time has elapsed, you will hear an acoustic signal. The rice cooker automatically switches to the keep warm program Keep Warm. The display shows you how long the keep warm mode has been running.
- To end the program, press the Start/Stop button again. The device is in standby mode.
- Press the release button 13 and carefully open the lid 1.
- Remove the hot pot 14 using potholders or oven gloves.
Steam cooking with rice
You can also steam and cook rice at the same time.
- Press the Menu button repeatedly to select one of the standard rice programs.
- Fill the pot 14 with rice and water.
- Place the steamer insert 16 with the ingredients in the pot 14.
- Close the lid 1.
- Press the button Start/Stop.
- When the time has elapsed, you will hear an acoustic signal. The rice cooker automatically switches to the keep warm program Keep Warm. The display shows you how long the keep warm mode has been running.
- To end the program, press the Start/Stop button again. The device is in standby mode.
- Press the release button 13 and carefully open the lid 1.
- Remove the hot pot 14 using potholders or oven gloves.
CAUTION:
- Cook a maximum of 3 measuring beakers of rice. If larger quantities are used, there is a risk that the steamer insert 16 will push up and the lid 1 will open abruptly.
- You can also add the food for steaming later. To do this, carefully open the lid 1 and watch out for the hot steam escaping.
12.12 Stew program
You can also use the rice cooker to prepare savoury stews.
- Prepare the ingredients according to the recipe.
- Add the ingredients into the pot 14.
- Close the lid 1.
- Press the button Menu repeatedly to select the program Stew on the display 20.
- If necessary, set the cooking time according to the recipe using the + Min. and - Hr. buttons.
- Press the button Start/Stop.
- When the time has elapsed, you will hear an acoustic signal. The rice cooker automatically switches to the keep warm program Keep Warm. The display shows you how long the keep warm mode has been running.
- To end the program, press the Start/Stop button again. The device is in standby mode.
- Press the release button 13 and carefully open the lid 1.
- Remove the hot pot 14 using potholders or oven gloves.
12.13 Yogurt program
You can make your own yoghurt with the Yogurt program. To do this, you require yoghurt cultures or fresh yoghurt and milk. All commercially available milk varieties (raw milk, pasteurised fresh milk, long-life milk and UHT milk) are suitable.
For the actual yogurt production, yoghurt cultures / a little fresh yoghurt is added. The actual yogurt production then takes place at moderate warmth.
NOTES:
- For 1 litre of milk, add 200 g of fresh yoghurt (with live cultures).
-
If you are using yoghurt cultures, refer to the manufacturer's instructions for the quantities.
-
Pour the milk, including yoghurt, into the pot 14 up to the 1.2 L marking.
- Add yoghurt cultures or fresh yoghurt. Stir the milk and yoghurt/yoghurt cultures well.
- Place the pot 14 into the device.
- Press the button Menu repeatedly to select the program Yogurt on the display.
- Use the + Min. and - Hr. buttons to adjust the time for yoghurt production.
- After approx. 8 hours, the yoghurt has a good consistency.
- After approx. 10 - 12 hours, the consistency of set yoghurt has been reached.
- Press the button Start/Stop.
- When the process is completed, you will hear an acoustic signal.
- Press the release button 13 and carefully open the lid 1.
13. Recipes
Chicken curry with coconut milk
Preparation time: 15 minutes (plus 40 minutes cooking time)
Ready in 55 minutes
Ingredients for 4 portions:
| 250 | g | basmati | rice | |
| 1 tsp | salt | |||
| 500 | g | chicken | breast | |
| 1 | onion | (80 | g) | |
| 2 | cloves | of | garlic | |
| 1 tbsp | coconut oil | |||
| 600 | ml | coconut | milk | |
| 2 - 4 tbsp | red curry paste (depending on spiciness) | |||
| Juice of half a lime | ||||
| 2 | broccoli | (800 | g | |
For the marinade:
4 tbsp soy sauce
2 tbsp honey
For seasoning/topping:
2 tsp sesame
Chilli flakes, salt and pepper to taste
Preparation:
- Wash the basmati rice until the excess starch has been washed out and the water remains clear. Drain the water and put the rice in the pot of the rice cooker.
- Add 320 ml water. Season with 1 tsp salt to taste.
- Close the lid and start the cooking process in White Rice mode.
As soon as the rice cooker switches to keep warm mode, the rice is ready.
-
While the rice is cooking, mix the soya sauce and honey to make a smooth marinade.
-
Cut the chicken breast into pieces and leave to marinate in the marinade for 20 minutes.
-
In the meantime, cut the broccoli into florets and blanch in hot water for 5 minutes (if you prefer, you can also peel and chop the stalk).
-
Then drain and set aside.
-
Peel and finely dice the onion and garlic cloves.
-
Pour the coconut oil into a wok pan and fry the drained chicken breast pieces on all sides over a medium heat for approx. 10 minutes until golden brown and remove.
-
Add the onion and garlic cubes to the wok pan with the curry paste (the amount varies depending on the spiciness) and fry.
-
Add the coconut milk and lime juice and leave to reduce for 5 minutes.
-
Then add the broccoli that has been set aside and the chicken and heat through.
-
Season with salt, pepper and chilli flakes to taste.
-
Pour the sauce over the rice, sprinkle with sesame seeds and serve hot.
Mango Sticky Rice
Preparation time: 2 hours 30 minutes (plus 40 minutes cooking time)
Ready in 3 hours and 10 minutes
Ingredients for 4 portions:
200 g sticky rice
250 ml coconut milk
A little sugar/stevia
Optional: coconut sugar
1 pinch salt
Topping:
2 mangoes (1000
1 sprig mint
1 tsp sesame
-
Soak the sticky rice in water for approx. 2 hours (the longer, the creamier it will be).
-
Wash the sticky rice until the excess starch has been washed out and the water remains clear. Drain the water and put the rice in the pot of the rice cooker.
-
Add 250 ml water. Close the lid and start the cooking process in Sushi Rice mode.
As soon as the rice cooker switches to keep warm mode, the rice is ready.
- In the meantime, prepare the topping.
- Peel and dice the mangoes.
- Wash the sprig of mint and pat dry.
- Pluck the mint leaves.
-
Shortly before the cooking time of the sticky rice is up, bring 200 ml coconut milk, 1 pinch of salt and a little sugar to boil in a pot.
-
Place the sticky rice in a bowl, pour over the coconut milk and stir. Cover the bowl and leave to infuse for 20 minutes.
-
Heat the remaining coconut milk (50 ml) with a little sugar in a pot. Pour over the sticky rice and stir briefly.
Serve the sticky rice with the mango cubes and top with coconut blossom sugar, sesame seeds and mint leaves, if desired.
One Pot Pasta Veggie Bolognese
Preparation time: 15 minutes (plus 55 minutes cooking time)
Ready in 1 hour 10 minutes
9) Ingredients for 4 portions
1 onion (70 g)
1 carrot (100 g)
2 stalks of celery (100 g)
2 tbsp olive oil
1 tbsp tomato paste
500 g vegan mince
600 ml tomato passata
200 ml red wine
350 ml broth
1 tsp sugar
1 bay leaf
3 tsp Italian herbs
300 g pasta (e.g. penne or fusilli)
Salt, pepper and paprika powder to taste
2 spring onions (60 g)
Preparation:
-
Wash, dry, peel and dice the carrots and celery.
-
Peel and finely dice the onion.
-
Heat the olive oil in the pot of the rice cooker in mode Multifunction at 100 °C for approx. 3 minutes.
-
Add the diced vegetables and sauté for 4 minutes, stew until translucent.
-
Add the veggie mince and 1 tbsp tomato purée and fry in Multifunction mode at 100 °C for approx. 10 minutes.
-
Deglaze with red wine and season with 1 tsp of sugar, 1 bay leaf and 3 tsp of
Italian herbs and reduce in Multifunction mode at 120 °C for approx. 4 minutes.
- Add the pasta with the tomato purée and broth and simmer with the lid closed in Multifunction mode at 100 °C, stir occasionally.
- As soon as the pasta is ready, season with salt, pepper and paprika powder.
To serve, wash and dry the spring onions, slice into fine rings and sprinkle on top.
Summer quinoa salad
Preparation time: 25 minutes (plus 45 minutes cooking time)
Ready in 1 hour 10 minutes
Ingredients for 4 portions:
100 g quinoa
1 tsp apple cider vinegar
1 tbsp olive oil
2 sweet potatoes (700 g)
1 red pepper (160 g)
250 g cherry tomatoes
3 stems mint (10 g)
100 g rocket salad
5 pitted dates
30 g almonds
2 spring onions
2 peaches
For the dressing:
5 tbsp olive oil
2 tbsp apple cider vinegar
12 tsp cumin
1 tsp mustard
12 tsp sugar
Salt and pepper to taste
Preparation:
- Preheat the oven to 180^ C top and bottom heat.
-
Peel the sweet potatoes and cut into bite-sized pieces.
-
Mix the sweet potatoes with 1 tbsp olive oil and roast on a baking tray for 30 minutes until soft.
- Meanwhile, wash the quinoa, drain and add to the pot in the rice cooker.
- Add 200 ml water and 1 tsp apple cider vinegar.
- Close the lid and start the cooking process in Quinoa mode.
As soon as the rice cooker switches to keep warm mode, the quinoa is ready. Leave the quinoa to cool slightly before using.
- Wash and dry the vegetables.
- Deseed the pepper and cut into bite-sized pieces.
- Halve the cherry tomatoes.
- Finely slice the spring onion into rings.
- Cut the mint leaves into thin strips and chop the rocket salad into slightly smaller pieces.
- Pit the peach and cut into bite-sized pieces.
- Roughly chop the almonds and dates.
- Place the quinoa, roasted sweet potatoes and vegetables in a bowl.
- For the dressing, mix all the ingredients together, pour over the salad and mix carefully.
(70) 16. Season the summery quinoa salad with salt and pepper to taste.
Tip: allow the salad to infuse. It will taste even better and only needs to be seasoned.
Sushi bites
Preparation time: 20 minutes (plus 40 minutes cooking time)
Ready in 1 hour
Ingredients for 4 portions (12 pieces):
260 g sushi rice
2 tbsp rice vinegar
1 tbsp sugar
3 nori seaweed leaves
1 avocado (200 g)
1 tbsp wasabi paste
A little lemon juice
1 cucumber (400
1 can tuna
Sesame seeds as decoration
Salt to taste
For serving:
Soy sauce
Sushi ginger
Wasabi paste
-
Make the marinade for the sushi rice. Mix the rice vinegar, sugar and 1 pinch of salt and set aside.
-
Wash the sushi rice until the excess starch has been washed out and the water remains clear. Drain the water and put the rice in the pot of the rice cooker.
-
Add 330 ml water. Close the lid and start the cooking process in Sushi Rice mode.
As soon as the rice cooker switches to keep warm mode, the rice is ready.
-
Season the sushi rice with the marinade.
-
In the meantime, prepare the two toppings.
For the first topping:
- Wash and dry the cucumber, cut in half lengthways, remove the seeds with a teaspoon and dice finely.
- Halve the avocado and remove the pip. Remove the flesh with a spoon and pulp with a fork. Flavour the avocado purée with wasabi and salt and mix with the diced cucumber.
For the second topping:
g) - Drain the tuna and mix with the Sriracha mayo.
- Cut the nori leaves into 12 squares. Use a brush to moisten them lightly with water.
- Place the squares in a muffin tin.
- Spread the sushi rice on top and create small hollows in the centre.
- Divide the two fillings between 6 sushi bites and decorate with sesame seeds.
The finished sushi bites can be served with sushi ginger, soya sauce and wasabi.
14. Cleaning and storage
Clean the device prior to its first use!

DANGER! Risk of electric shock due to moisture!
- The device, the mains power cable and the mains plug 12 must not be immersed in water or any other liquids.

DANGER! Risk of electric shock!
- Pull the mains plug 12 out of the wall socket before you clean the device.

DANGER! Risk of injury from burning!
- Wait for the device to cool down before cleaning.
WARNING! Risk of material damage!
- Do not clean using sharp objects or abrasive cleaning agents.
- Clean the device after each use and remove all food residues.
14.1 Disassembling the device
- Pull the mains plug 12 out of the wall socket and allow the device to cool.
- Pull the mains power cable 12 out of the port 9 on the device.
- Carefully open the lid 1 by pressing the release button 13.

DANGER! Risk of injury from scalding!
- Ensure that no part of your body (e.g. hand or arm) is positioned over the steam outlet 4. There is a danger of being scalded by escaping steam.
- Figure B: pull out the steam outlet 4.
- To remove the inner lid 2:
- Carefully press the two plastic tabs at the bottom of the outer edge of the inner lid 2 towards the centre of the lid 1.
- Remove the inner lid 2 by pulling it down slightly to release the two plastic tabs on the top edge from the recesses.
- Remove the pot 14 from the device.
- Pull the condensed water tank 5 out of the holder and pour the water away.
14.2 Cleaning the parts
Clean the following accessories in mild soapy water:
- Inner lid 2
- Steam outlet 4
- Condensed water tank 5
Cleaning accessories in the dishwasher
The following accessories can be cleaned in the dishwasher or in mild soapy water:
- P o t 14
- Soup spoon 18
- Rice spoon 17 and holder 10
- Measuring beaker 19
- Steamer insert 16
14.3 Cleaning the housing and power cable
Clean the device, the lid 1 and the mains power cable 12 as follows:
- Wipe these parts with a damp cloth (with a little detergent if necessary).
- Dry all parts completely before you use the device again.
- Pay particular attention to the recesses on the external rim of the device and inside the lid 1.
14.4 Storing the device

DANGER for children!
- Keep the device out of the reach of children.
- Allow all parts to dry completely before you put away the device for storage.
- Do not close the device when you store it.
- Store the device somewhere dry, dust-free and frost-free.
15. Disposal
This product is subject to the provisions of European Directive 2012/19/EC. The symbol showing a wheelie bin crossed through indicates that the product requires separate refuse collection in the European Union. This applies to the product and all accessories marked with this symbol. Products identified with this symbol may not be discarded with normal household waste, but must be taken to a collection point for recycling electric and electronic appliances.

This recycling symbol marks e.g. an object or parts of the material as valuable for recycling. Recycling helps to reduce the consumption of raw materials and protect the environment.

Packaging
When disposing of the packaging, make sure you comply with the environmental regulations applicable in your country.
16. Trouble-shooting
If your device fails to function as required, please try this checklist first. Perhaps there is only a minor problem, and you can solve it yourself.

DANGER! Risk of electric shock!
- Do not attempt to repair the device yourself under any circumstances.
| Fault | Possible causes / actions |
| No function | Has the device been connected to the power supply?Check the connection. |
| No steam escaping from the steam outlet 4. | Is the steam outlet 4 installed incorrectly? |
17. Technical specifications
| Model: SRKM 860 A1 | |
| Mains voltage: 220 – 240 V ~ 50 Hz | |
| Protection class: I | |
| Power rating: 860 W | |
| Filling volumes: | - min. 0.4 L / 2 CUP |
| - max. 1.5 L / 8 CUP | |
| Usable volume: | - max. 2.93 litres |
| Measuring beaker: | - 160 ml / 34 CUP |
| Inner pot volume: | 4 litres |
Symbols used
 | Protective earth connection |
 | Geprüfte Sicherheit (certified safety): devices must comply with the generally acknowledged rules of technology and the German Product Safety Act (Produkt-sicherheitsgesetz - ProdSG). (Not for UK) |
 | With the CE marking, HOYER Handel GmbH declares the conformity with EU guidelines. |
 | This symbol reminds you to dispose of the packaging in an environmentally friendly manner. |
 PAP PAP | Recyclable materials are marked with the recycling symbol (3 arrows). The material can be specified by the recycling number in the centre (here: 21) and/or an abbreviation (here: PAP). |
| ~ | AC voltage |
 | The symbol identifies parts that can be cleaned in the dishwasher. |
 | It is a recyclable product which is subject to an extended producer responsibility and for which the rules of waste separation apply. |
 | With the UKCA marking, HOYER Handel GmbH declares that the product is in conformity with the UKCA requirements. |
 | The symbol identifies the product manufacturer. |
Subject to technical modifications.
18. Warranty of the HOYER Handel GmbH
Dear Customer,
your device is provided with a 3 year warranty starting with the purchase date. In the event of product defects, you are entitled to statutory rights against the vendor. These statutory rights are not restricted by our warranty presented in the following.
Warranty conditions
The warranty period starts with the purchase date. Please keep the original purchase receipt in a safe place. This document is required to verify the purchase.
If within three years from the purchase date of this product a material or factory defect occurs, the product will be repaired or replaced by us – at our discretion – free of charge to you, or the purchase price will be refunded. This warranty implies that within the period of three years the defective device and the purchase receipt are presented, including a brief written description of the defect and the time it occurred.
If the defect is covered by our warranty, the repaired or a new product will be returned to you. No new warranty period starts with a repair or replacement of the product.
Warranty period and statutory claims for defects
The warranty period is not extended when the warranty has been claimed. This also applies to replaced and repaired parts. Any damages and defects already existing at the time of purchase must be reported immediately upon unpacking. Repairs arising after the expiration of the warranty period are subject to a charge.
Warranty coverage
The device was produced carefully according to strict quality guidelines and tested diligently prior to delivery. The warranty applies to material or factory defects.
Excluded from the warranty are wear parts subject to normal wear and damages to fragile parts, e.g. switches, lamps or other parts manufactured from glass.
This warranty expires if the product is damaged, not used as intended or not serviced. For the proper operation of the product, all instructions listed in the operating instructions must be observed carefully. Any form of use and handling that is advised against in the operating instructions or warned against must always be avoided.
The product is only intended for private and not for commercial use. In the case of incorrect and improper treatment, use of force and interventions not performed by our authorised Service Centre, the warranty shall cease.
Handling in case of a warranty claim
In order to ensure prompt processing of your matter, please observe the following notes:
- Please keep the article number IAN: 451565_2310 and the purchase receipt as a purchase verification for all inquiries.
- The article number can be found on the rating plate, an engraving, the title page of your instructions (in the bottom left), or as a label on the rear or underside of the device.
- If faulty operation or other defects occur, first contact the Service Centre listed in the following by telephone or email.
- Then, you are able to send a product reported as defective free of charge to the service address specified to you, including the purchase receipt and the information on the defect and when it occurred.
At www.lidl-service.com you can download this and many other manuals, product videos and installation software.

This QR code takes you directly to the Lidl Service website (www.lidl-service.com), where you can enter the article number (IAN)
451565_2310 to open your user instructions.

Service Centre
GB Service Great Britain
Tel.: 0800 404 7657
E-Mail: hoyer@lidl.co.uk
IE Service Ireland
Tel.: 1800 101010
E-Mail: hoyer@lidl.ie
MT Service Malta
Tel.: 80062230
E-Mail: hoyer@lidl.com.mt
CY Service Cyprus
Tel.: 8009 4241
E-Mail: hoyer@lidl.com.cy
IAN: 451565_2310

Supplier
Please note that the following address is no service address. First contact the aforementioned Service Centre.
HOYER Handel GmbH
Kühnehöfe 12
22761 Hamburg
GERMANY
Sommaire
natural_image
Diagram of a mechanical component with concentric circles and directional arrows, no visible text or symbolsCouvercle intérieur
12.3 Programme congee
natural_image
Diagram of a mechanical component with curved surfaces and directional arrows, no visible text or symbolsBinnendeksel
natural_image
Pure diagram of a mechanical component with concentric circles and arrows, no text or symbols presentPokrywka wewnętrzna
natural_image
Diagram of a mechanical component with concentric circles and directional arrows, no visible text or symbolsVnitřní víko
natural_image
Diagram of a mechanical component with concentric circles and directional arrows, no visible text or symbolsVnútorné veko
12.8 Program zohrievanie
natural_image
Diagram of a mechanical component with concentric circles and directional arrows, no visible text or symbolsTapa interior
12.3 Programa Congee
12.9 Programa Hornear
natural_image
Diagram of a mechanical component with concentric circles and directional arrows, no visible text or symbolsIndvendigt låg
Kontrollér, at det indvendige låg er sat korrekt i.
12.3 Programmet congee
natural_image
Diagram of a mechanical component with concentric circles and directional arrows, no visible text or symbolsCoperchio interno
- Cereal
- Pasta
- Crispy
- Turbo
- Yogurt
- Cake
- Baking
- Reheat