SVEB 160 C3 - Vacuum Sealer SILVERCREST - Free user manual and instructions
Find the device manual for free SVEB 160 C3 SILVERCREST in PDF.

User questions about SVEB 160 C3 SILVERCREST
0 question about this device. Answer the ones you know or ask your own.
Ask a new question about this device
Download the instructions for your Vacuum Sealer in PDF format for free! Find your manual SVEB 160 C3 - SILVERCREST and take your electronic device back in hand. On this page are published all the documents necessary for the use of your device. SVEB 160 C3 by SILVERCREST.
USER MANUAL SVEB 160 C3 SILVERCREST
natural_image
Exterior view of a modern office building (no signage)VAKUUMIERER SVEB 160 C3
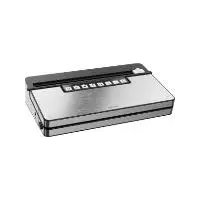
VACUUM SEALER SVEB 160 C3
APPAREIL DE MISE SOUS VIDE SVEB 160 C3
For EU market: Imported for GB market by:
HOYER Handel GmbH Lidl Great Britain Ltd
Kühnehöfe 12 Lidl House · 14 Kingston Road
22761 Hamburg Surbiton · KTS 9NU
GERMANY
Stand der Informationen · Status of information · Version des information
GB Operating instructions
VACUUM SEALER
natural_image
Technical illustration of a printer internal structure with arrows indicating motion or assembly (no text or symbols present)natural_image
Illustration of a device with buttons and a pointer, showing no text or symbolsnatural_image
Technical illustration of a printer's internal structure showing paper roll and printer casing (no text or symbols)natural_image
Illustration of a device with a control panel and directional arrows indicating movement or force (no text or symbols present)natural_image
Three cylindrical plastic rolls with black bands, arranged horizontally (no text or symbols visible)3 Folienrollen
natural_image
Exterior view of a cylindrical mechanical component with two protruding slots (no text or symbols visible)2 Folienrollen
- Overview 23
- Intended purpose 24
- Safety information 24
- Items supplied 27
- Switching the device on/off 27
- Advantages of vacuum-packed food 27
6.1 Durability.... 27
6.2 Sous-vide - gentle cooking method in a vacuum bag.... 27
- Preparation 28
7.1 Setting up the device 28
7.2 Requirements on the film/bags 28
7.3 Producing a bag.... 28
- Use 29
8.1 Overview of the functions.... 29
8.2 Tips.... 30
8.3 Vacuum-packing vacuum containers and bags (with valve).... 31
8.4 Filling bags (without valves) 32
8.5 Activating the Wet function 32
8.6 Activating the Soft function.... 32
8.7 Sealing bags (without valves) 33
8.8 Vacuum-packing and sealing bags (without valves) 33
8.9 Marinate.... 34
- Cleaning and storage 35
9.1 Cleaning.... 35
9.2 Storage 36
-
Disposal 36
-
Trouble-shooting 36
- Ordering film bags and accessories 37
- Technical specifications 37
- Warranty of the HOYER Handel GmbH 38
1. Overview
1 Button and LED for switching on/off
2 Button and LED for the Seal Film function (no vacuum)
3 Button and LED for the Vacuum + Seal Film function
4 Button and LED for the Wet function (for moist food)
5 Button and LED for the Soft function (for sensitive food)
6 Button and LED for the Vacuum function (for containers and bags with the valve above the connection 9)
7 Button and LED for the Marinate function
8 Button and LED for the Cancel function
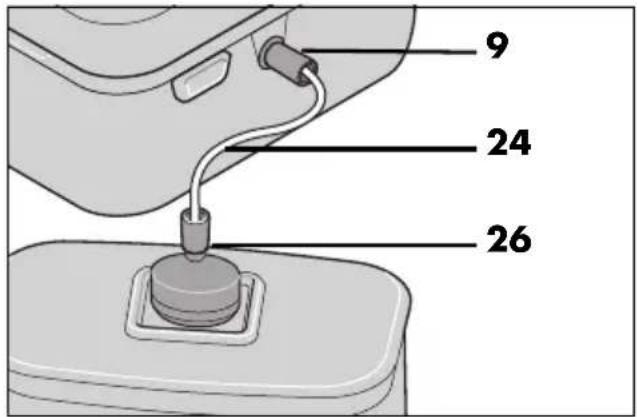
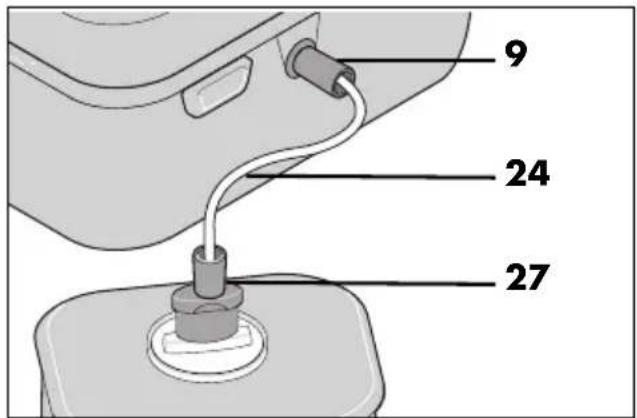
9 Connection for vacuum tubes 24
10 Power cable with mains plug
11 Film cutter
12 Sealing strip
13 Device lid
14 Upper sealing ring
15 Storage compartment for adapter A
16 Storage compartment for vacuum bagging tube roll
17 Suction nozzles, left and right (for the Vacuum + Seal Film function)
18 Welding wire
19 Collector for liquids (removable)
20 Storage compartment for adapter C
21 Storage compartment for adapter B
22 Lower sealing ring
23 Buttons for opening the lid (left and right)
Figure A:
24 Vacuum tubes (60 cm)
25 Adapter A (e.g. for Ernesto containers* and FoodSaver Lunchboxes**)
26 Adapter B (e.g. for FoodSaver freshness containers**)
27 Adapter C (e.g. for CASO containers** and FoodSaver storage boxes**)
* not included in items supplied
** Containers from other manufacturers - not included in items supplied. CASO is a registered brand of Caso Holding GmbH FoodSaver is a registered brand of Sunbeam Products, Inc.
Figure B:
28 Cable spool on the back of the device
Thank you for placing your trust in our products!
Congratulations on your new vacuum sealer.
For safe handling of the product and in order to get to know the entire range of features:
- Read these user instructions thoroughly prior to initial use.
- Above all, observe the safety information!
- The device should only be used as described in this copy of the user instructions.
- Keep this copy of the user instructions for information purposes.
- If you pass the device on to someone else, please include this copy of the user instructions. The user instructions are a part of the product.
We hope you enjoy your new vacuum seal-er!
Symbols on your device

The food-safe material of devices with this symbol will not change the taste or smell of food.
2. Intended purpose
Only use the device for sealing and/or vacuum-packing and marinating food. The device is designed for private home use and must not be used for commercial purposes.
The device must only be used indoors.
Foreseeable misuse
WARNING! Risk of material damage!
- Only use special plastic film bags that are suitable for use with vacuum sealers / bag sealers. Comply with the notes on the packaging of the plastic film bags.
3. Safety information
Warnings
If necessary, the following warnings are used in these user instructions:

DANGER! High risk: failure to observe this warning may result in injury to life and limb.
WARNING! Moderate risk: failure to observe this warning may result in injury or serious material damage.
CAUTION: low risk: ignoring this warning may result in minor injuries or damage to property.
NOTE: circumstances and specifics that must be observed when handling the device.
Instructions for safe operation
- This device can be used by children from the age of 8 and people with restricted physical, sensory or intellectual abilities or a lack of experience or knowledge if they are supervised or have been instructed in how to use this device safely and if they have understood the resulting dangers. Children must not play with the device. Cleaning and user maintenance must not be carried out by children without supervision.
- Never leave the device unattended while it is plugged in.
- If the mains power cable of this device should become damaged, it must be replaced by the manufacturer, the manufacturer's customer service department or a similarly qualified specialist, in order to avoid any hazards.
- This device is not intended to be operated using an external timer or a separate remote control system.
- Misuse may result in injuries.

DANGER for children!
- Packing materials are not children's toys. Children should not be allowed to play with the plastic bags: there is a risk of suffocation.

DANGER to or from pets and livestock!
Electrical devices can also represent a hazard to pets and livestock. In addition, animals can also cause damage to the device. For this reason you should keep animals away from electrical devices at all times.

DANGER! Risk of electric shock due to moisture!
- Protect the device from moisture, water drops and water splashes.
- The device, the power cable and the mains plug must not be immersed in water or any other liquids.
-
If liquid gets into the device, disconnect the mains plug immediately. Have the device checked before reusing.
-
If the device has fallen into water, pull out the mains plug immediately, and only then remove the device from the water. Do not use the device again, and have it checked by a specialist workshop.
- Never touch the device with wet hands.

DANGER! Risk of electric shock!
- Do not use the device if the device or the power cable has any visible damage, or if the device has previously been dropped.
- Lay the power cable such that no one can step on it, get caught on it, or trip over it.
- Only connect the mains plug to a properly installed and easily accessible wall socket whose voltage corresponds to the specifications on the rating plate. The wall socket must still be easily accessible after connection.
- Ensure that the power cable cannot be damaged by sharp edges or hot spots. Do not wrap the power cable around the device (Danger! Risk of cable damage!). Use the cable spool on the back.
- Let the device cool down completely before winding up the power cable.
- Ensure that the power cable cannot be trapped or crushed.
- To pull the mains plug out of the wall socket, always pull on the mains plug, and never on the power cable.
- Pull the mains plug out of the wall socket:
- after every use
- when a malfunction occurs
- when you are not using the device
- before you clean the device
- during thunderstorms

DANGER - Fire hazard!
- Never leave the device unattended while it is plugged in.
- Use the device on a stable, level and heat-resistant surface.
- Never cover the device when connected due to possible overheating and fire hazard!
- Do not use the device in the vicinity of flammable materials or flammable gases.

DANGER! Risk of injury through burning!
- The welding wire becomes very hot during operation. Do not touch the hot welding wire.
- Allow the device to cool down completely before you clean it or put it away.

DANGER Risk of injury!
- Ensure that you never vacuum your skin, hair or clothing with the adapters.

DANGER caused by insufficient hygiene!
- For a carefree enjoyment of your vacuum-sealed food, you should always comply with the following hygiene tips:
- During the preparation and packaging of the food make sure that the entire equipment is perfectly clean.
- Clean the vacuum sealer and all devices thoroughly after use.
- Perishable food should be cooled or frozen immediately after sealing.
- After thawing or heating perishable food, this must be consumed immediately.
WARNING! Risk of material damage!
- After 5 sealing and/or vacuum-packing processes, the device must cool down for at least 60 seconds.
To protect the device, an automatic lock is briefly activated between two sealing processes. - Only use special plastic film bags that are suitable for use with vacuum sealers / bag sealers.
- Never place the device on hot surfaces (e.g. hot plates) or near to heat sources or open fire.
- Ensure that no liquid is sucked in during the extraction of air.
The device is fitted with non-slip silicon feet. Because furniture can be coated with a wide variety of varnishes and plastics, and treated with various care products, the possibility cannot be excluded that some of these substances have components that may attack and soften the silicon feet. If necessary, place a non-slip mat under the device. - Do not clean using sharp objects or abrasive cleaning agents.
4. Items supplied
1 vacuum sealer
1 spare sealing ring for the lower sealing ring 22
1 roll of vacuum bagging tube
2 vacuum tubes (60 cm) 24
1 adapter A (e.g. for Ernesto containers and FoodSaver Lunchboxes) 25
1 adapter B (e.g. for FoodSaver freshness containers) 26
1 adapter C (e.g. for CASO containers and FoodSaver storage boxes) 27
1 collector for liquids 19 (inserted)
1 complete copy of the user instructions (on the Internet)
1 copy of the short manual (enclosed with the device)
Before using for the first time
- Remove all packing material.
- Check that the device is undamaged.
5. Switching the device on/off
Only connect the mains plug 10 to a properly installed and easily accessible wall socket whose voltage corresponds to the specifications on the rating plate. The wall socket must still be easily accessible after connection.
- Unwind the required length of power cable 10 from the cable spool 28.
- Connect the mains plug 10 with the wall socket.
- Press the button ⏻ 1 to switch the device on. The LED 1 is lit.
- Press the ⏻ 1 button again to switch off the device. The LED 1 goes out.
6. Advantages of vacuum-packed food
6.1 Durability
Vacuum-packed food keeps fresh for a significantly longer period. This is due to the fact that during the vacuum-packing process the oxygen is removed from the food packaging.
Furthermore, high-quality film bags and the vacuum packing protect well against freezer burn.
6.2 Sous-vide - gentle cooking method in a vacuum bag
The dream of every hobby cook: a steak that is pink and juicy on the inside, crispy on the outside. But unfortunately it does not always work using conventional methods, or it requires exact timing. Sous-vide makes cooking easier, and almost always yields perfect results.
In principle, sous-vide is nothing more than the slow cooking of vacuum-sealed food.
On the one hand, sous-vide is a very simple method for achieving excellent results when preparing food. On the other hand, sous-vide is a clear rejection of the “always-in-a-rush” attitude of our age.
Professional cooks have been using this method for many years. With the new sous-vide devices, this cooking method is now also affordable for hobby cooks at home.
7. Preparation
7.1 Setting up the device
Place the device on a dry, level and heat-resistant surface.
7.2 Requirements on the film/bags
- You can use tubular film or complete bags.
- The film bag must not be wider than 30 cm.
- The film bag must have dots/knobs or grooves on one side. Smooth film bags are not suited for sealing.
- The thickness should be between 0.17 and 0.29 mm (170 - 290 μm).
- When buying the film bag, check the temperature range it is suited for. The ideal range is between -20 °C and + 110 °C. Such film bags can be deep-frozen or boiled. The film supplied is suitable for this application.
- The films are microwaveable: max. 900 W and 3 minutes with the bag open.
- You will find those data on the packaging of the film or bag.
7.3 Producing a bag
If you use finished bags, these steps do not apply.
- Unwind the length of vacuum bagging tube from the roll that you require for your bag. Regarding the length of the bag, remember that a space of approx. 6 cm towards the top should be left after filling.
- Use scissors to cut the piece of vacuum bagging tube as straight as possible.
- Seal one end of the bag (see "Sealing bags (without valves)" on page 33).
Or:
Follow the steps below to use the built-in film cutter 11.
- Slide the film cutter 11 to the right or left to the edge of the lid 13.
- Open the lid 13 and pull out as much of the tubular film roll as you need from the storage compartment 16. Regarding the length of the bag, remember that a space of approx. 6 cm towards the top should be left after filling.
- Close the lid 13 again so that the film is firmly clamped inside.
- Press the film cutter 11 down gently and guide it from one side to the other to cut through the film.
- Press the two buttons for opening the lid 23 and open it.
- Seal one end of the bag (see "Sealing bags (without valves)" on page 33).
8. Use
8.1 Overview of the functions
| Button Function | ||
 | 1 | Switching the device on/off |
 | 2 | Start sealing (without vacuum) |
 | 3 | Start vacuum-packing and sealing the film bag |
 | 4 | Activate/deactivate for moist and juicy food |
 | 5 | Activate/deactivate for pressure-sensitive food, e.g. berries, cakes |
 | 6 | Start vacuum-packing using the connection 9 with a vacuum tube 24 and an adapter 25/26/27 |
 | 7 | Start marinating |
 | 8 | Cancel function/process |
WARNING! Risk of material damage!
- After 5 sealing and/or vacuum-packing processes, the device must cool down for at least 60 seconds.
To protect the device, an automatic lock is briefly activated between two sealing processes. - If the control lights ⓞ 2 and Ⓧ 8 do not go out after a maximum of 10 seconds during the sealing process, there is a fault with the device. Do not attempt to repair the device yourself. Contact customer service.
NOTE: make sure that the upper 14 and lower sealing rings 22 are undamaged. The device cannot suck the air out of the bag if the sealing ring is defective. If necessary, replace any defective sealing ring.
The functions ☐ 2, ☐ 3, ☐ 6, and ☐ 7 stop automatically when the process is complete. The process can be cancelled earlier by pressing the Ⓞ button.
Before vacuum-packing and/or sealing, press the ⚙ 4 button to vacuum particularly moist food or the ⚗ 5 button to vacuum particularly pressure-sensitive food. Pressing the respective button again or pressing the ⓞ 8 button deactivates the function.
8.2 Tips
| Food Notes | Recommended container | Recommended (additional) function | |
| Meat / Fish | -only use fresh productsDo not interrupt the cooling chain | Bag |  |
| Marinated food | -to speed up the marinating process | - Container |  |
| Vegetables | -peel or wash and dry-blanch for a few minutes in boiling water, rinse with ice water and dry to avoid loss of flavour and colour or gas formation during storage | Bag | |
| Leafy vegetables Lettuce | -wash and dry-not suitable for freezing | - Container | |
| Fruit | -peel or wash and dry - Refrigerator: | Container-Freezer:Bag | |
| -Freezer:Bag |   | ||
| Herbs | -wash and dry- entire stems | -Bag | |
| Baked goods | - Container | ||
| -Bag |  | ||
| Powdery food | -place a piece of kitchen roll in the top of the bag/container or vacuum seal in the original packaging | -Bag- Container | |
| Cold liquids | -briefly freeze - Container | ||
| -Bag |  | ||
| Cooled, cooked food | - Container | ||
| -Bag |  | ||
8.3 Vacuum-packing vacuum containers and bags (with valve)
NOTE: the adapters 25, 26 and 27 are located in the storage compartments inside the device.
This function allows you to vacuum-pack vacuum containers and bags with valves from various different manufacturers. For the different valves, the following adapters are included in the items supplied:
| Adapter e.g. | suitable for |
| Adapter A 25 | Ernesto, FoodSaver Lunchboxes |
| Adapter B 26 | FoodSaver freshness containers |
| Adapter C 27 | CASO, FoodSaver storage boxes |

DANGER! Risk of electric shock due to moisture!
- Ensure that no liquid is sucked in during the extraction of air. If this occurs, stop the process immediately by pressing the ⑧ button.
- Please comply with the manufacturers' instructions regarding the filling levels for containers and bags.
NOTE: the vacuum containers and bags are not included in the items supplied.
Vacuum containers
-
Fill the vacuum container to the maximum filling level and close the container lid.
-
Press one end of the vacuum tube 24 into the connection 9 on the right of the device.
-
Fit the adapter 25/26/27 suitable for the valve onto the other end of the vacuum tube 24.
- Press the adapter A 25 or B 26 onto the valve of the vacuum container. Hold the adapter firmly in place.
Or:
Insert the adapter C 27 into the valve of the vacuum container.
- Press the button ⏻ 6. The LEDs ⏻ 6 and Ⓐ are lit. The vacuum-packing process starts.
- After the vacuum-packing process, the LEDs go out and the vacuum-packing process is complete.
- Remove the vacuum tube 24 and the adapter 25/26/27 from the vacuum container and repeat the process if necessary with another container.
- After you have finished vacuum-packing, remove the vacuum tube 24 from the connection 9.
Vacuum bags with valves
- Place the prepared food into the vacuum bag. Ensure that there is no food under the valve.
- Carefully close the vacuum bag.
- Place the vacuum bag flat on a level surface with the valve pointing upwards.
- Proceed as for vacuum containers, starting at step 2 (see "Vacuum containers" on page 31), and use adapter A 25.
NOTE: suitable vacuum bags with valves can be ordered from the online shop under article number 424974 (see "Ordering film bags and accessories" on page 37).
8.4 Filling bags (without valves)
CAUTION:
- No food or liquids must be present at the top edge, where you want to seal the bag. That area must be clean and dry. Otherwise, it is impossible to produce a proper welding seam.
- Fill the bag only up to a level of 6 cm below the top edge.
8.5 Activating the Wet function

DANGER! Risk of electric shock due to moisture!
- For vacuum-packing, no liquids must be inside the bag.
- Ensure that no liquid is sucked in during the extraction of air. If this occurs, stop the process immediately by pressing the ⑧ button.
NOTE: due to the longer sealing process, a cooling phase of approx. 45 seconds is necessary after each sealing.
If the bag contains moist food (e.g. marinaded meat/fish, ready-to-use cut vegetables/fruit), this can result in incomplete seals. By activating the function ☺ 4, the duration of the sealing process is increased in order to achieve a better welding seam.
- Press the Ⓐ 4 button before vacuum-packing/sealing to activate the function. The LED is lit.
- To deactivate the function, press the ⏻ 4 button again.
- When the vacuum-packing/sealing process is completed or has been cancelled, the LED goes out and the function is automatically deactivated.
- During the vacuum-packing/sealing process, the function ⚙ 4 can neither be activated nor deactivated.
NOTES:
- This function is not suitable for vacuum-packing liquids, e.g. soup. These need to be frozen before vacuum-packing.
- To vacuum-pack moist and pressure-sensitive food, you can activate the 4 and 5 functions simultaneously.
8.6 Activating the Soft function
The 5 function reduces the vacuum pressure slightly so that pressure-sensitive food (e.g. berries or cake) is not compressed.
- Press the 🎨 5 button before vacuum-packing/sealing to activate the function. The LED is lit.
- To deactivate the function, press the 5 button again.
- When the vacuum-packing/sealing process is completed or has been cancelled, the LED goes out and the function is automatically deactivated.
- During the vacuum-packing/sealing process, the function 5 can neither be activated nor deactivated.
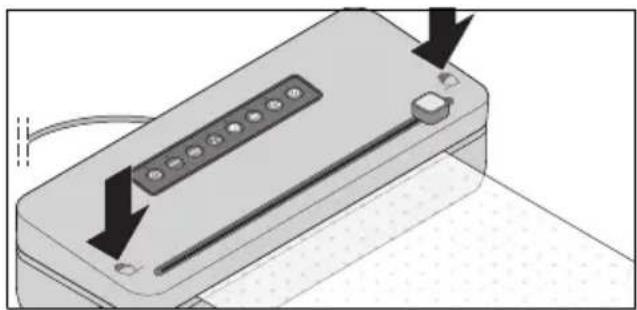
8.7 Sealing bags (without valves)
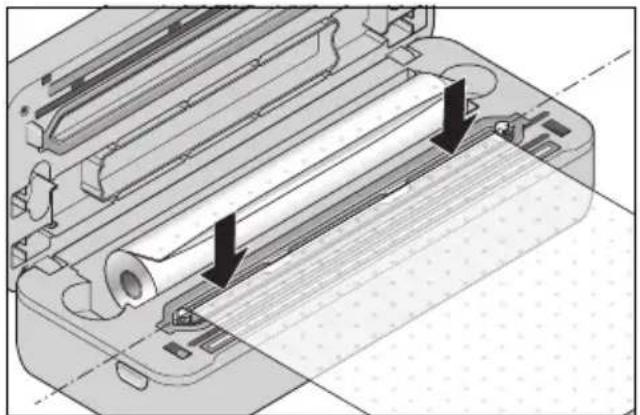
- Smooth the bag where it is to be sealed.
- Open the lid 13. If necessary, press the buttons 23 first.
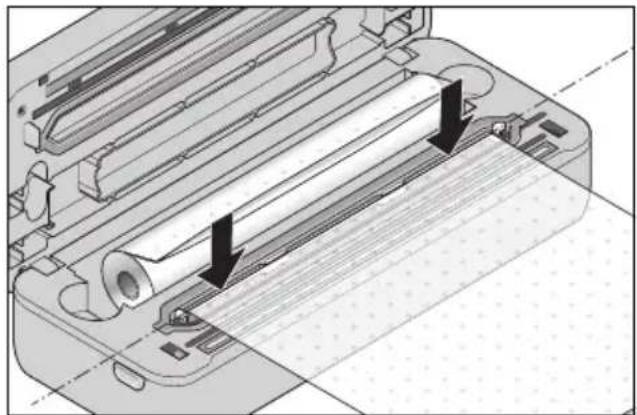
- Place the bag in the device until the opening of the bag is in the centre of the lower sealing ring 22.
natural_image
3D technical diagram of a printer holder with paper roll and mechanical components (no text or symbols)- Ensure again that there are no creases in the film bag - especially in the area above the welding wire 18.
- Close the lid 13.
- Use both hands to press firmly on the edges of the lid 13. They must audibly click into place.
natural_image
Illustration of a device with buttons and a scroll, no visible text or symbols- Press the button ☐ 2. The LED is lit. The film bag is being sealed. After the sealing process is finished, the LED goes out.
NOTE: if you have activated the ⏻ 4 function, the sealing process takes a few seconds longer.
- Simultaneously, press buttons 23 in order to release the lock of the lid 13.
- Open the lid 13 and remove the bag.
- Check the welding seam. It should be a smooth creaseless seam.
8.8 Vacuum-packing and sealing bags (without valves)

DANGER! Risk of electric shock due to moisture!
- For vacuum-packing, no liquids must be inside the bag.
- Ensure that no liquid is sucked in during the extraction of air. If this occurs, stop the process immediately by pressing the ⑧ button.
NOTE: when vacuum-packing film bags, there must not be any vacuum tube 24 plugged into the connection 9.
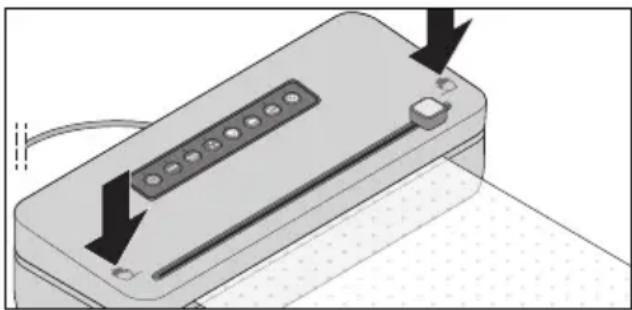
- Smooth the bag where it is to be sealed.
- Open the lid 13.
- Place the bag in the device until the opening of the bag is in the centre of the lower sealing ring 22.
natural_image
3D technical illustration of a printer holder with paper roll and black arrows indicating motion (no text or symbols)- Ensure again that there are no creases in the film bag - especially in the area above the welding wire 18.
- Close the lid 13.
- Use both hands to press firmly on the edges of the lid 13. They must audibly click into place.
natural_image
Illustration of a device with a grid and control buttons, showing directional arrows (no text or symbols)- Press the button 3. The LED is lit. The film bag is first vacuum-packed and then sealed.
The LED 2 is also lit during sealing. When the process is finished, both LEDs flash briefly and then go out.
NOTE: if the LED 3 does not go out and the noise of the vacuum pump does not stop, despite the fact that no further air is being sucked out of the film bag, cancel the process. Check that the film bag is in the correct position in the device, and check for leaks.
- Simultaneously, press buttons 23 in order to release the lock of the lid 13.
- Open the lid 13 and remove the bag.
- Check the welding seam. It should be a smooth creaseless seam.
8.9 Marinate
You can use the Marinate function to marinate meat, for example. By alternating between vacuum-packing and pausing, the marinade penetrates the pores of the meat much faster. The process takes about 15 minutes. You will need a suitable marinating container that is specially designed for marinating. It is characterised by a special valve which makes venting possible between the vacuuming phases.
- Connect a vacuum tube 24 to the connection for vacuum tubes 9 on the device.
- If necessary, plug the adapter 25/26/27 onto the vacuum tube 24.
- Close the device lid 13.
NOTE: make sure that both corners of the device lid click into place. If necessary, press it down again at the markings so that the device lid 13 engages and is locked.
- Connect the adapter 25/26/27 or the black coupling piece on the vacuum tube 24 to the corresponding fixture of the container. For further information, please refer to the user instructions of the container.
- Press the button ☎ 7. The 7 and ☎ 8 LEDs are lit and the device starts the Marinate function. The device now alternates between vacuum-packing (the LED ☎ 7 is lit) and venting (the LED ☎ 7 flashes) for approx. 15 minutes. The control lights go out as soon as the program is finished.
- You can now remove the adapter 25/26/27 or the vacuum tube 24 from the container and the device.
9. Cleaning and storage

DANGER! Risk of injury through burning/scalding!
- Allow the device to cool down completely before you clean it or put it away.
- The welding wire 18 becomes very hot during operation. Do not touch the hot welding wire 18.

DANGER! Risk of electric shock!
- Prior to cleaning, disconnect the mains plug 10 of the device.

DANGER! Risk of electric shock due to moisture!
- The device and the power cable with mains plug 10 must not be immersed in water or other liquids.
WARNING! Risk of material damage!
- Do not clean using sharp objects or abrasive cleaning agents.
9.1 Cleaning
In order to ensure the proper function and the full capacity of your device, clean it regularly.
- Wipe down the housing of the device with a damp cloth.
- Prior to the next use, the device must be completely dry.
Collector
- Grasp both outer ridges with your fingers and carefully lift the collector for liquids 19 out upwards.
- Drain the liquid.
- Rinse the collector 19 under warm dish-water or place it in the dishwasher. Make sure it is dry before inserting it.
- Insert the collector 19 into the device from above.
Sealing ring
- Grasp the sealing ring 22 with two fingers and lift it off upwards.
- Rinse the sealing ring 22 under warm dishwater. Make sure it is dry before inserting it.
- Replace the sealing ring 22 in the respective form inside the device. Ensure that it lies in smooth contact and is not wavy.
NOTE: the sealing ring 22 is a wearing part. Due to the high contact pressure, it will lose its shape over time. In this case, replace it with a new one (included in the items supplied).
9.2 Storage
WARNING! Risk of material damage!
During storage, the lid 13 must not be locked, but only loosely closed. Permanent locking could damage seals 14 and 22.
• Figure B: wind the power cable 10 around the cable spool 28 on the back of the device.
- Store the device so that it is protected against dust and dirt and out of the reach of children.
10. Disposal
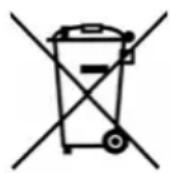
This product is subject to the provisions of European Directive 2012/19/EC. The symbol showing a wheelie bin crossed through indicates that the product requires separate refuse collection in the European Union. This applies to the product and all accessories marked with this symbol. Products identified with this symbol may not be discarded with normal household waste, but must be taken to a collection point for recycling electric and electronic appliances.
This recycling symbol marks e.g. an object or parts of the material as valuable for recycling. Recycling helps to reduce the consumption of raw materials and protect the envi

Packaging
When disposing of the packaging, make sure you comply with the environmental regulations applicable in your country.
11. Trouble-shooting
If your device fails to function as required, please try this checklist first. Perhaps there is only a minor problem, and you can solve it yourself.

DANGER! Risk of electric shock!
- Do not attempt to repair the device yourself under any circumstances.
| Fault | Possible causes / Actions |
| No function | Has the device been connected to the power supply? |
| Seams are not tight. | Ensure that the film bag is positioned smoothly between the sealing strip 12 and the welding wire 18.The film was damp or contaminated at the seam.For moist food, activate the 4 function. |
| Device does not seal several bags in a row. | To protect the device, an automatic lock is briefly activated between two sealing processes. |
12. Ordering film bags and accessories
Film bag rolls
For the aroma-tight, airtight and watertight preservation and marinating of food.
Suitable e.g. for the SilverCrest vacuum sealer SVEB 160 C3, SV 125 A1/B2/D1 and the SilverCrest bag sealer
SFS 110 A1/B1/B2/C2.
These film bags are suitable for gentle sous-vide cooking.

natural_image
Three cylindrical plastic rolls with black bands, arranged diagonally on a white background (no text or symbols visible)3 film bag rolls
Width: 20 cm / Length: each 3 m
natural_image
Exterior view of a cylindrical mechanical component with two flanged ends (no text or symbols visible)2 film bag rolls
Width: 28 cm / Length: each 3 m
Additional accessories
On our website you can find information regarding the accessories that can be reordered.
Ordering online shop.hoyerhandel.com

- Scan the QR code with your Smartphone/Tablet.
- The QR code will take you to a website where you can place the reorder.
13. Technical specifications
| Model: SVEB 160 C3 | |
| Mains voltage: | 220 - 240 V ~ 50 Hz |
| Protection class: II | |
| Power rating: | 160 W |
| Pause time: approx. 60 seconds after 5 uses | |
Symbols used
 | Double insulation |
 | Geprüfte Sicherheit (certified safety): devices must comply with the generally acknowledged rules of technology and the German Product Safety Act (Produkt-sicherheitsgesetz - ProdSG). (Not for UK) |
| CE | With the CE marking, HOYER Handel GmbH declares the conformity with EU guidelines. |
 | This symbol reminds you to dispose of the packaging in an environmentally friendly manner. |
 | Recyclable materials are marked with the recycling symbol (3 arrows). The material can be specified by the recycling number in the centre (here: 21) and/or an abbreviation (here: PAP). |
| ~ | AC voltage |
 | The symbol identifies parts that can be cleaned in the dishwasher. |
 | It is a recyclable product which is subject to an extended producer responsibility and for which the rules of waste separation apply. |
Subject to technical modifications.
14. Warranty of the HOYER Handel GmbH
Dear Customer, your device is provided with a 3 year warranty starting with the purchase date. In the event of product defects, you are entitled to statutory rights against the vendor. These statutory rights are not restricted by our warranty presented in the following.
Warranty conditions
The warranty period starts with the purchase date. Please keep the original purchase receipt in a safe place. This document is required to verify the purchase.
If within three years from the purchase date of this product a material or factory defect occurs, the product will be repaired or replaced by us – at our discretion – free of charge to you, or the purchase price will be refunded. This warranty implies that within the period of three years the defective device and the purchase receipt are presented, including a brief written description of the defect and the time it occurred.
If the defect is covered by our warranty, the repaired or a new product will be returned to you. No new warranty period starts with a repair or replacement of the product.
Warranty period and statutory claims for defects
The warranty period is not extended when the warranty has been claimed. This also applies to replaced and repaired parts. Any damages and defects already existing at the time of purchase must be reported immediately upon unpacking. Repairs arising after the expiration of the warranty period are subject to a charge.
Warranty coverage
The device was produced carefully according to strict quality guidelines and tested diligently prior to delivery.
The warranty applies to material or factory defects.
Excluded from the warranty are wear parts subject to normal wear and damages to fragile parts, e.g. switches, lamps or other parts manufactured from glass.
This warranty expires if the product is damaged, not used as intended or not serviced. For the proper operation of the product, all instructions listed in the operating instructions must be observed carefully. Any form of use and handling that is advised against in the operating instructions or warned against must always be avoided.
The product is only intended for private and not for commercial use. In the case of incorrect and improper treatment, use of force and interventions not performed by our authorised Service Centre, the warranty shall cease.
Handling in case of a warranty claim
In order to ensure prompt processing of your matter, please observe the following notes:
- Please keep the article number
IAN: 424974_2301 and the purchase receipt as a purchase verification for all inquiries. - The article number can be found on the rating plate, an engraving, the title page of your instructions (in the bottom left), or as a label on the rear or underside of the device.
- If faulty operation or other defects occur, first contact the Service Centre listed in the following by telephone or email.
- Then, you are able to send a product reported as defective free of charge to the service address specified to you, including the purchase receipt and the information on the defect and when it occurred.
At www.lidl-service.com you can download this and many other manuals, product videos and installation software.

This QR code takes you directly to the Lidl Service website (www.lidl-service.com), where you can enter the article number (IAN)
424974_2301 to open your user instructions.

Service Centre
GB Service Great Britain
Tel.: 0800 404 7657
E-Mail: hoyer@lidl.co.uk
IE Service Ireland
Tel.: 1800 101010
E-Mail: hoyer@lidl.ie
MT Service Malta
Tel.: 80062230
E-Mail: hoyer@lidl.com.mt
CY Service Cyprus
Tel.: 8009 4241
E-Mail: hoyer@lidl.com.cy
IAN: 424974_2301

Supplier
Please note that the following address is no
service address. First contact the aforementioned Service Centre.
HOYER Handel GmbH
Kühnehöfe 12
22761 Hamburg
GERMANY
Sommaire
natural_image
Technical illustration of a printer's internal structure showing roller and printer components (no text or symbols)natural_image
Illustration of a printer with a scroll and two arrows indicating motion (no text or symbols)natural_image
Technical diagram of a mechanical assembly with rollers and housing (no text or symbols)natural_image
Illustration of a device with a panel and scroll, showing directional arrows (no text or symbols)natural_image
Three cylindrical plastic rolls of white material, no visible text or markingsnatural_image
Three transparent plastic rolls of cylindrical material, no text or symbols visible3 rouleaux de film
natural_image
Exterior view of a cylindrical mechanical component with two protruding slots (no text or symbols visible)2 rouleaux de film
natural_image
Technical illustration of a printer's internal structure showing paper roll and printer casing (no text or symbols)natural_image
Illustration of a device with buttons and a scroll, no text or symbols presentnatural_image
Technical illustration of a printer's internal structure showing roller and printer components (no text or symbols)natural_image
Illustration of a device with a button and arrow indicator (no text or symbols)natural_image
Three cylindrical plastic rolls of white material, no visible text or markings12. Folies en accessoires bestellen
Folierollen
natural_image
Three transparent plastic rolls of cylindrical material, no text or symbols visible3 folierollen
natural_image
Exterior view of a cylindrical mechanical component with two flanged ends (no text or symbols visible)2 folierollen
natural_image
Technical illustration of a printer's internal structure showing roller and printer components (no text or symbols)natural_image
Illustration of a device with a control panel and buttons, showing directional arrows (no text or symbols)natural_image
Technical illustration of a printer holder with paper roll and mechanical components (no text or symbols)natural_image
Diagram of a device with a panel and control buttons, showing directional arrows (no text or symbols)natural_image
Three cylindrical white plastic or paper rolls with no visible text or markingsnatural_image
Three cylindrical plastic rolls with black bands, arranged diagonally on a white background (no text or symbols visible)3 rolki folii
natural_image
Metallic cylindrical object with two protruding slots, no visible text or symbols2 rolki folii
natural_image
Technical illustration of a printer's internal structure showing paper roll and printer tray (no text or symbols)natural_image
Illustration of a device with a control panel and buttons, showing directional arrows (no text or symbols)natural_image
3D technical diagram of a printer holder with paper roll and mechanical components (no text or symbols)natural_image
Illustration of a device with a button and arrow indicator (no text or symbols)natural_image
Three cylindrical plastic rolls with black bands, arranged diagonally on a white background (no text or symbols visible)3 role fólií
natural_image
Exterior view of a cylindrical mechanical component with two flanged ends (no text or symbols visible)2 role fólií
natural_image
Technical illustration of a printer's internal structure showing paper roll and printer casing (no text or symbols)- Opät dbajte na to, aby sa na fólii nevytvárali záhyby – hlavne nie na mieste nad zváracím drôtom 18.
- Zatvorte veko 13.
- Oboma rukami pevne tlačte rohy ve- ka 13. Tieto musia počutel'ne zapad- nút'.
natural_image
Illustration of a device with a control panel and buttons, showing directional arrows (no text or symbols)natural_image
Technical illustration of a printer's internal structure showing paper roll and printer casing (no text or symbols)- Opät'dbajte na to, aby sa na fólii nevytvárali záhyby – hlavne nie na mieste nad zváracím drôtom 18.
- Zatvorte veko 13.
- Oboma rukami pevne tlačte rohy veka 13. Tieto musia počutelne zapadnút.
natural_image
Illustration of a device with a button and arrow indicator (no text or symbols)natural_image
Three cylindrical plastic rolls with black bands, arranged diagonally (no text or symbols visible)3 fóliové kotúče
natural_image
Two transparent plastic cylindrical objects with black bands, no visible text or symbols2 fóliové kotúče
natural_image
Technical illustration of a printer's internal structure showing paper roll and printer casing (no text or symbols)natural_image
Illustration of a device with buttons and a scroll, no text or symbols presentnatural_image
Technical illustration of a printer holder with paper roll and black arrows indicating motion (no text or symbols)natural_image
Illustration of a device with a panel and control buttons, showing directional arrows (no text or symbols)natural_image
Three transparent cylindrical objects with black end caps, arranged diagonally (no text or symbols visible)q3 rollos de film film qu e -
natural_image
Roll of plastic cylindrical components with black bands, no visible text or symbols2 rollos de film
natural_image
Technical illustration of a printer's internal structure showing paper roll and printer casing (no text or symbols)natural_image
Illustration of a device with buttons and a scroll, no visible text or symbolsnatural_image
Technical diagram of a mechanical device with internal rollers and mounting brackets (no text or symbols)natural_image
Illustration of a device with a panel and buttons, showing directional arrows (no text or symbols)natural_image
Three cylindrical plastic rolls with black bands, arranged diagonally on a white background (no text or symbols visible)3 folieruller
natural_image
Exterior view of a cylindrical mechanical component with two flanged ends (no text or symbols visible)2 folieruller
natural_image
Technical illustration of a printer's internal structure showing roller and printer components (no text or symbols)natural_image
Illustration of a printer with a control panel and paper strip, no text or symbols presentnatural_image
Technical illustration of a mechanical device with rollers and mounting brackets (no text or symbols)natural_image
3D diagram of a device with a panel and buttons, showing directional arrows (no text or symbols)natural_image
Three cylindrical plastic rolls with black bands, no visible text or markingsnatural_image
Two transparent cylindrical objects with black bands, resembling plastic or paper rolls (no text or symbols visible)natural_image
Technical illustration of a printer's internal structure showing roller and printer components (no text or symbols)natural_image
Illustration of a printer with a control panel and paper strip, no text or symbols presentnatural_image
Technical illustration of a printer holder with paper roll and black arrows indicating motion (no text or symbols)natural_image
Illustration of a device with a panel and buttons, showing directional arrows (no text or symbols)natural_image
Three cylindrical plastic rolls with black bands, no visible text or markingsnatural_image
Three cylindrical plastic rolls with black bands, arranged diagonally on a white background (no text or symbols visible)3 fóliatekercs
natural_image
Two transparent cylindrical objects with black bands, resembling plastic or mechanical components (no text or symbols visible)2 fóliatekercs