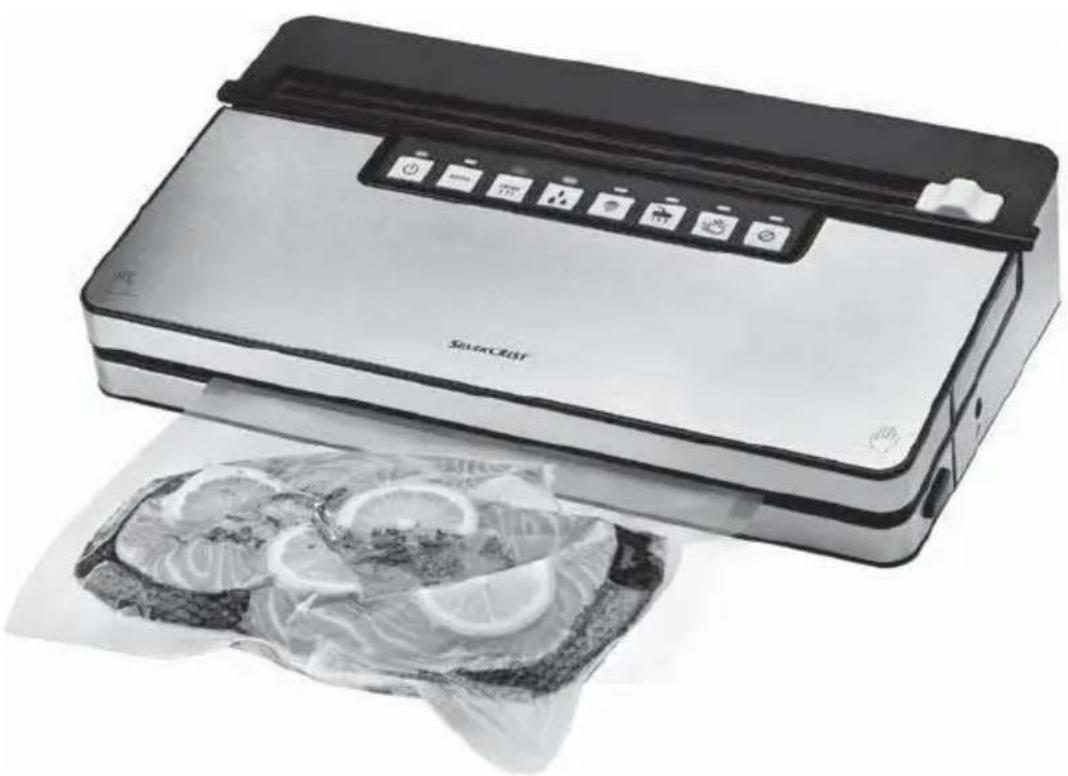
SVEB 160 B2 - Vacuum Sealer SILVERCREST - Free user manual and instructions
Find the device manual for free SVEB 160 B2 SILVERCREST in PDF.
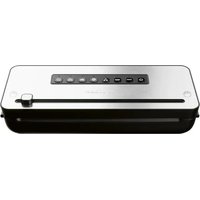
| Product type | Vacuum sealer |
| Brand | SilverCrest |
| Model | SVEB 160 B2 |
| Supply voltage | 220 - 240 V ~, 50/60 Hz |
| Power consumption | 160 W |
| Protection class | II / Double insulation |
| Dimensions (L x W x H) | approx. 40 x 20 x 10 cm |
| Weight | approx. 2 kg |
| Main functions | Vacuum sealing, sealing, external vacuum sealing, marinating |
| Additional functions | Wet (moist food), Soft (delicate food) |
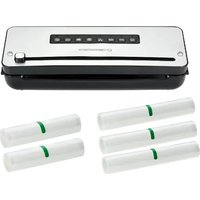
| Included accessories | 1 film roll, 2 hoses, 3 adapters, 1 spare sealing gasket |
| Compatible film width | max. 30 cm |
| Recommended film thickness | 0.17 - 0.29 mm (170 - 290 microns) |
| Film operating temperature | -20 °C to +110 °C |
| Sous vide cooking | Yes, with suitable film (bain-marie or steam) |
| Cleaning | Housing: damp cloth; drip tray: dishwasher safe |
| Safety | Emergency stop via STOP button, double insulation |
| Warranty | 3 years (subject to conditions) |
| Article number (IAN) | 367892_2101 |
Frequently Asked Questions - SVEB 160 B2 SILVERCREST
User questions about SVEB 160 B2 SILVERCREST
0 question about this device. Answer the ones you know or ask your own.
Ask a new question about this device
Download the instructions for your Vacuum Sealer in PDF format for free! Find your manual SVEB 160 B2 - SILVERCREST and take your electronic device back in hand. On this page are published all the documents necessary for the use of your device. SVEB 160 B2 by SILVERCREST.
USER MANUAL SVEB 160 B2 SILVERCREST
natural_image
SilverCRIST vacuum cleaner with lid and printed dessert, no visible text or symbols on the device itself.VACUUM SEALER / VAKUUMIERER APPAREIL DE MISE SOUS VIDE SVEB 160 B2
GB IE
VACUUM SEALER
Operating instructions
FR BE
APPAREIL DE MISE SOUS VIDE
Mode d'emploi
CZ
VAKUOVAČKA
Návod k obsluze
SK
VÁKUOVAČ
Návod na obsluhu
DK
VAKUUMPAKKER
Before reading, unfold the page containing the illustrations and familiarise yourself with all functions of the device.
DE AT CH
GB/IE Operating instructions Page 1

Contents
Introduction....2
Proper use 2
Package contents and transport inspection .... 2
Appliance description 3
Technical specifications .... 4
Safety information....4
Setting up and connecting 6
Requirements for the set-up location 6
Switching the appliance on/off 6
Functions....7
Tips 8
Sealing a tubular film 9
Vacuum sealing....12
Vacuuming the tube film 12
Vacuuming containers and resealable bags 15
Marinate function 17
Cleaning 18
Storage 19
Disposal 20
Kompernass Handels GmbH warranty 21
Service 22
Importer 22
Ordering replacement parts 23
Introduction
Congratulations on the purchase of your new appliance!
You have chosen a modern, high-quality product. These operating instructions are part of the product. They contain important information about safety, usage and disposal. Before using the product, please familiarise yourself with all operating and safety instructions. This product may only be used as described and for the purposes indicated. Please also pass these operating instructions on to any future owner.
Proper use
This appliance is intended exclusively for the sealing and vacuum-packing of foodstuffs in household quantities and only in private households. This appliance is not intended for commercial or industrial applications or for continuous use.
It is not intended for any other purpose nor for use beyond the scope described. No claims of any kind will be accepted for damage arising as a result of incorrect use. The risk shall be borne solely by the user.
Package contents and transport inspection
The appliance is supplied with the following components as standard:
- Vacuum sealer
- 1 x film roll
- 2 x tubes
- 3 x adapters
- 1 x replacement sealing ring
• These operating instructions
NOTE
▶ Check the package for completeness and signs of visible damage. If the delivery is incomplete or damage has occurred as a result of defective packaging or during transport, contact the Service hotline (see section Service).
◆ Remove all parts of the appliance, the tube film and the operating instructions from the carton.
◆ Remove all packaging materials and any protective film from the appliance.
DANGER
▶ Do not allow children to play with packaging materials. There is a risk of suffocation.
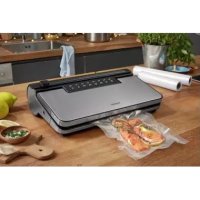
Appliance description
Figure A:
① Appliance lid
② Suction fitting
③ Lower sealing ring
4 Sealing wires
⑤ Cable storage compartment
6 Rear limiters
⑦ Front limiters
8 Lid release
⑨ Drip tray
⑩ Suction tube
⑪ Storage compartment lid
⑫ Upper sealing ring
13 Press seal
Figure B:
14 button (switch appliance on/off) with control lamp (green)
15 button (start "Sealing" function) with control lamp (red)
16 button (start "Vacuum sealing" function) with control lamp (red)
⑰ button (activate/deactivate additional function "Wet") with control lamp (green)
18 button (activate/deactivate additional function "Soft") with control lamp (green)
19 button (start/cancel "External vacuuming" function) with control lamp (green)
20 button (start "Marinate" function) with control lamp (green)
21 button (cancel function/process) with control lamp (green)
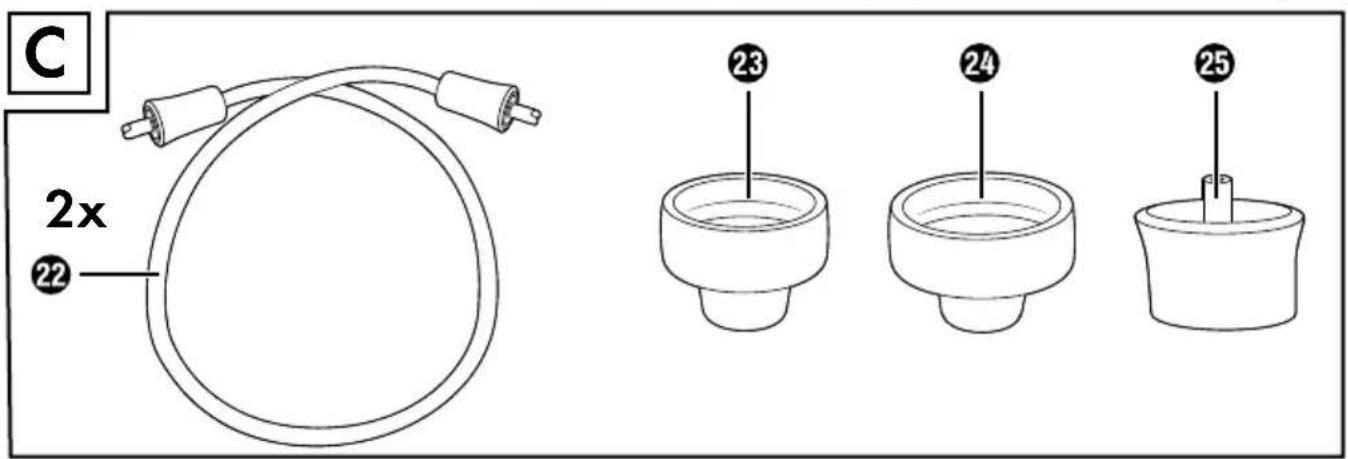
Figure C:
22 Vacuum hose
23 Adapter A
24 Adapter B
25 Adapter C
Technical specifications
| Operating voltage 220-240 V ~ (AC), 50/60 Hz | |
| Power consumption 160 W | |
| Protection class | II/☐ (double insulation) |
 | All parts of this appliance that come into contact with food are food-safe. |
Safety information
RISK OF ELECTRIC SHOCK!
■ Before use, check the appliance for visible external damage. Never operate an appliance that is damaged.
■ To avoid potential risks, damaged mains cables should be replaced by the manufacturer, their customer service department or a similarly qualified person.
■ Never use an appliance with a faulty power cable.
■ Do not use extension cables or power socket strips that do not meet the required safety standards.
■ Never open the appliance housing!
■ Pull the plug from the socket before starting to clean the appliance.
■ Ensure that no moisture can penetrate the appliance during cleaning.

RISK OF INJURY!
■ All repairs must be carried out by authorised specialist companies or by the Customer Service department. Improper repairs may result in a risk of injury to the user or damage to the appliance. It will also invalidate any warranty claims.
■ The mains power socket must be easily accessible, so that the power cable can be easily disconnected in the event of an emergency.
■ Cleaning and user maintenance tasks may not be carried out by children unless they are supervised.
This appliance may be used by children aged 8 years and above and by persons with limited physical, sensory or mental capabilities or lack of experience and knowledge, provided that they are under supervision or have been told how to use the appliance safely and are aware of the potential risks.
■ Do not allow children to play with the appliance!
■ Children must be supervised to make sure that they do not play with the appliance.
■ Do not leave the appliance unsupervised when it is ready for use. To prevent it being switched on accidentally, always unplug the appliance after use or during breaks.

CAUTION - PROPERTY DAMAGE!
■ Do not use an external timer switch or a separate remote control system to operate the appliance.
NOTE
■ No user action is required to switch the product between 50 and 60 Hz. The product switches automatically to either 50 or 60 Hz.
Setting up and connecting
Requirements for the set-up location
For safe and trouble-free operation of the appliance, the set-up location must fulfil the following requirements:
■ When setting up the appliance, place it on a firm, flat and horizontal surface.
■ Do not operate the appliance in a hot, wet or extremely damp environment or in the vicinity of flammable materials.
■ The mains power socket must be easily accessible, so that the power cable can be easily disconnected in the event of an emergency.
Switching the appliance on/off
CAUTION - PROPERTY DAMAGE
▶ Before you plug in the appliance, compare the connection data (voltage and frequency) on the rating plate with that of your mains power network. This data must match to prevent damage to the appliance.
▶ Ensure that the power cable is undamaged and is not routed over hot surfaces and/or sharp edges.
▶ Do not leave the mains cable hanging over any edges (tripping hazard).
◆ Insert the plug into the mains power socket.
◆ Press the button 14 to switch on the appliance. The control lamp 14 lights up.
◆ Press the button 14 again to switch off the appliance. The control lamp 14 switches off.
◆ Pull the plug from the socket if you do not plan to use the appliance for an extended period and before cleaning it.
Functions
| Button Function | ||
 | 14 Switch the appliance on/off | |
 | 15 | Start the "Sealing" function (without vacuum sealing) |
 | 16 Starting the "Vacuum sealing" function | |
 | 17 | Activate/deactivate additional "Wet" function (for particularly moist foods) |
 | 18 | Activate/deactivate additional "Soft" function (for pressure-sensitive foods, such as fruit or cakes) |
 | 19 | Start "External vacuuming" function (for vacuuming with hose and adapter) |
 | 20 | Start the "Marinate" function (for marinating in a container) |
 | 21 Cancel function/process | |
Tips
The following table offers some useful information on the optimal preparation and processing of various foods.
| Food Notes | Recommended container | Recommended (additional) function | |
| Fish/meat | -Use only when fresh-Do not interrupt the cold chain | -Bag |  |
| Marinated food | -To accelerate the marinating process | -Containers |  |
| Vegetables | -Peel or wash and dry-Blanch for a few minutes in boiling water, rinse with ice water and dry to avoid loss of flavour and colour or gas formation* during storage | -Bag | |
| Leafy vegetables/lettuce | -Wash and dry-Not suitable for freezing | -Containers | |
| Fruit -Peel or wash and dry | -Refrigerator:container | ||
| -Freezer: bag |  | ||
| Herbs | -Wash and dry-Whole sprig | -Bag | |
| Baked products | -Containers | ||
| -Bag |  | ||
| Powdery food | -Place a piece of kitchen paper in the top of the bag/container or vacuum seal in the original packaging | -Bag-Containers | |
| Food Notes | Recommended container | Recommended (additional) function |
| Cold liquids | -Containers | |
| -Freeze briefly | -Bag | |
| Cooled, cooked foods | -Containers | |
| -Bag |
* For example, this applies to all types of cabbage (broccoli, Brussels sprouts, kale, etc.), asparagus, sugar snap peas, beans, romanesco and pak choy.
Sealing a tubular film
NOTES ON THE FILM
The film width may not exceed 30 cm. Otherwise it cannot be sealed correctly.
▶ Use only nylon PA/PE films with a structure (dots or grooves) on one side and a thickness of approx. 0.17–0.29 mm (170–290 μ) in this appliance. Otherwise the seal will not be tight and the appliance may be damaged. You can recognise films of this type from the information on the packaging. The quality of the seal will vary depending on the type and thickness of the film.
The supplied film is suitable for temperatures between -20°C and 110°C.
The supplied foil is BPA-free and microwaveable. However, never heat completely sealed bags in the microwave. The bag could burst! One side of the bag must be open. Heat the bags for no more than 3 minutes at a maximum temperature of 70^ .
1) Using scissors, cut the required length for your bag from the tubular film. Cut as straight as possible or proceed as follows to use the film cutter integrated in the lid of the storage compartment ⑪:
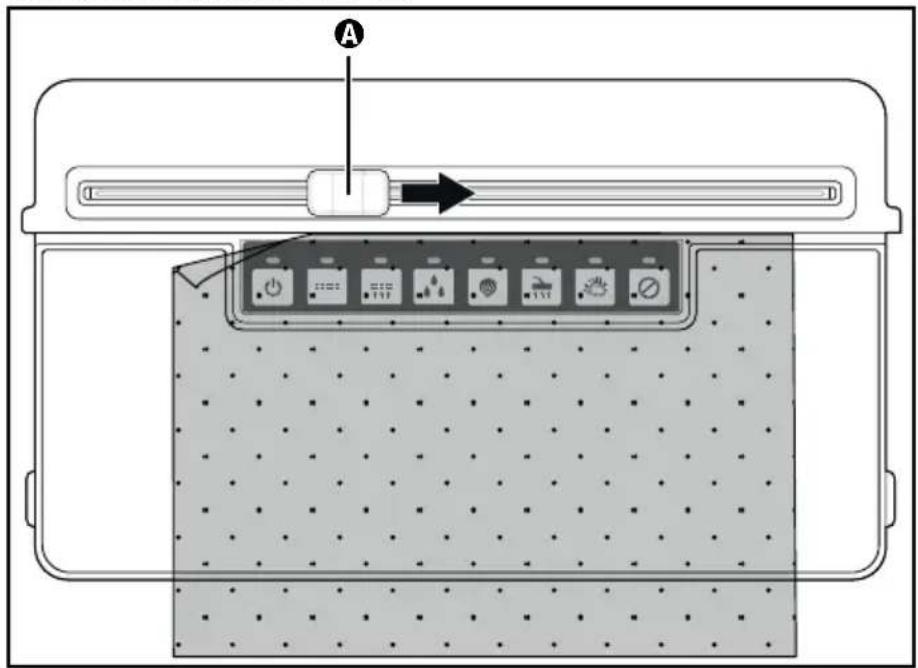
- Push the film Ⓐ to the right or left of the edge.
- Open the lid of the storage compartment ⑪ and pull out as much tubular film as you need. Please note that when the bag is filled, at least 6 cm must remain free from the sealing edge.
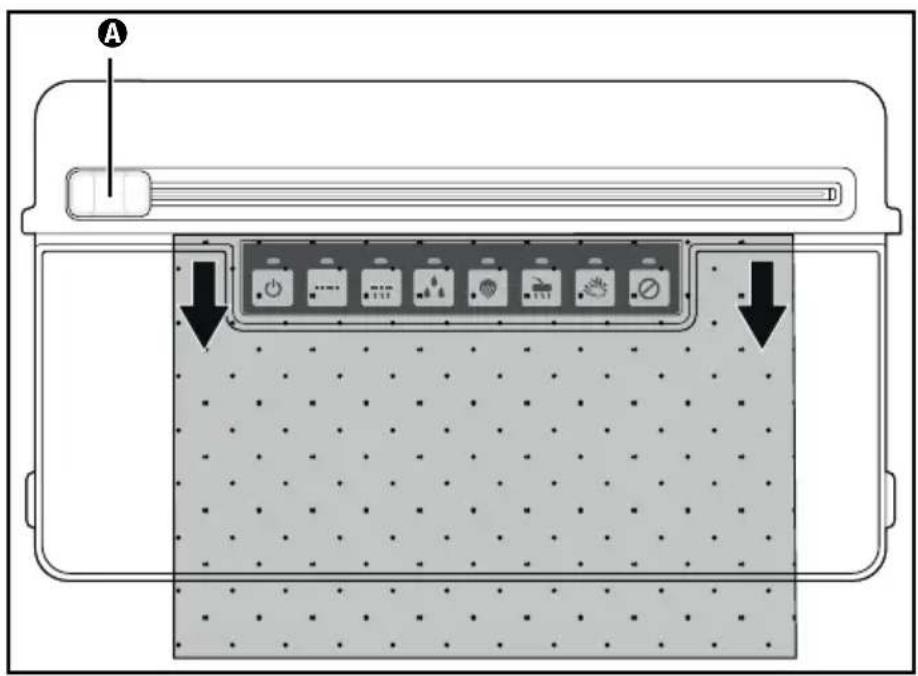
- Close the lid ⑪ again so that the tubular film is clamped in place.
- Press the film cutter Ⓐ down lightly and pull it from one side to the other over the tubular film to cut it off.
2) Open the appliance lid ① by pressing the lid release ⑧ and flipping the lid ① upwards.
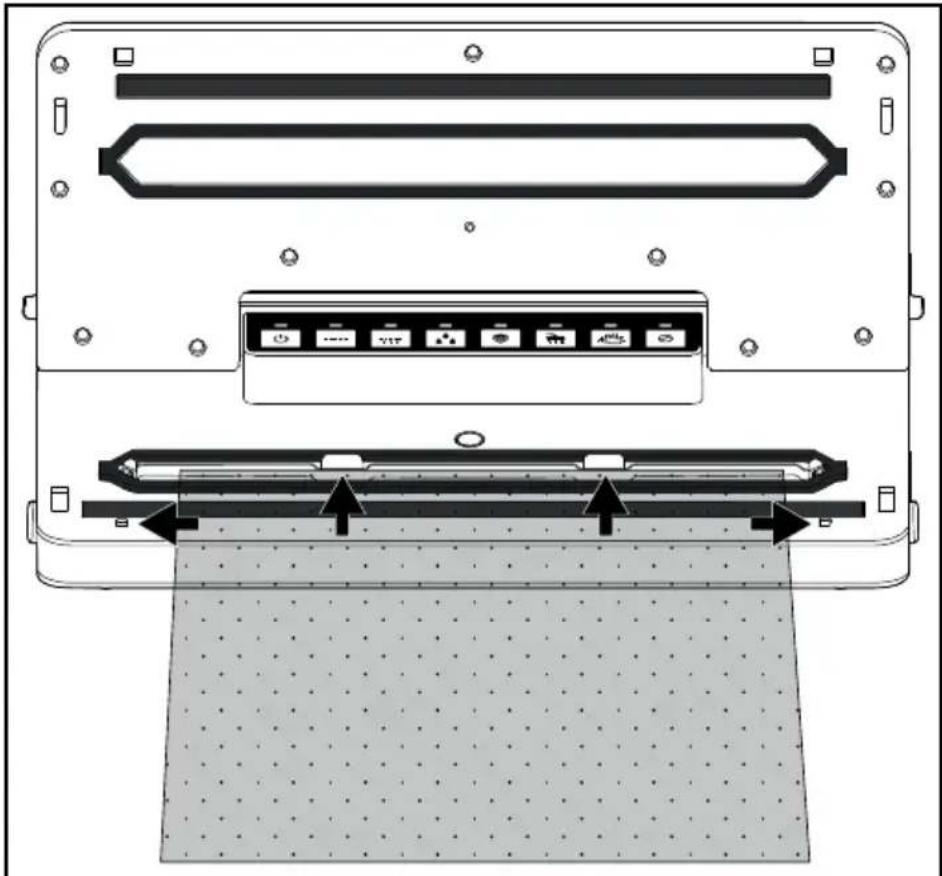
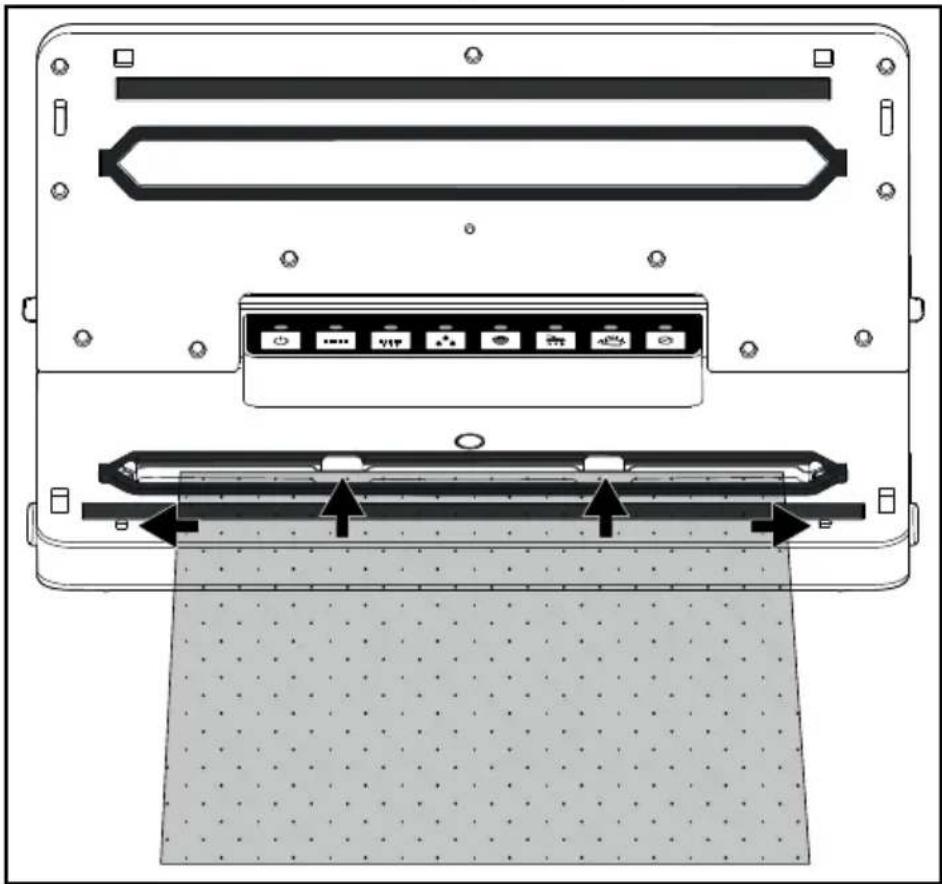
3) Lay the open end of the bag as far into the appliance so that the opening of the bag is located centrally under the lower seal ring ③. The bag should be inserted no further than the rear limiters ⑥ and must lie between the front limiters ⑦. If the bag is lying over one or both limits ⑥/⑦, it cannot be sealed correctly:
natural_image
Technical diagram of a computer monitor rear panel showing front, top, and side views with no visible text or symbolsNOTE
The bag opening must lie flat on the sealing wires ④. Otherwise the sealing does not work properly.
4) Close the appliance lid ①. The press seal ⑬ presses the bag onto the sealing wires ⑭, to create a smooth seam. Ensure that both corners of the appliance lid ① click into place. If necessary, press them down once again on the markings and so that the appliance lid ① clicks into place and locks shut.
5) Press the button 15. The control lamps 15/21 light up. As soon as the sealing process is completed, the control lamps 15/21 switch off.
NOTE
▶ You can stop the vacuum sealing process at any time by pressing the button 21. The control lamps 15/21 will then switch off. Press the == button 15 again to resume the sealing process.
CAUTION - PROPERTY DAMAGE
If the control lamps ⑮/㉑ do not switch off after a maximum of 10 seconds during the sealing process, the appliance is defective!
▶ Remove the plug from the mains power socket immediately. Do not attempt to repair the appliance yourself. Contact the Customer Service department.
6) Open the appliance lid ① by pressing the lid release ⑧ and flipping the lid ① upwards. Remove the bag. It is now sealed at one end.
NOTE
▶ Ensure that the seam is properly closed. A correct seam should be a smooth, straight stripe without any creases.
7) Fill the bag. You must leave at least 6 cm of the bag free up to the edge to be sealed.
CAUTION - PROPERTY DAMAGE
▶ Fill the bag so that no food scraps or liquids can leak out during sealing and get into the appliance.
8) If you do not want to vacuum the air out of the bag, seal the other, open side now.
NOTE
▶ Wait a few seconds to allow the appliance to cool down before sealing the next bag. During this cool-down phase, you cannot start the "Sealing" function.
Vacuum sealing
Vacuuming the tube film
You can also suck the air out of the bag (vacuuming) during sealing:
NOTE
If you want to vacuum seal bags with liquid contents only, freeze the liquid briefly so that it does not get sucked into the appliance during vacuuming. If small quantities of liquid or food nonetheless get sucked up, they will be deposited in the drip tray ⑨ that is located within the lower sealing ring ③.
1) Lay the open end of the bag as far into the appliance so that the opening of the bag is located centrally under the lower seal ring ③. The bag should be inserted no further than the rear limiters ⑥ and must lie between the front limiters ⑦. Otherwise the vacuuming and sealing will not function correctly:
natural_image
Technical diagram of a computer monitor rear panel showing internal components and mounting points (no text or labels)2) Close the appliance lid ①. Ensure that both corners of the appliance lid ① click into place. If necessary, press them down once again on the markings and so that the appliance lid ① clicks into place and locks shut.
NOTE
▶ Make sure that neither the upper 12 nor the lower sealing ring 3 is damaged. Otherwise the appliance cannot suck the air out of the bag.
If either one of the sealing rings ③/⑫ is damaged, then simply pull it out of the groove and press the replacement sealing ring into the groove.
3) If necessary, select the appropriate additional function for your food. Otherwise, you can skip this step and move on to point 4):
- Press the 📁 button ⑰ if you want to vacuum particularly moist or juicy food, such as freshly marinated meat or cut fruit.
Moisture between the film and the seam can lead to defective seals.
When this function is activated, the sealing time is increased so that the seal is more stable.
If the additional function ☐ "Wet" is activated, the corresponding control lamp ⑰ lights up.
-Press the button 18 if you want to vacuum seal pressure-sensitive foods such as cakes or berries. When the additional function "Soft" is activated, the suction pressure is slightly reduced and the food is not squeezed as much.
If the additional function "Soft" is activated, the corresponding control lamp 18 lights up.
NOTE
If you want to vacuum seal moist and pressure-sensitive food, you can also activate both additional functions simultaneously.
4) Press the button 16. The control lamps 16/21 light up and the appliance sucks the air out of the bag. As soon as all the air is sucked out, the control lamp 15 also lights up. The appliance now seals the bag. As soon as the sealing process is completed, the control lamps 15/16/21 switch off.
NOTE
▶ You can stop the vacuuming process at any time by pressing the button 21. The control lamps 16/21 will then switch off. Press the button 16 again to resume vacuuming.
If the appliance has already switched to the sealing process and the control lamp 15 is lit, the process can also be stopped with the ☑ button 21. The control lamps 15/16/21 will then switch off. Press the ⚡ button 15 again to resume the sealing process.
5) Open the appliance lid ① by pressing the lid release ⑧ and flipping the lid ① upwards. Remove the vacuum-sealed bag.
NOTE
▶ Once you have sealed 5 bags in a row, allow the appliance to cool down for about 1 minute. During this cool-down phase, it is possible that the appliance cannot be started.
After the cool-down phase, you can use the appliance as normal (even if a whole minute has not yet elapsed).
This does not apply, if the additional function ☐ "Wet" is activated. Due to the longer sealing process, a cooling phase of approx. 45 seconds is necessary after each pass.
TIP – "SOUS-VIDE COOKING"
As the supplied film is suitable for temperatures between -20°C and 110°C, it can be used for sous-vide cooking (vacuum cooking).
"Sous-vide" is French and means "under vacuum".
In vacuum cooking, the food (usually fish or meat, but vegetables can also be used) is vacuum-sealed in a bag and then cooked in water or steam cooked at a relatively low temperature (50°C to 90°C). The advantage of this is that volatile flavours and aromas are not lost during cooking. The food does not dry out and the vitamins and flavours are preserved. Herbs or spices that are vacuum-sealed in the bag with the food give off a more intense flavour.
Vacuuming containers and resealable bags
NOTE
If you want to vacuum seal containers or bags with liquid contents only, freeze the liquid briefly so that it does not get sucked into the appliance during vacuuming. If small quantities of liquid or food nonetheless get sucked up, they will be deposited in the small drip tray ⑨ that is located within the lower sealing ring ③.
▶ You can stop the vacuuming process at any time by pressing the button 21. The control lamp 19/21 will switch off. Press the 📋 button 19 again to resume vacuuming.
You can vacuum seal containers and resealable bags using the vacuum hoses ② and appropriate adapters ③/④/⑤ supplied with the appliance. With some bags or containers by various manufacturers, it is possible that no adapter ③/④/⑤ is required and you can push the black coupling piece on the vacuum hose ② directly into the bag/container. Experiment to find out which adapter ③/④/⑤ creates the best seal or whether you even need an adapter ③/④/⑤ at all.
NOTE
▶ You can order suitable bags and containers separately. Please refer to section "Ordering spare parts and accessories".
The vacuum hoses 22 and adapters 23/24/25 are also compatible with bags and containers made by other manufacturers.
| Adapters e.g. suitable for | |
| Adapter A 23 | FoodSaver* lunch boxes, Ernesto, various bags with a valve |
| Adapter B 24 | FoodSaver food storage boxes, Ernesto, various bags with a valve |
| Adapter C 25 CASO**, FoodSaver storage containers | |
*FoodSaver is a registered trademark of Sunbeam Products, Inc.
**CASO is a registered trademark of Caso Holding GmbH.
Vacuuming sealing bags
1) Connect the vacuum hose ② onto the suction fitting ① of the appliance.
2) Select the appropriate adapter A/B 23/24 for the bag you want to vacuum seal and attach it to the vacuum hose 22.
3) Close the appliance lid ①. Ensure that both corners of the appliance lid ① click into place. If necessary, press them down once again on the markings and so that the appliance lid ① clicks into place and locks shut.
4) Close the bag you want to vacuum seal carefully. Vacuum sealing only works properly if the bag is completely closed off. Position the bag so that the extraction opening of the bag is lying on a smooth surface.
5) Press the adapters A/B 23/24 firmly onto the extraction opening on the bag.
6) Press them button 19. The control lamps 19/21 light up and the appliance sucks the air out of the bag. As soon as all the air is sucked out, the control lamps 19/21 switch off.
7) You can now remove the adapter A/B 23/24 from the bag.
Vacuum sealing containers
1) Connect the vacuum hose 22 onto the suction fitting 3 of the appliance.
2) Select the appropriate adapter 23/24/25 for the container you want to vacuum seal and attach it to the vacuum hose 22.
3) Close the appliance lid ①. Ensure that both corners of the appliance lid ① click into place. If necessary, press them down once again on the markings and so that the appliance lid ① clicks into place and locks shut.
4) Connect the adapter 23/24/25 to the appropriate fitting on the container. Please refer to the instruction manual of the container for further information.
5) Press the 📄 button 19. The control lamps 19/21 light up and the appliance sucks the air out of the container. As soon as all the air is sucked out, the control lamps 19/21 switch off.
6) You can now remove the adapter 23/24/25 from the container and the appliance.
Marinate function
You can use the marinate function if you want to marinate food such as meat. The alternating vacuuming and pausing/aerating allows the marinade to penetrate the pores much more quickly and the marinating process is accelerated. The process takes around 15 minutes. You will need a suitable vacuum container (e.g. from FoodSaver*) specially designed for marinating. They are characterised by a special valve that makes ventilation possible between the vacuuming phases.
1) Connect the vacuum hose ② onto the suction fitting ① of the appliance.
2) If necessary for the container being used, connect the adapter ⑲ to the vacuum hose ⑳.
3) Close the appliance lid ①. Ensure that both corners of the appliance lid ① click into place. If necessary, press them down once again on the markings and so that the appliance lid ① clicks into place and locks shut.
4) Connect the adapter 25 or, if no adapter is required, the black coupling piece on the vacuum hose 22 to the appropriate fitting on the container. Please refer to the instruction manual of the container for further information.
5) Press the button 20. The control lamps 19/21 light up and the appliance starts the marinating programme with vacuuming. The appliance now alternates between vacuuming (control lamp 20 lights up) and ventilating (control lamp 20 flashes) for approx. 15 minutes. Once the programme is finished, the control lamps 20/21 switch off.
6) You can now remove the adapter 25/the vacuum hose 22 from the container and the appliance.
*FoodSaver is a registered trademark of Sunbeam Products, Inc.
Cleaning

DANGER
Risk of fatal injury from electrocution!
▶ Pull the plug from the socket before starting to clean the appliance.
▶ Ensure that no moisture can penetrate the appliance during cleaning.
CAUTION - PROPERTY DAMAGE
Possible damage to the appliance
▶ Do not use aggressive or abrasive cleaning agents, as they may corrode the surface of the housing.
▶ Do not use any hard or sharp objects to remove any adhesive from the sealing wires ④. Otherwise the sealing wires ④ or the insulation could be damaged.
◆ Wipe down the outer surfaces with a damp cloth. If necessary, apply a mild detergent to the cloth. Afterwards, wipe the appliance with a cloth moistened only with water to remove any detergent residues.
◆ Wipe off the upper ⑫ and the lower sealing rings ③ as well as the press seal ⑬ with a damp cloth.
Wipe the vacuum hoses 22 as well as the adapter 23/24/25 with a damp cloth. If there is heavy soiling, you can also clean these parts in hot water with a little detergent.
◆ Rinse and clean the drip tray ⑨ in warm water with a little detergent.
NOTE


You can clean the drip tray ⑨ in the dishwasher, if necessary. Make sure that the part does not get jammed in the dishwasher. Use the upper basket of the dishwasher if possible.
◆ Ensure that the appliance and all parts are completely dry before reusing or storing them.
Storage
CAUTION
Possible damage to the appliance
Do not click the lid ① into place when you are storing the appliance! When the appliance lid ① is clicked into place, it exerts continuous pressure on the upper ⑫ and lower sealing rings ③ as well as the press seal ⑬. This can negatively affect their function.
1) You can store the accessories in the storage compartment directly on the appliance. To do this, open the lid of the storage compartment ⑪:
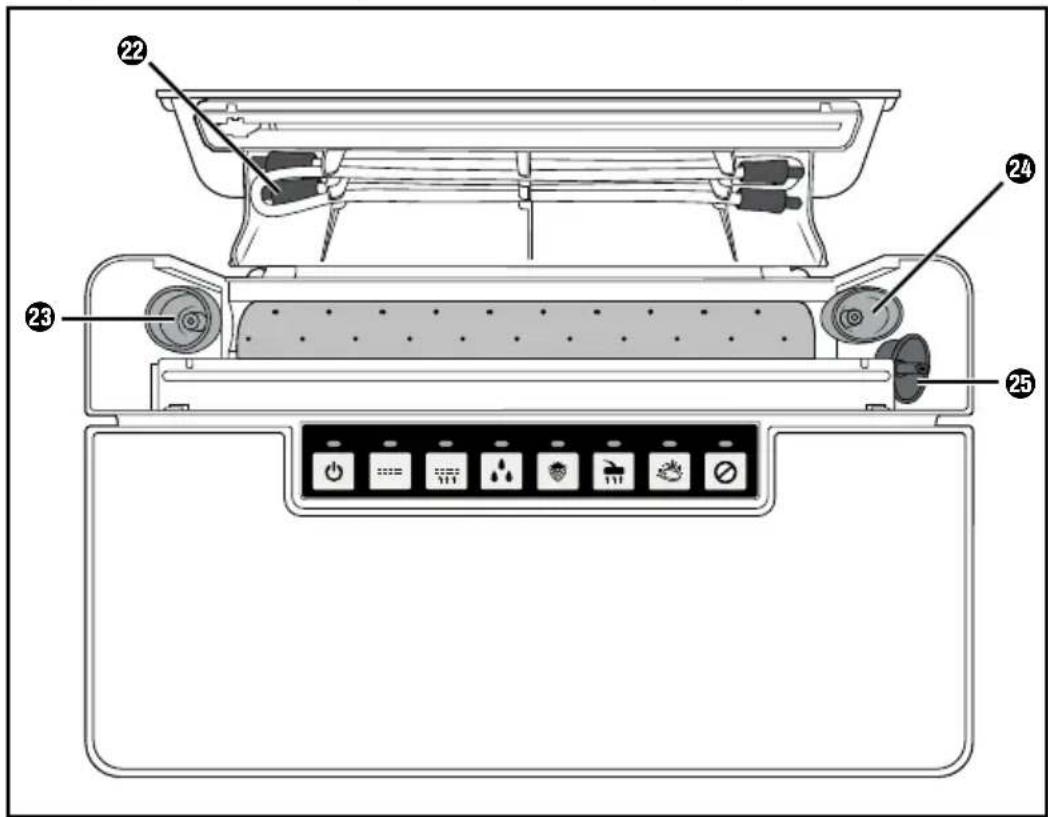
- Clamp the two vacuum hoses ② into the clamps in the lid of the storage compartment ⑪.
- Put the adapters A 23, B 24 and C 25 into the slots.
- You can slide the replacement seal into the film roll. This way it is also ready at hand.
2) Push the mains cable into the cable storage compartment ⑤ on the underside of the appliance.
3) Store the appliance in a clean, dry place away from direct sunlight.
Disposal
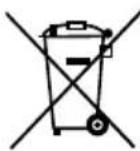
Never dispose of the appliance in your normal domestic waste. This product is subject to the provisions of the European Directive 2012/19/EU (Waste Electrical and Electronic Equipment).
Dispose of the appliance via an approved disposal company or your municipal waste facility. Please comply with all applicable regulations. In case of doubt, please contact your waste disposal centre.

Your local community or municipal authorities can provide information on how to dispose of the worn-out product.

The product is recyclable, subject to extended producer responsibility and is collected separately.

Returning the packaging to the material cycle conserves raw materials and reduces the amount of waste that is generated. Dispose of packaging materials that are no longer needed in accordance with applicable local regulations.
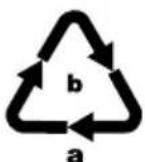
Dispose of the packaging in an environmentally friendly manner. Note the labelling on the packaging and separate the packaging material components for disposal if necessary. The packaging material is labelled with abbreviations (a) and numbers (b) with the following meanings: 1–7: plastics, 20–22: paper and cardboard, 80–98: composites.
This appliance has a 3-year warranty valid from the date of purchase. If this product has any faults, you, the buyer, have certain statutory rights. Your statutory rights are not restricted in any way by the warranty described below.
Warranty conditions
The warranty period starts on the date of purchase. Please keep your receipt in a safe place. This will be required as proof of purchase.
If any material or manufacturing fault occurs within three years of the date of purchase of the product, we will either repair or replace the product for you or refund the purchase price (at our discretion). This warranty service requires that you present the defective appliance and the proof of purchase (receipt) within the three-year warranty period, along with a brief written description of the fault and of when it occurred.
If the defect is covered by the warranty, your product will either be repaired or replaced by us. The repair or replacement of a product does not signify the beginning of a new warranty period.
Warranty period and statutory claims for defects
The warranty period is not prolonged by repairs effected under the warranty. This also applies to replaced and repaired components. Any damage and defects present at the time of purchase must be reported immediately after unpacking. Repairs carried out after expiry of the warranty period shall be subject to a fee.
Scope of the warranty
This appliance has been manufactured in accordance with strict quality guidelines and inspected meticulously prior to delivery.
The warranty covers material faults or production faults. The warranty does not extend to product parts subject to normal wear and tear or to fragile parts which could be considered as consumable parts such as switches, batteries or parts made of glass.
The warranty does not apply if the product has been damaged, improperly used or improperly maintained. The directions in the operating instructions for the product regarding proper use of the product are to be strictly followed. Uses and actions that are discouraged in the operating instructions or which are warned against must be avoided.
This product is intended solely for private use and not for commercial purposes. The warranty shall be deemed void in cases of misuse or improper handling, use of force and modifications / repairs which have not been carried out by one of our authorised Service centres.
Warranty claim procedure
To ensure quick processing of your case, please observe the following instructions:
■ Please have the till receipt and the item number (IAN) 367892_2101 available as proof of purchase.
■ You will find the item number on the type plate on the product, an engraving on the product, on the front page of the operating instructions (below left) or on the sticker on the rear or bottom of the product.
If functional or other defects occur, please contact the service department listed either by telephone or by e-mail.
■ You can return a defective product to us free of charge to the service address that will be provided to you. Ensure that you enclose the proof of purchase (till receipt) and information about what the defect is and when it occurred.

You can download these instructions along with many other manuals, product videos and installation software at www.lidl-service.com.
This QR code will take you directly to the Lidl service page (www.lidl-service.com) where you can open your operating instructions by entering the item number (IAN) 367892_2101.
Service
GB Service Great Britain
Tel.: 0800 404 7657
E-Mail: kompernass@lidl.co.uk
IE ServiceIreland
Tel.: 1890 930 034
(0,08 EUR / Min., (peak))
(0,06 EUR / Min., (off peak))
E-Mail: kompernass@lidl.ie
IAN 367892_2101
Importer
Please note that the following address is not the service address. Please use the service address provided in the operating instructions.
KOMPERNASS HANDELS GMBH
BURGSTRASSE 21
44867 BOCHUM
GERMANY
www.kompernass.com
Ordering replacement parts
You can order replacement parts for this product on the Internet at www.kompernass.com.

Scan the QR code with your smartphone/tablet. You can use this QR code to go directly to our website to view and order the available spare parts.
NOTE
If you have problems with your online order, contact our service centre by phone or e-mail.
▶ Please always quote the article number (e.g. IAN 123456_7890) when ordering. You can find it on the title page of these operating instructions.
▶ Please note that online ordering of replacement parts is not possible for all countries.
Inhaltsverzeichnis
Einleitung 26
natural_image
Technical diagram of a computer monitor rear panel showing front, top, and side views with no visible text or symbolsHINWEISZ
natural_image
Diagram of a computer monitor rear panel showing front, top, and side views with no text or symbolsKOMPERNASS HANDELS GMBH
BURGSTRASSE 21
44867 BOCHUM
DEUTSCHLAND
www.kompernass.com
Installation et raccordement
REMARQUES RELATIVES AU FILM
natural_image
Technical diagram of a computer monitor rear panel showing front, top, and side views with no visible text or symbolsREMARQUES
natural_image
Technical diagram of a computer monitor rear panel showing internal components and mounting points (no text or labels)KOMPERNASS HANDELS GMBH
BURGSTRASSE 21
44867 BOCHUM
ALLEMAGNE
www.kompernass.com
natural_image
Technical diagram of a computer monitor rear panel showing front, top, and side views with no visible text or symbolsOPMERKING
natural_image
Diagram of a computer monitor rear panel showing front, top, and side views with no text or symbolsZakken vacuumtrekken
Voorraaddozen vacuumtrekken
KOMPERNASS HANDELS GMBH
BURGSTRASSE 21
44867 BOCHUM
DUITSLAND
www.kompernass.com
⚠️ POZOR – HMOTNÉ ŠKODY!
POZOR - HMOTNÉ ŠKODY
natural_image
Diagram of a computer monitor rear panel showing front, top, and side views with no text or symbolsUPOZORNĚNÍ
POZOR - HMOTNÉ ŠKODY
POZOR - HMOTNÉ ŠKODY
natural_image
Technical diagram of a device rear panel showing internal components and mounting points (no text or symbols)POZOR - HMOTNÉ ŠKODY
KOMPERNASS HANDELS GMBH
BURGSTRASSE 21
44867 BOCHUM
NĚMECKO
www.kompernass.com
natural_image
Technical diagram of a computer monitor rear panel showing front, top, and side views with no visible text or symbolsWSKAZÓWKI
natural_image
Diagram of a computer monitor rear panel showing front, top, and side views with no text or symbolsKOMPERNASS HANDELS GMBH
BURGSTRASSE 21
44867 BOCHUM
NIEMCY
www.kompernass.com
⚠️ POZOR – VECNÉ ŠKODY!
natural_image
Technical diagram of a computer monitor rear panel showing front, top, and side views with no visible text or symbolsUPOZORNENIE
natural_image
Technical diagram of a device rear panel showing internal components and mounting points (no text or symbols)KOMPERNASS HANDELS GMBH
BURGSTRASSE 21
44867 BOCHUM
NEMECKO
www.kompernass.com
natural_image
Technical diagram of a computer monitor rear panel showing front, top, and side views with no visible text or symbolsINDICACIONES
natural_image
Diagram of a computer monitor rear panel showing front, top, and side views with no text or symbolsKOMPERNASS HANDELS GMBH
BURGSTRASSE 21
44867 BOCHUM
ALEMANIA
www.kompernass.com
Pedido de recambios
- Luk låget Ⓤ igen, så slangefolien klemmes fast i det.
natural_image
Technical diagram of a device rear panel showing internal components and mounting points (no text or symbols)BEMARK
natural_image
Technical diagram of a computer monitor rear panel showing internal components and mounting points (no text or labels)2) Luk låget ①. Sørg for, at begge lågets ① hjørner går i indgreb. Tryk eventuelt ned på markeringerne og , så låget ① går i indgreb og låses.
BEMARK
KOMPERNASS HANDELS GMBH
BURGSTRASSE 21
44867 BOCHUM
TYSKLAND
www.kompernass.com
Bestilling af reservedele
Du kan altid bestille reservedele til dette produkt på internettet på www.kompernass.com.

KOMPERNASS HANDELS GMBH
BURGSTRASSE 21
44867 BOCHUM
GERMANY
www.kompernass.com
Last Information Update · Stand der Informationen · Version des informations · Stand van de informatie
Stav informaci · Stan informacji · Stav informacií · Estado de las informaciones · Tilstand af information:
05 / 2021 · Ident.-No.: SVEB160B2-052021-2