SHLFS 2200 A1 - Electric fryer SILVERCREST - Free user manual and instructions
Find the device manual for free SHLFS 2200 A1 SILVERCREST in PDF.

User questions about SHLFS 2200 A1 SILVERCREST
0 question about this device. Answer the ones you know or ask your own.
Ask a new question about this device
Download the instructions for your Electric fryer in PDF format for free! Find your manual SHLFS 2200 A1 - SILVERCREST and take your electronic device back in hand. On this page are published all the documents necessary for the use of your device. SHLFS 2200 A1 by SILVERCREST.
USER MANUAL SHLFS 2200 A1 SILVERCREST
For EU market: Imported for GB market by:
HOYER Handel GmbH Lidl Great Britain Ltd
Kühnefo 12 LdHouse-14Kingston Road
22761 Hamburg Surbon - KTS 9NU
GERMANY
Stand der Informationen - Status of information - Version des information Stand von de informatie - Stau informaci - Stay informaci
Stav informaci - Estado de las informaciones - Informaciones stand Versione delle informazioni - Az informaci kalte
05/2025 ID:SHLFS 2200A1_25_V1.11
GB Operating instructions
AIR FRYER WITH GRILL & SMOKER
- Overview 35
- Intended purpose 36
- Safety information 37
- Items supplied 40
5.How to use 41 - The touch display at a glance 42
- The programs at a glance 43
- Using the accessories 44
- Operation 45
9.1 Power connection 45
9.2 The touch display 45
9.3 Switching on/off 45
9.4Smoker tray. 46
9.5 Manual settings 46
9.6 Using Programs 46
9.7 Interrupting the cooking process 47
9.8Smoker 48
9.9 End of the cooking process 48
9.10 Manually stop the cooking process 49
9.11 Grilling with bottom heat 49
10.Preparation tips 49
10.1 Cooking table 51
10.2 Table with meat types, degrees of doneness and the associated core temperatures 52
- Recipes 53
11.1 Grilled balsamic mushrooms 53
11.2 Smoked beef spare ribs 53
11.3 Salmon burger 54
11.4 Smoky chicken thighs 55
11.5 Lemon Pepper Prawns 55
11.6 Smoky mixed French fries with herb mayonnaise 56
11.7 Steak Provençal style 57
11.8 Chicken Jamaican style 57
11.9 Courgette and aubergine skewers 58
11.10Chocolate tartlets with a liquid core 58
- Cleaning 59
- Storage 59
- Disposal 60
- Trouble-shooting 60
- Technical specifications 61
- Warranty of the HOYER Handel GmbH 62
1. Overview
1 Handle on the lid
2 Lid
3 Heating element (at the top of the lid)
4 Air outlets
5 Power cable with mains plug
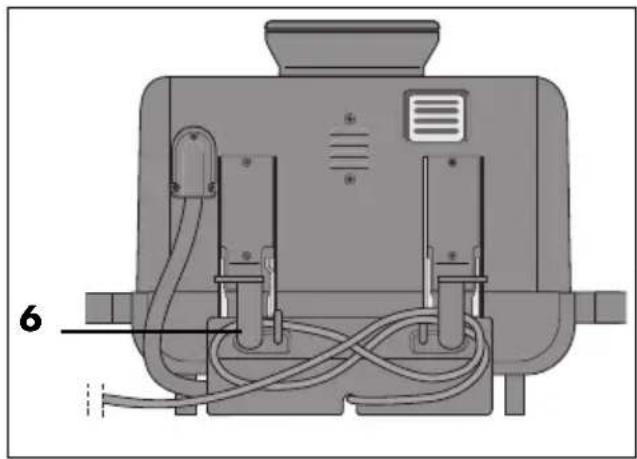
6 Cable spool (on the back of the device)
7 Handles
8 Cover for the smoker tray
9 Screws for attaching the handles
10 Smoke outlet
11 Touch display/display with indications and sensor buttons
12 Grease drip tray
13 Heating element (below the grill plate)
14 Grill plate
15 Pan (Plancha)
16 Frying insert
17 MAX Marking for the maximum filling level of the frying insert
18 Smoker tray
no image: spoon for measuring out the smoking chips
Thank you for your trust!
Congratulations on your new hot air fryer with tabletop smoker.
For safe handling of the product and in order to get to know the entire range of features:
- Read these operating instructions thoroughly prior to initial use.
- Above all, observe the safety information!
The device should only be used as described in these operating instructions. - Keep this copy of the operating instructions for information purposes.
If you pass the device on to someone else, please include this copy of the operating instructions. The operating instructions are a part of the product.
We hope you enjoy using your new hot air fryer with tabletop smoker!
Symbols on the device
This symbol warns you against touching the hot surface. The food-safe material of devices with this symbol will not change the taste or smell of food.

Do not operate the device in closed rooms and/or living spaces, e.g. buildings, tents, caravans, camper vans or boats. There is a danger to life from carbon monoxide poisoning.
2. Intended purpose
The hot air fryer with tabletop smoker is designed for cooking food in hot air at a temperature of max. 240^ .
The hot air fryer is designed for private, domestic use. The hot air fryer may only be used in a dry outdoor area.
This device must not be used for commercial purposes.
Foreseeable misuse
- The smoking chips must be completely cold before disposal. Under no circumstances should hot ash be disposed of with household waste.
The device must not be stored or operated at temperatures below 5^ .Make sure that the device is not left outside in frosty conditions. - Do not leave the device out in the rain.
The hot air fryer is not suitable for heating liquids.
The hot air fryer is not suitable for indoor use.
3. Safety information
Warnings
If necessary, the following warnings are used in these operating instructions:

DANGER! High risk: failure to observe this warning may result in injury to life and limb.
WARNING! Moderate risk: failure to observe this warning may result in injury or serious material damage.
CAUTION: low risk: ignoring this warning may result in minor injuries or damage to property.
NOTE: circumstances and specifics that must be observed when handling the device.
Instructions for safe operation
- This device can be used by children from the age of 8 and people with restricted physical, sensory or intellectual abilities or a lack of experience or knowledge if they are supervised or have been instructed in how to use this device safely and if they have understood the resulting dangers.
Children must not play with the device. - Cleaning and user maintenance must not be carried out by children without supervision.
- The device is only suitable for outdoor use. During operation outdoors...
... the device must be connected to a wall socket with a protective earth conductor.
... the device must be powered via a wall socket with a residual current device (RCD) set to trip in response to a leakage current no greater than 30mA in the electrical circuit. Ask your electrician for advice. The installation should only be carried out by a qualified electrician.
... the power cable must regularly be inspected for signs of damage. If the power cable is damaged, the device must no longer be used.
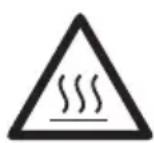
During operation, the surfaces of the device may become hot. Do not touch any hot parts of the device such as the air outlet on the back or the grill plate. Only touch the control elements of the device during operation.
During frying, hot steam escapes from the air outlet. Be careful not to put your hands into the steam.
- If the mains power cable of this device should become damaged, it must be replaced by the manufacturer, the manufacturer's customer service department or a similarly qualified specialist, in order to avoid any hazards.
The heating element must not be wiped with a damp cloth. - This device is not intended to be operated using an external timer or a separate remote control system.
Misuse may result in injuries.
Clean the device prior to its first use (see "Cleaning" on page 59). - Charcoal and similar fuels must not be used in this device. The exception: specially designed smoking chips may be used in the smoker tray.
- Under no circumstances should any materials or additives other than the specially designed smoking chips be used in the smoker tray. Do not use spirits or petrol for lighting or relighting!
The smoker tray must not be used indoors. - Only use smoking chips that are suitable for food preparation.

DANGER for children!
- Packing materials are not children's toys. Children should not be allowed to play with the plastic bags: there is a danger of suffocation.
- Ensure that children are not able to pull the device down from the work surface by the power cable.
- Keep the device out of the reach of children.

DANGER to and from pets and livestock!
- Electrical devices can represent a danger to pets and livestock. In addition, animals can also cause damage to the device. For this reason you should keep animals away from electrical devices at all times.
If liquid gets into the device, disconnect the mains plug immediately. Have the

DANGER for birds!
Birds breathe faster, distribute the air differently in their bodies and are significantly smaller than humans. For this reason, it may be dangerous for birds to inhale even the smallest smoke quantities, which develop while this device is in operation. There should be no birds in the vicinity when using this device.

DANGER! Risk of electric shock due to moisture!
The device must not be left out in the rain.
- Protect the device from moisture, water drops and water splashes.
The device, the power cable and the mains plug must not be immersed in water or any other liquids. device checked before reusing.
- If the device has fallen into water, pull out the mains plug immediately, and only then remove the device from the water. Do not use the device again, and have it checked by a specialist workshop.
- Never touch the device with wet hands.

DANGER! Risk of electric shock!
Do not use the device if the device or the power cable has any visible damage, or if the device has previously been dropped.
- Only plug the mains plug into the wall socket after the device has been completely assembled.
- If you use an extension cable, it must be sufficient for the technical specifications of this device.
Do not connect the device by using a multiple socket. By doing so the socket might be overloaded.
- Lay the power cable and any extension cable such that nobody can step on them, get caught on them, or trip over them.
- Connect the mains plug only to a correctly installed, easily accessible wall socket with earthing contacts with voltage corresponding to the rating plate. The wall socket must still be easily accessible after connection.
- Ensure that the power cable cannot be damaged by sharp edges or hot spots. Do not wrap the power cable around the device.
- When setting up the device, make sure that the power cable is not trapped or crushed.
- Even after it has been switched off, the device is not completely disconnected from the mains power supply. In order to fully disconnect it, pull out the mains plug.
To pull the mains plug out of the wall socket, always pull on the mains plug, and never on the power cable.
Pull the mains plug out of the wall socket:
- after every use
- when a malfunction occurs
- when you are not using the device
- before you clean the device
- during thunderstorms
To avoid any risk, do not make modifications to the product. Repairs must be carried out by a specialist workshop or the Service Centre.

DANGER - Fire hazard!
The smoking chips must be completely cold before disposal. Under no circumstances should hot ash be disposed of with household waste. There is an extremely high risk of fire!
- Never leave the device unattended while it is plugged in.
- Never leave the hot air fryer unattended during operation. You will thus be able to detect possible problems early on due to unusual smells or noises.
- Never cover the device or place it on soft objects (e.g. towels).
Make sure that there is free space on all sides and above the device.
Do not use the hot air fryer directly under wall units or wall sockets and not near to any curtains, paper or any similar flammable objects.
The hot air fryer should only be operated on a stable, flat, non-slip, dry and non-flammable work surface, in order to prevent it from tipping over, slipping away or the underlay catching fire and causing damage.

DANGER! Risk of injury through burning!
Do not touch the hot surfaces of the device or the interior. Use oven gloves or potholders.
Use oven gloves when you are cooking food at hot temperatures. Spitting fat could otherwise cause burns.
- Allow the device to cool down completely before you clean it or put it away.
Do not move or transport the hot air fryer while it is switched on.
- If fat catches fire on the device, never try to extinguish it with water!
There is a danger of explosive deflagration or electric shock. Instead, cover the device with a fire blanket.
WARNING! Risk of material damage!
Only use original accessories.
- Never place the device on hot surfaces (e.g. hot plates) or near to heat sources or open fire.
The device must not be stored or operated at temperatures below 5^ . Make sure that the device is not left outside in frosty conditions.
Make sure that the surface under the device is dry.
Make sure that the food will not touch the hot heating element at the top of the interior and become stuck there.
Do not overfill the frying basket. Please observe the reference values in these instructions.
Do not clean using sharp objects or abrasive cleaning agents.
The device is fitted with non-slip plastic feet. As furniture is coated with a variety of different varnishes and acrylics, and treated with different cleaning agents, it cannot be completely ruled out that components are contained in some of these substances that could damage
and soften the plastic feet. If necessary, place a non-slip mat under the device.
Do not place any objects on the device.
4. Items supplied
1 hot air fryer with smoker
1 grill plate 14
1 frying insert 16
1 pan (Plancha) 15
1 grease drip tray 12 (on the left of the device)
1 smoker tray 18 for smoking chips (on the right of the device)
2handles7
4 screws 9 for attaching the handles
1 spoon for measuring out the smoking chips
1 complete copy of the operating instructions (on the Internet)
1 copy of the short manual (enclosed with the device)
5. How to use
- Remove all packing material.

DANGER - fire hazard!
On the back of the device you will find the air outlet 4. Hot air escapes from the air outlet 4 during the operation.

Never cover the air outlets 4.
Do not use the hot air fryer indoors.
- Make sure that there is free space on all sides and above the device.
- There must be enough space behind the device so that the lid 2 can be opened completely.
NOTE: when in operation for the first time, some smoke and odour may be generated by the device. This is due to the assembly materials used for the heating element 3/13 and is not a fault in the product. Ensure adequate ventilation.
- Remove protective films and adhesive strips from the device, but do not remove the rating plate on the underside of the device.
- Check that all accessories are present and undamaged.
- Clean the device and all accessories before using for the first time (see "Cleaning" on page 59).
- Place the device on a dry, level, non-slip, heat-resistant surface.
Mounting the handles
The handles 7 must be mounted before using for the first time.
The device may only be carried by the side handles.
- Pull out the mains plug 5 if necessary.
- Open the lid 2 and remove all loose parts from the device.
- Close the lid again.
- Have the screws 9 and handles 7 ready.
- Carefully turn the device completely over and place it on the lid 2.
- Insert a handle. Please note that the ends of the handles are shaped differently and can only be inserted into the holder on the device in one way.
- Screw the handle tight and repeat the process with the second handle 7. The handles must not wobble, but must be firmly attached to the device.
- Turn the device over again.
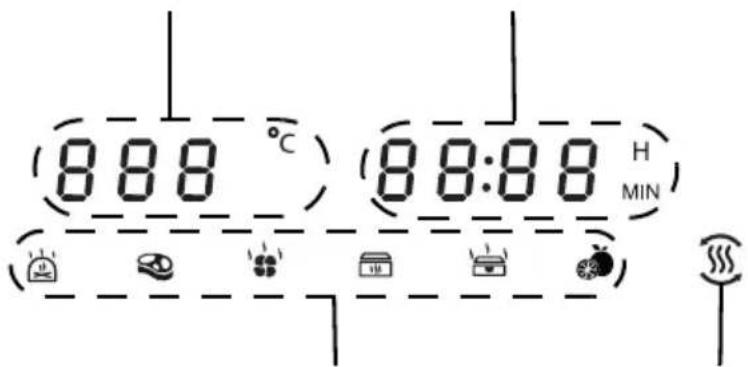
6. The touch display at a glance
19 20 21 22 24

23

25262728
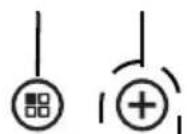
19 Button: press briefly, to switch to the next program press long: to quick scroll through the program display (see "The programs at a glance" on page 43)
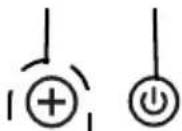
20 +/— Buttons: increase/decrease temperature 40 - 240 °C
21 Temperature display of the programs and display of the set temperature during operation
22 Time display: in minutes (MIN) and hours (H) At the start of a program: the default setting During operation: display of the remaining runtime
23+/- Buttons: increase/decrease time from 1 minute - 12 hours
24 Button: switching on/off
25 Start/Pause program
26 Preheating symbol: is lit when the device is preheating. Button: skip preheating
27 Program symbols (see "The programs at a glance" on page 43)
28 Smoker symbol: is lit when the smoker is active flashes when the smoker can be added Button: add smoker
7. The programs at a glance
The preset temperature and time specifications in the table are reference values. Depending on the quality, size and quantity of the food, and on your taste, you can vary the temperature and time.
| Symbol on the touch display | Program/Use | preset temperature (adjustable range) | preset time (adjustable range) in min. or hrs. |
| Smoker programSmoker | 120 °C(120 - 210 °C)(only when the pro-gram has been start-ed) | 4 hrs.(10 min. - 12 hrs.) | |
| -top heat only- without automatic preheating | |||
| Grill programSteaks, chops,but also vegetables for a grill pan | 240 °C(180 - 240 °C) | 10 min.(1 - 30 min.) | |
| -top heat with the lid closed-bottom heat with the lid open-with automatic preheating | |||
| Hot air programHot air fryer | 200 °C(125 - 200 °C) | 22 min.(1 min. - 1 hr.) | |
| -top heat only- with automatic preheating | |||
| Roasting programPork roast with crackling, pork roast, meatloaf | 180 °C(125 - 200 °C) | 25 min.(1 min. - 1 hr.) | |
| -top heat only- with automatic preheating | |||
| Baking programMuffins, cakes and baked goods | 160 °C(125 - 200 °C) | 30 min.(1 min. - 1 hr.) | |
| -top heat only- with automatic preheating | |||
| Drying programDehydration of fruit and vegeta-bles, e.g. apple rings | 50 °C(40 - 90 °C) | 2 hrs.(2 hrs. - 12 hrs.) | |
| -top heat only- without automatic preheating | |||
8. Using the accessories
| Accessory Function/use | |
| Grill plate 14 | ·Is always inserted into the hot air fryer. If not, ADD PAN appears on the display. ·Drains grease. Preparation with closed lid: The heat only comes from above. Well suited for the preparation of thicker pieces of meat and frozen meat. Preparation with open lid: Well suited for grilling lean pieces of meat, for example. The heat only comes from below. |
| Pan (Pancha) 15 | ·Place on the grill plate 14. Preparation with closed lid: well suited for grilling food without turning, e.g. pizza, or when little turning is required, e. g. fish. Preparation with open lid: ideal for grilling delicate foods that are turned frequently, such as vegetable slices or for baking. |
| Frying insert 16 | ·Place on the grill plate 14. ·The hot air can circulate easily through the holes in the frying insert 16. This promotes the even distribution of heat. ·For French fries, wedges, sweet potato chips, vegetables in pieces and similar food ·Fill the frying insert 16 only loosely up to the MAX 17 marking with French fries (maximum quantity: 1000 g). NOTE: for raw ingredients, mix in approx. 1/2 tablespoon of oil (e.g. sunflower or rapeseed oil). This prevents sticking to the frying insert 16 and improves the taste. This is not necessary for deep-frozen French fries and similar products, as these are already prefried. |
9. Operation

DANGER of burns!
During operation, the surfaces of the device may become hot. Do not touch any hot parts of the device such as the air outlet 4 on the back.
Use oven gloves or potholders to touch the pan 15 and frying insert 16.
During frying, hot steam escapes from the air outlet 4. Be careful not to put your hands into the steam.
Do not move or transport the hot air fryer while it is switched on.
- Only carry the hot air fryer by the side handles 7.
WARNING! Risk of material damage!
The device must not be operated under any circumstances without the grill plate 14!
9.1 Power connection
-
When the device is set up, plug the mains plug 5 into an earthed wall socket that corresponds to the specifications on the rating plate. The wall socket must also be easy to reach after switching on the device.
-
All indications on the touch display 11 are lit briefly.
- The grill plate 14 must be inserted, otherwise ADD PAN lights up on the touch display 11.
- A double acoustic signal can be heard.
- The on/off button 24 symbol lights up. The lit symbol indicates standby mode.
9.2 The touch display
On the touch display 11 there are symbols that only display functions, e.g. the preheating symbol 26.
Other symbols (also) represent a button, e.g. the start/pause button 25. The term 'buttons' is used in this instructions for buttons and keys to make the text easier to read.
9.3 Switching on/off
-
Press the button 24 to switch on the device from standby mode.
-
The 11s shows the program symbols 27 and all buttons.
- The smoker button 28 flashes.
- The temperature is not displayed and the time is displayed as 00:00.
-
If no button is pressed for 5 minutes, the device switches back to standby mode.
-
If you press the button 24 while a program is running, the program will end and done will appear on the display for a few seconds. The start screen then reappears. Press the button 24 again to switch the device to standby mode.
Once a program has been set, it must be started within the next 5 minutes by pressing 25 . If this does not happen, the device goes into standby mode.
9.4 Smoker tray

DANGER! Risk of fire !
The smoking chips must be completely cold before disposal. Under no circumstances should hot ash be disposed of with household waste. There is an extremely high risk of fire!
The smoking chips are ignited in the smoker tray. This only happens if you have made the appropriate settings on your device.
- While the smoking chips are being lit, IGN appears on the display. If a long smoking time is set, the process will repeat multiple times.
- Maximum quantity of smoking chips: Fill the smoker tray 18 to a maximum of just below the rim.
- A full smoker tray is sufficient for approx. 5 hours of smoking. You can then refill it during operation.
- The smoke produced is released into the interior via the smoke outlet 10.
- When the lid is open, no smoke is emitted via the smoke outlet 10.
-
Used smoking chips can be left in the smoker tray and used again next time.
-
Remove the cover 8 upwards.
2.Pull out the smoker tray 18. - Fill the smoker tray to just below the rim and reinsert it.
- Put the cover back in place and slide it all the way down. It must be completely closed.
9.5 Manual settings
While the device is switched on, the buttons are visible on the display 11. You can use them to change the temperature and cooking time settings at any time when the program is either selected or started.
- Use the buttons + / - 20 to set the temperature:
- Press briefly for 5^ increments. Keep pressed for fast forward/reverse.
- Use the buttons + / - 23 to set the cooking time:
- Press briefly for 1-minute increments for times up to 60 minutes. 15 minute increments for times longer than one hour.
- Keep pressed for fast forward/reverse.
- After releasing the button, the display flashes for approx. 5 seconds, then lights up and the new time begins to count down.
- The display shows H for the set hours and MIN for the set minutes.
9.6 Using Programs
NOTES:
- Make sure that the food will not touch the hot heating element 3 on the inside of the lid and becomes stuck there.
- You can shorten or skip the heating phase by pressing the button 26.
When you select a program, you can also change the following settings at any time:
- Temperature: press the setting buttons + / - 20
-
Cooking time: press the setting buttons +/- 23
-
Prepare the foods and place them in the frying insert 16 or the pan 15.
-
Place the grill plate 14 in the hot air fryer so that the fat runoff reaches into the funnel in the hot air fryer.
-
Close the lid 2.
-
Press the button 24 to switch on the device from standby mode. The entire display lights up.
-
Press the button 19 repeatedly to select the desired program.
-
The symbol of the selected program flashes.
-
T h stert/pause button 25 flashes. (The smoker button 28 also flashes during the smoker program.)
-
Press the start/pause button 25 again in order to start the program.
A heating phase now begins for all programs except smoker and dried fruit.
- The preheating symbol 26 is lit.
- The set temperature and the duration of the heating phase are displayed.
- The heating time/cooking time is counted down.
- The selected program symbol 26 is lit.
- The smoker button 28 flashes.
- At the end of the heating phase, an acoustic signal sounds and ADD FOOD appears on the display 11.
The start/pause button 25, the selected program symbol and the smoker button 28 flash.
Open the lid 2 and ...
... place the prepared food directly on the grill plate 14.
... place the frying insert 16 or the pan 15 with the prepared food on the grill plate 14.
- Close the lid 2. The cooking process is started automatically and the remaining cooking time is counted down in the cooking time display 22. The selected program symbol lights up and the smok- er button 28 flashes.
(If you press the smoker button 28, IGN appears on the display.) As long as
IGN is lit, the smoking pellets in the tray are heated until they start to smoke. After approx. 5 minutes, the full display appears again and the time is counted down. The lit smoker button 28 indicates that the smoker function has been selected as an additional function.
or
If you are using the grill plate 14, press the start/pause button 25 twice to start the cooking process with an opened lid 2. The remaining cooking time is counted down in the cooking time display 22. The selected program symbol lights up and the smoker button 28 flashes - the smoker function cannot be activated when the lid is open.
9.7 Interrupting the cooking process
You can interrupt the cooking process at any time, e.g. to check the degree of browning.
Pause with the start/pause button
-
Press the start/pause button 25.
-
The button 25 flashes.
- The program symbol flashes.
-
The time is no longer counted down.
-
Press the start/pause button 25 again to continue the cooking process.
Pause by opening the lid
-
O p e n t h e l i d 2.
-
The button 25 flashes.
- The program symbol flashes.
-
The time is no longer counted down.
-
Close the lid 2 again to continue the cooking process.
9.8 Smoker
You can run the smoker as a separate program or add it to other programs. The smoker program is started in the same way as all other programs. This program allows you to give the food a wonderfully smoky flavour.
It is important that you have placed smoking chips in the smoker tray 18 before starting the smoker function.
NOTE: the smoker function only works with the lid 2 closed. No more smoke is produced if the lid is opened when the smoker function is active. The function restarts after closing.
Use as custom program
- Press the button 19 until the smoker symbol flashes on the program display 27 and the smoker button 28 flashes.
- If required, change the setting for the time using the buttons + / - 23
- Press the start/pause button 25 to start the smoker program. IGN appears on the display. As long as IGN is lit, the smoking pellets are heated up in the tray until they start to smoke. After a few minutes, the entire display is shown and the time is counted down.
Use as an add-on to other programs
- Press the flashing smoker button 28 while another program is running. IGN appears on the display. As long as IGN is lit, the smoking pellets in the tray are heated until they start to smoke. After a few minutes, the full display is shown and the time starts to count down.
9.9 End of the cooking process
- An audio signal sounds when the program has finished. done appears on the display for a few seconds.
The ventilation continues to run for 30 seconds. - You need a plate or bowl (pre-heated if necessary).
-
To disconnect the device from the mains pull the mains plug 5 after use.
-
Open the lid 2.
- Place the food on the prepared plate / in the prepared bowl.
- Pull out the grease drip tray 12 and dispose of the collected oil.
- Allow the device and accessories to cool down before cleaning them.
NOTE: if, for example, the degree of browning does not yet meet your requirements, you can adapt the cooking process manually (see "Manual settings" on page 46). Close the lid 2 and start the cooking process again. Check the level of browning after a few minutes.
9.10 Manually stop the cooking process
While the program is running, press the button 24 to end the program. done appears on the display for approx. 10 seconds. The entire display is then shown again.
- You may select a program again.
- Or press the button 24 to switch the device to standby.
- An acoustic signal can be heard.
- The display 11 only shows the symbol 24.
- To completely switch off the device and disconnect it from the power supply, pull out the mains plug 5.
9.11 Grilling with bottom heat
Steak: This program enables grilling with bottom heat when the lid is open
- This is the right program for all foods that need to be seared and that require bottom heat, e.g. steaks.
- The cooking time is not interrupted during this program if the lid 2 is open from the start or is opened during the program.
Grilling with bottom heat with the lid 2 open is recommended, for example, when grilling delicate foods that are often turned, such as steaks or vegetable slices. - When the lid is closed, the oven switches from bottom heat to top heat.
10. Preparation tips
The hot air fryer combines many different functions in one device. You can, for example:
- fry with hot air
- grill a chicken or a roast
- bake pizza
- prepare many frozen ready meals (e.g. chicken wings, fish fingers, cheese or vegetable sticks)
- bake biscuits or muffins
- grill kebab or vegetable skewers
- dehydrate apple rings or other fruit
- use the smoker function to give the food a distinctive flavour
In this chapter you will find some tips and a cooking table with examples as a guideline for the quantity, cooking time and temperature.
- The information in the cooking table may differ from the preset times and temperatures. Due to the different properties and initial temperature of the food, it is not possible to give exact cooking times. The information in the cooking table is a guideline.
Preparation of the food
- All food must be as dry as possible when used for frying. Dry the food to be fried and remove any ice from frozen food.
- When using deep-frozen food, remove as much water and ice as possible before you put the food into the hot air fryer.
- In case of breaded food, please make sure that the breading sticks as tightly as possible to the food to be fried.
Temperature and cooking time
- For a tasty and healthy result, the information on the packaging should be observed very carefully when selecting the temperature and the cooking time.
- Only small quantities should be fried at a time.
The frying insert 16 must not be filled more than to the MAX 17 marking. - Acrylamide may be carcinogenic. In order to reduce the formation of acrylamide as much as possible, browning the food too much should be avoided.
For an even browning
- If the food (e.g. French fries or chicken nuggets) requires an even browning, give it 1 - 3 shakes or turns during the frying process.
- Use ingredients of uniform thickness or size.
Baking
Dough may never be filled directly into the frying insert 16. After preparing the dough put it into a baking tin or another heat-resistant pan (e.g. muffin liners). Then put the container holding the dough into the frying insert 16.
Package instructions
If on a package of deep-frozen food you don't find information regarding the cooking times for hot air fryers, observe the times given for convection ovens.
10.1 Cooking table
| Food Tips | Quantity (approx.) | Time* (minutes) | Tem- pera- ture* | |
| French fries 2,3 (deep-frozen prod- ucts, pre-fried) | - Program - Use the frying insert 16 | \( {500}{\mathrm{\;g}}^{2} \) | 19 190 | °C |
| \( {1000}{\mathrm{\;g}}^{3} \) | 35 190 | °C | ||
| French fries 3 (homemade, thick) | - Program - Add 1/2 tablespoon of oil and mix well - Use the frying insert 16 | 1000 g | 20 - 24 | 200 °C |
| Chicken legs 2,3 (fresh, boneless) | - Program - Use the frying insert 16 | 1000 g | 22 - 28 | 180 °C |
| Chicken nuggets (deep-frozen prod- ucts) | - Program - Use the frying insert 16 | 900 g | 18 - 22 | 180 °C |
| Fish fingers (deep- frozen products) | - Program - Use the frying insert 16 | 280 g | 8 - 10 | 200 °C |
| Courgette 2,3 | - Program - Use the pan 15 - Cut in slices - Add 1 tablespoon of oil to the pan - Cook with the lid open | 650 g | 17 - 20 | 200 °C |
| Potato pancakes | - Program - Use the frying insert 16 | 900 g | 20 | 180 °C |
| Chicken wings (deep-frozen prod- ucts) | - Program - Use the frying insert 16 | 1000 g | 15 - 20 | 200 °C |
| Ribeye steaks | - Program - Use the grill plate 14 - Grill with the lid open - If necessary, use a roast thermometer | 3 steaks, approx. 3 cm thick | 7 - 9 | 240 °C |
- Variables in bold type are to be adjusted manually.
All figures are approximate. The times may vary depending on the type and thickness of the food.
The superscript numbers ^1,2,3 have the following meaning:
1: shake or turn halfway through the cooking time.
2: shake or turn after one third and two thirds of the cooking time.
3: shake or turn after one fourth, one half and three fourths of the cooking time.
10.2 Table with meat types, degrees of doneness and the associated core temperatures
For pieces of roast meat, the cooking time and cooking temperature depend on the weight and which piece of meat you use. A good guideline is the core temperature, which you can measure with a roast thermometer.
| Degrees of doneness | |||||
| Rare | Medium Rare | Medium | Medium Well | Well Done | |
| Venison | X X 6 | 5°C 70°C | 75°C | ||
| Beef | 49°C | 54°C | 60°C | 66°C | 71°C |
| Pork | X | X | 63°C | 68°C | 71°C |
| Lamb | X | X | 63°C | 66°C | 71°C |
| Chicken | X | X | X | X | 85°C |
| Fish | X | X | X | X | 58°C |
| Burger | X | X | 60°C | 66°C | 71°C |
11. Recipes
The device is connected to the power supply and has been switched on. The grill plate is inserted and the entire display is visible. The lid is closed. The description in the recipes begins with the selection of the program.
11.1 Grilled balsamic mushrooms
Select the grill program Ingredients for 4 portions
Ingredients
400 g mushrooms, halved
1 tablespoon of oil
2 chopped garlic cloves
60 ml balsamic vinegar salt and pepper
2 tablespoons of chopped fresh parsley wooden skewers, soaked in water for
30 minutes
Preparation
- Mix the oil, balsamic vinegar, garlic, salt and pepper in a large bowl. Add the halved mushrooms and stir until the mushrooms are covered with the marinade. Cover and leave to infuse for 15 minutes.
- Skewer the mushrooms.
- Select the grill program. Set the time to 6 minutes. The temperature remains at 240^ .
- Start the program. Preheating begins.
- When preheating is complete, ADD FOOD appears on the display. Open the lid and place the skewers next to each other on the grill plate.
- Close the lid to start cooking. The time is counted down.
- After 3 minutes, turn the mushroom skewers and close the lid again.
- Once the cooking time is complete, open the lid and remove the skewers
from the device. Transfer to a serving dish and sprinkle with fresh parsley.
11.2 Smoked beef spare ribs
The cooking time depends on the size and thickness of the ribs. The aim is to bring the ribs to an internal temperature of approx. 90^ so that they become tender and crispy.
Select the smoker program
Ingredients for 4 portions
Ingredients
2kg beefribs
Spicemix:
1 tablespoon garlic powder
1 teaspoon of crushed mustard seeds or mustard powder
1 tablespoon of smoked paprika
1 tablespoon of ground black pepper
2 teaspoons salt
For brushing:
60 ml beef stock
60 ml water
2 tablespoons Worcestershire sauce
Preparation
- Place all the ingredients for the spice mix in a small bowl and stir until combined. Rub the ribs with the spice mix until they are coated.
- Pull the smoker tray out of the device. Use the small spoon to place the smoking chips in the smoker tray until it is filled to just below the rim. Push the smoker tray back into the device and reinsert the slider.
- Place the ribs on the grill plate and close the lid.
- Select the smoker program. Set the time to 5 hours. The temperature remains at 120^ .
- Start the smoker program. IGN appears on the display for a few minutes. This
means that the smoking chips are ignited. You will see IGN more often over the course of the 5 hours. This is normal. If you wish, turn the ribs after 1.5 hours.
- Add the broth, water and Worcestershire sauce to a bowl and mix together. Brush the ribs with a thin layer of this mixture several times during the last hour of the smoking time.
- The cooking process is complete when the ribs show approx. 90^ on a roast thermometer inserted into the thickest part of the ribs. Then switch off the device, leave the lid closed and leave the ribs to rest for approx. 45 minutes.
TIP: if you wish to prepare other foods in your hot air fryer, you can also warm the ribs in a preheated oven. Turn down the temperature in the oven when you put the ribs in.
- Cut into slices between the bones before serving.
11.3 Salmon burger
Select the grill program Ingredients for 4 portions
Ingredients
Salmon patties:
700g skinless salmon fillets (boneless)
1 small onion, finely chopped
100 g breadcrumbs
grated zest of half a lemon
1 teaspoon paprika
1 egg white
salt and black pepper to taste
additional:
4 hamburger buns
lettuce leaves
onion slices
mayonnaise
Preparation
- Place all the ingredients for the salmon patties in a food processor and chop until combined.
- Divide the mixture into 4 balls and carefully press them flat.
- Select the grill program. Set the time to 5 - 7 minutes. The temperature remains at 240^ .
- Start the program. Preheating begins.
- When preheating is complete, ADD FOOD appears on the display. Open the lid and place the salmon patties next to each other on the grill plate.
- Close the lid to start cooking. The time is counted down.
- Halfway through the cooking time, turn the salmon patties over and close the lid again.
- Prepare the burger buns with mayonnaise, lettuce leaves and onion slices.
- Once the cooking time is complete, open the lid, remove the patties from the device and divide them between the buns.
TIPS:
- The grilling time depends heavily on the thickness of the salmon patties. You can of course also fry the salmon patties California style. The inside remains slightly raw.
- You can also serve the salmon patties without buns.
- Graved salmon sauce or wasabi mayonnaise also taste great with this dish.
11.4 Smoky chicken thighs
Select the grill program and also the smoker
function
Ingredients for 4 portions
Ingredients
8 chicken thighs with bone and skin
Marinade:
1 1/2 tablespoons of smoked paprika
1 tablespoon onion powder
1/2 teaspoon chilli powder
1 tablespoon soy sauce
1 teaspoon dried oregano or thyme or both
1/2 tablespoon of ground black pepper
30 ml sunflower oil
Preparation
- Place all the ingredients for the marinade in a large bowl and mix until combined. Place the chicken thighs in the bowl and mix until they are coated with the marinade. Cover with cling film and place in the refrigerator for 30 minutes.
- Pull the smoker tray out of the device. Use the small spoon to place the smoking chips in the smoker tray until it is filled to just below the rim. Push the smoker tray back into the device and re-insert the slider.
- Select the grill program. Set the time to 22 minutes. The temperature remains at 240^ .
- Switch on the smoker function.
- Start the program. Preheating begins.
- When preheating is complete, ADD FOOD appears on the display. Open the lid and place the chicken thighs next to each other on the grill plate.
-
Close the lid. IGN appears on the display. The smoking chips are ignited. As soon as the display goes out, the time begins to count down and cooking begins.
-
Halfway through the cooking time, turn the chicken thighs over and close the lid again.
- When the cooking time is complete, open the lid and remove the chicken thighs from the device. Leave them to rest for approx. 5 minutes.
TIPS:
- 8 larger chicken thighs may not fit on the grill at once. In this case, you will need to grill them in two batches.
- Depending on the size of the chicken thighs, the cooking time may vary slightly.
11.5 Lemon Pepper Prawns
Select the grill program
Ingredients for 4 portions
Ingredients
Lemon Pepper Prawns:
500 g king prawns, peeled and veined
2 tablespoons sunflower oil
peel and juice of 1 lemon
salt and pepper
Salad:
chopped iceberg lettuce croutons
Dressing:
120 ml mayonnaise
2 tablespoons of grated Parmigiano Reggiano
2 teaspoons Dijon mustard
1 clove of garlic, chopped
1 tablespoon lemon juice
1 teaspoon Worcestershire sauce
salt and pepper
Preparation
-
Mix the oil, lemon juice, grated lemon zest, salt and pepper in a bowl. Add the prawns and mix.
-
Select the grill program. Set the time to 7 - 9 minutes. The temperature remains at 240^ .
- Start the program. Preheating begins.
- When preheating is complete, ADD FOOD appears on the display. Open the lid and place the skewers next to each other on the grill plate.
- Close the lid to start cooking. The time is counted down.
- Halfway through, turn the prawns over and close the lid again.
- Once the cooking time is complete, open the lid and remove the prawns from the device.
- Put all the ingredients for the dressing in a bowl and whisk them together.
- Divide the salad and croutons between the plates and pour the dressing over them. Finally, add the grilled prawns and serve.
TIP: You can add other ingredients such as baby tomatoes, cucumber or avocado and use different dressings to taste.
11.6 Smoky mixed French fries with herb mayonnaise
Select the hot air program and also the
smoker function
Ingredients for 4 portions
Ingredients for the mayonnaise
1 egg yolk
1 teaspoon mustard
125 ml sunflower oil
1 teaspoon finely chopped parsley
1 teaspoon finely chopped chervil
1 tablespoon lemon juice
salt, pepper
Ingredients for the French fries
250 g sweet potatoes
250 g waxy potatoes
2 tablespoons sunflower oil
Preparation
- To make the herb mayonnaise, place the egg yolk and mustard into a tall blender jug and blend these with a hand blender.
- While blending, pour in the oil in a thin stream until a creamy, homogeneous mixture is formed.
- Add herbs and flavour with salt, pepper and lemon juice.
- Peel, wash and pat the potatoes and sweet potatoes dry.
- Cut the potatoes and sweet potatoes into sticks about 1 cm thick and mix them with the oil in a bowl.
- Select the hot air program and change the time to 20 minutes - the temperature remains at 200^ .
- Switch on the smoker function.
- Start the program. Preheating begins.
- When preheating is complete, ADD FOOD appears on the display. Place the frying basket on the grill plate, place the potatoes in the basket and close the lid.
- IGN appears on the display. The smoking chips are ignited. As soon as the display goes out, the time begins to count down and cooking begins.
11.Shake the French fries well every 5 minutes or so. - Salt the French fries and serve them with the herb mayonnaise.
11.7 Steak Provençal style
Select the grill program Ingredients for 4 portions
Ingredients
4 steaks (175 g each)
2 tablespoons olive oil
1 teaspoon dried thyme
1 teaspoon dried rosemary
1 teaspoon dried oregano
12 teaspoon dried tarragon
salt and pepper
Preparation
- Mix the herbs, salt, pepper and olive oil and marinate the steaks in it.
- Switch on the grill program. Set the time to 12 - 14 minutes. The temperature remains at 240^ .
- Open the lid and start the program. Preheating begins.
- When preheating is complete, ADD FOOD appears on the display. Place the steaks next to each other on the grill plate.
- Leave the lid open and start the cooking process by pressing the start/pause button. The time is counted down.
- Grill the steaks with the lid open until the desired degree of doneness is reached. Turn them regularly.
- Serve with herb baguette, salad or vegetables.
11.8 Chicken Jamaican style
Select the hot air program Ingredients for 4 portions
Ingredients
1 whole chicken (approx. 1.5kg )
2 tablespoons soy sauce
2 tablespoons olive oil juice of 1 lemon
2 garlic cloves
4 cm ginger, grated
2 teaspoons chili flakes
1 tablespoon jerk spice mix
Preparation
- Wash and dry the chicken.
- Peel and chop the garlic.
- For the marinade, mix soy sauce, olive oil, lemon juice, spice mix, garlic, ginger and chili flakes in a bowl.
- Cover the chicken in marinade and leave to marinate overnight in the refrigerator.
- Select the hot air program. Set the time to 40 minutes and the temperature to 180^ .
- Start the program. Preheating begins.
- When preheating is complete, ADD FOOD appears on the display. Open the lid and place the marinated chicken on the grill plate.
- Close the lid to start cooking. The time is counted down.
- Halfway through, turn the chicken over and close the lid again.
- At the end, you can use a roast thermometer to check whether the chicken is cooked through. It should indicate around 80^ at the thickest point.
- Serve a salad with the chicken.
11.9 Courgette and aubergine skewers
Select the grill program Ingredients for 4 portions
Ingredients
12 teaspoon pepper
12 teaspoon pimento
12 teaspoon coriander
12 teaspoon dried thyme
12 teaspoon dried oregano
1 teaspoon salt
50 ml olive oil
2 aubergines
2 courgettes
2 onions
wooden skewers
Preparation
- Mix the herbs, spices and oil in a bowl.
- Cut the courgettes and aubergines into 2 cm thick slices and quarter the onions.
- Add the vegetables to the spice and oil mixture.
- Alternate the vegetables on the skewers.
- Open the lid and select the grill program. Set the time to 15 minutes. The temperature remains at 240^ .
- Start the program. Preheating begins.
- When preheating is complete, ADD FOOD appears on the display. Place the skewers next to each other on the grill plate.
- Leave the lid open and start the cooking process by pressing the start/pause button. The time is counted down.
- Turn the skewers regularly.
11.10Chocolate tartlets with a liquid core
Select the baking program Ingredients for 8 - 10 tartlets
Ingredients
75 g dark chocolate
3 eggs
75 g butter
75 g sugar
50 g flour
Preparation
- Chop the chocolate and melt it in a water bath.
- Add butter to it and let it melt as well.
- Whip the eggs and sugar until frothy.
- Sift the flour over the mixture and stir to form a smooth dough.
- Fold in the chocolate and butter mixture.
- Pour the batter into muffin moulds and place them in the pan.
- Select the baking program. Set the time to 7-10 minutes and the temperature to 160^ .
- Start the program. Preheating begins.
- When preheating is complete, ADD FOOD appears on the display. Open the lid and place the pan on the grill plate.
10.Close the lid to start cooking. The time is counted down. - Bake the chocolate tartlets and enjoy them warm.
12. Cleaning

DANGER of burns!
- Let the device cool down before moving or cleaning it.

DANGER! Risk of electric shock!
Pull out the mains plug 5 from the wall socket before cleaning the hot air fryer.
The hot air fryer must not be immersed in water.
WARNING! Risk of material damage!
- Do not clean using sharp objects or abrasive cleaning agents.
The heating elements 3 and 13 must not be wiped with a damp cloth.
NOTE: please note that water drops may still be present in cavities after drying. Allow all parts to air dry completely.
Accessories
- Remove coarse food residues.
- Grill plate 14, frying insert 16, pan 15 and the grease drip tray 12 can be cleaned in the dishwasher.
NOTE: you can also clean these parts by hand with warm water and detergent. Then rinse thoroughly with clean water.
- Soak burnt-in food leftovers beforehand.
- Let all parts dry completely before you put them away or use the device again.
Housing
- Wipe the housing from the outside with a damp cloth and a little mild detergent.
- Dry with a tea towel.
Interior
-
Clean the inside of the lid 2 with a soft sponge, a little water and mild detergent.
-
Wipe several times with a damp microfibre cloth which you should wash and wring out in between.
- Dry with a tea towel.
13. Storage
Before putting the hot air fryer away, make sure that ... ...the mains plug 5 has been pulled out, ...the device has cooled down and ...all parts are completely clean and dry.
- You can wind the power cable 5 around the cable spool 6 on the back of the device.
14. Disposal
This product is subject to the provisions of European Directive 2012/19/EC. The symbol showing a wheelie bin crossed through indicates

that the product requires separate refuse collection in the European Union. This applies to the product and all accessories marked with this symbol. Products identified with this symbol may not be discarded with normal household waste, but must be taken to a collection point for recycling electric and electronic appliances.
This recycling symbol marks e.g. an object or parts of the material as valuable for recycling. Recycling helps to reduce the consumption of raw materials and protect the environment.
Packaging
When disposing of the packaging, make sure you comply with the environmental regulations applicable in your country.
15. Trouble-shooting
If your device fails to function as required, please try this checklist first. Perhaps there is only a minor problem, and you can solve it yourself.

DANGER! Risk of electric shock!
Do not attempt to repair the device yourself under any circumstances.
| Fault | Possible causes /Actions |
| No function | Has the device been connected to the power supply? Check the connection. |
| Food not yet ready after the recommended time | Was the quantity too large or the pieces too thick? Was the temperature or cooking time set too low? |
| Formation of thick smoke and strong smell | Are there food residues on the heating element 3 that can burn during heating? The frying insert 16 must not be filled more than to the MAX 17 marking. Has the cooking time been set too long? |
| ADD FOOD | After the heating phase, open the lid 2 and add the food. |
| ADD PAN | Insert the grill plate 14. |
| done | Cooking time expired. Remove the cooked food. |
16. Technical specifications
| Model: SHLFS 2 | 200 A1 |
| Mains voltage: | 220 – 240 V ~ 50 – 60 Hz |
| Protection class: | I |
| Protection type: | IPX4 (protection against water splashes) |
| Power rating: 2 | 200 W |
Symbols used
| CE | With the CE marking, HOYER Handel GmbH declares the conformity with EU guidelines. |
| This symbol reminds you to dispose of the packaging in an environmentally friendly manner. | |
| 21PAP | Recyclable materials are marked with the recycling symbol (3 arrows). The material can be specified by the recycling number in the centre (here: 21) and/or an abbreviation (here: PAP). |
| ~ | AC voltage |
| The symbol identifies parts that can be cleaned in the dishwasher. | |
| It is a recyclable product which is subject to an extended producer responsibility and for which the rules of waste separation apply. | |
| UKCA | With the UKCA marking, HOYER Handel GmbH declares that the product is in conformity with the UKCA requirements. |
| The symbol identifies the product manufacturer. |
Subject to technical modifications.
17. Warranty of the HOYER Handel GmbH
Dear Customer,
your device is provided with a 3 year warranty starting with the purchase date. In the event of product defects, you are entitled to statutory rights against the vendor. These statutory rights are not restricted by our warranty presented in the following.
Warranty conditions
The warranty period starts with the purchase date. Please keep the original purchase receipt in a safe place. This document is required to verify the purchase.
If within three years from the purchase date of this product a material or factory defect occurs, the product will be repaired or replaced by us - at our discretion - free of charge to you, or the purchase price will be refunded. This warranty implies that within the period of three years the defective device and the purchase receipt are presented, including a brief written description of the defect and the time it occurred.
If the defect is covered by our warranty, the repaired or a new product will be returned to you. No new warranty period starts with a repair or replacement of the product.
Warranty period and statutory claims for defects
The warranty period is not extended when the warranty has been claimed. This also applies to replaced and repaired parts. Any damages and defects already existing at the time of purchase must be reported immediately upon unpacking. Repairs arising after the expiration of the warranty period are subject to a charge.
Warranty coverage
The device was produced carefully according to strict quality guidelines and tested diligently prior to delivery.
The warranty applies to material or factory defects.
Excluded from the warranty are wear parts subject to normal wear and damages to fragile parts, e.g. switches, lamps or other parts manufactured from glass.
This warranty expires if the product is damaged, not used as intended or not serviced. For the proper operation of the product, all instructions listed in the operating instructions must be observed carefully. Any form of use and handling that is advised against in the operating instructions or warned against must always be avoided.
The product is only intended for private and not for commercial use. In the case of incorrect and improper treatment, use of force and interventions not performed by our authorised Service Centre, the warranty shall cease.
Handling in case of a warranty claim
In order to ensure prompt processing of your matter, please observe the following notes:
-
Please keep the article number IAN: 474698_2407 and the purchase receipt as a purchase verification for all inquiries.
-
The article number can be found on the rating plate, an engraving, the title page of your instructions (in the bottom left), or as a label on the rear or underside of the device.
-
If faulty operation or other defects occur, first contact the Service Centre listed in the following by telephone or email.
-
Then, you are able to send a product reported as defective free of charge to the service address specified to you, including the purchase receipt and the information on the defect and when it occurred.
At www.lidl-service.com you can download this and many other manuals, product videos and installation software.

This QR code takes you directly to the Lidl Service website (www.lidl-service.com), where you can enter the article number (IAN) 474698_2407 to open your user instructions.

Service Centre
GB Service Great Britain Tel.:08004047657 E-Mail: hoyer@lidl.co.uk
IE Service Ireland Tel.: 1800 101010 E-Mail: hoyer@lidl.ie
MT Service Malta Tel.:80062230 E-Mail: hoyer@lidl.com.mt
Cy Service Cyprus Tel.:80094241 E-Mail: hoyer@lidl.com.cy
IAN: 474698_2407

Supplier
Please note that the following address is no service address. First contact the aforementioned Service Centre.
HOYER Handel GmbH
Kühnehofe 12
22761 Hamburg
GERMANY
Sommaire
11.2 Geroekte runderspareribs
Symbol recyklingu na produkt oznacza, ze produkt lub loroXXXXXXXXXXXXXXXXXXXXXXXXXXXXXXXXXXXXXXXXXXXXXXXXXXXXXXXXXXXXXXXXXXXXXXXXXXXXXXXXXXXXXXXXXXXXXXXXXXXXXXXXXXXXXXXXXXXXXXXXXXXXXXXXXXXXXXXXXXXXXXXXXXXXXXXXXXXXXXXXXXXXXXXXXXXXXXXXXXXXXXXXXXXXXXXXXXXXXXXXXXXXXXXXXXXXXXXXXXXXXXXXXXXXXXXXXXXXXXXXXXXXXXXXXXXXXXXXXXXXXXXXXXXXXXXXXXXXXXXXXXXXXXXXXXXXXXXXXXXXXXXXXXXXXXXXXXXXXXXXXXXXXXXXXXXXXXXXXXXXXXXXXXXXXXXXXXXXXXXXXXXXXXXXXXXXXXXXXXXXXXXXXXXXXXXXXXXXXXXXXXXXXXXXXXXXXXXXXXXXXXXXXXXXXXXXXXXXXXXXXXXXXXXXXXXXXXXXXXXXXXXXXXXXXXXXXXXXXXXXXXXXXXXXXXXXXXXXXXXXXXXXXXXXXXXXXXXXXXXXXXXXXXXXXXXXXXXXXXXXXXXXXXXXXXXXXXXXXXXXXXXXXXXXXXXXXXXXXXXXXXXXXXXXXXXXXXXXXXXXXXXXXXXXXXXXXXXXXXXXXXXXXXXXXXXXXXXXXXXXXXXXXXXXXXXXXXXXXXXXXXXXXXXXXXXXXXXXXXXXXXXXXXXXXXXXXXXXXXXXXXXXXXXXXXXXXXXXXXXXXXXXXXXXXXXXXXXXXXXXXXXXXXXXXXXXXXXXXXXXXXXXXXXXXXXXXXXXXXXXXXXXXXXXXXXXXXXXXXXXXXXX