
MPR-26 - Hair Straightener MPM - Free user manual and instructions
Find the device manual for free MPR-26 MPM in PDF.

| Product Type | Straightener with hot/cold air function and ionization |
| Brand | MPM |
| Model | MPR-26 |
| Power Supply | 220-240 V ~ 50-60 Hz |
| Power | 600 W |
| Temperature Range | 100 °C - 230 °C |
| Operating Modes | Straightener only, cold air, hot air, straightener + air |
| Plate Technology | Ceramic plates with mobile pressure system |
| Ionization | Built-in negative ion generator |
| Display | LED screen |
| Auto Shut-off | Switches to standby after 20 seconds of inactivity |
| Cord Length | 1.8 m |
| Plate Lock | Locking slider for storage |
| Air Filter | Removable cover to clean regularly |
| Cleaning | Wipe with a soft, damp cloth; do not immerse |
| Safety | Do not use near water; do not touch hot plates |
| Intended Use | Household use only |
| Included Accessories | No additional accessories mentioned |
| Standby Consumption | 0.72 W |
Frequently Asked Questions - MPR-26 MPM
User questions about MPR-26 MPM
0 question about this device. Answer the ones you know or ask your own.
Ask a new question about this device
Download the instructions for your Hair Straightener in PDF format for free! Find your manual MPR-26 - MPM and take your electronic device back in hand. On this page are published all the documents necessary for the use of your device. MPR-26 by MPM.
USER MANUAL MPR-26 MPM
EN W/We wish you satisfactor from using the product and more you to check a wide range of other MPM appliances.
2.1GMA KAASIN 2.1GMA KASIN
A
ESLLURACHLYLUX
PAAHAPALLL
PLAKU HILSIN UVAS
LUTABNOIAE
PROSTOWNCA
PLACALDLPAR
BbIPTMATEEBLINBCNOC
2E4LCKXNAVCAVSPWQKTHTTOOPOOO

CZ NAVCD K OBSLUZE 3
DE SEDENUNGSANLEITUNG 9
EE KASUTUSUHEND 16
EL EIXEPIOXPH2T 22
ENUSERMANUAL 29
ES MANUAL DE INSTRUCCIONES 35
FR MANUEL DE L'UTILISATEUR 42
HO HASZNALATUTASITAS 49
MANUALE D'USO 56
VARTCTOIO VADOVAS 63
LIETOTAJAROKASCRAMATA 69
NE GEBRIKERSHANDEING 75
PL N5TRUKC/AOBSLUGI 92
RO MANUAL DE UTILIZATION 89
RU/HCITPYKLLIITIOOBCYKBAHNO 96
SKPOUZIVATELSKAPRUKCA 103
UTOCISHKOPKCTYBAHA 10
MPM agd S.A.
Hot air straightening function / 'sold of air blow / 'treat heating of the fires / 'bovalable ceramic thenewed , 'sold of air blow / 'treat heating of the fires / 'bovalable ceramic thenewed / 'bovalable ceramic thenewed / 'bovalable ceramic thenewed / 'bovalable ceramic thenewed / 'bovalable ceramic thenewed / 'bovalable ceramic thenewed
BEZPECNOSTNI POKNY PRIPOUZIVANI
- Read the instructions carefully before use.
- Do not handle the device with wet hands.
- Take special care when children are near the device.
-
Do not use the device for purposes other than those for which it was intended.
-
Do not immerse the device, cable or charger in water or other liquids.
-
Do not leave the device unattended during operation.
-
Always remove the plug from the mains socket when not in use or before cleaning.
-
Never use a damaged device, including one with a damaged cord or plug, in which case have it repaired at an authorised service centre.
- Do not use the device outdoors.
- Do not hang the power cable on sharp edges or allow it to come into contact with hot surfaces.
-
Do not place the device neither on hot surfaces, nor in close proximity of other electric devices, e.g. cookers, burners, ovens, etc.
-
The device should be put on a dry, flat and stable surface.
-
The device is intended for domestic use only.
-
Always ensure that all parts of the device are correctly fitted before starting work.
- Use of accessories not recommended by the manufacturer may cause damage to the device, fire or personal injury.
- This equipment may be used by children of at least 8 years of age and by persons of diminished physical, mental capacity and lack of experience and knowledge of the equipment if supervision or instruction is provided regarding the safe use of the equipment so that the hazards involved are understood. Unsupervised children should not perform cleaning and maintenance of the equipment.
- Children are not allowed to play with the device,
- Keep the device and its cord out of reach of children under 8 years of age.
- Do not pull the plug out of the power socket by pulling the cord.
-
The equipment is not designed to operate using external timers or a separate remote control.
-
Do not connect the plug to the power socket with wet hands.
-
For the safety of children, please do not leave freely accessible parts of the packaging (plastic bags, cardboard boxes, polystyrene, etc.).
-WARNING! Do not allow children to play with the film. Danger of suffocation!
-
Check that the power supply parameters on the unit's nameplate match those of your mains supply.
-
CAUTION! Before starting cleaning and maintenance works, disconnect the device from the power supply network and wait until it cools down completely after work. Do not submerge the device into water!
-
CAUTION! Do not use sharp objects, abrasive polishes, solvents or other strong chemicals for cleaning since their use may cause damages to the device.
-
Keep the device away from water!
-
Do not use when taking a bath/shower!
-
If the device accidentally falls into water, immediately disconnect the plug from the power socket!
-
Do not touch hot parts of the device – it may burn your body!
-
Do not place the hot device on objects made of fabrics, e.g. upholstery, tablecloths, blankets, rugs, clothes, or near any other flammable objects (curtains, paper, wood, etc.) and flammable liquids!
-
Do not wind the power cord around the device!
-
For additional protection, it is advisable to install a residual current device (RCD) with a rated residual current not exceeding 30mA in the electrical circuit that supplies the bathroom. A specialist electrician should be consulted in this regard.
-
When using the device in the bathroom, disconnect it from the power source after use, as the proximity of water is constituted a hazard, even when the device is turned off.
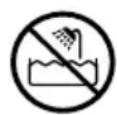
WARNING! Do not use this equipment near water.
WARNING! Do not use this equipment near bathtubs, showers, swimming pools and similar water tanks.
DESCRIPTION OF THE APPLIANCE
- Ceramic heating plates
D. Button to adjust the temperature of the straightener
- Housing
E. ON/OFF button
-
Control panel
-
Filter cover
A. Display
- Mains cable
B. Menu button
- Locking slider
C. Air control button
BEFORE FIRST USE
- Remove the device from the box, remove all bags, labels, cardboard profiles and fillers. Make sure the appliance has not been damaged during transport. Contact the seller in case of any doubts.
- Make sure the electrical mains parameters match the technical data on the appliance's rating plate.
The straightener can operate in three modes, in addition, the modes have their individual settings, which are illustrated in the table below.
| Mode Program | m: Type of air supply | supply | Supply power Temp | perature |
| Straightener - - - 100°C-230°C | ||||
| AirBLow | COOL | cool | medium/strong | - |
| WARM | warm | medium/strong | - | |
| HOT | hot | medium/strong | - | |
| Straightener with air supply | COOL | cool | medium/strong | 100°C |
| WARM | warm | medium/strong | 110°C-120°C | |
| HOT | hot | medium/strong | 150°C-210°C |
The straightener is equipped with the air ionization function (built-in generator) responsible for releasing negative ions when the appliance is turned on. Negative ions neutralize the positive charges on hair resulting with a lack of static discharge and smoothing individual hair strands.
Movable plates that equalize the pressure on the hair (pressure plate system) allow you to adjust the pressure according to the thickness of the hair strand to get the best straighten - ing results in one stroke.
-
Connect the device to a power source. Place it on a smooth, dry and even surface. Do not place it on a surface that is not heat resistant. Using the lock slider (6), open the straightener.
-
The display (3A) will show a "dashed horizontal line". Press the ON/OFF button (3E), the display will show the device's default program.
- Press the temperature control button of the straightener (3D) for 2 seconds, the display (3A) will show the temperature.
- Press the temperature control button (3D) to select your preferred temperature setting.
- The following settings are recommended:
| Hair type Temperature | |
| fine, damaged or dyed hair 100°C-170°C | |
| normal hair 190°C-210°C | |
| thick hair 230°C |
- Since the temperature level is selected, the display will flash the selected temperature, indicating that the device is heating up. When the device reaches the selected temperature and is ready for operation, the temperature on the display will stop flashing.
- Start straightening your hair. Pressing lightly, move the straightener downwards, starting from the hair roots to hair ends. Be careful not to touch the hot plates by your hands or head.
- Repeat the action all over the head, wait for the hair to cool down before combing it out.
- When you are finished, press and hold the ON/OFF button (5) for 2 seconds, then disconnect the device from the power source.
AIR SUPPLY OPERATION
- Connect the device to a power source. Place it on a smooth, dry and even surface. Do not place it on a surface that is not heat resistant. Using the lock slider (6), open the straightener.
- The display (3A) will show a "dashed horizontal line". Press the ON/OFF button (3E), the display will show the default program. Choose from three types of air supply:
cool air supply - press the menu button (3B), the display (3A) will show COOL. Press the airflow control button (3C) to select your preferred airflow settings. During operation, you can change the supply settings by pressing the (3C) button. - warm air - press the menu button (3B) until the display (3A) shows WARM. Use the airflow control button (3C) to select your preferred airflow level, then press the straightener temperature control button (3D). A large WARM sign will be displayed, indicating that the unit is switched to warm air supply mode.
- hot air - press the menu button (3B) until the display (3A) shows HOT. Use the airflow control button (3C) to select your preferred airflow level, then press the straightener temperature control button (3D). A large HOT sign will be displayed, indicating that the device is switched to hot air mode.
- Start straightening your hair. Pressing lightly, move the straightener downwards, starting from the hair roots to hair ends.
- Repeat the action on the entire head.
-
When you are finished, press and hold the ON/OFF button (5) for 2 seconds, then disconnect the device from the power source.
-
Connect the device to a power source. Place it on a smooth, dry and even surface. Do not place it on a surface that is not heat resistant. Using the lock slider (6), open the straightener.
- The display (3A) will show a "dashed horizontal line". Press the ON/OFF button (3E), the display will show the default program. Choose from three work programs:
- COOL - press the menu button (3B) until the display (3A) says COOL. Use the airflow control button (3C) to select your preferred airflow level, then press the straightener temperature control button (3D) and select your preferred straightener temperature setting. Since the temperature level is selected, the display will flash the temperature, indicating that the device is heating up. When the device reaches the selected temperatur and is ready for operation, the temperature on the display will stop flashing.
WARM - Press the menu button (3B) until the display (3A) shows WARM. Use the air control button (3C) to select your preferred air supply level, the temperature of the straightener is automatically set to 100^ and will flash to indicate that the device is heating up. When the device reaches temperature and is ready for operation, the temperature on the display will stop flashing. - HOT - press the menu button (3B) until the display (3A) says HOT. Use the airflow control button (3C) to select your preferred airflow level, then press the straightener temperature control button (3D) to select your preferred straightener temperature. When the device reaches the selected temperature and is ready for operation, the temperature on the display will stop flashing.
- Start straightening your hair. Pressing lightly, move the straightener downwards, starting from the hair roots to hair ends.
- Repeat the action on the entire head.
-
When you are finished, press and hold the ON/OFF button (5) for 2 seconds, then disconnect the device from the power source.
-
Place the device on a heat-resistant surface.
-
A peculiar smell may arise when used for the first time. This is a normal occurrence and will disappear the next time you use the device.
It is possible that some smoke may develop during use. This may be due to the evaporation of sebum or cosmetic residues, such as leave-in conditioner, varnish or moisture left in the hair.
It is also normal for a crackling sound - this is the noise generated by the ion generator.
AUTOMATIC SWITCH-OFF
The straightener automatically enters sleep mode after 20 seconds of inactivity, and the display shows "stand-by". To exit the stand-by mode, press the button on the control panel or close the straightener.
The device should be kept clean in order to ensure its proper functioning.
Follow the rules below before cleaning.
- Always disconnect the device from the electrical outlet after use and before cleaning.
-
After the straightener has cooled down, its casing and plate can be wiped with a soft, damp cloth.
-
To clean the filter, remove the filter cover by pulling the cover away from the device. Use a cloth or soft brush to remove any debris from both the filter mesh and its cover.
- Install the filter cover back into place, the cover will lock automatically due to the built-in magnets.
- Do not wrap the cord around the appliance, instead wind it loosely at the side.
- For easy storage, the plates can be closed and locked. To lock, close the plates and move the lock slider (9).
CAUTION! Do not heat the device in the closed position.
CAUTION! Do not use sharp objects, abrasive polishes, solvents or other strong chemicals for cleaning since their use may cause damages to the device.
TECHNICAL DATA
| Model MPR-26 | |
| Power supply 220-240V | ~50-60Hz |
| Power 600 W | |
| Off and standby mode available available | |
| Power consumption in standby mode - | |
| Power consumption in off mode - | |
| Power consumption in standby mode with display | 0.72 W |
| Power consumption in network standby mode | - |
| It automatically goes into standby mode after - | |
| Automatically goes into shutdown mode after - | |
| Network standby mode, if the device has a connection function with the appli-cation | - |
| Length of mains cable 1.8 m |

CAUTION! MPM agd S.A. reserves the right to technical changes.
Proper disposal of the product (waste electrical and electronic equipment)
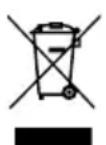
Marking on the product indicates that after the service-life of the product expires, it should not be disposed with other type of municipal waste. Used equipment may have a negative impact on the environment and health of people due to potentially containing hazardous substances, mixtures and components. Mixing electric waste with other types of waste or disassembling those in an unprofessional manner may cause a release of substances that are hazardous to the environment and health.
Used equipment should be handed-over to a point for collection of electric waste. In order to obtain detailed information regarding the electric waste collection points, the user should contact the municipal point of electric waste collection or used equipment processing department.
BESCHRIJVING VAN HET APPARAAT
- Keramische kookplaten
- Behuizing
- Bedieningspaneel
A. LCD-display
B. Menuknap
C. Luchtregelknop
PRACA WTRYBIE PROSTOWNICY
PRACA WTRYBIE PROSTOWNICY Z NAWIEWEM
COBETbI NO TEXHnKE B3OpACHOCTN INCNoJIb3OBAHn
-Пожалуніста,Внима teльно почтіte руково дъвпользова-tеля поед И спюльзовадан.
- He Āděpχīnte πριδόρ mokρbīmnypkamn.
-Будъпраздьно octopoxны,Когда ряdomс пибором HaxodЯТСДETN.
- He n cnoIb3yIte npI6op Hn dIy KaKnx ceJe, KpOme KaK no Ha3HaueHIO.
- He noprjkaite npibop, shnpy n Bnilky B Body nIi npyrne XndKoCTN.
- He octabla Te np6op 6e3 npncmoTpa BO BpeMa pa6oTbI.
- Bcerda BbIHMaIte BnIky n3 pO3eTKn, KOrda Bbl He nCNoJb3yeTe np6op nll nepeD hauaIOM ouNCTkn.
- He n cnojbl3yIte noBpeJdeHbI np6op, daJke ecIi cTeBOi Ka6eJIb IJIi BnIka NoBpeJdeHbI, B 3TOM Clyuae OTpeMOHTnpYiTe np6op B aBTOpN3OBAHHOM cepBnCHOM ceHTpe.
- He nscnojIb3yIte npnbop Ha oTKpbITOM Bo3dyXe.
- He Beisha Te Shnpy nnta Hn OctpbIe Kpa I He dOnyckaTe erO cOpNIKOCHOBENr C rOpAynM N NOBepxHOCTaMn.
- He cTaBbTe npi6op Ha ropeyne nobepxHocTn npaOM C pyrnmn 3JeKToPnp6Opamn, ropekamn, pIITamn, dYXOBKaMn n T. D.
-Помecтinte устpoиctBO Ha cyxyIO,poBHyIO u yCTOuINByIO NO-BepxHOCTb.
-Прибор педназаун.Toько дя 6ыITOBORO ИспОьБанЯ.
- Перац налом рабов BCeгда убетсь в правлбости установ BCex KOMnoHETOB UCTPOИCTBa.
- Историяахочьаров, He pekomeндоваHHbIX npOuN3BODHTeIeM, MoKTe npINBeCTn K NOBpeJdeHnIO yCTpoiCTBa, BO3RopAHIO IJI TpaBMam.
- ΘTO obOpudobAHne moKet nCNoIb3OBaTbcra DeTbMn B BO3paCTe He MeHee 8 JeT, a TaKxe JIncAmn C OrpaHnueHHbIMn fN3NuCeCKIMN ININ YmCTBeHHbIMn CnOCo6hOCTaMn, a TaKxe JIncAmn C HeDIOCTaTOUHbIM ONbITOM N 3HaHnYMaMn ObOpudobAHn, pRn YCIOBn, uTO obEcneuBaETcra Ha6JIouDeHne ININ INHCTpykTaJx O TOM, KaK 6e3OpaCHO nCNoIb3OBaTb ObOpudobAHne, uTo6bl
IPEEd IEPBbIM NcNoJIb3OBAHnEM
- Pacnakyute yctpoictbo n3 kaptoHHo Kopo6kn, ydaHnte naKeTbI, 3tkeKtn, DCn HanoHHTeIN. Ocmotpnte npnbop Ha npedmet NOBpeKdEHN, KOtOpbIE MOY T Bo3HKnHyTB BO Bpemr TpaHcnpoptipOBKn. Ecn y Bac eCTb KaKne-Jn6o comHeHn, o6paTntecb K CBOeMy DInepy.
- Y6eIntecb, yTO npaMeTpbl BaJero CeTeBOrO NITaHnA COOTBeTCTBYOT TexHnueckm DaHnHbIM Ha nacnopTHoN Ta6nUKe npOdykTa.
NcIIOJIb3OBAHNE BblIPrMNTEJIa
BbipramteIb moKet pa6oTaB B Tpex peximax pa6oTbI, Kpome toro, pexmbi pa6oTbIMeOT CBOHnINBnDyalbHbIe HacTpoIKN, KOtOpBIE npNBedeHbIB Ta6nue HnKe.
PABOTA C BblIPMNTEJEM
- ПОДКЛЮЧИТЕ усточь К ИСТОУнку петаши. ПОмecтinte Ha Гадkyю, cyхю И ровуню NOBERXHOCTB. He pa3meшайte Ha NOBERXHOCTN, KOTOpbIe He yCTOчUNBbl K BBICOKOД Temперatype. Cnomoцью NOJ3yHka 6JOKINPOBKN (6) OTKpoIJTe BblpmaTne.
- Ha dinçnnee (3A) 6yndeT oTo6paXaTbcra «nyHKtnpHa rOpu3oHTaJIbHa JInHna». HaJxMnte KhoNky BKJI/BblKJI (3E), Ha dinçnnee oTo6pa3ntcra nporpaMa yCTpoiCTBaNo yMOJuaHIO.
- Haxmnte KhoNky perynipOBKn Tempeatypbl BbInpMaTeTn (3D) n ydepxnbaiTe ee B TeueHne 2 cekynd, temepaotypa oTo6pa3ntcna Ha dincnnee (3A).
- Haxmte KhoNky perynilpoBkn Tempepatb (3D), yTo6bl BbIbpaTb npeInoTuTeNbHbIe HaCTpOuKn TempepatbI.
- Mbl pekomehnyem cJeDyUoIne HacTpoKn:
rpeBaetc. KOrda yctpoiCTBO DoCTnHET Bbl6paHHoT TempeatypbI N 6ydt roTOBO K pa6ote, TemepaTypa Ha DnCnnee nepectaHET MIRATb.
WARM - Нжима Te Кноку Meю (3B) до Тх по, Рoka на диспee (3A) He оTO-6paNTc WARM. Быберп Te Лаевь BO3dUshOro NOTOKa C NOMOUIKнОКи уравлия BO3dUshbIM NOTOKOM (3C), TempepaTpa BblpmaITeЯ abTomaTnueckn yctahablnBaETcna 100°C n 6ydt MiraTb, a 3NaHT arperat HarpeBaetc. Korda yctpoiCTBO harpeeTc n 6ydt rOTOB K pa6ote, TempepaTpa Na dIscPJIepepeCTaHET MiraTb.
HOT - habима Te KhoNK MeHIO (3B) Do Tex nop, noka Ha dncnnee He noBaNTcna Hndnscb HOT (3A). C nomoobu KhoNK u npabneHn a NOTOKOM Bo3dyxa (3C) Bbl6epnte npednoTtTeNbHbI yPOBeHb NOTOKa BO3dyxa, 3aTEM haxMnte KhoNK pyernynnpoBKN TempepaTypbI BblnpaMTeJra (3D), UTO6bl Bbl6paTb npednoTtTeNbHyTO TempepaTypy BblnpaMTeJra. Korda yCTpoNCTBO DOCTURHT Bbl6paHHoN TempepaTypbI N 6ydeT rOToBO K paBoTe, TempepaTaPaHa dncnnee nepectaHET MIRaTb.
- HauHnTe BbInpmaTb BOIOcbl. C IeRKM HaXmOM DBNrAaTe BbInpMaMItb BHn3, OT KOpHeN K KOHcAm.
- Повторе Deиства по Всей rolove.
- KOrda 3aKoHnTe, HaxMnte n ydePknBaIte KhoNky BKJI/BblKJI (5) B TeueHne 2 CeKYnD, 3aTeM OTKnIOUHTe YcTPOINCTBO OT NCTOuHnKa PNTaHnJ.
KOMMEHTAPIN
- Помechтite пибор на Термocтой Кю NOВерхноctь.
CneuΦnueckn 3anax moKet nOBtbc npn erO nepBOM nCNoJb3OBaHn. To HopMaJIbHOe RAJIeHne, KOTOpoe NCye3aET npn CNeDyUoIeM NcNoJb3OBaHn yCTPOICTBa.
He NCKIIOUeHO, UTO BO Bpemr NCNOJb3OBaHnRA NOBNTcR IeKn DbIM. 3TO MOKeT 6bITb CBraHO C nCnpaHnEM KOxHOrO CaJa ININ OCTaTKOB KOCMeTnKn, TaKnx KaK HeCMbIBaEmbl KOHNzIOHep, NaK dNBAONOC ININ OCTaBShaRC B BOLOCAx Bnara. - HopMaJIbHbIM RAJIeTcI N 3ByK, HAnOMHaIOUcN IOTpeCKnBaHne - 3TO 3ByK, XapaK- TepHbI dIy IOHHOro rHehepaTopa.
ABTOMATNUECKOE OTKJIIOUOHEHNE
Bbipmntb abTomatnueckn nepexoNT B cnaun pexm nocne 20 cekynd 6e3dei-CTBn, a Ha dncnlee noaBnaetc naDnscb «stand-by>. UTo6bl BbInu n3 cnaeero pekma, HAKMTe KhoNky Ha naHeJn ynpablenn nn 3akpoTe Bbipmntb.
CHCTKAIOBCJIYJXINBAHNE
Legible signature of the buyer