
DCCS1100 - Electric sprayer DEWALT - Free user manual and instructions
Find the device manual for free DCCS1100 DEWALT in PDF.

| Product type | Cordless electric sprayer for concrete chemicals |
| Brand | DeWalt |
| Model | DCCS1100 |
| Battery voltage | 18 V DC |
| Tank capacity | 15 L maximum |
| Maximum water pressure | 150 PSI |
| Maximum flow rate | 3 L/min |
| Weight (tank full of water) | 24 kg |
| Weight (empty, without battery) | 9 kg |
| Dimensions (L x W x H, without harness) | 380 x 236 x 558 mm |
| Hose length | 1.4 m |
| Admissible water temperature | 4 °C to 40 °C |
| Compatible batteries | DeWalt DCB181, DCB182, DCB183, DCB184, DCB185, DCB187, DCB188, DCB189, DCB546, DCB547, DCB548, DCB549, DCBP034, DCBP518, DCB18800, DCBP318 |
| Compatible chargers | DCB104, DCB107, DCB112/DCB1102, DCB115/DCB1104, DCB117/DCB1112, DCB118, DCB132 |
| Package contents | Sprayer with harness, hose, lance, 6 nozzles, instruction manual |
| Flow rate adjustment | 10-position flow rate variator |
| Battery charge indicator | On the lance handle (3 green LEDs) |
| Safety | Automatic shutdown in overpressure, trigger lock, IPX protection? |
| Maintenance | Rinse with clean water after each use; clean filters and nozzles regularly |
| Warranty | See manual (not specified) |
Frequently Asked Questions - DCCS1100 DEWALT
User questions about DCCS1100 DEWALT
0 question about this device. Answer the ones you know or ask your own.
Ask a new question about this device
Download the instructions for your Electric sprayer in PDF format for free! Find your manual DCCS1100 - DEWALT and take your electronic device back in hand. On this page are published all the documents necessary for the use of your device. DCCS1100 by DEWALT.
USER MANUAL DCCS1100 DEWALT
English (original instructions) 27

natural_image
Icon of a person using a laptop inside a circle (no text or symbols)www.DeWALT.eu
DCCS1100
Fig. A

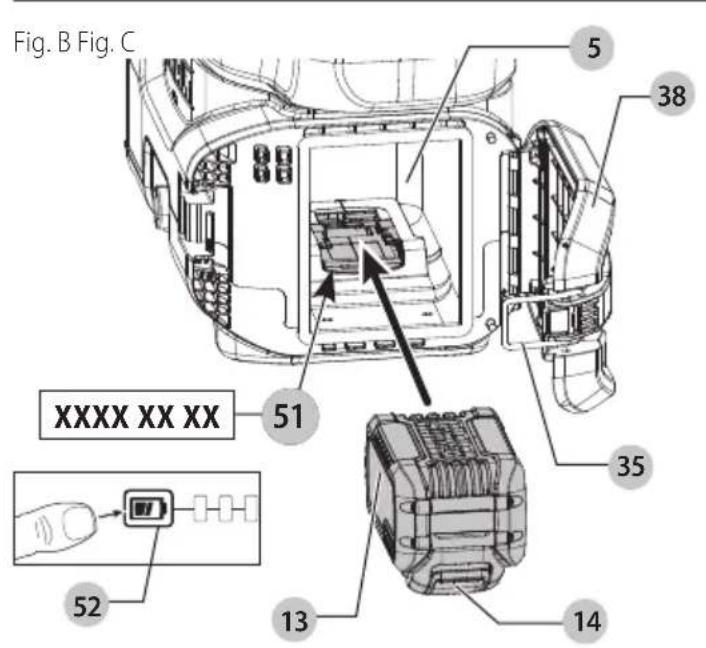
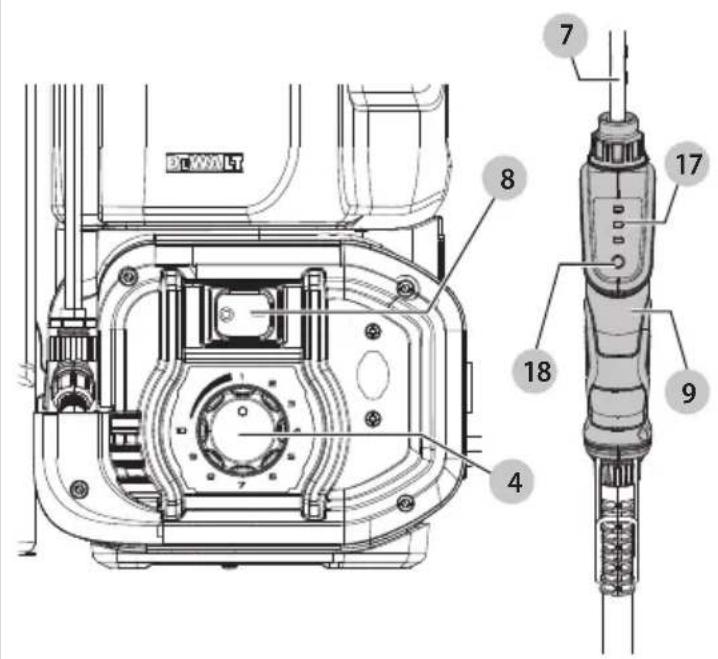
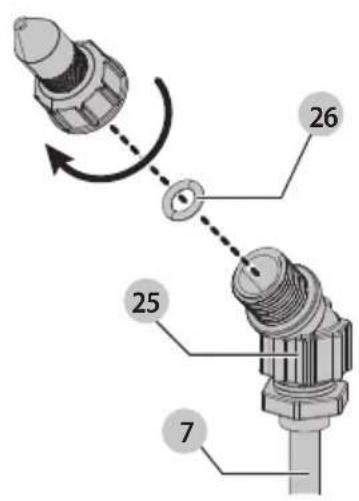
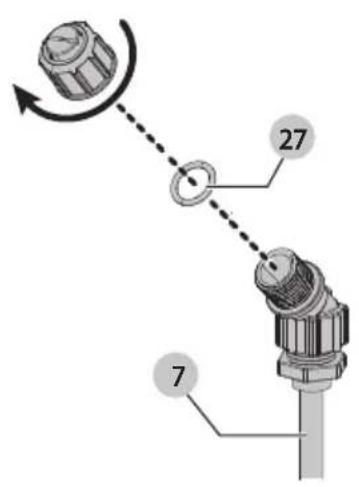
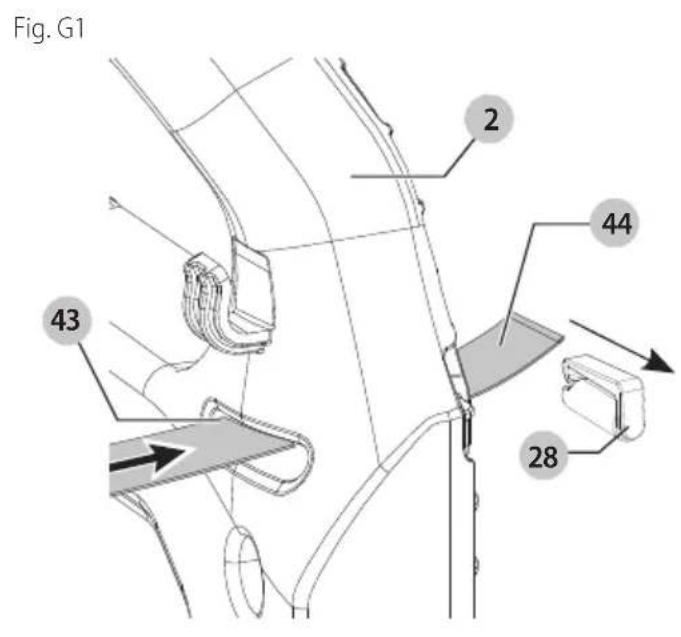
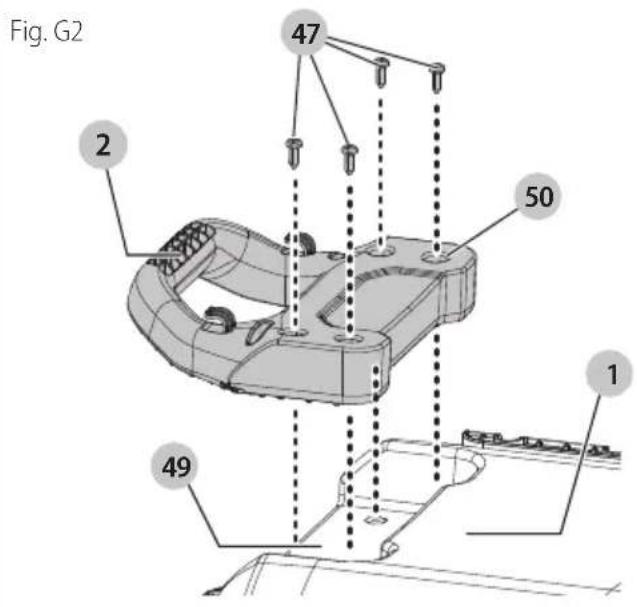
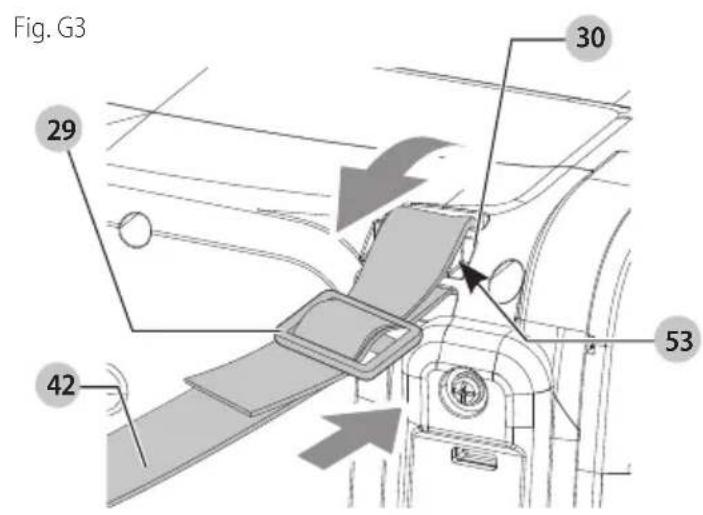
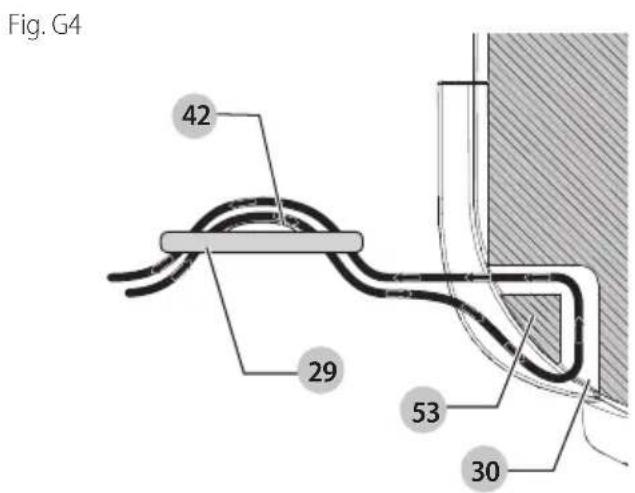
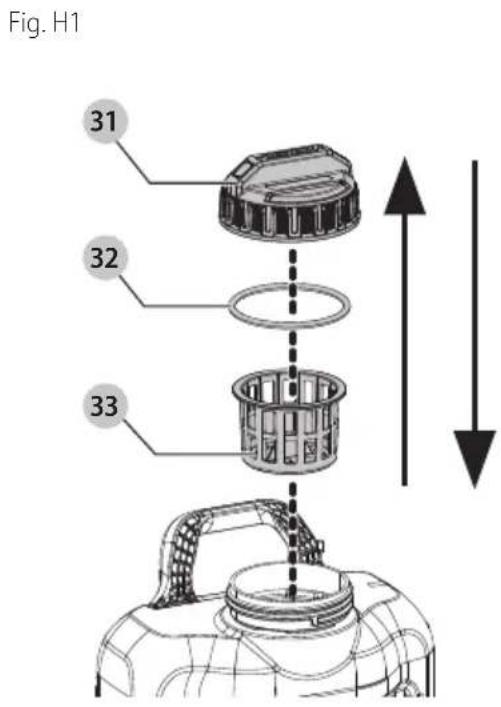
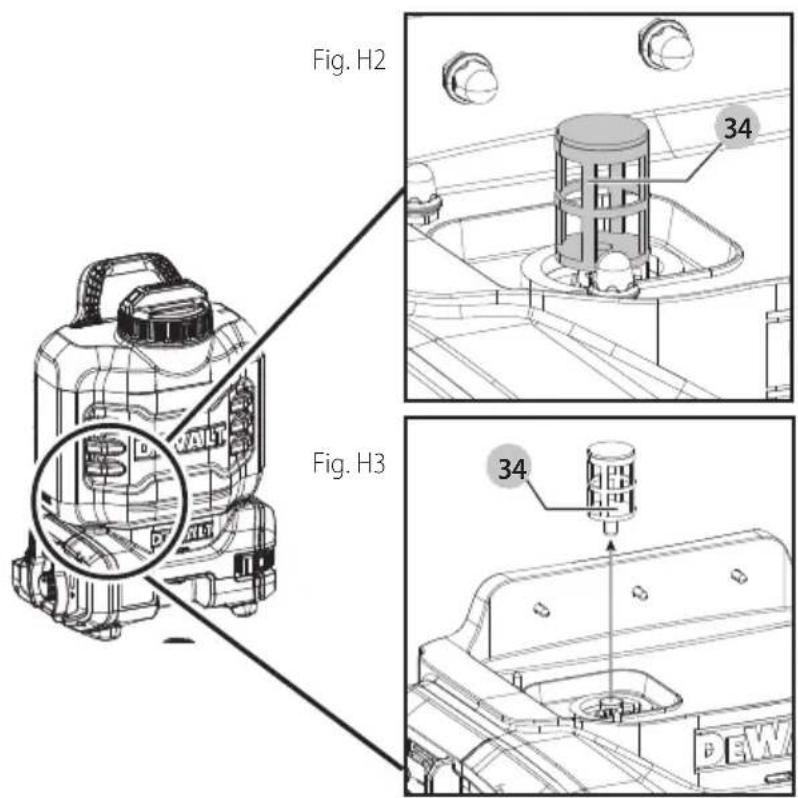
Fig.11

Fig.12
natural_image
Technical illustration of two mechanical components with internal channels and a numbered label '46' (no text or symbols on the diagram itself)Fig. 13 Fig. 14
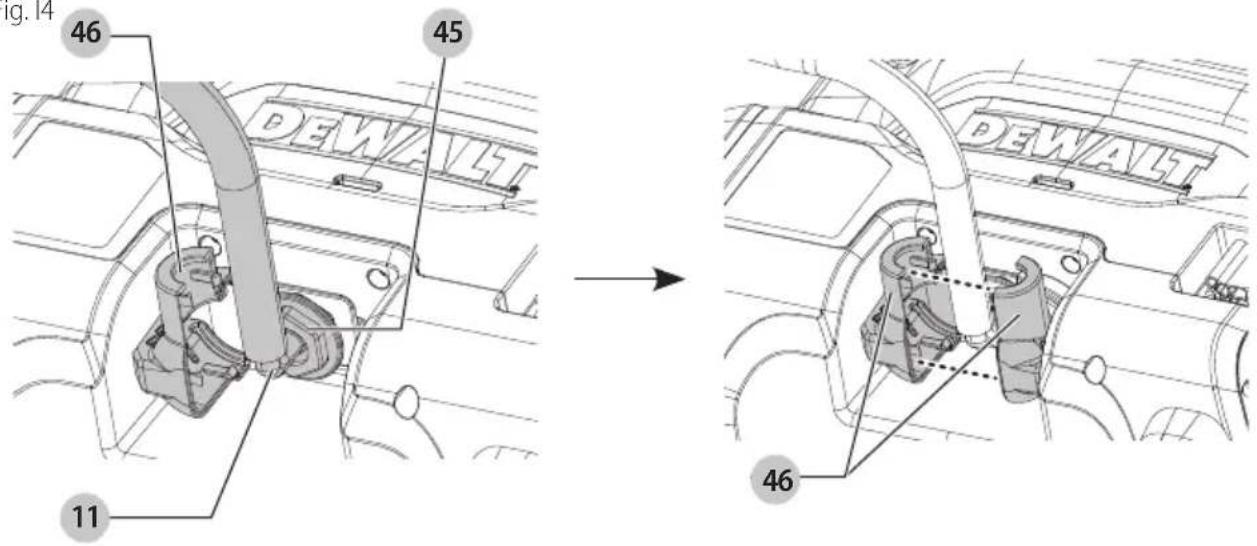
Fig. 15
natural_image
Technical line drawing of a mechanical assembly with no visible text or symbolsFig. J
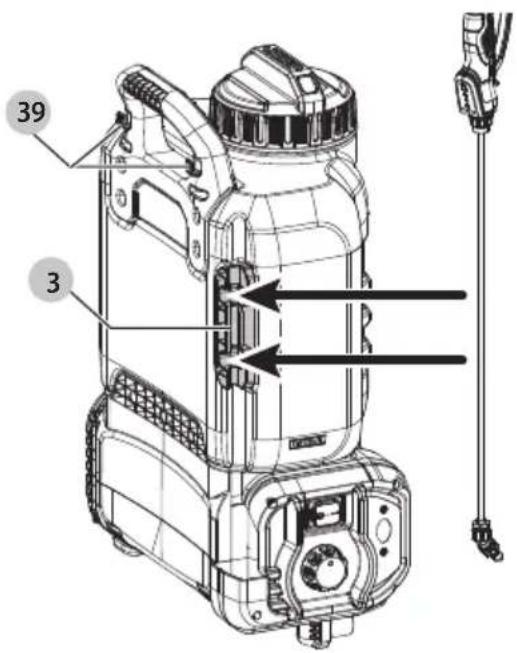
Fig. K
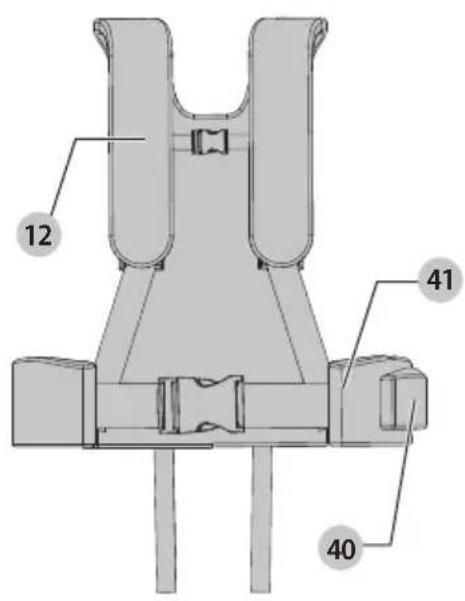
Fig. L
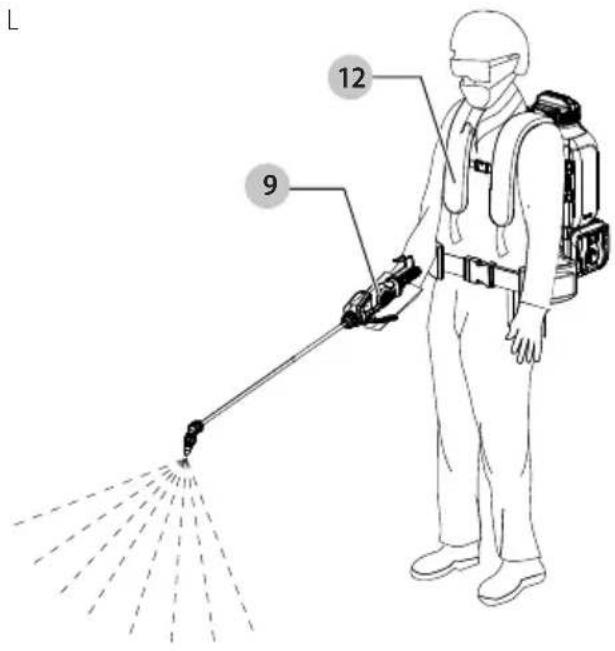
Fig. M
18V KEMIKALIESPR∅JTE TIL BETON
DCCS1100
Aetyder fare for elektrisk stød.
Aetyder risiko for brand.
GENERELLE SIKKERHEDSADVARSLER FOR ELVÆRKT∅JER
For at reducere risikoen for personskade:
FLOWDIAGRAM FOR DYSER
*For direct access, replace "xxx" with the product's model number given on the product rating label or packaging.
- Instruction Manual
• Declaration of Conformity (DoC) - Product Emission Data (PED): Information about Noise, Vibration and Dust (not applicable for all products)

WARNING: Read all safety warnings, instructions, illustrations, and specifications in this manual, including the battery and charger sections provided in an original tool manual or the separate Batteries and Chargers manual. Manuals can be obtained by contacting
Customer Service (refer to the back page of this manual).
Technical Data
| DCCS1100 | ||
| Type 1 | ||
| Power source DC | ||
| Battery voltage V | DC | 18 |
| Weight (with water) Kg 24 | ||
| Weight (without water and battery) Kg 9 | ||
| Max water capacity | L | 15 |
| Max water temperature | °C | 40 |
| Min water temperature | °C | 4 |
| Dimensions (L*W*H) (without harness) | mm | 380*236*558 |
| Max water pressure | PSI | 150 |
| Max flow rate | L/min | 3 |
| Hose length | m | 1.4 |
Definitions: Safety Guidelines
The definitions below describe the level of severity for each signal word. Please read the manual and pay attention to these symbols.
▲ANGER: Indicates an imminently hazardous situation which, if not avoided, will result in death or serious injury.
WARNING: Indicates a potentially hazardous situation which, if not avoided, could result in death or serious injury.
NAUTION: Indicates a potentially hazardous situation which, if not avoided, may result in minor or moderate injury.
NOTICE: Indicates a practice not related to personal injury which, if not avoided, may result in property damage.
▲ denotes risk of electric shock.
▲ denotes risk of fire.

GENERAL POWER TOOL SAFETY WARNINGS
WARNING: Read all safety warnings, instructions, illustrations and specifications provided with this power tool. Failure to follow all instructions listed below may result in electric shock, fire and/or serious injury.
SAVE ALL WARNINGS AND INSTRUCTIONS FOR FUTURE REFERENCE
The term "power tool" in the warnings refers to your mains-operated (corded) power tool or battery-operated (cordless) power tool.
1) Work Area Safety
a) Keep work area clean and well lit. Cluttered or dark areas invite accidents.
b) Do not operate power tools in explosive atmospheres, such as in the presence of flammable liquids, gases or dust. Power tools create sparks which may ignite the dust or fumes.
c) Keep children and bystanders away while operating a power tool. Distractions can cause you to lose control.
2) Electrical Safety
a) Power tool plugs must match the outlet. Never modify the plug in any way. Do not use any adapter plugs with earthed (grounded) power tools. Unmodified plugs and matching outlets will reduce risk of electric shock.
b) Avoid body contact with earthed or grounded surfaces, such as pipes, radiators, ranges and refrigerators. There is an increased risk of electric shock if your body is earthed or grounded.
c) Do not expose power tools to rain or wet conditions.
Water entering a power tool will increase the risk of electric shock.
d) Do not abuse the cord. Never use the cord for carrying, pulling or unplugging the power tool. Keep cord away from heat, oil, sharp edges or moving parts. Damaged or entangled cords increase the risk of electric shock.
e) When operating a power tool outdoors, use an extension cord suitable for outdoor use. Use of a cord suitable for outdoor use reduces the risk of electric shock.
f) If operating a power tool in a damp location is unavoidable, use a residual current device (RCD) protected supply. Use of an RCD reduces the risk of electric shock.
3) Personal Safety
a) Stay alert, watch what you are doing and use common sense when operating a power tool. Do not use a power tool while you are tired or under the influence of drugs, alcohol or medication. A moment of inattention while operating power tools may result in serious personal injury.
b) Use personal protective equipment. Always wear eye protection. Protective equipment such as a dust mask, non-skid safety shoes, hard hat or hearing protection used for appropriate conditions will reduce personal injuries.
c) Prevent unintentional starting. Ensure the switch is in the off-position before connecting to power source and/or battery pack, picking up or carrying the tool. Carrying power tools with your finger on the switch or energising power tools that have the switch on invites accidents.
d) Remove any adjusting key or wrench before turning the power tool on. A wrench or a key left attached to a rotating part of the power tool may result in personal injury.
e) Do not overreach. Keep proper footing and balance at all times. This enables better control of the power tool in unexpected situations.
f) Dress properly. Do not wear loose clothing or jewellery. Keep your hair and clothing away from moving parts. Loose clothes, jewellery or long hair can be caught in moving parts.
g) If devices are provided for the connection of dust extraction and collection facilities, ensure these are connected and properly used. Use of dust collection can reduce dust-related hazards.
h) Do not let familiarity gained from frequent use of tools allow you to become complacent and ignore tool safety principles. A careless action can cause severe injury within a fraction of a second.
4) Power Tool Use and Care
a) Do not force the power tool. Use the correct power tool for your application. The correct power tool will do the job better and safer at the rate for which it was designed.
b) Do not use the power tool if the switch does not turn it on and off. Any power tool that cannot be controlled with the switch is dangerous and must be repaired.
c) Disconnect the plug from the power source and/or remove the battery pack, if detachable, from the power tool before making any adjustments, changing accessories, or storing power tools. Such preventive safety measures reduce the risk of starting the power tool accidentally.
d) Store idle power tools out of the reach of children and do not allow persons unfamiliar with the power tool or these instructions to operate the power tool. Power tools are dangerous in the hands of untrained users.
e) Maintain power tools and accessories. Check for misalignment or binding of moving parts, breakage of parts and any other condition that may affect the power tool's operation. If damaged, have the power tool repaired before use. Many accidents are caused by poorly maintained power tools.
f) Keep cutting tools sharp and clean. Properly maintained cutting tools with sharp cutting edges are less likely to bind and are easier to control.
g) Use the power tool, accessories and tool bits, etc. in accordance with these instructions, taking into account the working conditions and the work to be performed. Use of the power tool for operations different from those intended could result in a hazardous situation.
h) Keep handles and grasping surfaces dry, clean and free from oil and grease. Slippery handles and grasping surfaces do not allow for safe handling and control of the tool in unexpected situations.
5) Battery Tool Use and Care
a) Recharge only with the charger specified by the manufacturer. A charger that is suitable for one type of battery pack may create a risk of fire when used with another battery pack.
b) Use power tools only with specifically designated battery packs. Use of any other battery packs may create a risk of injury and fire.
c) When battery pack is not in use, keep it away from other metal objects, like paper clips, coins, keys, nails, screws or other small metal objects, that can make a connection from one terminal to another. Shorting the battery terminals together may cause burns or a fire.
d) Under abusive conditions, liquid may be ejected from the battery; avoid contact. If contact accidentally occurs, flush with water. If liquid contacts eyes, additionally seek medical help. Liquid ejected from the battery may cause irritation or burns.
e) Do not use a battery pack or tool that is damaged or modified. Damaged or modified batteries may exhibit unpredictable behaviour resulting in fire, explosion or risk of injury.
f) Do not expose a battery pack or tool to fire or excessive temperature. Exposure to fire or temperature above 130 °C may cause explosion.
g) Follow all charging instructions and do not charge the battery pack or tool outside the temperature range specified in the instructions. Charging improperly or at temperatures outside the specified range may damage the battery and increase the risk of fire.
6) Service
a) Have your power tool serviced by a qualified repair person using only identical replacement parts. This will ensure that the safety of the power tool is maintained.
b) Never service damaged battery packs. Service of battery packs should only be performed by the manufacturer or authorised service providers.
Safety Rules for Concrete Chemical Sprayers
WARNING: When using an electric sprayer, basic safety precautions should always be followed to reduce risk of fire, electric shock, and personal injury, including the following:
- Do not leave the sprayer when connected to power source. Remove the battery pack when not in use and before servicing.
- Do not allow sprayer to be used as a toy. Close attention is necessary when used by or near children.
- Use this sprayer ONLY as described in the manual. Use only recommended attachments.
- Do not use this sprayer if it is showing signs of malfunction in any way. If the sprayer is not working correctly, has been dropped, damaged, or dropped into water, return it to a service centre.
- Keep hair, loose clothing, fingers, and all body parts away from the openings and moving parts.
- Turn off all controls before disconnecting from power source.
- Use extra care when being used on stairs.
Additional Safety Instructions
WARNING: Read all safety warnings and all instructions. Failure to follow the warnings and instructions may result in electric shock, fire, and/or serious injury.
To Reduce Risk of Injury:
- Avoid dangerous environmental conditions – Do not use electric sprayer in damp or wet locations. Don't use the sprayer in the rain.
- Use the right sprayer – Do not use this sprayer for any application except that for which it is intended.
- Keep children, bystanders and animals away from the work area when operating the sprayer.
- Maintain sprayer with care. Keep sprayer clean for best and safest performance. Follow instructions for proper maintenance.
- Stay alert – Watch what you are doing. Use common sense. Do not operate sprayer when you are tired.
- DO NOT point sprayer stream at anyone, including yourself.
▲ANGER: Risk of fluid injection and laceration. When using the high-pressure setting, DO NOT allow the high-pressure spray to come in contact with unprotected skin, eyes, or with any pets or animals. Serious injury will occur.
- DO NOT attempt to clear clogs from sprayer without first removing the battery.
• DO NOT immerse any part of the sprayer in liquid. - DO NOT use sprayer if switch does not turn it on or off. A sprayer that cannot be controlled with the switch is dangerous and must be repaired.
• DO NOT overreach. Keep proper footing and balance at all times. - Never leave sprayer running unattended. Turn power off.
- Store idle sprayer. When not in use, the sprayer should be stored in a dry, high or locked-up place - out of reach of children.
- Instructions for compatible batteries and chargers are included for reference in this manual. Read all instruction manuals included with your battery pack or charger. Read all cautionary markings on the charger and battery pack.
- Disconnect the battery pack from the sprayer before making any adjustments, changing accessories, servicing, moving or storing the sprayer. Such preventative safety measures reduce the risk of accidental spraying.
- DO NOT charge when the battery pack is below 4.5 °C or above 40 °C. Do not store or use the tool and battery pack in locations where the temperature may reach or exceed 40 °C.
IMPORTANT SAFETY INSTRUCTIONS
ANGER: RISK OF DEATH, SEVERE PERSONAL INJURY AND/OR PROPERTY DAMAGE FROM IMPROPER CHEMICAL USE OR MIXTURE.
WARNING: Explosion hazard. Use only a fluid having a flash point higher than 140 °F (60 °C). See container label or the fluid's Safety Data Sheet (SDS).
- Spraying flammable or combustible chemicals can create combustible fumes that could be ignited, causing an explosion.
WARNING: Do not mix different chemicals.
- Never use sealant.
- Use only chemicals indicated for spraying applications. Some chemicals may create a toxic or other hazardous atmosphere when sprayed.
- Always refer to chemical manufacturer's instructions and/or the chemical Safety Data Sheet (SDS) for proper mixture and safe application.
WARNING: RISK OF PERSONAL INJURY AND/OR PROPERTY DAMAGE DUE TO CHEMICAL EXPOSURE.
- Read and understand the entire instruction manual before using this sprayer.
- Follow all instructions and precautions in the instruction manual when using this sprayer.
- Read and follow all instructions and precautions on chemical manufacturer's label of chemicals used in this sprayer.
- Use the appropriate Personal Protective Equipment (PPE) as recommended by the chemical manufacturer and/or refer to the chemical Safety Data Sheet (SDS) of the chemical being used. This includes at least goggles, gloves, proper respiratory protection, and protective clothing. Failure to use appropriate PPE could result in chemical exposure through skin contact, eye contact, inhalation, or other means.
• After initial assembly, extended storage, or any possibly damaging event, such as a fall, always inspect the sprayer for damage, and test it with plain water to check for proper function.
Ensure all connections are secure and leak free, and the hose is free from damage, prior to using the sprayer with chemical.
• Always inspect the hose and all connections before each use. A damaged hose or loose connections could result in an uncontrolled high pressure discharge of chemical.
- Do not spray near open flame, hot surfaces, or anything that could vaporise the spray. Doing so could create a dangerous chemical atmosphere.
- Never use caustics, bleach, acids, hot water, or pressure producing chemicals in this sprayer.
- Keep the sprayer and all chemicals out of the reach of children and pets.
- Only spray when the air is calm (no wind or air movement) to prevent chemical spray from drifting onto non-targeted surfaces and avoid drift taking into account using different parameters such as nozzles, pressure, boom height, wind speed, etc.
• Always release pressure when sprayer is not in use and before performing maintenance. Fluid with high pressure retained in hose may cause injury when sprayed by accident.
- Never store chemicals in the sprayer.
- Store or dispose of any unused chemicals as instructed by the chemical manufacturer due to the potential for environmental damage from a spill or leak, and/or refer to the disposal criteria referenced in the Safety Data Sheet (SDS).
- Clean and rinse the sprayer after each use to avoid unintended chemical exposure and prevent contamination of subsequent applications.
- Store the sprayer in a warm, dry, dust-free location out of direct sunlight.
WARNING: RISK OF PERSONAL INJURY AND/OR PROPERTY DAMAGE DUE TO RUPTURE AND/OR UNCONTROLLED HIGH PRESSURE DISCHARGE OF LIQUID CHEMICAL.
- Never modify or alter the sprayer from original condition. Never heat or alter the hose, hose nut, or barb. Doing so could weaken the components and/or connections.
- Use only replacement parts from original manufacturer. Other replacement parts are not compatible with this sprayer.
- Never pressurise the sprayer with any device other than the pump supplied by the original manufacturer. Use of an air compressor or other non-standard device to pressurise the tank could exceed the safe working pressure of the sprayer.
- Do not lift, carry, or pull the sprayer by the hose, shut-off valve, or wand extension. Doing so could weaken the components and/or connections. Carry by the handle or harness only, making sure the connections are properly secured before lifting.
- To reduce the risk of electrical shock, do not put the sprayer in water or other liquid. Do not place or store the sprayer where it can fall or be pulled into a tub or sink.
Residual Risks
In spite of the application of the relevant safety regulations and the implementation of safety devices, certain residual risks cannot be avoided. These are:
- Risk of Inhalation of fine mist or chemical vapors may still occur during or after spraying if appropriate personal protective equipment is not used.
- Accidental skin or eye contact with liquid chemicals is possible when filling, using, or cleaning the sprayer.
- Spills or leaks may cause unintentional environmental contamination.
- Residual liquid chemicals may remain on or inside the sprayer after cleaning.
Compatible Batteries and Chargers
These battery packs may be used:
| Battery(kg)Battery(kg) | |
| DCB5461.08 DCB1850.35 | |
| DCB547/G1.46 DCB1870.54 | |
| DCB5481.46 DCB1880.95 | |
| DCB5492.12 DCB1890.54 | |
| DCB1810.35 DCBP034/G0.32 | |
| DCB1820.61 DCBP518/G0.75 | |
| DCB183/B/G0.40 DCB18800.98 | |
| DCB184/B/G0.62 DCBP3180.50 |
These chargers may be used: DCB104, DCB107, DCB112/DCB1102, DCB115/DCB1104, DCB117/DCB1112, DCB118, DCB132.
Refer to the battery/charger manual for more information.
Package Contents
The package contains:
1Sprayer/Harness
1Hose/Wand
6 Nozzles
1 Instructionmanual
- Check for damage to the tool, parts or accessories which may have occurred during transport.
• Take the time to thoroughly read and understand this manual prior to operation.
Markings on Tool
The label on the tool may include the following pictograms:

Read instruction manual before use.

Wear appropriate protective clothing.

Wear eye and respiratory protection.

Do not spray flammable liquids.

Keep bystanders away.
Date Code Position (Fig. B)
The production date code 51 consists of a 4-digit year followed by a 2-digit week and is extended by a 2-digit factory code.
Description (Fig. A, B)
WARNING: Never modify the power tool or any part of it.
Damage or personal injury could result.
1 Tank
2 Carry handle
3 Vertical wand storage clip
4 Variable flow control
5 Battery compartment
6 Nozzle accessory (other nozzles also included)
7 Wand
8 ON/OFF power switch
9 Wand handle/Shut-off assembly
10 Hose
11 Swivel-hose connector
12 Harness
13 Battery pack (Sold Separately)
14 Battery pack release button
15 Belt hook
Intended Use
This concrete chemical sprayer is designed for professional chemical spraying at various work sites (i.e., construction sites).
DO NOT use under wet conditions or in the presence of flammable liquids or gases.
This heavy-duty concrete chemical sprayer is a professional power tool.
DO NOT let children come into contact with the tool. Supervision is required when inexperienced operators use this tool.
- Young children and the infirm. This appliance is not intended for use by young children or infirm persons without supervision.
- This product is not intended for use by persons (including children) suffering from diminished physical, sensory or mental abilities; lack of experience, knowledge or skills unless they are supervised by a person responsible for their safety. Children should never be left alone with this product.
CHEMICALS STATEMENT:
NOTICE: Compatible with only the most common brands of curing compounds, form release and concrete cleaning compounds.
NOTICE: Do not use with pesticides, herbicides or fertilisers.
⚠ANGER: Explosion hazard. Do not use with flammable liquid having a flash point lower than 60°C.
WARNING: All wetted parts are made of NBR, PE, Nylon and brass material, please use with diluted or neat concrete chemicals with 3\~12 pH value, otherwise damage may occur.
WARNING: Before use, always refer to the chemical's instructions or Safety Data Sheet (SDS) and confirm compatibility with this sprayer.
WARNING: For the first-aid measures and waste treatment, please refer to the chemical Safety Data Sheet (SDS).
NOTICE: For additional chemical compatibility questions, please contact the chemical manufacturer or refer to the back page of this manual for service centre contact information.
ASSEMBLY AND ADJUSTMENTS
WARNING: To reduce the risk of serious personal injury, turn tool off and disconnect battery pack before making any adjustments or removing/installing attachments or accessories.
An accidental start-up can cause injury.
WARNING: RISK OF PERSONAL INJURY AND/OR PROPERTY DAMAGE DUE TO CHEMICAL EXPOSURE. After initial assembly, always inspect the sprayer for damage, and test it with plain water to check for proper function. Ensure all connections are secure and leak free, and the hose is free from damage, prior to using the sprayer with chemicals.
WARNING: Only use attachments recommended or sold by the manufacturer.
WARNING: Use only DEWALT batteries and chargers.
Variable Flow Control (Fig. C)
Flow can be controlled by turning the variable flow control knob 4. There are ten different pressure and flow selections. Turning knob clockwise will increase pressure and flow. Turning knob counterclockwise will decrease pressure and flow. See Nozzle Flow Rate Chart near the back of the section.
Assembling the Wand (Fig. E)
- Install the wand 7 onto the wand handle/shut-off assembly 9 and tighten the wand nut 16 clockwise on the wand to secure together.
Attaching a Nozzle (Fig. D, F)
- Attach the nozzle adapter 25 (Fig. F) onto the end of the wand 7, then select the desired nozzle accessory (Fig. D).
- Check if the O-ring 26 or flat seal 27 is in the nozzle accessory, then assemble to the nozzle adaptor and tighten securely (Fig. F).
nOZZLE FUnCTIONaLITY and UsEs
| Foaming Nozzle 19 | • Creates a stream of foam when spraying a liquid that foams easily. |
| Jet Stream Nozzle 20 | • Pinpoint stream for targeted applications from a distance. |
| Adjustable Brass Cone Nozzle 21 | • Produces a cone-shaped spray pattern, where the liquid emerges in a circular or oval pattern. |
| Small Flow Brass Fan Nozzle 24 | • Flat spray for small coverage and precision spraying in confined areas. |
| Medium Flow Fan Nozzle 23 | • Flat spray for medium coverage. |
| Large Flow Fan Nozzle 22 | • Flat spray for very broad coverage and higher viscosity liquids. |
See Nozzle Flow Rate Chart near the back of the section.
Harness Installation (Fig. A, G1–G4)
- For each side of the harness 12, remove the small plastic clips 28 from the two shoulder strap loops 44 and thread each loop through the handle slots 43 near the top of the carry handle 2 (Fig. G1).
- Replace the plastic clips through the two shoulder strap loops and pull on the harness/shoulder straps securing the two harness straps in place.
- After harness has been attached to the top of the carry handle 2, attach the carry handle to the top of the tank 1 by holding the carry handle in place against the tank recess area 49 while inserting the four provided screws 47 into the screw hole openings 50 (Fig. G2). Tighten all four screws.
- Insert the lower harness strap 42 into the "back" cutout 30 of the lower base below the fixed block 53 (Fig. G3, G4). Pull excess length through to allow for step 5.
- Loop excess strap below and back through the "bottom" cutout. Be sure that the strap loops around below the fixed block.
- As the lower harness strap is pushed, it will follow the curved surface of the plastic lower base, and come back outward from the "back" cutout.
- Pull excess material through to loop back through first section of buckle 29 (Fig. G3).
nOTE: If the strap comes right out of the lower base when pulling through the buckle (or prior), this shows that the strap was not properly looped around the fixed block, and steps 4-7 will need to be repeated.
- Loop through second portion of buckle above lower strap section, and adjust accordingly.
- Harness in assembled position as shown in Fig. G4.
- Loop the strap through the first section of the buckle. Then loop the strap through the other section of the buckle to tighten. Adjust the shoulder pads and strap lengths for a comfortable fit.
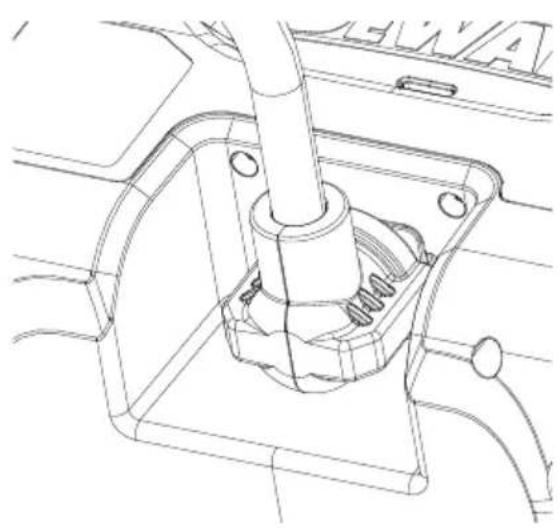
Connecting Hose to Tank (Fig. A, I1–I5)
- Connect the hose 10 to the base of the tank 48 by securing the hex nut 45 /swivel-hose connector 11 clockwise to the base of the tank (Fig. A, I1).
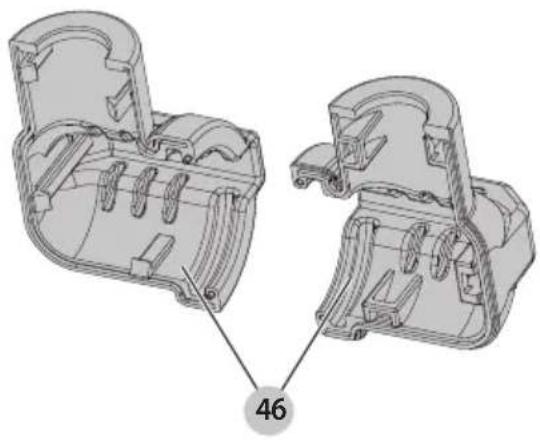
- Place both pieces of the connector cover 46 around the hex nut and swivel-hose connector (Fig. 12–14).
NOTE: The connector cover has a groove on the edge that matches and fits around the hex nut. - Align the four latches of the connector cover pieces and snap the two connector cover pieces together (Fig. 14) to finalize the water supply connection as shown in Fig. 15.
OPERATION
Instructions for Use
WARNING: Always observe the safety instructions and applicable regulations.
WARNING: To reduce the risk of serious personal injury, turn tool off and disconnect battery pack before making any adjustments or removing/installing attachments or accessories. An accidental start-up can cause injury.
WARNING: RISK OF PERSONAL INJURY DUE TO CHEMICAL EXPOSURE. Use the appropriate Personal Protective Equipment (PPE) as recommended by the chemical manufacturer and/or refer to the chemical Safety Data Sheet (SDS) of the chemical being used. This includes at least goggles, gloves, and protective clothing.
WARNING: To reduce the risk of serious personal injury, turn sprayer OFF and remove the battery pack before making any adjustments or removing / installing attachments or accessories. An accidental start-up can cause injury.
▲NOTICE: The battery pack is not fully charged out of the carton. Before using the battery pack and charger, read the safety instructions below and then follow the charging procedures outlined.
Proper Hand Position (Fig. A, L)
WARNING: To reduce the risk of serious personal injury, ALWAYS use proper hand position as shown.
WARNING: To reduce the risk of serious personal injury, ALWAYS hold securely in anticipation of a sudden reaction. Proper hand position requires one hand on the wand handle/shut-off assembly 9.
NOTE: Always wear the harness 12 and have the harness buckled up as shown (Fig. A, L).
Filling the Sprayer (Fig. A, H1, H2, M)
WARNING: Inspect the sprayer, hose, shut-off, wand, and all connections for damage before each use. A damaged or loose hose connection can result in unintended exposure to the pressurised chemicals, resulting in serious injury or property damage.
Before you Begin
Test the sprayer with plain water before use with chemicals, prior to initial use, and after prolonged storage.
-
Place the sprayer on a stable surface and ensure it is OFF.
-
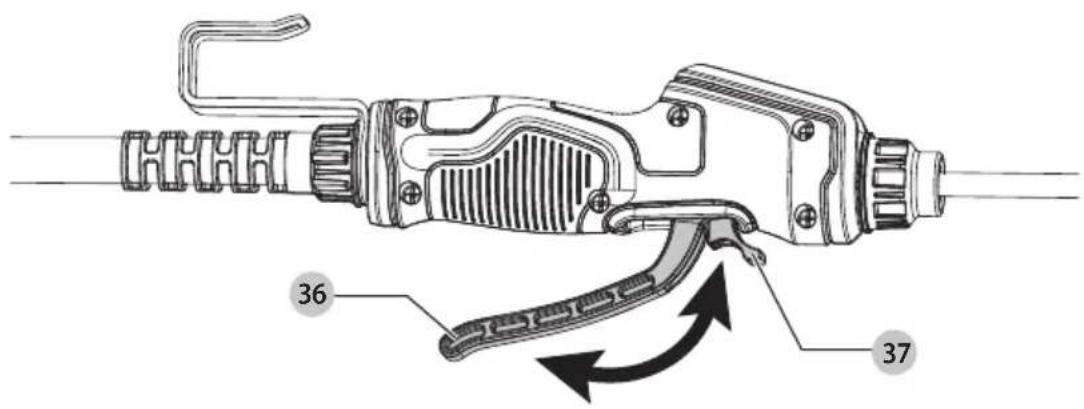
Squeeze the shut-off lever 36 to release any remaining pressure in the hose.
-
Remove the battery pack 13 from the battery compartment.
See Removing the Battery Pack.
- Unscrew the cap 31 and remove the filter basket gasket 32 from the cap. Place the filter basket gasket and cap on a clean surface where it will not collect dirt, dust, or other debris.
- Remove the filter basket 33, and remove any debris. Place the filter basket on a clean surface where it will not collect dirt, dust, or other debris.
- Inspect the tank 1 interior for debris, and clean as needed.
- Check to make sure the in-tank filter 34 is in place, the mesh is intact, and it is not clogged with debris (Fig. H2). See Cap/
Filter Basket / In-Tank Filter Maintenance section.
- Ensure the wand handle/shut-off assembly 9 is connected to the tank. Otherwise, liquid will pour out of the open connection. See Connecting Hose to Tank section.
- Re-Insert the filter basket after finishing checks.
- Follow the chemical manufacturer's instructions for preparing the chemical. Fill the sprayer by pouring liquid into the top opening and through the filter basket, to the desired volume, according to the volume graduation markings on the side of the tank.
- Re-Insert the filter basket gasket to the cap, then screw them tightly to the mouth of tank
- Clean up any spilled, splashed, or overflowed liquid on the sprayer. Avoid contact with skin.
- Insert the battery. See Installing the Battery Pack section.
Installing the Battery Pack (Fig. B)
WARNING: RISK OF FIRE, BURNS, OR ELECTRICAL SHOCK. To reduce risk of battery fire or bursts, use only batteries that are in good condition. Do not use batteries that are wet or have been damaged.
WARNING: Prevent unintentional spraying. Ensure the switch is in the OFF position before connecting the battery pack, picking up, or carrying the sprayer. Carrying the sprayer with your finger on the switch or energizing the sprayer which has the switch on invites accidents.
AUTION: RISK OF UNINTENDED SPRAYING. Ensure the sprayer is OFF and that the shut-off lever is released before inserting the battery. The sprayer will spray when the battery is inserted if the sprayer is ON and the shut-off lever depressed.
- Ensure the sprayer is on a stable surface and turned OFF.
- Open the battery compartment 5 by releasing the metallic door latch 35 attached to the side door 38, and swing the side door open sidewards.
- Align the battery pack 13 with the rails inside the battery compartment and slide it into the compartment until the battery pack is firmly seated. Ensure it does not disengage.
- Close the side door and ensure that the metallic door latch is engaged.
Removing the Battery Pack (Fig. B)
- Ensure the sprayer is on a stable surface and turned OFF.
-
Open the battery compartment by releasing the metallic door latch 35 attached to the side door 38, and swing the side door open sidewards.
-
Press the battery pack release button 14 and remove the battery from the compartment.
- Close the side door and ensure that the metallic door latch is engaged.
Fuel Gauge Battery Packs (Fig. B)
Some DEWALT battery packs include a fuel gauge 52, which consists of three LED lights that indicate the level of charge remaining in the battery pack.
To actuate the fuel gauge, press and hold the fuel gauge button. A combination of the three LED lights will illuminate, designating the level of charge left. When the level of charge in the battery is below the usable limit, the fuel gauge will not illuminate and the battery will need to be recharged.
NOTE: The fuel gauge is only an indication of the charge left on the battery pack. It does not indicate tool functionality and is subject to variation based on product components, temperature and end-user application.
Battery State of Charge Indicator (Fig. A–C)
When the battery pack 13 is installed, you can check the battery state of charge using the State of Charge (SOC) feature located on the wand handle/shut-off assembly 9. This feature is active whether the power switch 8 is turned ON or OFF. The power interface of the wand handle/shut-off assembly has a battery indicator push button 18, and indicator lights 17 as shown in Fig. C.
- Press the battery indicator button 18 to illuminate indicator lights 17.
BATTERY INDICATOR LIGHTS:
| LIGHTS Flow |
| Three green lights 100%–75% |
| Two green lights indicate 74%–51% |
| One green light indicate <50% |
NOTE: The LED on the battery may still show a remaining charge even though the sprayer does not operate.
Spraying (Fig. A, C, M)
WARNING: RISK OF PERSONAL INJURY AND/OR PROPERTY DAMAGE DUE TO UNINTENDED SPRAYING OF CHEMICALS. Ensure the shut-off lever is released before powering ON the sprayer. Once powered ON, the pump will pressurise the system and spray if shutoff lever is depressed.
NOTICE: RISK OF PROPERTY DAMAGE. Only spray when the air is calm (no wind or air movement) to prevent chemical spray from drifting onto nontargeted surfaces.
- Flip the ON/OFF power switch 8 to the ON position to turn the sprayer ON. If the sprayer has not been used recently, you may hear a low, audible sound. This indicates the pump has turned on and is building pressure in the system.
NOTE: If the sprayer was used recently, and still has pressure in the system, the pump may not turn on until the shut-off lever 36 is squeezed.
- Aim the wand 7 in the desired direction of spraying and squeeze the shut-off lever 36.
- For continuous spraying, squeeze the shut-off lever and rotate the lock 37 clockwise to hold the shut-off lever in the depressed position.
-
Unlock by rotating the lock counterclockwise, if needed, and release the shut-off lever to stop spraying.
-
To turn off the sprayer, switch the power button to the OFF position.
- Always remove any chemicals, and clean the sprayer when finished. See the Cleaning and Storage sections of this manual.
Vertical Wand Storage Clip (Fig. J)
There is a vertical wand storage clip 3 attached to the side of the tank which the wand can be secured with. The vertical wand storage clip helps with storage as it reduces the space needed around the sprayer. The horizontal storage wand clip 39 located below the backpack handle is still available for use.
Nozzle Storage Bag (Fig. K)
There is a nozzle storage bag 40 that is located on the waist belt 41 of the harness 12.
Storage
- Flush water through the pump, hose, wand handle/shut-off assembly, and nozzle for at least 30 seconds to rinse them out. See Cleaning section.
Once sprayer is fully rinsed and cleaned of all chemical residue, store the sprayer and battery indoors in a warm, dry location out of direct sunlight and away from any sources of moisture or intense heat. Do not store the sprayer where freezing temperatures (below 0^ C) will occur. Allowing water to freeze inside the sprayer may cause damage to the pump, seals, shut-off, or other components, and void the sprayer warranty.
Transportation
WARNING: FIRE HAZARD. Do not store, carry, or transport the battery pack so that metal objects can contact exposed battery terminals. For example, do not place the battery pack in aprons, pockets, tool boxes, product kit boxes, drawers, etc., with loose nails, screws, keys, coins, hand tools, etc. When transporting individual battery packs, make sure that the battery terminals are protected and well insulated from materials that could contact them and cause a short circuit. Secure the sprayer during transport to prevent damage or injury.
NOTE: Li-ion battery packs should not be put in checked baggage on airplanes and must be properly protected from short circuits if they are in carry-on baggage.
Belt Hook (Fig. A)
WARNING: To reduce the risk of serious personal injury, ONLY use the tool's belt hook to hang the tool from a work belt. DO NOT use the belt hook for tethering or securing the tool to a person or object during use. DO NOT suspend tool overhead or suspend objects from the belt hook.
The wand handle/shut-off assembly 9 comes supplied with a pre-installed belt hook 15. This belt hook is assembled onto the wand handle/shut off assembly at the factory and cannot be removed.
MAINTENANCE
Your power tool has been designed to operate over a long period of time with a minimum of maintenance. Continuous satisfactory operation depends upon proper tool care and regular cleaning.
WARNING: To reduce the risk of serious personal injury, turn tool off and disconnect battery pack before making any adjustments or removing/installing attachments or accessories. An accidental start-up can cause injury.
WARNING: RISK OF PERSONAL INJURY AND/OR PROPERTY DAMAGE DUE TO CHEMICAL EXPOSURE. Always ensure that all chemicals have been removed from the sprayer and the sprayer has been cleaned prior to performing any maintenance.
WARNING: RISK OF PERSONAL INJURY. Always release pressure from the sprayer prior to performing any maintenance. Disassembly of a sprayer that is still pressurised may result in the high-speed ejection of components. Ensure the sprayer is OFF and squeeze the shut-off lever until all pressure is released.
Your DEWALT power tool has been designed to operate over a long period of time with minimum maintenance. Continuous satisfactory operation depends upon proper tool care and regular cleaning.
The charger and battery pack are not serviceable.
Please refer to the back page of this manual for service centre contact information, or visit www.2helpU.com.
Nozzle Maintenance
WARNING: Prior to performing maintenance, always depressurise sprayer by ensuring the sprayer is OFF and then squeezing the shut-off lever to spray until liquid flow stops.
- If a nozzle clogs, remove and disassemble the nozzle assembly.
- Clean the openings of any obstructions or residue.
- Do not use sharp tools that could scratch or damage the nozzles as spray pattern could be affected.
- Do not hit nozzle against surfaces to unclog.
Cap / Filter Basket / In-Tank Filter Maintenance (Fig. H1, H3, M)
AUTION: RISK OF DAMAGE TO INTERNAL COMPONENTS. Do not operate the sprayer without the in-tank filter properly installed. Doing so could allow debris to enter the pump and cause clogging or damage to the pump.
- Ensure the sprayer is OFF and remove the battery pack 13. See Removing the Battery Pack section.
- Squeeze the shut-off lever 36 to release any remaining pressure in the hose.
- Remove the cap 31 and filter basket 33. Separate the gasket 32 from the cap. Rinse with clean water to remove any debris.
NOTE: Check the cap, gasket, and filter basket to ensure they do not show signs of wear and are operating properly. Replace them as required.
- Place the cap, gasket, and filter basket on a clean surface where they will not collect dirt, dust, or other debris.
- Pour any liquid from the tank into an appropriate container for later use or proper disposal according to chemical manufacturer's instructions.
- Rinse and empty the tank to remove any dirt, debris, or residue.
- Reach into the tank and carefully grasp the in-tank filter 34 located at the bottom of the tank (Fig. H3).
- Turn the in-tank filter clockwise and pull up to remove it from the tank.
-
Clean the in-tank filter carefully rinsing from the inside to the outside. Be sure not to tear or damage the mesh. Any damage to the mesh may allow debris to enter the pump and cause clogging or damage to the pump.
NOTE: If the in-tank filter is damaged or too dirty to permit cleaning, replace with a new in-tank filter. -
To re-install the in-tank filter, align the end of filter with the bottom installation hole of water tank, push down the filter until it stops.
Lubrication
Your power tool requires no additional lubrication.
Cleaning Fig. (Fig. A–C, H1, M)
WARNING: Electrical shock and mechanical hazard. Disconnect the plug from the power source and/or remove the battery pack, if detachable, from the product before cleaning.
WARNING: To ensure safe and efficient operation, always keep the product and the ventilation slots (if applicable) clean. Ventilation slots can be cleaned using a dry, soft non-metallic brush and/or a suitable vacuum cleaner. Do not use water or any cleaning solutions.
WARNING: Blow dirt and dust out of the main housing with dry air as often as dirt is seen collecting in and around the ventilation slots. Wear approved eye protection and approved dust mask when performing this procedure.
WARNING: Use a cloth dampened only with water and mild soap. Never let any liquid get inside the product. Never immerse any part of the product into a liquid.
WARNING: Always release pressure from the sprayer prior to cleaning. Disassembly of a sprayer that is still pressurised may result in the high-speed ejection of the remaining liquid in the hose.
WARNING: RISK OF PERSONAL INJURY DUE TO CHEMICAL EXPOSURE. Use the appropriate Personal Protective Equipment (PPE) as recommended by the chemical manufacturer and/or refer to the chemical Safety Data Sheet (SDS) of the chemical being used. This includes at least goggles, gloves, and protective clothing.
WARNING: RISK OF DAMAGE TO INTERNAL COMPONENTS. Failure to properly rinse out the sprayer may allow chemical residue build-up that can clog or damage the filters, pump, shut-off, wand, and nozzle. Chemical residue build-up can also contaminate subsequent applications. Leaving chemical liquids in the sprayer when not in use can lead to premature sprayer wear. Never store the sprayer with chemicals in any part of the sprayer.
-
Ensure the sprayer is OFF and remove the battery pack 13. See Removing the Battery Pack section.
-
Remove the cap 31 and empty any extra chemical from the tank into a suitable container for later use or dispose according to the chemical manufacturer's instructions.
- Use clean water to thoroughly rinse and empty the tank until all chemicals and residues are removed.
-
Add approximately 1 liter of clean water to the tank.
-
Insert the battery pack. See Installing the Battery Pack section.
-
Flip the ON/OFF power switch 8 to the ON position to turn the sprayer ON.
-
Flush water through the pump, hose, wand handle/shut-off assembly, and nozzle for at least 30 seconds to rinse them out. Failure to rinse out these components may allow chemical residue build-up that can clog or damage the components. After heavy use, rinsing the nozzles may not be enough to remove residue. The nozzles may need to be soaked in plain water or cleaned with a small brush.
-
Empty out any remaining water from the tank then continue to spray until water no longer comes out of the
nozzle. This indicates that most of the water in the system has been removed.
- Turn the ON/OFF switch to the OFF position to turn the sprayer OFF and then remove the battery.
- Squeeze the shut-off lever 36 to release any remaining pressure in the hose.
- Allow the sprayer to dry. This is best done by removing the cap 31 and filter basket 33 and hanging the tank 1 upside down to let it drain.
- Once the tank is dried, turn the tank upright and reinstall the filter basket and cap to prevent debris from entering the tank.
Optional Accessories
WARNING: Since accessories, other than those offered by DEWALT have not been tested with this product, use of such accessories with this tool could be hazardous. To reduce the risk of injury, only DEWALT recommended accessories should be used with this product.
Consult your dealer for further information on the appropriate accessories.
Protecting the Environment


Products/batteries are recyclable, but if marked with the crossed-out bin, they must not be disposed of with normal household waste.
Run the batteries down completely and separate them, and separate any light sources from the product if possible. It is the user's responsibility to delete personal data from the product. Then take the waste to an official waste collection centre or a participating retailer who will often accept it free of charge. Packaging should be discarded based on the marked material code. Operating and safety instructions should only be discarded once the applicable product is no longer in use.
Please check with your local community/municipality for waste management guidance. For further information, visit www.2helpU.com and scan the above QR code.
NOZZLE FLOW RATE CHART
NOTICE: RISK OF DAMAGE. Frequent use under high pressure setting may result in a damaged pump or nozzle.
| VaRlable COnTROL DlaL sETTInG - PREssURE (1-10) | ||||||||
| Nozzle Accessory 1 2 3 4 | ||||||||
| nOTE: Pressure and Flow may vary ~10% | Pressure (PSI) | Flow (L/min) | Pressure (PSI) | Flow (L/min) | Pressure (PSI) | Flow (L/min) | Pressure (PSI) | Flow (L/min) |
| Foaming Nozzle 19 | 20 1.06 | 28 1.24 33 1.28 | 40 1.58 | |||||
| Small Flow Fan Nozzle 24 33 1.01 38 | 1.14 44 1.24 50 | 1.38 | ||||||
| Medium Flow Fan Nozzle 23 | 24 1.08 | 29 1.22 35 1.36 | 39 1.48 | |||||
| Large Flow Fan Nozzle 22 | 3 | 1.42 | 5 | 1.64 | 6 | 1.86 | 7 | 2.08 |
| Jet Stream Nozzle 20 11 1.26 15 1.4 | 18 1.61 20 1.74 | |||||||
| Adjustable Brass Cone Nozzle 21 46 | 0.85 54 0.92 62 | 1.04 66 1.09 | ||||||
| NOTE: All values represent spraying with water or similar viscosity liquid product. Pressure may vary ~10%. Recommend optimum working pressure to be between 9 to 131 PSI depending on configuration and preference. | ||||||||
| 5678910 | |||||||||||
| Pressure(PSI) | Flow(L/min) | Pressure(PSI) | Flow(L/min) | Pressure(PSI) | Flow(L/min) | Pressure(PSI) | Flow(L/min) | Pressure(PSI) | Flow(L/min) | Pressure(PSI) | Flow(L/min) |
| 56 1.76 | 61 1.86 66 1.92 | 70 1.98 80 2.11 | 87 2.2 | ||||||||
| 57 1.58 | 75 1,64 80 1.68 | 85 1.76 96 1.91 | 105 1.98 | ||||||||
| 53 1.72 | 56 1.82 61 1.86 | 64 1.94 74 2.02 | 84 2.16 | ||||||||
| 9 2.31 | 11 2.48 13 2.6 | 15 2.74 18 2.92 | 19 3.18 | ||||||||
| 25 2.08 | 28 2.16 30 2.28 | 32 2.36 36 2.52 | 40 1.66 | ||||||||
| 88 1.22 | 98 1.28 105 1.34 | 119 1.41 131 | 148 150 1.56 | ||||||||
TROUBLESHOOTING
WARNING: Risk of Unsafe Operation. Before servicing sprayer, remove battery pack, discharge any remaining residual pressure, and allow the tank and hose to dry.
| PROBLEM | CaUsE | CORRECTION |
| The sprayer does not turn ON (no audible hum of the pump). | Ensure the battery is correctly installed. | Install the battery correctly. SeeInstalling the Battery Packsection. |
| Ensure the battery is charged. | Charge the battery. See separateBatteries and Chargersmanual. | |
| The battery may be damaged or may have overheated. Visually inspect the battery for damage. | Replace the battery if it is damaged or not working. If the battery overheated, allow the battery to cool. | |
| The hose is pressurised. The pump turned OFF automatically. | Squeeze the shut-off lever to see if the sprayer starts and the pump turns ON. | |
| The sprayer turns ON (pump head hums) but it will not spray. | There is no liquid in the tank. | Add liquid to the tank. SeeFilling the Sprayersection. |
| The shut-off lever is clogged. | Clean the shut-off lever. SeeShut-off Assembly Maintenancesection. | |
| The nozzle is clogged. | Clean the nozzle. SeeNozzle Maintenancesection. | |
| The pump is not primed. | Allow at least 30 seconds for the pump to prime. | |
| The sprayer turns ON but only sprays at low pressure. | The shut-off lever is clogged. | Clean the shut-off lever. SeeShut-off Assembly Maintenancesection. |
| The nozzle is clogged. | Clean the nozzle. SeeNozzle Maintenancesection. | |
| The pump is not primed. | Allow at least 30 seconds for the pump to prime. |
PROBLEM CaUsE CORRECTION
| The pump does not fully prime. | The liquid level in the tank is low. | Add liquid to the tank. See Filling the Sprayer section. |
| The pump was run dry (without liquid) before the tank was refilled. | Ensure the sprayer is OFF and squeeze the shut-off lever until all pressure is relieved. | |
| There is chemical residue or build-up in the tank and/or pump due to improper or inadequate cleaning. | Clean the sprayer. See Cleaning section. If necessary, repeat with warm water and a mild detergent mixture. Allow the mixture to stay in the pump for up to 1 hour prior to rinsing. Replace the pump if necessary. | |
| The in-tank filter is improperly installed, missing, or damaged, allowing debris to enter the pump. | Clean the sprayer. See Cleaning section. If necessary, repeat with warm water and a mild detergent mixture. Allow the mixture to stay in the pump for up to 1 hour prior to rinsing. Replace the pump if necessary. | |
| The hose leaks at the tank connection. | The hose is cracked, swollen, or faulty. Replace the shut-off assembly. | |
| The connection is damaged. Replace the shut-off assembly. | ||
| The hose leaks at the shut-off assembly. | The hose is cracked, swollen, or faulty. Replace the shut-off assembly. | |
| The connection is damaged. Replace the shut-off assembly. | ||
| The nozzle drips when the shut-off lever is released. | There is dirt or debris in the shut-off lever. Clean the shut-off assembly. | |
| There is a damaged 0-ring or seal in the shut-off assembly. | Replace the shut-off assembly. | |
| The nozzle tip leaks. | The flat seal is missing. | Install the flat seal behind the nozzle tip. See Attaching a Nozzle section. |
| The flat seal is damaged. Replace the flat seal. | ||
| The sprayer shuts off abruptly. | The battery pack has reached its maximum thermal limit. Allow the battery pack to cool down. | |
| The battery is out of charge. To maximize the life of the battery, it is designed to shutoff abruptly when the charge is depleted. | Place the battery on the charger and allow it to charge. | |
| The battery pack does not charge. | The battery pack is not inserted in the charger. | Insert the battery pack into the charger until the red (charging) light illuminates. |
| The charger is not plugged in. Plug the charger into a working outlet. | ||
| The surrounding air temperature is too hot or too cold. | Move the battery pack to a surrounding air temperature of above 4.5°C or below 40°C. | |
| Battery will not charge. | No lights illuminated on charger (not plugged into outlet). Plug charger into outlet. | |
| No lights illuminated on charger (plugged into outlet). Check that outlet is functioning. | ||
| No lights illuminated on charger (plugged into outlet, the outlet is functioning). | Replace charger. | |
| No lights illuminated on charger (plugged into outlet, the outlet is functioning, new/functioning battery inserted in the charger). | Replace battery. | |
| Red light blinking on charger, but a yellow indicator light is also illuminated (battery temperature too high for safe charging). | Allow battery to cool. | |
www.2helpU.com/DoC/ of www.2helpU.com/DoC/index/xxx*
WAARSCHUWING: Lees alle