
Ox 3-1200 - Log splitter SCHEPPACH - Free user manual and instructions
Find the device manual for free Ox 3-1200 SCHEPPACH in PDF.

| Product type | Vertical hydraulic log splitter |
| Brand | Scheppach |
| Model | Ox 3-1200 |
| Dimensions (L×W×H) | 830 × 540 × 1560 mm |
| Table height | 50 / 430 / 810 mm |
| Working height | 930 mm |
| Weight | 199 kg |
| Power supply | 400 V / 50 Hz three-phase |
| Power input / output | 4.10 kW / 3.30 kW |
| Motor speed | 1420 min⁻¹ |
| Splitting capacity | 12 tonnes |
| Cylinder stroke | 53 cm |
| Down / return speed | 4 cm/s / 20 cm/s |
| Max log diameter | 40 cm |
| Max log length | 133 cm |
| Hydraulic oil quantity | 9 liters |
| Noise level (idle) | 88 dB(A) |
| Operating mode | S6 40% |
| Motor thermal protection | Yes |
| Phase inverter | Yes |
| Ambient operating temperature | 5 °C to 40 °C |
| Max ambient humidity | 95% |
| Storage | -20 °C to +60 °C, max humidity 80% |
| Oil maintenance | First oil change after 50 h, then every 250 h |
| Recommended hydraulic oil | Aral Vitam GF22, BP Energol HLP-HM 22, Mobil DTE 11, Shell Tellus 22 |
| Safety | Two-hand control, thermal protection, residual current circuit breaker recommended |
| Wear parts | Splitting wedge, splitting cross, extension, slides, hydraulic oil |
| Warranty | Legal, defective parts replaced |
Frequently Asked Questions - Ox 3-1200 SCHEPPACH
User questions about Ox 3-1200 SCHEPPACH
0 question about this device. Answer the ones you know or ask your own.
Ask a new question about this device
Download the instructions for your Log splitter in PDF format for free! Find your manual Ox 3-1200 - SCHEPPACH and take your electronic device back in hand. On this page are published all the documents necessary for the use of your device. Ox 3-1200 by SCHEPPACH.
USER MANUAL Ox 3-1200 SCHEPPACH
We hope you have a lot of fun and success using your new machine.
Note:
Under current product liability regulations, the manufacturer of this equipment will not be liable for damages to the equipment or caused by it in the case of:
- improper handling,
- failure to observe the operating instructions,
- repairs by third parties, non-authorised technicians,
- installation of and replacement by non-original spare parts,
non-intended use, - failures of the electrical system while not adhering to the electrical regulations and regulations of the VDE (German Association for Electrical, Electronic and Information Technologies) 0100, DIN 57113 / VDE0113.
Our recommendations:
Read the entire text of the operating instructions before installation and operation.
These operating instructions are to help you to get to know your machine and its intended fields of application.
The operating instructions contain important notes on how to work safely, properly, and efficiently with the machine and how to avoid hazards, save costs of repairs, keep downtimes short improve reliability and product life of the machine.
In addition to the safety instructions in this manual, you must observe all regulations of your country applicable for the operation of the machine.
Keep the operating instructions close to the machine, protected by a plastic envelope against dirt and humidity. Any operator must read the operating instructions prior to work and follow them precisely. Only people trained to operate the machine and who are aware of the associated dangers are permitted to work with the machine. The required minimum age must be observed.
General Notes
- After unpacking, inspect all parts for possible transport damages. In the case of complaints you must inform the deliverer immediately. Subsequent complaints will not be accepted.
- Check the shipment to ensure that it is complete.
- Familiarise yourself with the equipment with the help of the operating instructions before putting the equipment into operation.
-
Use only original parts as accessories and spare parts. You can buy spare parts from your specialist dealer.
-
When you order, please state our order numbers as well as the equipment's type and year of manufacture.
| Ox 3-1200 | |
| Scope of Delivery | |
| Hydraulic log splitter | |
| Operating instructions | |
| Specifications | |
| Dimensions D/W/H | 830 x 540 x 1560 |
| Table height mm | 50/430/810 |
| working height mm | 930 |
| log length max cm | 600/965/1040/1330 |
| power max. t* | 12 |
| cylinder travel cm | 53 |
| forward speed cm/s | 4 |
| return speed cm/s | 20 |
| oil volume I | 9,0 |
| weight kg | 199 |
| Noise level at Idle dB(A) | 88 |
| Drive | |
| Motor | 400 V/50 Hz |
| input power P1 kW | 4,10 |
| output power P2 kW | 3,30 |
| duty type | S6/40 % |
| motor speed 1/min | 1420 |
| motor protection | yes |
| phase inverter | yes |
| Specifications are subject to change! | |
| * The maximum achievable splitting force is dependent on the resistance of the splitting material. | |
Warning Symbols /Warnings
| Please read the manual before start-up | |
| Wear safety footwear | |
| Wear work gloves | |
| Use hearing protection and safety goggles | |
| Wear a hardhat | |
| Authorised personnel only | |
| No smoking in the working area | |
| Do not spill hydraulic oil on the floor | |
| Keep your workspace clean! Untidiness can cause accidents! | |
| If a crane is used, put the lifting belt round the housing. Never lift the firewood splitter by the hand grip, | |
| Disposition of waste oil correctly (waste oil collection point on site). Do not dump waste oil in the ground or mix it with waste. | |
| Do not remove or modify protection and safety devices. | |
| Only the operator is allowed in the work area of the machine. Keep other people and animals (minimum distance 5 m) at a distance. | |
| Do not remove jammed trunks with your hands. | |
| Caution! Switch off the engine before repair, maintenance and cleaning. Unplug the mains plug. | |
| Danger of bruising and injury from sharp edges; never touch danger areas when the cleaver is moving. | |
| High-voltage, danger to life! | |
| The machine must only be operated by one person! | |
| Loosen the vent bolt two revolutions, before starting work. Close before transport. | |
| Caution! Moving machine parts! | |
| Do not transport the device in the horizontal position! |
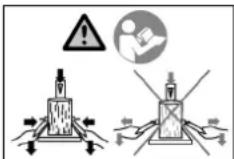
Familiarise yourself with the two-hand control before operating the machine! Read the operating instructions thoroughly.
Additional warnings without symbols:
- Do not remove the casing.
In this operating manual, points concerning your safety will be marked with this symbol:
General Safety Instructions
WARNING: If you use electric tools, you should observe the general safety measures mentioned below in order to reduce the risk of fire, electric shock, and personal injury.
Please read all instructions before working with these tools.
- Observe all safety instructions and warnings for the machine.
- Keep all safety instructions and warning labels on the machine complete and in legible condition.
- You must not remove the safety devices on the machine or make them inoperative.
- Inspect the power cords. Do not use faulty power cords.
-
Check that the two-hand control is functioning correctly before operation.
-
The operator must be at least 18 years of age. Trainees must be at least 16 years old, but may only work with the machine under supervision.
- Wear work gloves during work.
- Attention during work: injury hazard to fingers and hands.
- When splitting heavy or bulky materials, use appropriate appliance for support. Switch motor off for retooling, adjustment, and cleaning, as well as for maintenance and troubleshooting. Pull power plug!
- Installation, repairs and maintenance work on the electrical installation may only be carried out by qualified personnel.
- All guards and safety mechanisms must be reinstalled immediately after completing the repairs or the maintenance work.
- Switch the motor off when leaving the working area. Pull power plug!
ADDITIONAL SAFETY INSTRUCTIONS FOR LOG SPLITTERS
- The log splitter may only be operated by a single person.
- Wear protective gear (protective goggles/mask, gloves, hearing protection, and safety shoes) to protect against possible injuries.
- Never split logs with nails, wire or other objects in them.
- Logs already split and shavings pose a threat within the working area. There is the risk of tripping, slipping, or falling. Always keep the working area tidy.
- Never put your hands on moving parts while the machine is switched on.
Only split logs with a maximal length of 1,300 mm. - Before starting work, check the hydraulic lines and hoses.
- Check protective units and functions of the machine.
- Do not put your hands into the splitting area.
- Should the wood jam, turn the machine off and remove the wood carefully.
Warning! This electric tool generates an electromagnetic field during operation. This field can impair active or passive medical implants under certain conditions. In order to prevent the risk of serious or deadly injuries, we recommend that persons with medical implants consult with their physician and the manufacturer of the medical implant prior to operating the electric tool.
Intended Use
This machine complies with the current EC machinery directive.
- The hydraulic log splitter is designed for "stationary operation", logs may only be split standing upright and along the grain. The dimensions of the logs to be split:
wood length: 60/96,5/104/133 cm min/max: 10/40 cm
- Never split logs lying horizontally or across the grain.
-
The manufacture's safety, working, and maintenance instructions as well the dimensions stated in the technical specifications must be observed.
-
The applicable rules for accident prevention and other generally accepted rules concerning safety must be obeyed.
- The machine may only be operated, serviced, or repaired by persons familiar with it and aware of the risks. Arbitrary modifications of the machine exclude any liability of the manufacture for damages arising from this.
- The machine may only be used with original accessories and original tools from the manufacturer.
- Every other use will be considered to be unintended use. The manufacturer assumes no liability for damages arising from this and it will be solely at the operator's own risk.
Residual Risks
The machine was designed according to the state of the art and accepted safety standards. However, residual risks might occur during work.
- Risk of finger or hand injury by the cutting knife due to improper guidance or placement of the log.
- Injuries by the work piece being catapulted out of machine due to improper clamping or guidance.
- Electrical hazard due to use of improper power cords.
- Furthermore there might be non-obvious remaining risks despite all precautions.
- Residual risks can be reduced if safety instructions, intended use, as well as all operating instructions are observed.
- Danger due to particular characteristics of wood (branches, irregular shapes, etc.).
Components, Fig. 1
1 Switch/outlet
2 Electrical motor
3 Steel frame
4 Splitting column
5 Hoisting adjustment bar
6 Splitting wedge
7 On/off lever for splitting wedge
8 Grip protection
9 Rubber stopper
10 Fixed splitting table
11 Lower pivoting table
12 Upper pivoting table
13 Locking hooks
14 Quick mounting wedge
15 Wheels for brief transport
16 Transportation handles
17 Hydraulic oil tank
Transport
Transport with a fork lift truck:
For shipment, the machine is fixed to a pallet by steel bands. It is protected by a plastic sheet cover.
At least two persons are required to lift it off the pallet.
Tilt it carefully to the side with the wheels and let it glide off the pallet.
Attention: The log splitter has a high centre of gravity - danger of tipping over!
Transportation by Hand
In order to move the wood splitter, splitting knife 9 must be pushed all the way down. The splitter must be tipped slightly to the splitting column with the transport handles, until the machine inclines to the wheels and can be moved.
Transport with a crane
Pull through 2 ropes crosswise under the frame and lift carefully.
Attention: Never lift the machine at the splitting knife!
Storage conditions:
Maintain the following storage conditions:
- dry, sheltered storage location
maximum humidity 80% - temperature range -20°C ... +60 °C
The machine should be operated under the following conditions:
| minimum maxima | recommended | |
| temperature 5 °C° 40 °C° | 16 °C° | |
| humidity | 95 % 70 % |
Setting-up
Prepare the location, where the machine will stand. Clear enough space to ensure safe and trouble-free working.
The machine is designed for operation on level surfaces and must stand stably on a level, solid underground.
Assembly
Packaging considerations have dictated that your wood splitter is not completely assembled upon delivery.
Assembling the operating arm, Fig. 2.2/2.5
Place operating arm A in the lateral connection C, and tighten the hexagon screw D, with the disc and the safety bolt. The safety bolt should only be tightened to the point where the operating arm can still be moved.
Assemble of the support wheels Ox 3-1200 Fig. 2.2/2.4
Screw the two tabs (D) of the support wheels with 2 hexagon bolts M10 and 2 slices of 10mm screw on both sides by hand, to the housing.
Sliding axis (E) by the two tabs (D).
Slide Washer, support wheel (F), washer on both sides on the axis. After this fix it by pressing the safety caps (G) on the axis. Tighten both straps.
Mount the rubber stopper, Fig.3.4
Mount the rubber stopper on both operating arms with a retaining plate, 2 carriage plates M 8x35, 2 washers 8 mm and 2 safety nuts M8.
Function Test
Before every use you should conduct a function test.
| Action: Result: | |
| Pressing both handles down. | The splitting knife moves down - as far as approx. 5 cm above the table. |
| Releasing either handle. | The splitting knife stays in its position. |
| Releasing both handles. | The splitting knife moves back into top position. |
Operating Instructions
Travel limit
- Move the splitting knife into the desired position.
- Release one control lever,
- Switch motor off.
- Release second control lever,
- Move the travel adjustment bar up until it is under tension and fasten it with the tommy screw.
- Switch motor on, and
- Check upper position.
Splitting
- Place the wood on the table and hold it down with the two handles. Push the handles down. Once the splitting knife enters the wood, push the handles outward and with an equal amount of pressure downward. This prevents the pressure from being placed on the holding arms.
- Only split squarely cut logs.
- Split logs in upright position.
- Never in horizontal position or across.
- Wear appropriate gloves while splitting logs.
Attention: When operating the machine the pivoting table must always be in the locked position!
Pivoting table for short pieces of wood up to 60 cm, Fig. 3.1
In order to split wood, both of the pivoting tables must be in the operating position and locked.
Pivoting table for wood up to 96,5 cm, Fig. 3.2
In order to split wood of this length, the lower pivoting table must be in the operating position and locked.
Table for long pieces of wood up to 104/133 cm, Fig. 3.3
In order to split wood of this length, both pivoting tables must be swung outward.
Efficient working
- upper position is approx. 5 cm above the log
- lower position is approx. 5 cm above the table
Start-Up
When working at temperatures less than 5^ , the machine should be operated ca. 15 minutes without a load, so the hydraulic oil can warm up.
Make sure that the machine is completely and properly assembled. Before every use, check:
-
the power cords for faults (cracks, cuts and such),
-
the machine for possible damages,
- if all bolts are fastened tightly,
- the hydraulic system for leaks, and
the oil level.
Power on/off
Press the green button to power on.
Press the red button to power off.
Note: Check the function of the on/off-unit before every use by switching it on and off once.
Restart cut-out in case of power failures (zero voltage switch)
In case of a power failure, unintentionally pulling the power plug or a defect fuse, the machine will automatically switch off. To restart the machine press the green button on the switchbox again.
Electrical Connection
Inspect the power cords for damages regularly. Make sure that during this inspection the power cord is not connected to the mains supply.
The power cords must comply with the applicable VDE (German Association for Electrical, Electronic, and Information Technologies) and DIN (German Institute for Standardization) regulations. Use only power cords with the designation H 07 RN.
A type label on the power cord is prescribed.
Faulty power cords
Power cords often suffer insulation damages.
Causes are:
- Pinching, when power cords are routed through windows or door cracks.
- Bending due to improper attachment or routing of the power cords.
- Cuts due to driving over the power cords.
Insulation damages caused by yanking it out of the power outlet. - Cracks in the insulation because of ageing.
Such faulty power cords must not be used and are, due to the damaged insulation, a danger to life!
Three-phase motor 400 V/50 Hz
Power supply 400 volts / 50 Hz.
Power cord and extension cord must have 5 conductors = 3P + N + PR - (3/N/PE).
The extension wires must have a cross-section of at least 2.5mm^2 and must not be longer than 20m
The power supply must be protected by a 16 A (or less) circuit breaker.
After connecting the power supply or after relocating, check the direction of rotation. Invert polarity if necessary.
Turn the polarity inverter inside the power plug.
Maintenance
Always switch motor off for retooling, adjustment, and cleaning.
Pull power plug.
Minor repairs can be carried out by skilled workmen themselves.
Repairs and maintenance work at the electrical installation must be carried out by qualified electricians!
All guards and safety mechanisms must be replaced immediately after completing the repairs or the maintenance work.
Our recommendations:
- Thoroughly clean the machine after each use!
- Splitting knife
The splitting knife is an element subject to wear and tear and needs to be sharpened or replaced by a new one, when necessary.
- Two-hand safety mechanism
The holding/control combination must be kept working smoothly. Occasionally lubricate with a few drops of oil.
-
Moving parts
-
Keep splitting knife guides clean. (from dirt, shavings, bark etc.)
-
Lubricate guides with spray oil or grease.
-
Checking the hydraulic oil level.
Inspect hydraulic connectors for leakage and wear.
Tighten screw fittings if necessary.
Checking the oil level, fig. 4
Check the oil level before every use. A low oil level might damage the oil pump. Check the oil level with the oil dipstick.
For the check the splitting beam must be retracted and the machine must stand levelly.
When do I change the oil?
First oil change after 50 operating hours, then every 250 operating hours.
Changing Oil, fig. 5
- Put the splitting column all the way in.
- Place a container with a capacity of at least 9 l. below the splitter.
- Release the venting hatch A.
- Open the release screw B, so that the oil can run out.
- Close the release screw again and tighten it well.
- Using a funnel, fill 9 l. of new hydraulic oil into the container.
- Screw the venting hatch on again.
Dispose of the used oil in a correct manner at a public collection facility. It is prohibited to drop old oil on the ground or to mix it with waste.
We recommend the following hydraulic oils:
Aral Vitam gf 22
BP Energol HLP-HM 22
Mobil DTE 11
Shell Tellus 22
or equivalent types.
Splitting beam
Slightly lubricate the beam of the splitter before operation. Repeat this process every 5 operating hours.
Apply a little grease or spray oil. The beam must not run dry.
Hydraulics
The hydraulic system is a closed type with oil tank, oil pump, and control valve.
This system is completely assembled at the factory and must not be modified or manipulated.
Check oil level regularly.
A low oil level will damage the oil pump.
Inspect the hydraulic connectors regularly for leakage - tighten if necessary.
Before you commence maintenance or inspection work, clean the working area and keep suitable tools in good condition ready.
The intervals mentioned here apply for normal operating conditions; if the machine is heavily used, the intervals will be shorter accordingly.
Clean the machine panels, covers, and control levers with a soft cloth, dry or moistened with a little neutral cleaning agent. Do not use solvents such as alcohol or petrol, as this might damage the surfaces.
Keep oil and grease out of reach of unauthorized personnel. Read the instructions on the product containers carefully and observe them precisely. Avoid direct contact with skin and wash off well after use.
Service information
Please note that the following parts of this product are subject to normal or natural wear and that the following parts are therefore also required for use as consumables.
Wear parts*: splitting wedge, splitting cross, splitting wedge extension, wedge leadership, hydraulic oil, splitting plant, wedge broadening
- Not necessarily included in the scope of delivery!
Accident Prevention Standards
The machine may only be operated by qualified personnel who are well aware of the contents of this manual.
Before operating the machinery, you must check the integrity of the safety mechanisms and ensure that they are working properly.
Also before operation, you should familiarise yourself with the machine controls, following the operating instructions.
The specified capacity of the machine must not be exceeded. Under no circumstances the machine must be used for anything else but its indented use.
All personnel must wear work clothes as stated in the regulations of the country in which the machine is operated. Wide, loose clothing, belts, rings, and necklaces should not be worn. Long hair should be tied back.
Try to keep the working area tidy at all times. Tools, accessories, and spanners should be kept within reach.
During cleaning or maintenance work the machine must not be connected to the mains supply.
It is strictly prohibited to operate the machine without safety mechanisms or with safety mechanisms disengaged.
It is strictly prohibited to remove or modify safety mechanisms.
You should not carry out any maintenance or adjustments before having carefully read this manual.
The given maintenance schedule must be observed for safety reasons as well as to ensure that the machine performs properly.
The warning labels must be always clean and legible and must be observed in order to avoid accidents. If labels are damaged or missing or belong to parts that were replaced, then those labels must be replaced by original labels ordered from the manufacturer and be attached at the positions prescribed.
In case of fire, dry powder fire extinguishing agents must be used. A burning machine must not be extinguished with water because of the risk of a short circuit.
If the fire cannot be extinguished immediately, watch for liquids leaking.
If the fire is more widespread, the oil tank or the pressurised lines can explode: Therefore, make sure that you are not getting into contact with the leaking liquids.
Dismantling and Disposal
The machine does not contain any materials that are hazardous to health or the environment, because it is manufactured from materials that are either completely recyclable or can be disposed in a normal way. For disposal, you should use specialist companies or qualified personnel, who know the possible risks and have read these operating instructions and follow them precisely.
If the machine falls into disuse, follow these steps under observance of all applicable accident prevention measures:
- Disconnect the energy supply (electrical or PTO),
- Remove all electrical wires and hand over to a specialised collecting point, while observing national regulations.
- Drain the oil tank and deliver the oil in a closed container to a collecting point, while observing national regulations.
- Deliver all other machine parts to a scrap collection point, while observing national regulations.
Make sure every part of the machine is disposed of in accordance with all applicable national regulations.
For faults not mentioned here, please contact the customer service of the company scheppach.
Troubleshooting
| Fault | Possible Causes | Remedy | Level of Danger |
| The hydraulic pump is not running. | No power Check if there is voltage on the wires. | Electrical hazardThis work step must be carried out by a service electrician. | |
| The thermal circuit breaker of the motor tripped. | The thermal circuit breaker will switch back on after the motor cooled down. The motor can be restarted. | - | |
| The beam is not moving downwards. | Low oil level Check oil level and replenish. | Danger of contamination! This work step may be carried out by the machine operator. | |
| Two hand control out of order | Check attachment of the levers. | Cutting hazard! | |
| Dirt in the beam guides Clean beam. Wrong direction of rotation may damage the pump. | |||
| Motor runs, but beam is not moving downwards. | Wrong direction of rotation of the three-phase motor | Check direction of rotation of the motor and reverse. | Incorrect rotation can damage the pump |
Maintenance and Repairs
All maintenance work has to be carried out by qualified personnel in strict adherence to the operating manual in hand. Before each maintenance procedure, you must take all possible precautions, switch off the motor, and disconnect the power supply (pull the power plug if necessary). Attach a sign to the machine explaining the breakdown situation: "Machine out of order because of maintenance: Unauthorised persons are forbidden to stay near the machine or to operate it."
Fabricant:
NOS RECOMMANDATIONS :
Günzburger Straße 69
D-89335 Ichenhausen
Tyskland
Kare kunde
Only for EU countries.
Do not dispose of electric tools together with household waste material! In observance of european directive 2012/19/EC on wasted electrical and electronic equipment and its implementation in accordance with national law, electric tools that have reached the end of their life must be collected separately and returned to an environmentally compatible recycling facility.
FR
Apparent defects must be notified within 8 days from the receipt of the goods. Otherwise, the buyer's rights of claim due to such defects are invalidated. We guarantee for our machines in case of proper treatment for the time of the statutory warranty period from delivery in such a way that we replace any machine part free of charge which provably becomes unusable due to faulty material or defects of fabrica
tion within such period of time. With respect to parts not manufactured by us we only warrant insofar as we are entitled to warranty claims against the upstream suppliers. The costs for the installation of the new parts shall be borne by the buyer. The cancellation of sale or the reduction of purchase price as well as any other claims for damages shall be excluded.