USER MANUAL Freo X10 Pro Narwal
Thank you for purchasing Narwal products. To access comprehensive support from Narwal, you are recommended to read carefully the manual and illustrations before using the product. Please keep the manual property.
The manual may be updated from time to time based on product updates and user feedback. Please scan the QR code below to browse the official website and view the latest version.
In case of any problem in using the product, please contact Narwal after-sales customer service through the following ways:
Customer service email:
Enel du service client - support.na@global.narwal.com (Amér que du Nord)
support.naglobal.narwal.com (North America)
support.eu@global.narwal.com(Germany)
support it@global.narwal.com (Italy)
support.fr@global.narwal.com(France)
support.cs@gloca.narwal.com(Spain)
*For other countries, please refer to the after-sales contact information provided by your local vendors.
We wish you a pleasant experience!
Electronic version of the user manual
The image is too blurry to recognize any text content.
Regional Availability and Compatibility
Based on user experience consideration and relevant legal and compliant requirements, Narwal products normally sold by Narwal (and its authorized retailers) are only available for use and after-sales service support in the country or region in which they were originally sold. If a product is shipped to any other countries or regions, you might not be able to use the Narwal App to bind the product or perform relevant operations. We recommend that you purchase the local version of the Narwal product from Narwal or its authorized retailers in order to obtain the best product use and service experience.
For avoidance of doubt, Norwal products sold by Narwal (and its authorized relators) in the PRD are only available for use and other-sales service support in the PRD (for this purpose, excluding Hong Kong, Macao and Taiwan).
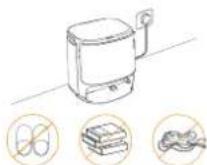
1. Product At A Glance
1.1 Check list
Main parts
Robot×1
(Dust collection box × 1, roller brush × 1 installed)
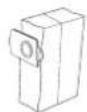
Multifunctional dock × 1
(Including clean base × 1, clean water tank × 1 and dirty water tank × 1)
Accessories
Anti-tangling side brush = 1
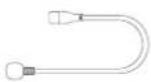
Power cord × 1 Dust Bag × 1


Replaceable cleaning filter × 1
1.2 Robot Accessory
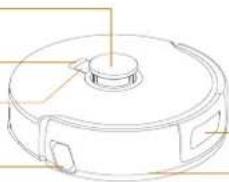
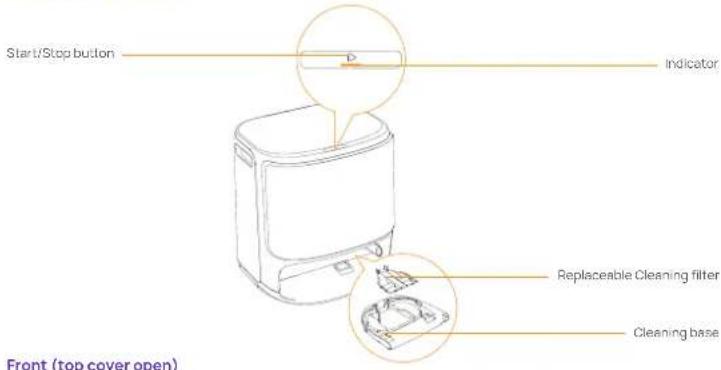
Front of the Robot (top cover closed)
Radar sensors
Recall button
Start/Stop button
natural_image
Line drawing of a circular mechanical component with a central hub and side slots (no text or symbols)
Structured light forward sensor
Bumper sensor
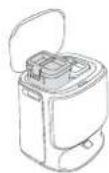
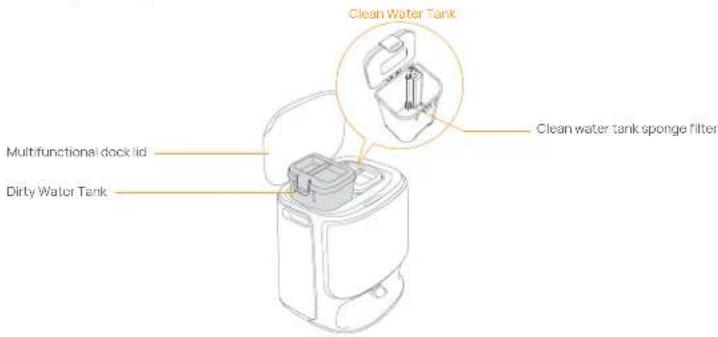
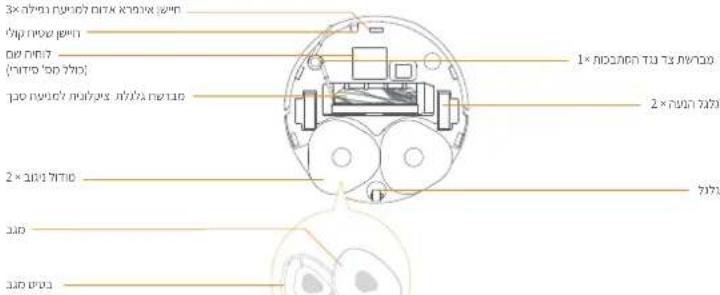
Front of the Robot (top cover open)
[Non-Text]
Robot top cover
RESET button
natural_image
Technical line drawing of a vacuum cleaner with open lid and internal components (no text or symbols)
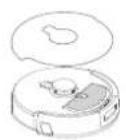
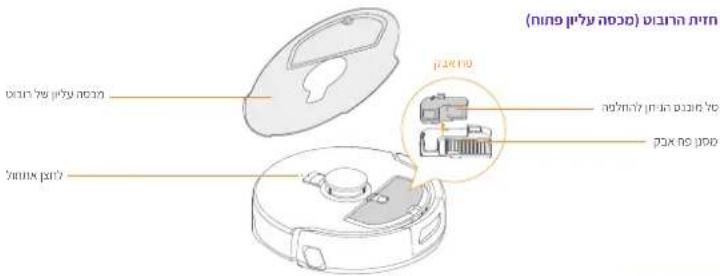
Dust Bin

Replaceable insert bin
Dust Bin Filter
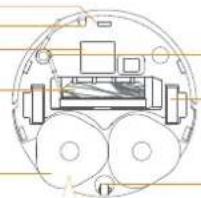
Robot bottom
Infrared anti-drop sensor ×3
Ultrasonic carpet sensor
Nameplate
(S/N included)
Zero-Tangling Floating Brush

Anti-tangling side brush × 1
Drive wheel × 2
Mopping module × 2
Mop
Mop base
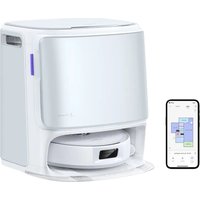
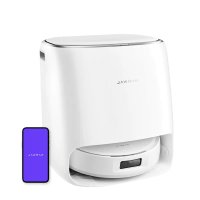
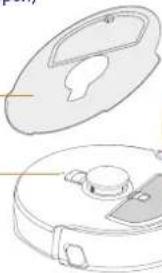
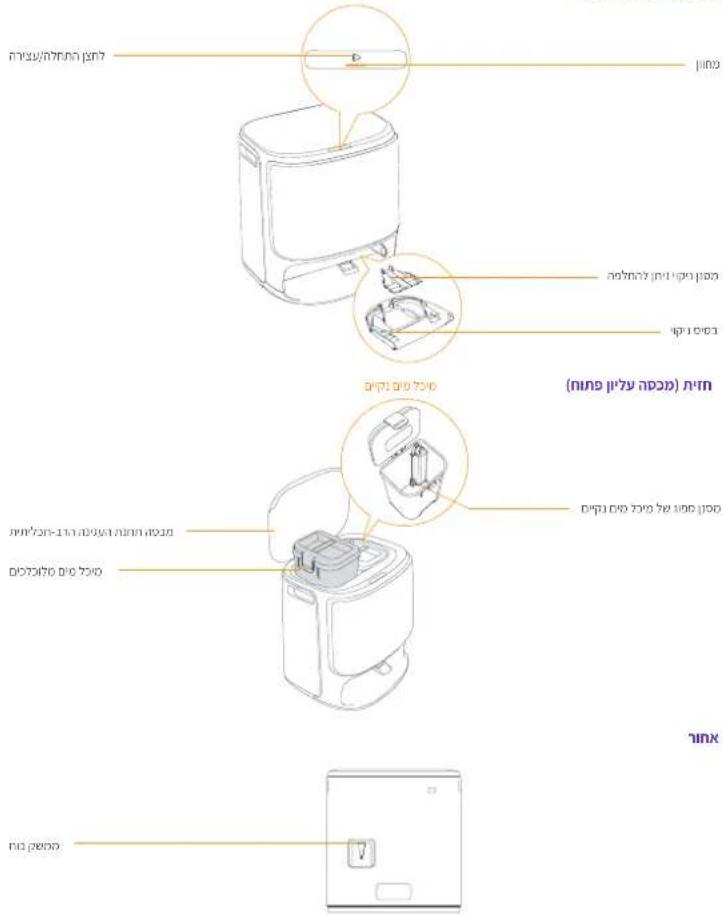
1.3 Multifunctional dock components
Front (top cover closed)
Front (top cover open)
Back
Robot buttons
| Button | Action Function |
| Start/Stop | Short press | Start/Pause/Resume Task |
| Press and hold for 2s | On/Off |
| Recall | Short press | Return to the dock |
| Press and hold for 2s | Turn On/Off Child Lock |
| Reset | Short press | Enter the pairing mode |
| Press and hold for 5s | Unbind the account and clear user data |
| Press and hold for 10s | Restore factory settings |
Multifunctional dock button
Action Function
| Short press | Start/pause/resume the current task |
| Double click | Start/cancel mop washing |
| Press and hold for 2s | End current task |
| Press and hold for 10s | Enter/exit the pairing mode |
| Five clicks | Automatic Water Exchange Module Self-Check |
Robot indicators
| Robot Indicators | Meaning |
| Steady white | Steady Red |
| Breathing white | Powering on/Pairing/Updating |
| Steady Red | Robot error or disconnected |
| Note: The touch panel goes dark after no operation for 50 seconds. |
Multifunctional dock indicators
| Indicator | Meaning |
| Off | Idle/drying |
| Steady | In task/pause/standby mode |
| Breathing | Updating/refill/discharge self-check underway |
| Flashing | Error/disconnected |
2. Get Ready Before Use
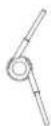
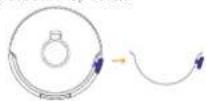
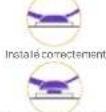
(1) Install the side brushes
Press the side brush firmly into the card slot and install it in place with a click.


Not installed properly
(3) Remove the paper trays and install the replacable cleaning filter
- Remove the paper trays that fix the robot inside the dock.
- Take out the cleaning tray, clip the replaceable filter into the slot of the tray and press it down to install it in place.
- Put the cleaning base with cleaning filter installed back to the dock.

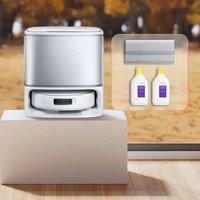
(5) Dust Bag Installation
- Remove the dock front cover.
- Insert the dust bag into the slot in the marked direction until it hits the bottom.
• Install the dock front panel in proper place.
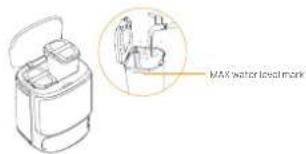
(7) Add clean water
- Open the clean water tank and fill it with clean water
- Please fasten the upper lid of the water tank and put it back into the Multifunctional dock.
(2) Remove the anti-collision foam
- Lift the top cover sticker to open the robot top cover and remove the anti-collision foam
- Close the robot's top cover.
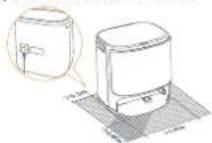
(4) Placing the multifunctional dock
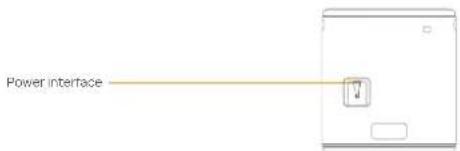
- Plug in the power cord in the back of the dock to connect the power.
- Leave an open space of at least 0.45 meter long in front of the dock for the robot to enter and leave the dock.
Tips: DO NOT put the dock close to a heat source.
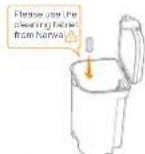
(6) Add the floor cleaning tablet
Add a floor cleaning tablet to the clean water tank. Note: Cleaning Tablet should be purchased separately.
(8)Boot settings
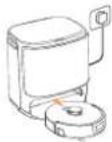
Push the robot into the dock with side brushes facing outward. The dock will beep once to indicate that charging is successful and the robot will turn itself on and prompt a voice message.
(9) Connect and bind the robot in the App
Download the Narwal App and follow the instructions for connecting and binding the robot. Note In the App device page, tap "Settings" > "Device" and then press hold the "Restart Robot" for 10s to turn on/off the power-saving mode.
The power-saving model is only available in North America.

3. How to Use
Before using the robot, please make sure you have finished the installation and multifunctional dock setup in Chapter 2.
3.1 Organize the home environment
A. Put away the clutter on the floor, e.g. scattered cables, rags, slippers, clothes, and books, slippers, clothes, and books.
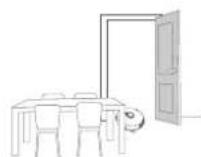
B. Open the doors of the rooms to be cleaned and arrange the furniture to leave as much space as possible for cleaning.
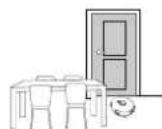
C. Leave other doors closed and install the fence to prevent the robot from entering elevated or low areas.
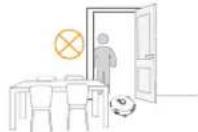
E. DO NOT stand in front of the robot, on the threshold, or in narrow aisles to avoid omission.
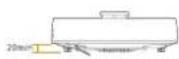
D. The maximum obstacle crossing height is 20mm and the robot cannot enter rooms with a threshold height of over 20mm. You can purchase Narwal Threshold Ramp to help the robot climb over obstacles.
3.2 Mapping
Before cleaning a new home, the robot needs to explore the home and create a map. Before first-time cleaning, you can trigger mapping by short pressing the button on the dock or tapping [Start Mapping] in the App.
Note:
-
Once a map is created, it can be edited in the App.
-
Do not move the dock after mapping finished, otherwise you need to rebuild the map. If there is a change in the location of large pieces of furniture, it is recommended to rebuild the map.
3.3 Cleaning
Select cleaning modes
The product comes with four built-in cleaning modes: Vacuum, Mop, Vacuum and Mop, and Vacuum then Mop. You can select and adjust parameters like cleaning cycles, suction, and mop humidity for each mode in the App.
Set Freo Mind
The Freo Mind is an intelligent cleaning assistant. When Freo Mind is turned on, the robot will intelligently adjust cleaning parameters, without needing manual settings.
You can select whether to activate Free Mode when starting a cleaning task in the App.
Start cleaning task
You can start the robot for cleaning in three ways
• Tap • [Start Cleaning] in the App:
- Short press the ⏻ [Start/Stop] button on the robot to start cleaning. The robot will activate the Vacuum Mode by default;
- Short press the button on the dock to start cleaning. The robot will activate the Vacuum and Mop Mode by default.
Note: You can adjust the cleaning mode and set more cleaning parameters in the App.
Pause/resume the current task
You can pause/resume the current task in three ways:
- Tap [Pause]/ [Resume] in the App;
- Short press the ⏻ [Start/Stop] button
- Short press the dock button
Dust collection
When vacuuming task started, solid waste in the robot dust box will be automatically vaccinated to the dust bag in the dock. You can also tap dust collection in the App to start dust collection manually.
Clean Mop
If the robot is set for multiple mopping runs or the area for cleaning is large, the robot will automatically return to the dock for mop washing.
The number of mopping runs and return frequency can be modified in the App before cleaning starts, and the modification during the current cleaning task will take effect during the next task.
You can also have the Multifunctional dock wash the mop
• Tap ▲ [Mop Washing] in the App;
• Double-click the dock ▶ [mop]
Note: Please DO NOT pull the robot out the deck during mop cleaning process so as to avoid component damage.
End current task
The robot will navigate itself back to the dock when cleaning ends. You can view the current cleaning report in the App. You can manually end the task in the following three ways:
- Press 2s [Task End] In App]
- Short press robot Home [Recall];
- Long press the dock button for 2s
Start mop drying
After the last mopping run, the robot will return to the dock for mop washing and drying. The crying time can be modified in the App.
You can also start mop washing and drying manually in the following way
• Tap ▲ [Mop Washing & Drying] In the App;
4. Parameters
4.1 Specifications
| Robot(YJCC027) | Multifunctional dock(YJCB027) |
| Dimensions: 355*350*107.7 mm | Dimensions: 431*403.5*461.5mm |
| Weight: 3.7 kg | Weight: 8.4 kg |
| Rated voltage: 14.4V= (lithium battery) | Rated input: 220-240V~, 50-60Hz100-127V ~,50-60Hz(The actual rated output is based on the product nameplate information.) |
| Rated output: 20V= 2.0A |
| Rated powerCharging: 45WDust Collection: 450WDrying: 65W |
| Wi-Fi | |
| Protocol: IEEE 802.1lb/g/n | |
| Frequency Range: 2412-2472MHz | |
| Max. Transmitter Power (EIRP): ≤20dBm | |
| Bluetooth | Bluetooth |
| Protocol: BLE 5.0 | Protocol: BLE 5.0 |
| Frequency Range: 2402-2480MHz | Frequency Range: 2402-2480MHz |
| Max. Transmitter Power (EIRP): ≤10dBm | Max. Transmitter Power (EIRP): ≤10dBm |
| Battery (Robot) |
| Battery Pack Quantity Per Pack: | 1 pcs |
| Battery Type: | Rechargeable U-ion Battery |
| Nominal Voltage: | 14.4V= |
| Quantity of Battery Cells Per Battery Pack: | 8 pcs |
| Rated Capacity, Rated Energy: | 5000mAh, 72Wh |
fr-ca
natural_image
Technical line drawing of a circular mechanical component with a central hub and side slots (no text or symbols)

Non-install correctionment
(2) Retirez la mousse anti-collision
natural_image
Technical line drawing of a circular mechanical component with mounting holes and a central hub (no text or symbols)
natural_image
Illustration of two kitchen appliances with food containers and a tray, showing internal components (no text or symbols)
natural_image
Line drawing of a circular mechanical component with a central hub and side slots (no text or symbols)
natural_image
Line drawing of a circular mechanical component with a central hub and side slots (no text or symbols)
Non reliable correction
natural_image
Illustration of a food toaster with three steps showing the process from oven to tower (no text or symbols present)
(2) Retirez la mousse anti-collision
natural_image
Line drawing of a circular mechanical component with a central hub and side slots (no text or symbols)
natural_image
Technical line drawing of a mechanical component with top and side views (no text or symbols)
natural_image
Line drawing of a circular mechanical component with a central hub and side ports (no text or symbols)
natural_image
Line drawing of a circular mechanical component with a central hub and side slots (no text or symbols)
natural_image
Illustration of a toaster oven and two separate kitchen appliances with heat sinks, shown in step-by-step diagrams (no text or symbols)
natural_image
Line drawing of a circular mechanical component with a central knob and side ports (no text or symbols)
Przedni czujnik
natural_image
Line drawing of a circular mechanical component with a central hub and side slots (no text or symbols)
(5)Lắp túi rác
natural_image
Line drawing of a circular mechanical component with a central knob and side brackets (no text or symbols)
The following table is a list of 10 items, including the first item and the last item.
הכלה
1. 2017年1月1日
1 × 2000
1× p1× n1p2
natural_image
Diagram of a mechanical assembly with rollers and a central device (no text or labels)

1 × 100000000000000
הכלה-הכלההוּרָהוּרָהוּרָהוּרָהוּרָהוּרָהוּרָהוּרָהוּרָהוּרָהוּרָהוּרָהוּרָהוּרָהוּרָה
(בִיַעְפֹשׁ)
| הכלה | הכלה |
| ### / ### | ### |
| ###/###/###/###/###/###/###/###/###/###/###/###/###/###/###/###/###/###/###/###/###/###/###/###/###/###/###/###/###/###/###/###/###/###/###/###/###/###/###/###/###/###/###/###/###/###/###/###/###/###/### | ### |
| ###/###/###/###/###/###/###/###/###/###/###/###/###/###/###/###/###/###/###/###/###/###/###/###/###/###/###/###/###/###/###/###/###/###/###/###/###/###/###/###/###/###/###/###/###/###/###/ | |
הכלהה-הכלה.2
natural_image
Illustration of two toaster machines with open doors and internal compartments, showing exterior and front views (no text or symbols)
הכלה (5)
•
(7) כרְשָׁה
(6) Household and household housing
- 2016-10-01 19:30, 19:30, 19:30, 19:30, 19:30, 19:30, 19:30, 19:30, 19:30, 19:30, 19:30, 19:30, 19:30, 19:30, 19:30, 20
natural_image
Top-down schematic of a mechanical device with wheels and components (no text or labels)

Manufacturer/Fabricant: Yunjing Intelligence Innovation (Shenzhen) Co., Ltd.
Address/Adresse: Room A2901, Yunzhongcheng, Building 1, Vanke Yuncheng VI, Dashi 2nd Road, Xili Community, Xili Street, Nanshan District, Shenzhen, Guangdong, China

Copyright © 2025 Yunjing Intelligence Innovation (Shenzhen) Co., Ltd. All Rights Reserved.
NARWAL is a trademark of Yunjing Intelligence Innovation (Shenzhen) Co., Ltd.