SL473 - Power bank Schumacher - Free user manual and instructions
Find the device manual for free SL473 Schumacher in PDF.

| Product Type | Jump Starter and External Battery |
| Brand | Schumacher |
| Model | SL473 |
| Internal Battery | Lithium-ion |
| Starting Output Voltage | 12 V DC |
| USB Output Ports | 1 x USB 5 V/2.4 A, 1 x USB QC 3.0 (5 V/3 A, 9 V/2 A, 12 V/1.5 A) |
| Wireless Charging | 10 W |
| Charge Input | Micro-USB / USB-C, 5 V, 2 A |
| Full Charge Time | 3 to 5 hours |
| Integrated LED Light | Yes, SOS and strobe modes |
| Smart Cable | Yes, with reverse polarity, short circuit and overheat protection |
| Emergency Start Function | For 12 V lead-acid batteries |
| Minimum Charge Required for Start | 75% of internal battery |
| Max Start Duration | 3 seconds, 1 minute pause between attempts |
| Max Number of Attempts | 3 consecutive |
| Operating Temperature | -10 °C to +45 °C |
| Cleaning | With a dry cloth |
| Maintenance | Recharge at least once a month if unused |
| Included Accessories | Smart cable with clamps, USB/USB-C cable, travel case |
Frequently Asked Questions - SL473 Schumacher
User questions about SL473 Schumacher
0 question about this device. Answer the ones you know or ask your own.
Ask a new question about this device
Download the instructions for your Power bank in PDF format for free! Find your manual SL473 - Schumacher and take your electronic device back in hand. On this page are published all the documents necessary for the use of your device. SL473 by Schumacher.
USER MANUAL SL473 Schumacher
BOOSTER LITHIUM AND USB POWER SOURCE
SL 472 SL 473 SL 474
EN · English English 2
AR · Arabic العربية 8
DA · Danish Dansk 14
DE · German Deutsch 20
IT · Italian Italiano 50
EN - English - Instructions for use
Charge the booster immediately after purchase, after each use and every 30 days or when the charge level falls below 85%, to keep the internal battery fully charged and extend battery life.
- CAUTION - SAFETY INSTRUCTIONS
 | Read the instructions before use. Keep these instructions for future reference. This manual will explain how to use the appliance safely and effectively. Please read and follow these instructions and safety guidelines carefully. Failure to do so could result in serious injury or death. | |
 | Read, understand and follow all instructions of the battery, vehicle and any equipment used. Review the cautionary markings on the battery and on the engine. | |
 | Do not expose to rain, snow, moisture or dust. | |
 | WARNING: Explosive gases. Prevent flames and sparks. Provide adequate ventilation during charging/use. | |
 | Risk of electric shock. | |
 | Risk of fire. | |
 | Risk of hazardous materials. | |
 | Wear protective clothes; complete eyes and body protection, including safety goggles. | |
1.1 Keep out of reach of children.
1.2 The appliance is not to be used by persons (including children) with reduced physical, sensory or mental capabilities, or lack of experience and knowledge, unless they have been given supervision or instruction.
1.3 Children being supervised not to play with the appliance.
1.4 Do not use with non-rechargeable batteries.
1.5 Use in a dry, well-ventilated area away from liquids.
1.6 Use only attachments recommended by the manufacturer.
1.7 Do not use the appliance with damaged input or output cables.
1.8 Do not open or disassemble the appliance; take it to a qualified service person when service or repair is required.
1.9 Do not use the appliance if it has received a sharp blow, been dropped or otherwise damaged in any way.
1.10 Do not put fingers or hands into the appliance.
1.11 Never put the appliance on top of the battery while using it.
1.12 Do not attempt to start a damaged battery.
1.13 Never start a frozen battery. Do not permit the internal battery of the appliance to freeze.
1.14 Never connect the appliance to a battery or starter which is in short-circuit.
1.15 Do not use the booster to jump start a vehicle while charging the internal batteries.
1.16 Keep away from jewelry. Remove personal metal objects such as rings, bracelets, necklaces and watches when working with a lead-acid battery. A lead-acid battery can produce a short-circuit current high enough to weld a ring or the like to metal, causing a severe burn.
1.17 Keep away from tools. Be extra cautious, to reduce the risk of dropping a metal tool onto the battery. It might spark or short-circuit the battery or other electrical part that may cause an explosion.
1.18 Never allow clamps to touch together or contact the same piece of metal.
1.19 Consider having someone close enough by to come to your aid when you work near a lead-acid battery.
1.20 If battery acid contacts your skin or clothing, immediately flood the area with water for at least 30 minutes. If acid enters your eyes, immediately flood the eyes with running water for a least 10 minutes and get medical attention right away.
1.21 If battery acid is accidentally swallowed, do not induce vomiting. Seek medical attention immediately.
1.22 Determine the voltage of the battery by referring to the vehicle owner's manual and make sure that the output voltage of the appliance is correct.
1.23 Position the output cables to reduce any the risk of damage by the hood, door and moving or hot engine parts. If it is necessary to close the hood during the jumps starting process, ensure that the hood does not touch the metal part of the battery clamps or cut the insulation of the cables.
1.24 The battery terminal not connected to the chassis has to be connected first. The other connection is to be made to the chassis, remote from the battery and fuel line.
1.25 Refer to the instructions for cleaning and user maintenance.
1.26 Cleaning and user maintenance shall not be made by children without supervision.
1.27 The appliance must only be supplied at safety extra low voltage corresponding to the marking on the appliance.
1.28 This product contains a lithium ion battery. In case of fire, please contact the emergency service to seek help. You may use a dedicated extinguisher to extinguish the fire. Use water in last resort. Never attempt to pick up or move a hot smoking, or burning product, as you may be injured.
2. GENERAL INFORMATION
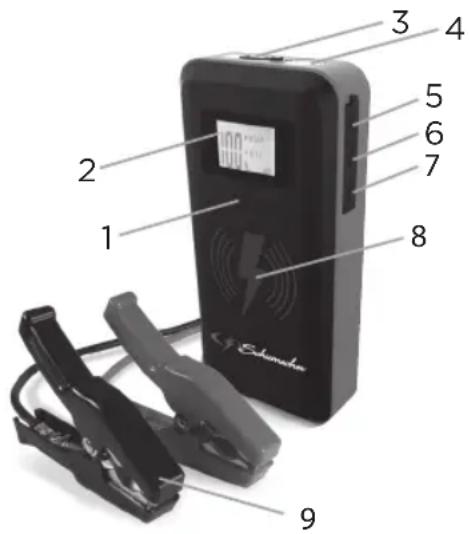
2.1 Description
- Display button
- LCD display
- Output socket for Smart cable
- LED light
- USB-C input socket for recharging
- USB output port 5 V - 2.4 A
- USB output port 5 V - 3 A
- Pad for wireless charging
- Smart cable with battery clamps
Not shown:
Type C / USB cable & Travel bag
3. THE INTERNAL BATTERY
3.1 Charging level
Checking the level of the internal battery:
Press the display button. The LCD display will show the battery's percentage of charge. A fully charged internal battery will read 100%. Charge the internal battery if the display shows it is under 85%.
3.2 Charging the internal battery
Charge the unit as soon as possible after use. Never completely discharge the battery. Use a 2 A USB charger (not included), or a 2 A USB charging port to quickly recharge the booster. Using a charger with less than 2 A will increase charge time.
- Plug the USB-C end of the charging cable into the input port. Next, plug the USB end of the charging cable into a charger's USB port.
- Plug your charger into a live AC or DC power outlet.
- The LCD display will light; the digit begins to flash and show "IN", indicating that charging has begun.
- By using the 5 V DC, 2 A charging input, the booster will be fully charged in about:
SL472: 2.5-4 hours
SL473: 3-5 hours
SL474: 7-8 hours
-
When the unit is fully charged, the display will show "100%".
-
When the battery is fully charged, disconnect your charger from the outlet, and then remove the charging cable from the charger and the unit.
4. USING THE LED LIGHT
- Press the display button.
- Hold down the display button for 3 seconds.
- Once the LED light is on (steady glow), press and release the display button to cycle through the following modes:
- Flash for an SOS signal;
- Flash in strobe mode
-
When finished using the LED light, press the display button until the light turns off.
-
Recharge the unit as soon as possible after each use.
5. CHARGING A MOBILE DEVICE
5.1 Charging with the USB ports
The booster includes two USB ports. One provides up to 2.4 A at 5 V DC; the other is a Quick Charge 3.0, which provides up to 5 V at 3 A, 9 V at 2 A or 12 V at 1.5 A.
- Consult your mobile device manufacturer for proper charging power specifications.
Connect a mobile device cable to the appropriate USB port. - Press the display button. Charging should begin automatically. The display will show which port is in use.
- Charging time will vary, based on the mobile device battery size and the charging port used.
NOTE: Most devices will charge with either USB port, but may charge at a slower rate.
-
When finished using the USB port, disconnect the charging cable from your mobile device and then disconnect the charging cable from the unit. The unit switch OFF automatically.
-
Recharge the unit as soon as possible after each use.
NOTE: If no USB device is connected, power to the USB ports will automatically shut off after 30 seconds.
5.2 Wireless charging
The wireless charging pad provides 10 W of power to quickly charge your compatible mobile devices.
Consult your mobile device manufacturer to make sure your device supports wireless charging. Place the compatible device face-up on top of the charging pad.
- Press the display button.
- Charging should begin automatically. A symbol appears on the display.
- When finished charging, remove your mobile device.
- Recharge the unit as soon as possible after each use.

6. OPERATING INSTRUCTIONS
6.1 To start a vehicle
IMPORTANT:
- Using the booster without a battery installed in the vehicle will damage the vehicle's electrical system.
- Only jump start a 12 V lead-acid battery system vehicle.
- Only use the smart cable provided with the product for the jump start function.
NOTE: The internal battery must have a charge if at least 75% to jump start a vehicle.
Ignite OFF and all electrical devices (heating, lighting...) before using the booster.
Lay the DC cables away from any fan blades, belts, pulleys and other moving parts.
- Connection to the booster - Stand-by mode
Plug the battery clamps smart cable into the booster's output socket. The green LED is flashing on the smart cable, which means that the booster is in "Jump Start Stand-by mode".
- Connection to the battery
Check first if the negative terminal is connected/grounded to the chassis. If not, contact your reseller.
Connect the red clamp (+) to the positive terminal (+) of the battery, then connect the black clamp (−) to the earth/chassis of the vehicle (a heavy gauge metal part of the frame or engine block. Do not connect to the carburetor or fuel lines).
- Jump Start mode
The green LED on the smart cable turn into solid green, which means that the booster is in "Ready to Jump Start mode".
NOTE: If the vehicle battery is extremely discharged, the initial current draw from the booster may activate short circuit protection in the smart cable. When the condition is corrected, the smart cable will automatically reset.
- Start the engine
Crank the engine for maximum 3 seconds and wait at least 1 minute before a second attempt.
- Disconnect the output cable
After the engine starts, unplug the battery clamps from the booster socket.
- Disconnection
Disconnect the black clamp (-) at first and then the red clamp (+).
- Recharging
Recharge the unit as soon as possible.
6.2 Starting attempt
When using the booster to start an engine, do not crank for more than 3 seconds, and wait at least 1 minute before a second attempt.
If the car does not crank a second time, check the smart cable to see if the green LED is lit (solid). If you hear beeping or an LED is flashing, refer to Troubleshooting.
NOTE: Cold weather may affect the performance of the booster's lithium battery. If you hear only a click and the engine does not turn over, try the following:
With the booster connected to the car battery and the green LED solid on the smart cable, turn on all lights and electrical accessories for one minute. This draws current from the booster and warms the battery. Now try to crank the engine. If it does not turn over, repeat the procedure. Extremely cold weather may require two or three battery warmings before the engine will start.
IMPORTANT: DO NOT attempt to jump start your vehicle more than three consecutive times. If the vehicle will not start after three attempts, consult a service technician.
7. MAINTENANCE AND STORAGE
After unplug and disconnect the unit, use a dry cloth to wipe all battery corrosion and other dirt or oil from the battery clamps, cords, and the outer case.
Charge battery to full capacity before storage. Charge at least once every month, if not in frequent use, to prevent over-discharge.
Store this unit at temperatures between -10^ and +45^ , in a dry place to protect it against humidity and moisture.
8. TROUBLESHOOTING
8.1 Booster
| Problem Solution | |
| The booster's display will not turn on. Make sure the unit is charged. Connect to a power source, to reset. Make sure you have pressed the display. | |
| The thermometer symbol is flashing. The unit is too hot or cold. The thermometer symbol will disappear when the condition is corrected. | |
| The booster will not recharge. Make sure the power source is live. Check if the charging cable is well connected. | |
| The booster turns on, but will not jump start my vehicle. | Check connections. |
| Verify the charge level of the booster is at least 50%. | |
| Do not attempt to jump start your vehicle more than three consecutive times. If the vehicle still does not start, consult a qualified service technician. | |
| Check the red/green LED on the cable and check in below table the problem. | |
8.2 Smart cable LED and alarm behavior
| LED display | Buzzer warning | LED and buzzer description | Description / Reason |
 | Green LED flashing No beep | Stand-by modeCable properly connected to booster but no battery is connected.TO DO: Connect the booster to the vehicle battery. | |
| False detection of high voltage"Fake" high battery voltage is detected, but reverse charging protection did not activate.TO DO: Turn key to jump start the vehicle. | |||
 | Green LED solid No beep | Jump Start Ready modeCable properly connected to both booster and battery.TO DO: A jump starting of the car engine is ready. | |
 |  | 2 Red LEDs solid Rapid beeping | Reverse polarity protectionThe clamp polarity has not been respected.TO DO: Connect the clamps correctly (see step 4.1 - point 2 - Connection to the battery). |
 |  | No lights/LED No beep | Battery exhausted or poor connection(1) the smart cable is not properly connected to the booster OR(2) The jump starter battery is over discharged.TO DO: First check the connection between smart cable and booster. Then check the battery status of the booster. |
 |  | 1 Red LED solid Rapid beeping | Shot circuit protection(1) there is a short circuit on the clamps OR(2) There is a short circuit on the car battery.TO DO: First check the clamp connection.Then check the car battery and replace it. |
 |  ---- ---- | Red and green LED solid Beeps once per second | Temperature protectionThe booster has automatically switched to temperature protection mode.TO DO: Let the booster cool down before considering any new attempt. |

Electrical products should not be discarded with household products. Electrical products used must be collected separately and disposed of at collection points provided for this purpose. Talk with your local authorities or dealer for advice on recycling.