Escort HP 9500 - Talkie Walkie PNI - Free user manual and instructions
Find the device manual for free Escort HP 9500 PNI in PDF.


User questions about Escort HP 9500 PNI
0 question about this device. Answer the ones you know or ask your own.
Ask a new question about this device
Download the instructions for your Talkie Walkie in PDF format for free! Find your manual Escort HP 9500 - PNI and take your electronic device back in hand. On this page are published all the documents necessary for the use of your device. Escort HP 9500 by PNI.
USER MANUAL Escort HP 9500 PNI
CB Radio/CB-Radio/Radio CB/Static radio CB
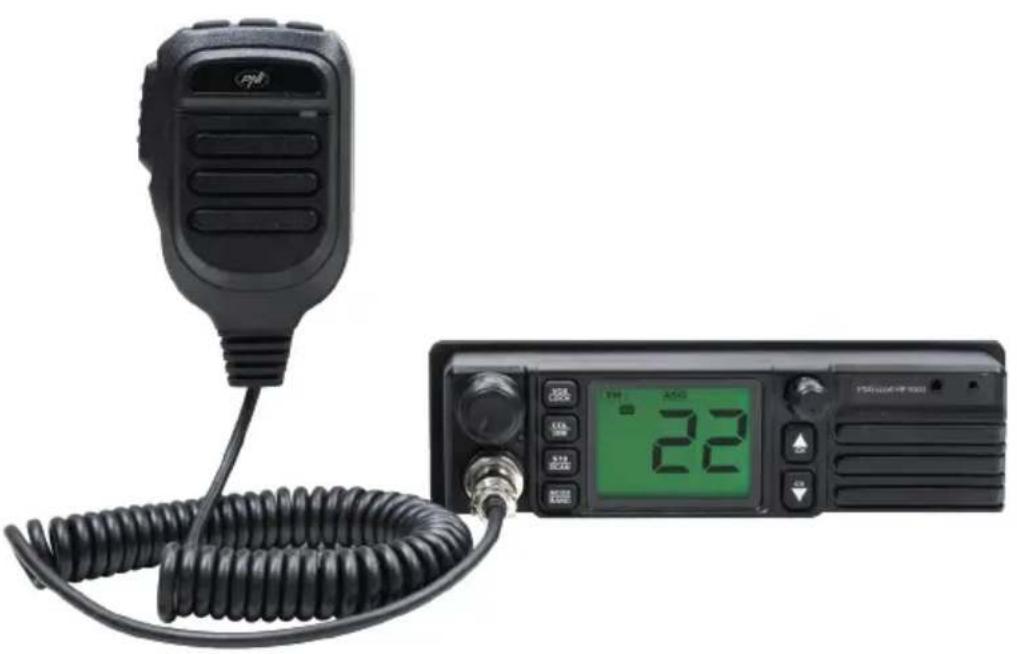
EN User manual 3
BG PbkoBoCTBO 3a ynoTpe6a 12
Please read the following precautions to prevent fire, personal injury or the product's destruction.
Do not attempt to set the radio while driving; it might be dangerous.
This product is designed for 12V or 24V DC power supply.
Do not place the radio on an excessively dusty, damp or unstable surface.
Do not connect the antenna during transmission, risk electric shock.
Please keep the distance from devices that cause interference (such as TV, generator, etc.)
People who use pacemakers are advised to keep distance from the antenna during transmission and especially not to touch it.
Do not approach metal objects to the internal electrical side pf the radio; danger of electric shock.
Avoid exposing the radio to temperatures below -26^ and above +80^ . The temperature inside a vehicle may sometimes exceed +80^ , which can cause irreparable damages to electric devices. Do not expose the radio to direct sunlight.
Do not place anything on the radio, it will prevent it from cooling down.
Check if you have the vehicles battery charged enough to avoid its quick discharge.
It is important to turn the radio off before starting the engine, to avoid damages caused by high starting voltage.
You must use a 2A 250V type F fuse. No not use a fuse with higher value.
If an abnormal smell or smoke is detected as coming from the radio, switch off the appliance immediately.
Do not transmit for a long time, the radio may warm up.
Keep the radio away from children.
OTHERWARNINGS:
Before you connect or use this product, please read these operating instructions carefully. Keep this user manual for future use.
Before using the radio, please connect the antenna. Check the SWR before transmitting. A too high SWR can lead to the destruction of the internal components of the radio, which are not covered by the guarantee.
None of the inner components of the radio can be repaired by the user. In case of damage, contact an authorized centre.
To prevent the risk of fire, use only the recommended power supply.
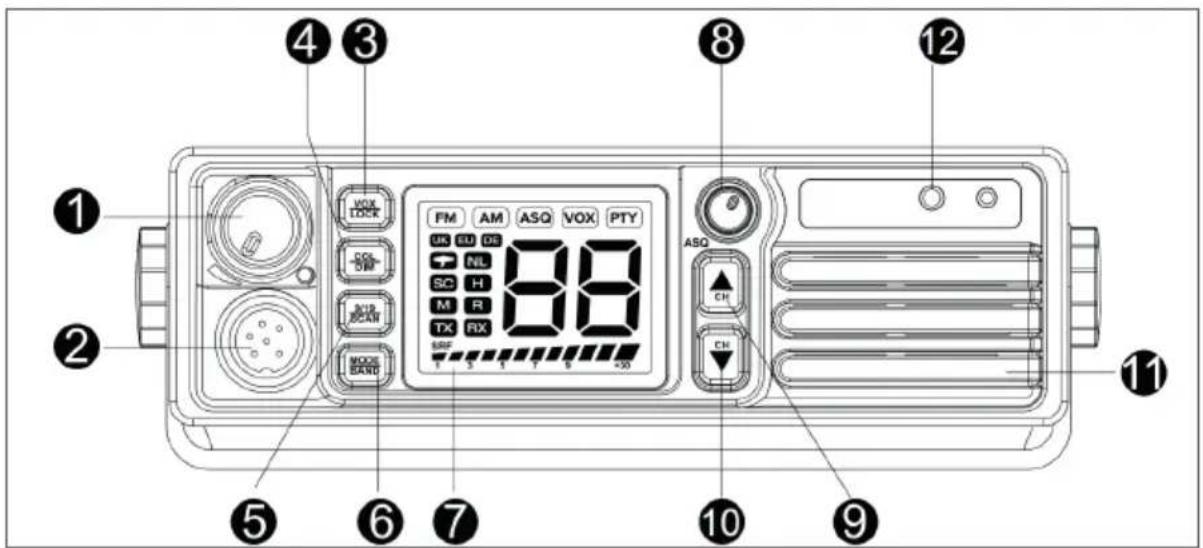
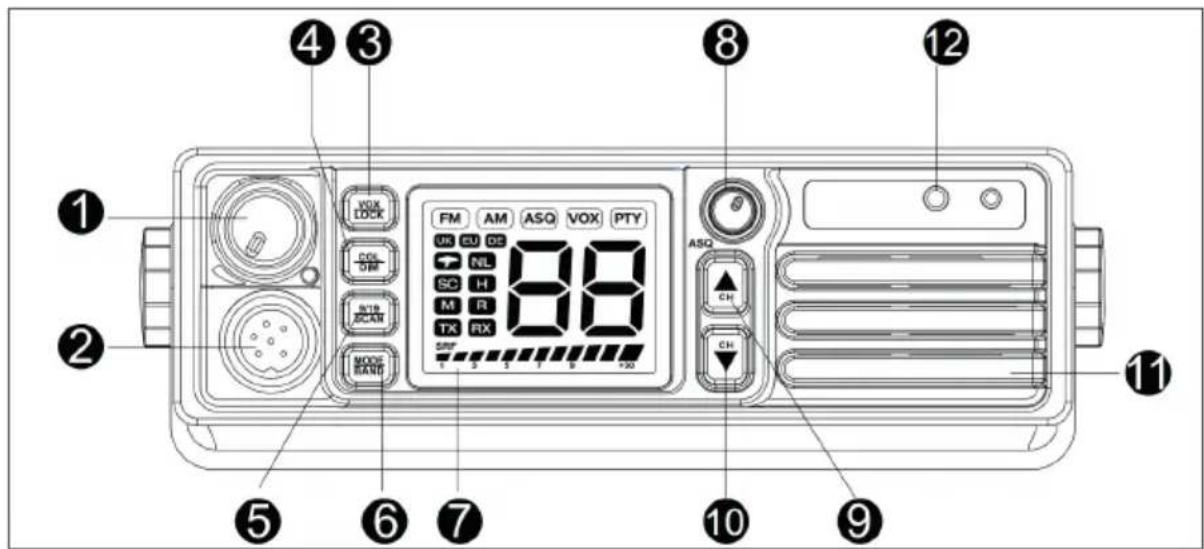
| No. | Short press/Rotation | Long press | |
| 1 | On/off/volume knob | Rotate to the right to turn the radio onKeep turning to the right to adjust the volumeRotate to the left to turn the radio off | - |
| 2 | 6-pin microphone connector | - | - |
| 3 VOX/Lock | Activate the VOX function | Activate the Lock function | |
| 4 COL/DIM | Change the brightness of the screen | Change the color of the screen backlight | |
| 5 9,19/SCAN | The radio switches to the emergency channels | Activate the Scan function | |
| 6 MODE/BAND | Switch between AM/FM | Change the frequency band | |
| 7 LCD screen -- | |||
| 8 SQ | Turn clockwise to change Squelch level | - | |
| 9 CH+ | Change the channel number up | Quickly change the channel number up | |
| 10 CH- | Change the channel number down | Quickly change the channel number down | |
| 11 Speaker | |||
| 12 Earphone 2 pin connector | |||
eennnnnne
DISPLAY
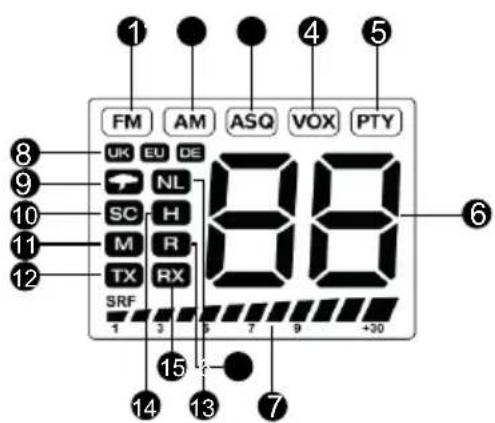
| 1 FM - active FM band 9 The function is not active | |||
| 2 AM- active AM band 10 SC - Scan function active | |||
| 3 | ASQ - Automatic Squelch function is active (activate by pressing the ASQ button on the microphone) | 11 | M - the function is not active |
| 4 | VOX - active VOX function | 12 | TX - it lights up when you transmit |
| 5 | PTY - emergency channels active | 13 | NL - the function is not active |
| 6 | Selected channel number | 14 | H - the function is not active |
| 7 | Signal level when transmitting | 15 | RX - it lights up when you receive |
| 8 | Selected standard | 16 | R - the function is not active |
INSTALLATION INSTRUCTIONS
Check the radio and all its accessories before installation.
5 User manual
Power the radio with the lighter plug included in the package. The radio must be powered at 12V or 24V. The fuse mounted on the power cord protects the radio against damage caused by technical defects or wrong polarity. If the fuse is burned, first remove the cause and then replace it using the F3A 250V type. Check the correctness of the connections before starting the radio. Make sure there is no risk of short circuiting.
Home use
Use the radio at home only with a stable power supply capable of supplying at least 2A at 12V/24V. Unstable voltage sources or battery chargers are not recommended as it can cause damage. Connect the red wire to the positive terminal (+) and the black wire to the negative terminal (-) of the power supply.
Antenna installation
Connect the CB antenna to the antenna connector on the rear panel of the radio. The antenna must be tuned for the CB band. Use for this an S-meter. For a good communication distance, the SWR must be less than 2. A high SWR value may damage the antenna or the cable or it may short circuit the antenna connectors. Never transmit without an antenna.
Note: The antenna must be mounted away from other antennas or sources of interference. The CB antenna is usually mounted on the highest point of the vehicle on a metal surface. A larger metal surface is essential for the operation of the antenna. For installation on fiberglass or plastic cabs, use special antennas.
INSTRUCTIONS FOR USE
Turn the radio on/off
Firts, check the power supply of the radio. Then turn the volume knob to the right to start the radio. The current channel number will appear on the screen. Turn the volume knob to the left to stop the radio.
Volume + / -
When the radio is on, turn the volume knob left or right to adjust the volume to
the desired level.
Channel + / -
Press the CH + and CH- buttons on the radio or the and buttons on the microphone to change the channel number. Long press one of these buttons to quickly switch channels.
Adjust the brightness and the color of the screen
Briefly press the COL/DIM button to change the color of the screen backlight. Options: off (without backlight), blue, red, cold green, purple, cyan, warm green, light blue.
Long press the COL/DIM button to adjust the brightness of the screen. Two levels of intensity are available (100% and 50%).
FUNCTIONS
VOX/LOCK
Briefly press the VOX/LOCK button to activate VOX mode. The VOX symbol will flash on the screen. Press again briefly to exit VOX mode.
Long press the VOX/LOCK button to activate the Lock function. The LC symbol will briefly appear on the screen, followed by the current channel number. All keys on the radio and on the microphone are now locked. Press this button once again to exit Lock mode. The OF symbol will appear on the screen.
Note: If you close the radio, the Lock function will automatically deactivate when you restart.
SQ
Turn the SQ knob clockwise until you hear a click. The manual Squelch adjustment mode is now active. Continue to rotate the knob until you get the desired level of filtering of noise.
ASQ
Briefly press the ASQ button on the microphone to activate the ASQ function. The ASQ symbol will light on the screen. Press and hold the ASQ key on the microphone again to select the level. 5 levels are available (01-05).
9,19/SCAN
Briefly press the button 9,19/SCAN. The PTY symbol will flash on the screen. Channel number 09 will appear on the screen. Briefly press the 9,19 button again to switch to channel 19. Press the 9,19 button again briefly to return to normal operating mode. PTY will disappear from the screen.
Long press the 9,19/SCAN button to activate the SCAN function. The SC symbol will light on the screen. Use the CH+ or CH- buttons on the radio or the and buttons on the microphone to decide the channel scan direction.
Note: If the RX symbol is lit on the screen, meaning the radio is on the reception, the SCAN function will not work. Turn the Squelch knob slightly to the right. The RX symbol will disappear from the screen. Reactivate the SCAN function by long pressing the 9,19/SCAN button.
MODE/BAND
Briefly press the MODE/BAND button to switch between AM and FM mode. If you are in the UK band, briefly press this button to quickly switch to the CE band and vice versa, from the CE band to the UK band.
Changing the standard
Long press the MODE/BAND button to change the frequency band corresponding to your country. Use the CH+ or CH- buttons to find the desired band, then press the PTT key or restart the radio to confirm and save.
| Norm | Frequency (MHZ) | Channels Country | EMG (9/19) |
| EU | 26.965-27.405 | 40CH (4W)AM/FM | AT, BE,BG, CH,CY, DK,EE, ES, FI,FR, GR,HR, HU,IE, IS, IT,LT, LU, LV,NL, NO,PT, RO,SE, SI |
| CE | 26.965-27.405 | 40CH (4W)FM only | RO, MT |
| UK* | 27.60125-27.99125 | 40CH (4W)FM only | UK |
| PL | 26.960-27.400 | -5KHZ40CH (4W)AM/FM | PL |
| IO | 26.965-27.405 | 40CH (4W)AM/FM | IT |
| I2 | 26.965-26.955 | 34CH (4W)AM/FM | IT |
English
| dE | 26.965-27.405 | 01CH-40CH(4W) AM/FM | DE | CH09:27.065MHz AM/FMCH19: 27.185 AM/FM |
| 26.565-26.955 | 41CH-80CH(4W) FMonly | |||
| In | 26.965-27.275 | 27CH(4W)AM/FM | IN | CH09:27.065MHz AM/FMCH19:27.185MHz AM/FM |
- In the UK norm, to quickly switch to the CE norm, briefly press the MODE/BAND key. CE appears on the screen. Press the MODE/BAND key again to return to the UK norm.
Reset
When the radio is turned off, press and hold the VOX/Lock button while turning on the radio (by turning the volume knob). The radio enters the reset mode. The rE symbol will appear on the screen. Press the PTT key or restart the radio to complete the reset procedure.
TECHNICAL SPECIFICATIONS
| General | |
| Frequency range 26.965 - 27.405 MHz (according to the set multistandard mode) | |
| Channels max. 80 AM/FM | (according to the set multistandard mode) |
| Frequency control PLL | |
| Power voltage 13.8/24 VDC ±5% | |
| Duty cycle 100% (Standby) | |
| Dimensions 187 x 56 x 85 mm | |
| Weight 786 gr | |
| Usage temperature -26°C ~ +80°C | |
| Transmitter | |
| Frequency control PLL synthesized | |
| Maximum RF output power 4W (@ 13.8 VDC/24 VDC | |
| Modulation 2 KHz ±0.2%KHz(FM) | |
| Antenna impedance 50Ω | |
| Current drain | max. 1.8A |
| Receiver | |
| System | Double conversion superheterodyne |
| Intermediate frequencies | 1st: 10.7MHz/2nd:450Hz |
| Sensitivity | 0.5μV (AM), 0.25μV@12Db(FM) |
| Audio output power | 3W @ 8Ω (10% distortion) |
| Distortion | <5% @ 1kHz |
| Image rejection | 70dB |
| Adjacent channel selectivity | ≥60 dB |
| Signal/noise ratio 45 dB | |
| Current drain | max. 800mA |
English
SPECIALWARNINGS
Ipooyete npedynpejdeHnraTao-no-doly,3a da npedotbpaTne noxap, HapaHyaHe nll nobpeHa hCB paAnoto nll Ha CB aHTeHaTa.
He ce onntbaite da ynpablaBaTe paNoto,doKaTo 0oΦnape. Ito3n HauHH ce n3laIate Ha pNcKa OT nbTHN INHcNdeHTN.
Toba paДио e npoeKtnpaHо 3a 12V/24V DC 3axpaHbaHe. He n3noJ3BaIte HappeJKeHne, NO-BnCOKO OT npenOpbUaHOTO.
He noctabraye paINOTo Ha npeKaIeHo npaSha, BlaJHa nn HeCTa6nHa NOBbpxHOCT.
He cBbP3BaIte aHTeHaTt no BpeMe Ha npedabAhe; pNCK OT TOKOB yIap.
Mol, na3eTe ce ot cmyuaBau n yctpoiCTBa (KATO: TeJIeBn3Op, reHepaTOp n dp.)
Ha Te3n, KOInTo H3POn3BaT NeiCMeiKbprn, ce npenOpbyBa Da ce OTdaIeHaBaT OT aHTeHaTa No BpeMe Ha npedaBaHe n Oco6eHo Da He Ja DOKOCBaT.
He npn6nKabTe MeaHn ppeMeTn 6n3o Do BbTpewHaTa eJeKtpnuecka qacT Ha paNDOTO; ONaCHOCT OT TOKOB yDap.
1368BaTe Da n3laTe paNoto Ha tempeatypn noD -26°C n noBnCOKn OT + 80°C, Tempeatypata Ha 6opda Ha aBTOMOBnla noHAKORA MoKe Da NaBnUn 80°C, Koeto MoKe Da npuHn HeNoPpABmN uetn Ha paNOTO B ClyaH Na npoDbIJIKnteHa ekCno3nua. He n3laarTe paNoto Ha CbHueBa CBETlnHa DblrO BpeMe.
He ckrpnbaiTe peDnOTo, TOBa ige npedotbpaTn OxlaJdAHeTo My.
I npobepete daHn akymylaTopbT Ha aBTOMO6nla e doCTaTbUHO 3apeH, 3a da ce n36erHe 6bp3o pa3peKdaHe.
BaxHo e da n3KIOUHTe paIHOTo, npEi Da cTapTnPaTe DBrAteJIa, 3a Da n36erHeTe NOBpeDi, npuHHeHr OT BnCOKO NyCKOBO HAppeKeHne.
Korato noDMeHare npedna3ntela, TpaBa da n3noI3BaTe npedna3ntel 2A 250V tnp F. He n3noI3BaIte npedna3ntel c NO-BnCOka cToHocT.
Ako ot paJnoTo ce oTKpne Heo6uHa Mnpn3Ma nIi dIM, He3a6aBHO n3KJIouTe paJNOTo.
He npedabaite nbIro BpeMe, paHnTo MoKe da ce Harpee n da ce Nobpei.
Na3eTe paInOTo daJIeU OT deua.
ДPyгИ ПЕДУПЕЖDEHЯ
Ipei Da CbpxKeTe IIN N3NoJ3BaTe To3N IpOdyKT, MoJ, IpOyTeTe BHNMaTeJIHO INCTpyKcHnTe 3a yN0Tpe6a. 3aNa3eTe TOBa pbKOBoDcTBO 3a 6bDeu n CnpabKn.
Прешида ИЗползВаTe радноTo, CBьржеTe aHTeHata. П探测ete SWR прешип_PREдаван. Пре鉴定 ВисокиТ SWR може ддовед do уншожаBaHe Ha радно ТерминалITE, Bьтpeшни КOMпОнeHTN, KOnTO He ca nokpNTn OT rapaнцятA.
HЯма комноенти Ha paDNOTO, KOnTO MORaT Da 6bDaT nonpaBEn OToNTpe6nteJI. 3a peMOHT noTbpcTe OTOpN3npaH cepBn3eH ueHTbp.
3a da npedotbpatnte pncka ot noxap, n3noJ3BaIte noXoJIo 3axpaHbaHe.
ПЕДЕН ПАHEЛ:
SPECIAL WAIARSCHUWINGEN
ANDERE WAARSCHUWINGEN:
INSTALLATIE INSTRUCTIES
EU Simplified Declaration of Conformity
SC ONLINESHOP SRL declares that CB Radio PNI Escort HP 9500 complies with the Directive EMC 2014/30/EU and RED 2014/53/UE. The full text of the EU declaration of conformity is available at the following Internet address: https://www.mypni.eu/products/6475/download/certifications
BG:
OnpocTeHa deknapaun3a cboTBeTCTBne Ha EC
SC ONLINESHOP SRL DeKnapura, Ye CB Radio PNI Escort HP 9500 cna3Ba dnpeKtNbata EMC 2014/30/EU IN RED 2014/53/UE. ПьлнятTekCT Ha EC DeKnapaцЯТа 3a cboTBetCTBne e DoctbpeH ha cneHnI nHTepHET aDpec:
https://www.mypni.eu/products/6475/download/certifications
DE:
https://www.mypni.eu/products/6475/download/certifications
FR
https://www.mypni.eu/products/6475/download/certifications
HU:
https://www.mypni.eu/products/6475/download/certifications
NL:
https://www.mypni.eu/products/6475/download/certifications
PL:
https://www.mypni.eu/products/6475/download/certifications
RO:
Declaratie UE de conformitate simplificata
SC ONLINESHOP SRL declara ca Static radio CB PNI Escort HP 9500 este in conformitate cu Direcva EMC 2014/30/EU si Direcva RED 2014/53/UE. Textul integral al declaratiei UE de conformitate este disponil la urmatoarea adresa de internet: https://www.mypni.eu/products/6475/download/certifications