
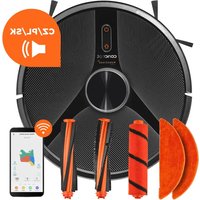
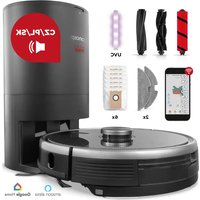
VR4130 - Robot vacuum Concept - Free user manual and instructions
Find the device manual for free VR4130 Concept in PDF.

| Product type | Robot vacuum with multifunction docking station |
| Brand | Concept |
| Model | VR4130 |
| Robot power supply | Li-Ion battery 14.4 V DC, 5100 mAh |
| Station power supply | 220-240 V ~, 50-60 Hz, 1 A |
| Battery life in standard mode | 100 minutes (vacuuming and mopping) |
| Full charge time | Less than 6 hours |
| Noise level | 54 dB |
| Wi-Fi frequency | 2.4/5 GHz, 2412-2472 MHz, power <20 dBm |
| Mobile app | Concept HOME (Android 5.0+ / iOS 9.0+) |
| Cleaning modes | Vacuum only, Mop only, Vacuum then mop, Vacuum and mop simultaneously |
| Adjustable suction power | Low, Medium, High, Maximum |
| Adjustable water flow | Low, Medium, High |
| Carpet recognition | Avoid mode, Adaptive mode (lifts mop), Ignore mode |
| Docking station | Automatic dust bin emptying, mop washing and drying, automatic detergent dosing |
| Navigation | Rotating laser, anti-drop sensors, small object detection (3-7 cm) |
| Mapping | Yes, with automatic room division and restricted zones |
| Clean water tank capacity | 3 L |
| Maintenance | Washable HEPA filter, interchangeable brushes, replaceable dust bag |
| Automatic station cleaning | Yes, via self-cleaning function |
| Child safety | Yes, enable/disable via charge button (long press) |
| Operating temperature | 0°C to 40°C |
| Weight | Approximately 4 kg (estimated) |
| Dimensions (L x W x H) | Approximately 35 x 35 x 10 cm (estimated) |
Frequently Asked Questions - VR4130 Concept
User questions about VR4130 Concept
0 question about this device. Answer the ones you know or ask your own.
Ask a new question about this device
Download the instructions for your Robot vacuum in PDF format for free! Find your manual VR4130 - Concept and take your electronic device back in hand. On this page are published all the documents necessary for the use of your device. VR4130 by Concept.
USER MANUAL VR4130 Concept
Robotic vacuum cleaner
Roboterstaubsauger
Aspirateur robot
Robot aspirapolvere
Aspiradora robótica
Aspirator robot
natural_image
White conceptual vacuum cleaner with digital display and control panel (no visible text or symbols on device body)VR4130
CZ
ROENSKI
concept
CZ
PODĚKOVÁNÍ

concept
concept

Dokovací stanice

natural_image
Diagram of a device rear panel with labeled ports and a highlighted internal component (no text or symbols present)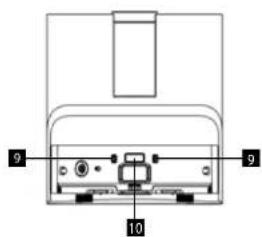
Seznam součástí
KLÍČOVÉ FUNKCE
Robot
natural_image
Two technical line drawings of a device with internal components, no text or symbols presentPOUŽITÍ ROBOTA BEZ APLIKACE
natural_image
Technical line drawing of a mechanical assembly with cross-sectional view (no text or symbols)Postranní kartáček
flowchart
graph TD
    A["Machine with lid"] --> B["Shining down"]
    B --> C["Shooting down"]
    C --> D["Shooting down"]
    D --> E["Shooting down"]
    E --> F["Shooting down"]
Nádoba na špinavou vodu
natural_image
Technical line drawing of a robotic vacuum cleaner with hands operating the housing (no text or symbols present)ČISTĚNÍ FILTRŮ PRACHOVÉ NÁDOBY V ZÁKLADNĚ
Prachový filtr:
HEPA filtr:
ČISTICI PROSTŘEDEK
SK
concept
concept
SK
Dokovacia stanica

natural_image
Diagram of a computer monitor with labeled ports and an icon pointing to the right (no text or symbols present)
Zoznam dielov
1 Vrecko na prach
2 HEPA filter
3 Hybridná mopovacia tkanina
na čistenie kobercov
4 Čistiaca kvapalina
5 Bočná kefa
6 Napájaci kábel
7 Umývacia vanička
8 Nakladacia rampa
9 Rotačná kefa
10 Mopovacia tkanina
(len tvrdé podlahy)
KLÚČOVÉ FUNKCIE
Robot
natural_image
Two technical line drawings of a device with internal components, no text or symbols presentflowchart
graph TD
    A["Top Left Toilet"] --> B["Shrinker"]
    B --> C["Shrinker with Air"]
    C --> D["Shrinker with Air"]
    D --> E["Shrinker with Air"]
    E --> F["Shrinker with Air"]
Nádoba na špinavú vodu
natural_image
Diagram showing two views of a robotic vacuum cleaner with hands adjusting the component (no text or symbols present)Senzory
Senzory čistite mäkkou suchou handričkou nasledovne:
ČISTENIE FILTROV NÁDOBY NA PRACH V ZÁKLADNI Prachový filter:
HEPA filter:
ČISTIACI PROSTRIEDOK
- Odstránte kryt štrbiny čističa.
- Odstrante čistiaci prostriedok smerom nahor.
- Nádobku na použitý čistiaci prostriedok zlikvidujte.
- Odstránte uzáver z novej nádoby na prací prostriedok, vložte ju do štrbiny a zatlačte ju až na dno.
natural_image
Diagram of a hand using a paper filter to generate a trash bin (no text or symbols present)PL
concept
concept
PL
Stacja dokująca

Lista części
KLUCZOWE FUNKCJE
natural_image
Two technical line drawings of a printer or printer device, showing internal components and alignment (no text or symbols)flowchart
graph LR
    A["Raw material"] --> B{Waste Disposal}
    B --> C["Recycling with Sunlight"]
    C --> D["Recycling with Air Capture"]
    D --> E["Recycling with Air Capture"]
    E --> F["Recycling with Air Capture"]
    F --> G["Recycling with Air Capture"]
    G --> H["Recycling with Air Capture"]
    H --> I["Recycling with Air Capture"]
    I --> J["Recycling with Air Capture"]
    J --> K["Recycling with Air Capture"]
    K --> L["Recycling with Air Capture"]
    L --> M["Recycling with Air Capture"]
    M --> N["Recycling with Air Capture"]
    N --> O["Recycling with Air Capture"]
    O --> P["Recycling with Air Capture"]
    P --> Q["Recycling with Air Capture"]
    Q --> R["Recycling with Air Capture"]
    R --> S["Recycling with Air Capture"]
    S --> T["Recycling with Air Capture"]
    T --> U["Recycling with Air Capture"]
    U --> V["Recycling with Air Capture"]
    V --> W["Recycling with Air Capture"]
    W --> X["Recycling with Air Capture"]
    X --> Y["Recycling with Air Capture"]
POJEMNIK NA BRUDNĄ WODE
Czujniki
CZYSZCZENIE FILTRÓW POJEMNIKA NA KURZ W PODSTAWIE
natural_image
Diagram of a hand inserting a paper into a device with an arrow indicating the process (no text or symbols present)HU
concept
concept
HU
Dokkoló állomás

natural_image
Diagram of a device rear panel with labeled ports and a highlighted internal component (no text or symbols present)
Alkatrészlista
FUNKCIÓK
Robot
natural_image
Two technical line drawings of a device with internal components, no text or symbols presentnatural_image
Technical illustration of a mechanical assembly with cross-sectional views (no visible text or symbols)Oldalsókefe
flowchart
graph TD
    A["Top View"] --> B["Device with Motion"]
    B --> C["Device with Motion"]
    C --> D["Device with Motion"]
    D --> E["Device with Motion"]
    E --> F["Device with Motion"]
natural_image
Technical line drawing of a robotic vacuum cleaner with hands adjusting the component (no text or symbols present)Érzékelők
Firmware frissités
LV
concept
concept
LV
Bāzes stacija

natural_image
Diagram of a device rear panel with labeled ports and a highlighted internal component (no text or symbols present)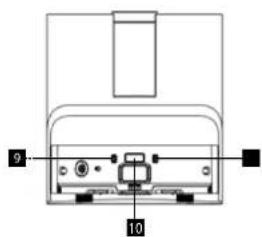
Dalu saraksts
GALVENÄS IETEIKSMES
Robota
Dokstacija
natural_image
Two technical line drawings of a printer or printer device, showing front and side views with no visible text or symbols.flowchart
graph TD
    A["Water Splitter"] --> B["Lighting"]
    B --> C["Lighting & Drying"]
    C --> D["Lighting & Drying"]
    D --> E["Lighting & Drying"]
    E --> F["Lighting & Drying"]
Netirā üdens konteiners
natural_image
Illustration of a robotic vacuum cleaner with hands operating the component (no text or symbols visible)Sensori
PUTEKLU KONTEINERA FILTRUTİRİŞANA PAMATNÉ
Puteklu filtrs:
HEPA filtrs:
Thank you for purchasing a Concept product. We wish you much joy with your new appliance every day you use it. Please read the instruction manual carefully before initial use. To refer to this manual any time you need to, we recommend you to keep it in a safe place. And please pass it to any future owner of the appliance.
| Technical specifications | |
| Parameters of the docking station 220-240 V ~, 50-60 Hz, 1 A | |
| Battery voltage 14,4 V DC | |
| Charging parameters of the robot 24 V DC, 1 A | |
| Sound level 54 dB | |
| Battery 5100 mAh, Li-Ion | |
| Operating time - standard vacuuming and wiping mode 100 min | |
| Full charge time < 6 h | |
| Frequency range 2412 - 2472 MHz | |
| Transmitter power (max.) < 20 dBm | |
IMPORTANT
Before connecting to the mains, make a visual check to ensure that the unit is intact and that no damage occurred during transport.
IMPORTANT SAFETY PRECAUTIONS
- Do not use the appliance in any other way than as described in this manual.
- Remove all the covering and marketing materials from the appliance before the first use.
- Remove all items from the floor that could disrupt the effective a trouble-free cleaning (cables, papers, clothes, tablecloths and curtains touching the ground, fragile vases).
- If there are stairs in the area to be cleaned by the robot vacuum cleaner, it is essential to set a restricted zone or otherwise prevent the vacuum cleaner from falling down the stairs.
- Use only original accessories and spare parts for this model.
- Do not sit or step on the vacuum cleaner or docking station, or place other objects on them.
- The appliance should only be used in households at temperatures between 0 °C and 40 °C.
- Do not start cleaning without the dust bag in the docking station and the
91
EN
concept
concept
EN
water container inserted.
- Do not put your hair, clothes, fingers or other body parts near the main brush. Keep the main brush and the suction part of the vacuum robot clean, remove all hair and dust that can lower the suction properties of the vacuum robot and the cleaning quality.
- Do not vacuum liquids, burning cigarettes, shards and sharp objects, lighters and other flammable materials, large pieces of paper, plastic bags, nails, toner from printers and copiers, or other items that may damage the vacuum cleaner.
- Do not allow the vacuum robot to pass over loose cables when vacuuming.
- When servicing and cleaning the appliance, turn the power switch to the OFF position. Before cleaning the docking station, unplug it from the mains first. Clean the robot and docking station with a dry or slightly damp cloth. Only wipe the charging contacts with a dry cloth!
- Direct sunlight may cause a reduced sensitivity of the infra-red sensors of the vacuum robot, please avoid direct sunlight.
- CAUTION: Some very dark carpets or dark floors may not be able to be cleaned properly by the robot - the laser beam may be absorbed by the floor and the robot will not be able to enter the spot. If there is dark furniture or walls in the room, the reflection of the sensor beams in the bumper may be disturbed - the robot bounces the bumper off the obstacle.
- Do not use the appliance outdoors, on balconies, terraces.
- Keep children and pets away from the rotating brushes when operating the robot to prevent injury.
- Keep the robot and docking station away from heat sources such as radiators, ovens, etc. Protect them from direct sunlight, moisture. Keep them in a cool, dry place.
- When moving the robot or docking station, grasp the entire body of the appliance and do not use only parts such as the bumper, top covers, moving parts, etc. for transfer!
- It is recommended to monitor the robot during the first cleaning to ensure that it deals with any potential problems to ensure trouble-free cleaning in the future.
-
In case you have defined an area where the robot should not clean, set a restricted zone in the mobile app.
-
Do not place the appliance in a place where it could easily fall on the floor (table, chairs).
- Before charging the appliance, make sure the charging station is properly connected. Only use the docking station supplied with the robot for charging.
- Under extreme temperature conditions or improper use, the battery may leak fluid. If the fluid gets on your skin, wash immediately under running water. In case of contact with eyes, rinse immediately under running water for at least 10 minutes. Get medical help.
- If you wish to dispose of the product, you must first disconnect the battery from the appliance and take it to a designated place.
- If you are transporting the appliance or will not be using it for a long time, drain the water from the robot's tank (press drain on the side of the robot and let the water flow out). Fully charge the robot and then switch off the main switch to prolong the battery life. Make sure to charge the robot at least every 3 months to avoid lowering the battery capacity. Disconnect the docking station from the mains and empty and dry the tanks, rinse and dry the filter sponge. It is recommended to use the original box for transportation.
- Make sure the mains voltage corresponds to the values on the rating plate of the product. Do not connect the appliance to the distribution sockets and extension leads. Only use a power supply with a grounded connection.
- When unplugging the charging station from the power outlet, never pull the power cord, but grasp the plug and pull it off. Do not handle the plug or the appliance with wet hands.
- Do not use the appliance as a toy.
- Do not use coarse and chemically aggressive substances to clean the appliance.
- The appliance is only suitable for home use and is not intended for commercial use. The appliance is designed for cleaning washable floors and carpets.
- Do not immerse the power cord, plug or appliance in water or any other liquid.
- Do not repair the appliance yourself. Please contact an authorized service centre to prevent injury from improper handling.
- This appliance can be used by children aged from 8 years and above
EN
concept
concept
EN
and persons with reduced physical, sensory or mental capabilities or lack of experience and knowledge if they have been given supervision or instruction concerning the use of the appliance in a safe way and understand the hazards involved. Cleaning and maintenance performed by the user must not be carried out by children unless they are 8 years old and under supervision. Children aged under 8 years of age must be kept away from the appliance and its power cord. Do not let children play with the appliance.
• Children under 3 years of age must be prevented from accessing the robot and docking station unless they are permanently supervised.
- Any damage or injury caused by improper use is the responsibility of the user.
- If the power cord is damaged, have it replaced by a qualified service centre to avoid a dangerous situation. It is forbidden to use the appliance with a damaged power cord.
Damages from failure to follow the manufacturer's instructions are not covered by the warranty.
Carefully check that you have unpacked all the accessories that are supplied. During the warranty period, we recommend to keep the original paper box, user manual and the packaging material.
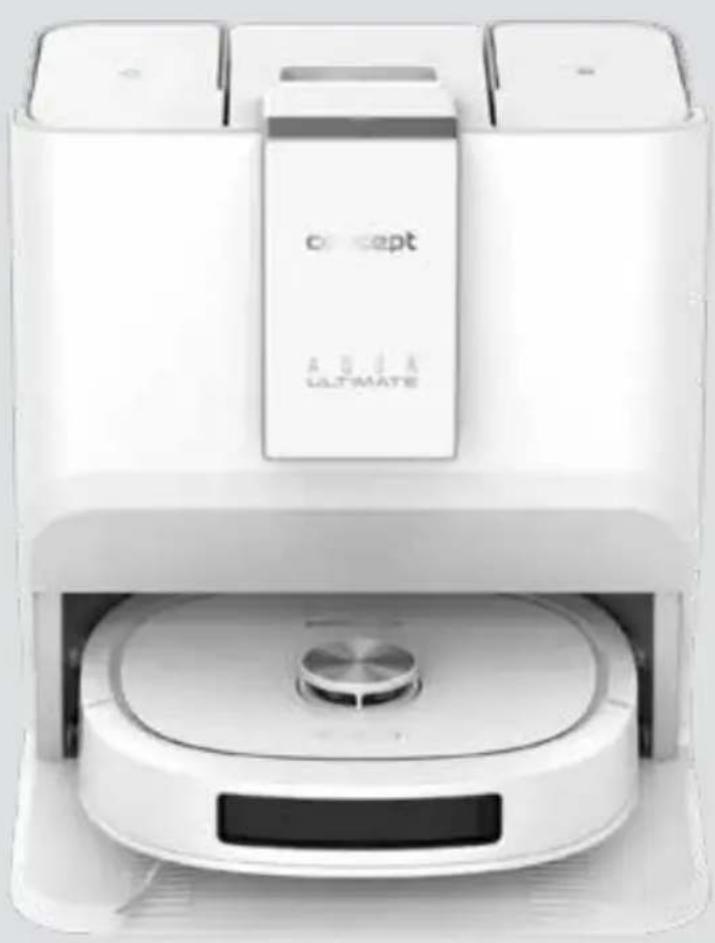
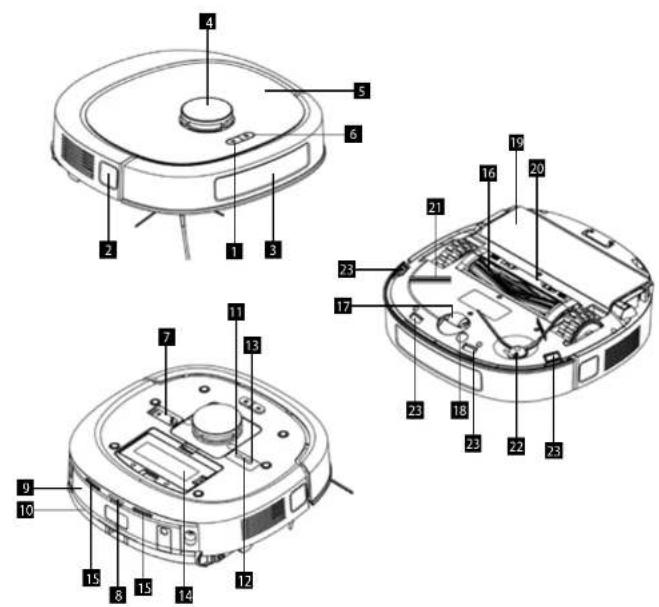
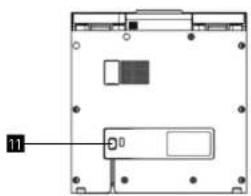
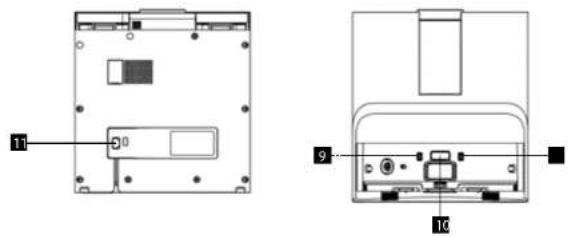
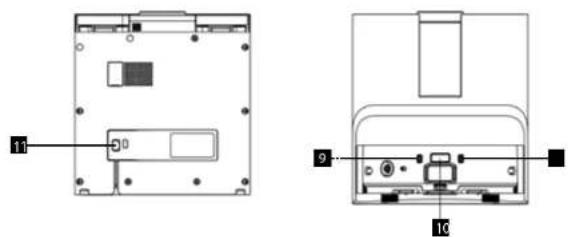
PRODUCT DESCRIPTION
1 Start/Stop button
2 Side laser
3 Front impact sensor
4 Rotating laser cover
5 Top magnetic cover
6 Charge button
7 Cleaning brush
8 Return correction optics
9 Dirty water container
10 Dirty water squeegee
11 ON/OFF switch
12 Wifi reset button
13 Wif pairing button
14 Dust container
15 Charging connectors
16 Rotary brush
17 Center wheel
18 Carpet sensor
19 Mopping assembly
20 Rotary brush cover
21 Side ba
22 Side brush
23 Anti-tip sensors
EN
concept
concept
EN
Docking station
1 Cleaner cover
2 Dirt vacuum button
3 Cleaning button
4 Wash tray
5 Loading ramp
6 Clean water tank
7 Dust container cover
8 Dirty water tank
9 Charging connectors
10 Return correction mirror
11 Power port

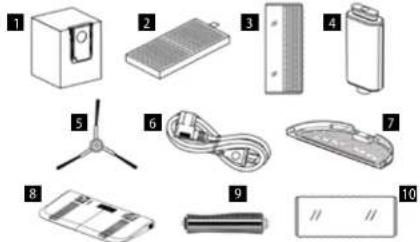
Parts list
1 Dust ban
2 HEP4 filter
3. Hybrid monging fabric
for event ordering
4. Cleaning fluid
4. Cleaning tools
5. Side knock
5 Sloc Brush
6 Drums and
6 Power cord
7 Wash tray
7 Wash-tray
8 Loading-
8 Loading ramp
9 Rotary brush
10 Mopping fabric (for hard floors only)

KEY FEATURES
Robot
| Buttons | Control method | |
| Short press Long press | ||
| Start/Stop Button | Start/Stop/Continue Cleaning | Local 1x1 m cleaning centered at current position |
| Charge Button | Return to Docking Station/Stop and Return to Docking Station | Activate/ Deactivate Child Lock |
| ON/OFF Button | / On/Off | |
| Wifi Pairing Button | / | Enter Wifi Pairing Mode |
| Wifi Reset Button | / Wifi Reset | |
Docking station
| Buttons | Control method | |
| Short press Long press | ||
| Dirt vacuuming button | Vacuuming dirt into the dust bag | Activating/deactivating the child lock |
| Cleaning button | When the robot is on the base: cleaning the mop When the robot is not on the base: cleaning the washing tray | When robot is on base: Cleaning mop When robot is not on base: Cleaning wash tray |
| Dirt vacuuming button + Cleaning button | / | Enter pairing mode between robot and station |
| Lights Light elements | Meaning | |
| White pulsing light | Robot charging | |
| Steady white light | Robot cleaning/returning tocharge | |
| Red flashing | Robotmalfunction | |
| Lights Light elements | Meaning | |
| White pulsing light | Cleaning the wash tray | |
| Steady white light | Charging robot/Cleaning/Returning to docking station | |
| Red flashing | Base failure/Removing robot while cleaning | |
Note:
- When the child lock is activated, the buttons on the docking station and the robot will be deactivated and the robot can only be controlled via the app. To disable/ enable the child lock, long press the charge button on the robot.
- If you need to reset the robot to factory settings, press the charge button and engage the Wifi pairing button for 3 seconds.
Note:
- Cleaning the wash tray: Long press the cleaning button (when the robot is not on the base) to start cleaning the wash tray. The water starts spraying from the bottom inside of the base. Once the bottom tray is filled with water, you can clean it with the brush. When cleaning is complete, press any button on the station to suck the dirty water into the dirty water container.
EN
concept
concept
EN
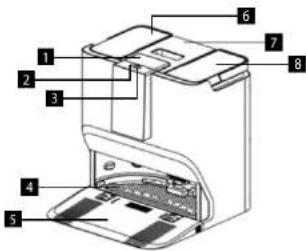
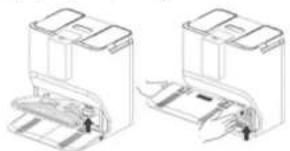
INSTALLATION
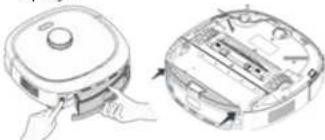
- Install the side brush. Align and press until you hear a click. At that point, the brush is properly installed.
- Remove the protective strips and protective film on the front and side of the bumper.
- Install the ramp by pressing it into the appropriate position on the dock body, you will hear a click. Next, place the wash tray inside the docking station in the appropriate position, making sure it is level.
natural_image
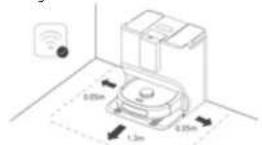
Two technical line drawings of a printer or printer device, showing front and side views with no visible text or symbols.- Place the base on a firm and level surface. Make sure that there is at least 5 cm of clearance on the sides of the base and at least 130 cm in front of the base. Connect one end of the power cord to the docking station (Power Port) and the other to the mains. Make sure that the placed base is in a location well covered by Wifi signal.
-
Refill with clean water. To refill clean water, remove the left water container, lift the container lid and pour water into the reservoir (maximum capacity is 3 L). Close the lid and put the container back into the docking station. Note: Do not add any cleaning, disinfecting or other agents to the clean water container to avoid unforeseen damage.
-
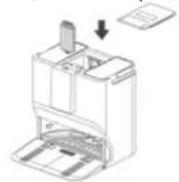
Adding a cleaning agent. Insert the cleaning agent into the slot under the cleaning agent cover. When you hear a click, it is in the correct position.
- To recharge the robot, remove the top magnetic cover and press and hold the Start/Stop button. Wait until the robot indicator is permanently illuminated, replace the top cover and place the robot with the charging connectors facing inside the docking station.
CONNECTION TO WIFI NETWORK
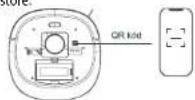
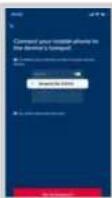
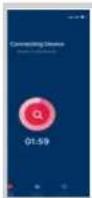
- Download the app - Scan the QR code below or on the body of the vacuum cleaner under the top cover or search for the Concept HOME app on Google Play or the App store.
- If you already have the Concept Home app, open it, log in and follow the pairing instructions.
- Remove the top magnetic cover and turn on the robot.
-
Press and hold the Wifi pairing button until you hear the voice signal to pair the robot.
-
Then press + or 'add device' in the app.
- A list of appliances will appear, select from the list.
- Fill in your Wifi network and password or it will be automatically filled in.
- Continue on as instructed by the app.
- Go to the Wifi settings on your mobile device and connect to the Wifi Robot-xxxx, go back to the Concept HOME app and wait for pairing. Once
Fig. 1
- Arrange furniture, especially tables and chairs, before you start cleaning. Clear away excess items on the floor to create ideal conditions for mapping the space and cleaning up afterwards.
- Avoid standing in the robot's path for optimal space mapping. Open all doors to map all desired rooms.
- If the robot cleans in areas such as the base of stairs or the edges of stairs, place barriers there beforehand to ensure the safety of people and avoid damage to the robot.
USE
FIRST CLEANING
Start the robot using the app or the Start/Stop button. When the mapping/first cleaning is complete, a map will appear in the app with the rooms automatically divided. You can edit the rooms freely in the app.
CHARGING
Automatic mode: After working, the unit will automatically return to the docking station, where it will also vacuum the dirt from the tray and clean the mopping fabrics according to your settings. If the battery runs out during cleaning, the robot will drive to the charging station and then finish cleaning from where it left off.
Note: After pressing the charge button on the robot/station/app, the robot will return to the station to charge. It is recommended to leave the robot in the station between regular cleanings where the battery is kept charged.
Note: If you will not be using the robot for a long period of time, fully charge the robot and then turn it off. Charge the robot at least every 3 months to prevent damage to the battery due to excessive discharge.
Note: If the unit does not find the docking station, it will automatically return to its original position. In this case, insert the unit back into the docking station manually.
COMPLETE AUTOMATIC CLEANING
Once the robot is switched on, it maps the area and generates a map and intelligently divides it into areas. Save the map in the app and edit the rooms as needed. Start cleaning by pressing the Start/Stop button and the robot will then thoroughly vacuum/wipe the areas one by one along the wall and plan the cleaning path in curves/S-shapes. After cleaning, the robot will automatically return to the charging base. Note: Do not move the robot freely and frequently while cleaning. After moving, place the robot in its original location.
ZONE CLEANING
Use the mobile app to set the size and location of the area you want to clean. You can set a maximum of 5 areas. The robot will clean in the areas you have set.
ROOM CLEANING
Use the mobile app to select the rooms you want to clean.
CLEANING MODE
- Vacuum only
- Mon only
- Vacuum and then mop
- Vacuum and mop at the same time
Adjust the cleaning mode settings in the mobile app. The vacuum then wipe program is suitable for heavily soiled surfaces.
SETTING THE SUCTION POWER
-
Low - for quick cleaning, lightly soiled floors
-
Medium - for everyday cleaning
-
High - for more soiled floors
-
Maximum - maximum suction power
Select the level in the application according to the dirt on the floor and the required suction power.
WATER DOSAGE SETTINGS
In the app, choose between 3 water dosage modes
-
Low
-
Medium
-
High
Note: If the robot runs out of water while cleaning to wet the fabric, it will return to the station to perform maintenance, refill clean water and return to finish cleaning.
Note: You can also select between standard and deep cleaning in the application under the suction power and fabric wetting selection section. In deep cleaning, the robot traverses the route more thoroughly and partially returns to already cleaned areas to ensure more precise results.
CLEANER DOSAGE
In the app in the station settings, you can turn on/off automatic detergent dosage.
FREQUENCY OF VACUUMING DIRT FROM THE ROBOT TO THE STATION
Select the frequency of dirt extraction in the application. You can select after every 1st, 3rd or 5th cleaning or turn off the automatic vacuuming.
Note: If you have the automatic dirt vacuuming turned off, you must enter an instruction in the app or press and hold the Start/Stop button on the docking station to vacuum immediately - after you have finished cleaning or filled the dust cup.
CARPET CLEANING SETUP
You can choose between 3 modes in the app.
Mode:
- Avoid mode: The robot will not drive on the carpet. It will go around it and continue cleaning.
- Adaptive mode: the robot will drive onto the carpet, increase the suction force and put the mopping fabric in a position where it will not wet the carpet.
- Ignore mode: In this mode, the robot will disregard the carpet. It will clean it in the mode in which it is currently set.
Note: For adaptive mode, you must put on a mopping textile to clean the carpet!
CLEANING
- According to the selected carpet cleaning setting mode, fit the appropriate mopping fabric.
- The mopping must always start directly from the station.
• The robot will fill the water tank and soak the cleaning textile before starting mopping. - When the mopping is finished, it washes the fabrics and then dries them.
Note: In the app, it is possible to manually start washing the fabric, drying the fabric with hot air or emptying the dust container at any time. The robot must be placed in the docking station when these instructions are given.
Note: In the app you can select a drying time of 4 or 6 hours for the fabric.
DRYING THE CLEANING TEXTILES
In the app, you can start the immediate washing and drying of the fabric, sucking the dirt into the dust bag.
CLEANING THE ROBOT THROUGH THE APP
The application can be used to start immediate washing and drying of the fabric, and to vacuum up dirt into a dust bag.
RECOGNITION OF SMALL ITEMS
The robot uses a laser to pinpoint small objects on the floor (3-7 cm high) and avoid them. It will not avoid objects that are too small.
CLEANING ON ANOTHER FLOOR
In case you need to clean another floor (and you do not have another robot and station), ideally carry the robot with the docking station and always place it in the same place. If you carry only the robot, you need to adjust the cleaning mode (select only the vacuuming mode, or adjust the fabric wetting so that the robot completes the cleaning without the need to draw water.
FORBIDDEN AREA
Use the mobile app to set one or more restricted areas. The robot will not clean in these prohibited areas and will clean in the others.
Note: The robot may enter a prohibited area due to positioning error, sensor error, or other reasons.
- A permanently restricted zone may be invalidated due to a large change in the position of the charging base and furniture. Therefore, try not to move or otherwise interfere with the robot during cleaning.
- The permanently disabled area will be cleared once the map is refreshed.
PLANNING THE CLEANING
Fixed cleaning times can be set using the mobile app. The robot will automatically start cleaning at the set time and return to the docking station when finished.
RESET WIFI
Press and hold the reset button if your mobile phone cannot connect to the device due to router configuration and password changes or other reasons.
DO NOT DISTURB MODE
Set in the app. During the set time period of the do not disturb mode, there will be no suction to the dust bag and the voice prompts will be turned off.
LANGUAGE AND VOLUME SETTINGS
Control in the app. Choose which language and how loud you want the robot to speak.
MANAGE ACCESSORIES
Information in the app about the lifetime of the HEPA filter, brushes and cleaning fabrics and recommendations for replacing them.
USING THE ROBOT WITHOUT THE APP
If you cannot control the robot using the mobile app, it can be used without the app, but in a very limited way. Without the app, you cannot use the special functions, scheduled cleaning, do not disturb mode, change cleaning mode, cleaning the robot, etc.
DEFAULT ROBOT SETTINGS:
- Cleaning mode: Vacuum and mop simultaneously
• Suction power: Standard
• Water quantity control: Medium - Resume cleaning after interruption: on
- Small object detection: on
- AUTO BOOST: on
RUNNING MAINTENANCE
EN
concept
concept
EN
In order to maintain the best performance of the robot, it is recommended to perform the maintenance according to the table below.
| Part | Cleaning interval | Replacement interval |
| Centre wheel as required / | ||
| Dust container as required / | ||
| Rotary brush every 2 weeks | every 6-12 months | |
| Side brush monthly every 3-6 months | ||
| Washable HEPA filter and dust filter | every 2 weeks | every 6-12 months |
| Cleaning fabric as required every 3-6 months | ||
| Station location sensor | every month / | |
| Anti-fall sensors every month / | ||
| TOF sensor every month / | ||
| Ultrasonic sensor (Carpet Detection Sensor) | every month / | |
| Running wheels every month / | ||
| Charging contacts (robot) | every month / | |
| Charging contacts (station) | every month / | |
| Clean/dirty water tank | as required | / |
| Dust bag | / as needed/ every 1-2 months | |
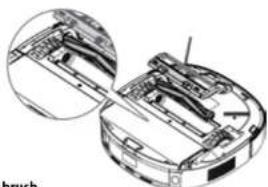
Main Brush
-
Turn the machine over and press the latches on the main brush cover to remove it.
-
Remove the main brush.
-
Replace the brush.
-
Replace the brush cover.
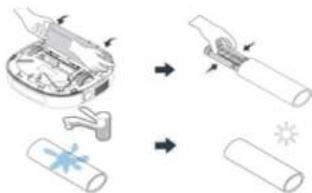
Note: Use the supplied cleaning brush to remove hair tangled in the rotary brush. Rinse the brush with water according to the level of dirt, let it dry and put it back in. Depending on the level of wear, the brush may need to be replaced with a new one.
natural_image
Technical line drawing of a mechanical component with two views (top and side), no visible text or symbolsSide brush
-
Gently squeeze the side brush and remove it upwards.
-
After cleaning, place it back in its original position in the opposite way.
Note: Use the supplied cleaning brush to remove hair tangled in the side brush. Rinse the brush with water according to the degree of soiling, allow it to dry and replace it. Depending on the level of wear, the brush may need to be replaced with a new one.
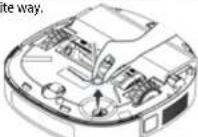
Centre wheel
- Use a small screwdriver or other tool to remove the centre wheel.
Note: The centre wheel carrier cannot be removed.
-
Rinse the caster with water to remove hair and other debris and dry.
-
Replace the caster and press into place.
-
Wipe the castors with a dry soft cloth.
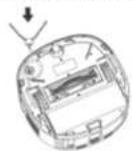
Dust container
-
Remove the top magnetic cover of the robot and remove the dust container.
-
Open the dust container and pour out the dirt.
-
Flip up the dust filter cover on one side and remove the dust filter.
-
You can rinse the container and filter with clean water (without detergents, so as not to damage the filter), and pour out the dirty water.
-
Allow the container and filter to dry and replace.
Note: Dirt is sucked into the dust bag in the station, so just check occasionally for larger lint stuck in the container and clean the container.
flowchart
graph TD
    A["Water Washing"] --> B["Receiving Toilet"]
    B --> C["Lighting & Dusting"]
    C --> D["Lighting & Cooling"]
    D --> E["Lighting & Heat Treatment"]
    E --> F["Lighting & Refrigeration"]
Dirty water container
- Press the release button on the back of the robot, and remove the dirty water container.
- Press both sides of the waste squeegee with both thumbs and gently pull forward to remove the squeegee.
natural_image
Illustration of a robotic vacuum cleaner with hands operating the lid (no text or symbols present)- Open the top cover of the dirty water container and wipe with a soft cloth or rinse under water, depending on the level of contamination. Clean the waste squeegee in the same way.

Cleaning cloths
- Press the release buttons on either side of the lower mop holder of the robot, swing it open and then remove the holder.
- Squeeze the mop holder and remove the fabric.
- Rinse the mop with water according to the level of soiling, dry it and then put it back in.
- Depending on the level of wear, the mop may need to be replaced with a new one.
Note: Although the fabric is washed and dried in the station after each cleaning, check its condition before cleaning. Dirty fabric can affect the quality of the mopping.
Sensors
Clean the sensors with a soft, dry cloth as follows:
1. Keep the robot switched off during cleaning. Clean all sensors see product description.
2. Unplug the docking station from the mains and wipe the charging contacts on the docking station with a dry soft cloth.
SELF-CLEANING STATION
- The robot vacuum cleaner must be out of the docking station!
- Perform to keep the docking station in good condition.
- Start the station self-cleaning process by pressing and holding the charge button - water will be pumped into the bottom and when any button on the station is pressed, it will drain into the dirty water tank.
- Use the self-cleaning function of the station also in case there is water left in the lower part of the station after washing the cleaning fabric (all of it has not been drained).
Note: You can use a cleaning brush to clean the lower part of the station, then wipe with a dry cloth.
CLEANING THE WATER CONTAINER
- Check the water container regularly to avoid mould!
- Change the water in the container depending on how often the robot is used.
- Remove the container, open the lid and pour out the dirty water.
- Pour in clean water and close the lid.
- Press the lid down and shake the container. In case of larger dirt, rinse the tank.
- Pour out the water and leave the container with the lid open to dry.
- Replace the container.
EN
concept
concept
EN
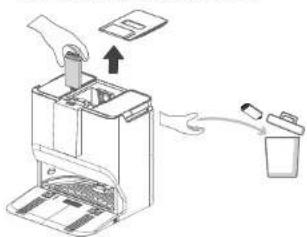
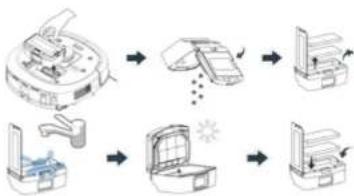
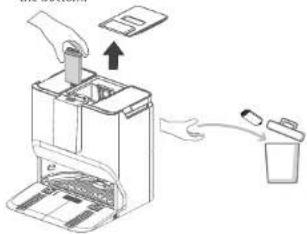
DUST BAG REPLACEMENT
Regular dust bag replacement.
- Open the lid of the dust container in which the dust bag is inserted.
- Slide the full dust bag up and close it to prevent dirt from escaping. Discard the used dust bag.
- Clean the rim of the container with a dry cloth and insert a new dust bag. Make sure the new dust bag is inserted correctly so that dirt cannot escape and damage the station.
- Close the cover and squeeze it lightly to make sure it is closed properly.

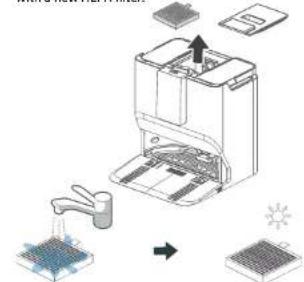
CLEANING THE DUST CONTAINER FILTERS IN THE BASE
Dust Filter:
- Open the dust container lid and remove the dust filter.
- Use a cloth or disposable damp cloth to clean the surface of the dust filter.
- Depending on the level of contamination, rinse with water, dry and return to service.

HEPA filter:
- Open the lid of the dust container and remove the HEPA filter.
- Rinse the HEPA filter with clean water and allow it to air dry before using it again. This may take up to one day.
- Depending on the degree of wear, it can be replaced with a new HEPA filter.
CLEANING AGENT
- Remove the cleaning hole cover.
- Remove the cleaning fluid upwards.
- Dispose of the used cleaning fluid container.
- Remove the cap of the new detergent container, insert it into the opening and push it all the way to the bottom.
natural_image
Diagram of a printer or scanner device with an open lid and a hand inserting a paper into it (no text or symbols present)Firmware update
Use the mobile app to update the firmware. If new firmware is detected, update as prompted. When updating the firmware, the battery level should be ≥50% and the device must be placed in the docking station.
TROUBLESHOOTING
Robot reports error
• The Start/Stop light flashes red and a voice error message is heard.
- Follow the robot's message or the application's troubleshooting guide to fix the problem yourself.
Docking station reports error
• The docking station light is red and a voice error message is heard.
- Follow the docking station message or the application's troubleshooting guide to correct the problem yourself.
- If you are unable to correct the problem, contact customer service.
FREQUENT PROBLEMS
| Issue Description Possible Cause Problem-Solving Procedure | ||
| Robot is not charging | Robot is not in contact with the charging connector | Place the robot in front of the docking station and press the charging button |
| Robot does not return to charging | Base station is placed in an unsuitable location | Refer to the user manual, section "Installation" |
| Robot got stuck | Robot is stuck or entangled in objects on the floor, e.g., cables | Remove all cables and objects from the floor |
| Side brushes or main brush are jammed | Remove all objects blocking the side or main brushes and start the robot on a flat surface | |
| Robot is blocked by obstacles on the floor | Remove obstacles or set up no-go zones in the app | |
| Robot returns for charging or stops cleaning before finishing | Robot has a depleted battery Let the robot | return for recharging |
| Not cleaning according to the scheduled time | Scheduled cleaning is turned off in the app | Reset the cleaning schedule in the app |
| Robot stopped | Left or right wheel stopped moving | Gently tap the protective bumper to remove any foreign objects |
| Robot cannot complete mapping smoothly | Protective cover of the navigation module is jammed | Immediately remove any obstacles |
| Obstacles are in front of the robot | After removing obstacles, gently tap the collision plate | |
| Drop sensor is covered with dust Clean any dust from the drop sensor lens | ||
EN
concept
concept
EN
| Robot cannot complete mapping smoothly | Robot cannot reach all areas of the home | More details can be found in the "Home Preparation" section of the user manual |
| Threshold to unreachable area is too high | ||
| Narrow passage to unreachable area | ||
| Doors to unreachable area are closed | ||
| App responds slowly | Network is overloaded | Restart the router (reduce number of connected devices) |
| Insufficient wireless signal on the mobile network | Check the phone settings | |
| Insufficient network bandwidth | Increase network bandwidth | |
| Docking station reports robot is disconnected | Connection between robot and base station is interrupted | Press and hold the start and return buttons on both the base station and the robot to enter pairing mode |
| App displays message about device disconnection from network | Phone is not properly connected to network | Try reconnecting the phone to the network |
| Router is not working properly | Restart the router | |
| Robotic vacuum cleaner is not turned on | Turn on the vacuum cleaner's power switch | |
| Wi-Fi configuration in the device has been deleted | Re-add the device in the app | |
| Wi-Fi password changed or network changed | After reboot, press and hold the button for 8 seconds to release Wi-Fi signal | |
| - | Follow the instructions on the phone to re-add the device | |
| App cannot scan robot's QR code | QR code on the device is blurry or damaged | Open the Concept HOME app – Add Device |
| Cannot clean the mop | Water tank is empty | Remove the clean water tank and refill it |
| Dirty water tank is full | Remove the dirty water tank and empty it | |
| Robot leaks debris during operation | Foreign object is blocking the dust collection opening | Remove the object from the dust collection opening |
WIRELESS CONNECTION AND COMPATIBILITY
- Jindlich Valenta - CONCEPT shall in no way be liable for any incidental, indirect or consequential damages, or for any loss of data or loss due to information leakage during communication via wireless technology.
- Successful wireless communication cannot be 100% guaranteed on all Smart devices and Wi-Fi networks (routers). Due to the variety of devices on the market, there may be cases where the character or specification of a given Smart device or Wi-Fi network (router) makes connection impossible or is somehow disturbed. In addition, a number of factors, including hardware and software configuration, also affect the success of wireless communication via Wi-Fi network. The connection between the robot and your Wi-Fi network can also be adversely affected by the surrounding Wi-Fi networks, which can be tuned to the same channel and thus interfere with the connection (e.g. in housing estates, apartment buildings, etc.). These facts are not a reason to claim the appliance.
- The app is owned and operated by a third party (the "Entity") different from Jindrich Valenta - CONCEPT (the "Seller"). No personal data is transferred to the Entity by the Seller. When registering for the app, the customer submits personal data directly to the Entity, who becomes the administrator of personal data. The app and the associated protection of personal data are governed by the Entity's rules.
Compatibility:
Smart device operating system - Android 5.0 and higher - IOS 9.0 and higher
Wi-Fi network -2.4/5 GHz
- WPA1 and WPA2 security (WPA2 recommended)
NOTICE: The appliance cannot be operated on IEEE 802.1X-protected Wi-Fi networks
(usually corporate Wi-Fi networks).
Before you can control the device using the app, it is necessary to connect it to your phone and give it access to your Wi-Fi network.
Recommended distance during set-up: less than 4 meters.
Make sure your robotic vacuum cleaner, router, and your mobile phone are close together so that you can pair your phone with the device with no problems.
Pairing troubleshooting
- Verify that your Wi-Fi network password is correct.
• The device only supports 2.4 and 5 GHz Wi-Fi networks. - The router is overwhelmed by connecting many other devices (especially in housing estates or in case of large concentrations of connected Smart devices). For stable operation it is necessary that the Wi-Fi signal reaches the places intended for use of the vacuum cleaner and at the same time is sufficiently strong.
- restart the vacuum cleaner and smart device and repeat the process;
- if possible, try also restarting the Wi-Fi router itself;
• If your smart device is running Android 6.0 and above, you need to have location detection turned on. - Once you have paired the vacuum cleaner with your smart device via the "Concept Home" app, do not move or relocate the docking station. The vacuum cleaner uses the charging station as a landmark on the map.
- By relocating the docking station, you risk losing the generated map, including the selected cleaning zones and restricted zones! The vacuum cleaner creates a new map, which overwrites the original map.
EN
concept
concept
DE
SERVICE
Extensive maintenance or repair, which requires access to internal parts of the product, has to be performed by a qualified specialist or the service centre.
ENVIRONMENTAL CONCERNS
- Packaging materials and old appliances should be recycled.
• Packaging materials may be disposed of as sorted waste - Dispose the plastic bags made of polyethylene (PE) of as sorted waste.
Recycling of the appliance at the end of its lifespan:

This appliance is labelled in accordance with European Directive 2012/19/EU concerning used electrical and electronic appliances (Waste Electrical and Electronic Equipment - WEEE). The symbol on the product or on its packaging indicates that this product may not be treated as household waste. Instead, it should be taken to the appropriate collection point for the recycling of electrical and electronic equipment. By ensuring this product is disposed of correctly, you will help prevent potential negative consequences for the environment and human health, which could otherwise be caused by inappropriate waste handling of this product. The disposal of such material has to be done according to the recycling regulations. For more detailed information about recycling of this appliance see the authorized local office or service for household waste disposal or the shop, where you purchased the appliance.

The product meets all the necessary requirements of the EU directives applicable to the specific product.
Changes in text, design, and technical specifications are subject to change without prior notice and we reserve the right to change them.
11c
DANKSAGUNG
Dockingstation
Teileliste

DE
concept
concept
DE
natural_image
Two technical line drawings of a printer or printer device, showing internal components and assembly (no text or symbols)natural_image
Technical line drawing of a mechanical assembly with two views (top and side), no visible text or symbolsSeitenbürste
Sensoren
HEPA-Filter:
REINIGUNGSMITTEL
natural_image
Diagram of a hand using a paper filter to generate a trash bin (no text or symbols present)Firmware-Update
FR
concept
concept
FR
Bloc d'alimentation

natural_image
Diagram of a computer monitor with an open rear panel and a labeled component (no text or symbols present)
Teileliste
CARACTÉRISTIQUES PRINCIPALES
Robot
| Boutons | Méthode de contrôle | |
| Appui court Appui long | ||
| Bouton Start/Stop | Marche/Arrêt/Poursuite du nettoyage | Nettoyage local1 x 1 m centrésur la positionactuelle |
| Bouton Charge | Return to Docking Station/Stop and Return to Docking Station | Activate/Deactivate Child Lock |
| Bouton ON/OFF | / On/Off | |
| Bouton Wifi Pairing | / | Enter Wifi Pairing Mode |
| Bouton Wifi Reset | / Wifi Reset | |
Station d'accueil
natural_image
Two technical line drawings of a device with internal components and directional arrows (no text or symbols)natural_image
Illustration of a robotic vacuum cleaner with hands operating the lid (no text or symbols present)Capteurs
NETTOYAGE DES FILTRES DU BAC À POUSSIÈRE DANS LA BASE
Filtre HEPA:
PRODUIT DE NETTOYAGE
natural_image
Diagram of a device being inserted into a paper holder, showing internal components and a close-up of the paper holder (no text or symbols present)
Elenco delle parti
IT
concept
concept
IT
CARATTERISTICHE CHIAVE
Robot
natural_image
Two technical line drawings of a device with internal components, showing no text or symbols.CONNESSIONE ALLA RETE WIFI
natural_image
Technical line drawing of a robotic vacuum cleaner with open lid and internal components (no text or symbols)natural_image
Illustration of two hand washing machines with a circular label containing the word 'oppure' (no other text or symbols)Sensori
PULIZIA DEI FILTRI DEL CONTENITORE DELLA POLVERE NELLA BASE
Filtro antipolvere:
Filtro HEPA:
PULITORE
natural_image
Diagram of a hand operating a device with an arrow indicating motion (no text or symbols present)IT
concept
concept
IT
Estación base
Lista de piezas
ES
concept
concept
ES
CARACTERÍSTICAS PRINCIPALES
Robot
natural_image
Two technical line drawings of a device with internal components, no text or symbols presentflowchart
graph TD
    A["Hand washing machine"] --> B["Add air pollutants"]
    B --> C["Add air filter"]
    C --> D["Add air mask"]
    D --> E["Add air filter with sun icon"]
    E --> F["Add air mask with grid pattern"]
    F --> G["Add air mask with grid pattern"]
natural_image
Two technical line drawings of a robotic vacuum cleaner, showing hand positioning and internal components (no text or symbols)natural_image
Illustration of two handshelves with internal compartments, one open and one closed, both without any text or symbolsPaños de limpieza
Sensores
LIMPIEZA DE LOS FILTROS DEL DEPÓSITO DE POLVO EN LA BASE
Filtro de polvo:
Filtro HEPA:
LIMPIADOR
natural_image
Diagram of a hand inserting a device into a machine, with an arrow indicating the process (no text or symbols present)Statia de andocare

Lista de piese
RO
concept
concept
RO
CARACTERISTICI CHEIE
Robot
natural_image
Two technical line drawings of a printer or printer device, showing internal components and alignment (no text or symbols)
m = 311
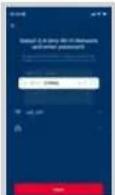
Fig. 10
Fig. 11
Fig. 12 Fig. 13 Fig. 14
PREGÄTIREA GOSPODÄRIEI
flowchart
graph LR
    A["Lighting Toilet"] --> B["Lighting Toilet"]
    B --> C["Lighting Toilet"]
    C --> D["Lighting Toilet"]
    D --> E["Lighting Toilet"]
    E --> F["Lighting Toilet"]
    F --> G["Lighting Toilet"]
    G --> H["Lighting Toilet"]
    H --> I["Lighting Toilet"]
    I --> J["Lighting Toilet"]
    J --> K["Lighting Toilet"]
    K --> L["Lighting Toilet"]
    L --> M["Lighting Toilet"]
    M --> N["Lighting Toilet"]
    N --> O["Lighting Toilet"]
    O --> P["Lighting Toilet"]
    P --> Q["Lighting Toilet"]
    Q --> R["Lighting Toilet"]
    R --> S["Lighting Toilet"]
    S --> T["Lighting Toilet"]
    T --> U["Lighting Toilet"]
    U --> V["Lighting Toilet"]
    V --> W["Lighting Toilet"]
    W --> X["Lighting Toilet"]
    X --> Y["Lighting Toilet"]
natural_image
Line drawings of a robotic vacuum cleaner with hands operating the button (no text or symbols)Senzori
CURĂȚAREA FILTRELOR RECIPIENTULUI DE PRAF DIN BAZĂ
filtru HEPA:
- concept
- PODĚKOVÁNÍ
- Dokovací stanice
- Seznam součástí
- KLÍČOVÉ FUNKCE
- POUŽITÍ ROBOTA BEZ APLIKACE
- Postranní kartáček
- Nádoba na špinavou vodu
- ČISTĚNÍ FILTRŮ PRACHOVÉ NÁDOBY V ZÁKLADNĚ
- ČISTICI PROSTŘEDEK
- Dokovacia stanica
- Zoznam dielov
- KLÚČOVÉ FUNKCIE
- Nádoba na špinavú vodu
- Senzory
- ČISTIACI PROSTRIEDOK
- Stacja dokująca
- Lista części
- KLUCZOWE FUNKCJE
- POJEMNIK NA BRUDNĄ WODE
- Czujniki
- CZYSZCZENIE FILTRÓW POJEMNIKA NA KURZ W PODSTAWIE
- HU
- Dokkoló állomás
- Alkatrészlista
- FUNKCIÓK
- Oldalsókefe
- Érzékelők
- Firmware frissités
- Bāzes stacija
- Dalu saraksts
- GALVENÄS IETEIKSMES
- Netirā üdens konteiners
- Sensori
- PUTEKLU KONTEINERA FILTRUTİRİŞANA PAMATNÉ
- IMPORTANT
- IMPORTANT SAFETY PRECAUTIONS
- EN
- Damages from failure to follow the manufacturer's instructions are not covered by the warranty.
- PRODUCT DESCRIPTION
- Docking station
- Parts list
- KEY FEATURES
- Note:
- INSTALLATION
- CONNECTION TO WIFI NETWORK
- USE
- FIRST CLEANING
- CHARGING
- COMPLETE AUTOMATIC CLEANING
- ZONE CLEANING
- ROOM CLEANING
- CLEANING MODE
- SETTING THE SUCTION POWER
- WATER DOSAGE SETTINGS
- CLEANER DOSAGE
- FREQUENCY OF VACUUMING DIRT FROM THE ROBOT TO THE STATION
- CARPET CLEANING SETUP
- CLEANING
- DRYING THE CLEANING TEXTILES
- CLEANING THE ROBOT THROUGH THE APP
- RECOGNITION OF SMALL ITEMS
- CLEANING ON ANOTHER FLOOR
- FORBIDDEN AREA
- PLANNING THE CLEANING
- RESET WIFI
- DO NOT DISTURB MODE
- LANGUAGE AND VOLUME SETTINGS
- MANAGE ACCESSORIES
- USING THE ROBOT WITHOUT THE APP
- DEFAULT ROBOT SETTINGS:
- RUNNING MAINTENANCE
- Main Brush
- Side brush
- Centre wheel
- Dust container
- Dirty water container
- Cleaning cloths
- Sensors
- SELF-CLEANING STATION
- CLEANING THE WATER CONTAINER
- DUST BAG REPLACEMENT
- CLEANING AGENT
- Firmware update
- TROUBLESHOOTING
- Robot reports error
- Docking station reports error
- WIRELESS CONNECTION AND COMPATIBILITY
- Compatibility:
- Pairing troubleshooting
- SERVICE
- ENVIRONMENTAL CONCERNS
- Recycling of the appliance at the end of its lifespan:
- DANKSAGUNG
- Dockingstation
- Teileliste
- Seitenbürste
- Sensoren
- HEPA-Filter:
- REINIGUNGSMITTEL
- Firmware-Update
- FR
- Bloc d'alimentation
- Capteurs
- NETTOYAGE DES FILTRES DU BAC À POUSSIÈRE DANS LA BASE
- PRODUIT DE NETTOYAGE
- Elenco delle parti
- CONNESSIONE ALLA RETE WIFI
- PULIZIA DEI FILTRI DEL CONTENITORE DELLA POLVERE NELLA BASE
- Filtro HEPA:
- PULITORE
- Estación base
- Lista de piezas
- Paños de limpieza
- Sensores
- LIMPIEZA DE LOS FILTROS DEL DEPÓSITO DE POLVO EN LA BASE
- LIMPIADOR
- Statia de andocare
- Lista de piese
- CARACTERISTICI CHEIE
- PREGÄTIREA GOSPODÄRIEI
- Senzori
- CURĂȚAREA FILTRELOR RECIPIENTULUI DE PRAF DIN BAZĂ
Brand : Concept
Model : VR4130
Category : Robot vacuum