
38.2 Li Comfort - Lawn mower AL-KO - Free user manual and instructions
Find the device manual for free 38.2 Li Comfort AL-KO in PDF.

| Product type | Cordless lawn mower |
| Brand | AL-KO |
| Model | 38.2 Li Comfort |
| Cutting width | 38.2 cm |
| Cutting height adjustment | Centralized (lever) |
| Power supply | Lithium-ion battery (2x) |
| Battery type | Lithium-ion |
| Charger included | Yes |
| Grass catcher | Yes, with fill level indicator |
| Mulching function | Yes (accessory included depending on model) |
| Grass roller | Yes (depending on model) |
| Handlebar | Height-adjustable and foldable |
| Safety devices | Safety key, safety bar, start button |
| After-sales service | AL-KO |
| Warranty | Legal warranty against manufacturing defects |
| Delivery content | Mower, grass catcher, handlebar, mulching accessory, 2 batteries, charger |
| Maintenance | Cleaning with a brush, checking and replacing the blade, lubrication |
| Repairability | Original parts, repair by authorized service center |
Frequently Asked Questions - 38.2 Li Comfort AL-KO
User questions about 38.2 Li Comfort AL-KO
0 question about this device. Answer the ones you know or ask your own.
Ask a new question about this device
Download the instructions for your Lawn mower in PDF format for free! Find your manual 38.2 Li Comfort - AL-KO and take your electronic device back in hand. On this page are published all the documents necessary for the use of your device. 38.2 Li Comfort by AL-KO.
USER MANUAL 38.2 Li Comfort AL-KO
natural_image
Line drawings of three lawn mower machines in different orientations (no text or symbols)


Inhaltsverzeichnis
Deutsch 16
English....32
Nederlands 48
Français....64
Español 81
Italiano 98
Slovenščina 115
Hrvatski....131
Српски....147
Polski....164
Česky 181
Slovenská 196
Magyarul....212
Dansk 229
Svensk....244
Norsk 259
Suomi 274
Lietuvių 289
Latviešu 305
Русский 321
Україна....340
© 2022
AL-KO KOBER GROUP Kötz, Germany
This documentation or excerpts therefrom may not be reproduced or disclosed to third parties without the express permission of the AL-KO KOBER GROUP.
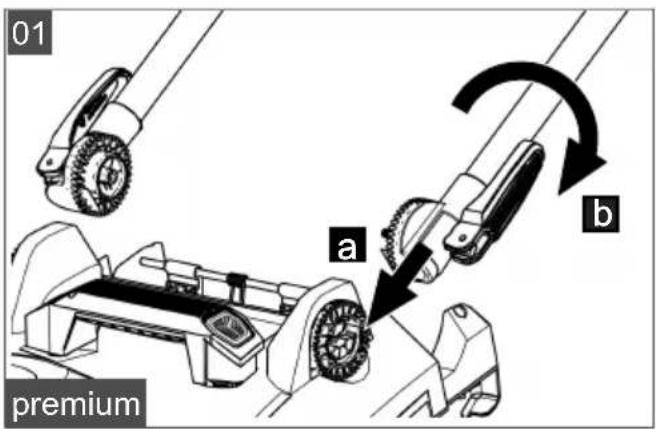
01
easy
*: depending on the model.
**: depending on the scope of delivery.
02
comfort
*: depending on the model.
**: depending on the scope of delivery.
scatter
| Label | Value | |---|---| | 19** | 19 | | 20** | 20 | | 2x | 2x | | 7 | 7 | | 8 | 8 | | 20** | 20** | | 2x | 2x | | 7 | 7 | | 8 | 8 | | 20** | 20** | | 2x | 2x | | 7 | 7 | | 8 | 8 | | 20** | 20** | | 2x | 2x | | 7 | 7 | | 8 | 8 | | 20** | 18 | | 2x | 2x | | 7 | 7 | | 8 | 8 | | 20** | 18 | | 2x | 2x | | 7 | 7 | | 8 | 8 | | 20** | 17 | | 2x | 2x | | 7 | 7 | | 8 | 8 | | 20** | 16 | | 2x | 7 | | 7 | 7 | | 8 | 8 | | 20** | 16 | | 2x | 7 | | 7 | 7 | | 8 | 8 | | 20** | 15 | | 2x | 7 | | 7 | 7 | | 8 | 8 | | 20** | 13 | | 2x | 7 | | 7 | 7 | | 8 | 8 | | 20** | 13 | | 2x | 7 | | 7 | 7 | | 8 | 8 | | 20** | 14 | | 2x | 7 | | 7 | 7 | | 8 | 8 | | 20** | 15 | | 2x | 7 | | 7 | 7 | | 8 | 8 | | 20** | 15* | | 2x | 7 | | 7 | 7 | | 8 | 8 | | 20** | * | | 2x | * | | 7 | * | | 8 | * | | 20** | * | | 2x | * | | 7 | * | | 8 | * | | 20** | * | | 2x | * | | 7 | * | | 8 | * | | 20** | * | | 2x | * | | 7 | * | | 8 | * | | 20** | * | | 2x | * | | 3 | - | | - | - | | - | - | | - | - | | - | - | | - | - | | - | - | | - | - | | - | - | | - | - | | - | - | | - | - | | - | - | | - | - | | - | - | | - | - | | - | - | | - | - | | - | - | | - | - | | - | - | | +1 | - | | +1 | - | | +1 | - | | +1 | - | | +1 | - | | +1 | - | | +1 | - | | +1 | - | | +1 | - | | +1 | - | | +1 | - | | +1 | - | | +1 | - | | +1 | - | | +1 | - | | +1 | - | | +1 | - | | +1* | * | | +1* | * | | +1* | * | | +1* | * | | +1* | * | | +1* | * | | +1* | * | | +1* | * | | +1* | * | | +1* | * | | +1* | * | | +1* | * | | +1* | * | | +1* | * | | +1* | * | | +1* | * | | +1* | * | | +1* | * | | +1* | * | | +1* | * | | +1* | * | | +1* | * | | +1* | * | | +1* | * | | +1* | * | | +1*: depending on the model.
**: depending on the scope of delivery.
2
5
3
1
1 2
6
4
1
1
2
1
2
flowchart
graph TD
    A["Left Road"] --> B{Curved Lanes}
    B --> C["Car Icon"]
    C --> D["Right Car Icon"]
    style A fill:#f9f,stroke:#333
    style B fill:#ccf,stroke:#333
    style C fill:#cfc,stroke:#333
    style D fill:#fcc,stroke:#333


easy


38.2 Li comfort
comfort
382 Li premium
premium

 | 3.22 Li easy | 3.82 Li easy | 38.2 Li comfort | 382 Li premium |
 | 113857 | 113845 (UK) | 113842 | 113846 (UK) | 113843 | 113847 (UK) | 113844 | 113848 (UK) |
 | 2x B50 Li | 2x B75 Li | 2x B75 Li | 2x B100 Li |
 | C50 Li | C50 Li | C50 Li | FC100 Li |
 | 113903 | 113933 (UK) | 113904 | 113934 (UK) | 113905 | 113935 (UK) | 113906 | 113936 (UK) |
 | ||||
 | ||||
 | 32 cm 38 cm 38 cm 38 cm | |||
 | 200 m^2 | 300 m^2 | 300 m^2 | 400 m^2 |
 | 11,7 kg | 11,9 kg (UK) | 13,4 kg | 13,6 kg (UK) | 13,7 kg | 13,9 kg (UK) | 13,8 kg | 14,0 kg (UK) |
 | 35 | 45 | 45 | 45 | | |||
 | 2,0 cm – 7,5 cm 2,0 cm – 7,5 cm 2,0 cm – 7,5 cm | |||
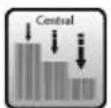
 | 6(central) | |||
 | 550 W 800 W 800 W 800 W | |||
 | --XX | |||
 | - | x (UK) - | x (UK) - | x (UK) - | x (UK) | |||
 | L_pA = 70 dB(A), K = 3 dB(A) | L_pA = 74 dB(A), K = 3 dB(A) | L_pA = 76 dB(A), K = 3 dB(A) | L_pA = 76 dB(A), K = 3 dB(A) |
 | L_wA = 82 dB(A), K = 0,7 dB(A) | L_wA = 86 dB(A), K = 1,4 dB(A) | L_wA = 86 dB(A), K = 0,7 dB(A) | L_wA = 86 dB(A), K = 0,7 dB(A) |
 | a_hv < 2,5 m/s^2, K = 1,5 m/s^2 | a_hv < 2,5 m/s^2, K = 1,5 m/s^2 | a_hv < 2,5 m/s^2, K = 1,5 m/s^2 | a_hv < 2,5 m/s^2, K = 1,6 m/s^2 |
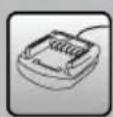 | C50 Li(AL 1830 CV) | FC100 Li(AL 1880 CV) |
 | 113897|113898 (UK) 113899|113900 (UK) | |
 | 220 – 240 V AC, 50/60 Hz | |
 | 14,4 V – 18 V DC | |
 | 3 A 8 A | |
 | 0 °C – +45 °C | |
 | ☐ / II | |
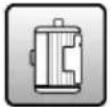
 | B50 Li(PBA 18V 2.5Ah W-B) | B75 Li(PBA 18V 4.0Ah W-C) | B100 Li(PBA 18V 5.0Ah W-C) | B125 Li(PBA 18V 6.0Ah W-C) |
 | 113893 113894 | 113895 113896 | ||
 | 18 V | |||
 | 2,5 Ah 4,0 Ah 5,0 Ah 6,0 Ah | |||
 | 45 Wh 72 Wh 90 Wh 108 Wh | |||
 | C50 Li: ≈ 60 minFC100 Li: ≈ 36 min | C50 Li: ≈ 95 minFC100 Li: ≈ 39 min | C50 Li: ≈ 105 minFC100 Li: ≈ 46 min | C50 Li: ≈ 130 minFC100 Li: ≈ 62 min |
 | 0 °C – +45 °C | |||
 | -20 °C – +50 °C | |||
3.8 "maxRun"-Cockpit (04)* 20
3.8 "maxRun"-Cockpit (04)\*
www.al-ko.com/service-contacts
15 GARANTIE
1 Special safety instructions 33
2 About these operating instructions ..... 33
2.1 Symbols on the title page.... 33
2.2 Legends and signal words ...... 33
3 Product description 33
3.1 Designated use 34
3.2 Possible foreseeable misuse .... 34
3.3 Residual risks...... 34
3.4 Safety and protective devices ...... 34
3.5 Symbols on the appliance 34
3.5.1 Safety signs 34
3.5.2 Operating signs 35
3.6 Product overviews.... 35
3.6.1 Product overview (01) – easy..... 35
3.6.2 Product overview (02, 03) – comfort and premium ...... 35
3.7 Scope of supply.... 36
3.8 "maxRun" cockpit (04)* 36
4 Safety instructions 36
4.1 Safety instructions for lawnmowers.... 36
4.1.1 Training.... 36
4.1.2 Preparatory measures 36
4.1.3 Handling 36
4.1.4 Maintenance and storage...... 37
4.2 Vibration load 37
4.3 Noise pollution.... 38
4.4 Safety notes for rechargeable battery and charger 38
5 Installation.... 38
6 Start-up 38
6.1 Charging the rechargeable battery..... 38
6.2 Inserting and removing batteries (05) 38
6.3 Switching the power supply on and off (06).... 39
6.4 Switching the cockpit ON and OFF*... 39
7 Operation.... 39
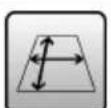
7.1 Setting the cutting height 39
7.1.1 Setting the cutting height (07) – easy and comfort .... 39
7.1.2 Setting the cutting height (08) – premium 39
7.2 Mowing with grass catcher (09, 10).... 40
7.3 Mowing without grass catcher (26)..... 40
7.4 Mowing with lawn roller (11)*...... 40
7.5 Mulching with mulching insert (12, 13) ^* 40
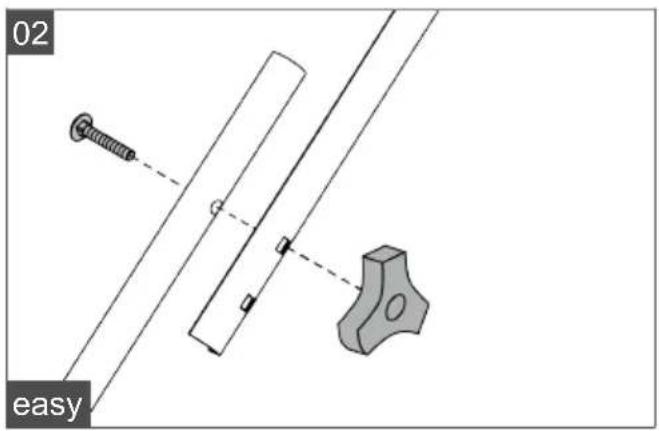
7.6 Adjusting the handlebar to your body size*.... 41
7.6.1 Adjusting the handlebar – easy (14).... 41
7.6.2 Adjusting the handlebar – comfort (15, 24) ...... 41
7.6.3 Adjusting the handlebar – premium (16).... 41
7.7 Folding the handlebar in and out*...... 41
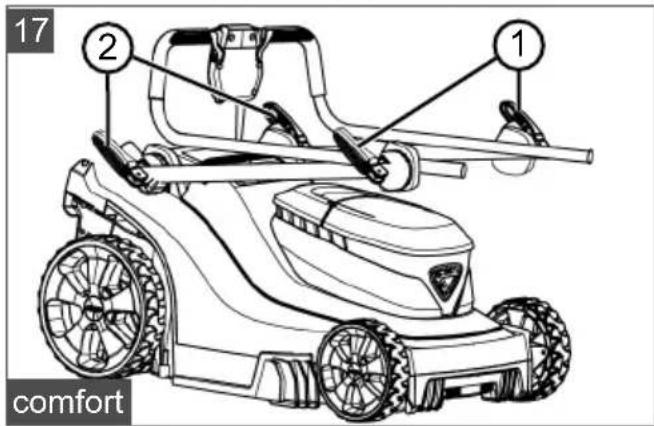
7.7.1 Folding the handlebar in and out – comfort (17, 24)...... 41
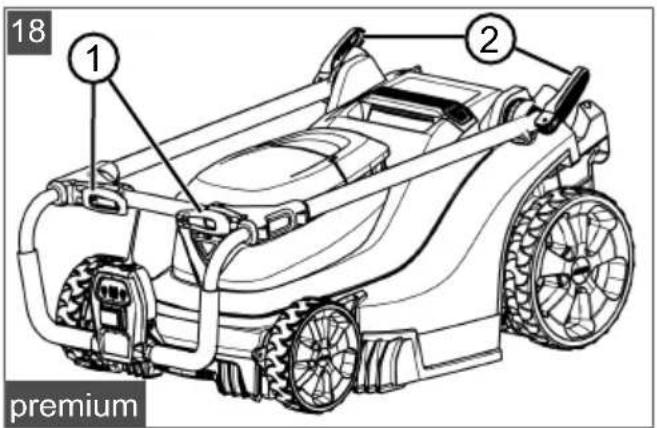
7.7.2 Folding the handlebar in and out – premium (18, 25).... 41
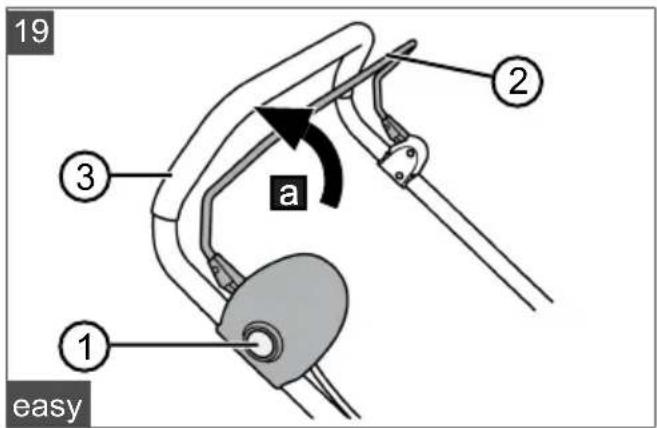
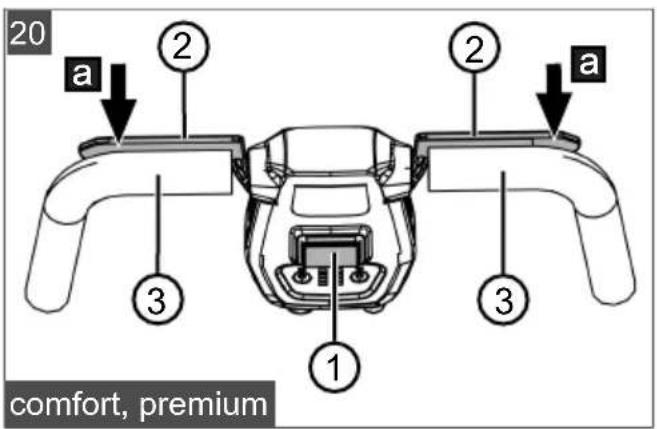
7.8 Starting and stopping the mower mechanism (19, 20) ^* ..... 41
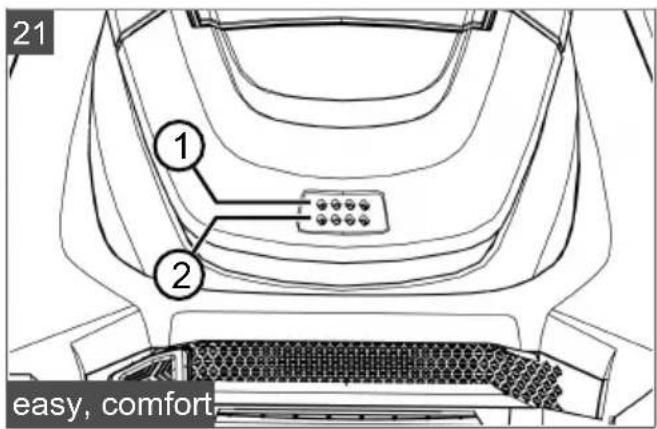
7.9 Checking the battery charge status (21, 22) ^* ..... 42
7.10 Switching Eco mode ON and OFF (23)* 42
8 Work instructions.... 42
9 Maintenance and care.... 43
9.1 Regular maintenance work.... 43
9.2 Cleaning the appliance and mower mechanism 43
9.3 Checking and renewing the cutting blade.... 43
9.4 Repair work 43
10 Help in case of malfunction 43
11 Transport.... 45
12 Storage 45
12.1 Storing the rechargeable battery
lawnmower 45
12.2 Storing the rechargeable battery and charging unit.... 46
13 Disposal 46
14 After-Sales/Service 47
15 Guarantee.... 47
1 SPECIAL SAFETY INSTRUCTIONS
This appliance can be used by children of 8 years and older and by persons with reduced physical, sensory or mental capabilities, or those lacking experience and knowledge, if they are supervised or have been instructed with regard to the safe use of the appliance and the ensuing risks. Children must not be allowed to play with the appliance. Cleaning and maintenance must not be carried out by children without supervision.
People with very strong and complex restrictions may have needs that exceed the instructions described here.
2 ABOUT THESE OPERATING INSTRUCTIONS
The German version is the original operating instructions. All additional language versions are translations of the original operating instructions.
■ Always safeguard these operating instructions so that they can be consulted if you need any information about the appliance.
■ Only pass on the appliance to other persons together with these operating instructions.
■ Comply with the safety and warning information in these operating instructions.
2.1 Symbols on the title page
Symbol Meaning

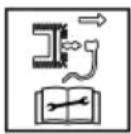
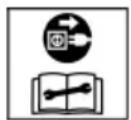
It is essential to read through these operating instructions carefully before start-up. This is essential for safe working and trouble-free handling.

Operating instructions
Symbol Meaning

Handle Li-Ion rechargeable batteries with care! In particular, observe the notes on transport, storage and disposal in these operating instructions!
2.2 Legends and signal words
⚠️ DANGER! Denotes an imminently dangerous situation which will result in fatal or serious injury if not avoided.
WARNING! Denotes a potentially dangerous situation which can result in fatal or serious injury if not avoided.
CAUTION! Denotes a potentially dangerous situation which can result in minor or moderate injury if not avoided.
IMPORTANT! Denotes a situation which can result in material damage if not avoided.
NOTE Special instructions for ease of understanding and handling.
3 PRODUCT DESCRIPTION
This operating manual describes various models of pedestrian-controlled battery-powered lawnmowers with different configurations. The configurations of the individual models are presented in the technical data.
Some models are equipped with a lawn roller. By walking up and down uniformly when mowing, you create an elegant stripe pattern in your lawn.
The appliance may only be used together with the lithium-ion rechargeable batteries and chargers specified in the technical data. See the separate operating manuals for further information on rechargeable batteries and chargers:
■ Operating manual 443130: Rechargeable batteries
■ Operating manual 443131: Chargers
IMPORTANT! Danger of damage to the appliance and battery. If the appliance is operated with unsuitable batteries, both the device and the batteries may be damaged.
- Operate the appliance only with the specified rechargeable batteries.
3.1 Designated use
This appliance is intended for the mowing of lawns and may only be used on dry grass.
This appliance is intended solely for use in non-commercial applications. Any other use as well as unauthorised conversions or modifications are regarded as contrary to the intended use and will result in voiding of the warranty as well as loss of conformity; the manufacturer will thus decline any responsibility for damage and/or injury suffered by the user or third parties.
3.2 Possible foreseeable misuse
The tool is designed neither for commercial use in public parks and sports facilities, nor for use in farming and forestry.
- Do not use the appliance in the rain or on wet grass.
There must be no foreign objects on the area to be mowed, e.g. stones, pieces of wood, bottles.
3.3 Residual risks
Even during correct use of the appliance, there is always a certain residual risk that cannot be excluded. Depending on the use, the following potential risks can be derived from the type and construction of the appliance:
■ Throwing out of cuttings, soil and small stones.
■ Inhalation of cuttings particles if no breathing protection is worn.
■ Lacerations from reaching into the rotating cutting blade.
3.4 Safety and protective devices
WARNING! Risk of injury. Defective and disabled safety and protective devices can result in serious injury.
■ Have any defective safety and protective devices repaired.
■ Never disable safety and protective devices.
Safety key
The appliance is provided with a safety key to prevent inadvertent switching on. Switch off the appliance before maintenance work and always remove the safety key.
Safety handle/operator presence control
The appliance is fitted with a safety handle/operator presence control. In an emergency, simply release the safety handle/operator presence control. The motor and mower mechanism are stopped.
Start button (on the handlebar)
The start button must first be pressed before the motor can be switched on by means of the safety handle/operator presence control.
Baffle
The baffle offers protection against e.g. material particles and stones which can be flung out.
3.5 Symbols on the appliance
3.5.1 Safety signs
Symbol Meaning

Pay special attention when handling this appliance!

Read the operating manual before starting operation!
Risk of injury! Keep your hands and feet away from the mower mechanism!
Before starting maintenance and repair work, switch off the appliance and remove the safety key!
Before starting maintenance and repair work, switch off the appliance and remove the batteries from the appliance!

Danger due to objects being thrown out!

Keep other people out of the danger area!
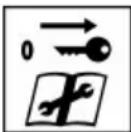
Always remove the safety key before working on the appliance!
Symbol Meaning

Danger of electric shock if the mains cable is damaged!
Keep the mains cable away from the mower mechanism and do not drive over it!
3.5.2 Operating signs
Symbol Meaning

Procedure for starting the motor (see chapter 7.8 "Starting and stopping the mower mechanism (19, 20)*", page 41)
When not in use: Remove the safety key and pull the battery out of the appliance.
3.6 Product overviews
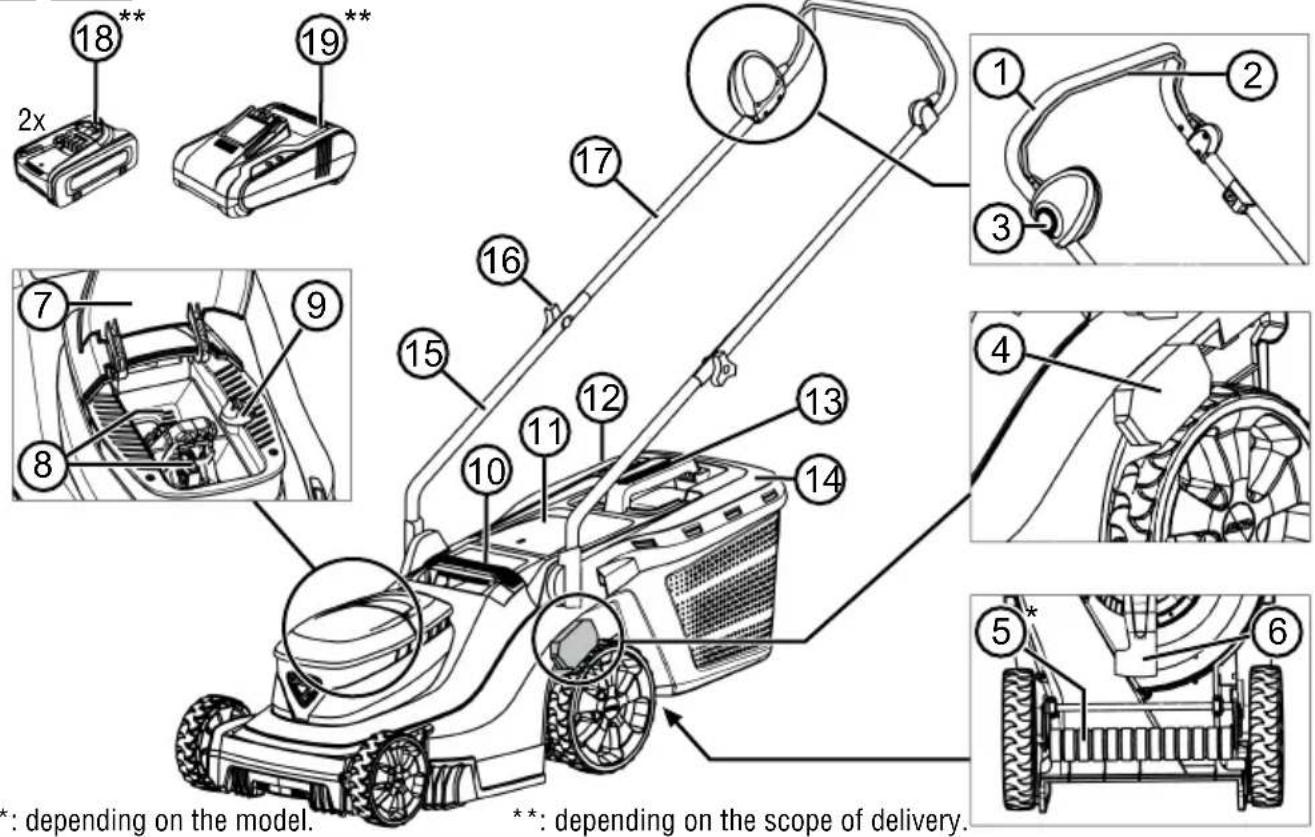
3.6.1 Product overview (01) - easy
No. Component
1 Handle
2 Operator presence control
3 Start button
4 Central cutting height adjustment
5* Lawn roller*
6 Cutting blade
7 Battery compartment cover
8 Battery compartment 1 and 2
9 Key switch with safety key
10 Handle
11 Baffle
12 Fill-level indicator
No. Component
13 Handle of grass catcher
14 Grass catcher
Height-adjustable handlebar, consisting of:
15 Lower brace
16 Height adjustment screw
17 Upper brace
18** Rechargeable battery (2x)**
19** Charger**
* depending on the model, see technical data.
** depending on the scope of supply.
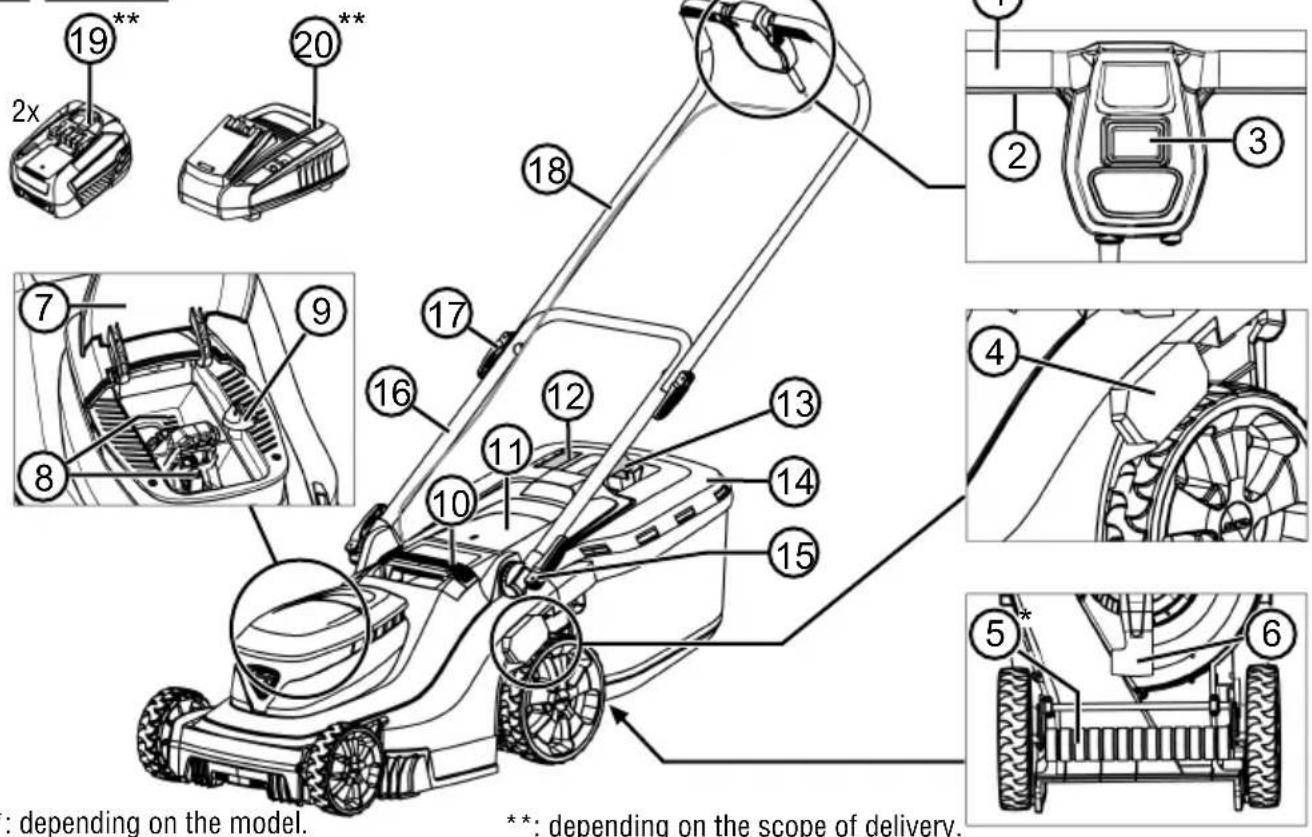
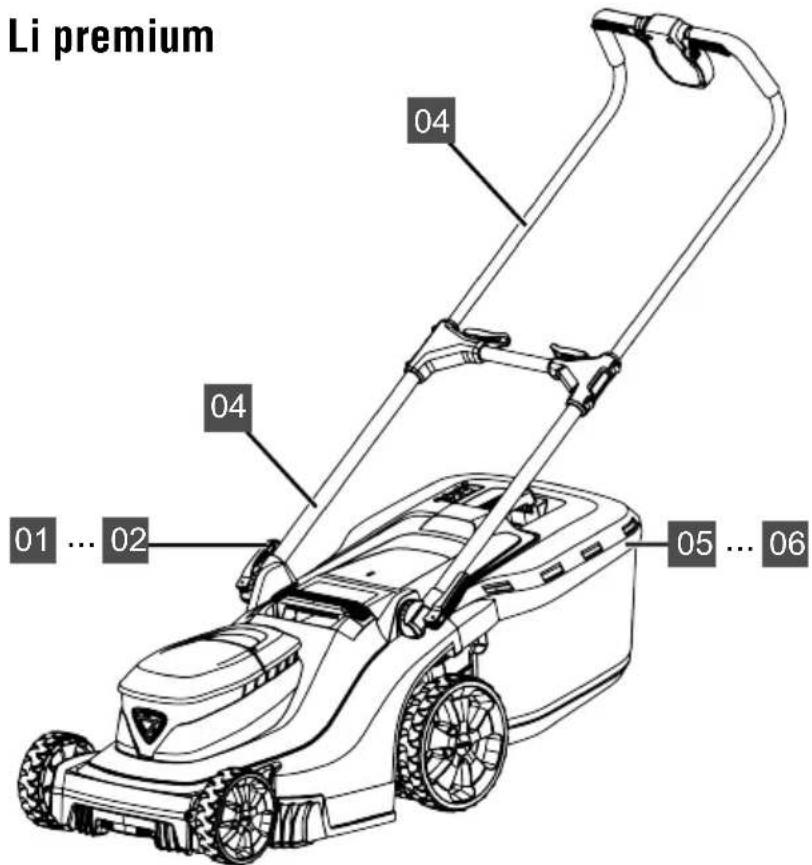
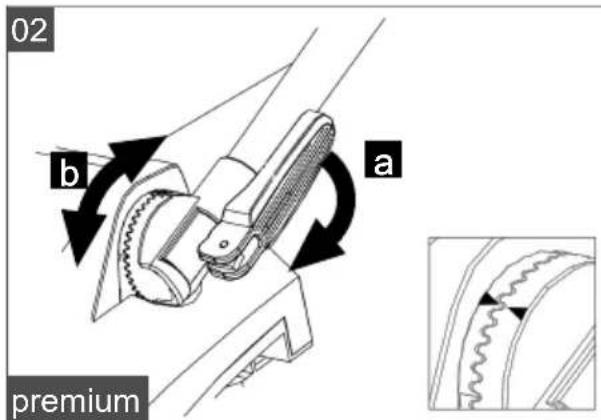
3.6.2 Product overview (02, 03) – comfort and premium
No. Component
1 Handle
2 Operator presence control
3 Start button
4 Central cutting height adjustment
5* Lawn roller*
6 Cutting blade
7 Battery compartment cover
8 Battery compartment 1 and 2
9 Key switch with safety key
10 Handle
11 Baffle
12 Fill-level indicator
13 Handle of grass catcher
14 Grass catcher
Height-adjustable and folding handlebar, consisting of:
15 Rotary/snap-in joints with quick-release lever
16 Lower brace
17 comfort: Rotary joint with quick-release lever premium: Quick-release lever for upper brace
No. Component
18 comfort: Upper brace, folding premium: Upper brace, telescopic
19** Rechargeable battery (2x)**
20** Charger**
21 premium: Cockpit
* depending on the model, see technical data.
** depending on the scope of supply.
3.7 Scope of supply
The items listed here are included in the standard scope of supply. Check that all items are present:
No. Component
1 Lawnmower
2 Grass catcher (unassembled/partially assembled)*
3 Handlebar (unassembled/partially assembled)*
4 Mulch insert*
5 Rechargeable battery**
6 Charger**
* depending on the model, see technical data.
** depending on article number, see technical data.
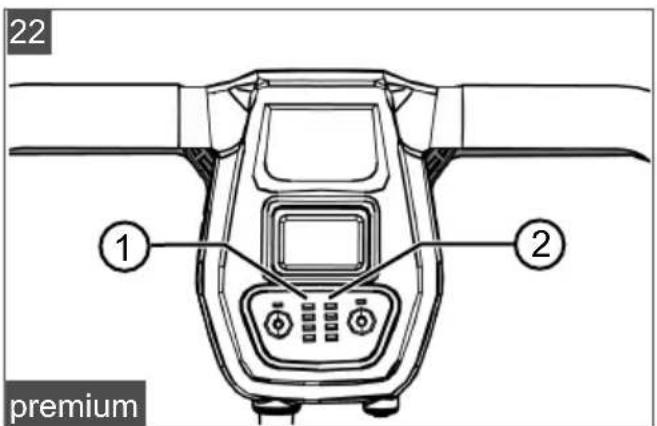
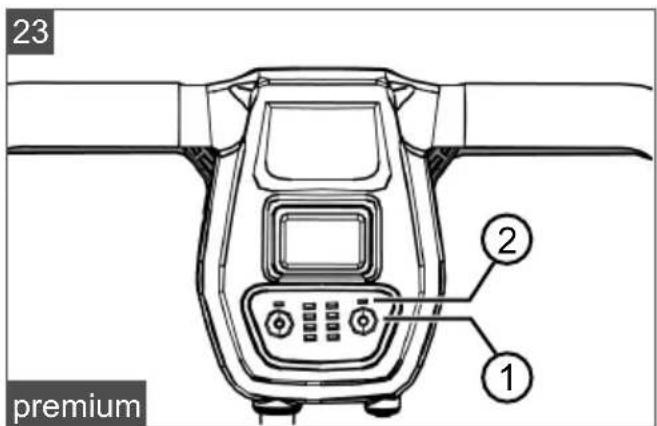
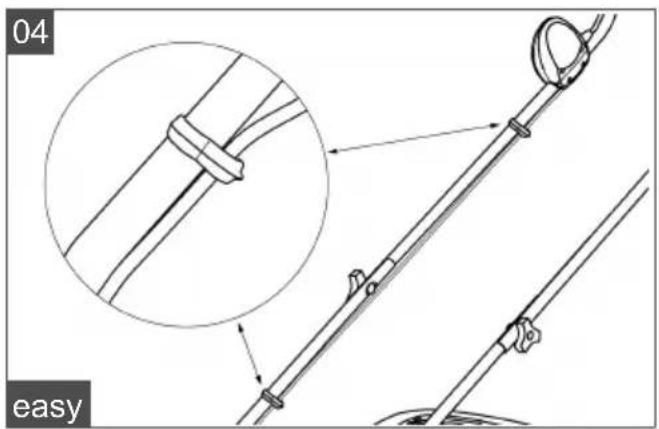
3.8 "maxRun" cockpit (04)\*
* depending on the model, see technical data.
Controls
No. Meaning
1 Start button
2 Operator presence control
3 ON/OFF button for cockpit, with status LED
4 "Eco mode" button, with status LED
Displays
No. Meaning
5 Charge status display for battery 1
6 Charge status display for battery 2
4 SAFETY INSTRUCTIONS
4.1 Safety instructions for lawnmowers
4.1.1 Training
- Read the operating manual carefully. Familiarise yourself with the control devices and the correct use of the appliance.
■ Never allow children or other persons who are not familiar with the operating manual to use the lawnmower.
Children should be supervised so that they do not play with the appliance.
- Cleaning and maintenance must not be carried out by children.
- Local regulations may specify the minimum age of the user.
■ Never mow when there is anyone, especially children or animals, in the vicinity.
■ Remember that the user is responsible for accidents involving other persons or their property.
■ Do not operate the appliance if you are under the influence of alcohol, drugs or medication.
4.1.2 Preparatory measures
■ Always wear sturdy shoes and long trousers when operating the appliance. Do not operate the appliance when barefoot or wearing light sandals. Avoid wearing loose clothing or clothing with dangling cords or belts.
- Check the area where the appliance is being used and remove any objects that could be picked up and flung out by the appliance.
Before using the appliance, always check if the cutting blades, fastening bolts and the entire mowing unit are worn or damaged. Worn or damaged cutting blades and fastening bolts must only be replaced as a set to avoid unbalance. Worn or damaged information signs must be replaced.
4.1.3 Handling
■ Only mow during daylight hours or with good artificial lighting.
If possible, avoid using the appliance on wet grass.
■ Always make sure that you have a good standing position on slopes.
■ Only operate the appliance at walking pace.
■ Mow across the slope, never up or down.
■ Be especially careful when changing the direction of travel on a slope.
■ Do not mow on very steep slopes.
■ Be especially careful when reversing or pulling the lawnmower towards you.
- Stop the cutting blade(s) if the lawnmower needs to be tilted for transport over areas other than grass and when the lawnmower is being moved to and from the area to be mowed.
■ Never use the appliance with damaged protective devices or protective grilles or without mounted protective devices, e.g. baffle plates and/or grass catcher. Damaged protective devices and covers must be replaced, missing protective devices and covers must be correctly fitted.
- Start the engine with care and in accordance with the manufacturer's instructions. Ensure that your feet are at a sufficient distance from the cutting blade(s).
- When starting the engine, do not tilt the lawnmower unless the lawnmower needs to be raised during the process. In this case, tilt it only as far as is absolutely necessary and only lift up the side facing away from the user.
- Do not start the engine when standing in front of the discharge channel.
■ Never put your hands or feet on or under rotating parts. Always keep away from the ejection opening.
■ Never lift or carry the appliance with the engine running.
■ Switch off the engine and remove the safety key. Make sure that all moving parts have come to a complete stop:
■ whenever you leave the lawnmower,
■ before removing blockages or clogging in the discharge channel,
■ before inspecting, cleaning or working on the lawnmower,
■ after encountering a foreign object. Check for damage to the lawnmower and carry out the necessary repairs before re-starting and working with the lawnmower.
■ An immediate check is required if the lawnmower starts to vibrate in an unusual way:
Check for damage.
- Carry out the necessary repairs of damaged parts.
■ Make sure that all nuts, bolts and screws are firmly tightened.
- Do not work with the appliance in bad weather conditions, especially when it is raining or when thunderstorms are approaching.
4.1.4 Maintenance and storage
■ Make sure that all nuts, bolts and screws are tightened and the appliance is in a safe working condition.
■ Regularly check the grass catcher for wear or loss of functional capability.
- Replace worn or damaged parts due to safety reasons.
- On appliances fitted with several cutting blades, note that the movement of one cutting blade can cause the other cutting blades to rotate.
■ When adjusting the appliance, make sure that your fingers are not trapped between moving cutting blades and stationary parts of the appliance.
- Allow the engine to cool down before storing the appliance.
■ When maintaining the cutting blades, be aware that the cutting blades can be moved even when the power supply is switched off.
- Replace worn or damaged parts due to safety reasons. Only use original spare parts and accessories.
4.2 Vibration load
■ Danger due to vibration
The actual magnitude of the vibration emissions during the use of the appliance may deviate from that stated by the manufacturer. Observe the following influencing factors before or during use:
Is the appliance being used as intended?
Is the material being cut or processed in the proper manner?
Is the appliance in a proper condition of use?
Is the cutting tool properly sharpened or is the correct cutting tool installed?
Are the handle grips and any optional vibration grips mounted, and are they firmly attached to the appliance?
■ Only operate the tool at the motor speed required for the respective work. Avoid using the maximum speed in order to reduce noise and vibrations.
The noise and vibrations of the tool may increase due to improper use and mainte-
nance. This leads to health damage. In this case, immediately switch off the tool and have it repaired by an authorised service workshop.
The degree of stress due to vibration depends on the work to be performed or on the use of the tool. Estimate the stress and plan appropriate work breaks. This considerably reduces stress due to vibration over the entire working time.
- Extensive use of the tool exposes the operator to vibrations, which can lead to circulatory issues ("white fingers"). To avoid this risk, wear gloves and keep your hands warm. If any symptoms of "white fingers" occur, immediately consult a physician. These symptoms include: Numbness, loss of feeling, tingling, itching, pain, reduced muscular strength, changes in the colour or condition of the skin. Normally these conditions affect the fingers, hands or pulse. The risk increases at low temperatures.
Take long breaks during your working day so you can recover from the noise and the vibrations. Plan your work in such a way that the use of appliances that generate strong vibrations is spread over several days.
If you notice an unpleasant sensation or discoloration of the skin on your hands when using the tool, stop work immediately. Take sufficient work breaks. Without sufficient breaks, a hand/arm vibration syndrome can occur.
- Minimise your risk of being exposed to vibrations. Maintain the tool according to the instructions in the operating instructions.
If the tool is used frequently, contact your dealer to purchase anti-vibration accessories (e.g. handles).
- Avoid working with the tool at temperatures below 10 °C. Define how the vibration load can be limited in a work plan.
4.3 Noise pollution
A certain level of noise exposure from this appliance is inevitable. Carry out noisy work at approved and specified time periods. Observe rest periods as necessary and restrict the duration of the work to a minimum. For your personal protection and protection of persons in the vicinity, appropriate hearing protection must be worn.
4.4 Safety notes for rechargeable battery and charger
■ Remove the batteries from the appliance before charging.
- Do not use different battery types or new and used batteries together in the appliance.
- Install the batteries in the appliance with the correct polarity.
■ Remove the batteries from the appliance before putting it into storage for an extended period.
- Do not short-circuit the terminals of the appliance or battery.
Operating instructions
Please observe the safety instructions for the rechargeable battery and the charger in the separate operating instructions.
See:
■ Operating instructions 443130: Rechargeable batteries
■ Operating instructions 443131: Chargers
5 INSTALLATION
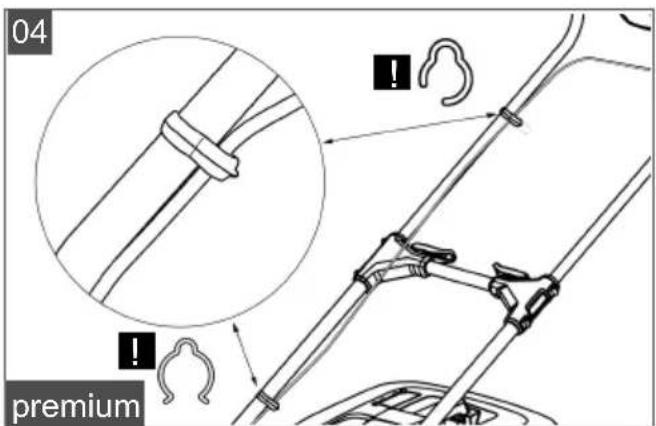
Assembly: See figures “comfort” (00) to (06) and “premium” (00) to (06).

WARNING! Danger if assembly is not
carried out completely! Use of an incompletely assembled appliance can result in serious injury.
- Operate the appliance only when it is fully assembled!
- Do not insert the batteries into the appliance until it is fully assembled!
6 START-UP
6.1 Charging the rechargeable battery
i NOTE For detailed information, heed the separate operating instructions for the rechargeable battery and for the charging unit.
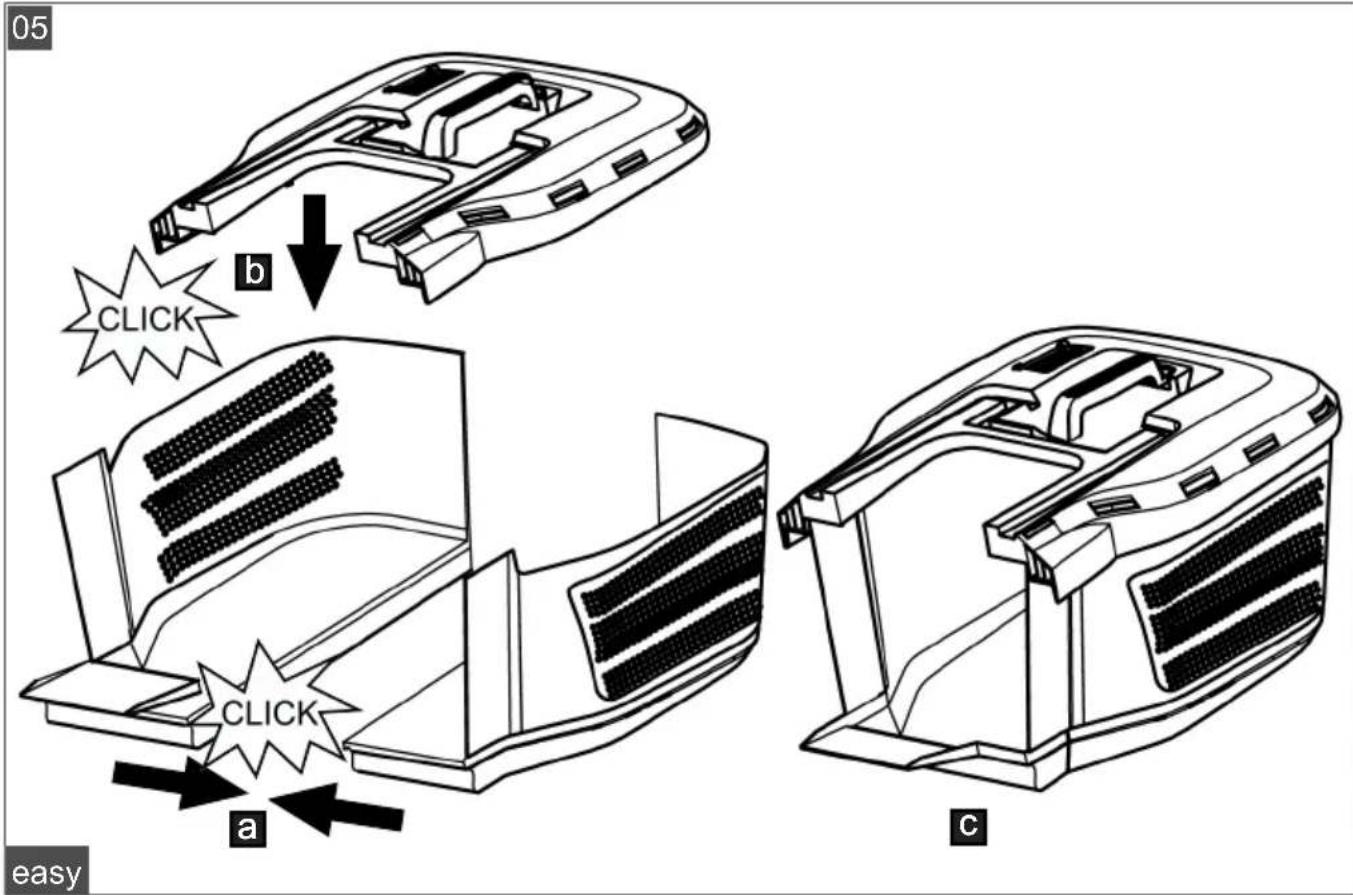
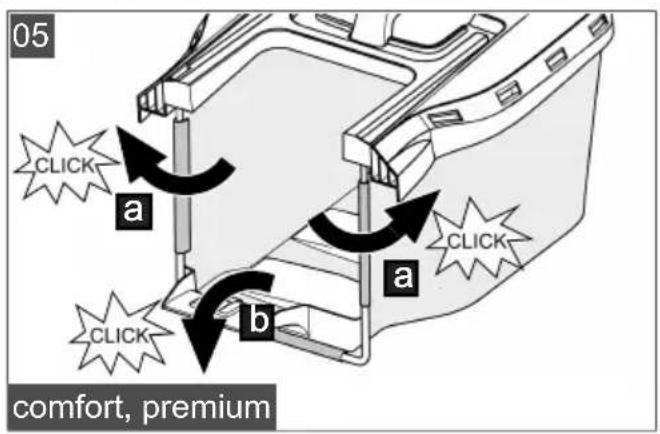
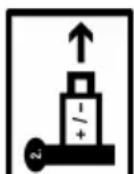
6.2 Inserting and removing batteries (05)
The lawnmower functions only when both batteries are installed.
Batteries can be used with different charge statuses.
IMPORTANT! Risk of damage to the batteries. If the batteries are left in the appliance after use, they could be damaged.
■ Take the batteries out of the appliance immediately after use and store in a frost-protected area.
■ Install the batteries in the appliance only immediately before starting work.
Installing the battery
- Open the battery compartment cover (05/1) (05/a).
- Battery 1 and 2: Push the battery into a battery slot (05/2) from above until it engages.
- Close the battery compartment cover.
Removing the battery
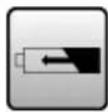
- Press and hold the unlock button on the battery.
- Pull out the battery.
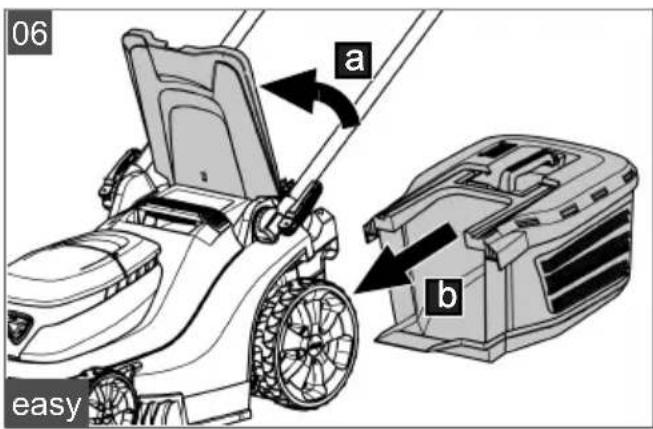
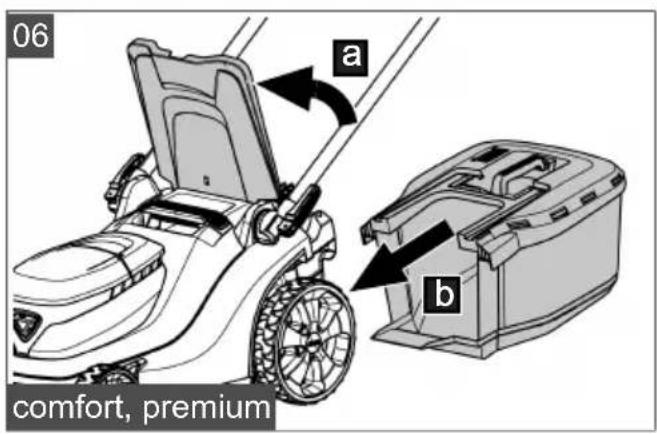
6.3 Switching the power supply on and off (06)
The key switch can be used to switch the power supply to the mower mechanism on and off. The key switch is operated with the safety key.
WARNING! Risk of injury. Unintentional switching on can lead to serious injuries.
Each time before work breaks and maintenance work: To turn off the power, turn the safety key to the 'Off' position and then remove it.
Switching on the power supply
- Open the battery compartment cover.
- Insert safety key (06/1) into the key switch.
- Turn the safety key to the ON position (position I) (06/ a). The appliance is supplied with operating voltage, but does not yet begin to operate.
- Close the battery compartment cover.
- Switch on the appliance: see chapter 7.8 "Starting and stopping the mower mechanism (19, 20)*", page 41.
Switching off the power supply
- Turn the safety key to the OFF position (position 0) (06/b) and remove.
- Immediately after use, remove the batteries from the appliance, charge and store in a frost-protected area. Insert the batteries into the appliance only immediately before the next use.
6.4 Switching the cockpit ON and OFF\*
* depending on the model, see technical data.
Precondition: Both batteries are installed.
Switching on the cockpit
- Press the ON/OFF button (04/3) on the cockpit.
Switching off the cockpit
- Press the ON/OFF button (04/3) on the cockpit.
If not in use, the cockpit switches off automatically after 10 minutes.
7 OPERATION
WARNING! Risk of injury! Defective and disabled safety and protective devices can result in serious injury.
■ Before switching on, check that all safety and protective devices are in place and functioning correctly!
7.1 Setting the cutting height
CAUTION! Danger of lacerations. Danger of lacerations when reaching into the running mower mechanism.
■ Only adjust the cutting height when the motor is switched off and the mower mechanism is stationary.
7.1.1 Setting the cutting height (07) – easy and comfort
- Pull lever (07/1) outwards to disengage it (07/a) and hold.
■ For short grass, push the lever towards the front wheel (07/b).
■ For longer grass, push the lever towards the grass catcher (07/b).
- Release the lever until it engages at the required level.
The set cutting height is displayed at the front left wheel.
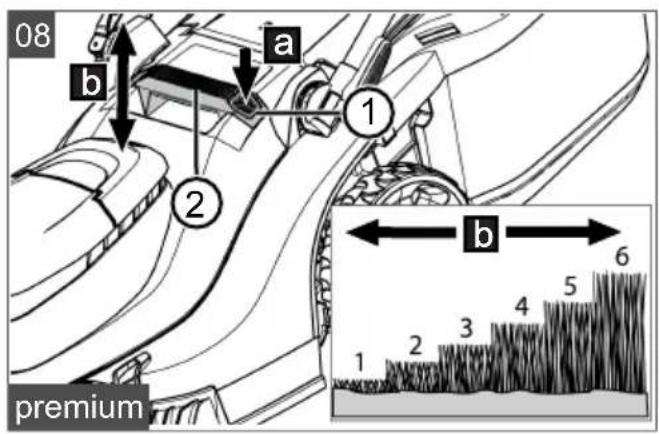
7.1.2 Setting the cutting height (08) – premium
- Press release button (08/1) (08/a).
- Pull the lawnmower up or push down at handle (08/2) until the desired cutting height is reached (08/b).
- Allow the lawnmower to engage at the desired height.
The set cutting height is displayed at the front left wheel.
7.2 Mowing with grass catcher (09, 10)
The appliance can be operated with and without a grass catcher.
Hooking in the grass catcher
- Make sure that the appliance is switched off and the mower mechanism has come to a standstill.
- Raise the baffle (09/1) (09/a).
- Hook the grass catcher (09/2) into the holders (09/b).
- Release the baffle.
Checking the fill level
The fill-level indicator (10/1) is pressed upwards by the air stream when mowing (10/a). If the grass catcher (10/2) is full, the fill-level indicator is in contact with the grass catcher (10/b). The grass catcher must be emptied.
Unhooking and emptying the grass catcher
CAUTION! Danger of lacerations. Danger of lacerations when reaching into the running mower mechanism.
■ Only remove the grass catcher when the mower mechanism has stopped.
- Make sure that the appliance is switched off and the mower mechanism has come to a standstill.
- Raise the baffle (09/1).
- Lift the grass catcher (09/2) out of the holders and take off to the rear.
- Empty the grass catcher.
- Clean the air outlet holes (09/3) under the fill-level indicator.
- Hook in the grass catcher (see above).
7.3 Mowing without grass catcher (26)
The appliance can also be operated without grass catcher. The baffle must be opened slightly so that the discharge channel does not clog.
- Make sure that the appliance is switched off and the mower mechanism has come to a standstill.
- Raise baffle (26/1) (26/a).
- Pull up (26/b) baffle prop (26/2) until it engages.
- Release the baffle.
7.4 Mowing with lawn roller (11)\*
* depending on the model, see technical data. The lawn roller allows you to create an elegant stripe pattern in your lawn.
- When mowing with the lawnmower, walk up and down in uniform paths.
7.5 Mulching with mulching insert (12, 13)\*
* depending on the model, see assembly instructions.
When mulching, the cuttings are not collected but remain on the lawn. The mulch protects the ground from drying out and supplies it with nutrients. The best results are achieved through regularly cutting back by approx. 2 cm. Only new grass with soft leaf tissue rots quickly.
■ Grass height before mulching: max. 8 cm
Grass height after mulching: min. 4 cm
i NOTE Adjust the stepping speed of the mulching, do not go too quickly.
Installing mulching insert (12)
CAUTION! Danger of lacerations. Danger of lacerations when reaching into the running mower mechanism.
■ Switch off the appliance and remove the safety key before inserting or removing the mulching insert.
- Switch off the appliance: Turn the safety key to the OFF position (position 0) and remove.
- Unhook the grass catcher.
- Lift the baffle (12/1) and insert the mulching insert (12/2) in the discharge channel (12/3) (12/a). The locking mechanism must engage.
IMPORTANT! Danger of damage to the appliance. If the mulching insert does not engage, the mulching insert and mower mechanism can be damaged.
■ Make sure that the locking mechanism engages.
Removing mulching insert (13)
- Switch off the appliance: Turn the safety key to the OFF position (position 0) and remove.
- Lift the baffle.
- Release the locking mechanism (13/1) on the mulching insert (13/a).
- Pull out (13/b) the mulching insert (13/2).
7.6 Adjusting the handlebar to your body size\*
* depending on the model, see technical data.
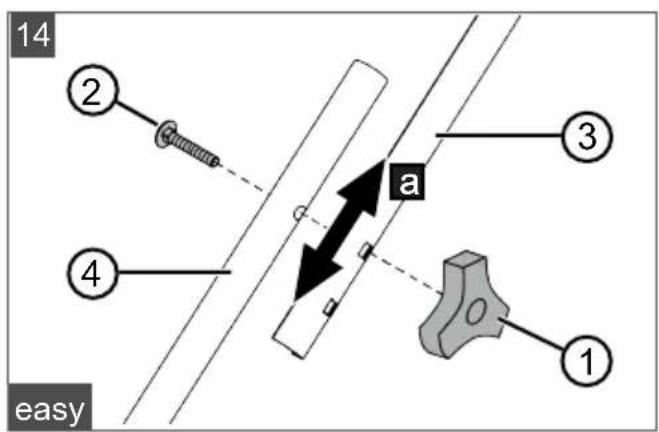
7.6.1 Adjusting the handlebar - easy (14)
- On both sides of the handlebar:
■ Loosen height adjustment screw (14/1).
■ Pull out screw (14/2).
-
Push upper brace (14/3) to the next hole in lower brace (14/4) (14/a).
-
Tighten upper brace again in the reverse order.
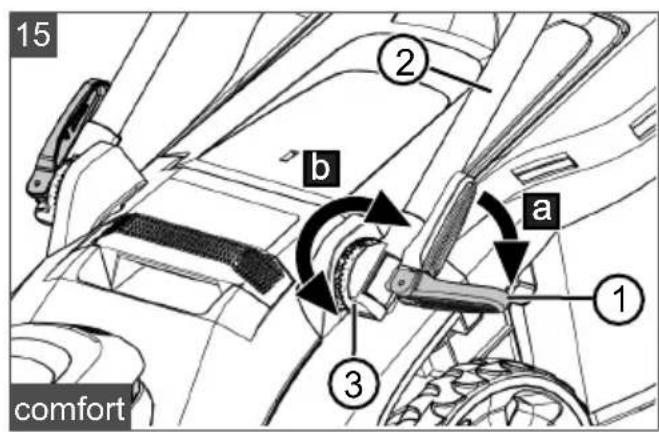
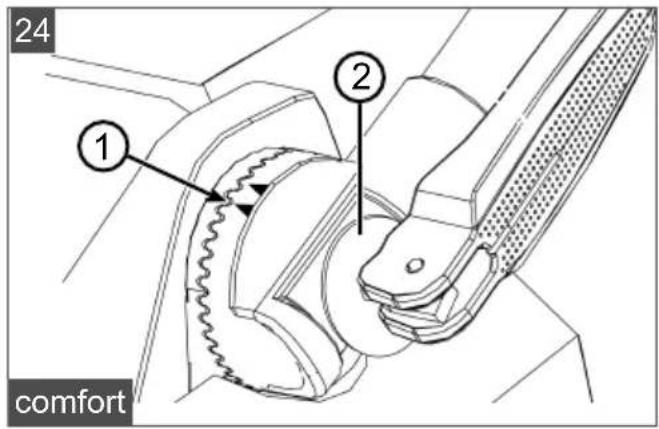
7.6.2 Adjusting the handlebar - comfort (15, 24)
- Open quick-release levers (15/1) (15/a).
- Rotate handlebar (15/2) around rotary/snap-in joints (15/3) until the desired height is reached (15/b).
- Observe marking arrows (24/1).
- Position plastic washers (24/2) and close the quick-release levers.
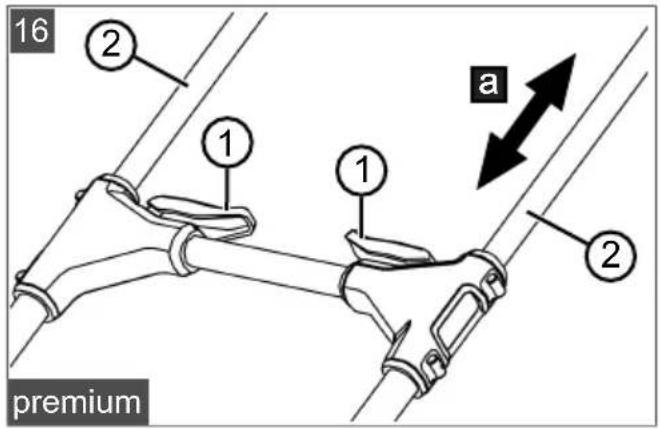
7.6.3 Adjusting the handlebar – premium (16)
Upper brace
- Open quick-release levers (16/1).
- Pull up or push down (16/a) upper brace (16/2) to the desired height.
- Close the quick-release levers.
7.7 Folding the handlebar in and out\*
* depending on the model, see technical data.
After folding in the handlebar, the appliance can be placed on its back to allow the mowing mechanism to be easily cleaned. This position also saves space when storing the appliance.

CAUTION! Danger of crushing. Fingers or other parts of the body can be crushed between the loose parts of the handlebar.
- Hold the loose parts of the handlebar tightly.
- Do not hold any fingers or other parts of the body between the loose parts.
7.7.1 Folding the handlebar in and out – comfort (17, 24)
Folding in the handlebar
-
Release upper quick-release lever (17/1) and fold the upper brace downwards.
-
Release lower quick-release lever (17/2) until the entire handlebar can be folded forward into the horizontal position.
- Position plastic washers (24/2) and close all quick-release levers.
Folding out the handlebar
Proceed in the reverse order.
7.7.2 Folding the handlebar in and out – premium (18, 25)
Folding in the handlebar
- Release upper quick-release lever (18/1) and push in the upper brace up to the stop.
- Release lower quick-release lever (18/2) until the lower brace can be folded forward into the horizontal position.
- Position plastic washers (25/2) and close all quick-release levers.
Folding out the handlebar
Proceed in the reverse order.
7.8 Starting and stopping the mower mechanism (19, 20)\*
* depending on the model, see technical data.
Start the mower mechanism on level ground and not in long grass. The ground must be free of foreign bodies such as stones. Do not lift or tilt the appliance to start it.
Starting the mower mechanism
- If you have not already done so: Switch on the power supply (see chapter 6.3 "Switching the power supply on and off (06)", page 39).
- Press start button (19/1, 20/1) and hold.
- Pull operator presence control (19/2, 20/2) towards the handlebar (19/3, 20/3) (19/a, 20/a). The motor and mower mechanism are started.
- Release the start button and keep holding the operator presence control.
i NOTE The operator presence control does not lock in place. Hold it tight against the handlebar during the entire working period.
Stopping the mower mechanism
- Release the operator presence control. It automatically returns to its starting position.
-
Wait for the mower mechanism to come to a standstill.
-
Switch off the power supply (see chapter 6.3 "Switching the power supply on and off (06)", page 39).
CAUTION! Danger of lacerations. Danger of lacerations when reaching into the running mower mechanism.
- Wait until the mower mechanism has stopped.
Before all maintenance and care work: Switch off the appliance and wait until the mower mechanism has stopped. Remove the safety key, and remove the rechargeable batteries.
7.9 Checking the battery charge status (21, 22) ^*
* depending on the model, see technical data.
■ easy and comfort: The charge status displays for battery 1 (21/1) and battery 2 (21/2) are located at the bottom of the housing.
premium: The charge status displays for battery 1 (22/1) and battery 2 (22/2) are located on the cockpit.
The charge status display for each battery comprises 4 LEDs. The LEDS flash or light up, depending on the battery charge status.
LED Battery charge status
| 4 LEDs are lit. Battery fully charged. |
| 3 LEDs are lit. Battery 75% charged. |
| 2 LEDs are lit. Battery 50% charged. |
| 1 LED is lit. Battery 25% charged. |
| 1 LED flashes. Battery almost flat. The appliance will switch off shortly. |
7.10 Switching Eco mode ON and OFF (23)\*
* depending on the model, see technical data. The cutting blade runs slower in Eco mode. This prolongs the operating time of the batteries.
- Switch on the cockpit (see chapter 6.4 "Switching the cockpit ON and OFF*", page 39).
- Switch on Eco mode: Press the "Eco mode" button (23/1). LED (23/2) comes on.
- Switch off Eco mode: Press the "Eco mode" button again. The LED goes out.
8 WORK INSTRUCTIONS
Observe the safety instructions!
NOTE Comply with the local regulations as to when a lawnmower may be operated.
- Watch out for objects in the grass and remove them from the working area.
■ Only mow when visibility is good.
■ Only mow with a sharp cutting blade.
■ Only control the appliance by the handlebar.
■ Only move the appliance at walking speed.
■ Always move the appliance across the slope. Do not mow up or down the slope, or on slopes with a gradient of more than 10^ . Exercise particular care when changing direction.
Cutting performance and operating times of the batteries
The cutting performance or the area that can be mown depends on the properties of the grass. Factors such as the length of the grass, the grass density, the selected cutting height and wet grass affect the cutting performance.
■ Optimum operating time is achieved by frequent mowing and keeping the grass short.
■ Frequently switching the lawnmower on and off during the mowing process reduces the cutting performance as do non-fully charged batteries.
To optimise cutting performance, it is recommended to mow the grass often, to set a high cutting height and to move the appliance at walking speed.
NOTE Additional batteries can be purchased to prolong the operating time.
Tips for mowing
- Maintain a constant cutting height of 3–5 cm; do not mow the grass to less than half its original height.
- Do not overload the lawnmower! If the motor speed drops noticeably because of long, thick grass, increase the cutting height and mow in several passes.
Wind and sun can dry out the lawn after mowing so it is better to mow in the late afternoon.
9 MAINTENANCE AND CARE
WARNING! Danger of cuts and lacerations. Danger of cuts and lacerations when reaching into sharp-edged, moving appliance parts and into cutting tools.
Before maintenance, care and cleaning work, always switch off the appliance. Remove the batteries.
■ Always wear protective gloves during maintenance, care and cleaning work.
9.1 Regular maintenance work
■ Make sure that all nuts, bolts and screws are tightened and the appliance is in a safe working condition.
- Check the grass collector regularly for correct operation and wear.
9.2 Cleaning the appliance and mower mechanism
IMPORTANT! Danger from water. Water in the appliance causes short-circuits and destroys electrical components.
■ Do not spray the appliance with water.
■ Only use a broom or a brush for cleaning.
- Stop the motor.
- Pull out the batteries.
- Remove the grass catcher.
- Ensure that baffle prop (26/2) is folded down (26/c).
- Fold in the handlebar (see chapter 7.7 "Folding the handlebar in and out*", page 41).
- Tilt the appliance* and clean the mower mechanism.
* comfort and premium: Place the appliance on its back (27).
9.3 Checking and renewing the cutting blade
WARNING! Severe injuries due to blade parts being flung out. A worn, cracked or damaged cutting blade can break, and its parts can become dangerous projectiles.
■ Regularly check the cutting blade for damage.
- Do not use the lawnmower if the cutting blade is worn or damaged.
- Have blunt or damaged cutting blades sharpened or replaced only by one of the manufacturer's service centres or an authorised specialist company.
■ To avoid vibrations, the cutting blade and blade bolt must always be replaced together.
■ Resharpened cutting blades must be balanced. Unbalanced cutting blades cause strong vibrations and damage the appliance.
9.4 Repair work
WARNING! Risk of injury during repair work. Improper repairs can lead to serious injuries and damage to the appliance.
■ Have repair work performed by the manufacturer's service centres and authorised specialist companies only!
In the following cases, contact one of the manufacturer's service centres:
■ Motor no longer starts.
■ Appliance has moved onto an obstruction.
■ Cutting blade and/or motor shaft are bent.
■ Appliance vibrates and does not run smoothly.
■ Batteries are discharged or damaged.
10 HELP IN CASE OF MALFUNCTION
CAUTION! Risk of injury. Sharp-edged and moving appliance parts can lead to injury.
■ Always wear protective gloves during maintenance, care and cleaning work!
i NOTE For malfunctions that are not listed in this table or that you cannot resolve yourself, please contact our customer service.
| Malfunction Cause Remedy | ||
| Engine does not start. | The power supply is switched off at the key switch. | Switch the power supply on at the key switch. |
| Rechargeable battery missing or not seated correctly. | Install the battery correctly. | |
| Rechargeable battery is flat. Charge the battery. | ||
| Cutting blade is blocked. | ■ Free the blade of obstructions.■ Start the lawnmower on short grass. | |
| Cables or switches are defective. | Do not operate the appliance! Contact a service centre of the manufacturer. | |
| Engine loses power. Rechargeable battery is flat. Charge the battery. | ||
| Cutting blade is blunt. Have the cutting blade sharpened at one of the manufacturer's service centres. | ||
| Too much grass in the ejector. | ■ Remove the grass.■ Clean the baffle. | |
| Motor stops during mowing. | Cutting blade is blunt. Have the cutting blade sharpened at one of the manufacturer's service centres. | |
| Motor is overloaded. Switch off the battery lawnmower, set on level ground or short grass and restart. | ||
| Grass catcher is not filled sufficiently | Grass is wet. Allow the lawn to dry. | |
| Grass catcher is clogged. Clean the grid of the grass catcher. | ||
| Too much grass in the discharge channel or housing. | ■ Clean discharge channel / housing.■ Correct the cutting height. | |
| Cutting blade is blunt. Have the cutting blade sharpened at one of the manufacturer's service centres. | ||
| Rechargeable battery operating time is significantly shorter. | Cutting height is too low. Increase the cutting height. | |
| Grass is too long or too wet. Improve the conditions: allow to dry, increase the cutting height. | ||
| Mowing speed is too high. | ■ Reduce the mowing speed■ Clean the discharge channel/housing, the cutting blade must rotate freely. | |
| Mowing with full grass catcher. Empty the grass catcher and clean the discharge channel. | ||
| The service life of the battery has expired. | Replace the battery. Use only genuine accessories from the manufacturer. | |
| Rechargeable battery cannot be charged. | Rechargeable battery contacts are dirty. | Clean the battery contacts with a non-metallic object and spray with a contact spray.Important: Do not short-circuit the battery contacts with a metallic object! |
| Battery or charger is defective. Order replacement parts from the manufacturer. | ||
| Battery is too hot. Allow the battery to cool down. | ||
| Cockpit is switched on, but the motor is not running. | The power supply is switched off at the key switch. | Switch the power supply on at the key switch. |
11 TRANSPORT
Before transporting, carry out the following measures:
- Switch off the appliance.
- Remove the batteries from the appliance.
- Attach all protective covers.
- Pack the batteries properly (see below).
NOTE The nominal energy of the rechargeable battery is more than 100 Wh. Therefore, observe the following transport instructions.
The li-ion rechargeable battery contained in the appliance is subject to the hazardous goods law, but can be transported under simplified conditions:
The rechargeable battery can be transported on public roads by the private user without further conditions provided it is packaged for retail sale and the transport serves personal purposes.
■ Commercial users who carry out the transport in connection with their main activity (e.g. delivery from and to building sites, or demonstrations) can also take advantage of this simplification.
In both cases, it is essential to take the mandatory precautions mentioned above to prevent any leakage of the contents. In other cases, it is essential to comply with the regulations of the hazardous goods law. In the case of non-compliance, severe penalties can be imposed on the sender and possibly the transporter.
Additional notes on transport and shipment
■ Only transport or send the li-ion rechargeable battery in an undamaged condition.
■ For transporting the rechargeable battery, only use the original cardboard box or a suitable
hazardous goods cardboard box (not required for rechargeable batteries with a nominal energy less than 100 Wh).
■ Tape off exposed rechargeable battery contacts to avoid a short circuit.
- Secure the rechargeable battery against shifting in the packaging to avoid damage to the rechargeable battery.
■ Ensure the correct marking and documentation of the shipment for transport or shipping (e.g. by parcel service or freight forwarding).
- Check in advance that transport with the selected service provider is possible and indicate the shipment.
We recommend involving a hazardous goods specialist in preparation of the shipment. Also heed any further national regulations.
12 STORAGE
Thoroughly clean the appliance after each use and – if present – attach all covers. Store the appliance in a dry, lockable place out of the reach of children.
12.1 Storing the rechargeable battery lawnmower
CAUTION! Risk of injury during storage.
There is a risk of injury from sharp parts on the stored appliance.
■ Store the appliance out of the reach of children and unauthorised persons.
■ Store the appliance only when the batteries have been removed.
- Switch off the appliance: Remove the safety key.
- Set the cutting height to the highest level.
-
Pull out the batteries.
-
Allow the motor to cool down.
- Thoroughly clean the device.
- Rub a thin coat of oil or silicon onto all metal parts for corrosion protection.
- Fold down the handlebar.
- Store the appliance in a dry, clean location protected from frost. Cover with a breathable tarpaulin to protect against dust. Do not use plastic film in order to avoid the accumulation of moisture.
12.2 Storing the rechargeable battery and charging unit
NOTE For detailed information, heed the separate operating instructions for the rechargeable battery and for the charging unit.
13 DISPOSAL
Information on the German Electrical and Electronic Equipment Act (ElectroG)

■ Electrical and electronic appliances do not belong in household waste, but should be collected and disposed of separately.
■ Used batteries or rechargeable batteries that are not installed permanently in the old appliance must be removed before disposal. Their disposal is regulated by the battery law.
- Owners or users of electrical and electronic appliances are obliged by law to return them after use.
■ The end user bears personal responsibility for deleting his personal data from the old appliance to be disposed of.
The symbol of the crossed-through rubbish bin means that electrical and electronic appliances may not be disposed of in the household rubbish. Electrical and electronic appliances can be handed in at the following places at no charge:
■ Public service disposal or collection points (e.g. municipal building yards)
■ Points of sale of electrical appliances (stationary and online) provided traders are obliged to take them back or offer this voluntarily.
These statements only apply to appliances that are installed and sold in the countries of the European Union and are subject to European Directive 2012/19/EU. Different provisions may apply to the disposal of electrical and electronic appliances in countries outside the European Union.
Information on the German Battery Act (BattG)

Used batteries and rechargeable batteries do not belong in household waste, but should be collected and disposed of separately.
For safe removal of batteries or rechargeable batteries from the electrical appliance and for information on their type or chemical system, follow the further information within the operating or installation instructions.
- Owners or users of batteries and rechargeable batteries are obliged by law to return them after use. Return is limited to the handover of customary household quantities.
Used batteries can contain harmful substances or heavy metals that can cause damage to the environment and human health. Reuse of the used batteries and use of the resources contained therein contributes to the protection of these two essential commodities.
The symbol of the crossed-through rubbish bin means that batteries and rechargeable batteries may not be disposed of in household rubbish. In addition, if the symbol Hg, Cd or Pb appears under the rubbish bin, this stands for the following:
■ Hg: Battery contains more than 0.0005 % mercury
Cd: Battery contains more than 0.002 % cadmium
■ Pb: Battery contains more than 0.004 % lead Rechargeable batteries and batteries can be handed in at the following places at no charge:
■ Public service disposal or collection points (e.g. municipal building yards)
■ Points of sale of batteries and rechargeable batteries
■ Disposal points of the common take-back system for the used batteries of appliances
■ Disposal point of the manufacturer (if not a member of the common take-back system)
These statements apply only to rechargeable batteries and batteries that are sold in the countries of the European Union and that are subject to European Directive 2006/66/EU. Different provisions can apply to the disposal of rechargeable
batteries and batteries in countries outside the European Union.
KO Service Centre. These can be found on the Internet at:
www.al-ko.com/service-contacts
14 AFTER-SALES/SERVICE
In the event of questions of warranty, repair or spare parts, please contact your nearest AL-
15 GUARANTEE
We will resolve any material or manufacturing faults on the appliance during the legal warranty period for claims relating to faults, in accordance with our choice either to repair or replace. The legal warranty period is determined by the legislation of the country in which the appliance was purchased.
Our warranty promise applies only if:
■ These operating instructions are heeded
■ The appliance is handled correctly
■ Original spare parts have been used
The warranty becomes void in the case of:
■ Unauthorised repair attempts
■ Unauthorised technical modifications
Non-intended use
The guarantee excludes:
■ Paint damage that can be attributed to normal wear and tear
■ Wear parts that are marked with a frame xxxxxx (x) on the spare parts card
The guarantee period commences with purchase by the first end user. The date on the proof of purchase is decisive. In the event of a guarantee claim, please take this guarantee declaration and the original proof of purchase, and contact your dealer or the nearest authorised customer service centre. This statement does not affect the purchaser's statutory claims for defects against the vendor.
VERTALING VAN DE ORIGINELE GEBRUIKERSHANDLEIDING
Inhoudsopgave
3.8 "maxRun"-Cockpit (04)* 52
3 PRODUCTOMSCHRIJVING
3.8 "maxRun"-Cockpit (04)\*
www.al-ko.com/service-contacts
15 GARANTIE
3.8 Cockpit "maxRun" (04)* 68
3.8 Cockpit "maxRun" (04)\*
www.al-ko.com/service-contacts
15 GARANTIE
3.8 Cockpit "maxRun" (04)\*
14 SERVISNA SLUŽBA/SERVIS
www.al-ko.com/service-contacts
15 GARANCIJA
www.al-ko.com/service-contacts
15 JAMSTVO
Možebitne greške u materijalu ili proizvodnji na uređaju uklonit ćemo tijekom zakonskoga roka zastare za jamstvo na nedostatke prema vlastitom izboru popravljanjem ili zamjenskom dostavom. Rok zastare određuje se prema pravu države u kojoj je uređaj kupljen.
3.8 "maxRun"-Cockpit (04)* 151
3.8 "maxRun"-Cockpit (04)\*
www.al-ko.com/service-contacts
15 ZÁRUKA
www.al-ko.com/service-contacts
15 ZÁRUKA
3.8 "maxRun"-cockpit (04)* 233
3.8 "maxRun"-cockpit (04)\*
www.al-ko.com/service-contacts
15 GARANTI
3.8 "maxRun"-Cockpit (04)\*
* modellberoende, se Tekniska data.
Manöverdon
| Nr. Innebörd |
| 1 Startknapp |
| 2 Säkerhetsbygel |
| 3 TILL/FRÅN-knapp för Cockpit, med status-LED |
| 4 Eco-Mode-knapp, med status-LED |
Indikeringar
| Nr. Innebörd |
| 5 Laddningsindikering batteri 1 |
| 6 Laddningsindikering batteri 2 |
4 SÄKERHETSANVISNINGAR
www.al-ko.com/service-contacts
15 GARANTI
9 VEDLIKEHOLD OG PLEIE
www.al-ko.com/service-contacts
15 GARANTI
www.al-ko.com/service-contacts
15 TAKUU JA TUOTEVASTUU
www.al-ko.com/service-contacts
15 GARANTIJA
www.al-ko.com/service-contacts
15 ГАРАНТИЯ
www.al-ko.com/service-contacts
15 ГАРАНТИЯ
Imported by: AL-KO Gardentech UK Ltd, Murray way, Wincanton, Somerset, BA9 9RS / UK | +44 (0) 1963
828055
shop.uk@al-ko.com | www.alko-garden.uk
AL-KO Service: www.al-ko.com/service-contacts

- Inhaltsverzeichnis
- "maxRun"-Cockpit (04)\*
- GARANTIE
- SPECIAL SAFETY INSTRUCTIONS
- ABOUT THESE OPERATING INSTRUCTIONS
- Symbols on the title page
- Symbol Meaning
- Legends and signal words
- PRODUCT DESCRIPTION
- Designated use
- Possible foreseeable misuse
- Residual risks
- Safety and protective devices
- Safety key
- Safety handle/operator presence control
- Start button (on the handlebar)
- Baffle
- Symbols on the appliance
- Safety signs
- Operating signs
- Product overviews
- Product overview (01) - easy
- No. Component
- Product overview (02, 03) – comfort and premium
- Scope of supply
- "maxRun" cockpit (04)\*
- Controls
- No. Meaning
- Displays
- SAFETY INSTRUCTIONS
- Safety instructions for lawnmowers
- Training
- Preparatory measures
- Handling
- Maintenance and storage
- Vibration load
- ■ Danger due to vibration
- Noise pollution
- Safety notes for rechargeable battery and charger
- Operating instructions
- INSTALLATION
- WARNING! Danger if assembly is not
- START-UP
- Charging the rechargeable battery
- Inserting and removing batteries (05)
- Installing the battery
- Removing the battery
- Switching the power supply on and off (06)
- Switching on the power supply
- Switching off the power supply
- Switching the cockpit ON and OFF\*
- Switching on the cockpit
- Switching off the cockpit
- OPERATION
- Setting the cutting height
- Setting the cutting height (07) – easy and comfort
- Setting the cutting height (08) – premium
- Mowing with grass catcher (09, 10)
- Hooking in the grass catcher
- Checking the fill level
- Unhooking and emptying the grass catcher
- Mowing without grass catcher (26)
- Mowing with lawn roller (11)\*
- Mulching with mulching insert (12, 13)\*
- Installing mulching insert (12)
- Removing mulching insert (13)
- Adjusting the handlebar to your body size\*
- Adjusting the handlebar - easy (14)
- Adjusting the handlebar - comfort (15, 24)
- Adjusting the handlebar – premium (16)
- Upper brace
- Folding the handlebar in and out\*
- Folding the handlebar in and out – comfort (17, 24)
- Folding in the handlebar
- Folding out the handlebar
- Folding the handlebar in and out – premium (18, 25)
- Starting and stopping the mower mechanism (19, 20)\*
- Starting the mower mechanism
- i NOTE The operator presence control does not lock in place. Hold it tight against the handlebar during the entire working period.
- Stopping the mower mechanism
- Checking the battery charge status (21, 22) *
- Switching Eco mode ON and OFF (23)\*
- WORK INSTRUCTIONS
- Cutting performance and operating times of the batteries
- Tips for mowing
- MAINTENANCE AND CARE
- Regular maintenance work
- Cleaning the appliance and mower mechanism
- Checking and renewing the cutting blade
- Repair work
- HELP IN CASE OF MALFUNCTION
- TRANSPORT
- Additional notes on transport and shipment
- STORAGE
- Storing the rechargeable battery lawnmower
- CAUTION! Risk of injury during storage.
- Storing the rechargeable battery and charging unit
- DISPOSAL
- Information on the German Electrical and Electronic Equipment Act (ElectroG)
- Information on the German Battery Act (BattG)
- AFTER-SALES/SERVICE
- GUARANTEE
- VERTALING VAN DE ORIGINELE GEBRUIKERSHANDLEIDING
- Inhoudsopgave
- PRODUCTOMSCHRIJVING
- Cockpit "maxRun" (04)\*
- SERVISNA SLUŽBA/SERVIS
- GARANCIJA
- JAMSTVO
- ZÁRUKA
- GARANTI
- Manöverdon
- Indikeringar
- SÄKERHETSANVISNINGAR
- VEDLIKEHOLD OG PLEIE
- TAKUU JA TUOTEVASTUU
- GARANTIJA
- ГАРАНТИЯ
Brand : AL-KO
Model : 38.2 Li Comfort
Category : Lawn mower