USER MANUAL Easy 38-5 Combi AL-KO
DK
GB
DE
SE
NO



Table of contents
Danish 8
English....12
German 16
Swedish....20
Norwegian 24
© 2020
AL-KO KOBER GROUP Kötz, Germany
This documentation or excerpts therefrom may not be reproduced or disclosed to third parties without the express permission of the AL-KO KOBER GROUP.
01
02

![graph TD A["3"] --> B["7"] B --> C["8"] C --> D["7"] D --> E["8"] E --> F["7"] F --> G["8"] G --> H["7"] H --> I["3"] style A fill:#f9f,stroke:#333 style I fill:#f9f,stroke:#333](/content/2026/06/1375054/images/44f8450d8eada8ff42e12128516ce7e78d3b0245e5614f9d4d28e1aa57dd0751.jpg)



Easy 38-5 COMBI

113863
1050×850×520mm

approx. 7.7 kg

38 cm

18 - 41 mm

approx. 25 l
TRANSLATION OF THE ORIGINAL INSTRUCTIONS
Table of contents
10 Customer service/Service.... 11
11 Warranty 11
1 ABOUT THESE INSTRUCTIONS
www.al-ko.com/service-contacts
11 WARRANTY
1 About these operating instructions ..... 12
1.1 Symbols on the title page.... 12 1.2 Legends and signal words ...... 12
2 Product description ...... 12
2.1 Designated use 12 2.2 Possible foreseeable misuse .... 13 2.3 Residual risks.... 13 2.4 Product overview (01) 13 2.5 Scope of supply (02) 13
3 Safety instructions .... 13
3.1 Training 13 3.2 Preparatory measures.... 13 3.3 Handling 13 3.4 Maintenance and storage.... 13
4 Assembly 14
4.1 Assembly of the handlebar (03 - 05) .. 14 4.2 Assembly of the grass collector (06 - 07) 14
5 Operation 14
5.1 Setting the cutting height (08) ..... 14 5.2 Adjusting the counterblade (09) ..... 14 5.3 Attaching the grass collector (10)..... 14
6 Work instructions .... 14 7 Maintenance and care 14 8 Storage 14 9 Help in case of malfunctions.... 15 10 After-Sales / Service 15 11 Guarantee.... 15
1 ABOUT THESE OPERATING INSTRUCTIONS
The German version is the original operating instructions. All additional language versions are translations of the original operating instructions. ■ Always safeguard these operating instructions so that they can be consulted if you need any information about the appliance.
■ Only pass on the appliance to other persons together with these operating instructions. ■ Comply with the safety and warning information in these operating instructions.
1.1 Symbols on the title page
Symbol Meaning

It is essential to read through these operating instructions carefully before start-up. This is essential for safe working and trouble-free handling.
Operating instructions

1.2 Legends and signal words
⚠️ DANGER! Denotes an imminently dangerous situation which will result in fatal or serious injury if not avoided. WARNING! Denotes a potentially dangerous situation which can result in fatal or serious injury if not avoided. CAUTION! Denotes a potentially dangerous situation which can result in minor or moderate injury if not avoided.
IMPORTANT! Denotes a situation which can result in material damage if not avoided.
NOTE Special instructions for ease of understanding and handling.
2 PRODUCT DESCRIPTION
2.1 Designated use
This appliance is intended for mowing a lawn in non-commercial applications. Any other use, including unauthorised conversions or add-ons, are regarded as contrary to the intended use and will result in the warranty becoming void; this means the manufacturer will reject any responsibility for damage and/or injury suffered by the user or third parties.
2.2 Possible foreseeable misuse
The tool is designed neither for commercial use in public parks and sports facilities, nor for use in farming and forestry.
2.3 Residual risks
Even during correct use of the appliance, there is always a certain residual risk that cannot be excluded. Depending on the use, the following potential risks can be derived from the type and construction of the appliance:
■ Throwing out of cuttings, soil and small stones. ■ Inhalation of cuttings particles if no breathing protection is worn. ■ Lacerations from reaching into the rotating cutting blade.
2.4 Product overview (01)
The product overview (01) provides an overview of the appliance.
No. Component
| 1 Handlebar |
| 2 Spindle with blades |
| 3 Counterblade |
| 4 Roller |
| 5 Spring bolts for height adjustment |
| 6 Grass collector |
| 7 Attachment strap for grass collector |
2.5 Scope of supply (02)
The items listed here are included as standard. Check that all items are present:
No. Component
| 1 Grip on handlebar |
| 2 Upper parts for handlebar (x2) |
| 3 Lower parts for handlebar (x2) |
| 4 Cylinder mower |
| 5 Bracket frame for grass collector |
| 6 Grass collector |
| 7 M6 x 35 bolts (x8) |
| 8 M6 star grip nuts (x8) |
3 SAFETY INSTRUCTIONS
This appliance can be used by children of 8 years and older and by persons with reduced physical, sensory or mental capabilities, or those lacking experience and knowledge, if they are supervised or have been instructed with regard to the safe use of the appliance and the ensuing risks. Children must not be allowed to play with the appliance. Cleaning and maintenance must not be carried out by children without supervision. ■ People with very strong and complex restrictions may have needs that exceed the instructions described here.
3.1 Training
- Read the operating instructions carefully. Familiarise yourself with the control devices and the correct use of the appliance. ■ Never mow when there is anyone, especially children or animals, in the vicinity.
- Do not operate the appliance if you are under the influence of alcohol, drugs or medication.
3.2 Preparatory measures
■ Always wear sturdy shoes and long trousers when operating the appliance. Do not operate the appliance when barefoot or wearing light sandals. - Check the area where the appliance is being used and remove any objects that could be picked up and flung out by the appliance. Before using the appliance, always check if the cutting blades, fastening bolts and the entire mowing unit are worn or damaged.
3.3 Handling
■ Only mow during daylight hours or with good artificial lighting. ■ Always make sure that you have a good standing position on slopes. ■ Mow across the slope, never up or down. ■ Do not mow on very steep slopes. ■ Never put your hands or feet on or under rotating parts. Always keep away from the ejection opening.
3.4 Maintenance and storage
■ Make sure that all nuts, bolts and screws are tightened and the appliance is in a safe working condition. ■ When adjusting the appliance, make sure that your fingers are not trapped between
moving cutting blades and stationary parts of the appliance.
- Replace worn or damaged parts due to safety reasons. Only use original spare parts and accessories.
4 ASSEMBLY
WARNING! Danger if assembly is not carried out completely! Operation of an incompletely assembled appliance can result in serious injury.
■ Operate the device only when it is fully assembled!
4.1 Assembly of the handlebar (03 - 05)
See images (03) to (05).
4.2 Assembly of the grass collector (06 - 07)
See images (06) and (07).
5 OPERATION
5.1 Setting the cutting height (08)
The cutting height is set by adjusting the height of the roller. The roller must be at the same height on both sides.
- Pull the spring bolts (08/1) outwards on both sides.
- Turn the lever (08/2) including the roller (08/3) using handle (08/a) until the required cutting height is achieved.
- Fit the spring bolts on both sides into the same hole (08/4).
5.2 Adjusting the counterblade (09)
The counterblade must be set when the grass is no longer being cut cleanly and evenly.
- Turn the adjusting nut (09/1) on both sides.
- Move the counterblade (09/2) until the spindle blade (09/3) brushes gently over the counterblade when turning.
The counterblade is correctly set when a sheet of paper between the blades is cut when the spindle is turned.
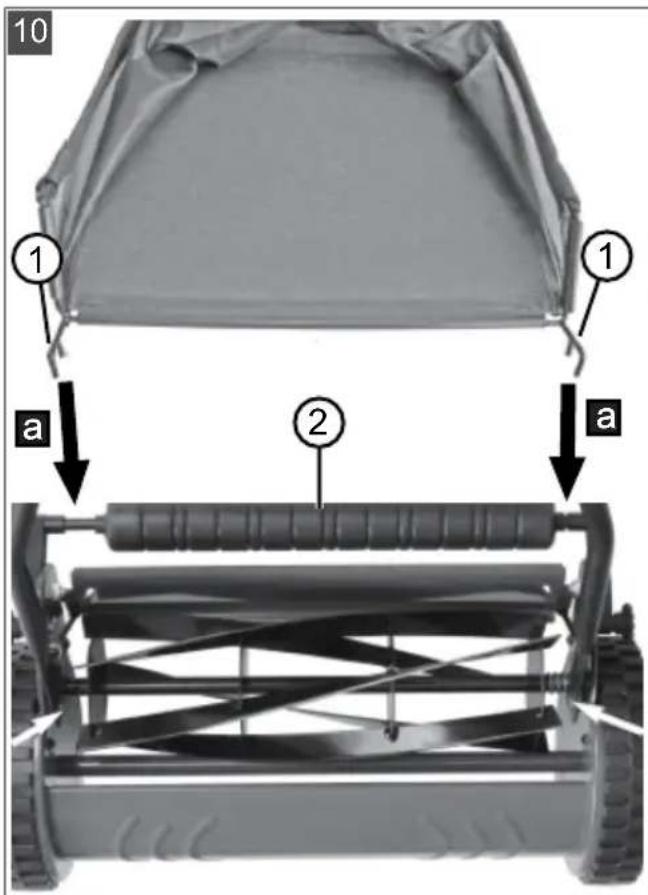
5.3 Attaching the grass collector (10)
- Suspend the grass collector using the hooks (10/1) onto the sides of the roller (10/2) (see 10/a).
- Fasten the grass collector onto the handlebar with the attachment strap (as shown in figure 01).
6 WORK INSTRUCTIONS
Mow the lawn while it is still short. The longer the lawn, the higher the force required.
7 MAINTENANCE AND CARE
WARNING! Danger of cuts and lacerations. Danger of cuts and lacerations when reaching into sharp-edged, moving appliance parts and into cutting tools.
■ Always wear protective gloves during maintenance, care and cleaning work.
IMPORTANT! Danger from water. Cleaning using a high-pressure cleaner will damage the appliance.
■ Do not spray the appliance with water. ■ Only use a hand-held brush, bristle brush and a damp cloth.
Accumulations of material have an adverse effect on the cutting quality and grass discharge.
- Clean the appliance immediately after mowing.
- Lightly lubricate the blades on the spindle and the counterblade using a low viscosity oil.
8 STORAGE
- Thoroughly clean the appliance (see chapter 7 "Maintenance and care", page 14).
- Store the appliance in a cool, dry place.
9 HELP IN CASE OF MALFUNCTIONS
CAUTION! Risk of injury. Sharp-edged and moving appliance parts can lead to injury.
■ Always wear protective gloves during maintenance, care and cleaning work.
NOTE For malfunctions that are not listed in this table or that you cannot resolve yourself, please contact our customer service.
| Malfunction Cause Remedy | | |
| Unusual noises Loose bolts or parts Re-tighten screws. | |
| Foreign body in the cutting blade | Remove foreign body. |
| Nick on the cutting blades Grind away the nick using a grinding stone. |
| Too much contact between the cutting blades. | Adjust the blade system. |
| Lawn not cleanly cut Incorrect setting of the cutting blades | Adjust the blade system. |
| Blunt cutting blades Regrind or replace cutting blades. |
| Lawn too long Mow the lawn shorter using a motor-driven lawnmower. |
10 AFTER-SALES / SERVICE
In the event of questions of warranty, repair or spare parts, please contact your nearest AL-KO Service
Centre. These can be found on the Internet at: www.al-ko.com/service-contacts
11 GUARANTEE
We will resolve any material or manufacturing faults on the appliance during the legal warranty period for claims relating to faults, in accordance with our choice either to repair or replace. The legal warranty period is determined by the legislation of the country in which the appliance was purchased.
Our warranty promise applies only if:
■ These operating instructions are heeded
■ The appliance is handled correctly
■ Original spare parts have been used
The warranty becomes void in the case of:
■ Unauthorised repair attempts
■ Unauthorised technical modifications
■ Non-intended use
The guarantee excludes:
■ Paint damage that can be attributed to normal wear and tear
■ Wear parts that are marked with a frame xxxxxx (x) on the spare parts card
The guarantee period commences with purchase by the first end user. The date on the proof of purchase is decisive. In the event of a guarantee claim, please take this guarantee declaration and the original proof of purchase, and contact your dealer or the nearest authorised customer service centre. This statement does not affect the purchaser's statutory claims for defects against the vendor.
www.al-ko.com/service-contacts
11 WARRANTY
5.2 Adjusting the counter knife (09)
7 MAINTENANCE AND CARE
www.al-ko.com/service-contacts
11 WARRANTY