
Classic 4.64 SP-S - Lawn mower AL-KO - Free user manual and instructions
Find the device manual for free Classic 4.64 SP-S AL-KO in PDF.


| Product Type | Petrol Lawn Mower |
| Brand | AL-KO |
| Model | Classic 4.64 SP-S |
| Engine | 4-stroke, 139 cc displacement |
| Power | 2.8 kW |
| Cutting Width | 46 cm |
| Cutting Height | 25-75 mm, central adjustment |
| Grass Collector Volume | 60 L |
| Drive Type | Self-propelled |
| Drive Speed | Variable |
| Wheels | Front 180 mm, rear 250 mm |
| Weight | 30 kg |
| Dimensions (L × W × H) | 800 × 560 × 450 mm |
| Sound Level | 96 dB(A) |
| Vibration | < 2.5 m/s² |
| Starting | Manual (recoil start) |
| Handlebar | Foldable |
| Cutting Functions | Mulching, side discharge, bagging |
| Safety | Engine brake, contact bar |
| Maintenance | Oil change, collector cleaning, blade sharpening |
| Available Spare Parts | Blade, air filter, spark plug |
Frequently Asked Questions - Classic 4.64 SP-S AL-KO
User questions about Classic 4.64 SP-S AL-KO
0 question about this device. Answer the ones you know or ask your own.
Ask a new question about this device
Download the instructions for your Lawn mower in PDF format for free! Find your manual Classic 4.64 SP-S - AL-KO and take your electronic device back in hand. On this page are published all the documents necessary for the use of your device. Classic 4.64 SP-S by AL-KO.
USER MANUAL Classic 4.64 SP-S AL-KO
natural_image
Line drawing of a lawn mower with visible blades and handle (no text or symbols)GB D
NL DK
F S
E N
P FIN
I EST
SLO LV
HR DT
PL RUS
CZ DA
SKBG
HRO
MK TR
SRB GR
operation manual
BENZINRASENMÄHER
Betriebsanleitung


469378_a I 08/2013




natural_image
Side-by-side diagrams of a car showing front and side views with directional arrows (no text or symbols)
natural_image
Mechanical assembly diagram showing a component being inserted into a housing (no text or symbols visible)©


natural_image
Diagram of a car interior showing steering wheel, dashboard, and steering wheel (no text or symbols)


natural_image
Technical line drawing of a mechanical assembly with a circular component and an arrow indicating direction (no text or symbols)
natural_image
Illustration of a person using a tool to lift a vehicle, showing motion direction (no text or symbols)
natural_image
Line drawing of a person using a cable harness to lift a weight (no text or symbols)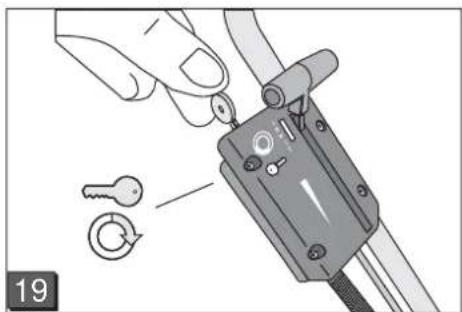
natural_image
Illustration of a hand using a cabledriver to adjust a component with a key and circular switch (no text or symbols)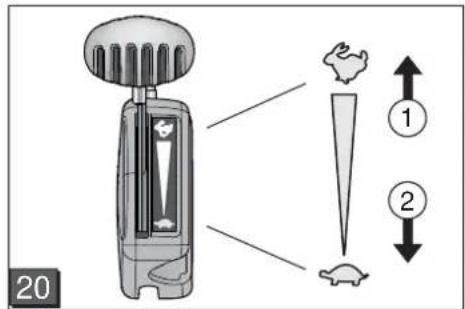
natural_image
Illustration of hands using a tool to adjust or install a mechanical component, with an arrow indicating rotation (no text or symbols present)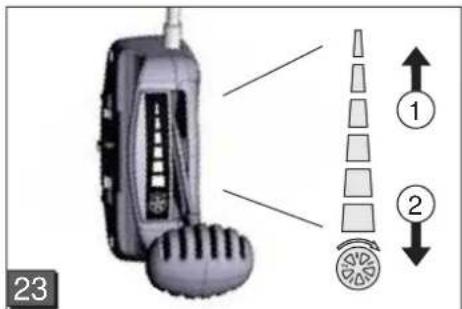
natural_image
Illustration of a person using a cable clamp device to lift a car (no text or symbols visible)©

natural_image
Illustration of a person using a cable clamp to lift a vehicle (no text or symbols present)
natural_image
Diagram of a car's rearview and side view showing the wheel rim, dashboard, and steering wheel (no text or symbols)
natural_image
Illustration of a lawn mower with directional arrows indicating motion (no text or symbols on the diagram itself)
natural_image
Illustration of hands assembling electronic components with a device and cable (no text or symbols)
natural_image
Illustration of hands installing or adjusting a device component with cable and a multimeter (no text or symbols visible)
natural_image
Diagram of a mechanical device with a magnified inset showing a pin adjustment (no text or symbols)D
Zu diesem Handbuch
Read these instructions before start-up. This is a prerequisite for safe and trouble-free operation. Familiarize yourself with the operating elements and the use of the machine before operating.
■ Please observe the safety and warning notices in this document and on the unit
This document is a permanent part of the product described and should be handed over to the customer when the unit is sold.
Meaning of symbols

Attention!
Strictly following these warning notices can prevent personal injury and/or material damage.

Special information for better understanding and correct handling.

The camera symbol refers to illustrations.
Contents
About this manual 22
Description of product 22
Safety and protective devices 22
Safety instructions 24
Assembly....25
Fuelling....25
Electric starting (option) 29
Maintenance and care 31
Storage 32
Repairs 32
Disposal....32
Fault remedy 33
Warranty 34
EC declaration of conformity 34
Description of product
This documentation describes different models of petrol lawn mowers. Several models are equipped with grass catcher and/or are suitable for mulching.
Identify your model using product pictures and the description of the various options.
Intended use
This unit is intended to mow lawns in private use and may only be used on dry lawns.
Any other use is deemed as being not in accordance with its intended use.
Wrong use
This lawn mower is not intended for use in public grounds, parks, and sporting arenas, as well as in agriculture and forestry
■ Do not remove or bypass safety devices
■ Do not use the mower during rain and/or on a wet lawn
■ The device may not be used for commercial purposes
Safety and protective devices

Danger - risk of injury!
Safety and protective devices must not be disabled!
Safety bar
The mower is fitted with a safety bar. Let go of the safety bar in case of danger.
Device without blade clutch:
■ Cutting blade is stopped
■ Motor is stopped
Device with blade clutch:
■ Cutting blade is stopped
■ Motor continues to run
Baffle plate
The baffle plate protects against items being ejected.
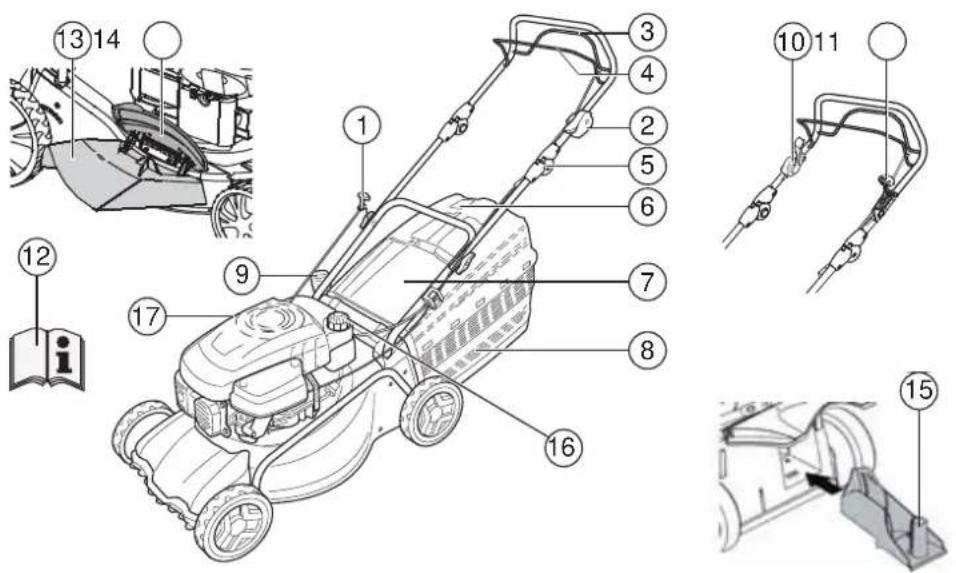
| 1 Starter cord 9 Cutting height adjustment* | ||
| 2 Start, Stop* 10 Blade clutch* | ||
| 3 Wheel drive* 11 Vario gearbox* | ||
| 4 Safety bar 12 Operating instructions | ||
| 5 Ergonomic height adjustment* 13 Discharge insert* | ||
| 6 Fill level indicator* 14 Cover flap* | ||
| 7 Baffle plate* 15 Mulch kit* | ||
| 8 Grass catcher* 16 | Petrol tank | |
| *depending on version 17 Oil filler neck |
Symbols on the unit
| Attention!Special care required during use. | Pull the spark plug connector before working on the cutter area! | ||
 | Read the instructions before start-up! Release the motor | ### | |
 | Keep other persons away from the danger area! Switch on the wheel drive. | ||
 | Keep hands and feet away from the cutter area! | Gas remote control start / stop. | |
 | Keep a distance from the danger area. | ||
GB
Additional symbols for devices with electric start
| Attention! Risk of electric shock! | |
| Keep the connecting cable away from the cutting blades! | |
| Always disconnect the device from the mains before maintenance work or if the cable is damaged. |
Safety instructions

Attention!
Use the unit only in a technically faultless condition

Danger - risk of injury!
Safety and protective devices must not be disabled!

Danger - risk of fire!
Do not store fuelled machines in buildings where fuel vapours can come into contact with open flame or sparks!
Keep the area around the motor, exhaust, battery box, fuel tank free of grass clippings, fuel and oil.

Warning - risk of fire!
Petrol and oil are highly flammable!
- Keep other persons away from the danger area.
■ Never mow while persons, especially children or pets are nearby.
■ The unit operator or user is responsible for accidents involving other persons and their property.
■ Children or persons who are not familiar with these operating instructions are not permitted to use the unit. - Observe the local regulations governing the minimum age of the operator.
■ Do not operate the unit when under the influence of alcohol, drugs or medication.
■ Wear suitable work clothing.
Long trousers
■ Firm and slip-resistant footwear
■ Hearing protection
■ When working on slopes
■ Always make sure the unit is in a safe position.
■ Always mow across slopes, never up or down.
■ Never mow slopes with a gradient of more than 20^ .
■ Take special care when turning
■ Only work when there is adequate daylight or proper artificial lighting
- Keep body, body parts and clothing away from the cutter area.
■ Observe country-specific ordinances for operating times
■ Never leave the unit unattended when it is ready for operation
■ Mow only with a sharp cutting blade
■ Never operate the unit with damaged safety devices/safety grilles
■ Never operate the unit without completely installed safety devices (e.g., baffle plate, grass catchers)
■ Prior to each use, check the unit for damage and have damaged parts replaced before using again.
■ Only replace used or damaged blades and mounting bolts as a set to prevent imbalance
■ Before starting the motor, disengage all blades and drives
■ Shut down the motor, wait until the unit comes to a standstill, and remove the ignition key and pull the spark plug connector
When leaving the unit
- When inspecting, cleaning or working on the unit
■ After faults occur
Before loosening blockages
Before eliminating stoppages
■ After contact with foreign bodies
Before refuelling
If malfunctions or unusual vibrations occur on the unit (immediate inspection required)

Inspect for damage to the lawn mower and perform the necessary repairs before starting again and working with the lawn mower.
■ Attach the spark plug connector and start the motor
■ After rectification of the malfunction (see troubleshooting table) and inspection of the unit
■ After cleaning the unit
■ Do not start the motor if you are standing in front of the discharge chute
- Check the terrain to be mowed completely and carefully and remove all foreign bodies.
■ Be especially careful when turning the lawn mower around or when pulling the lawn mower towards you
■ Do not mow over obstacles (e.g. branches, roots of trees)
■ Only remove cuttings when the motor is at a standstill.
■ Switch the motor / cutting blades off when an area other than the area to be mowed is crossed
■ Never lift or carry the unit while the motor is running.
■ Do not eat or drink while refuelling or adding motor oil
■ Do not breathe in fuel vapours
■ Guide the unit at walking speed
■ Before use, make sure the seat of nuts, screws, and bolts is firm.
■ Close the throttle valve when running out the motor. If the motor has a fuel stopcock, it should be closed after mowing
Assembly
Observe the enclosed installation instructions.

Attention!
The unit must only be operated after it has been fully assembled
Fuelling
You must fill up the lawn mower before using.

Warning - risk of fire!
Petrol and oil are highly flammable!

Always observe the applied operating instructions of the motor manufacturer.
Operating material
| Petrol Motor oil | ||
| Type | Normal petrol / lead-free | See information of the motor manufacturer |
| Filling quantities | See information of the motor manufacturer | Approx. 0.6 L |
Safety

Warning!
Never run the motor in enclosed spaces. Risk of poisoning!
■ Store petrol and oil in suitable containers
■ Only fill or empty petrol and oil outdoors when the motor is cold
■ Never fill petrol or oil when the motor is running
■ Do not overfill the fuel tank (petrol expands)
■ Do not smoke while refuelling
■ Do not open the fuel tank while the motor is running or if the motor is hot
■ Replace damaged fuel tank or fuel tank cap
■ Always close the fuel tank tightly
If fuel overflows never attempt to start the motor. Instead, move the machine away from the fuel contaminated area. Avoid any attempt to start the ignition until the fuel vapours have evaporated.
■ If motor oil has leaked out:
Do not start the motor
Soak up the leaked motor oil using an oil binding agent or rag and dispose of it properly
GB
Petrol lawn mower
Clean the unit

Used oil may not:
■ be disposed of in household waste
■ be dumped into the sewage system, drain or onto the ground
We recommend disposing of used oil in a closed container at a recycling centre or a customer service centre.
Filling with petrol
- Unscrew the fuel tank cover and store in a clean location.
- Fill up with petrol using a funnel.
- Close the fuel tank filler opening firmly and clean.
Filling with motor oil
- Unscrew the oil fill cap and store in a clean location.
- Fill up with oil using a funnel.
- Close the oil filler opening firmly and clean.
Commissioning

Attention!
The unit may not be used if the cutter area or mounting parts are loose, damaged or worn! Perform a visual inspection before each use.

The camera symbol on the following pages references the figures, page 4–7.
Adjusting the cutting height

Danger - risk of injury!
Adjust the cutting height only while motor is switched off and the cutting blade has stopped!

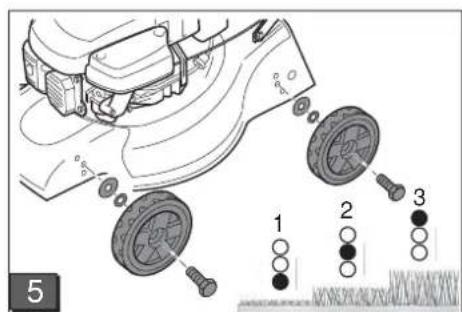
- Always adjust all wheels to the same cutting height.
- Cutting height adjustment depends on the model.
For longer grass, pull the handle of the central height adjustment upwards (☐ 1/2)
The level of the central height adjustment is displayed (☐ 1/3)
- Release the button at the desired cutting height.
Axle adjustment or central adjustment (2, 3)
- To unlock, press the lever to the side and hold.
- Slide the lever to the left or right in the desired cutting height.
- Allow the lever to engage.
- Make sure all wheels engage at the same position.
Individual wheel quick adjustment or axle adjustment (☐4)
- To unlock, press the lever to the side and hold.
- Slide the lever to the left or right in the desired cutting height.
- Allow the lever to engage.
- Make sure all wheels engage at the same position.
Individual wheel adjustment (☐)
- Loosen the wheel bolt in the left or right direction.
- Insert the wheel bolt in the hole for the desired cutting height.
- Tighten the wheel bolt.

The wheel threads have left and right threads. When screwing in, observe the correct thread direction in the mower housing and the associated bolts.
- Make sure all wheels at the same hole position.
Central adjustment (1)
- Hold the button of the central adjustment pressed (1/1).
For shorter grass, press the handle of the central height adjustment downwards (1/2)
GB
Central axle adjustment (c)
- Place both thumbs on the ends of the axle.
- Place fingers under the motor housing.
- Using both thumbs, pull the axle out of the previous notch for the cutting height.
- Using both thumbs, pull the axle in front of the desired notch and allow it to engage.
- Make sure all wheels engage at the same position.
Mowing with grass catcher

Danger - risk of injury!
Remove or replace the grass catcher only while the motor is switched off and the cutting blade has stopped.
- Lift up the baffle plate and hang the grass catcher into the holders. (8).
Fill level indicator
The level indicator is pressed upwards by the air stream during mowing (7a).
If the grass catcher is full, the level indicator lies flat on the box (☐ 7b). The grass catcher needs to be emptied.
Emptying the grass catcher
- Lift the baffle plate.
- Unhook the grass catcher and remove it to the rear (☐8).
- Entity the grass catcher.
- Lift up the baffle plate and hang the grass catcher into the holders (☐ 8).
Mowing with grass catcher

Attention!
Only mow without grass catcher if the torsion spring of the baffle plate is functional.
The baffle plate lies on the lawn mower means of spring force. The grass clippings are thus discharged towards the rear.
Mulching with the mulching kit (option)
With mulching, the cuttings are not collected and remain on the grass. The mulch protects the ground from drying out and provides it with nutrients.
The best results are achieved by regular cutting of approx. 2 cm. Only young grass with soft blades will decompose quickly.
■ Height of grass before mulching: Maximum 8 cm
■ Height of grass after mulching: Minimum 4 cm

Adapt your walking speed to the mulching and do not go too quickly.
Utilising the mulch kit

Danger - risk of injury!
Remove or insert the mulch kit only while the motor is switched off and the cutting blade has stopped.
- Remove the grass catcher ( 8).
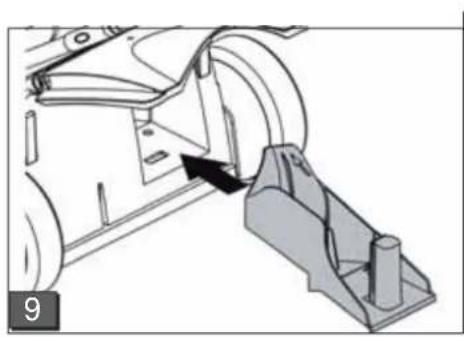
- Lift up the baffle plate and insert the mulch kit into the discharge chute (9). The locking mechanism must engage.

If the mulch kit does not engage, the mulch kit and cutting blade can be damaged.
Removing the mulch kit
- Lift the baffle plate.
- Release the locking mechanism on the mulch kit (10/1).
- Pull out the mulch kit ( 10/2).
Mowing with side discharge (option)

Danger - risk of injury!
Remove or replace the side discharge only while the motor is switched off and the cutting blade has stopped.
GB
Inserting the side discharge
- Remove the grass catcher and insert the mulch kit.
- Fold open the cover for the side discharge and hold firmly (☐ 11/1).
- Insert the side discharge chute ( 11/2).
- Slowly close the cover. The cover secures the side discharge channel from falling out.
Removing the side discharge
- Fold open the cover for the side discharge and hold firmly (☐ 11/1).
- Remove the side discharge and close the cover (11/2).
Working height adjustment (option)
The working height can be adjusted to two different heights, if needed.
- Screw off both handle screws on the handle bar fitting.
- Pull out the threaded bolts and adjust to the desired position by inserting into one of the two square holes on the holders and through the bars (12). Make sure that the same hole is used on each of the holders!
- Tighten the holders with the lower bar again using the handle screws.
Starting the motor

Danger - risk of poisoning!
Never run the motor in enclosed spaces.

Danger - risk of injury!
Do not tip the unit during the starting procedure.

- Only start the motor with mounted blade (the blade serves as centrifugal mass)
- When starting the warmed motor, do NOT use the (HONDA) choke or primer button
- Do not modify the control settings on the motor
■ Do not start the unit if the discharge chute is not covered by one of the following parts:
Grass catcher
Baffle plate
Mulch kit
■ Operate the starter switch with particular care according to the manufacturer instructions
■ Make sure your feet are at a sufficient distance away from the cutter unit.
■ Start the unit in low grass
Position indicators on the unit:
| Choke*Start Run Stop |  |
| Speed remote control*Start Stop |  |
 | |
| Speed remote control, with choke* | |
| Vario gearbox*Fast Slow |  |
| Blade clutch*On Off |  |
*depending on version
Manual starting
Without speed remote control, with choke
| ChokeStart Run Stop | ZSTART RUN STOP |
- Set choke to position 1 ( ☐/1).
- Pull the safety bar to the upper bar and hold ( 17) – safety bar does not engage.
- Pull the starter cord quickly and allow it to slowly coil up again (☐ 18).
- After the motor has warmed up (approx. 15-20 seconds), set the choke position 2 (13/2).
GB
The motor has a fixed speed setting. A speed regulation is not possible.
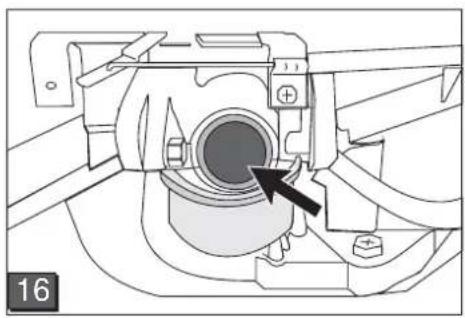
Without speed remote control, with primer (6)
- Press the primer button 3x, at intervals of approx. 2 seconds (16). At temperatures below 10 °C, press the primer button 5x.
- Pull the safety bar to the upper bar and hold (17) - safety bar does not engage.
- Pull the starter cord quickly and allow it to slowly coil up again (☐ 18).
The motor has a fixed speed setting. A speed regulation is not possible.
Without speed remote control, without primer/choke
- Pull the safety bar to the upper bar and hold ( 17) – safety bar does not engage.
- Pull the starter cord quickly and allow it to slowly coil up again (☐ 18).
The motor has a fixed speed setting. A speed regulation is not possible.
With speed remote control, with choke
Speed remote control, with choke

- Set speed lever to position (1/45).
- Pull the safety bar to the upper bar and hold (17) - safety bar does not engage.
- Pull the starter cord quickly and allow it to slowly coil up again (☐ 18).
- After the motor has warmed up (approx. 15-20 seconds) set the gas lever to a position between and (-149).
With speed remote control, without primer/choke
| Speed remote control Start Stop |
- Set speed lever to position 📋 (20/1).
- Pull the safety bar to the upper bar and hold (17) - safety bar does not engage.
- Pull the starter cord quickly and allow it to slowly coil up again (☐ 18).
- After the motor has warmed up (approx. 15-20 seconds) set the speed lever to a position between and 20
With speed remote control, with primer (16)
| Speed remote control Start Stop |
- Set speed lever to position (200).
- Press the primer button 3x, at intervals of approx. 2 seconds (16). At temperatures below 10 °C, press the primer button 5x.
- Pull the safety bar to the upper bar and hold ( 17) - safety bar does not engage.
- Pull the starter 📋d quickly and allow it to slowly coil up again ( 18).
- As soon as the motor is running, set the speed lever for the desired motor speed to a position between and 20p
Electric starting (option)
Electric start with primer (6)
- Set gas lever to position "START" ( 15/1).
- Press the primer button 3x, at intervals of approx. 2 seconds (16). At temperatures below 10 °C, press the primer button 5x.
- Pull the safety bar to the upper bar and hold (17) - safety bar does not engage.
- Turn ignition key in ignition switch to the right completely (19).
GB
- As soon as the motor is running, release the ignition key (it jumps back to position "0").
- Set the gas lever to a position according to the desired motor speed between and (152).
Electric start without primer/choke (15)
- Set gas lever to position "START" ( 15/1).
- Pull the safety bar to the upper bar and hold (17) – safety bar does not engage.
- Turn ignition key in ignition switch to the right completely (19).
- As soon as the motor is running, release the ignition key (it jumps back to position "0").
- Set the gas lever to a position according to the desired motor speed between and (15).
Blade clutch (option)
| Blade clutchOn Off |  |  |
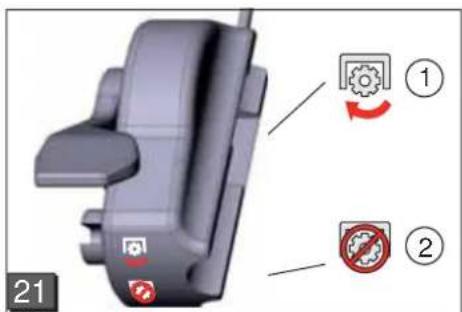
The blade clutch allows the cutter blade to be engaged and disengaged while the motor is running.
Engaging the cutter blade
- Pull the safety bar to the upper bar and hold ( 17) - safety bar does not engage.
- Push the coupling lever away from you (☐ 21/1) - cutter blade is engaged.
Disengaging the cutter blade.
- Release the safety bar ( 25).
- cutter blade is disengaged.
- clutch lever goes to resting position (21/2).
Switching off the motor
Device without blade clutch
- Set speed lever to position (20/1)
- Release the safety bar ( 25).
- Motor switches off.

Danger severe cutting injuries!
The motor may coast down. After deactivation, make sure that the motor is at a standstill.
Device with blade clutch
Blade clutch On


- Release the safety bar (25).
- Set speed lever to position 📄 (0/2).
- Motor switches off.

Danger severe cutting injuries!
The motor may coast down. After deactivation, make sure that the motor is at a standstill.
Wheel drive (option) (2)

Attention!
Engage the transmission only when the motor is running.
Switching on the wheel drive
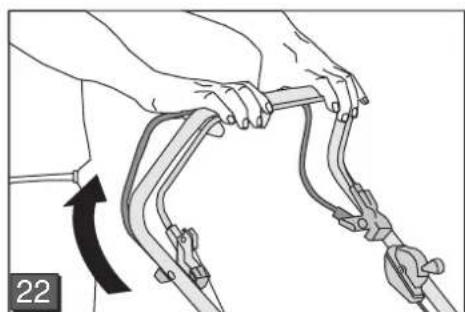
- Press and hold the transmission control lever against the upper handle bar (22) – the transmission control lever does not engage.
- wheel drive is switched on.
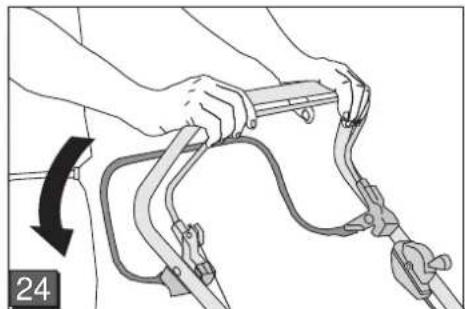
Switching off the wheel drive
- Release the safety bar ( 24).
- wheel drive is switched off.
Vario gearbox (option)
Vario gearbox Fast Slow


GB
With the Vario gearbox, the driving speed of the lawn mower can be variably adjusted.

Attention!
Operate the lever only when the motor is running. Switching without motor drive can damage the drive mechanism.
■ For higher speed, pull the level (23) in direction (23/2)
■ For lower speed, pull the level (23) in direction (23/1)

Always adapt the driving speed to the current ground and grass conditions.
Maintenance and care

Danger - risk of injury!
- Before all maintenance and care, always switch off the motor and disconnect the spark plug connector.
- The motor may coast down. After deactivation, make sure that the motor is at a standstill.
- Always wear work gloves when carrying out maintenance on the cutter blade!
■ All nuts, bolts, and screws must be tightened firmly
■ The unit must be in a safe working condition
■ Allow the motor to cool off before the machine is shut down
■ Regularly check the grass catcher system for correct function and wear.
■ Cleaning the unit after every use
■ Do not hose down the unit with water Water ingress can lead to malfunctions (ignition system, carburettor)
■ Regularly check the cutter blade for damage
■ Always replace defective silencers
Tilting the mower
Depending on the motor manufacturer:
■ The carburettor / air filter must point upward (26)
■ The spark plug must point upwards (27)

Observe the operating instructions of the motor manufacturer!
Sharpening /replacing the cutting blade
■ Have the blunt or damaged cutter blades sharpened or replaced only at an AL-KO service centre or authorized specialist firm.
■ Sharpened cutter blades must be balanced

Attention!
Non-balanced cutter blades will lead to serious vibrations and damage the mower.
Charging the starter battery (option)
The starter battery is maintenance-free and is normally charged by the mower. In special cases, the battery must be recharged by the user:
■ Before using the mower for the first time
In the event of discharge, before the winter break or for longer periods of inactivity (> 6 months)
Charging procedure:
- Remove the charger from the battery box.
- Disconnect the battery cable from the motor cable ( 28).
- Connect the battery cable to the charger (29).
- Connect the charger to the mains supply. The voltage of the mains supply must match the operating voltage of the charger.
The charging time is approx. 36 hours. Use only the supplied original charger.

Attention!
- Only charge the battery in dry and well ventilated rooms.
- Do not use the lawn mower during the charging procedure.
GB
Motor care
Changing the motor oil
- Make a suitable container available for collecting the oil.
- Allow the oil to drain or be suctioned off completely via the oil filler opening.

Dispose of used motor oil in an environmentally proper way!
We recommend disposing of used oil in a closed container at a recycling centre or a customer service centre.
Used oil may not:
- be disposed of in household waste
- be dumped into the sewage system or drain
- be dumped onto the ground
Replacing the air filter
■ Observe the operating instructions of the motor manufacturer
Replacing the spark plug
■ Observe the operating instructions of the motor manufacturer
Wheel drive (option)
Adjusting the Bowden cable
If the wheel drive can no longer be switched on- or off while the motor is running, the corresponding Bowden cable must be readjusted.

Attention!
Only adjust the Bowden cable when the motor is switched off.
- Turn the adjustment part on the Bowden cable in the direction of the arrow (☐ 30).
- To check the adjustment, start the motor and switch on the wheel drive.
- If the wheel drive still does not function, bring the lawn mower to a service centre or an authorized specialist firm.
Oiling the drive pinion
■ Oil the drive pinion on the drive shaft with spray oil from time to time

The transmission of the wheel drive is maintenance-free.
Storage

Danger - risk of explosion!
Do not store the unit near an open flame or heat source.
■ Allow the motor to cool off
■ Fold the upper handle bar to save space during storage
■ Store the mower in a dry place and inaccessible to children and unauthorized persons
■ Store the starter battery in an area protected from frost
■ Recharge the battery from time to time
■ Empty the fuel tank
■ Pull the spark plug connector
Repairs
Repairs may only be carried out at service centres or authorized specialist firms.
Disposal

Do not dispose of worn-out devices, batteries or rechargeable batteries in the household waste!
Packaging, device and accessories are made of recyclable materials and are to be disposed of accordingly.
Fault remedy

Attention!
Cutting blade and motor shaft may not be aligned if damaged!
| Fault Solution | |
| Motor does not start • Filling | with petrol• Set speed lever to "Start" position• Switch on the choke• Press the motor switch lever to the upper bar• Check the spark plug, replace, if necessary• Clean the air filter• Turn the mower blade free• Charge the starter battery• Start on mowed surface |
| Reduced motor performance | Correct cutting height• Sharpen / replace mower blade• Clean discharge chute / housing• Clean the air filter• Reduce working speed |
| Unclean cutting • Sharpen / | replace mower blade• Correct cutting height |
| Grass catcher does not fill up completely | • Correct cutting height• Allow lawn to dry• Sharpen / replace mower blade• Clean the grass catcher grid.• Clean discharge chute / housing |
| Wheel drive does not function | • Adjust the Bowden cable• V-belt defective• Contact the customer service workshop.• Remove dirt in the wheel drive, V-belt, and transmission.• Lubricate freewheels (drive pinion on drive shaft) with spray oil |
| Do not rotate wheels with gearbox switched on | • Retighten wheel bolts• Wheel hub defective• V-belt defective• Contact the customer service workshop. |
| Unit vibrates strongly in an unusual way | • Check mower blade |

If faults are not listed in this table or you are unable rectify them yourself, please contact our customer service department.
GB
■ Professional inspection is always necessary:
■ After running onto an obstacle
At immediate standstill of the motor
For transmission damage
For defective V-belt
■ When the cutting blade is bent
■ When the motor shaft is bent
EC declaration of conformity
■ see installation instructions
Warranty
We will rectify possible material and manufacturing faults on the unit during the statutory period of limitation against warranty claims by means of repairs or replacement according to our choice. The period of limitation is governed by the laws of the country in which the unit was purchased.
Our guarantee is valid only if: The guarantee becomes invalid if:
■ The unit has been properly handled
■ The operating instructions have been adhered to
■ Original spare parts are used
■ Efforts have been made to repair the unit
■ Technical modifications have been made to the unit
■ The unit has not been used for its intended purpose (e.g. commercial or municipal authority use)
The guarantee does not include:
■ Damage to paint work due to normal use
- Spare parts that are marked in the spare parts list with a frame XXX XXX (X)
Internal combustion engines – separate warranty conditions of the respective engine manufacturer apply for these
In the event of a warranty claim, please contact your supplier or the nearest authorised customer service centre with this guarantee declaration and the purchasing receipt. This guarantee does not affect the legal warranty claims of the purchaser against the seller.
GB
NL
Over dit handboek
| 1 Vrvica za zagon 9 Nastavitev višine košnje* | ||
| 2 Start, stop* 10 Sklopka noža* | ||
| 3 Pogon koles* 11 Gonilo Vario* | ||
| 4 Varnostni ročaj 12 Navodila za uporabo | ||
| 5 Ergonomska nastavitev višine* 13 Vstavek za izmet* | ||
| 6 Prikaz stanja polnosti* 14 Zapiralna loputa* | ||
| 7 Naletna loputa* 15 Komplet za mulčenje* | ||
| 8 Koš za travo* 16 Posoda za bencin | ||
| *glede na izvedbo 17 Cev za nalivanje olja |
Simboli na napravi
| 1 Uže pokretača 9 Namještanje visine rezanja * | ||
| 2 Pokretanje, zaustavljanje * 10 Spojka noža * | ||
| 3 Pogon kotača * 11 Varijabilni prijenosnik * | ||
| 4 Sigurnosni držač 12 Upute za uporabu | ||
| 5 Ergonomsko namještanje visine * 13 Nastavak za izbacivanje | ||
| 6 Pokazivač razine napunjenosti * 14 Zaklopka zatvarača * | ||
| 7 Udarna zaklopka * 15 Komplet za malčiranje * | ||
| 8 Kutija za travu * 16 Benzinski spremnik | ||
| * ovisno o izvedbi 17 Nastavci za ulijevanje ulja |
Simboli na uređaju
| Pozor!Budite posebno oprezni pri rukovanju! | Izvucite utikač za svjećice prije rada na rezaču. | ||
 | Pročitajte upute za uporabu prije puštanja u rad! | Otpusčite kočnicu motora. | |
 | Držite treće osobe daleko od područja opasnosti! | Ukljodite/vojon kotača. | |
| [ZKKG] | Držite ruke i noge daleko od rezača! | Daljinski upravljač gasa - pokretanje/zaustavljanje. | |
 | Držite razmak od područja opasnosti. | ||
HR
Dodatni simboli na uređajima s električnim pokretanjem

\$ ERZGHQW NLNDSFVROW PRWRU
-
\$ ERZGHQHQ OpYE iOOtWyFVDYDUW FVDYDUMD D Q\uO irányába (30).
-
\$ EHiOOtWiV HOOHQEUJpVpKH] LQGtWVD EH D PRWRUW PDMG kapcsolja be a kerékmeghajtást.
-
+D D NHUpNPHJKDMWiV PpJ PLQGLJ QHP PHN|GLN D IHQ\tUyW V]HUYLJEH YDJ\ KLYDWDORV V]DNV]HUYLJEH NHOO V]iOOtWDQL
| 1 Sajla za paljenje 9 Podešavanje visine košenja* | ||
| 2 Start, Stop* 10 Spojnica za nož* | ||
| 3 Pogon točkova* 11 Vario-menjač* | ||
| 4 Sigurnosni držač 12 Uputstvo za rad | ||
| 5 Ergonomsko podešavanje po visini* 13 Dodatak za izbacivanje* | ||
| 6 Indikator za punjenje* 14 Zatvarač* | ||
| 7 Udarna klapna* 15 Komplet za razbacivanje pokošene trave* | ||
| 8 Korpa za travu* 16 Rezervoar za benzin | ||
| *zavisno od modela 17 Priključak za punjenje ulja |
Simboli na uređaju
| Pažnja!Budite posebno obazrivi kod rukovanja. |  | Pre radova na pogonu za sečenje izvucite utikač svećice. | ||
| Pre puštanja u rad pročitajte uputstvo! Otpustite koč | ||||
| Držite ostale izvan opasnog područja! Uključite pogc | ||||
| Držite ruke i noge dalje od pogona za sečenje! | [ASD2] | |||
| Održavajte razmak od opasnih područja. | Daljinsko upravljanje gasom Start / Stop. | |||
SR
Benzinska kosilica za travu
Dodatni simboli kod uredaja sa električnim paljenjem
| Pažnja! Opasnost od strujnog udara. | |
| Držite priključni kabl dalje od noževa. | |
| Pre radova na održavanju ili kod oštećenog kabla uvek isključite uređaj iz struje. |
Sigurnosni saveti

Pažnja!
Koristite uređaj samo u besprekornom tehničkom stanju!

| Choker Start Run Stop |
| Choke Start Run Stop |
| Choke Start Run Stop |



- BENZINRASENMÄHER
- D
- Zu diesem Handbuch
- Meaning of symbols
- Attention!
- Contents
- Description of product
- Intended use
- Wrong use
- Safety and protective devices
- Danger - risk of injury!
- Safety bar
- Baffle plate
- Symbols on the unit
- GB
- Safety instructions
- Danger - risk of fire!
- Warning - risk of fire!
- Assembly
- Fuelling
- Safety
- Warning!
- Filling with petrol
- Filling with motor oil
- Commissioning
- Adjusting the cutting height
- Axle adjustment or central adjustment (2, 3)
- Individual wheel quick adjustment or axle adjustment (☐4)
- Individual wheel adjustment (☐)
- Central adjustment (1)
- Central axle adjustment (c)
- Mowing with grass catcher
- Fill level indicator
- Emptying the grass catcher
- Mulching with the mulching kit (option)
- Utilising the mulch kit
- Removing the mulch kit
- Mowing with side discharge (option)
- Inserting the side discharge
- Removing the side discharge
- Working height adjustment (option)
- Starting the motor
- Danger - risk of poisoning!
- Position indicators on the unit:
- Manual starting
- Without speed remote control, with choke
- Without speed remote control, with primer (6)
- Without speed remote control, without primer/choke
- With speed remote control, with choke
- With speed remote control, without primer/choke
- With speed remote control, with primer (16)
- Electric starting (option)
- Electric start with primer (6)
- Electric start without primer/choke (15)
- Blade clutch (option)
- Engaging the cutter blade
- Disengaging the cutter blade.
- Switching off the motor
- Device without blade clutch
- Danger severe cutting injuries!
- Device with blade clutch
- Wheel drive (option) (2)
- Switching on the wheel drive
- Switching off the wheel drive
- Vario gearbox (option)
- Maintenance and care
- Tilting the mower
- Sharpening /replacing the cutting blade
- Charging the starter battery (option)
- Motor care
- Changing the motor oil
- Used oil may not:
- Replacing the air filter
- Replacing the spark plug
- Wheel drive (option)
- Adjusting the Bowden cable
- Oiling the drive pinion
- Storage
- Danger - risk of explosion!
- Repairs
- Disposal
- Do not dispose of worn-out devices, batteries or rechargeable batteries in the household waste!
- Fault remedy
- EC declaration of conformity
- Warranty
- NL
- Over dit handboek
- HR
- Dodatni simboli na uređajima s električnim pokretanjem
- SR
- Sigurnosni saveti
- Pažnja!
Brand : AL-KO
Model : Classic 4.64 SP-S
Category : Lawn mower