7789 - Milk frother Cloer - Free user manual and instructions
Find the device manual for free 7789 Cloer in PDF.

User questions about 7789 Cloer
0 question about this device. Answer the ones you know or ask your own.
Ask a new question about this device
Download the instructions for your Milk frother in PDF format for free! Find your manual 7789 - Cloer and take your electronic device back in hand. On this page are published all the documents necessary for the use of your device. 7789 by Cloer.
USER MANUAL 7789 Cloer
natural_image
Modern stainless steel water heater with control panel and digital display (no visible text or symbols)natural_image
Black-and-white photo of a glass of tea with scattered coffee beans on a saucer (no text or symbols visible)SPRACHEN - LANGUAGES
DE Bedienungsanleitung S. 5
EN Instruction Manual....S. 8
NL Gebruiksaanwijzing.... S. 11
FR Notice d'utilisation.... S. 14
IT Istruzioni sull'uso....S. 17
ES Instrucciones de uso S. 20
PT Instruções de uso....S. 23
LT Naudojimo instrukcija ....S. 26
LV Lietošanas instrukcija ....S. 29
DK Brugsanvisning S. 32
NO Bruksanvisning S. 35
SE Bruksanvisning S. 38
FI Használati utasitás S. 41
HU Használati utasitás S. 44
GR Οδηγίες Χρήσης.... S. 47
text_image
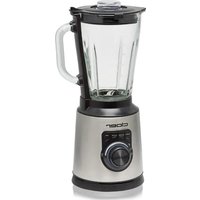
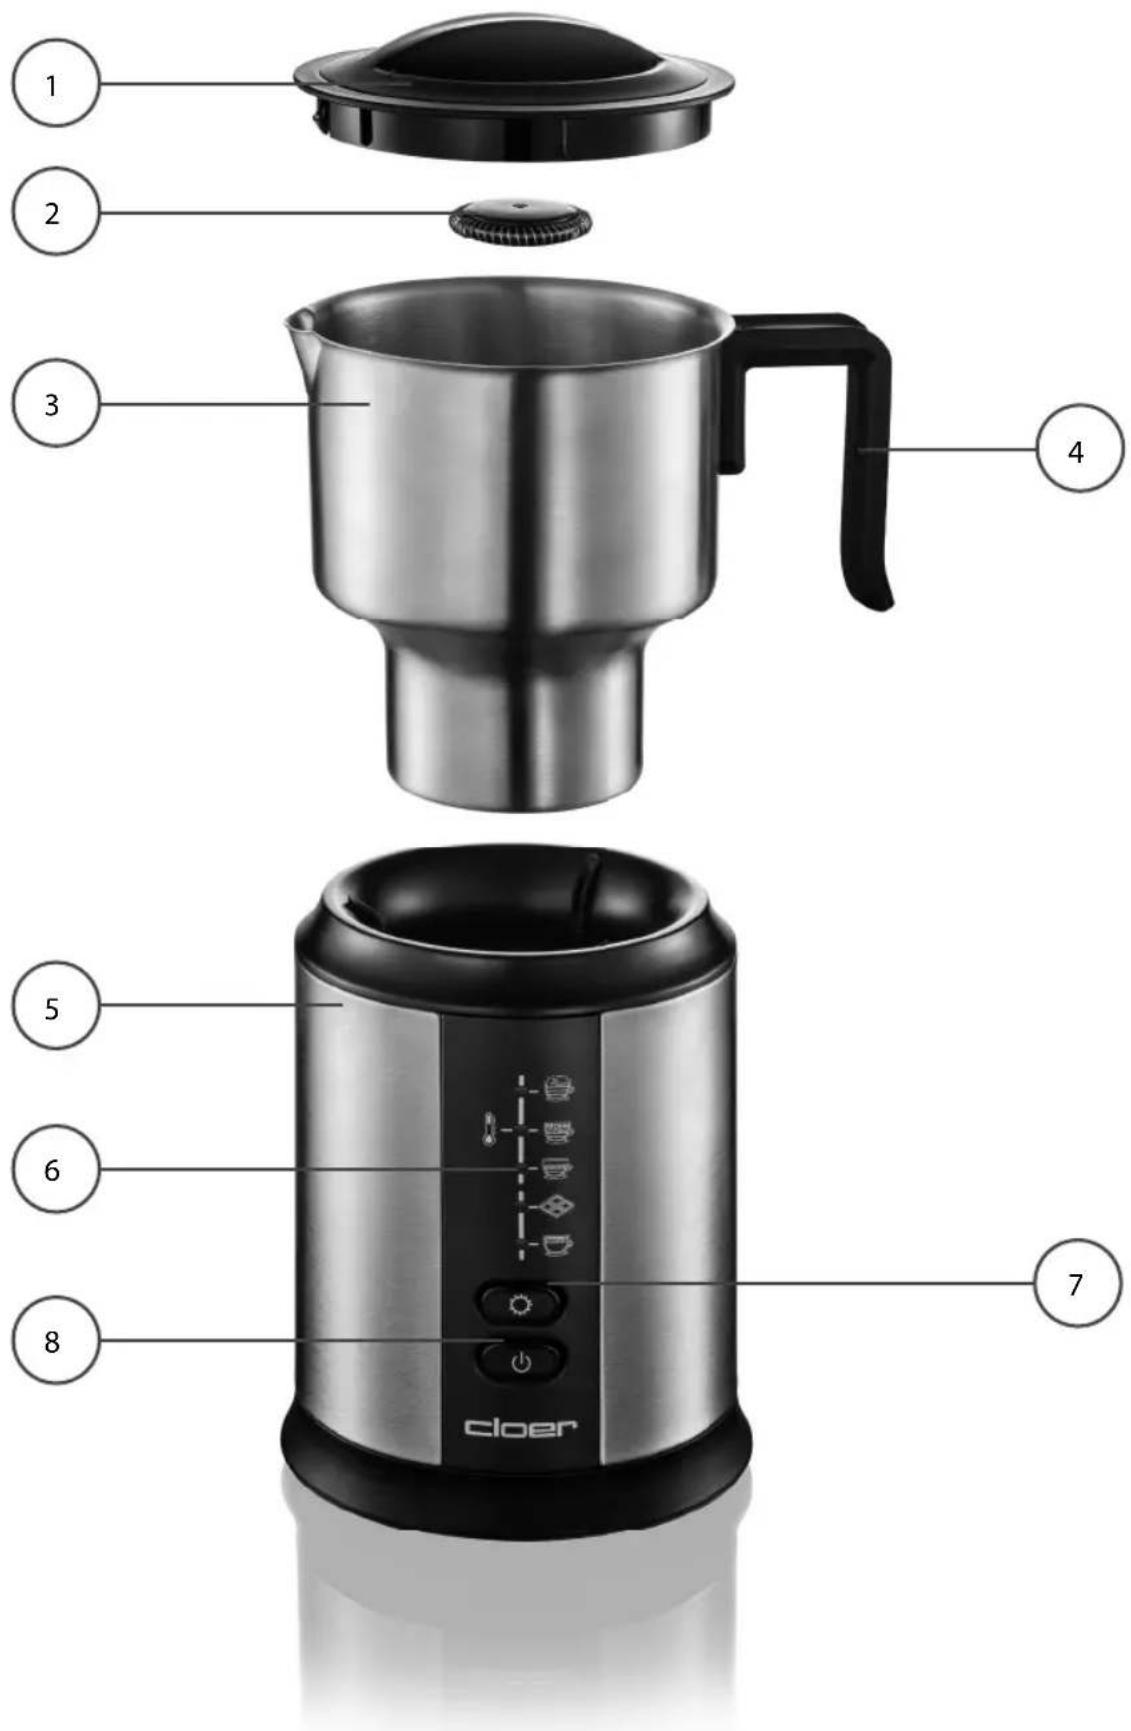
1 2 3 4 5 6 7 cloer| D | 1 Deckel2 Aufschäumspule3 XL Milchkännchen 800ml4 Griff5 Basis6 Modi7 Moduswahltaste8 Start-/Stopptaste | EN | 1 Lid2 Frothing coil3 XL Milk jug 800ml4 Handle5 Base station6 Modes7 Mode selection button8 Start/Stop button |
| NL | 1 Deksel2 Opschuimspoel3 XL Melkkannetje 800ml4 Handgreep5 Basisstation6 Modi7 Modus keuzetoets8 Start/Stoptoets | FR | 1 Couverture2 Bobine de moussage3 XL Pot à lait 800ml4 Poignée5 Station de base6 Modes7 Bouton de sélection de mode8 Bouton Marche / Arrêt |
| IT | 1 Coperchio2 Frustino per la schiuma3 XL Caraffa da latte 800ml4 Manico5 Stazione di base6 Modalità7 Tasto selezione modalità8 Tasto Avvio/Stop | ES | 1 Tapa2 Espumador3 XL Jarra de leche 800ml4 Manija5 Estación base6 Modos7 Tecla de elección del modo8 Tecla de encendido/apagado |
| PT | 1 Tampa2 Espiral para preparação de espuma3 XL Jarro de leite 800ml4 Pega5 Estação de base6 Modo7 Tecla para seleção do modo8 Tecla Start/Stop | LT | 1 Dangtis2 Putų plakiklis3 XL Pieno āsotėlis 800ml4 Rankena5 Bazinė stotelė6 Režimai7 Režimo parinkties mygtukas8 Paleidimo / sustabdymo mygtukas |
| LV | 1 Vāks2 Putošanas uzgalis3 XL Piena kanniņa 800ml4 Rokturis5 Pamatne6 Režimi7 Režima izvēles taustiņš8 Gatavošanas sākšanas/beigšanas taustiņš | DK | 1 Låg2 Mælkeskummerspole3 XL Mælkekande 800ml4 Greb5 Basisstation6 Modi7 Modusvalgknap8 Start/stop-knap |
| NO | 1 Lokk2 Skumspole3 XL Melkekanne 800ml4 Händtak5 Basisstasjon6 Modus7 Modusvalgtast8 Start-/stopptast | SE | 1 Lock2 Uppskumningsspole3 XL Mjölkkannor 800ml4 Handtag5 Bottenplatta6 Val7 Knappval8 Start-/stoppknapp |
| FI | 1 Kansi2 Vahtokela3 XL Maitokannu 800ml4 Kahva5 Alusta6 Tilat7 Tilan valintapainike8 Käynnistys-/pysäytyspainike | HU | 1 Fedő2 Habositópálca3 XL Tejeskancsó 800ml4 Fogantyú5 Alapállomás6 Üzemmódok7 Üzemmód-választó gomb8 Start/stop gomb |
| GR | 1 Kαπάκι2 Ακροφύσιο αφρού3 Κανατάκι χτυπήματος αφρού γάλακτος4 Λαβή5 Báση6 Λειτουργίες7 Διακόπτης επιλογής λειτουργίας8 Διακόπτης έναρξης/παύσης | ||
Basic safety instructions
- The appliance is intended to be used in household only and using in:
– staff kitchen areas in shops, offices and other working environments,
– in farm houses,
– by clients in hotels, motels and other residential type environments,
– on bed and breakfast type environments.
- Have repairs of Cloer electronic appliances carried out only by authorized Cloer specialist dealers or by the Cloer customer service. Improper repairs can involve substantial dangers for the user. Furthermore, this will void your warranty claims.
- Only operate the appliance at household-usual power sockets. Check if the mains voltage stated on the type plate is up to that of your power supply network.
EN
- The device must be connected to a power outlet with protective ground.
- If the supply cord is damaged, it must be replaced by Cloer, its service agent or similarly qualified persons in order to avoid a hazard.
- Pull power plug of the power socket
– in case of a defect,
- if the appliance is not used for a longer time,
— before any cleaning.
- Only pull at the plug, never at the feed cable.
- Do not stretch the feed cable over sharp edges and do not tighten it too tight.
- Do not use it for carrying and protect it from heat (hotplate, for example).
- Do not tighten the feed cable too tight as otherwise the appliance is likely to tip over.
- This appliance can be used by children aged from 8 years and above and persons with reduced physical, sensory or mental capabilities or lack of experience and knowledge if they have been given supervision or instruction concerning use of the appliance in a safe way and understand the hazards involved.
- Do not leave children unattended to ensure they do not play with the appliance.
- Keep the appliance and its cord out of reach of children less than 8 years.
- Cleaning and user maintenance shall not be made by children unless they are older than 8 and supervised.
- Do not immerse the appliance in water.
- Protect your appliance from humidity (splash water / rain).
- Let the appliance cool off before cleaning or stowing away.
- Do not use the appliance outdoors.
- The appliance is suitable for warming and frothing milk, and for melting small pieces of chocolate while the milk is being heated.
- Never fill it with any other liquid or solid food. Improper use can lead to injury.
Technical Data
type volt hz watt
778 220-240 50/60 500
Before the first use

Read these operating instructions carefully before using the appliance for the first time.
- Remove all packing parts and possibly stickers, but not the type plate nor the serial number.
- Rinse the milk jug, the lid and the frothing spool with hot water.
- Place the milk frother on a dry, non-slip and level surface.
EC Label / Safety information

The appliance meets the requirements of the applicable EC directives.

The appliance is designed for indoor domestic use only.
ATTENTION! Always unplug the appliance when not in use and before cleaning.
- Never leave the appliance unattended while in use.
• The milk jug may overflow if filled high.
• The milk may burn slightly if filled low. - Please do not move the appliance during operation.
- Make sure you have switched the appliance off before taking out the milk jug.
• Always use the appliance with the lid in place.
Operation
- Put the milk jug on the base.
• Take the lid off the milk jug. - Lay the frothing coil in the milk jug. The frothing coil is held in the middle of the milk jug floor by a magnet.
- Fill the milk jug with refrigerated milk to between the filling marks MIN (100 ml) and MAX (250 ml). 100 ml of milk makes 250-300 ml of milk foam. 250 ml of milk makes 500-600 ml of milk foam. In chocolate mode, you can fill up to CHOCOLATE MAX (450 ml), as no milk foam is produced in this mode. With 450 ml milk and max. 80 g chocolate / cocoa, you can make up to 500 ml drinking chocolate.
Note
If you accidentally operate the milk frother without the coil, liquid or milk jug, a signal tone will sound three times and operation will be automatically stopped.
- Put the lid on the milk jug.
- Plug the mains plug into the socket. A signal tone sounds and the operation control lights flash briefly. Shortly afterwards, Cappuccino Mode lights up automatically.
- If the mains plug is not pulled out of the socket after use, the appliance will save the last mode used. Simply press the mode selection button and the current mode will be shown.
- Then press the mode selection button until the LED lights up at the symbol of your chosen program.
- Press the Start/Stop button to start operation. Operation can be interrupted at any time by pressing this button again.
- A signal tone sounds, the operation control light flas - hes and the appliance ventilation comes on.
• The appliance then starts to beat the milk. - When the milk is sufficiently frothed and/or heated, a signal tone sounds twice, the LED lights up with a steady light and program ends. A short time after, the appliance goes into standby mode.
- Note! The appliance ventilation may continue to run after the program has ended.
- You can now take the milk jug off the base.
- Open the lid, scoop the milk froth out separately with a spoon, or pour the milk froth out together with the remaining milk.
- A magnet ensures the frothing coil stays stuck to the milk jug.
- Note! The magnetic whisk sticks to most standard household stainless steel spoons. This means it can be removed directly from the jug with a spoon and cleaned quickly and easily under running water.
- Caution! Both the milk jug and the milk may be hot.
- The mains plug must be pulled out of the socket to turn off the appliance completely.
Degree of frothing and temperature
Different milk froths can be produced by pressing the mode selection button (symbol). If the mains plug is not pulled out of the socket after use, the appliance will save the last mode used. Otherwise, it will open in Cappuccino Mode.
| Modes Usage indications | |
| Latte Mode | - Hot milk with a small amount of milk froth- Suitable for latte or coffee with milk- The milk is heated to 62-67°C- The temperature can be raised further |
| Cappuccino Mode | - Evenly fine-pored milk foam- The milk is heated to 62-67°C- The temperature can be raised further |
   | - A lot of thick milk froth- Suitable for latte macchiato- The milk is heated to 62-67°C- The temperature can be raised further |
 | - Press the mode selection button down for 2 seconds until the red LED comes on- Press the mode selection button again to select a program- The milk is heated to 70-75 °C |
 | - Cold creamy milk froth- Suitable for frappé, ice coffe cocktails or desserts- The milk is not heated |
 | - Hot drinking chocolate from small chocolate pieces, shavings or powder- Do not add any more than 80 g of chocolate- The process may take up to 14 minutes depending on the level of liquid- The milk is heated to 83-88 °C |
Note
The quality and volume of milk froth depend on the type of milk used (including fat and protein content, temperature).
Cleaning
- Unplug the appliance before any cleaning.
- Do not use abrasive cleaning agents, sprays or scouring sponges.
- As required, the milk jug, the lid and the foaming coil can be washed in the dishwasher. However, we recommend you wash them with warm water and a little washing-up liquid.
- The base cannot be put in the dishwasher!
- Treat the appliance with special cleaning agents for stainless steel to eliminate small impurities (like fingerprints).
Problem / Cause / Solution
| Problem Possible Cause | Solution |
| The appliance does not start up. | Plug not plugged in. |
| Overheating protection because the appliance is too hot. | |
| No milk or too little. | |
| The foaming coil has not been put in. | |
| Milk overflows out of the lid. | Filled too high. Use less milk. |
Environmentally friendly disposal
We use environmentally friendly packaging for the transport of our appliances. Please recycle cardboard/ paper and plastic packaging appropriately.

ATTENTION!
Electrical appliances should not be disposed of with the household trash.
Electrical appliances contain valuable raw materials. When an appliance is worn-out, please take it to a recognised recycling facility. Consult the local authorities for information on recycling appliances.
Warranty
Cloer electrical appliances are in conformity with the currently required EC-guidelines and safety regulations. If your Cloer electrical appliance has a defect or it does not work properly, contact your specialist dealer.
Registered clients have at their disposal our technical customer service.
Manufacturer warranty
Please register your appliances in the period of 6 months since the purchase in order to benefit from our manufacturer warranty. The published conditions of warranty in the moment of the registration are valid. You will find conditions of warranty and product registration here:

Manufacturer warranty
https://cloer.eu/guarantee
type voltage hz watt
778 220-240 50/60 500
Note
© 2024 by Cloer Germany GmbH&CoKG
We reserve the right to make technical changes, we are not liable for any errors or printing errors.