
TSA5050 - Vacuum Cleaner Teesa - Free user manual and instructions
Find the device manual for free TSA5050 Teesa in PDF.

| Product type | Robot vacuum |
| Brand | Teesa |
| Model | TSA5050 |
| Dimensions | ø28 x 7.7 cm |
| Weight | 1.6 kg |
| Power supply | Mains charger: input 100-240 V~, output 12 V / 580 mA |
| Battery | NiMH 9.6 V / 2000 mAh |
| Run time | 70 to 90 minutes |
| Charging time | Approximately 4 to 6 hours |
| Suction power | 1000 Pa (2 adjustable levels) |
| Dust bin capacity | 200 ml |
| Filtration | Washable HEPA 11 filter (up to 50 washes) |
| Cleaning modes | Random, spot, along walls |
| Noise level | 52 dB |
| Obstacle detection | Infrared sensors and threshold detectors |
| Obstacle climbing | Up to 1.2 cm |
| Return to base | Automatic on charging dock |
| Controls | Remote control (AAA batteries not included) and buttons on the device |
| Voice messages | Yes (in French and English) |
| Recommended surfaces | Hard floors and short-pile carpets |
| Filter maintenance | Clean every 3 weeks; replace HEPA filter every 12 months |
| Included accessories | Remote control, charging dock, charger, 2 pairs of side brushes, cleaning brush |
| Repairability | Spare parts available at teesa.pl and rebellelectro.com |
| Warranty | Contact the distributor |
Frequently Asked Questions - TSA5050 Teesa
User questions about TSA5050 Teesa
0 question about this device. Answer the ones you know or ask your own.
Ask a new question about this device
Download the instructions for your Vacuum Cleaner in PDF format for free! Find your manual TSA5050 - Teesa and take your electronic device back in hand. On this page are published all the documents necessary for the use of your device. TSA5050 by Teesa.
USER MANUAL TSA5050 Teesa
Robot vacuum cleaner
SMART VAC2
TSA5050
Návod k obsluze
Bedienungsanleitung
Owner's manual
- Nádoba na prach
natural_image
Technical line drawing of a mechanical bracket assembly (no text or symbols)
DÁLKOVÉ OVLÁDÁNÍ

flowchart
graph TD
    A["1"] --> B["AUTO"]
    C["2"] --> D["home"]
    E["3"] --> F["start stop"]
    G["4"] --> F
    H["5"] --> I[" swirl"]
    J["6"] --> K["home"]
    L["7"] --> M["square"]
    N["8"] --> O["*"]
    P["9"] --> Q["R"]
natural_image
Technical line drawing showing a hand holding a power source connected to a device and a circular device with wires (no text or symbols)natural_image
Pure diagram of a curved mechanical component with a power button and directional arrow (no text or symbols)natural_image
Technical line drawings of two circular mechanical components with internal features (no text or symbols)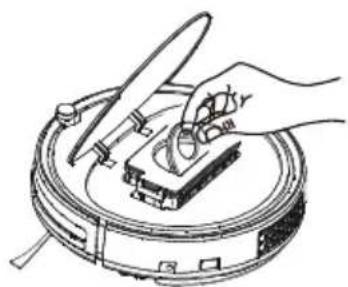
natural_image
Illustration of a hand using a tool to clean or inspect a small object on a circular device (no text or symbols visible)natural_image
Line drawing of a mechanical device with an open lid and internal grating, showing an upward arrow (no text or symbols)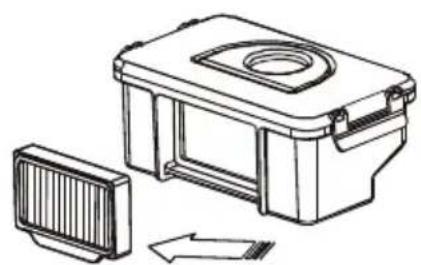
natural_image
Technical line drawing of a mechanical housing with a side panel and directional arrow (no text or symbols)natural_image
Illustration of three kitchen utensils: a microwave oven, a faucet with a handle, and a water dispenser (no text or symbols)
natural_image
Illustration of a hand holding a small container with a lid, next to a striped object and an arrow (no text or symbols)- Zavřete horní kryt.
** JE ZAKÁZÁNO VKLÁDAT DO ZAŘÍZENÍ MOKRÉ NEBO MÍRNĚ VLHKÉ ČÁSTI, PROTOŽE TO MŮŽE ZPŮSOBIT ÚRAZ ELEKTRICKÝM PROUDEM A POŠKODIT ZAŘÍZENÍ.
3. Přívod vzduchu
natural_image
Technical line drawing of a mechanical assembly with no visible text or symbols

- Staubbehälter
5a. Vorfilter
5b. HEPA 11 Filter
5c. HEPA 11 Filterdichtung
natural_image
Technical line drawing of a mechanical bracket assembly (no text or symbols)
FERNBEDIENUNG

flowchart
graph TD
    A["1"] --> B["AUTO"]
    C["2"] --> D["home"]
    E["3"] --> F["start stop"]
    G["4"] --> F
    H["5"] --> I[" swirl icon"]
    J["6"] --> K["house icon"]
    L["7"] --> M["square icon"]
    N["8"] --> O["*"]
    P["9"] --> Q["R"]
natural_image
Line drawing of hands connecting a cable to a mounted device on a tripod (no text or symbols)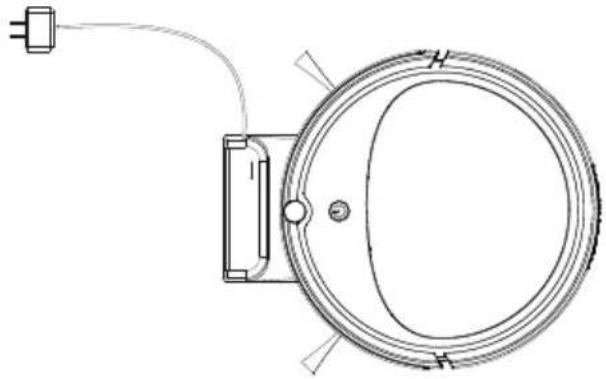
natural_image
Technical line drawing of a circular mechanical component with a cable and mounting bracket (no text or symbols)natural_image
Pure diagram of a curved mechanical component with a circular button and directional arrow, no text or symbols present.natural_image
Technical line drawings of two circular mechanical components with internal features (no text or symbols)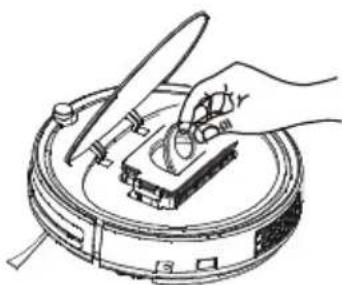
natural_image
Illustration of a hand using a tool to clean or inspect a circular device (no text or symbols visible)natural_image
Line drawing of a mechanical device with an open lid and internal structure, showing an upward arrow (no text or symbols)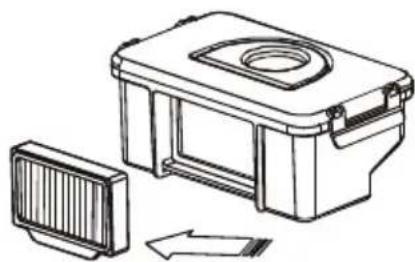
natural_image
Technical line drawing of a mechanical device with a side panel and housing (no text or symbols)natural_image
Illustration of three kitchen utensils: a microwave oven, a drain faucet, and a water dispenser (no text or symbols)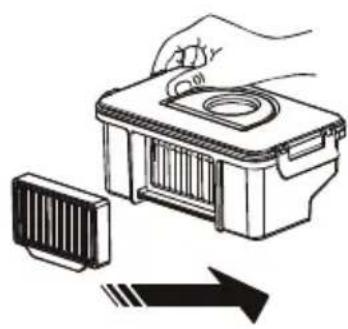
natural_image
Illustration of a hand holding a small container with a lid, next to a striped component and an arrow indicating direction (no text or symbols)
Thank you for purchasing TEESA appliance. Please read this operation instruction carefully before use, and d keep it for future use. Distributor does not take responsibility for damages caused by inappropriate handling and use of the product.
SAFETY INSTRUCTIONS
In order to reduce the injuries or damages, follow basic safety precautions applied when using any electrical device, including the following:
- Read this instruction manual carefully, even if you are familiar with the appliance. Keep the manual for future reference.
- Before connecting the appliance to power supply socket, make sure the voltage indicated on the appliance corresponds to the voltage in the power supply socket.
- Product intended for household use only.
- Clean and store this appliance in accordance to instructions listed in "Cleaning and storage" section.
- ALWAYS turn off the appliance and disconnect it from the mains supply:
• if it's not operating correctly,
- if there's an uncommon voice when using,
• before disassembling the device,
- before cleaning,
- when not in use.
- When you disconnect the power cord of the appliance, grasp and pull the plug, not the cord/cable.
- This appliance may be used by children who are above 8 years old and by persons with reduced physical, sensory or mental capabilities, or lack of experience and knowledge, if they are supervised and guided by a person who is responsible for their safety in a cautious manner, and all the safety precautions are understood and followed. Children should not play with this device. Children should not perform cleaning and servicing of the device unsupervised.
- Keep the appliance out of the reach of children.
- Use only the included AC adapter to charge the device.
- Keep the appliance and its cord/cable away from heat, water, moisture, sharp edges and any other factor which may damage the appliance or its cord.
- Make sure the power cord does not touch any hot or sharp elements.
- Do not use the product for purposes different from displayed in this operating manual.
- Do not place the appliance in water or any liquid; nor handle/use it with wet or moist hands.
- DO NOT use this appliance if the cord or the plug is damaged, or the appliance is broken.
- Do not attempt to repair this appliance yourself. Only authorized and qualified personnel may repair this appliance. Never disassemble this appliance.
- Do not use unauthorized accessories.
IMPORTANT!
- Do not use the appliance to vacuum up:
• large, sharp-edged objects which could block and damage the appliance;
• construction waste;
- harming or erodent liquids or inflammable and explosive substances, as this could cause a fire;
• hot or burning substances;
• wet surfaces or wet objects;
• water or any other liquid
-
Use the robot vacuum cleaner on hard floors and low pile carpets only.
-
Use the appliance only on dry surfaces.
-
The appliance is suitable for indoor use only.
-
Do not insert any objects into the ventilation slots or openings.
-
Do not obstruct the airflow.
-
Do not cover the sensors in any way.
-
Keep hair, loose clothing and any other part of body away from the openings and moving parts.
-
Do not place the appliance on stairs or furniture.
-
Do not sit, stand or put any objects on the appliance.
-
Remember that the robot moves on its own. Exercise caution when walking in the area where the appliance is operating to avoid stepping on it or tripping over it.
-
Make sure to turn off the appliance before installing or removing brushes.
-
If the product is not going to be used for a long time please set the power switch to 0 position.
-
Do not use the appliance if dust bin and filter are not mounted.
-
Prior to using the robot vacuum cleaner, prepare the room to be cleaned properly. Please be sure that there are no cables, clothes, curtain belts or any other material scattered in the cleaning area to avoid tangling or trapping the appliance during cleaning.
-
Make sure that there are no fragile or small objects, lit candles, etc. on the surface to be cleaned or on the furniture in the room to be cleaned to avoid damage.
-
If the room to be cleaned contains a balcony, a physical barrier should be used to prevent access to the balcony and ensure safe operation.
-
Make sure that children and pets do not have an access to the room where the appliance is operating.
*** Environmental conditions such as exposure to sunlight may influence cliff sensor operation. Therefore it is important to ensure safe operation for the robot vacuum cleaner. If in the room to be cleaned there are stairs, balcony or any other places where the appliance is exposed to a fall, use a physical barrier so that in case of cliff sensor malfunction, the appliance will not get damaged.
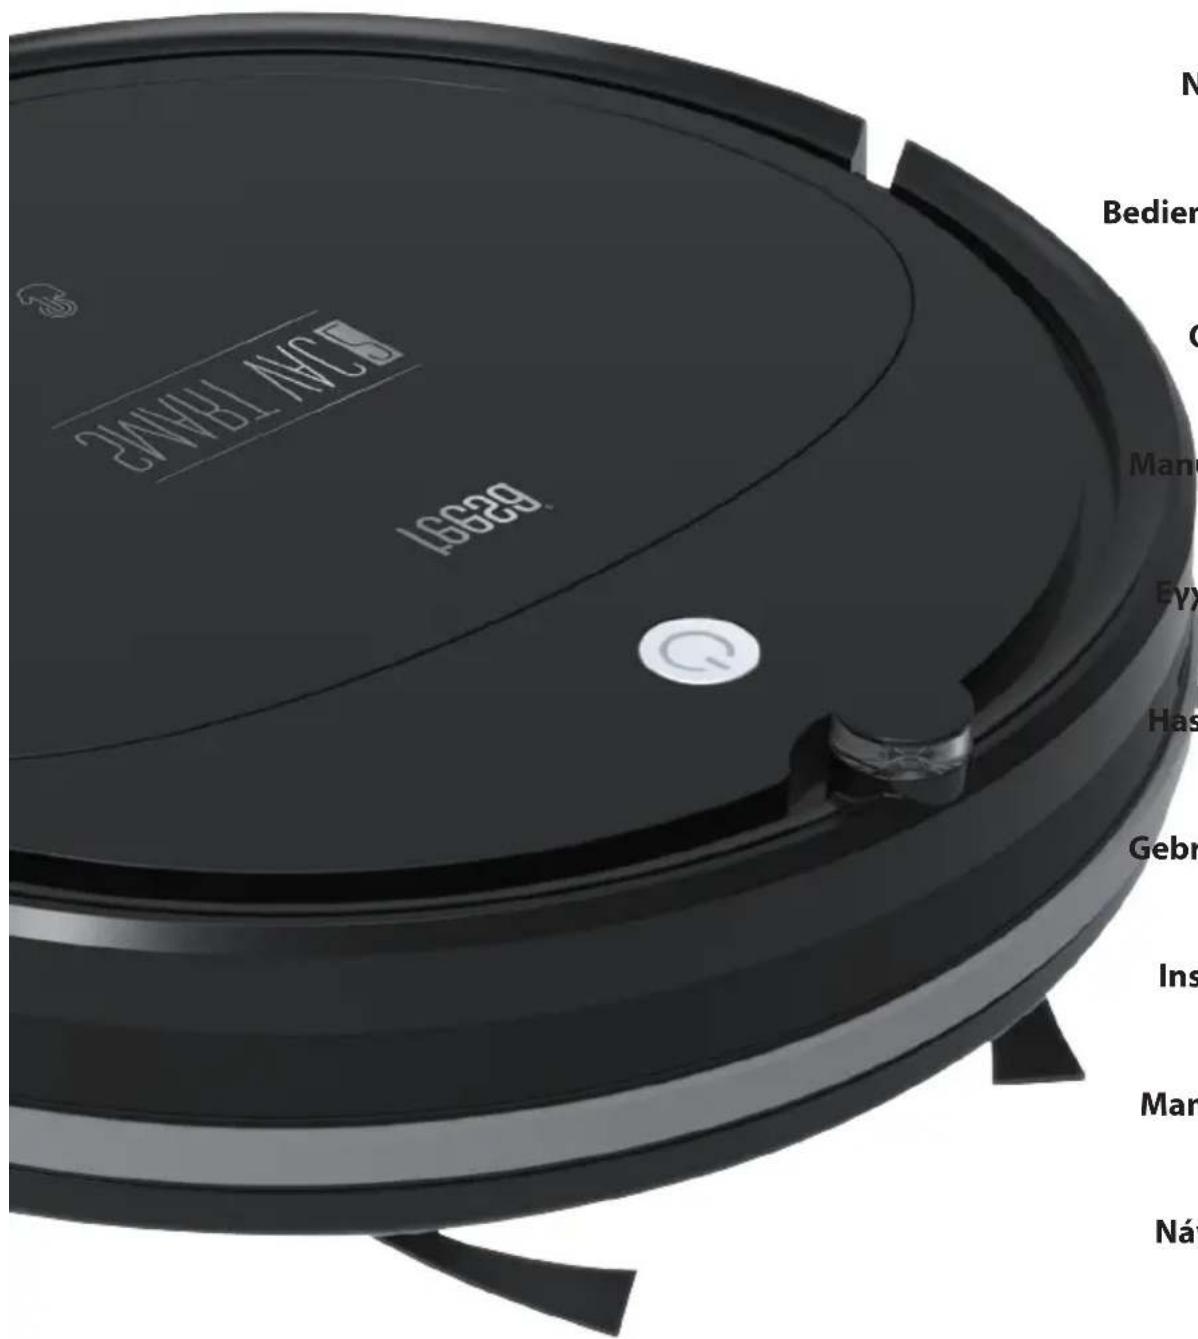
PRODUCT DESCRIPTION
TEESA SMART VAC 2
Top view Bottom view
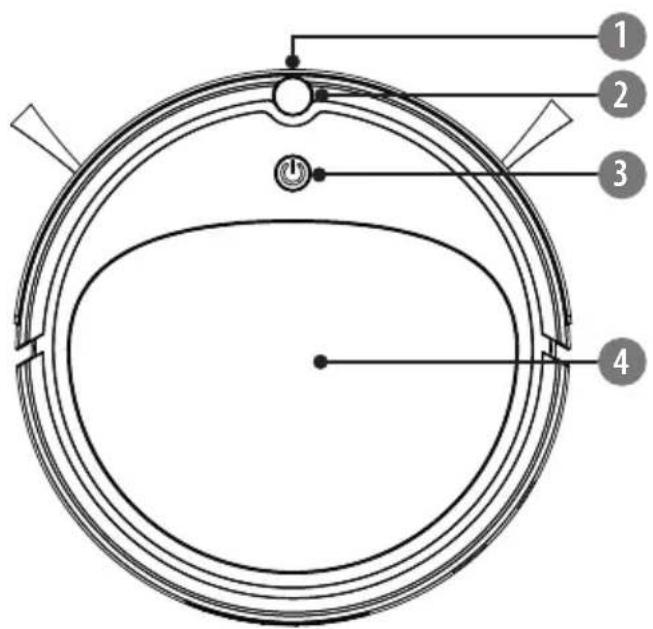
- Bumper
- IR sensor
- ON/OFF button/ LED indicator
- Upper cover
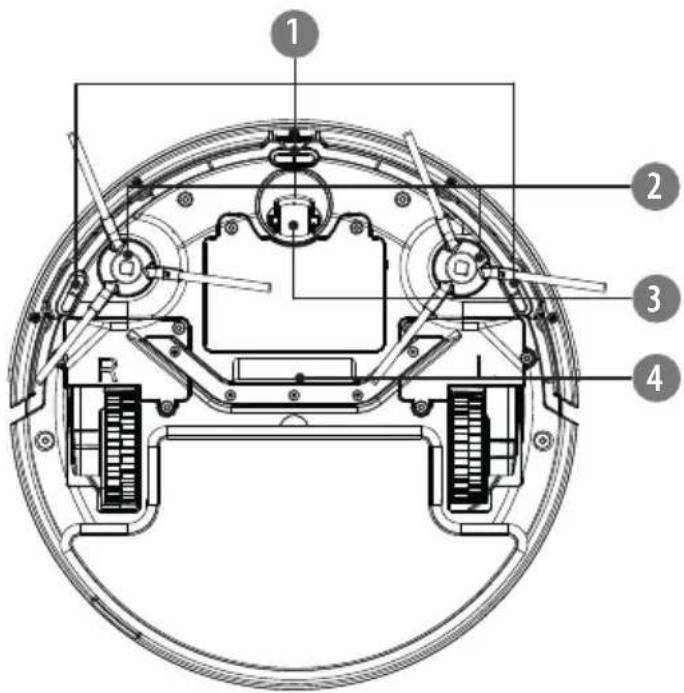
- Cliff sensors
- Side brushes
- Front wheel
- Suction intake
EN
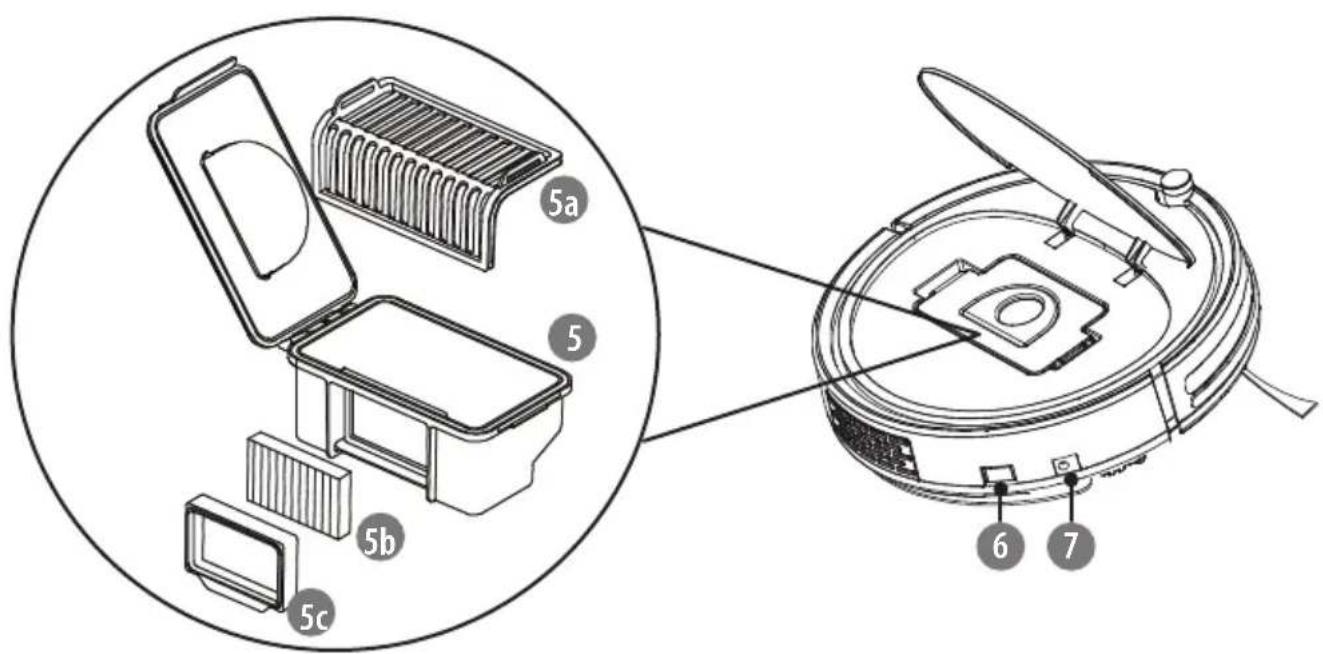
- Dustbin
5a. Premilinary filter
5b. HEPA 11 filter
5c. HEPA 11 filter seal
- Power switch
- Charging socket
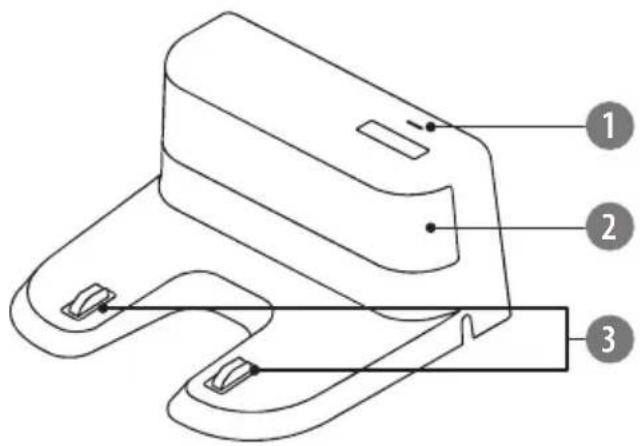
CHARGING DOCK

- LED indicator
- Signal emission area
- Charging pins
- Bottom cover
- Wire slots
- Power socket
EN
natural_image
Technical line drawing of a mechanical bracket assembly (no text or symbols)
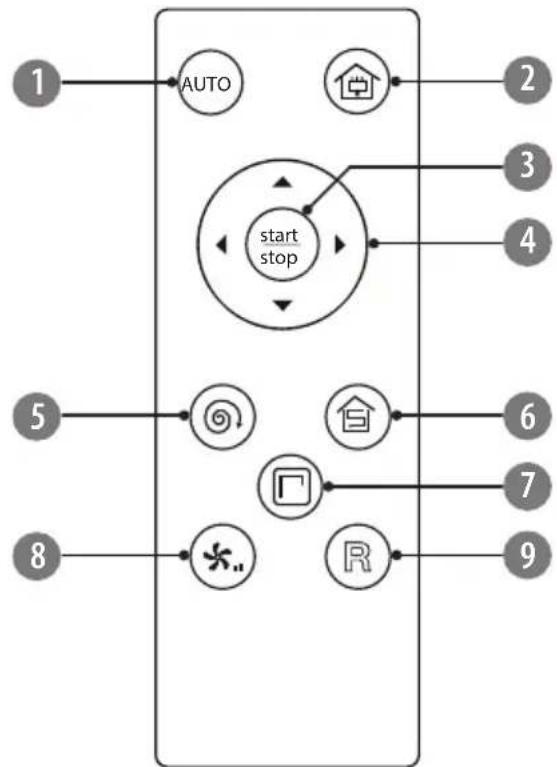
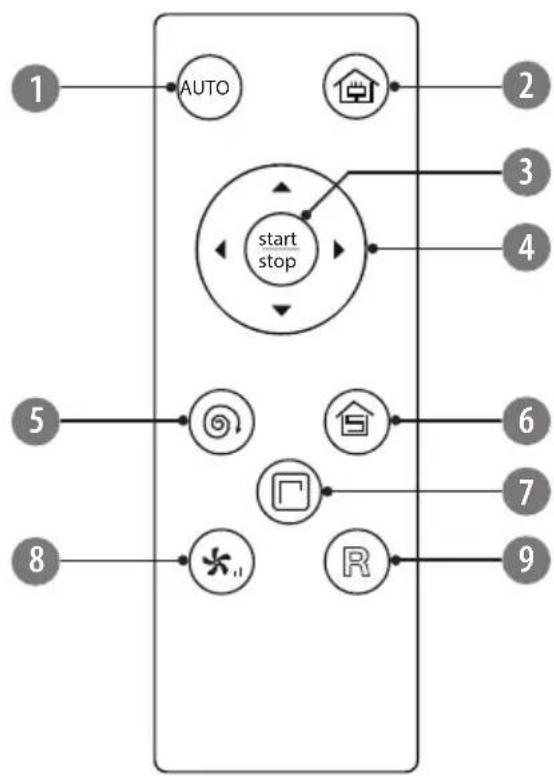
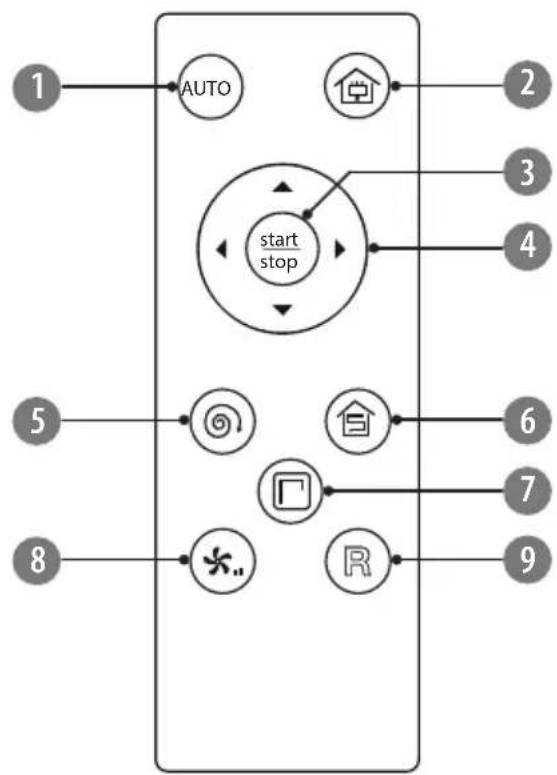
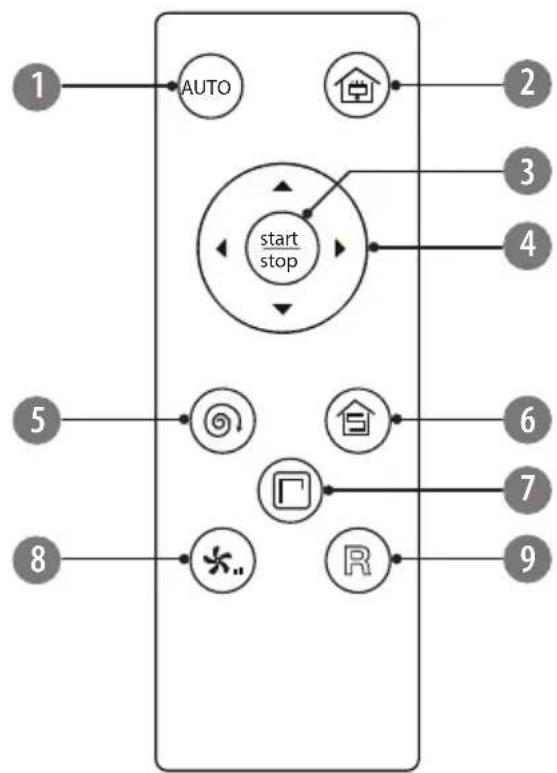
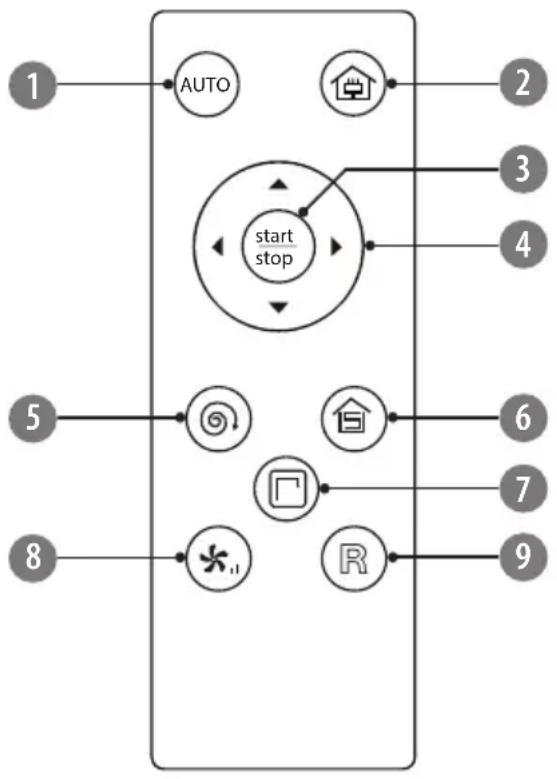
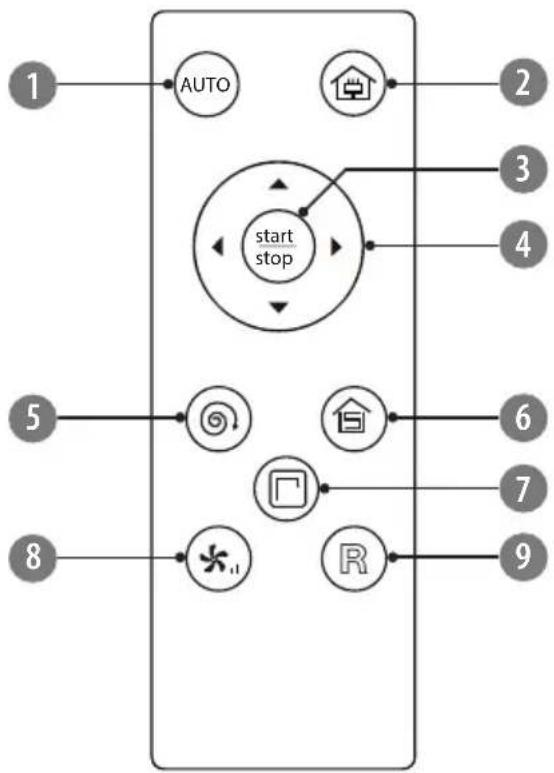
REMOTE CONTROL
flowchart
graph TD
    A["1"] --> B["AUTO"]
    C["2"] --> D["home"]
    E["3"] --> F["start stop"]
    G["4"] --> F
    H["5"] --> I[" swirl icon"]
    J["6"] --> K["house icon"]
    L["7"] --> M["square icon"]
    N["8"] --> O["*.."]
    P["9"] --> Q["R"]
- Start/stop automatic cleaning
- Auto docking and charging: the appliance will automatically return to the charging dock and start recharging
- Start operation, press again to stop and enter standby mode
- Direction buttons: manually navigate the appliance (in operation and standby mode)
- Activate spot cleaning mode
- Activate random cleaning mode
- Activate edge cleaning mode
- Suction power adjustment (two levels available)
- Locate the appliance. When you press this button, the appliance will issue a voice prompt which can help you locate it
REMOTE CONTROL BATTERY INSTALLATION
- Remove the battery cover at the back of the remote control.
- Insert 2x AAA battery with correct polarization.
- Reattach the battery cover.
Notes:
• Always point the IR sensor of the remote control towards the IR sensor on the front of the appliance.
• Use only specified batteries.
• Do not mix different types of batteries.
- Replace all batteries at the same time.
- Please remove the batteries if the remote control is not going to be used for a long time.
INSTALLATION
Charging dock
-
Remove the cover at the bottom of the charging dock.
-
Connect the plug of the AC adapter to the power socket and put the excess cable inside the compartment. Afterwards, reattach the cover.

If the excess cable will not be put into the slot, the appliance may stuck during ging or cleaning.
Make sure charging dock is ALWAYS plugged in. Otherwise, the appliance will not return to the dock automatically.
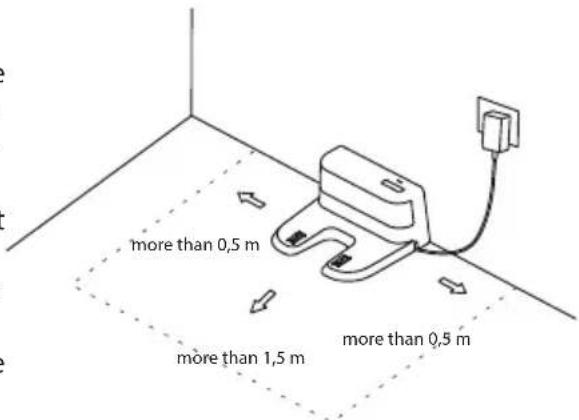
- Place the charging dock against the wall on a floor and connect the AC adapter to the power outlet.
Notes:
- Ensure a space of above 0,5 m on both sides of the charging dock and a space of above 1,5 m in the front. Make sure that space will be easily accessible for the appliance.
- Make sure the cable of the AC adapter is not lying flat on the floor as it may be dragged by the appliance and consequently the charging dock may be powered off.
-
LED indicator on the charging dock is on when the charging dock is plugged in.
-
Please do not move the charging dock arbitrarily and keep it out of direct sunlight.
Notes:
• If the charging dock is relocated, the appliance may fail to locate it.
- Direct sunlight will interfere with recharging signal and consequently the appliance may be unable to return to the charging dock.

Clean the charging pins of the charging dock regularly to avoid malfunction.
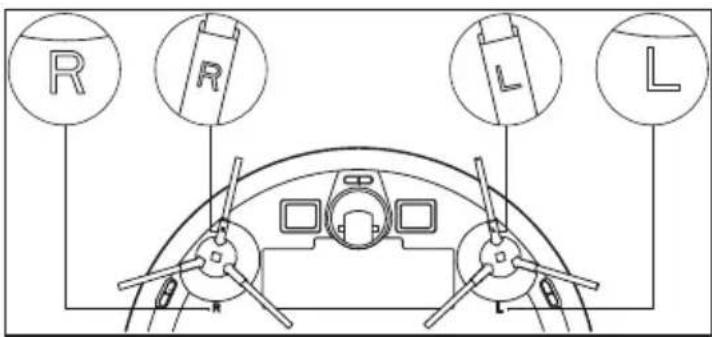
Side brushes
- Make the left side brush (L) and the right side brush (R) correspond to L and R on the bottom casing.
- Press the L and R side brushes into corresponding slots until they lock in place. If you hear a clicking sound that means that the brushes have been installed correctly.
CHARGING
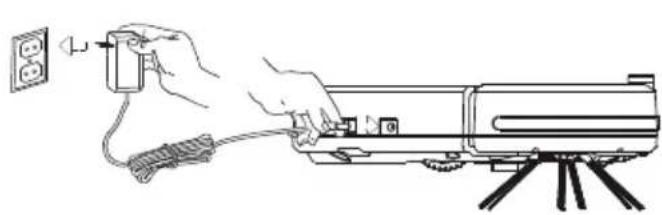
You can charge the appliance in two ways:
- By directly connecting the appliance to power supply
Connect one plug of the AC adapter to the power socket of the appliance; connect the other plug to the wall outlet.
- Using charging dock (automatic charging)
Make sure the charging dock is correctly installed and connected to the power supply (LED is on).
natural_image
Line drawing of a hand using a power plug to install a cylindrical device on a tripod (no text or symbols)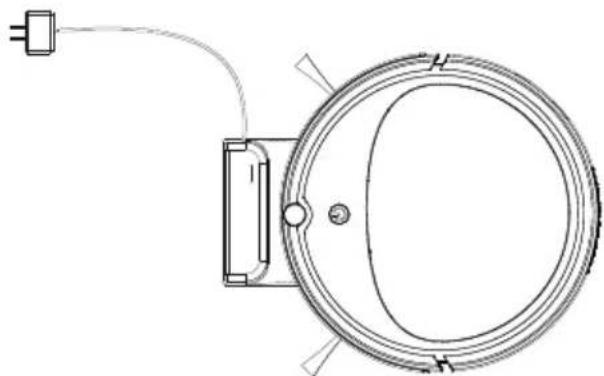
natural_image
Technical line drawing of a circular mechanical component with a power outlet and cable (no text or symbols)- When the appliance is operating, and the battery level gets low, the appliance will automatically return to the charging dock.
- Press the button on the remote control and the appliance will return to the charging dock for recharge.
- You can also manually put the appliance on the charging dock. Make sure that the charging pins on the bottom of the appliance align with the charging pins on the charging dock.
LED indicator
natural_image
Pure diagram of a curved mechanical component with a power button and directional arrow (no text or symbols)| Color Battery status | |
| Flashing red Charging in progress | |
| Solid blue Charging finished,battery fully charged |
Notes:
- When the battery is low, there will be a voice notification and red LED will flash for a few times. The appliance will not start working in that state.
- When charging for the first time, make sure that it is charged for at least 6 hours.
• Make sure to fully charge the appliance before first use.
• If the appliance is not used, charge the appliance every 5 weeks to protect the battery.
OPERATION
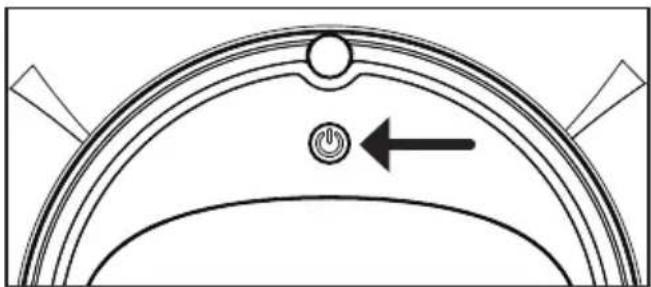
Power on: First set the power switch to I position.
Start cleaning: Press the ON/OFF button on the appliance or the stop / AUTO button on the remote control. The appliance starts automatic cleaning. Blue LED on the appliance flashes. When the battery level gets low, the appliance will automatically return to the charging dock for recharge.
Stop cleaning: When the appliance is operating, press the ON/OFF button on the appliance or the start / AUTO button on the remote control to stop operation. The appliance enters standby mode.
Power off: Set the power switch to 0 position.
Suction power control: Press the button on the remote control to select between two available levels.
Navigating the appliance manually (in standby mode): Use direction buttons on the remote control to manually control the appliance.
- Keep the button pressed, so that the appliance will move forward.
• Use the buttons to turn left/right. - Press the▼to move backwards.
Note: You can also use the direction buttons during automatic cleaning (◀ ▼ ▶) to adjust the appliance's path.
Cleaning modes
The appliance has been equipped with three cleaning modes. Use the remote control to choose one of them.
| Button on the remote control | Mode name Mode description | |
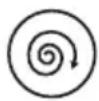 | SPOT CLEANING MODE | If you want to clean the specific area, put the appliance in that place and activate spot cleaning mode. The appliance will issue a voice notification and start cleaning by spiraling outward and then spiraling inward to where it started. Then it will switch to random cleaning mode and operate until low battery. |
 | EDGE CLEANING MODE | If you want to clean for example along the walls or furniture, activate the edge cleaning mode. The appliance will issue a voice notification and start operation. When it detects a wall or an obstacle it will start cleaning alongside for 20 minutes; afterwards, the appliance will switch to random cleaning mode. |
 | RANDOM CLEANING MODE | After pressing the button, the appliance will issue a voice notification and start operation. It will go straight until meeting first obstacle, bounce back, change direction and move on. It will operate in that mode, until low battery, then it will return to the charging dock for recharge. |
CLEANING
Prior to cleaning make sure the appliance is turned off (the power switch is in 0 position).
1. Side brushes
- Turn over the appliance and pull out the side brushes upwards.
- Clean them from any hair, debris or threads which have been entangled around the shaft. The side brushes can be rinsed under running water. In such case, always make sure to dry them completely.
- When the side brushes are clean and dry, push them onto the shaft until you hear a click (always match the symbol L and R on the brush to correspond to the position of L and R at the bottom of the appliance respectively).
- If the side brushes are worn and as a consequence cleaning performance deteriorates, replace them with new ones*.
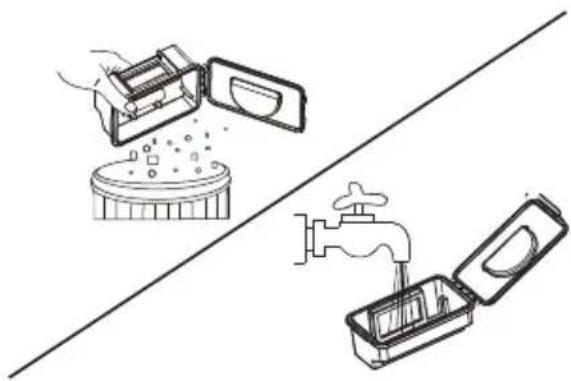
2. Dustbin and filters

Empty the dustbin after each use!
- Open the upper cover. 2. Grasp the dustbin handle and take out the dustbin.

natural_image
Technical line drawings of two circular mechanical components with internal features and mounting brackets (no text or symbols)
natural_image
Line drawing of a hand using a tool to clean or inspect a circular object (no text or symbols)-
Unlock the clip at the side of the dustbin and open its cover.
-
Take out the preliminary filter. Rinse it under running water. Let it dry completely in the shade.
-
Remove the HEPA filter and the seal. Rinse them under running water. Let them dry completely in the shade.
EN

natural_image
Line drawing of a mechanical device with an open lid and internal structure, showing an upward arrow (no text or symbols)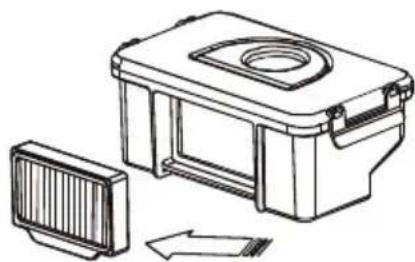
natural_image
Technical line drawing of a mechanical device with a side panel and internal components (no text or symbols)• It is recommended to clean the filters every 3 weeks.
• HEPA filter can be washed under running water up to 50 times.
- The maximum lifespan of the HEPA filter is 12 months. Thereafter, replace it with a new one. Replace it also when you notice significant deterioration in cleaning performance.
• HEPA filter is available to be purchased online at www.teesa.pl lub www.rebelelectro.com
-
Empty the dustbin and rinse it under running water. Wipe it well with a soft cloth or let it dry completely in the shade.
-
When all parts are clean and completely dry**, put the filters back into place and close the dustbin lid (make sure you hear a click). Put the dustbin back into the appliance.
natural_image
Illustration of three kitchen tools: a microwave oven, a water tap, and an open drawer (no text or symbols)
natural_image
Illustration of a hand holding a small container with a lid, next to a striped component and an arrow indicating direction (no text or symbols)- Close the upper cover.

** DO NOT INSERT WET OR SLIGHTLY MOIST PARTS INTO THE APPLIANCE AS THIS BRINGS THE RISK OF ELECTRIC SHOCK AND CAN DAMAGE THE APPLIANCE.
3. Air inlet
Check regularly for any dust and debris in the suction intake. Make sure the suction intake is not blocked by any foreign body.
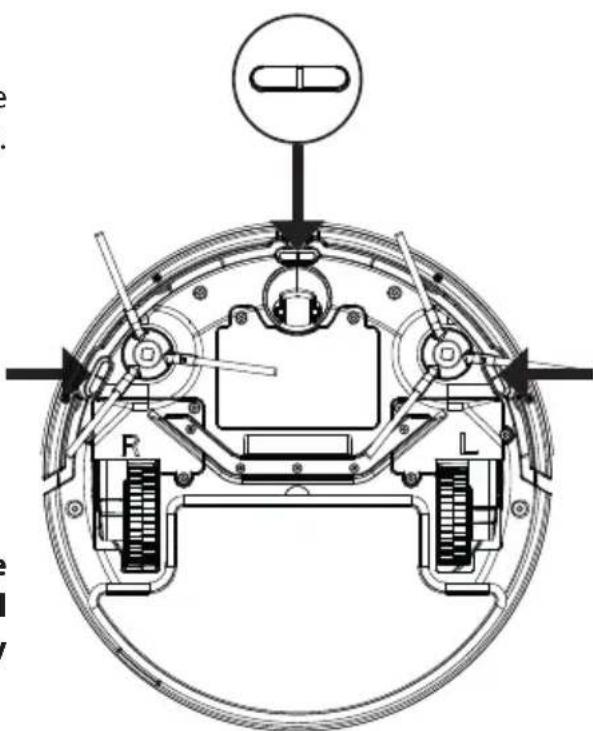
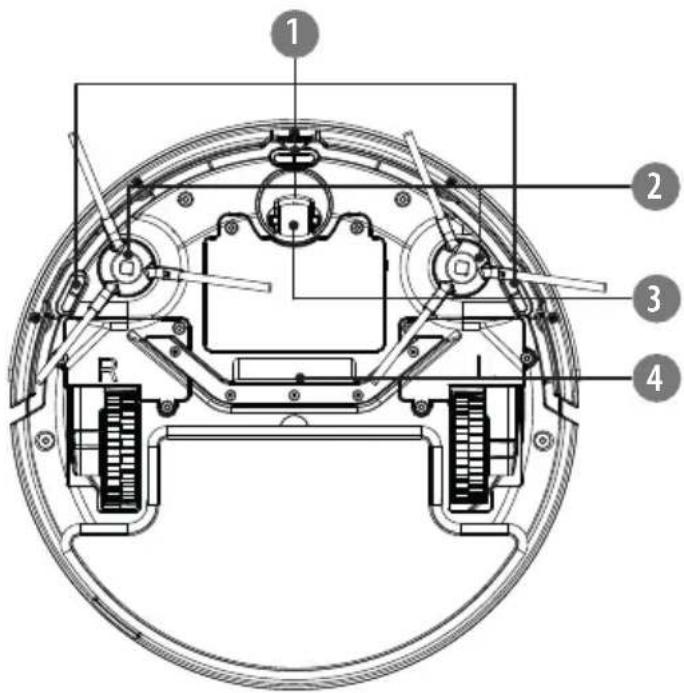
4. Sensors
There are three sensors at the bottom of the appliance (see the exact location shown below). Gently wipe the sensors with a dry, soft cloth.
natural_image
Technical diagram of a mechanical assembly with labeled components (R, L, and a capsule), no readable text or symbols present.
It is crucial for proper operation of the appliance to keep the sensors clean all the time. Otherwise, the appliance may malfunction.
5. Wheels
Clean the wheels with a cleaning brush or with a soft, dry cloth. If wheels are blocked by a foreign body, use a rod or tweezers and carefully remove it.
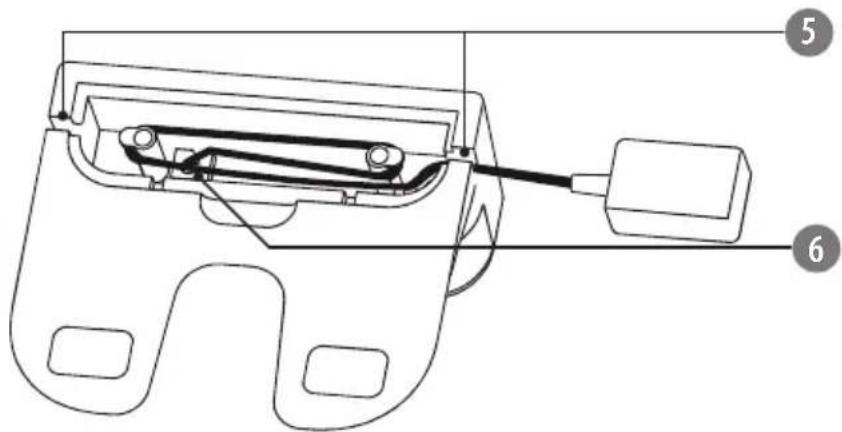
6. Charging dock
Wipe the signal emission area as well as the charging pins (including those on the bottom of the appliance) with a soft, dry cloth.
SPECIFICATION
Main features
For multiple hard floor types and low pile carpets
Washable HEPA filter
3 cleaning modes
Two side brushes
Cliff sensor
Charging indicator
Voice notifications
Auto docking and charging
Overcoming obstacles up to 1,2 cm
Low profile design (7,7 cm)
Rubber bumper
Navigating with remote control (2x AAA battery, not included)
Technical data
Suction power: 1000 Pa (2 levels)
Filter: HEPA 11
Dustbin capacity: 200 ml
Cleaning area: 90 m²
Operation time: 70 – 90 min
Charging time: approx. 4 – 6 h
Noise level: 52 dB
In set: remote control, 2 pairs of side
brushes, cleaning brush, charging dock, AC adapter
Weight: 1,6 kg
Dimensions: ∅28 x 7,7 cm
Power supply
Power: 15 W
Battery: 9,6 V; 2000 mAh
AC adapter:
Input: 100 - 240 V\~; 50/60 Hz
Output: 12 V / 580 mA
English
Correct Disposal of This Product
(Waste Electrical & Electronic Equipment)

(Applicable in the European Union and other European countries with separate collection systems) This marking shown on the product or its literature, indicates that it should not be disposed with other household wastes at the end of its working life. To prevent possible harm to the environment or human health from uncontrolled waste disposal, please separate this from other types of wastes and recycle it responsibly to promote the sustainable reuse of material resources. Household users should contact either the retailer where they purchased this product, or their local government office, for details of where and how they can take this item for environmentally safe recycling. Business users should contact their supplier and check the terms and conditions of the purchase contract This product should not be mixed with other commercial wastes for disposal.
natural_image
Technical line drawing of a mechanical bracket assembly (no text or symbols)FR

TÉLÉCOMMANDE
flowchart
graph TD
    A["1"] --> B["AUTO"]
    C["2"] --> D["home"]
    E["3"] --> F["start stop"]
    G["4"] --> F
    H["5"] --> I[" swirl icon"]
    J["6"] --> K["house icon"]
    L["7"] --> M["square icon"]
    N["8"] --> O["*"]
    P["9"] --> Q["R"]
natural_image
Technical line drawing showing electrical connections: a hand holding a power outlet, a mounted device with wires, and a close-up of a circular device (no text or symbols present)natural_image
Pure diagram of a curved mechanical component with a power button and directional arrow (no text or symbols)natural_image
Technical line drawings of two circular mechanical components with internal features (no text or symbols)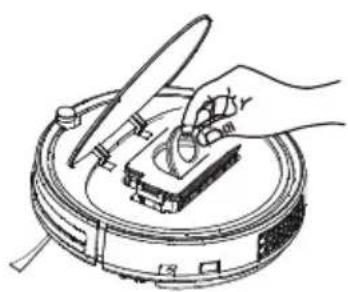
natural_image
Illustration of a hand using a tool to clean or inspect a circular device (no text or symbols visible)natural_image
Line drawing of a mechanical device with an open lid and internal structure, showing a force arrow (no text or symbols)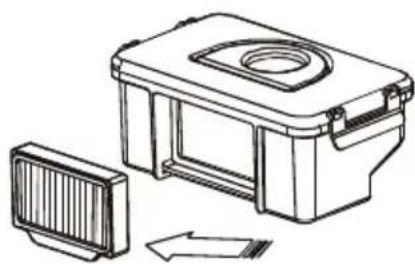
natural_image
Technical line drawing of a mechanical housing with a side panel and directional arrow (no text or symbols)natural_image
Illustration of three kitchen tools: a microwave oven, a water tap, and a second open tool (no text or symbols)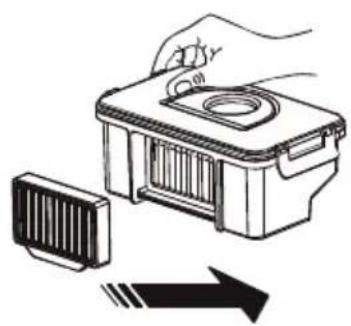
natural_image
Illustration of a hand holding a small electronic device with a circular top, next to a rectangular component and an arrow indicating direction (no text or symbols)
- Κάδος σκόνης
natural_image
Technical line drawing of a mechanical bracket assembly (no text or symbols)GR

THΛΕΧΕΙΡΙΣΤΗΡΙΟ
flowchart
graph TD
    A["1"] --> B["AUTO"]
    C["2"] --> D["home"]
    E["3"] --> F["start stop"]
    G["4"] --> F
    H["5"] --> I[" swirl icon"]
    J["6"] --> K["house icon"]
    L["7"] --> M["square icon"]
    N["8"] --> O["*.."]
    P["9"] --> Q["R"]
    B --> F
    D --> F
    F --> G
    F --> K
    F --> M
    F --> Q
    style F fill:#f9f,stroke:#333
natural_image
Technical line drawing showing a hand using a power source to connect to a device and a circular device (no text or symbols present)natural_image
Pure diagram of a curved mechanical component with a power button and directional arrow (no text or symbols)natural_image
Technical line drawings of two circular mechanical components with internal components and mounting holes (no text or symbols)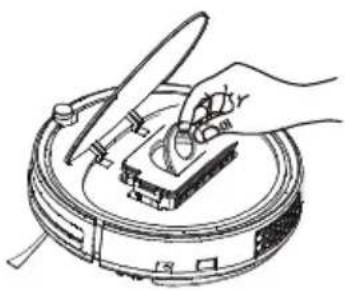
natural_image
Line drawing of a hand using a tool to clean or inspect a circular object with a handle (no text or symbols)natural_image
Line drawing of a mechanical device with an open lid and internal structure, showing an upward arrow (no text or symbols)
natural_image
Technical line drawing of a mechanical device with a side panel and internal components (no text or symbols)natural_image
Illustration of three kitchen utensils: a microwave oven, a water tap, and a second open drawer (no text or symbols)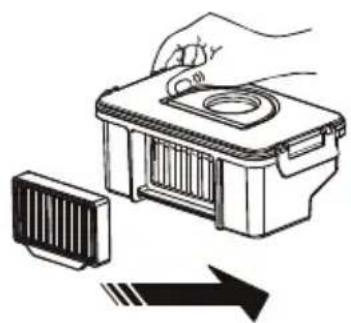
natural_image
Illustration of a hand holding a small electronic device with a circular top, next to a rectangular component and an arrow indicating direction (no text or symbols)natural_image
Technical line drawing of a mechanical assembly with labeled components (R, L, and a cylindrical component) — no readable text or symbols beyond labels.GR
5. Τροχοί
- Porgyűjtő tartály
natural_image
Technical line drawing of a mechanical bracket assembly (no text or symbols)
TÁVIRÁNYÍTÓ

flowchart
graph TD
    A["1"] --> B["AUTO"]
    C["2"] --> D["home"]
    E["3"] --> F["start stop"]
    G["4"] --> F
    H["5"] --> I[" swirl icon"]
    J["6"] --> K["home icon"]
    L["7"] --> M["square icon"]
    N["8"] --> O["*.."]
    P["9"] --> Q["R"]
natural_image
Line drawing of a hand using a power outlet to connect electrical cable to a mounted device (no text or symbols present)
natural_image
Technical line drawing of a circular mechanical component with a power outlet and cable (no text or symbols)natural_image
Pure diagram of a curved mechanical component with a power button and directional arrow (no text or symbols)natural_image
Technical line drawings of two circular mechanical components with internal features and mounting brackets (no text or symbols)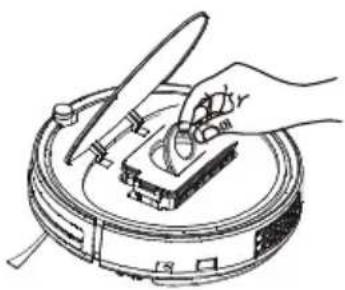
natural_image
Illustration of a hand using a tool to clean or inspect a circular device (no text or symbols visible)natural_image
Line drawing of an open storage tray with a rack and upward arrow indicating compression or lifting (no text or symbols)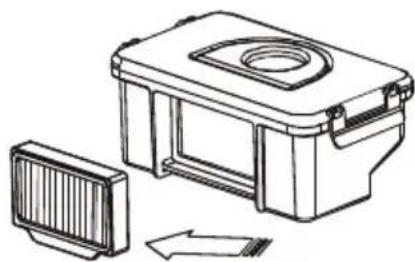
natural_image
Technical line drawing of a mechanical device with a side panel and housing (no text or symbols)natural_image
Illustration of three kitchen utensils: a microwave oven, a drain with a faucet, and a water-filled appliance (no text or symbols)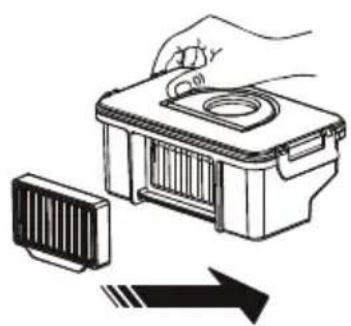
natural_image
Illustration of a hand holding a small electronic device with a circular top, next to a rectangular component and an arrow indicating direction (no text or symbols)
BESCHRIJVING VAN HET PRODUCT
TEESA SMART VAC 2
- Bumper
- Infrarood sensor
- ON/OFF knop/ LED-indicator
- Deksel boven
- Stofreservoir
5a. Voorfilter
5b. HEPA 11-filter
5c. HEPA 11-filterpakking
natural_image
Technical line drawing of a mechanical bracket assembly (no text or symbols)NL
AFSTANDSBEDIENING
flowchart
graph TD
    A["1"] --> B["AUTO"]
    C["2"] --> D["home"]
    E["3"] --> F["start stop"]
    G["4"] --> F
    H["5"] --> I[" swirl icon"]
    J["6"] --> K["home icon"]
    L["7"] --> M["square icon"]
    N["8"] --> O["*.."]
    P["9"] --> Q["R"]
natural_image
Technical line drawing showing a hand holding an electrical outlet connected to a device and a circular device (no text or symbols present)natural_image
Pure diagram of a curved mechanical component with a power button and directional arrow (no text or symbols)natural_image
Technical line drawings of two circular mechanical components with internal components and mounting features (no text or symbols)
natural_image
Line drawing of a hand using a tool to clean or inspect a circular device (no text or symbols)natural_image
Line drawing of an open battery pack with a rack inside, showing internal structure and upward arrow (no text or symbols)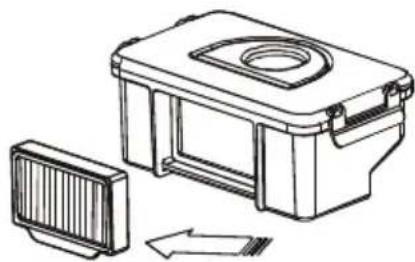
natural_image
Technical line drawing of a mechanical device with a side panel and internal components (no text or symbols)natural_image
Illustration of kitchen utensils and a faucet (no text or symbols)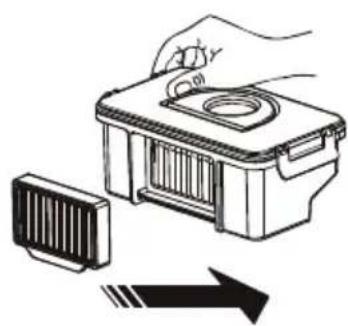
natural_image
Illustration of a hand holding a small device next to a rectangular component with an arrow indicating direction (no text or symbols)natural_image
Technical line drawing of a mechanical bracket assembly (no text or symbols)
PL
PILOT ZDALNEGO STEROWANIA

flowchart
graph TD
    A["1"] --> B["AUTO"]
    C["2"] --> D["home"]
    E["3"] --> F["start stop"]
    G["4"] --> F
    H["5"] --> I[" swirl icon"]
    J["6"] --> K["窗"]
    L["7"] --> M["口"]
    N["8"] --> O["*.."]
    P["9"] --> Q["R"]
natural_image
Technical line drawing showing a hand using a power source to switch a device, and a close-up of a circular device with wires (no text or symbols)natural_image
Pure diagram of a curved mechanical component with a power button and directional arrow (no text or symbols)natural_image
Technical line drawings of two circular mechanical components with internal mechanisms and mounting brackets (no text or symbols)
natural_image
Line drawing of a hand using a tool to press or install a mechanical component on a circular base (no text or symbols)natural_image
Line drawing of an open battery pack with a rack inside, showing internal structure and upward arrow (no text or symbols)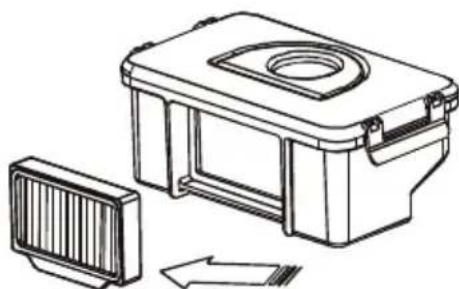
natural_image
Technical line drawing of a mechanical housing with a side panel and directional arrow (no text or symbols)PL
natural_image
Illustration of kitchen utensils and a faucet, showing cleaning and cleaning process (no text or symbols)
natural_image
Illustration of a hand holding a device with a lid and a rack, next to an arrow symbol (no text or labels)natural_image
Technical line drawing of a mechanical bracket assembly (no text or symbols)
TELECOMANDĂ
flowchart
graph TD
    A["1"] --> B["AUTO"]
    C["2"] --> D["home"]
    E["3"] --> F["start/stop"]
    G["4"] --> F
    H["5"] --> I[" swirl"]
    J["6"] --> K["窗口"]
    L["7"] --> M["口"]
    N["8"] --> O["*_i"]
    P["9"] --> Q["R"]
natural_image
Technical line drawing showing a hand using a power source to switch a device, and a close-up of a circular component with wires (no text or symbols)natural_image
Pure diagram of a curved mechanical component with a central button and directional arrow (no text or symbols)natural_image
Technical line drawings of two circular mechanical components with internal features and mounting brackets (no text or symbols)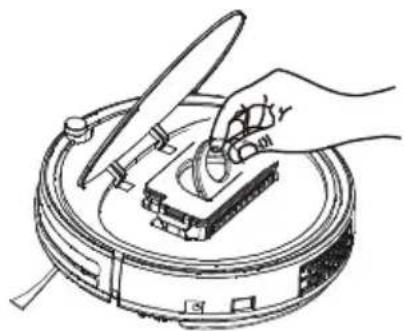
natural_image
Hand operating a mechanical device on a circular base (no text or symbols visible)natural_image
Line drawing of an open storage tray with a rack and upward arrow indicating compression or lifting (no text or symbols)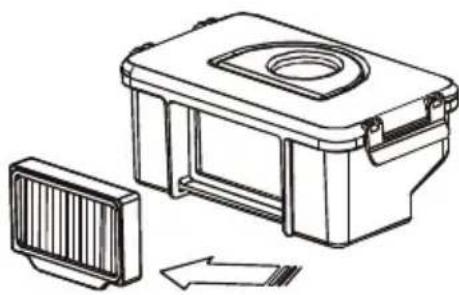
natural_image
Technical line drawing of a mechanical device with a side panel and internal components (no text or symbols)natural_image
Illustration of kitchen utensils and a faucet, showing cleaning and cleaning process (no text or symbols)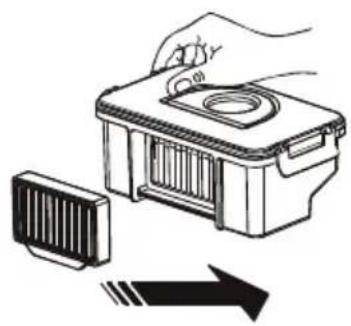
natural_image
Illustration of a hand holding a small electronic device with a lid and internal components, next to a striped component and an arrow (no text or symbols)- Nádoba na prach
5a. Vstupný filter
5b. Filter HEPA 11
5c. Tesnenie filtra HEPA 11
- Prepínač
- Konektor nabíjania
DOKOVACIA STANICA
natural_image
Technical line drawing of a mechanical bracket assembly (no text or symbols)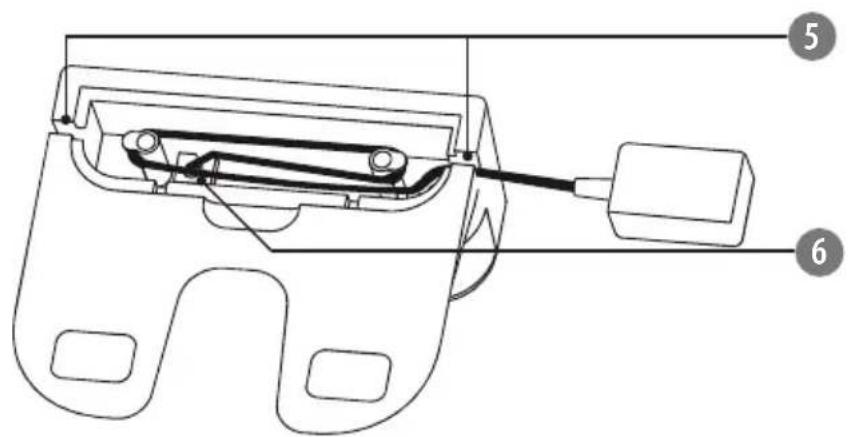
DIAL'KOVÉ OVLÁDANIE
flowchart
graph TD
    A["1"] --> B["AUTO"]
    C["2"] --> D["home"]
    E["3"] --> F["start stop"]
    G["4"] --> F
    H["5"] --> I[" swirl icon"]
    J["6"] --> K["house icon"]
    L["7"] --> M["square icon"]
    N["8"] --> O["*"]
    P["9"] --> Q["R"]
natural_image
Technical line drawing showing a hand using a power source to switch a device, and a close-up of a circular device with wires (no text or symbols)natural_image
Pure diagram of a curved mechanical component with a central button and directional arrow (no text or symbols)natural_image
Technical line drawings of two circular mechanical components with internal components and mounting brackets (no text or symbols)
natural_image
Hand operating a mechanical device on a circular base (no text or symbols visible)- Uvol'nite zámok a otvorte veko.
-
Vyberte vstupný filter. Opláchnite ho pod tečúcou vodou. Následne ho nechajte úplne vyschnút na zatienenom mieste.
-
Vyberte HEPA filter a tesnenie. Opláchnite ich pod tečúcou vodou a nechajte ho úplne vyschnút na zatienenom mieste.

natural_image
Line drawing of a mechanical device with an open lid and internal structure, showing an upward arrow (no text or symbols)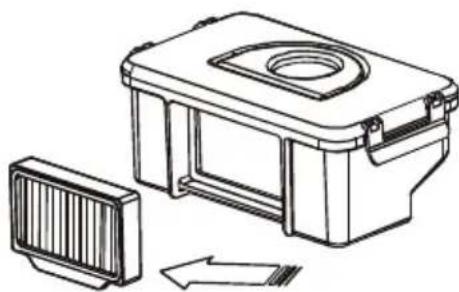
natural_image
Technical line drawing of a mechanical device with a side panel and internal components (no text or symbols)natural_image
Illustration of a kitchen appliance with a drain, a lid, and a faucet (no text or symbols)
natural_image
Illustration of a hand holding a small device next to a rectangular component with an arrow indicating direction (no text or symbols)- Zatvorte horný kryt.

** JE ZAKÁZANÉ DO VYSÁVAČA VKLADAŤ MOKRÉ ALEBO MIERNE VLHKÉ KOMPONENTY, PRETOŽE TO MÔŽE SPÓSOBIŤ ÚRAZ ELEKTRICKÝM PRÚDOM A POŠKODENIE ZARIADENIA.
natural_image
Technical diagram of a mechanical assembly with labeled components (no readable text or symbols)


- Robot vacuum cleaner
- SMART VAC2
- TSA5050
- DÁLKOVÉ OVLÁDÁNÍ
- Přívod vzduchu
- FERNBEDIENUNG
- SAFETY INSTRUCTIONS
- IMPORTANT!
- PRODUCT DESCRIPTION
- TEESA SMART VAC 2
- CHARGING DOCK
- REMOTE CONTROL
- REMOTE CONTROL BATTERY INSTALLATION
- Notes:
- INSTALLATION
- Side brushes
- CHARGING
- LED indicator
- OPERATION
- Cleaning modes
- CLEANING
- Side brushes
- Dustbin and filters
- Empty the dustbin after each use!
- Air inlet
- Sensors
- Wheels
- Charging dock
- SPECIFICATION
- Main features
- Technical data
- Power supply
- TÉLÉCOMMANDE
- THΛΕΧΕΙΡΙΣΤΗΡΙΟ
- Τροχοί
- TÁVIRÁNYÍTÓ
- BESCHRIJVING VAN HET PRODUCT
- AFSTANDSBEDIENING
- PILOT ZDALNEGO STEROWANIA
- PL
- TELECOMANDĂ
- DOKOVACIA STANICA
- DIAL'KOVÉ OVLÁDANIE
Brand : Teesa
Model : TSA5050
Category : Vacuum Cleaner