
Sweeper 7000 TSA5040 - Vacuum Cleaner Teesa - Free user manual and instructions
Find the device manual for free Sweeper 7000 TSA5040 Teesa in PDF.


| Product Type | 2-in-1 Stick & Handheld Vacuum Cleaner |
| Dimensions | 119 x 22.5 x 25.5 cm |
| Weight | 2.3 kg |
| Power | 150 W |
| Suction Power | ≥ 24 W |
| Airflow | ≥ 8.5 l/s |
| Vacuum | ≥ 7 kPa |
| Dust Container Capacity | 0.3 L |
| Battery Type | Li-Ion 25.2 V, 2000 mAh |
| Charging Time | Up to 6 hours |
| Runtime (Low Mode) | 40 minutes |
| Runtime (Normal Mode) | 16 minutes |
| Noise Level | ≤ 82 dB (sound power level) |
| Performance Levels | 2 (Normal & Slow) |
| Cleaning Surface Backlight | Yes (LEDs on electric brush) |
| Battery Level Indicator | Yes (2 LEDs) |
| Wall Mountable | Yes (mounting plate included) |
| Mopping Function | Yes (with optional mopping attachment TSA0118) |
| Included Accessories | AC charger, electric brush, 2-in-1 crevice brush, crevice tool, mounting plate, mounting set, user manual |
| Filter Type | Washable (upper part of dust container) |
| Safety Approvals | CE compliant; WEEE marked |
Frequently Asked Questions - Sweeper 7000 TSA5040 Teesa
User questions about Sweeper 7000 TSA5040 Teesa
0 question about this device. Answer the ones you know or ask your own.
Ask a new question about this device
Download the instructions for your Vacuum Cleaner in PDF format for free! Find your manual Sweeper 7000 TSA5040 - Teesa and take your electronic device back in hand. On this page are published all the documents necessary for the use of your device. Sweeper 7000 TSA5040 by Teesa.
USER MANUAL Sweeper 7000 TSA5040 Teesa
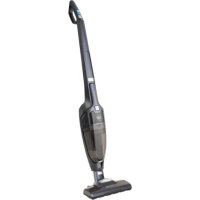
Rechargeable 2-in-1 Stick Vacuum Cleaner
SWEEPER 7000
TSA5040
Návod k obsluze
Bedienungsanleitung
Owner's manual
Εγχειρίδιο χρήσης
Instrukcja obsługi
Manual de utilizare
Návod na použitie
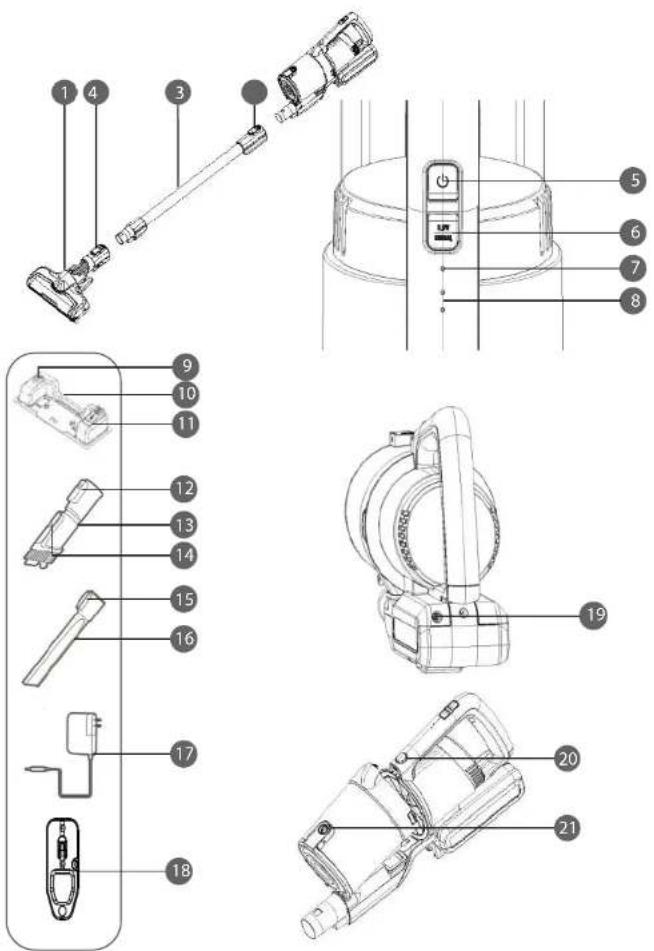
natural_image
Technical line drawings of mechanical components with arrows indicating assembly or transformation (no text or symbols)Elektrokartáč
Thank you for purchasing TEESA appliance. Read this instruction manual and keep it for future reference. Producer does not take responsibility for damages caused by inappropriate handling and use of the product.
SAFETY INSTRUCTIONS
In order to reduce the injuries or damages, follow basic safety precautions applied when using any electrical device, including the following:
- Read the entire instruction manual before you start installation and assembly and keep it for future reference. Keep the manual for future reference.
- Before connecting the device to power supply socket, make sure the voltage indicated on the device corresponds to the voltage in the power supply socket.
- Use only the included AC charger to charge the device.
- Do not use the included AC charger to charge other devices or batteries.
- Do not start vacuuming if the dust bag or filter are not installed in the vacuum cleaner.
- Appliance for household use only.
- Do not place any objects in ventilation slots.
-
Clean this device in accordance to instructions listed in Cleaning section.
-
Turn off the device:
- if it's not operating correctly
• If there's an uncommon voice when using
• before disassembling the device
- before cleaning
- when not in use
-
Keep the device out of the reach of children. Do not leave children unsupervised with the product.
-
This appliance must not be used by persons (including children) with reduced physical, sensory or mental capabilities, or lack of experience and knowledge, unless they are supervised by the person who is responsible for their safety.
-
Keep the device and charger away from heat, water, moisture, sharp, edges and any other factor which may damage the appliance or charger cable.
13.Do not place the appliance in water or any liquid; nor handle/use it with wet or moist hands.
14.Do not point tube at people or animals.
15.Do not vacuum:
• big objects with sharp edges; it may block and damage the device;
- fine dust - e.g. plaster, cement, flour, etc.,
- remnants of renovation works, debris etc.,
- harmful and corrosive liquids or flammable and explosive substances as this may cause fire;
• hot or glowing substances;
- wet or moisture surfaces and objects;
• water and other liquids.
16.Do not use the product for purposes different from displayed in this operating manual.
17.Do not leave the appliance unattended when it's working.
-
Producer of this product is not responsible for damages caused by inappropriate handling and using of the device.
-
Do not use this device if the charger cable is damaged or appliance is broken.
- Do not attempt to repair this device yourself. Only authorized and qualified personnel may repair this device. Never disassemble this device.
- Use only authorized accessories.
ASSEMBLING/DISASSEMBLING
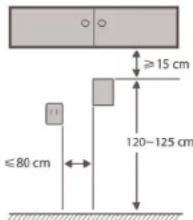
Wall mount
- The vacuum cleaner can be attached to the wall using mounting plate.
- The plate should be attached to the wall with mounting pins and screws, which are included in the kit.
- Choose a location near the power outlet (the charger cable has a length of 1.8 m).
- The wall mount is located at the bottom of the battery housing.
Attaching accessories
- To attach the accessory to the tube / hand vacuum cleaner, push its end onto the tube / hand vacuum cleaner until it locks in place.
- Correct installation is indicated by an audible click.
- Appropriate cutouts at the ends of accessories do not allow you to connect them incorrectly.
- To disconnect the accessory, press the release button and pull it out.
CHARGING
- Make sure the device is switched off.
- Connect the AC charger plug to the device's charging socket, which is located at the back of the battery housing next to the handle. Connect the AC charger to the power socket.
- When the battery is fully charged, two LEDs are on.
- When the battery is half empty, one LEDs is on.
- When the battery level is low, the lower battery level indicator blinks until the device turns off.
- When the battery is completely discharged, pressing the power button will cause the lower LED to flash for a few seconds.
- Fully charged battery allows:
• 16 minutes usage in normal mode
• 40 minutes usage in slow mode - Charging takes up to 6 hours.
-
When the battery is charging, the lower battery level indicator will blink.
-
When fully charged, the battery level indicator will turn off after a minute.
11.Disconnect the charger when charging is finished. - Do not remove the battery from the device – it may void the warranty.
- The charger may become warm during charging – this is normal.
- Before first use, make sure, that the battery is fully charged.
- Use only the included charger to charge the device.
• After each use, fully charge the battery and store the device fully charged.
Notes:
OPERATION
Note: Before using the appliance, check that no sharp objects have become attached to the wheels and the roller brush to avoid scratching delicate floors and ensure maximum vacuuming performance.
- Press the power button to turn on the device.
- By default, when turned on, the device will work in normal mode (the mode indicator will be on).
- To change the mode, press the mode button (in slow mode the LED will not light up).
- Start vacuuming.
- To turn off the device, press the power button.
- The electric brush has LEDs located inside the front part of the housing. The LEDs light up when the vacuum cleaner is on, regardless of the selected mode.
Vacuuming with mopping\*
- The device has the ability to vacuum and mop simultaneously using a mopping attachment. Make sure the pad is attached to the bottom of the water tank before use.
- First, open the water filler cap on the right side of the water tank. Then pour water in there, not exceeding the maximum water level line in the tank.
- To attach the mopping attachment, insert the electric brush in a properly shaped place on the mopping attachment.
- These elements connect with each other with strong magnets.
- To moisten the microfiber pad, place the electric brush with the tank on the surface to be cleaned and press the water ejection button on the left of the tank with your foot. Each press releases a small amount of water into the pad.
- After finishing work, remove the mopping attachment by pulling it out of the electric brush.
- Pour out the rest of the water from the tank through the hole that was previously filled with water.
- After each use wash the pad in warm water. Do not wash in the washing machine.
- After finishing work, do not store the vacuum cleaner on the mopping attachment.
*Moping attachment (TSA0118) is not included in the set. It is available for purchase in our online store teesa.pl or rebelelectro.com.
CLEANING AND MAINTENANCE
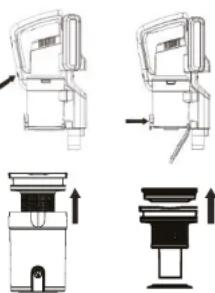
Dust container
- Press the dust container release button and then pull the container.
- To spill the dust from the container, press the dust t container lid release button. The container lid will open When closing the lid, make sure the catch locks in place
- It is recommended to clean the inside of the container. After pulling it out, remove its lower part from the top by turning the rim under the protective mesh.
- There is a filter in the upper part of the container, which must also be removed before cleaning the remaining elements of the container.
- The filter can be cleaned by dusting it off or rinsing it under running water.
- All the elements can be cleaned under running water. Dry them thoroughly before next use.
natural_image
Technical line drawings of mechanical components with arrows indicating assembly or transformation (no text or symbols)Electric brush
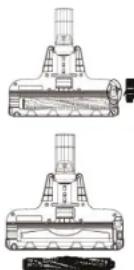
- To keep the brush parts in good condition, clean the rotating brush inside every few uses.
- To disassemble it:
- Disconnect the electric brush from the tube or vacuum cleaner,
- Turn it upside down,
- Looking from the front of the electric brush, there is a flap that must be removed on its right side,
- Then pull out the brush roll and clean it from dirt.
STORAGE
- Before storing, make sure the device is clean, dry and fully charged.
- Store the device in a dry place.
- The set includes a mounting plate that allows the vacuum cleaner to be stored on the wall in an upright position.
SPECIFICATION
BASIC FEATURES
Cordless hand held vacuum cleaner
2 performance levels
Backlight of cleaning surface
Battery level indicator
Easy emptying of dust container
Maneuverable, lightweight and easy to use
Ergonomic handle
Mountable on the wall
TECHNICAL DATA
Power: 150 W
Sound power level:=<82 dB
Dust container capacity: 0,3 l
Suction power: >=24 W
Airflow: >=8,5 l/s
Vacuum: >=7 kPa
POWER SUPPLY
Battery: 25,2 V; 2000 mAh
Battery type: Li-Ion
Charging time: up to 6 h
Maximum runtime:
Level 1 (low): 40 min
Level 2 (high): 16 min
AC charger:
Input: AC 100 \~ 240 V; 50/60 Hz
Output: 25-29 V; 500 mA
PHYSICAL PARAMETERS
Weight: 2,3 kg
Dimensions: 119 x 22,5 x 25,5 cm
IN SET
AC charger
Electric brush
2-in-1 crevice brush
Crevice tool
Mounting plate
Mounting set
User's manual

English
Correct Disposal of This Product
(Waste Electrical & Electronic Equipment)


(Applicable in the European Union and other European countries with separate collection systems) This marking shown on the product or its literature, indicates that it should not be disposed with other household wastes at the end of its working life. To prevent possible harm to the environment or human health from uncontrolled waste disposal, please separate this from other types of wastes and recycle it responsibly to promote the sustainable reuse of material resources. Household users should contact either the retailer where they purchased this product, or their local government office, for details of where and how they can take this item for environmentally safe recycling. Business users should contact their supplier and check the terms and conditions of the purchase contract. This product should not be mixed with other commercial wastes for disposal.
Made in China for Lechpol Electronics Leszek Sp.k., ul. Garwolińska 1, 08-400 Miętnec.
Ηλεκτρική βούρτσα
Akumulator: 25,2 V; 2000 mAh
natural_image
Technical line drawings of mechanical components with arrows indicating assembly or movement (no text or symbols)Peria electrică
Tip accumulator: LI-Ion

- Rechargeable 2-in-1 Stick Vacuum Cleaner
- SWEEPER 7000
- Elektrokartáč
- SAFETY INSTRUCTIONS
- ASSEMBLING/DISASSEMBLING
- Wall mount
- Attaching accessories
- CHARGING
- Notes:
- OPERATION
- Vacuuming with mopping\*
- CLEANING AND MAINTENANCE
- Dust container
- Electric brush
- STORAGE
- SPECIFICATION
- BASIC FEATURES
- TECHNICAL DATA
- POWER SUPPLY
- PHYSICAL PARAMETERS
- IN SET
- English
- Ηλεκτρική βούρτσα
- Peria electrică
Brand : Teesa
Model : Sweeper 7000 TSA5040
Category : Vacuum Cleaner