TSA5045 - Vacuum Cleaner Teesa - Free user manual and instructions
Find the device manual for free TSA5045 Teesa in PDF.


User questions about TSA5045 Teesa
0 question about this device. Answer the ones you know or ask your own.
Ask a new question about this device
Download the instructions for your Vacuum Cleaner in PDF format for free! Find your manual TSA5045 - Teesa and take your electronic device back in hand. On this page are published all the documents necessary for the use of your device. TSA5045 by Teesa.
USER MANUAL TSA5045 Teesa
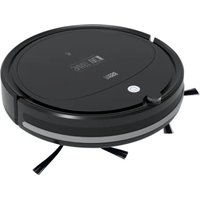
Robot vacuum cleaner
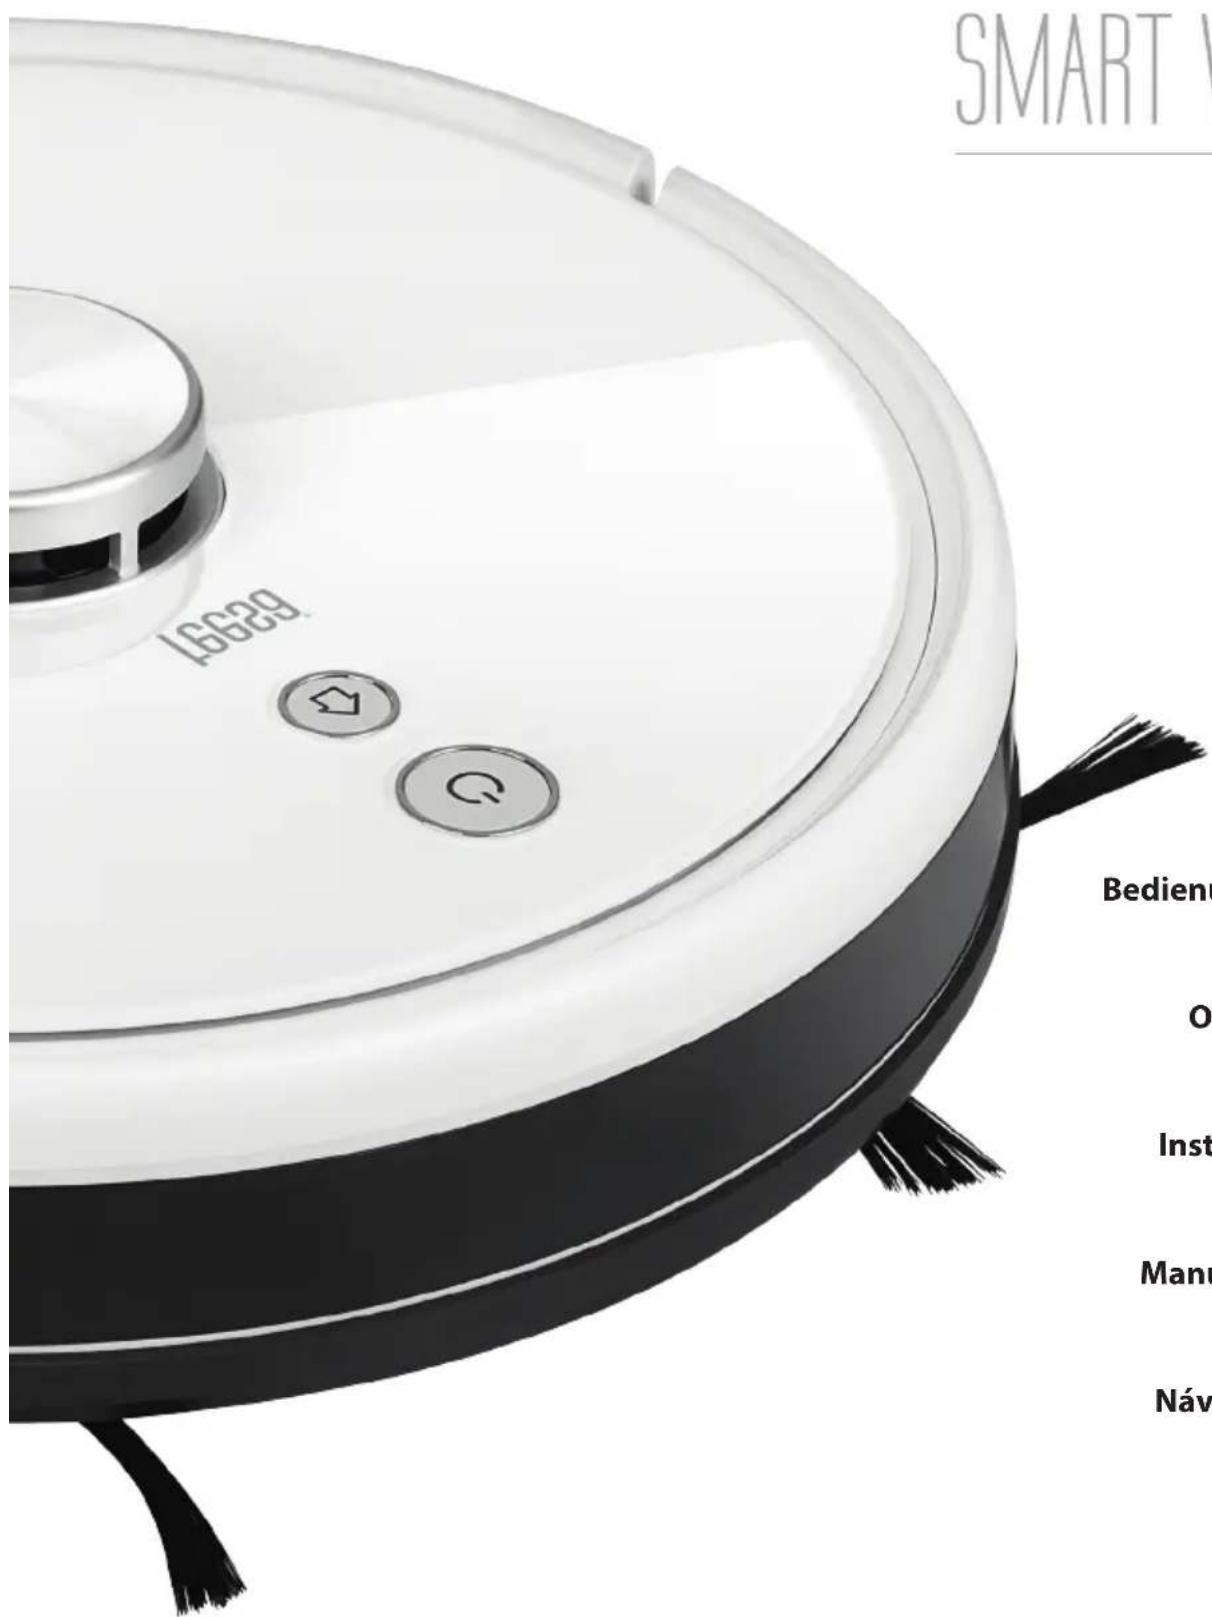
SMART VAC PRO
TSA5045
Bedienungsanleitung
Owner's manual
Instrukcja obsługi
Manual de utilizare
Návod na použitie
DE
EN
PL
RO
SK
natural_image
Technical line drawing of a mechanical device with labeled parts (no text or symbols present)DE
FERNBEDIENUNG
natural_image
Line drawing of a robotic vacuum cleaner with control panel and sensor array (no text or symbols)
DE
2a. Anmeldung:
Hinweise:
natural_image
Technical line drawing of a mechanical component with a curved base and mounting bracket (no text or symbols)natural_image
Technical line drawing of a mechanical component with an upward arrow indicating motion (no text or symbols)natural_image
Line drawing of a mechanical component with a cylindrical pouring into it (no text or symbols)natural_image
Technical line drawing of a mechanical component or housing (no text or symbols)natural_image
Line drawing of a robotic vacuum cleaner with control panel and mounting bracket (no text or symbols)flowchart
graph TD
    A["Water level"] --> B["area"]
    C["Only sweep the floor"] --> D["Partition editing"]
GERÄTEREINIGUNG
natural_image
Technical line drawing of a robotic vacuum cleaner with attached components (no text or symbols)natural_image
Line drawing of a Vorfilter filter component (no text or symbols on the diagram itself)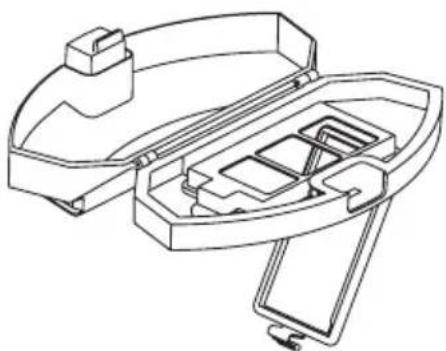
natural_image
Technical line drawing of a mechanical device with internal compartments and housing (no text or symbols)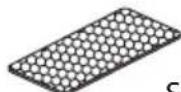
Schwammfilter
HEPA Filter
4.2 in1 Behälter
natural_image
Technical line drawing of a mechanical component with internal channels and mounting features (no text or symbols)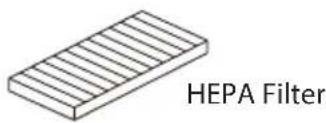
natural_image
Isometric line drawing of a Vorfilter component with grid layout (no text or symbols)
natural_image
Technical line drawing of a mechanical component with no visible text or symbolsDE
5. Sensoren
Thank you for purchasing TEESA appliance. Please read this operation instruction carefully before use, and d keep it for future use. Distributor does not take responsibility for damages caused by inappropriate handling and use of the product.
SAFETY INSTRUCTIONS
In order to reduce the injuries or damages, follow basic safety precautions applied when using any electrical device, including the following:
- Read this instruction manual carefully, even if you are familiar with the appliance. Keep the manual for future reference.
- Before connecting the appliance to power supply socket, make sure the voltage indicated on the appliance corresponds to the voltage in the power supply socket.
- Product intended for household use only.
-
Clean and store this appliance in accordance to instructions listed in "Cleaning and storage" section.
-
ALWAYS turn off the appliance and disconnect it from the mains supply:
• if it's not operating correctly,
- if there's an uncommon voice when using,
• before disassembling the device,
• before cleaning,
- when not in use.
-
When you disconnect the power cord of the appliance, grasp and pull the plug, not the cord/cable.
-
This appliance may be used by children who are above 8 years old and by persons with reduced physical, sensory or mental capabilities, or lack of experience and knowledge, if they are supervised and guided by a person who is responsible for their safety in a cautious manner, and all the safety precautions are understood and followed. Children should not play with this device. Children should not perform cleaning and servicing of the device unsupervised.
-
Keep the appliance out of the reach of children.
-
Use only the included AC adapter to charge the device.
-
Keep the appliance and its cord/cable away from heat, water, moisture, sharp edges and any other factor which may damage the appliance or its cord.
-
Make sure the power cord does not touch any hot or sharp elements.
-
Do not use the product for purposes different from displayed in this operating manual.
-
Do not place the appliance in water or any liquid; nor handle/use it with wet or moist hands.
-
DO NOT use this appliance if the cord or the plug is damaged, or the appliance is broken.
-
Do not attempt to repair this appliance yourself. Only authorized and qualified personnel may repair this appliance. Never disassemble this appliance.
-
Do not use unauthorized accessories.
IMPORTANT!
-
The product is used for floor cleaning in home environment only and cannot be used for outdoor (such as open terrace), non-ground (such as sofa) and commercial or industrial environment.
-
Do not use the appliance to vacuum up:
• large, sharp-edged objects which could block and damage the appliance;
• construction waste;
- harming or erodent liquids or inflammable and explosive substances, as this could cause a fire;
• hot or burning substances;
• wet surfaces or wet objects;
• water or any other liquid
- Use the robot vacuum cleaner on hard floors and low pile carpets only.
- Use the appliance only on dry surfaces.
- The appliance is suitable for indoor use only.
- Please do not use the product at a temperature of above 40°C or below 0°C.
- Please do not move or transport the appliance by holding the laser distance sensor or bumper.
- Do not insert any objects into the ventilation slots or openings.
- Do not obstruct the airflow.
- Do not cover the sensors in any way.
- Keep hair, loose clothing and any other part of body away from the openings and moving parts.
- Do not place the appliance on stairs or furniture.
- Do not sit, stand or put any objects on the appliance.
- Remember that the robot moves on its own. Exercise caution when walking in the area where the appliance is operating to avoid stepping on it or tripping over it.
- Make sure to turn off the appliance before installing or removing brushes.
- If the product is not going to be used for a long time please set the power switch to 0 position.
- Do not use the appliance if dust bin and filter are not mounted.
- Prior to using the robot vacuum cleaner, prepare the room to be cleaned properly. Please be sure that there are no cables, clothes, curtain belts or any other material scattered in the cleaning area to avoid tangling or trapping the appliance during cleaning.
- Make sure that there are no fragile or small objects, lit candles, etc. on the surface to be cleaned or on the furniture in the room to be cleaned to avoid damage.
- If the room to be cleaned contains a balcony, a physical barrier should be used to prevent access to the balcony and ensure safe operation.
- Make sure that children and pets do not have an access to the room where the appliance is operating.
*** Environmental conditions such as exposure to sunlight may influence cliff sensor operation. Therefore it is important to ensure safe operation for the robot vacuum cleaner. If in the room to be cleaned there are stairs, balcony or any other places where the appliance is exposed to a fall, use a physical barrier so that in case of cliff sensor malfunction, the appliance will not get damaged.
Laser safety information
Laser distance sensor of the product complies with the standard for Class 1 laser products of IEC-60825-1:2014 and does not product dangerous radiation.
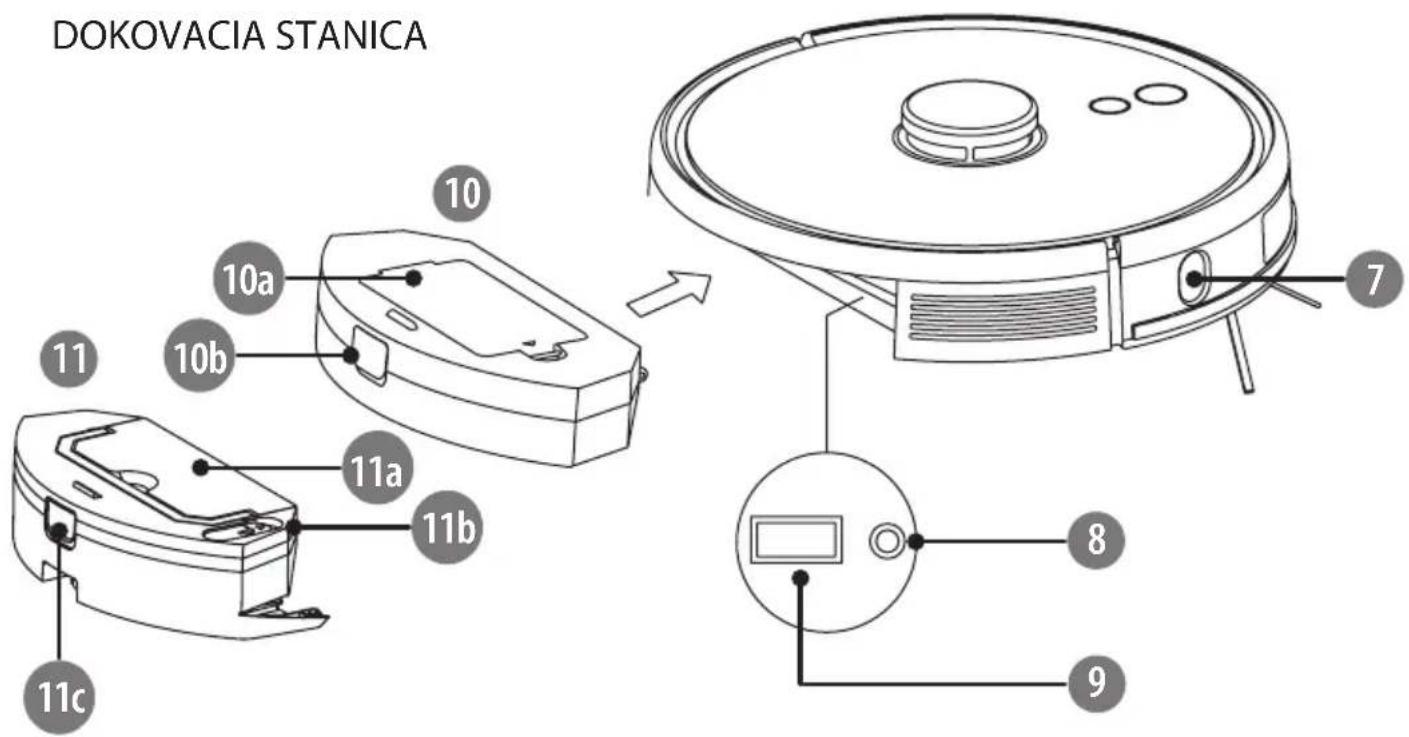
PRODUCT DESCRIPTION
TEESA SMART VAC PRO
Top view
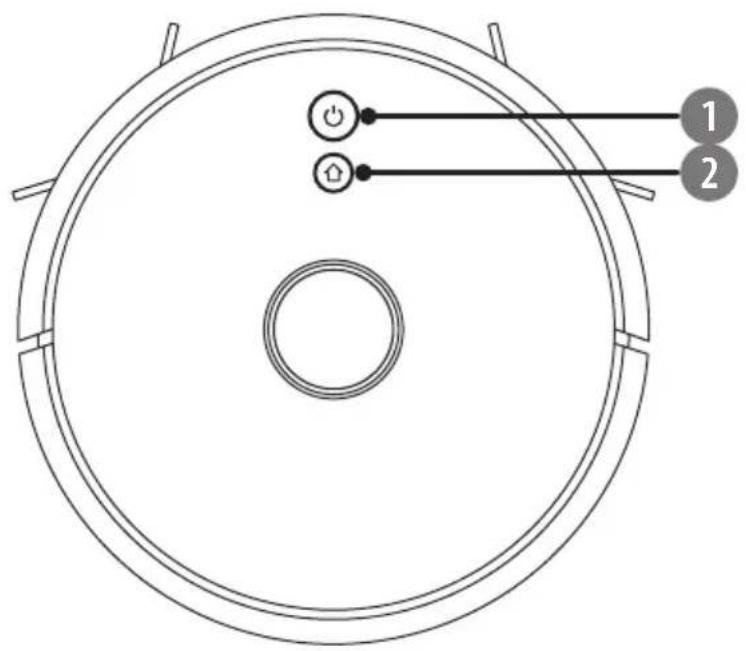
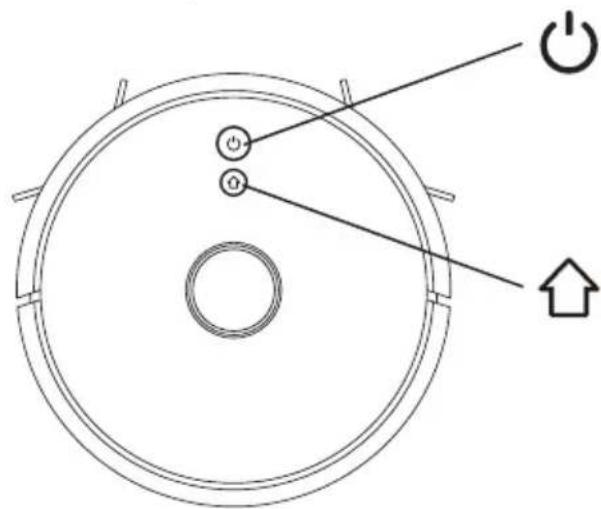
- ON/OFF/ reset button/ LED indicator
- Charging/ local cleaning button/ LED indicator
EN
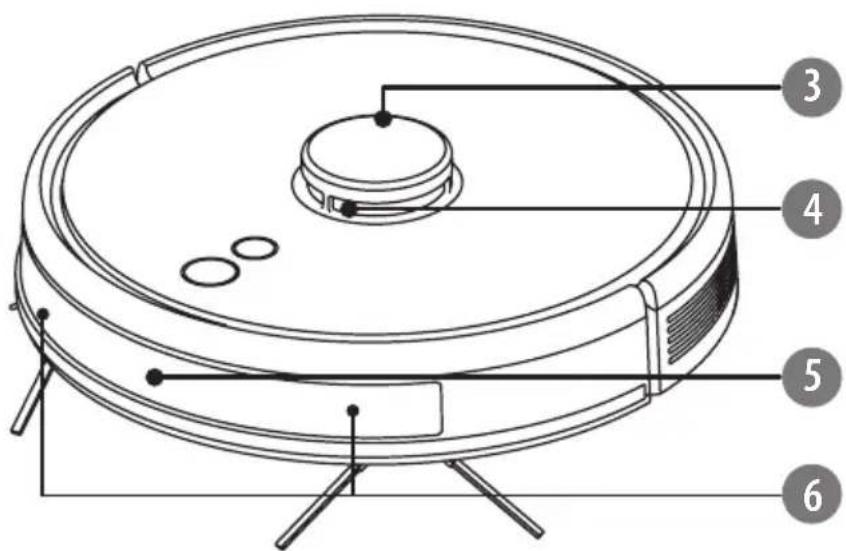
- Laser distance sensor (LDS)
- Anti-collision sensor (for LDS)
- Infrared charging sensor
- Anti-collision sensors
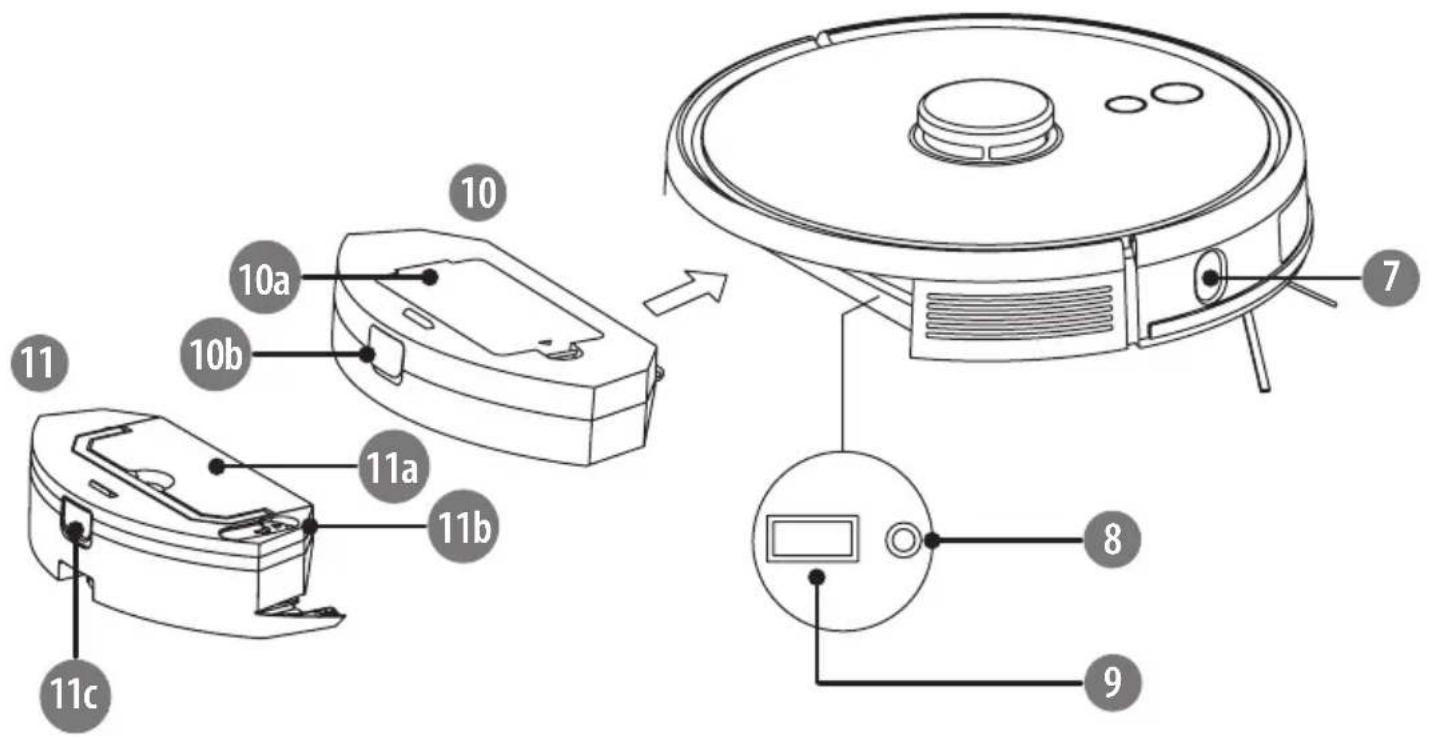
- TOF sensor
- Reset button
- System upgrade port (for professional use only)
- Dustbin
10a. Filter cover
10b. Dustbin release button
11. 2in1 tank
11a. Dustbin
11b. Water inlet
11c. 2in1 tank release button
Bottom view
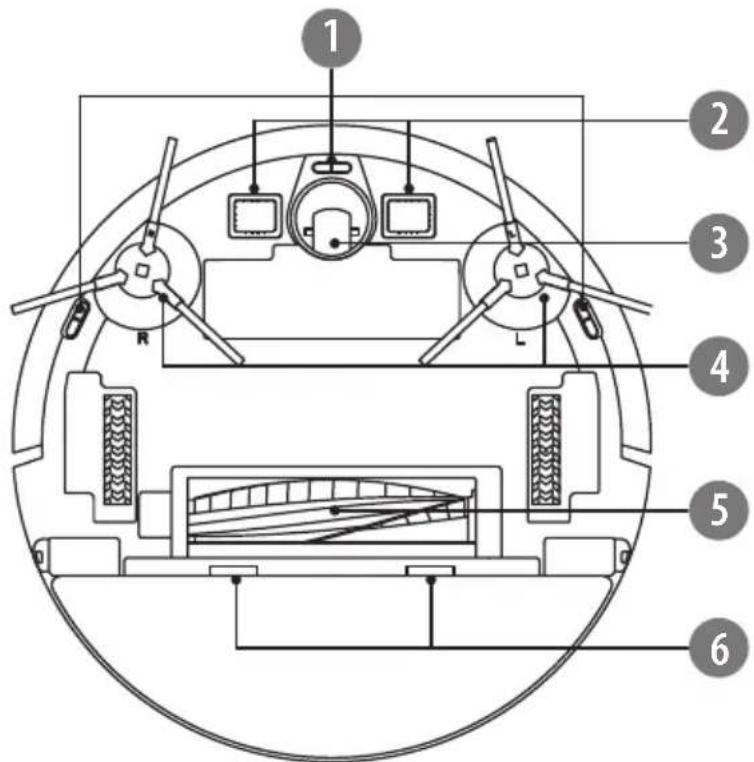
- Cliff sensors
- Charging pins
- Front wheel
- Side brushes
- Main brush
- Main brush guard buckles
EN
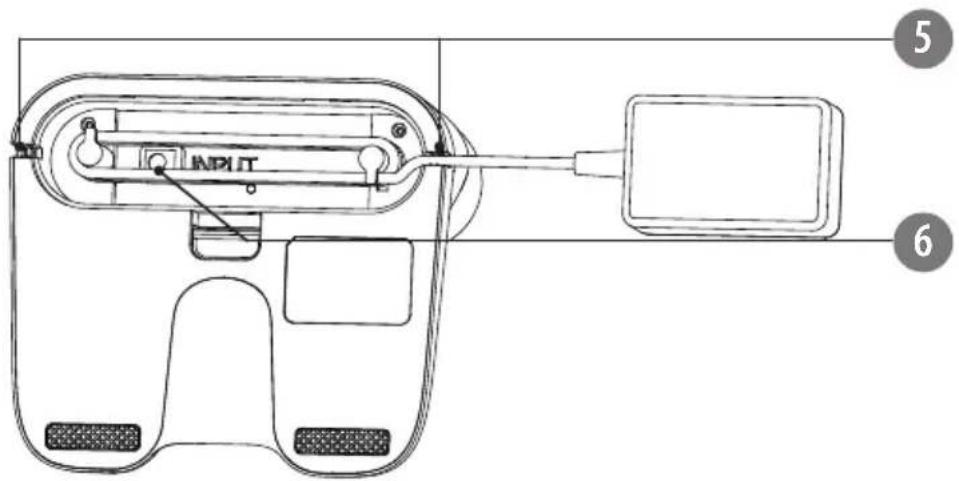
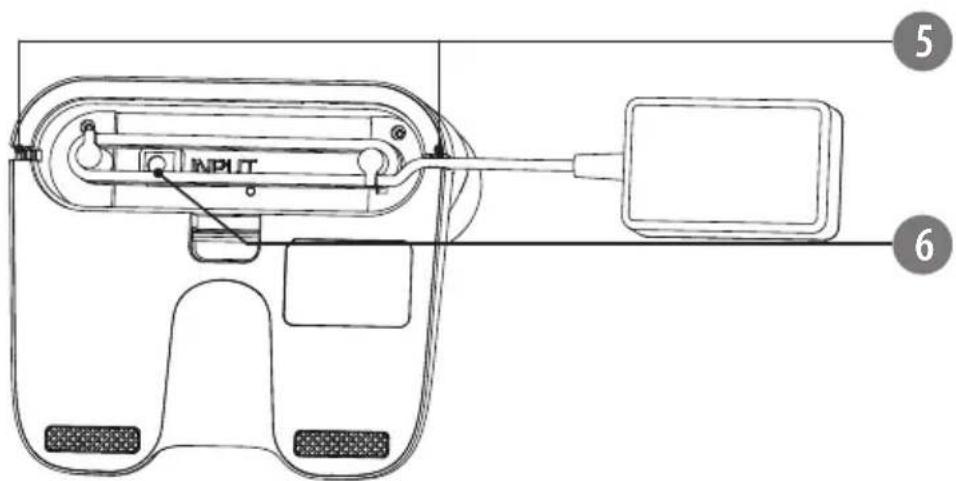
CHARGING DOCK
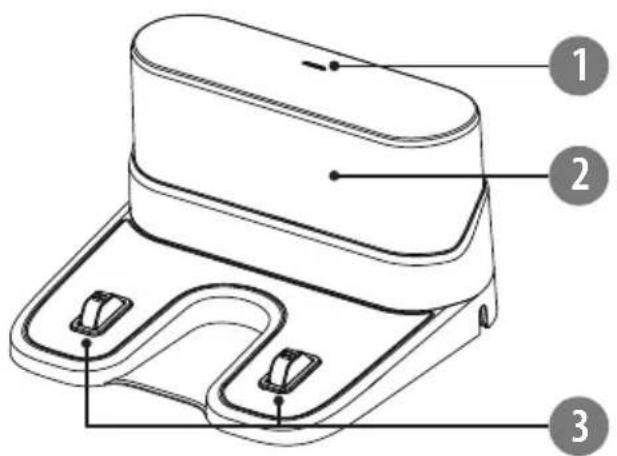
- LED indicator
- Signal emission area
- Charging pins
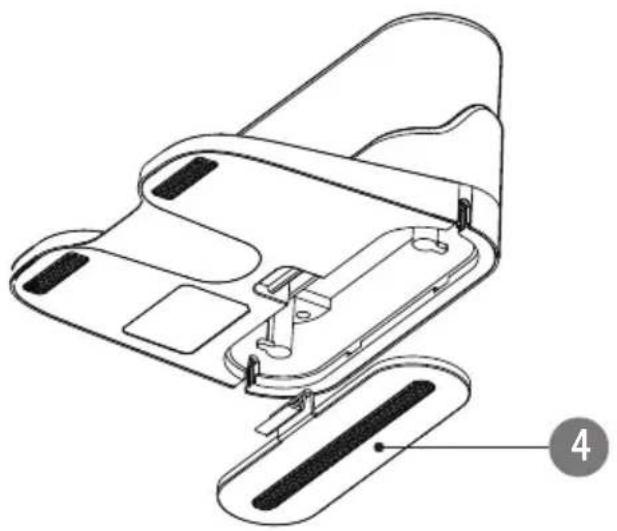
- Bottom cover
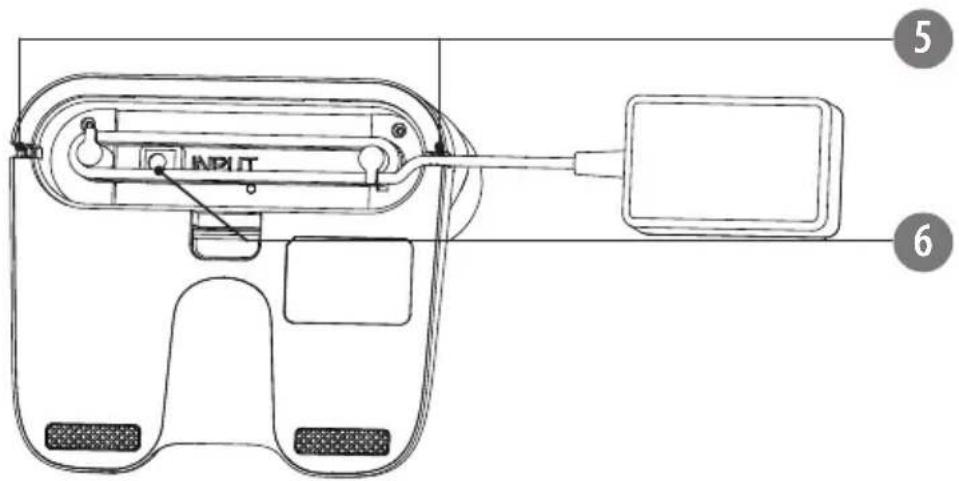
- Wire slots
- Power socket
natural_image
Technical line drawing of a mechanical device with labeled parts (no text or symbols present)EN
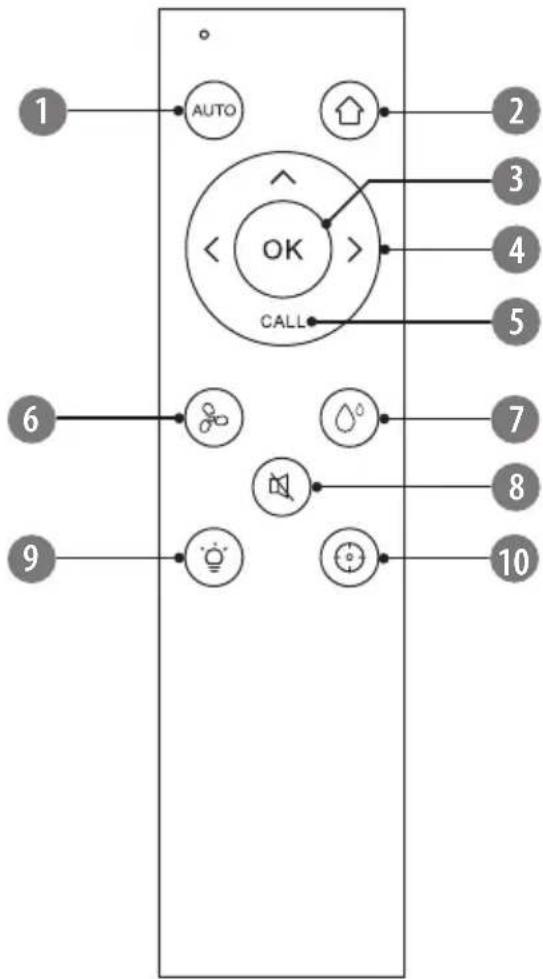
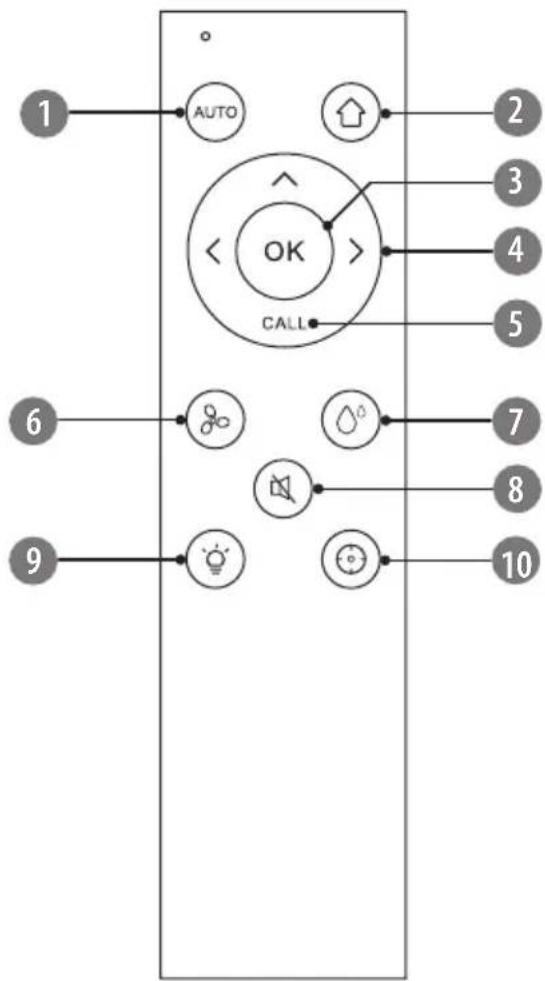
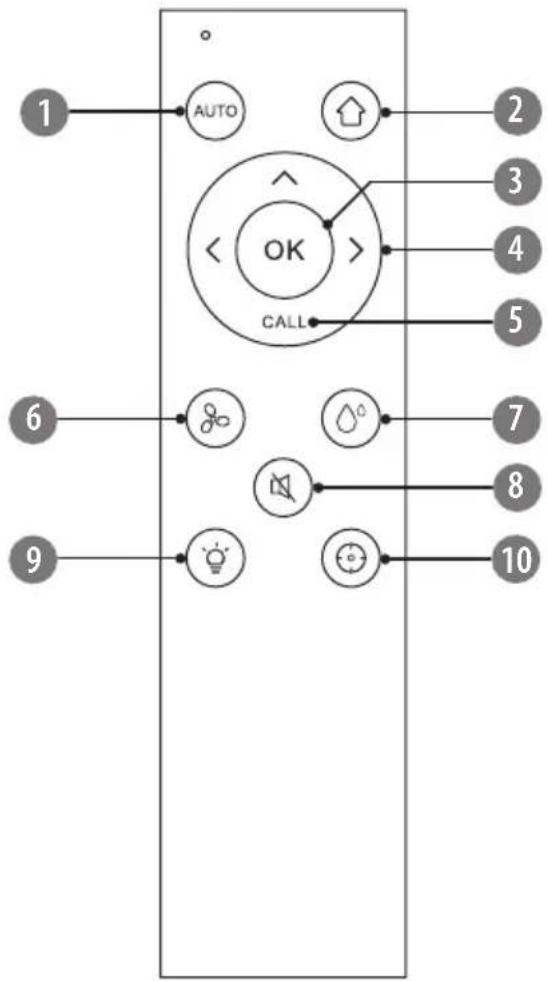
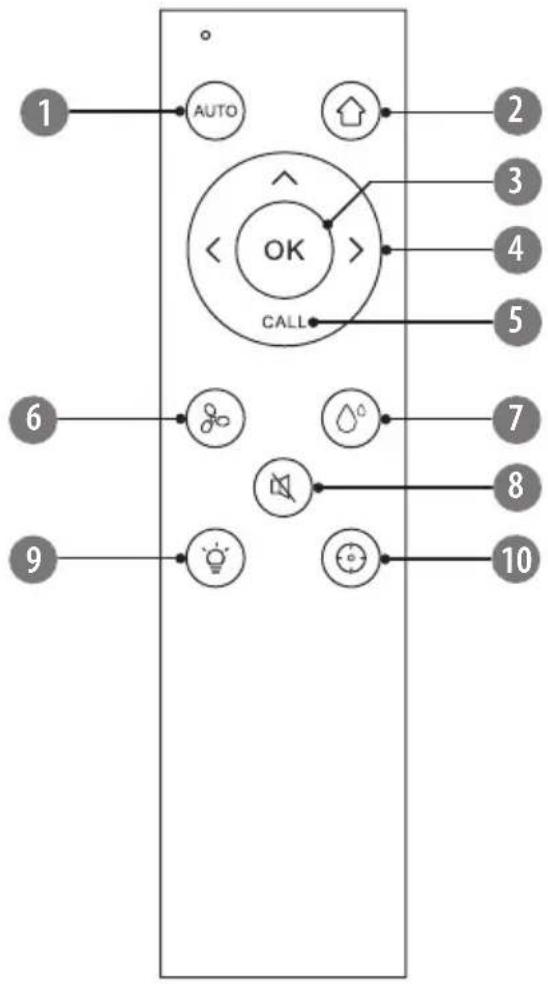
REMOTE CONTROL
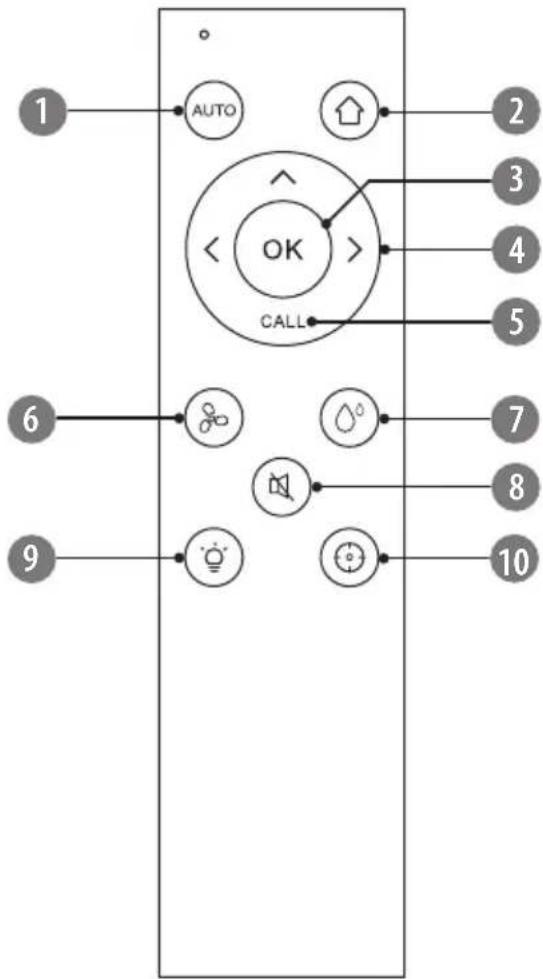
- Start/stop automatic cleaning
- Automatic docking and charging: the appliance will automatically return to the charging dock and start recharging
- Start/stop operation in any mode
- Direction buttons: manually navigate the appliance (in operation and standby mode)
- Locate the appliance
- Suction power adjustment (also via app)
- Water dripping speed adjustment (also via app)
- Turn on/off do not disturb mode
- Turn on/off backlight of the buttons on top of the appliance
- Activate spot cleaning mode
REMOTE CONTROL BATTERY INSTALLATION
- Remove the battery cover at the back of the remote control.
- Insert 2x AAA battery with correct polarization.
- Reattach the battery cover.
Notes:
• Always point the IR sensor of the remote control towards the IR sensor on the front of the appliance.
• Use only specified batteries.
• Do not mix different types of batteries.
- Replace all batteries at the same time.
- Please remove the batteries if the remote control is not going to be used for a long time.
INSTALLATION
Charging dock
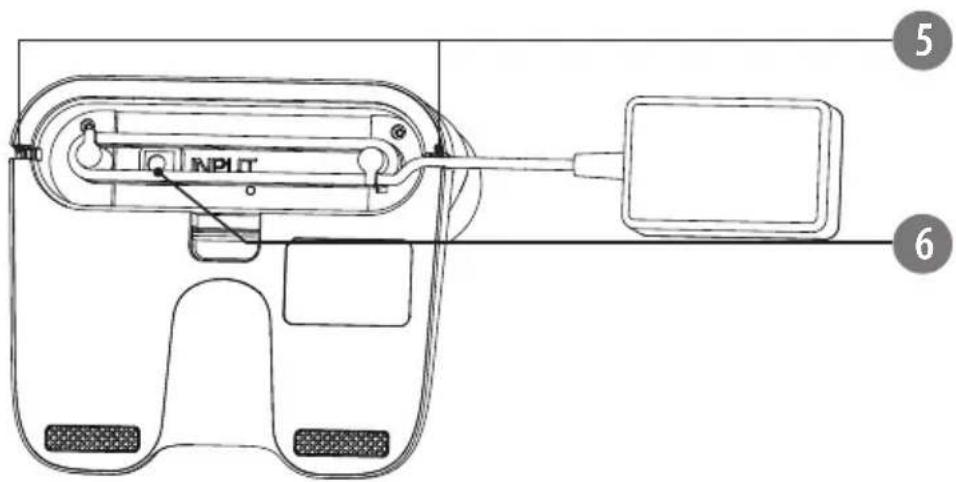
- Remove the cover at the bottom of the charging dock.
- Connect the plug of the AC adapter to the power socket and put the excess cable inside the compartment. Afterwards, reattach the cover.

If the excess cable will not be put into the slot, the appliance may stuck during ging or cleaning.
Make sure charging dock is ALWAYS plugged in. Otherwise, the appliance will not return to the dock automatically.
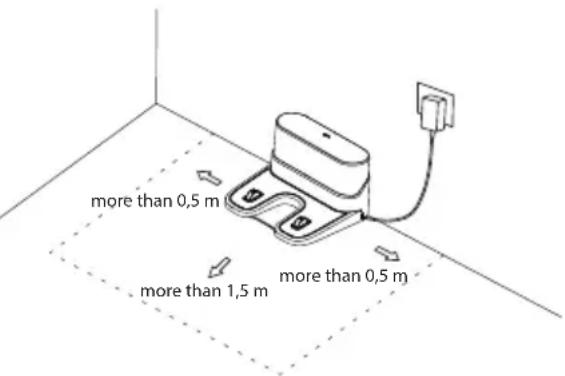
- Place the charging dock against the wall on a floor and connect the AC adapter to the power outlet.
Notes:
- Ensure a space of above 0,5 m on both sides of the charging dock and a space of above 1,5 m in the front. Make sure that space will be easily accessible for the appliance.
- Make sure the cable of the AC adapter is not lying flat on the floor as it may be dragged by the appliance and consequently the charging dock may be powered off.
- LED indicator on the charging dock is on when the charging dock is plugged in.
- Please do not move the charging dock arbitrarily and keep it out of direct sunlight.
Notes:
- If the charging dock is relocated, the appliance may fail in positioning and lose the map. When restarted, the appliance will rebuild and memorize the map again and that rebuilt map may lose cleaning information of forbidden areas and other areas.
- Direct sunlight will interfere with recharging signal and consequently the appliance may be unable to return to the charging dock.

Clean the charging pins of the charging dock regularly to avoid malfunction.
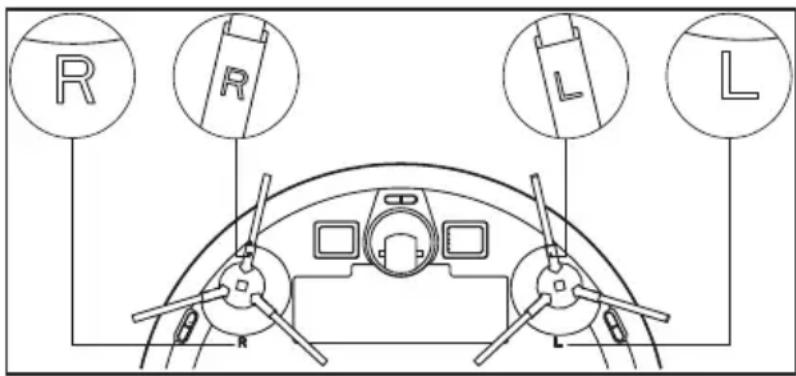
Side brushes
- Make the left side brush (L) and the right side brush (R) correspond to L and R on the bottom casing.
- Press the L and R side brushes into corresponding slots until they lock in place. If you hear a clicking sound that means that the brushes have been installed correctly.
CHARGING
1. Automatic
IMPORTANT
Make sure the charging dock is correctly installed and connected to the power supply (LED is on). The charging dock has to be always plugged in. Otherwise, the appliance will not return to the dock automatically.
- The appliance will return to the charging dock automatically when it finishes operation.
- It will also return to the charging dock automatically when during operation the battery level will drop below 20%. It will resume operation automatically when the battery level reaches 80%.
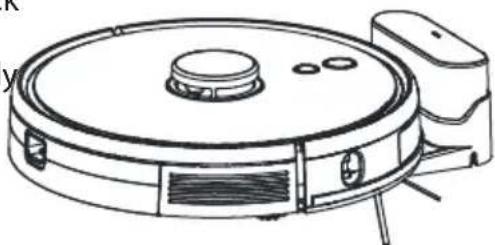
natural_image
Line drawing of a robotic vacuum cleaner with control panel and sensor array (no text or symbols)Note: Please clear any wires (including cable of the AC adapter) on the floor before use so as to avoid unplugging and damage of objects or wires when they are dragged by the appliance.
2. Manual
- When the operation is paused, press the button on the appliance or tap on the app's main screen to make the appliance return to the charging dock. The appliance will issue a voice notification and lead toward the charging dock. When it reaches the dock it will issue a voice notification again and start charging. It will charge until full battery.
Note: It may take some time for the appliance to find the charging dock for the first time. When it finally does, the charging dock will be marked on the map in the app. From now on, it will be much easier for the appliance to return to the charging dock.
If the appliance cannot find the charging dock, it will automatically return to the starting position. In that case, put the appliance manually* on the charging dock. Make sure that the charging pins on the bottom of the appliance align with the charging pins on the charging dock. The appliance will charge until full battery.
* If during first charging the appliance is placed on the charging dock manually, it will not mark the charging dock on the map and it will not continue cleaning if it has been paused due to low battery.
| Color Battery status |
| Flashing blue Charging in progress |
| Solid blue Charging finished |
APP CONNECTION GUIDANCE

-
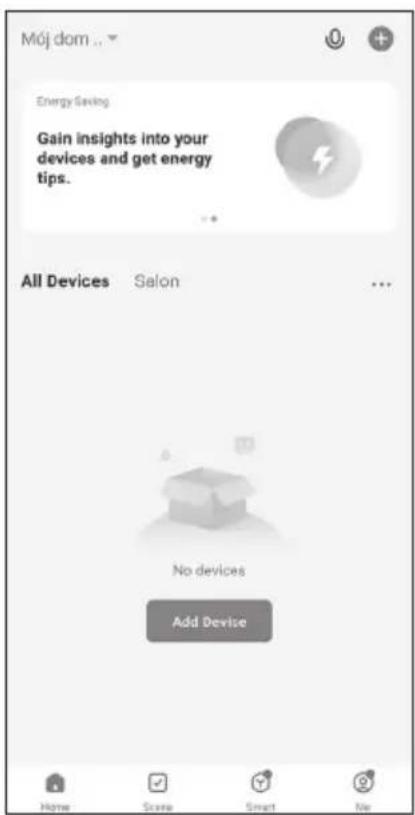
Enter Google Play or AppStore, download the Tuya Smart app and install it on your smartphone. You can also access the app by scanning the above QR code.
-
For new users, register a new account. For existing users, log into the app. Try now- launch the app without previous registration or logging in. Please note that in that mode some app features may not be available.
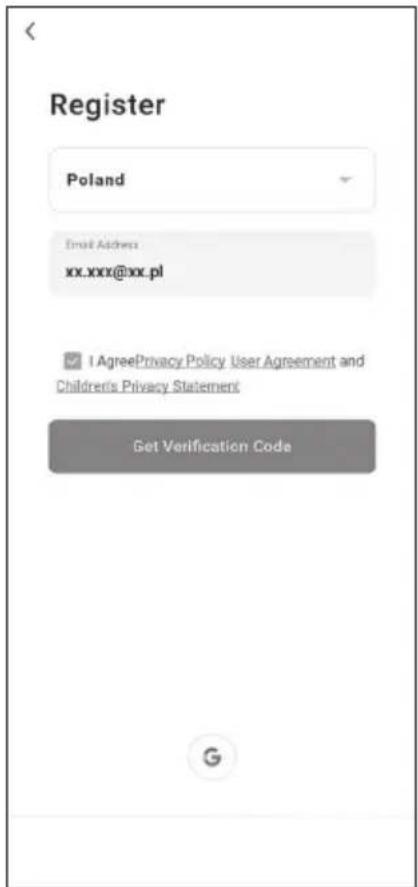
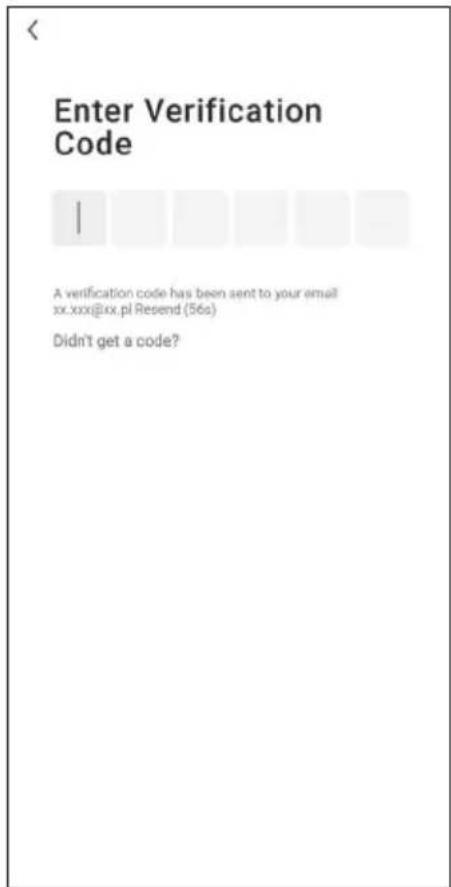
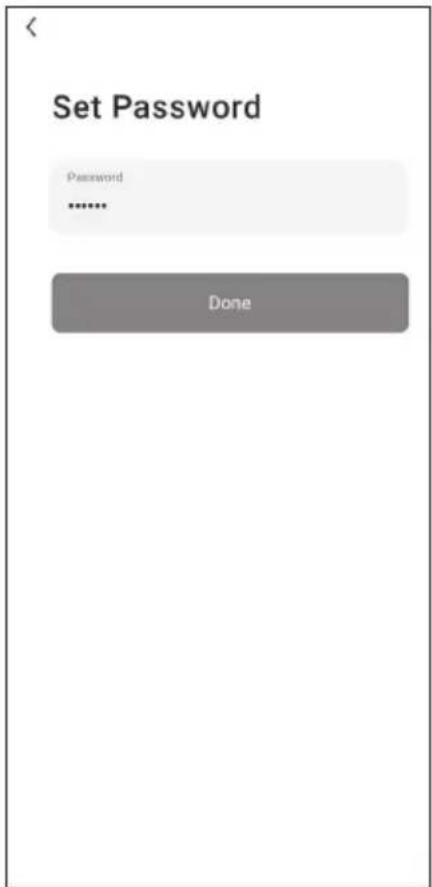
2a. Registration:
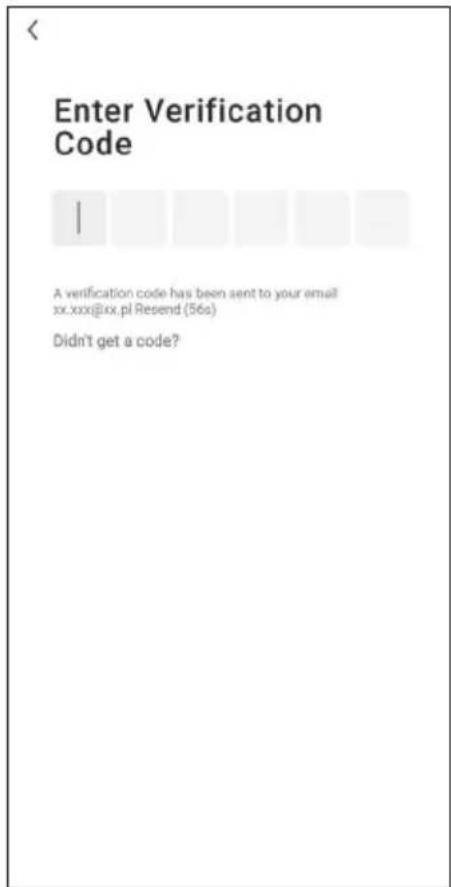
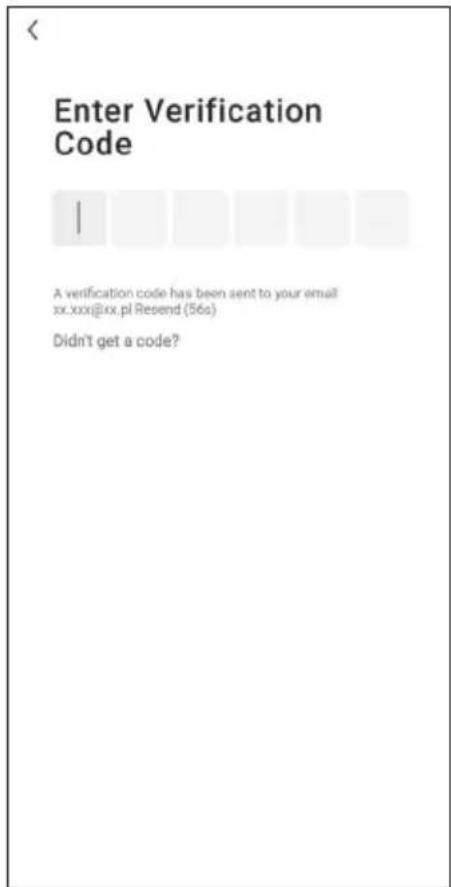
- The app will automatically select country or a user can do it manually, then enter e-mail address and tap [Get Verification Code]. It will be sent on the provided e-mail address. Enter it on the following screen.
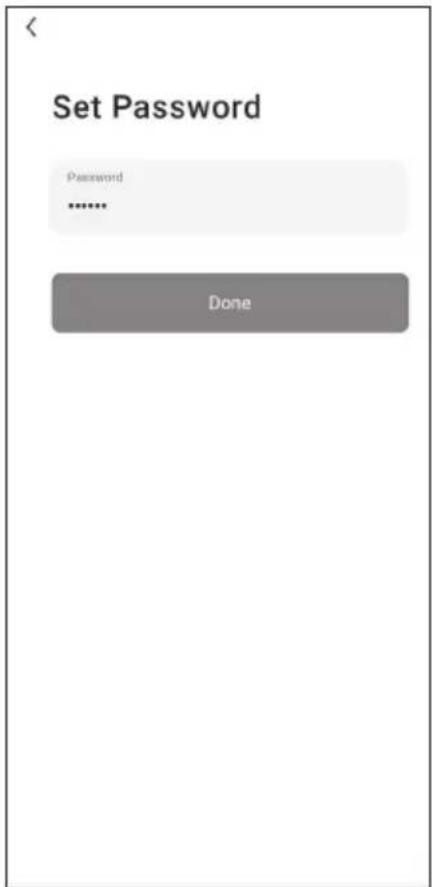
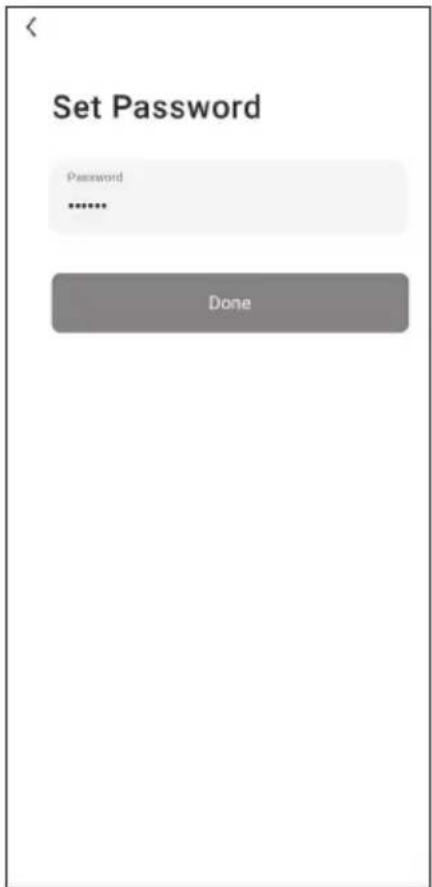
- Set a new password according to the instructions provided. Then select [Done].
2b. Log in:
- The app will automatically select country or a user can do it manually, then enter e-mail address and tap [Log In].
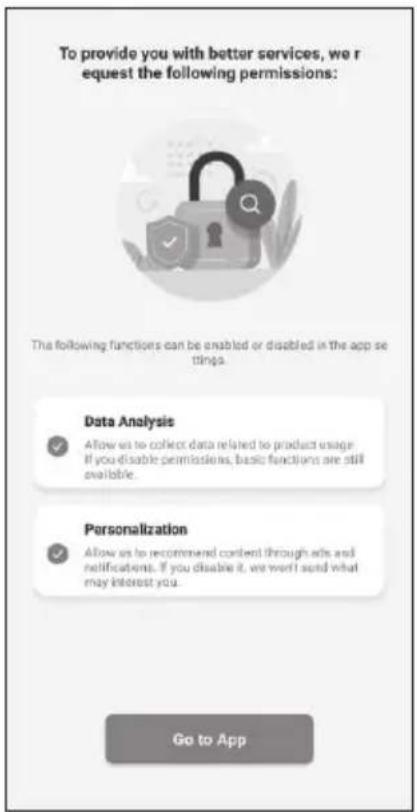
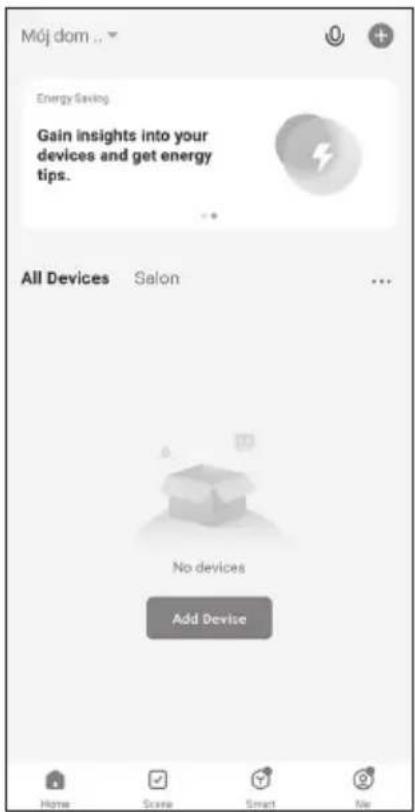
- Before initiating the connection, ensure the appliance is on in standby mode.
-
Allow or disable permissions then tap [Go to App].
-
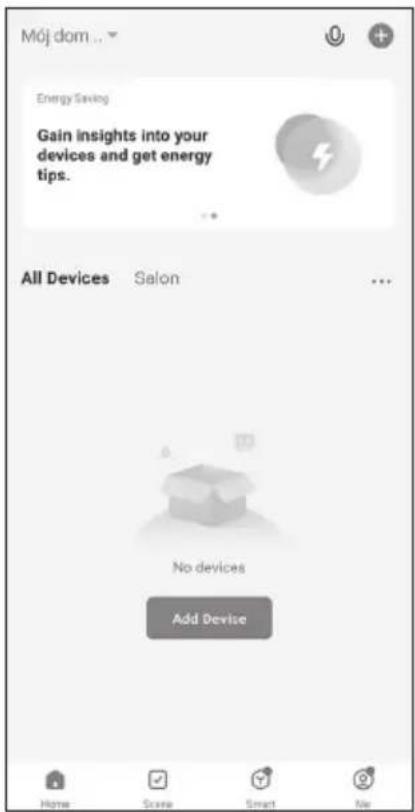
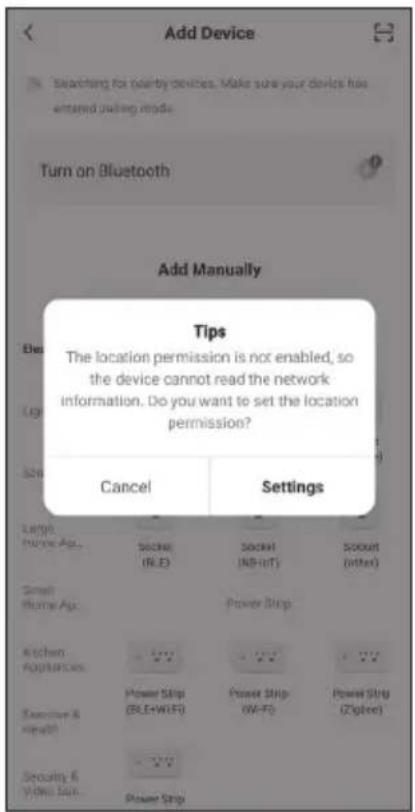
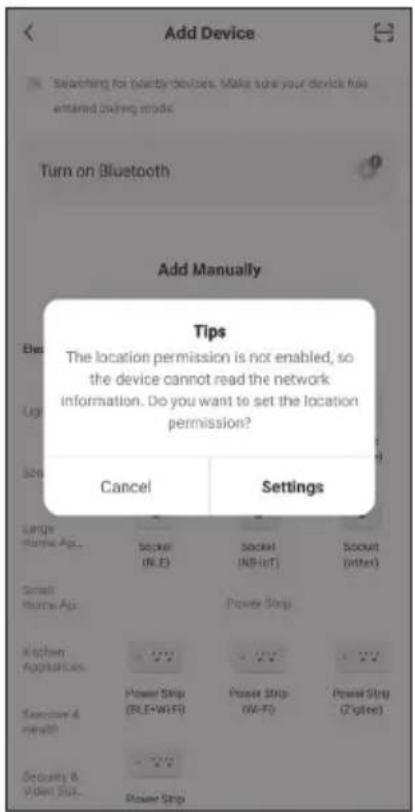
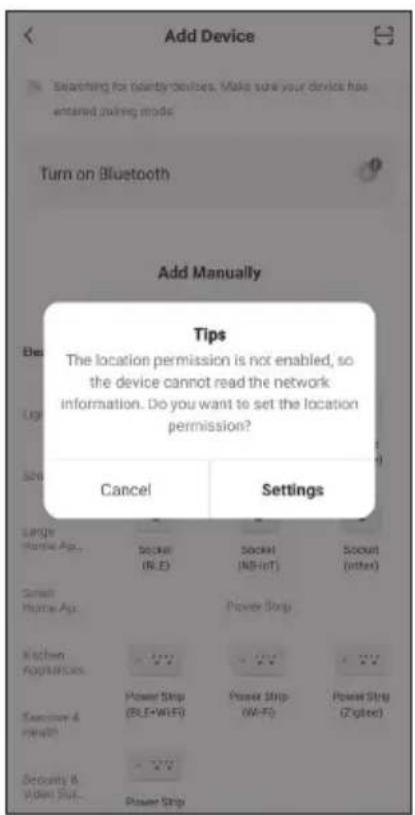
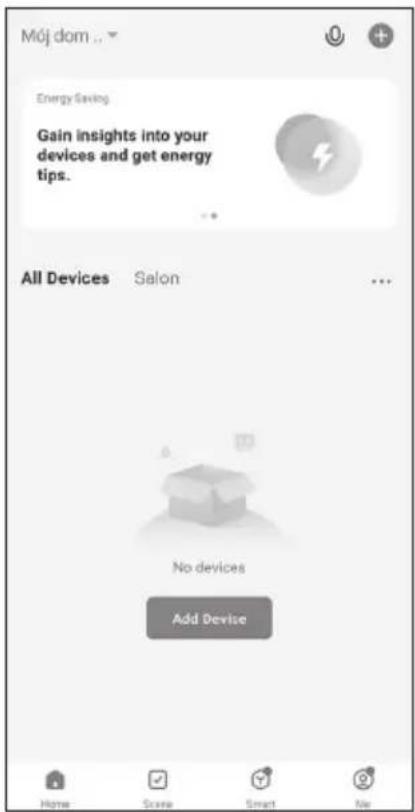
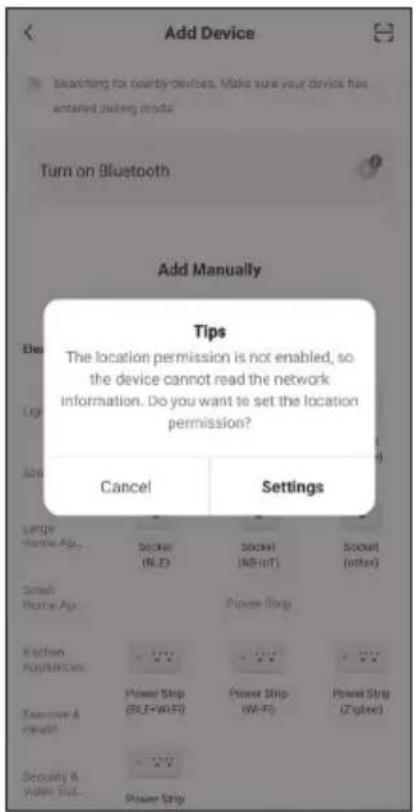
Tap (+) or [Add Device] to add a new device. It is necessary to enable location permission.
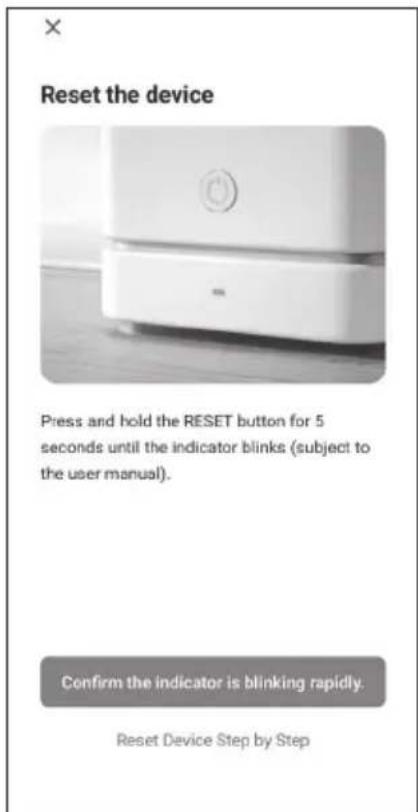
-
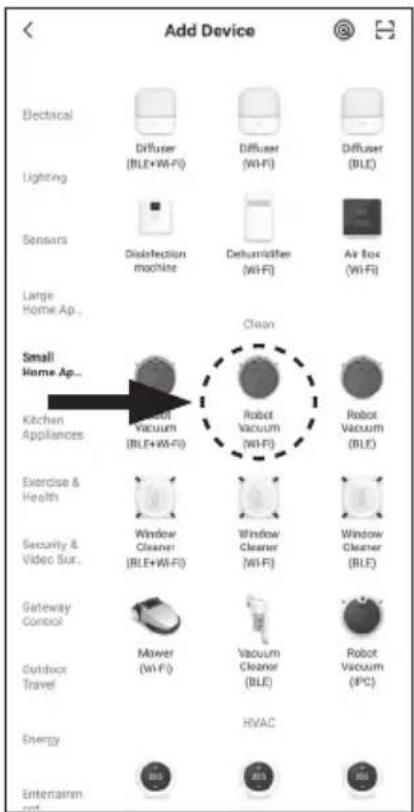
Go to [Small Home Appliances] tab and choose [Robot Vacuum (Wi-Fi)].
-
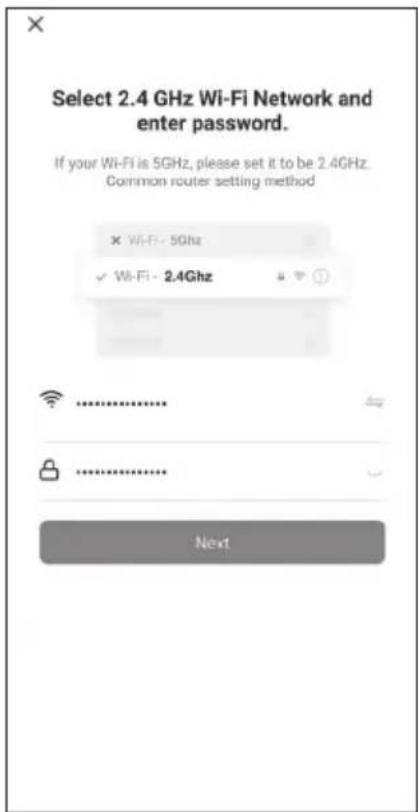
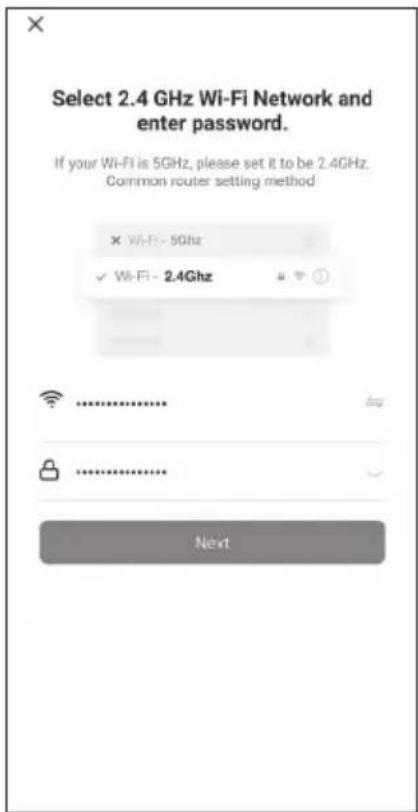
Choose your Wi-Fi network and enter password. Then tap [Next]. Make sure your smartphone is connected to 2,4 GHz network. Note: The appliance supports only 2,4 GHz Wi-Fi network.
-
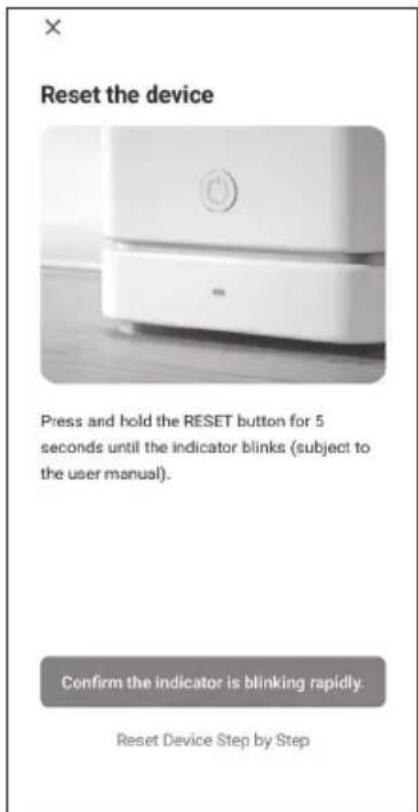
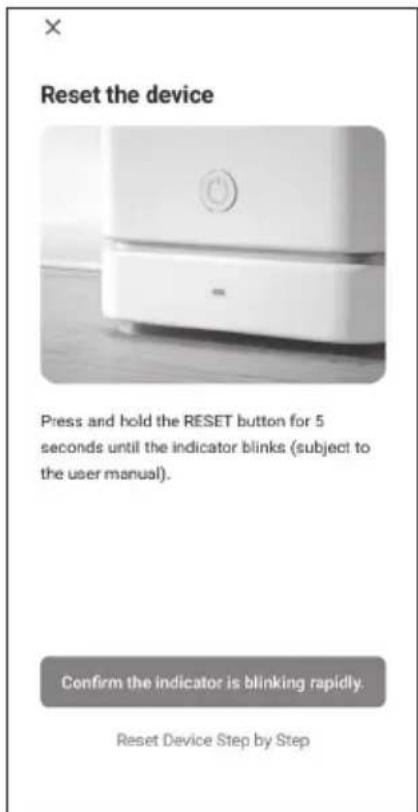
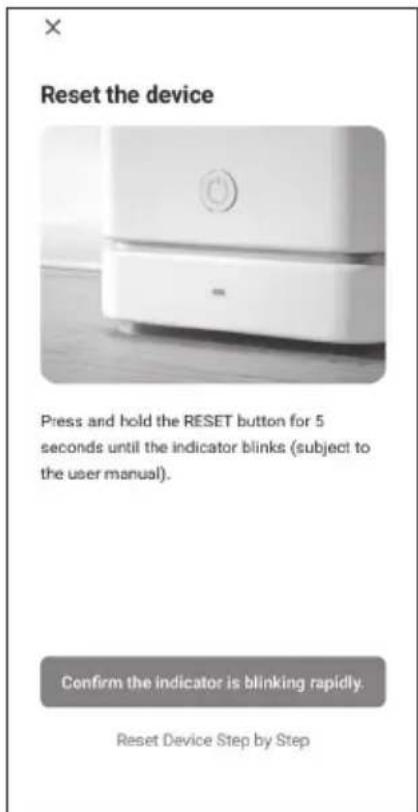
Press and hold both buttons on the top of the appliance for about 5 seconds until the indicators flash purple then tap [Confirm the indicator is blinking rapidly].
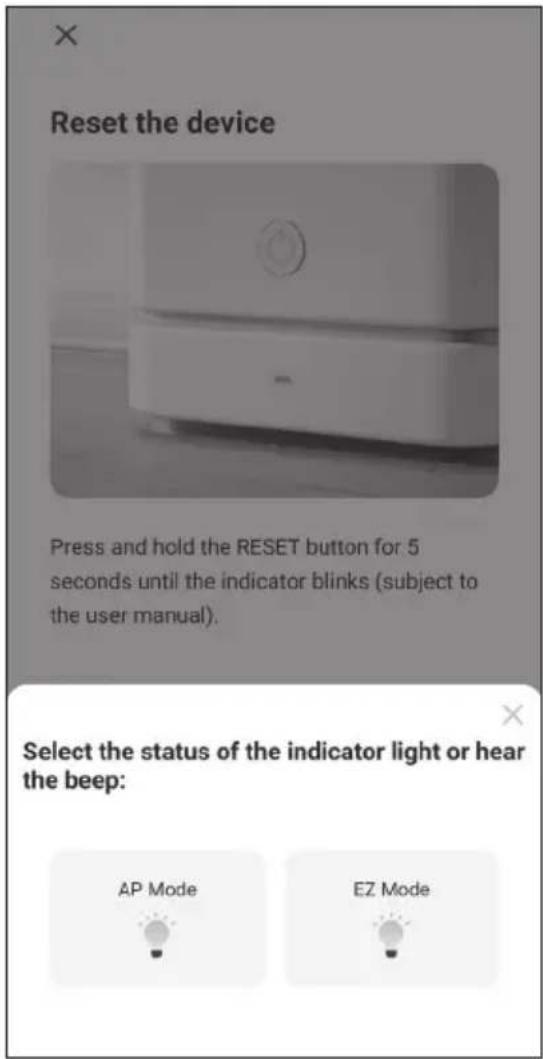
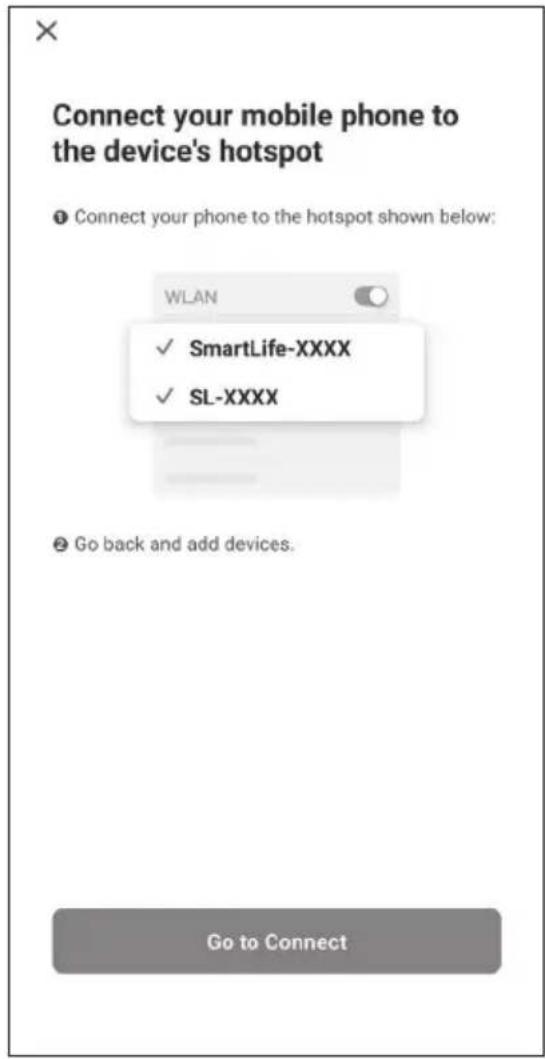
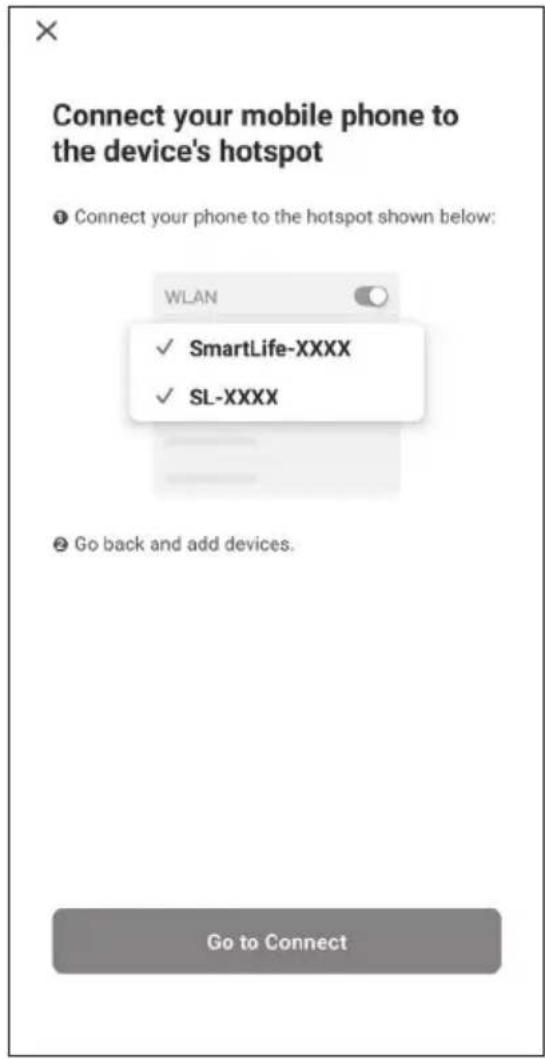
- Select [AP Mode].
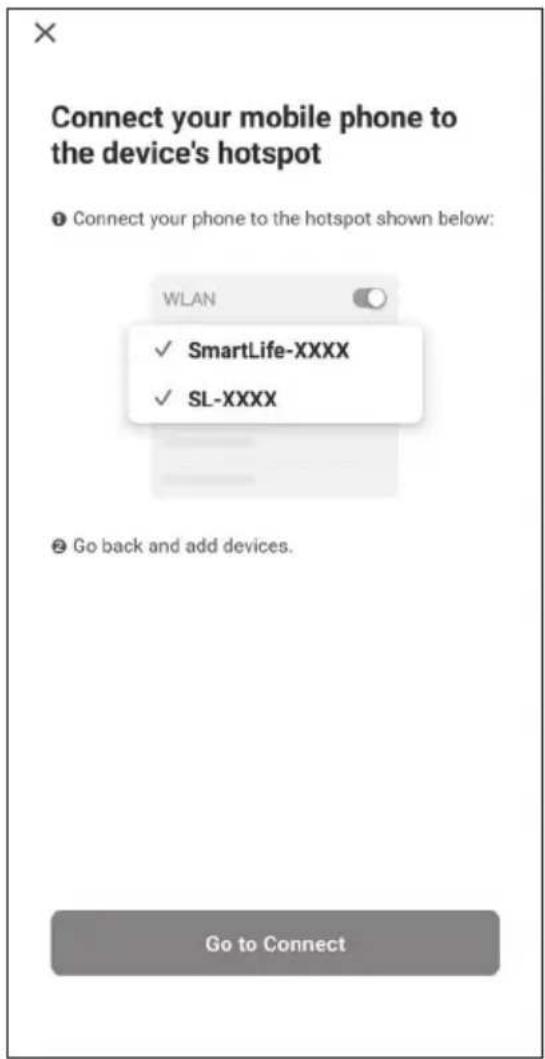
- Connect the robot with the app through Wi-Fi hotspot. Select [Go to Connect].
- The app will automatically switch to the network settings in your smartphone (if not, do it manually). Connect to the [SmartLife XXX]. No password is required. Afterwards return to the app to complete setup.
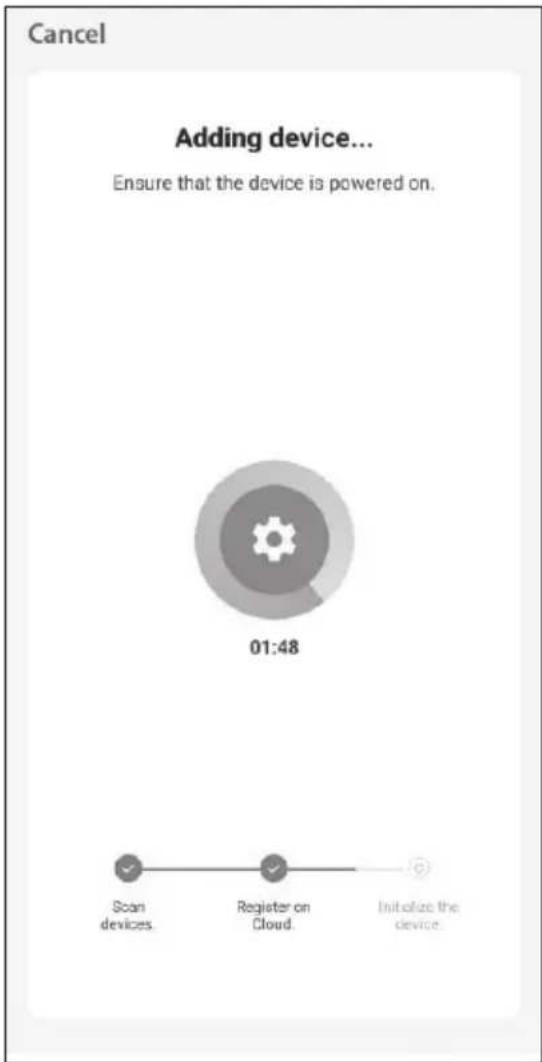
- The app will connect with the appliance automatically. Successful connection is indicated by a voice notification issued by the appliance.
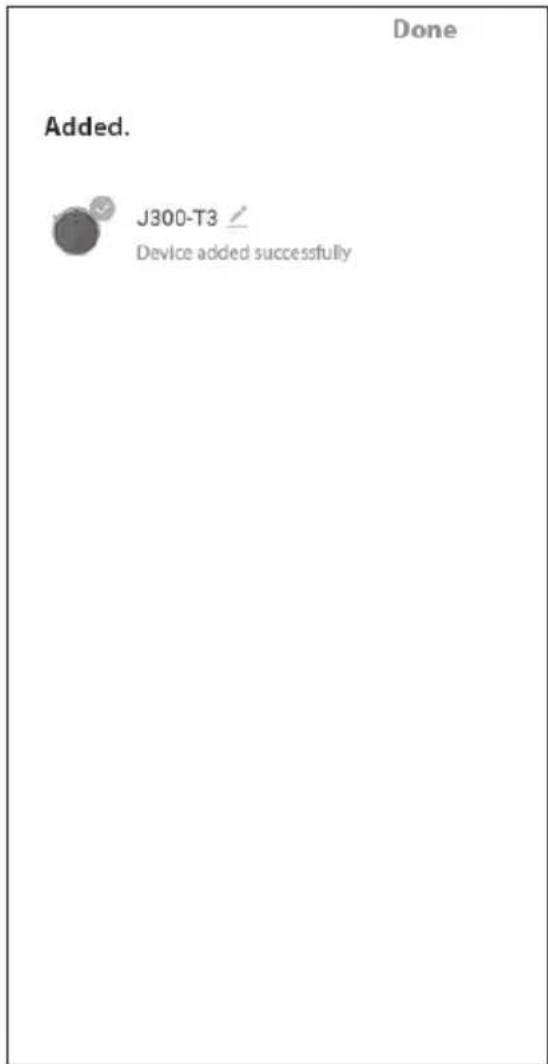
- Press [Done] to move to the app's main interface.
Note: When the wireless router is changed, the connection between the appliance and the app is broken.
Wi-Fi reset
If the app cannot connect to the appliance, press and hold the button and button simultaneously about 3 seconds, until you hear a voice notification and both LED indicators flash purple.
BASIC OPERATION
Power on: Press and hold the button for about 5 seconds. Blue LED indicators light up and start pulsing. The appliance issues a voice notification. After a while, the appliance enters standby mode and is ready to operate (blue LED is on).
Start cleaning: When the appliance is in standby mode, press the ⏻ button on the appliance or the AUTO / OK button on the remote control to start operation. You can also start cleaning using the mobile app.
Stop cleaning: When the appliance is operating, press the ⏻ button on the appliance or the AUTO / OK button on the remote control to stop operation. The appliance enters standby mode.
Power off: When the appliance is in standby mode, press and hold the button for about 5 seconds. The appliance issues a voice notification, LED indicators flash red for a few seconds then go off. The appliance is off.
Note: The appliance cannot be powered off when it is being charged. Remove it from the charging dock if you want to turn it off.
Forced shutdown: Press and hold the button on the appliance for about 15 seconds to force shutdown under abnormal circumstances.
LED indicators
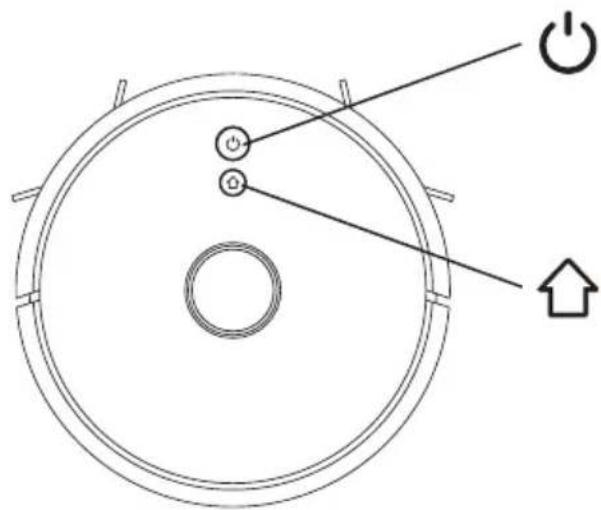
| Color Battery status | |
| Blue Normal operation | |
| Red Abnormal condition or low battery | |
| Purple Appliance is not connected to the network |
CLEANING
When the appliance is turned on for the first time, it studies cleaning space through auto cleaning. It generates the map and divides it into areas. Then the appliance cleans the areas one by one along the wall in an S shape. The appliance continues operation until it cleans the whole area. After studying and cleaning the whole space, a map is saved.
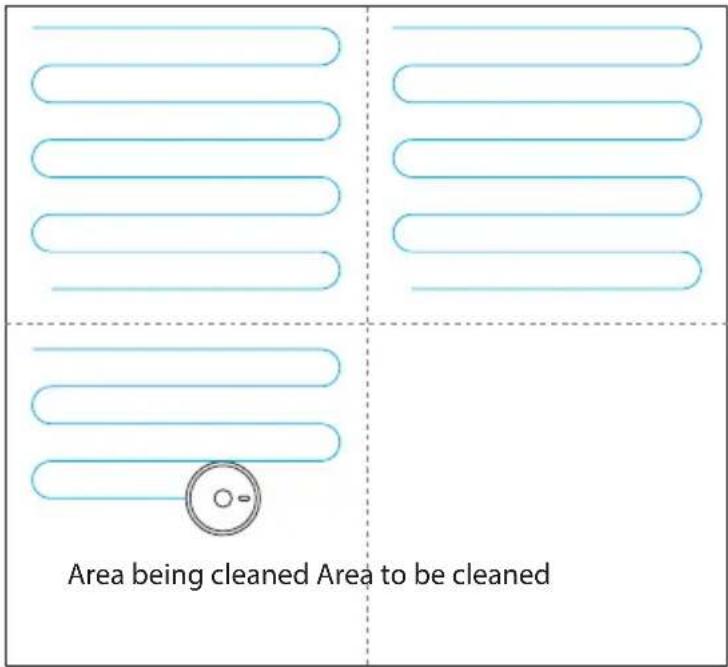
The appliance will automatically save the map only when cleaning is finished. If cleaning is aborted, the appliance will lose the map it has made so far.
You can also manually save the map (you can save up to 5 maps). To do this, go to the app, select [More] from main screen then [Change map] and save current map.
Notes:
- If the battery gets too low before finishing cleaning, the appliance will automatically return to the charging dock. It will resume operation automatically when the battery level reaches 80%.
• The appliance will return to the charging dock automatically after cleaning.
Do not move the appliance casually and frequently when it is cleaning. After moving, please put the appliance near the original position. When it starts again, it will try to reposition itself. After successful positioning, it would follow the planned path and continue to work. If the positioning fails, the appliance will abort previous cleaning, make a map and do the cleaning again.
Errors
During cleaning, the appliance may encounter different problems. When that happens the appliance will stop, LED indicators will flash red for a few times and the appliance will issue a voice notification describing possible problem. Go to Errors section down below to solve that problem.
Manual navigation: If you want the appliance to go to the specific place in the room, use manual navigation.
Remote control:
- Keep the ^ button pressed, so that the appliance will move forward.
• Use> buttons to turn left/right.
Mobile app: Go to [More] – [Manual mode].
- Tap the to make the appliance move forward.
- Tap the to turn left/right.
• If you tap the , the appliance will start automatic cleaning.
Local cleaning
Take the appliance to the place you want to be cleaned. Press and hold the local cleaning button on the appliance for about 3 seconds. The appliance will issue a voice notification and start cleaning within the scope of 2 m x 2 m. The appliance will do the cleaning twice. Afterwards it will return to the charging dock.
Spot cleaning
App: Tap [Spot] on the app's main screen. Tap the place on the map you want to clean- a tag will appear there. Tap ; the appliance will automatically drive to the vicinity of that point, take the point as the center and clean within 1,5 m x 1,5 m. The appliance will do the cleaning twice. Afterwards it will return to the charging dock.
Remote control: Press the Ⓤ button. The appliance will start spot cleaning from the place it is currently in.
Note: Suction power in that mode will be automatically set to strong.
Area cleaning (via app)
Set the area you want to be cleaned.
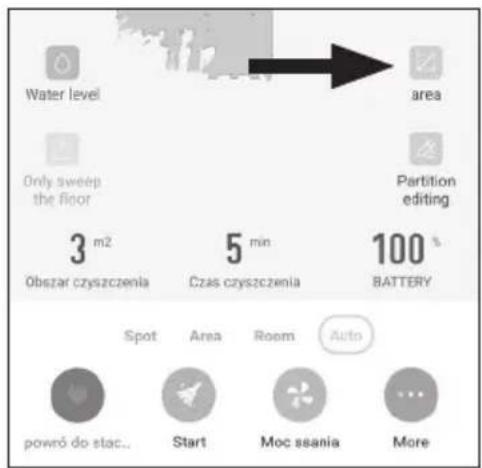
Tap [Area] on the app's main screen, then select [Create area]. A square will appear on the map. Tap and hold it and move it to the place on the map you want to be cleaned and set the desired size of that area. If you want to add another area, tap [Create area] again. When all is set, tap . The appliance will move to the set area, clean it once and return to the charging dock afterward. If there is more than one area set, the appliance will clean them one by one and when all areas are clean, it will return to the charging dock.
If you want to delete an area, tap it and select X.
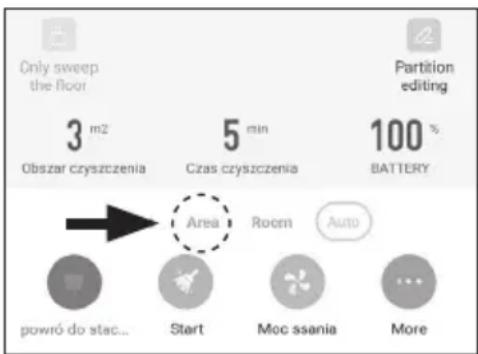
Room cleaning (via app)
Select a room you want to be cleaned.
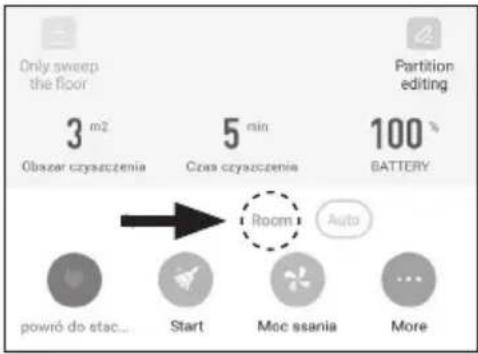
Tap [Room] on the app's main screen. Tap the room you want the appliance to clean then tap . The appliance will start cleaning. Afterwards, it will automatically return to the charging dock.
Note: This function is available only if the map has been created and saved.
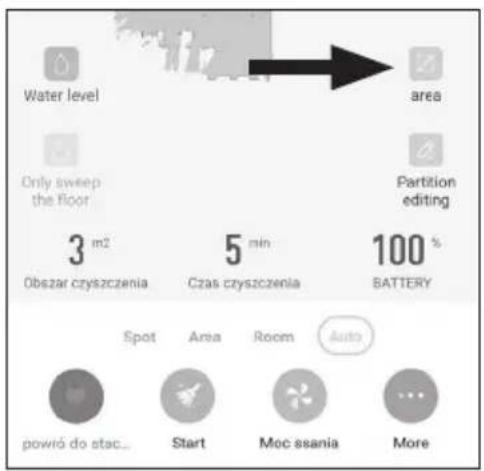
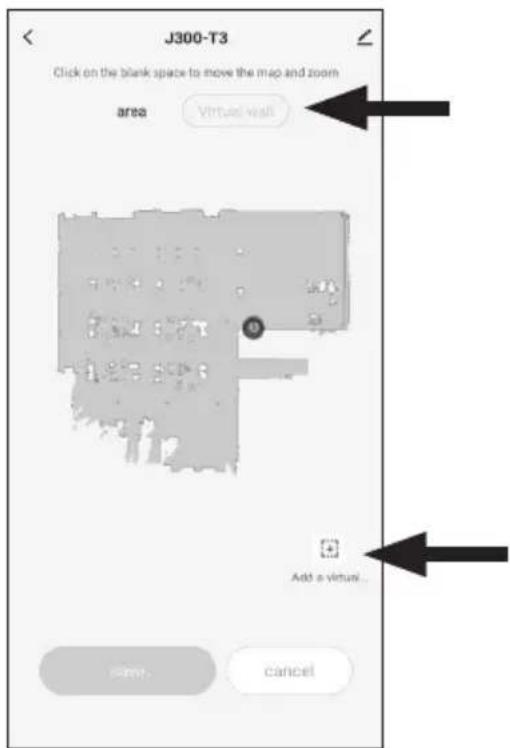
It is an invisible barrier that will not be crossed by the appliance.
Tap [Area] on the app's main screen. Then select [Virtual wall] – [Add a virtual wall]. Dashed line will appear on the map. Tap and hold it and move it to the place where you want to create an artificial barrier. Set the desired length and angle of the virtual wall. If you want to add another virtual wall, tap [Add a virtual wall] again. When all is set, tap [Save].
If you want to delete a virtual wall, tap it and select X.
EN
Restricted area (via app)
Set the area that will not be cleaned.
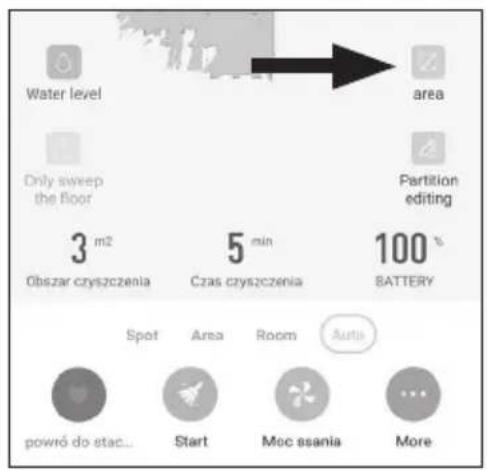
Tap [Area] on the app's main screen. Then select [Restricted area]. A red square will appear on the map. Tap and hold it and move it to the place on the map you do not want to be cleaned and set the desired size of that area. If you want to add another area, tap [Restricted area] again. When all is set, tap [Save]. The appliance will not clean in set areas.
If you want to delete an area, tap it and select X.
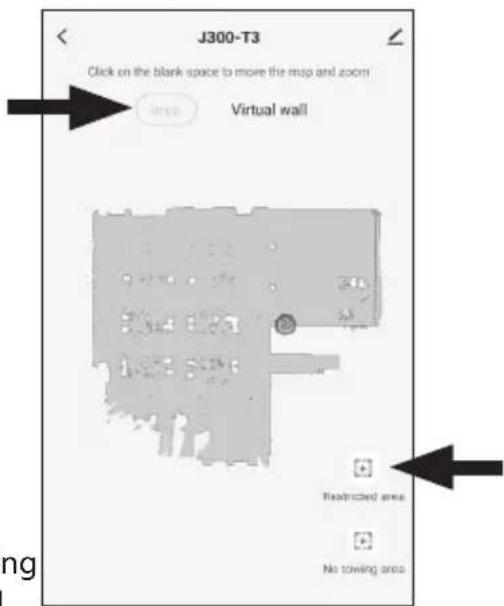
Notes:
- Do not set the restricted area within the charging dock. Otherwise, the appliance will not be able to find the charging dock.
- The appliance may intrude into restricted area due the to positioning errors, sensors malfunction and other reasons.
- The restricted area may become invalid due to the significant changes in furnishings or appliance's position. Therefore, please try not to move or interfere with the appliance during cleaning.
• The restricted area would be lost when the map is rebuilt.
No mopping area (via app)
Set the area that will not be mopped.
Tap [Area] on the app's main screen. Then select [No towing area]. A blue square will appear on the map. Tap and hold it and move it to the place on the map you do not want to be mopped and set the desired size of that area. If you want to add another area, tap [No towing area] again. When all is set, tap [Save]. The appliance will not mop in set areas.
If you want to delete an area, tap it and select X.
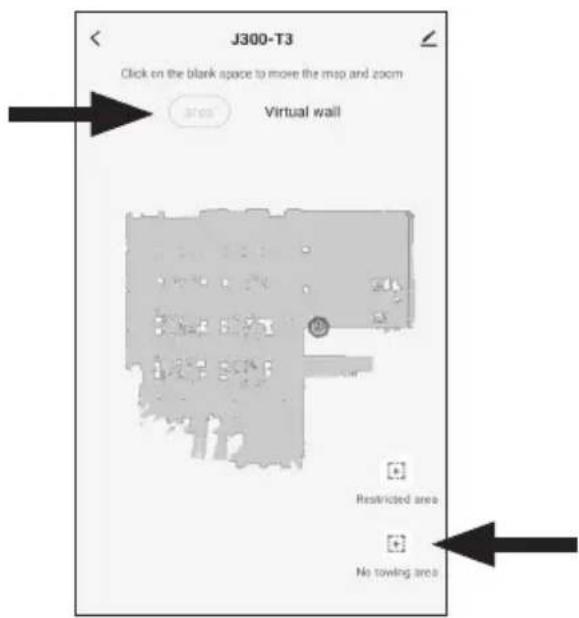
Schedule cleaning (via app)
Set the exact day(s) and time when the appliance will automatically start cleaning.
The appliance will start cleaning automatically at the set time on given days and return to the charging dock after cleaning.
Tap [More] on the app's main screen. Then select [timing] - [Add]. Set specific time, day, suction power, water level (for mopping function) and mode. When all is set, tap [Save].
You can disable or enable a schedule on the Timing screen.
Tap [Add] on the bottom of the screen to add another schedule.
Tap and hold the schedule to delete it.
Note: If the appliance is detached from the charging dock at the scheduled time, the scheduled cleaning does not work.
Area editor and customization (via app)
Edit and customize the map to your needs (function available only if the map has been created and saved).
Tap [Partition editing] on the app's main screen.
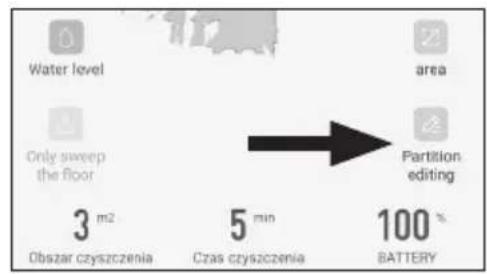
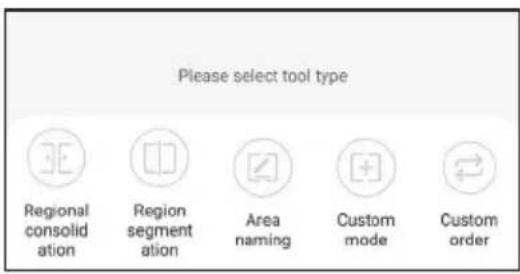
• Regional consolidation: Select two adjacent rooms you want to merge into one area.
• Regional segmentation: Select a room you want to split. Then set a new wall.
- Area naming: Tap the room to change its name. Choose a new name from the list or enter your own name.
- Custom mode: Set power suction and water level for a specific room.
- Custom order: Set room order in which the appliance will clean (in auto cleaning mode).
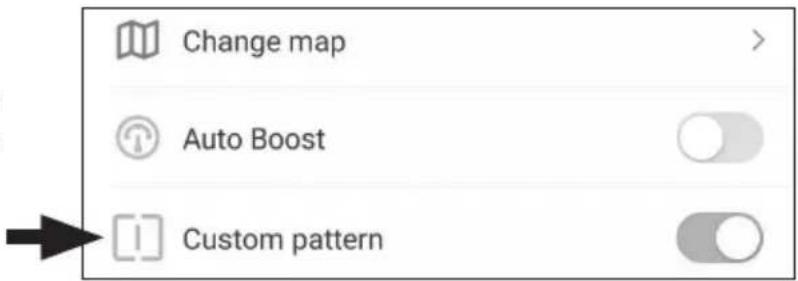
You can set those settings to be displayed on the map on the app's main screen. Go to [More] and switch on [Custom pattern].
ADDITIONAL FUNCTIONS
Locate the appliance
The appliance will issue a voice notification which can help you locate it when it gets out of your sight or when no sound is heard.
Press the CALL button on the remote control or go to [More] – [robot seek] in the app.
Auto Boost
The appliance will automatically increase suction power when it cleans carpets.
Go to [More] on the app's main screen, then switch on [Auto Boost].
DND mode (do not disturb)
The appliance will neither do the automatic cleaning, schedule cleaning nor issue voice notifications. Use the remote control or go to mobile app ([More] – [disturb switch]) to turn that mode on or off. In the app you can also set start and end time of do not disturb mode.
Cleaning history
View the general statistics (the amount of time the appliance spent cleaning, the total area it has cleaned and the total number of cleanups it has done) as well as the details of each cleaning performed. Go to [More] – [recording].
Language and volume
Change language and set volume of voice notifications.
Go to [More] – [Language and volume].
Care and maintenance
Check the actual state of HEPA filter, side brushes and main brush and see how much life they have left.* The app will issue a notification when their lifespan is over.
Go to [More] – [Consumables and maintenance].
Tap the desired accessory to reset the statistics.
* For reference only, always check with the actual wear and replace accordingly.
MOPPING FUNCTION
Installation of 2in1 tank
natural_image
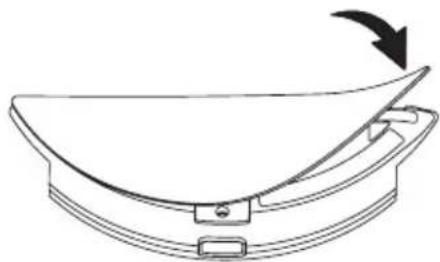
Line drawing of a mechanical component with a curved base and mounting bracket, showing a rotation arrow (no text or symbols)- Attach the mopping pad to the bottom of the 2in1 tank.
natural_image
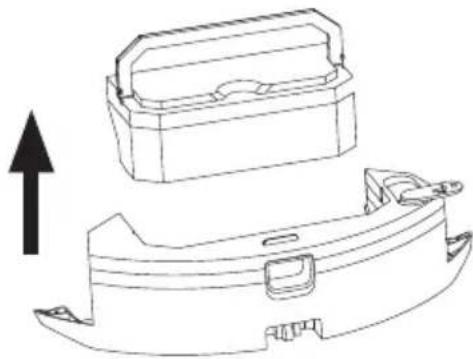
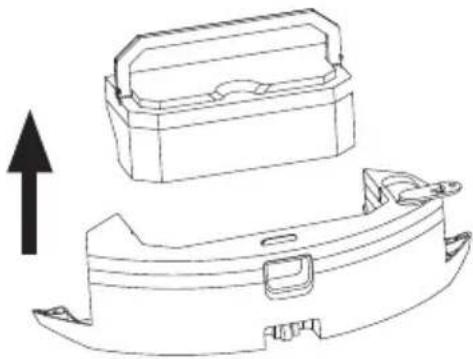
Technical line drawing of a mechanical component with an upward arrow indicating motion (no text or symbols)- Before filling the tank, remove the dustbin.
natural_image
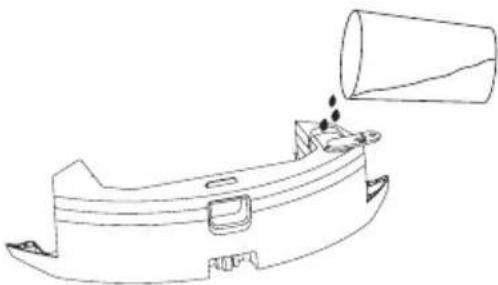
Line drawing of a mechanical component with a cylindrical container pouring liquid into it (no text or symbols)- Then, open the rubber plug and fill the tank with water. Afterwards, close the plug tightly.
natural_image
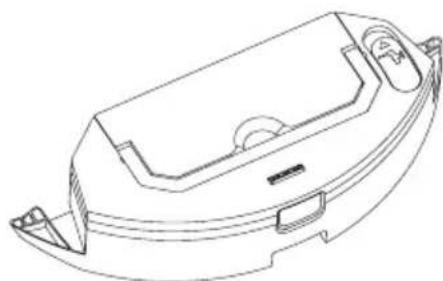
Technical line drawing of a mechanical component or housing (no text or symbols)- Reattach the dustbin and put its handle into the slot.
Note: Fill the water tank only with clean water. Do not add any detergents as they may damage the water tank.
natural_image
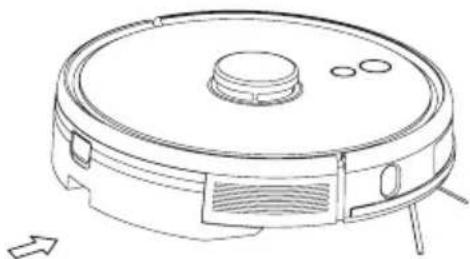
Line drawing of a robotic vacuum cleaner with control panel and mounting bracket (no text or symbols)- Push the tank horizontally along the rear part of the appliance. The tank is installed correctly in place if you hear a clicking sound.
Notes:
- For safety reasons, please be sure to remove the 2in1 tank when the appliance is being charged or left unused.
- Please do not mop the carpet. Set a forbidden area in the app to prevent the appliance from entering the carpet.
• Prior to mopping, make sure the floor is well vacuumed. - To add water or clean/replace the mopping cloth when the appliance operates, please pause it by pressing the appropriate button and take out the 2in1 tank by pressing down the release button and slide it out. Afterwards, reassemble the tank according to the step number 4. Do not move or turn over the appliance so as to avoid failing in positioning and/or losing the map.
-
Mopping function is intended for wiping and is a good start for deep cleaning. It cannot remove stubborn stains effectively and replace traditional mopping.
-
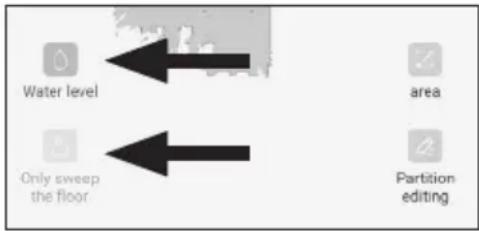
Use the remote control (button) or go to mobile app to set the water dripping speed. Set to [Dry tow] so that the water will not be drawn from the water tank.
-
Only sweep the floor (2in1 tank must be installed)-clean without mopping.
CARE AND MAINTENANCE
Note: Prior to cleaning make sure the appliance is turned off.
1. Main brush
Clean it regularly.
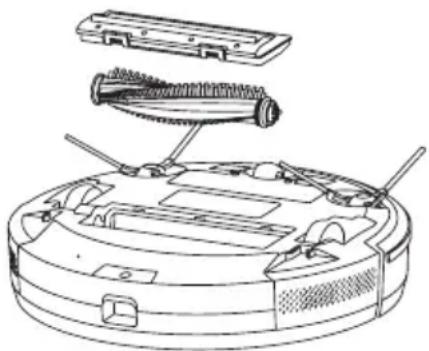
- Turn over the appliance, press the buckles on the main brush guard, remove the guard and take out the main brush.
- Clean the main brush compartment and shaft; remove any hair, debris or threads which have been entangled around the shaft.
- Clean the main brush and remove any hair which have been entangled around it.
- Reassemble the main brush and its guard. They are installed correctly if you hear a clicking sound.
natural_image
Line drawing of a robotic vacuum cleaner with attached brush and housing (no text or symbols)Note: Main brush is available to be purchased online at www.teesa.pl or www.rebelelectro.com.
2. Side brushes
Clean them regularly.
- Turn over the appliance and pull out the side brushes upwards.
-
Clean them from any hair, debris or threads which have been entangled around the shaft. The side brushes can be rinsed under running water. In such case, always make sure to dry them completely.
-
When the side brushes are clean and dry, push them onto the shaft until you hear a click (always match the symbol L and R on the brush to correspond to the position of L and R at the bottom of the appliance respectively).
-
If the side brushes are worn and as a consequence cleaning performance deteriorates, replace them with new ones*.
* One extra pair of side brushes is included in the set. Side brushes are available to be purchased online at www.teesa.pl lub www.rebelelectro.com
3. Dustbin and filters
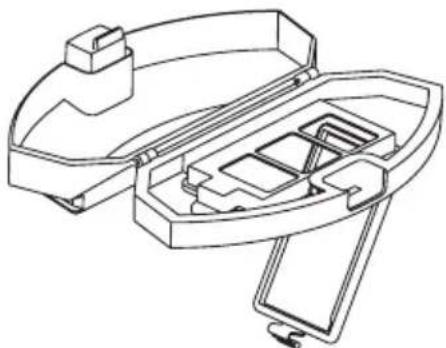
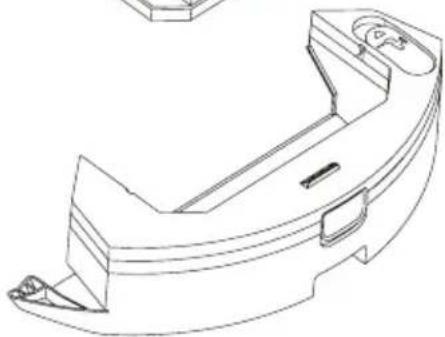
- Press the dustbin release button and open it. Empty the dustbin and clean it. You can rinse it under running water. Wipe it well with a soft cloth or let it dry completely in the shade.
Note: Empty the dustbin after each use.
-
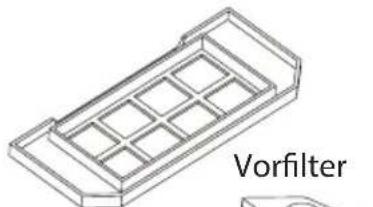
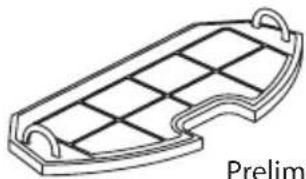
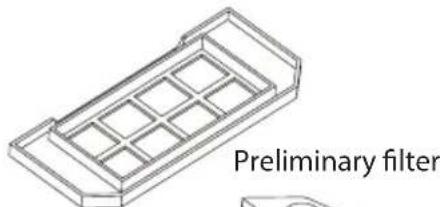
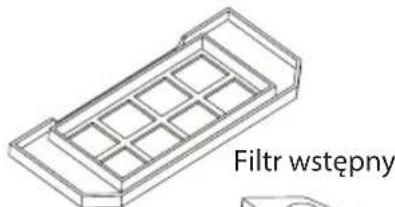
Remove the preliminary filter. Rinse it under running water. Afterwards, let it dry completely in the shade.
-
When the dustbin and preliminary filter are clean and completely dry, reassemble the filter and close the dustbin.
-
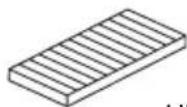
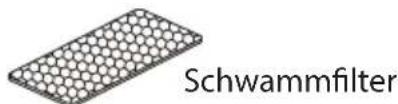
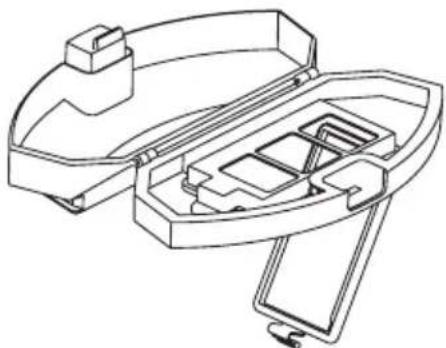
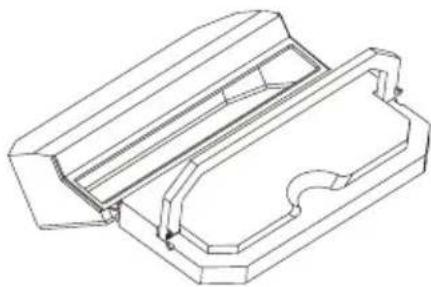
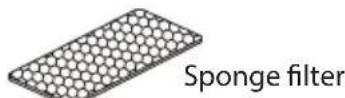
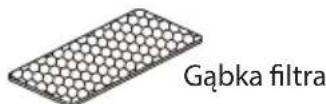
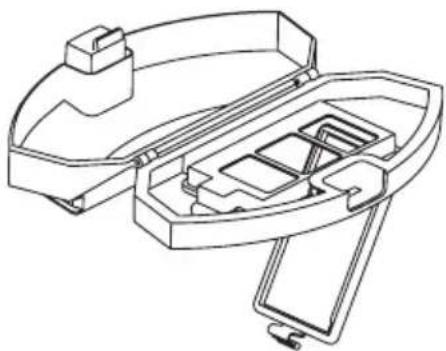
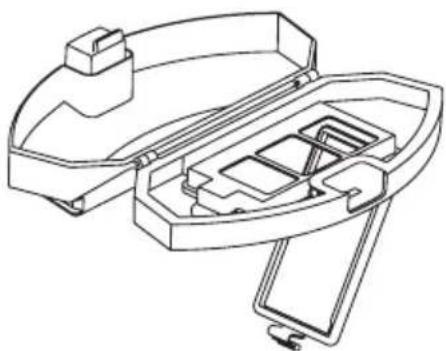
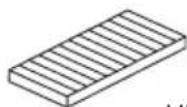
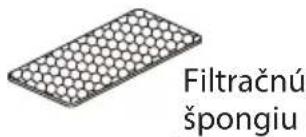
Open the filter cover and remove HEPA and sponge filter. Gently tap out dirt. If heavily soiled, rinse them under running water. Afterwards, let them dry completely in the shade.
• It is recommended to clean the filters every 3 weeks.
• HEPA filter can be washed under running water up to 50 times.
- The maximum lifespan of the HEPA filter is 12 months. When that time passes, replace it with a new one. Replace it also when you notice significant deterioration in cleaning performance.
- HEPA filter is available to be purchased online at www.teesa.pl or www.rebelelectro.com.
- When the filters are clean and completely dry, put them back into place and close the filter cover until it locks in place (make sure you hear a click).
natural_image
Line drawing of a grid-patterned object resembling a tray or container (no text or symbols)Preliminary filter
natural_image
Technical line drawing of a mechanical device with internal compartments and housing (no text or symbols)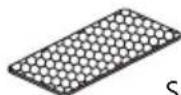
Sponge filter
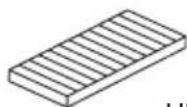
HEPA filter
4. 2in1 tank
-
Detach the dustbin from the water tank and open its cover. Remove preliminary filter, HEPA filter and sponge filter.
-
Rinse filters under running water and let them dry completely in the shade.
-
Empty and clean the dustbin. You can rinse it under running water. Then wipe it well with a soft cloth or let it dry completely in the shade.
-
Empty the water tank, rinse the inside under running water and let it dry completely in the shade.
Note: Empty the 2in1 tank (dustbin and water tank) after each use.
- Detach the mopping cloth from the bottom of the 2in1 tank. Rinse it under running water. Make sure to dry it completely before another use. It cannot be washed in the washing machine.
Note: The mopping cloth is available to be purchased online at www.teesa.pl or www.rebelelectro.com.

** DO NOT INSERT WET OR SLIGHTLY MOIST PARTS INTO THE APPLIANCE AS THIS BRINGS THE RISK OF ELECTRIC SHOCK AND CAN DAMAGE THE APPLIANCE.
natural_image
Technical line drawing of a mechanical housing or enclosure component (no text or symbols)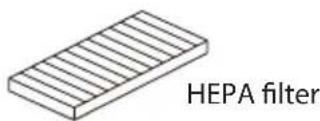
natural_image
Technical line drawing of a rectangular filter component with grid pattern (no text or symbols)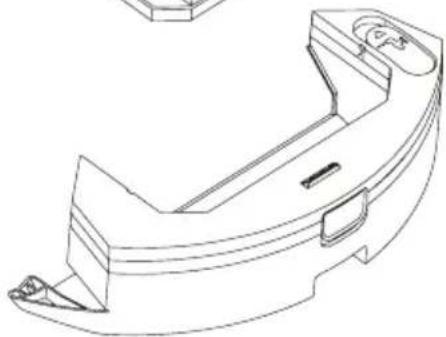
natural_image
Technical line drawing of a mechanical component (no text or symbols)5. Sensors
Clean them regularly.
Gently wipe the sensors with a dry, soft cloth. See the product description for the exact location of the sensors.

It is crucial for proper operation of the appliance to keep the sensors clean all the time. Otherwise, the appliance may malfunction.
6. Wheels
Clean them regularly.
Clean the wheels with a cleaning brush or with a soft, dry cloth. If wheels are blocked by a foreign body, use a rod or tweezers and carefully remove it.
7. Charging dock
Clean it regularly.
Wipe the signal emission area as well as the charging pins (including those on the bottom of the appliance) with a soft, dry cloth.
SOFTWARE UPDATE
If a new software is found, update it according to the prompt.
Note: The battery level should be above 50% during upgrade so place the appliance on the charging dock.
SYSTEM RESET
Remove the dustbin and press the reset button. Current map and schedule will be lost. Wi-Fi and personalized settings will remain.
TROUBLESHOOTING
| Problem Possible solution | |
| The appliance cannot be started | · In case of a low battery level, please place the appliance on the charging dock and align it at the charging pins; the appliance will be started automatically (if the appliance is completely powered off, it can be started automatically after it has charged for a while) · Make sure you use the appliance at the temperature of 0-40°C |
| The appliance cannot charge · | Remove the appliance from the charging dock; check if the LED indicator on the charging dock is on and if the AC adapter is connected well · Clean the charging pins on the charging dock and at the bottom of the appliance |
| The appliance cannot return to the charging dock automatically | · The appliance is too far from the charging dock, bring it closer to the charging dock · There is no easy access to the charging dock- make sure there is enough space in front of the charging dock (1,5 meter) and that there are no obstacles on the appliance's way |
| Abnormal behavior · Turn off the appliance and restart it | |
| Abnormal noise when the appliance is in use | · Main brush, side brushes or wheels may be blocked by foreign body; turn off the appliance and remove the blockage |
| Cleaning performance deteriorates or dust falls out | ·Dustbin is full, empty it·Preliminary filter/HEPA filter is blocked, clear or replace it·Main brush is blocked by foreign body, remove it |
| Wi-Fi cannot be connected ·Wi-Fi signal is poor, move the appliance to place with better Wi-Fi signal·Wi-Fi has connected abnormally, reset Wi-Fi, download the latest version of the mobile app and try again·Incorrect password·The router is available for 5 GHz frequency band, the appliance is available for 2,4 GHz frequency band only | |
| Scheduled cleaning fails ·Battery level too low, scheduled cleaning can only be started when the battery level is no less than 30%·Do not disturb mode is on, turn it off in the app or with the remote control·The appliance is not on the charging dock at the time of the scheduled cleaning; make sure the appliance is on the charging dock at the scheduled time | |
| Does the appliance consume power when it is docked? | ·The appliance will consume a little power to keep the battery at peak performance |
| Does the appliance have to be charged for 16 hours for the first three times? | ·No, the appliance may be used after each full charge |
ERRORS
| Voice notification Possible cause and solution | ||
| 1 Oh | dear! I cannot find the dust collector | Cleaning has been started when the dustbin is not connected; make sure the dustbin is correctly installed |
| 2 Please | check if the radar on top has been covered or blocked | The appliance is placed in an open area (there is no obstacle within the area of 6 x 6 m2) |
| 3 Please | place me in a new location and try again | Pick up the appliance or move it to a new location |
| 4 Please | clean the cliff sensor and restart me from a new location | The cliff sensor is covered or the appliance is tilted |
| 5 Please | scrub the front sensor and restart me from a new location | The anti-collision sensors are dirty or covered |
| 6 Please scrub the right-hand sensor and restart me from a new location | The TOF sensor is dirty or covered |
| 7 Please scrub the radar housing on top and restart me from a new location | The LDS sensor is dirty or covered |
| 8 Please check if the bumper has been blocked in some way | The TOF or anti-collision sensors are stuck |
| 9 Master, please clean the dust container and filter | The dustbin is full or the filter needs to be replaced |
| 10 Dust container has been removed, please clean the container and filter | After error 9 is issued, user takes out the dustbin and error 10 is triggered |
| 11 I'm stuck, please help me! The appliance is stuck | |
| 12 Please place me correctly! The appliance is tilted | |
| 13 Please check if my wheels have become blocked somewhere | The driving wheel is stuck or twined |
| 14 Please check if the main brush has become blocked somewhere | The main brush is twined or stuck |
| 15 Please check if the side brushes have become stuck | The side brush is twined or stuck |
| 16 What's going on? Where is the docking station? | The appliance cannot find the charging dock or the charging dock is not plugged in |
| 17 Oh dear! Program error, please restart me | Abnormalities are caused by unknown breakdown, restart the robot |
| 18 Error encountered initiating shutdown | The robot informs about the error and shuts down automatically or is recharged |
| 19 Low battery, please recharge When | the battery level is too low and the robot is not on the charging dock, charging is triggered (the battery level is lower than 10%) |
| 20 To shut me down, please place me away from the docking station | Remove the robot from the charging dock to power it off; it cannot be turned off when it is placed on the charging dock |
SPECIFICATION
Main features
Compatible with Tuya app
Mapping function
Scheduled cleaning
3-stage cleaning system
Washable HEPA filter
Carpet identification
4 cleaning modes
Silent mode
Mopping function
Voice notifications
Compatible with Google Assistant and Alexa
Auto docking and charging
Charging indicator
Low profile design (10 cm)
Overcoming obstacles up to 2 cm
Sensors
LDS (laser distance sensor)
TOF sensor (walls and obstacles detection)
Gyroscope
Speed sensor
Cliff sensor
Anti-collision sensor
Obstacles sensor
Virtual wall (via app)
Technical data
Connectivity: Wi-Fi (via app)
Suction power: 3000 Pa (4 levels)
Filter: HEPA 11
Dustbin capacity: 600 ml
2in1 tank capacity:
Water tank: 300 ml
Dustbin: 350 ml
Cleaning area: 100 m²
Operation time: 60 – 100 min
Charging time: approx. 3 h
Noise level: = < 65 dB
In set: 3x HEPA 11 filter, 2in1 tank, 2x
mopping cloth, remote control, 2 pairs of
side brushes, cleaning brush, charging dock,
AC adapter
Weight: 3,1 kg
Dimensions: ø35 x 10 cm
Power supply
Power: 48 W
Battery: 14,4 V; 2600 mAh
AC adapter:
Input: 100 - 240 V\~; 50/60 Hz
Output: 24 V / 1 A
EN
Lechpol Electronics Leszek Sp.k. hereby declares that Robot vacuum cleaner TSA5045 is consistent with directive 2014/53/UE. Full text of the EU Declaration of Conformity is available at following Internet address: www.lechpol.pl
English
Correct Disposal of This Product
(Waste Electrical & Electronic Equipment)

(Applicable in the European Union and other European countries with separate collection systems) This marking shown on the product or its literature, indicates that it should not be disposed with other household wastes at the end of its working life. To prevent possible harm to the environment or human health from uncontrolled waste disposal, please separate this from other types of wastes and recycle it responsibly to promote the sustainable reuse of material resources. Household users should contact either the retailer where they purchased this product, or their local government office, for details of where and how they can take this item for environmentally safe recycling. Business users should contact their supplier and check the terms and conditions of the purchase contract This product should not be mixed with other commercial wastes for disposal.
natural_image
Technical line drawing of a mechanical device with labeled component (4), showing internal components and mounting points (no text or symbols beyond label)PL
PILOT ZDALNEGO STEROWANIA
natural_image
Line drawing of a robotic vacuum cleaner with labeled parts (e and a), no text or symbols present.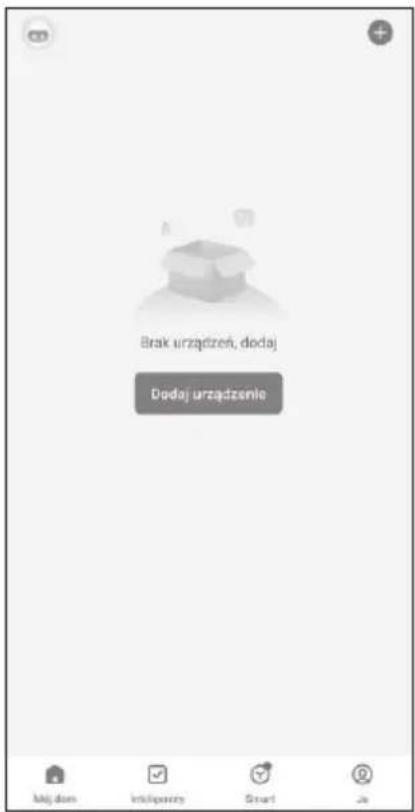
PL
Uwagi:
natural_image
Technical line drawing of a mechanical component with a curved base and mounting bracket (no text or symbols)natural_image
Line drawing of a mechanical component with a cylindrical container pouring liquid into it (no text or symbols)natural_image
Technical line drawing of a mechanical component with an upward arrow indicating motion (no text or symbols)natural_image
Technical line drawing of a mechanical component or housing (no text or symbols)natural_image
Line drawing of a robotic vacuum cleaner with control panel and mounting feet (no text or symbols)flowchart
graph TD
    A["Water level"] --> B["area"]
    C["Only sweep the floor"] --> D["Partition editing"]
CZYSZCZENIE I KONSERWACJA
natural_image
Technical line drawing of a robotic vacuum cleaner with attached screw and handle components (no text or symbols)natural_image
Line drawing of a grid-patterned plastic or plastic component with curved edges (no text or symbols)Filtr wstępny
natural_image
Technical line drawing of a mechanical device with internal compartments and housing (no text or symbols)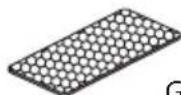
Gąbka filtra
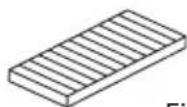
Filtr HEPA
4. Zbiornik 2w1
natural_image
Technical line drawing of a mechanical housing or bracket component (no text or symbols)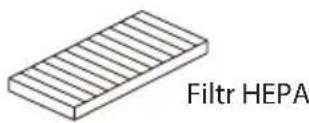
natural_image
Technical line drawing of a mechanical component (no text or symbols)5. Czujniki
Kompatybilny z Google Assistant and Alexa
Wymiary: ø35 x 10 cm
Zasilanie
Moc: 48 W
Akumulator: 14,4 V; 2600 mAh
Zasilacz sieciowy:
natural_image
Technical line drawing of a mechanical device with labeled parts (no text or symbols present)RO
TELECOMANDĂ
natural_image
Line drawing of a robotic vacuum cleaner with labeled parts (e), no text or symbols present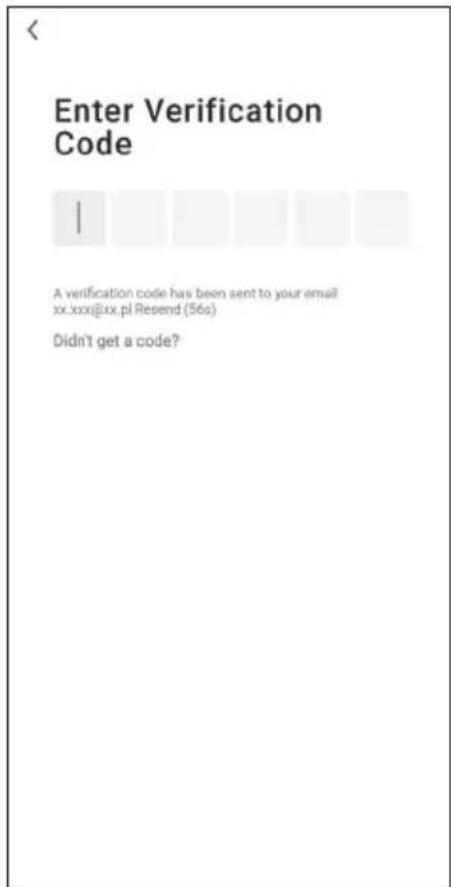
2a. Înregistrare:
- Selectati [AP Mode].
Note:
Accesati [More] – [Consumables and maintenance].
natural_image
Line drawing of a curved mechanical component with a circular base and arrow indicating rotation (no text or symbols)natural_image
Technical line drawing of a mechanical component with an upward arrow indicating motion (no text or symbols)natural_image
Line drawing of a mechanical component with a cylindrical container pouring liquid into it (no text or symbols)natural_image
Technical line drawing of a mechanical component or housing (no text or symbols)natural_image
Line drawing of a robotic vacuum cleaner with control panel and mounting bracket (no text or symbols)flowchart
graph TD
    A["Water level"] --> B["area"]
    C["Only sweep the floor"] --> D["Partition editing"]
CURĂȚARE
natural_image
Technical line drawing of a robotic vacuum cleaner with attached screw and handle components (no text or symbols)natural_image
Line drawing of a grid-patterned rectangular object with curved edges (no text or symbols)Filtru preliminar
natural_image
Technical line drawing of a mechanical device with internal compartments and housing (no text or symbols)natural_image
Technical line drawing of a mechanical component with internal channels and mounting brackets (no text or symbols)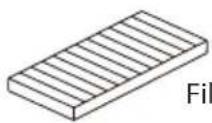
Filtru HEPA
natural_image
Isometric line drawing of a rectangular filter or tray structure with grid pattern (no text or symbols)Filtru preliminar

** NU INTRODUCEȚI ÎN APARAT PIESE UMEDE SAU UȘOR UMEDE, DEOARECE EXISTĂ RISCUL DE ELECTROCUTARE ȘI SE POATE DETERIORA APARATUL.
natural_image
Technical line drawing of a mechanical component with no visible text or symbols5. Senzori
- Laserový snímač vzdialenosti (LDS)
- Protikolízny senzor (pre LDS)
- Senzor nabíjania
- Protikolízne senzory
natural_image
Technical line drawing of a mechanical device with labeled parts (no text or symbols present)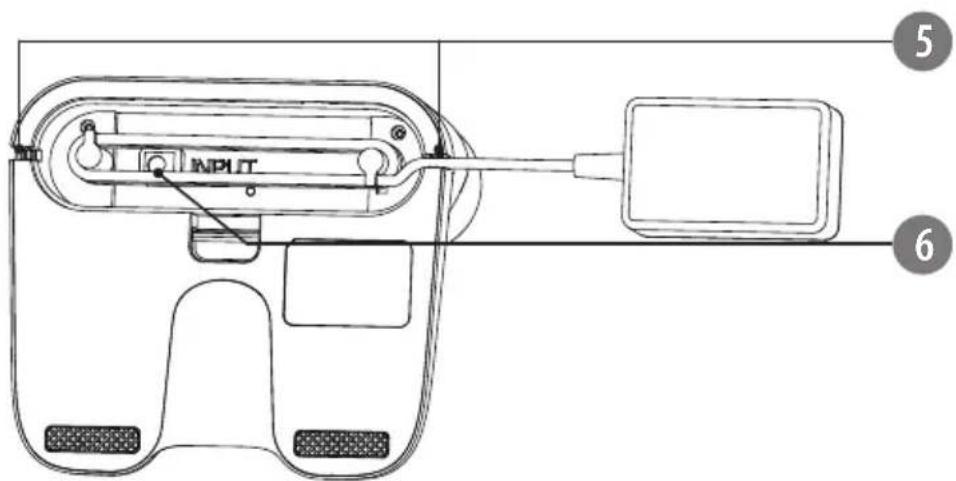
DIAL'KOVÉ OVLÁDANIE
natural_image
Line drawing of a robotic vacuum cleaner with control panel and sensor array (no text or symbols)| Farba Status akumulátora | |
| Modrá bliká Prebieha | nabíjanie |
| Modrá svieti Nabíjanie | ukončené |
PRIPOJENIE K APLIKÁCII

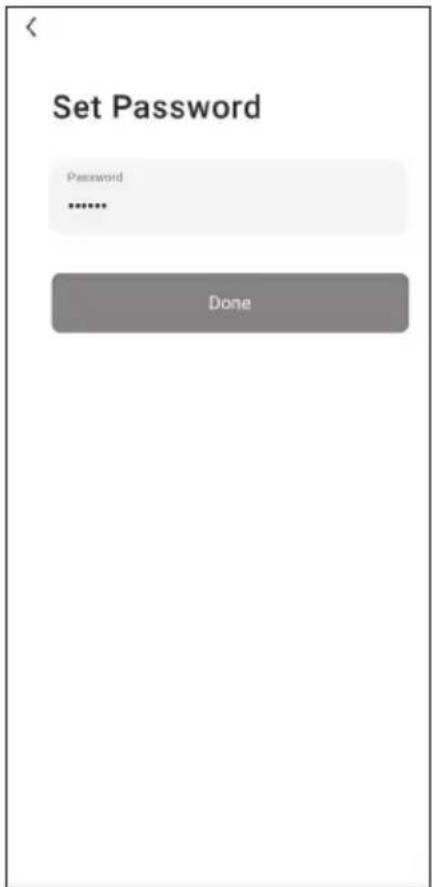
2a. Registrácia:
-
Prejdite do záložky [Small Home Appliances] a vyberte [Robot Vacuum (Wi-Fi)].
-
Vyberte siet' Wi-Fi a zadajte heslo. Zvolte [Next]. Uistite sa, že je smartfón pripojený k sieti 2,4 GHz.
- Vyberte [AP Mode].
- Vyberte [Done] a prejdite na domovskú obrazovku aplikácie.
Poznámky:
natural_image
Simple line drawing of a curved mechanical component with a black arrow indicating rotation (no text or symbols)- Na spodok nádoby 2v1 pripevnite mopovaciu handričku.
natural_image
Technical line drawing of a mechanical component with an upward arrow indicating motion (no text or symbols)natural_image
Line drawing of a mechanical component with a cylindrical container pouring liquid into it (no text or symbols)natural_image
Technical line drawing of a mechanical component or housing (no text or symbols)natural_image
Line drawing of a robotic vacuum cleaner with control panel and mounting bracket (no text or symbols)flowchart
graph TD
    A["Water level"] --> B["area"]
    C["Only sweep the floor"] --> D["Partition editing"]
ČISTENIE
natural_image
Line drawing of a robotic vacuum cleaner with attached blades and housing (no text or symbols)natural_image
Line drawing of a grid-patterned object resembling a shield or tray (no text or symbols)Vstupný filter
natural_image
Technical line drawing of a mechanical device with internal compartments and housing (no text or symbols)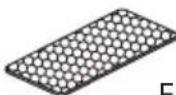
Filtračnú špongiu
HEPA filtra
4. Nádoba 2v1
natural_image
Technical line drawing of a mechanical housing or enclosure component (no text or symbols)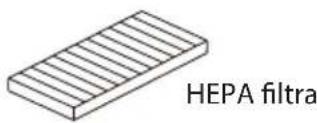
natural_image
Technical line drawing of a mechanical component with no visible text or symbols5. Senzory
Čistite ich pravidelne.
Jemne utrite senzory suchou mäkkou handričkou. Presné umiestnenie senzorov je uvedené v kapitole "Popis" na začiatku.


- Robot vacuum cleaner
- SMART VAC PRO
- FERNBEDIENUNG
- 2a. Anmeldung:
- Hinweise:
- GERÄTEREINIGUNG
- in1 Behälter
- DE
- Sensoren
- SAFETY INSTRUCTIONS
- IMPORTANT!
- Laser safety information
- PRODUCT DESCRIPTION
- TEESA SMART VAC PRO
- CHARGING DOCK
- REMOTE CONTROL
- REMOTE CONTROL BATTERY INSTALLATION
- Notes:
- INSTALLATION
- Side brushes
- CHARGING
- Automatic
- IMPORTANT
- Manual
- APP CONNECTION GUIDANCE
- Wi-Fi reset
- BASIC OPERATION
- LED indicators
- CLEANING
- Errors
- Local cleaning
- Spot cleaning
- Area cleaning (via app)
- Room cleaning (via app)
- Restricted area (via app)
- No mopping area (via app)
- Schedule cleaning (via app)
- Area editor and customization (via app)
- ADDITIONAL FUNCTIONS
- Locate the appliance
- Auto Boost
- DND mode (do not disturb)
- Cleaning history
- Language and volume
- Care and maintenance
- MOPPING FUNCTION
- Installation of 2in1 tank
- Main brush
- Side brushes
- Dustbin and filters
- 2in1 tank
- Sensors
- Wheels
- Charging dock
- SOFTWARE UPDATE
- SYSTEM RESET
- SPECIFICATION
- Main features
- Sensors
- Technical data
- Power supply
- PILOT ZDALNEGO STEROWANIA
- Uwagi:
- CZYSZCZENIE I KONSERWACJA
- Zbiornik 2w1
- Czujniki
- Zasilanie
- TELECOMANDĂ
- Note:
- CURĂȚARE
- Senzori
- DIAL'KOVÉ OVLÁDANIE
- PRIPOJENIE K APLIKÁCII
- 2a. Registrácia:
- Poznámky:
- ČISTENIE
- Nádoba 2v1
- Senzory
Brand : Teesa
Model : TSA5045
Category : Vacuum Cleaner