USER MANUAL PRPA 20-Li B3 PARKSIDE
natural_image
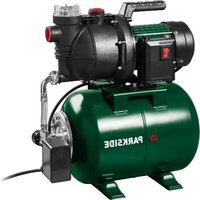
Exterior view of a black Parkside vacuum cleaner with attached cable, next to a cylindrical trash bin (no text or symbols visible)
20 V CORDLESS WATER BUTT PUMP / 20 V AKKU-REGENFASSPUMPE / 20 V POMPE POUR COLLECTEUR DEAU DE PLUIE SANS FIL PRPA 20-Li B3
GB / IE
20 V CORDLESS WATER BUTT PUMP
Translation of the original instructions
FR / BE
20 V POMPE POUR COLLECTEUR
DEAU DE PLUIE SANS FIL
Before reading, unfold both pages containing illustrations and familiarise yourself with all functions of the device.
DE / AT / CH
GB/IE Translation of the original instructions Page 1
| DE/AT/CH Originalbetriebsanleitung Seite 13 |
| FR/BE Traduction des instructions d'origine Page 27 |
| NL/BE Vertaling van de originele gebruiksaanwijzing Pagina 43 |
| CZ Překlad originálního provozního návodu Strana 57 |
| PL Tłumaczenie oryginalnej instrukcji obsługi | Strona | 69 |
| SK Preklad originálneho návodu na obsluhu | Strana | 83 | |
| ES Traducción del manual de instrucciones original | Página | 95 |
| DK Oversættelse af den originale driftsvejledning | Side | 109 |
| IT Traduzione delle istruzioni d’uso originali | Pagina | 121 |
| HU Az originál használati utasítás fordítása | Oldal | 135 |

line
| Voltage Level | Value |
| ------------- | ----- |
| 20 V max. | 18 V |

All Parkside tools and the chargers PLG 20A1/A4/C1/A2/C2/A3/C3/PDSLG 20A1/B2/PLGS2012A1 of the X20V Team series are compatible with the PAP 20 A1/A2/A3/B1/B3/PAPS 204 A1/PAPS 208 A1 battery pack.
Working with the appliance 3
Additional safety instructions 5
Before use 5
Charging the battery pack 5
Getting started 5
Assembly 5
Attachment to the rain barrel 6
Immersing the pump 6
Shortening the connection hose (fig.C)....6
Connecting the pump to the operating unit 6
Attaching/disconnecting the battery pack to/from the appliance (fig. D) 6
Checking the battery charge level 7
Operation 7
Switching on/off 7
Timer 7
Charge level indicator 7
Cleaning, maintenance and storage 7
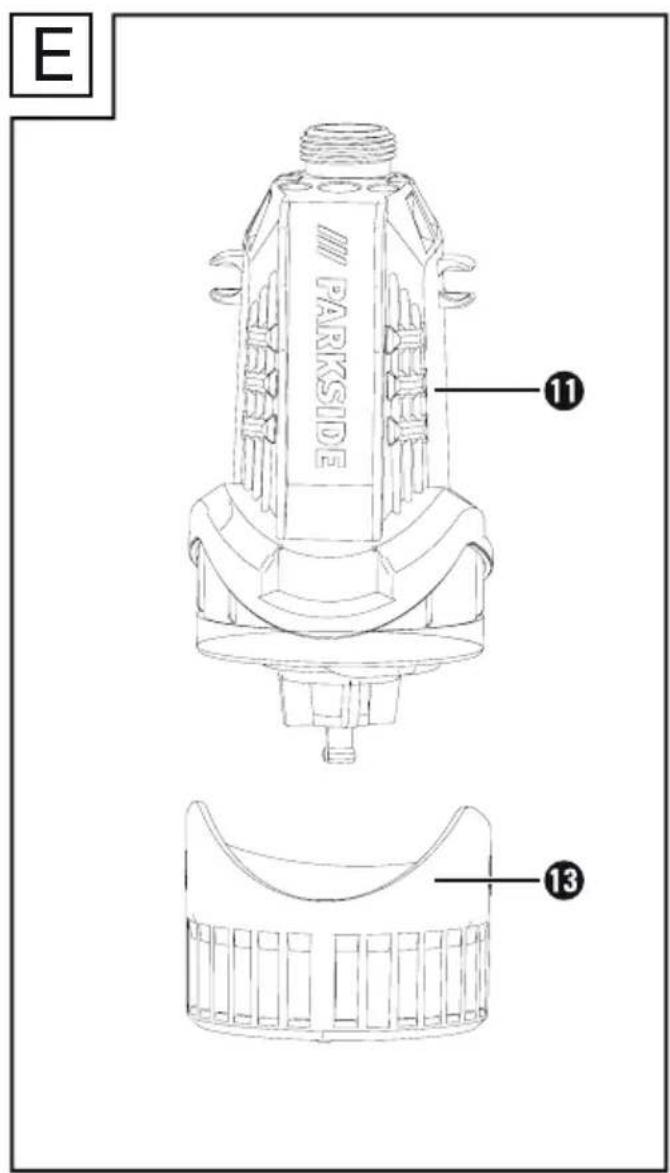
Cleaning the filter (fig. E) 8
Flushing the pump 8
Storage 8
Disposal 8
Kompernass Handels GmbH warranty 9
Service....10
Importer....10
Ordering a replacement battery and charger 12
Introduction
Congratulations on the purchase of your new appliance. You have selected a high-quality product. The operating instructions are part of this product. They contain important information about safety, usage and disposal. Before using the product, please familiarise yourself with all instructions regarding safety and use. Use the product only as described and for the specified range of applications. Please also pass on all documents to any future owner.
Intended use
The rain barrel pump is designed for pumping water from a rain barrel or rain collection tank. It is ideal for watering your garden. The appliance is intended exclusively for pumping clear water and rainwater up to a temperature of max. 35°C. Any other use which is not expressly permitted in these operating instructions (e.g. pumping of foods, salt water, motor fuels, chemicals or water containing abrasive substances) may damage the appliance and represents a serious risk for the user.
This appliance is not designed for continuous operation. Continuous operation can reduce the operating life and will invalidate the guarantee.
This appliance is not suitable for commercial use. Commercial use will invalidate the guarantee.
The operator or user is responsible for accidents or damage to other people or their property. The manufacturer accepts no liability for damages caused by improper use or incorrect operation of the appliance.
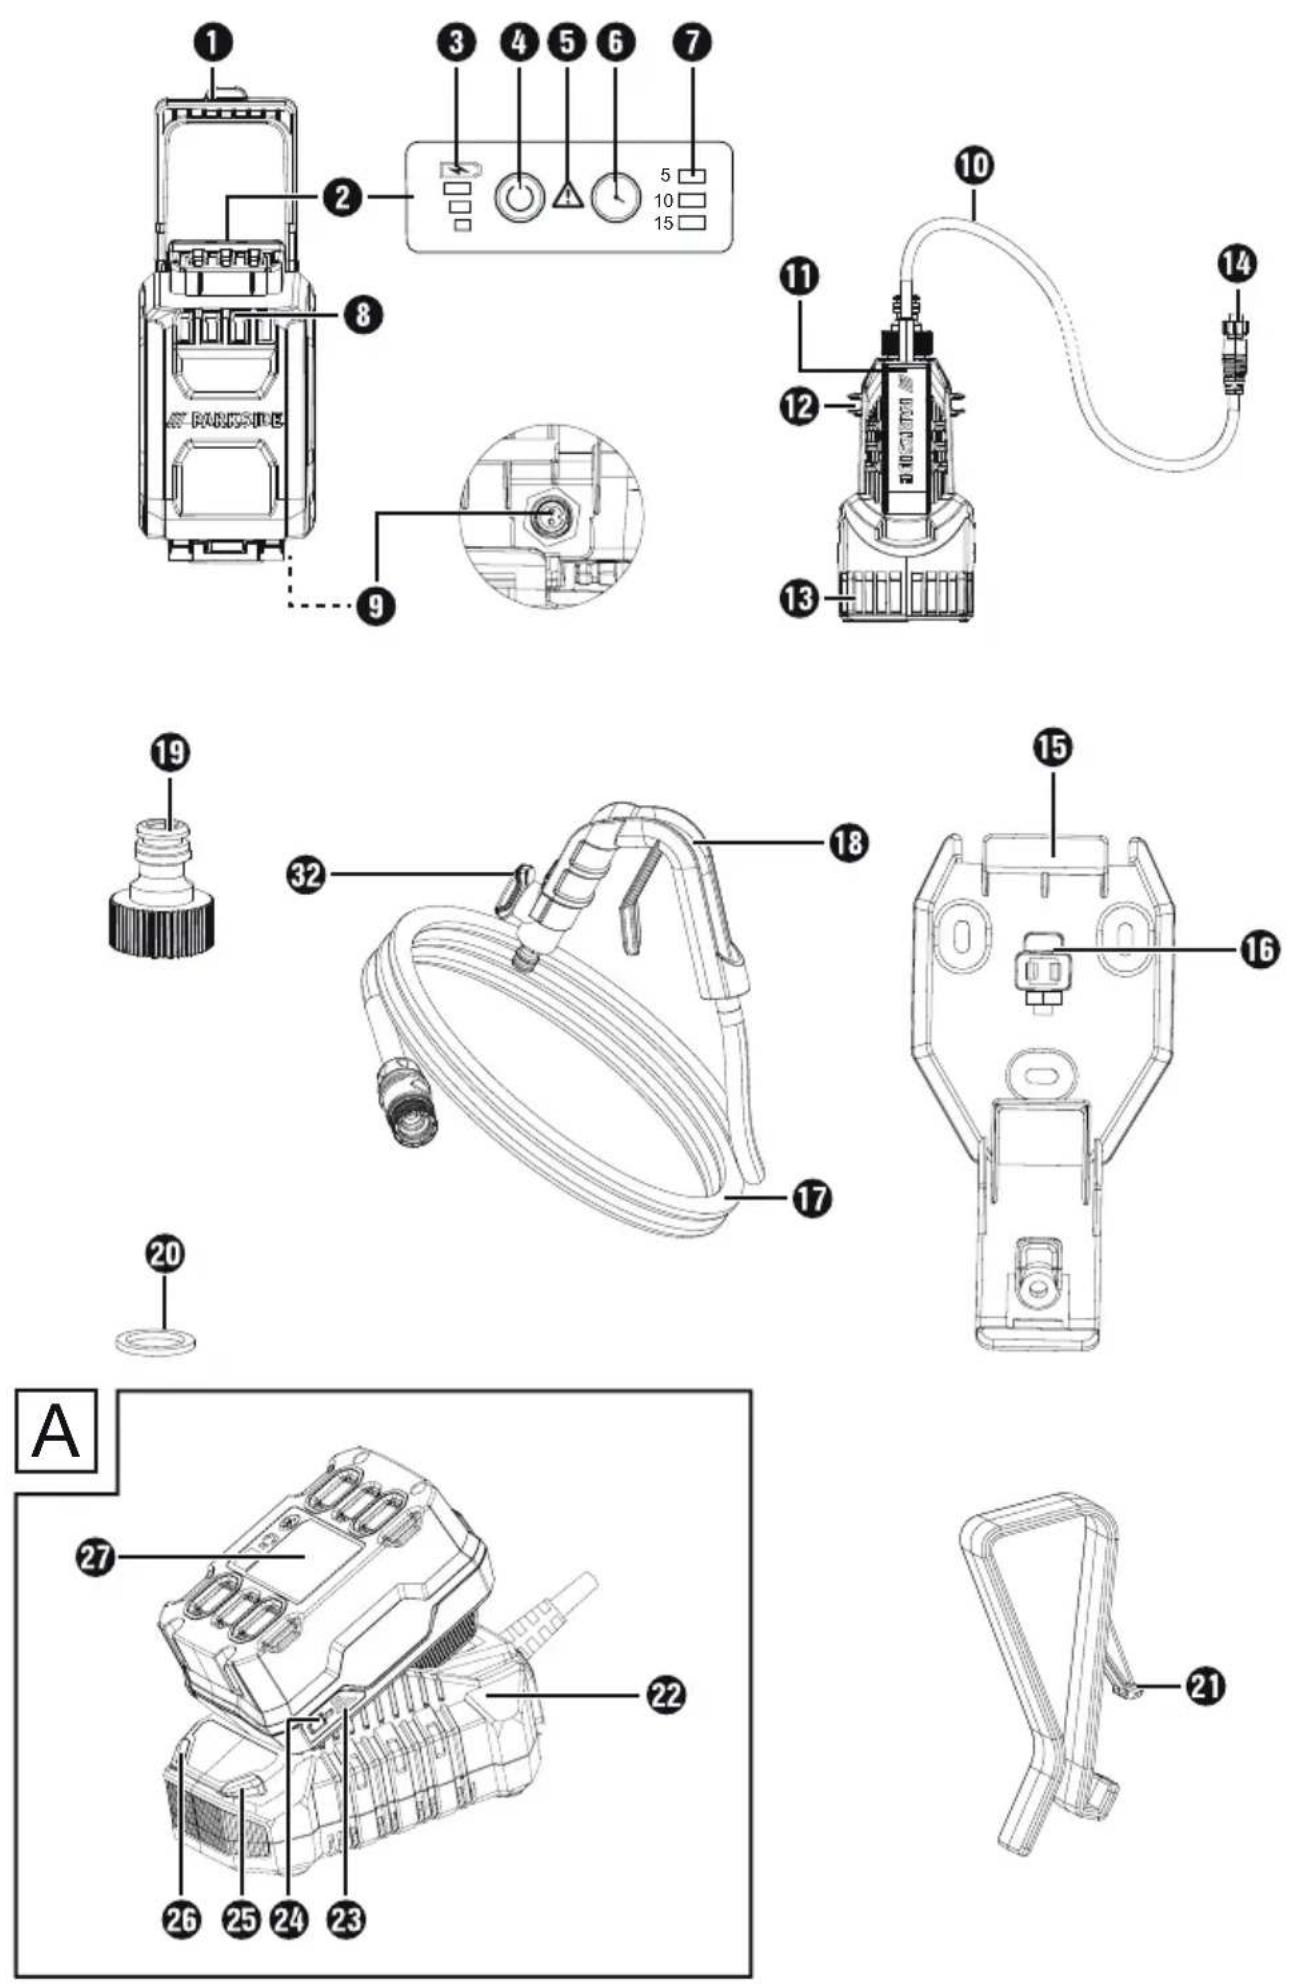
Features
① Handle
② Operating panel
③ Charge level indicator
4 Power button
⑤ Error LED
6 Timer button
⑦ Timer LED
⑧ Operating unit
⑨ Connection socket
10 Connection cable
⑪ Pump
⑫ Cable clip
⑬ Suction foot
14 Plug
15 Wall bracket
16 Screw + nut
17 Connection hose
18 Plastic hook
19 Quick-connect adapter
20 Sealing ring
21 Clip
22 High-speed charger*
23 Battery display LED
24 Battery charge level button
25 Red charge indicator LED
26 Green charge indicator LED
27 Battery pack*
28 Connecting piece
29 Union nut
30 Battery cover
31 Release button for the battery pack
32 Stopcock
Package contents
1 20 V cordless water butt pump
1 operating unit
1 wall bracket with screw
1 clip
1 pipe with plastic hook
1 main cable
1 quick-connect adapter
1 set of operating instructions
Technical data
20 V Cordless water butt pump
Rated voltage 20 V (DC)
Protection rating (pump) IPX8
Protection rating
(operating unit) IPX4
Max. flow rate
(Qmax)
2 Ah Battery pack 1980 l/h
4 Ah Battery pack 2000 l/h
8 Ah Battery pack 2020 l/h
Max. delivery height (Hmax)
2 Ah Battery pack 19 m
4 Ah Battery pack 20 m
8 Ah Battery pack 21 m
Max. pressure 2 bar
Max. immersion depth 1.8 m
Minimum suction height 9 cm
Residual water level 25 mm
Max. particle size (absorbent suspended solids) 0.25 mm
Max. water temperature
(Tmax) 35^ C
The appliance is part of the Parkside
X2014 PARKSIDE team series and can be operated using Parkside batteries.
Batteries from the Parkside X20VTEAM series may only be charged using Parkside
X20V series chargers.
We recommend that you only operate this appliance with the following batteries:
PAP20A1/PAP 20A2/PAP 20A3/PAP 20B1/
PAP20B3/Smart PAPS 204A1/
Smart PAPS 208A1.
We recommend that you charge these batteries with the following chargers:
PLG 20 A3/PLG 20 A4/PLG 20C1/
PLG20C3/ PDSLG 20 A1/B2/
Smart PLGS2012 A1.
Explanation of the symbols used
 | Before using the appliance for the first time, read the original operating instructions and safety instructions. |
 | Do not use for pure sand water! |
 | Attention! Hot surface. |
 | Max. immersion depth |

WARNING!
▶ Read all safety warnings, instructions, illustrations and specifications provided with this power tool.
Failure to follow all instructions listed below may result in electric shock, fire and/or serious injury.
Save all warnings and instructions for future reference.
The term "power tool" in the warnings refers to your mains-operated (corded) power tool or battery-operated (cordless) power tool.
Working with the appliance
■ Appliances may be used by persons with limited physical, sensory or mental capabilities or lack of experience and knowledge, provided that they are under supervision or have been told how to use the appliance safely and are aware of the potential risks.
■ Do not allow children to play with the appliance.
■ This appliance may not be used by children.
■ Cleaning and maintenance tasks may not be carried out by children.
■ Never allow children or persons who are not familiar with these instructions to use the machine.
Local regulations regarding the minimum age of operators may apply.
■ Take suitable precautions to keep children away from the appliance while it is running. There is a risk of injury.
■ Always disconnect the appliance from the power supply before assembling, disassembling or cleaning.
■ The appliance must not be used at altitudes higher than 2000 m.
WARNING!
■ Store out of the reach of children. Ingestion may cause chemical burns, perforation of soft tissues and death. Severe burns may occur within 2 hours after ingestion. Seek medical attention immediately.
■ The normal temperature range for charging the battery is 4–40°C.
■ Fluids may leak out of rechargeable battery units if they are misused. If this happens, avoid contact with the fluid. If contact occurs, flush the affected area with water. Seek additional medical help if any of the fluid gets into your eyes. Escaping battery fluid may cause skin irritation or burns.
■ Do not expose the appliance or the battery to high temperatures.
■ Be aware of the risk of short-circuiting the poles of the battery-powered appliance or battery with metal objects.
■ Do not use modified or damaged batteries.
■ Wear suitable footwear to protect yourself from electric shocks.
■ Do not use the appliance near flammable liquids or gases. Failure to observe this warning may result in a fire or explosion.
■ Pumping aggressive, abrasive (grinding), corrosive, flammable (e.g. motor fuels) or explosive liquids, salt water, cleaning agents and foodstuffs is not permitted. The temperature of the pumped liquid must not exceed 35°C.
- Do not work with a damaged or incomplete appliance or an appliance that has been modified without the consent of the manufacturer.
Before use, have the required electrical protection measures checked by a specialist.
- Keep an eye on the appliance during operation to detect automatic shut-down or dry running of the pump in good time. Ignoring this warning will invalidate the warranty and any liability claims.
■ Please note that the pump is not suitable for continuous operation (e.g. for watercourses in garden ponds). Check the appliance regularly to ensure that it is functioning properly.
■ Note that there are lubricants used in the appliance which may cause damage or contamination if they leak out. Do not use the pump in garden ponds with fish stock or valuable plants.
■ Do not carry or fasten the appliance by the hose.
■ Protect the appliance from frost and from running dry.
■ Only use original accessories and do not carry out any modifications to the appliance.
Read the instructions on "Cleaning, maintenance, storage" in the operating manual. All measures that go beyond this, in particular those that involve opening the appliance, must be carried out by a qualified electrician. In the event of a fault, always contact our Service Centre.
Additional safety instructions
If there is a risk of flooding, make sure that the cordless rain barrel pump is set up in an area that is safe from flooding.
- Do not use any accessories that are not recommended by PARKSIDE. This can lead to an electric shock or fire.
■ Rechargeable batteries must be removed from the appliance before charging.
If the appliance is going to be stored for a long period and not used, the battery must be removed.
■ Do not leave the appliance outside if there is a danger of frost.
Before use
Charging the battery pack

CAUTION!
▶ Always unplug the appliance before you remove the battery pack from or connect the battery pack to the charger.

WARNING!
▶ Observe the safety instructions and the instructions on charging and correct use given in the operating instructions for your X20MTEAM series battery and charger.
A detailed description of the charging process and further information can be found in these separate operating instructions.
NOTE
▶ Ideally, charge the battery completely before use. You can charge the lithium-ion battery at any time without shortening its service life. Interrupting the charging process does not damage the battery.
NOTE
▶ Never charge the battery pack if the ambient temperature is below 10^ C or above 40^ C. If a lithium-ion battery is to be stored for an extended period, the charge level should be checked regularly. The optimum charge level is between 50% and 80%. The storage climate should be cool and dry and the ambient temperature should be between 0^ C and 50^ C.
The recommended ambient temperature range for using tools and batteries is between -5^ and 50^ .
- If necessary, remove the battery from the appliance.
- Insert the battery pack 27 into the charger 22.
◆ Insert the mains plug into the mains socket.
When charging is complete, disconnect the charger 22 from the mains.
◆ Pull the battery pack 27 out of the charger 22.
◆ Switch off the charger for at least 15 minutes between successive charging sessions. Also disconnect the mains plug.
Getting started
Assembly
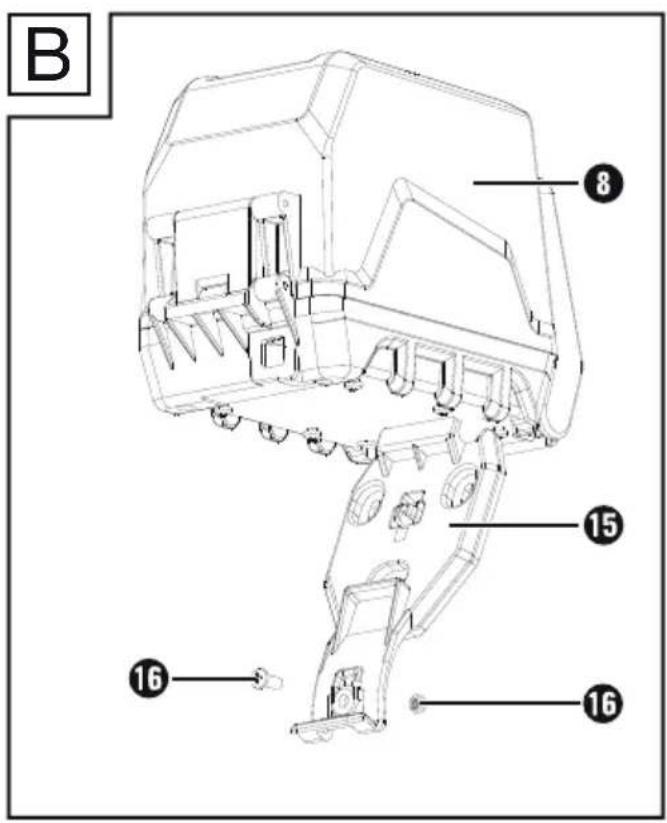
Mounting the wall bracket
♦ Remove the screw+nut 16 from the clamp in the wall bracket 15.
♦ Insert the nut 16 on the back of the wall bracket 15 into the hexagonal recess (see fig. B).
- Attach the wall bracket ⑮ to the wall using three screws (not included). Note, the distance from wall bracket ⑮ to the rain barrel is restricted by the length of the connection cable ⑩ and the depth of the rain barrel.
Attaching the operating unit (fig. B)
◆ Hook the operating unit ⑧ into the wall bracket ⑮.
♦ Fasten the operating panel ⑧ onto the wall bracket ⑮ using the screw ⑯.
Connecting the connection hose
♦ Screw the quick-connect adapter 19 with the sealing ring 20 onto the thread of the pump 11.
♦ Push the connection hose ⑰ onto the quick-connect adapter ⑲.
Attachment to the rain barrel
Instead of using the wall bracket 15, you can also attach the operating unit 8 directly onto the rain barrel.
◆ Hook the clip 21 instead of the wall bracket 15 into the operating unit 8.
◆ Attach the clip 21 to the edge of the rain barrel.
Immersing the pump

WARNING!
■ Make sure you do not hold or hang the appliance by the connection cable 10. Damage to the connection cables may cause an electric shock.
◆ Use the plastic hook 18 or the connection hose 17 to immerse or raise the pump.
◆ Place the pump into the rain barrel. Note that the maximum immersion depth is 1.8 m due to the length of the connection hose ⑰.
◆ Hook the plastic hook 18 onto the edge of the rain barrel.
◆ Wind the excess connection cable 10 around the pump and fix the cable onto the side of the pump using one of the cable clips 12.
NOTE
▶ Be careful that dirt and sand may accumulate in the bottom of the barrel over time and this could damage the pump.
We recommend placing the pump on a brick.
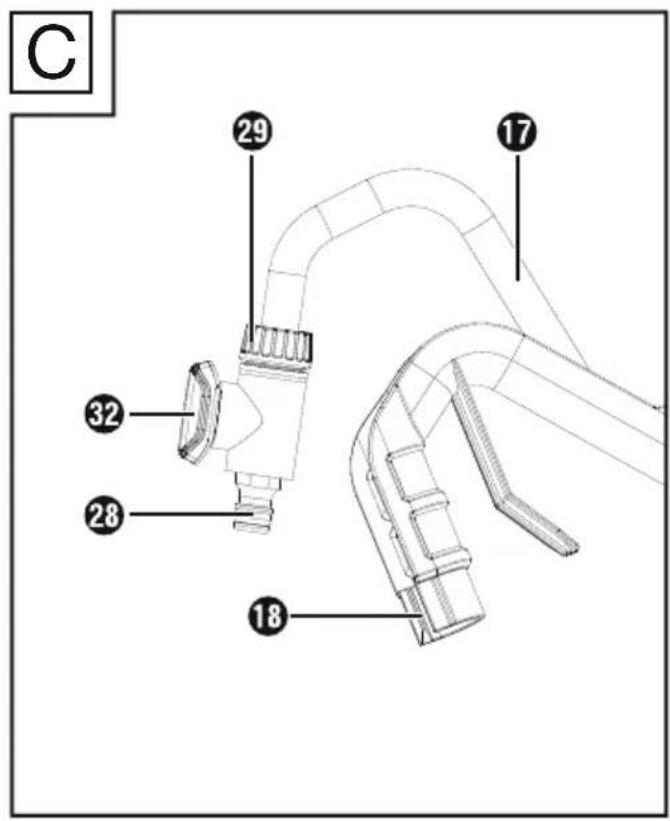
Shortening the connection hose (fig.C)
You can shorten the connection hose ⑰ to prevent the excess length from causing problems.
◆ Press the connection hose ⑰ out of the plastic hook ⑱.
◆ Unscrew the union nut 29 from the connecting piece 28.
◆ Pull the connection hose 17 out of the connecting piece 28.
Shorten the connection hose 17 to the desired length by cutting off the excess.
◆ Re-attach the connection hose ⑰ to the connecting piece ⑱ and the plastic hook ⑲ in the reverse order.
Connecting the pump to the operating unit
Connect the plug 14 of the connection cable 10 to the connection socket 9 on the operating unit 8.
♦ Screw the union nut of the plug ⑭ onto the connection socket ⑨.
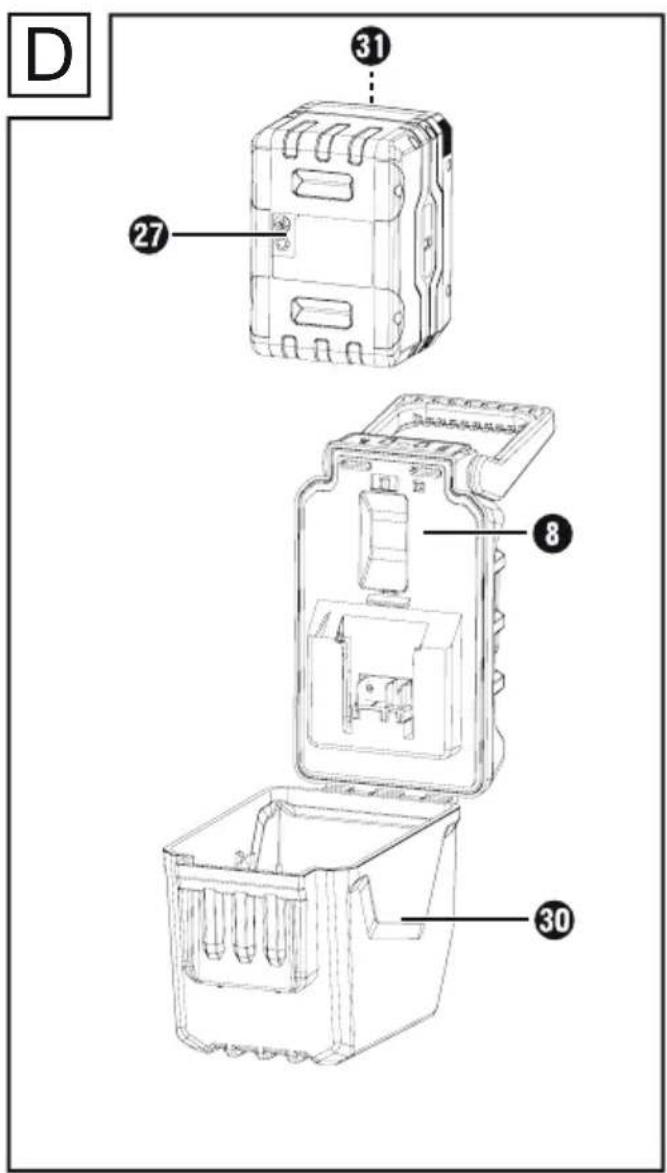
Attaching/disconnecting the battery pack to/from the appliance (fig. D)
Inserting the battery pack
♦ Pull the handle ① upwards.
♦ Flip open the battery cover 30 on the operating unit 8.
To insert the battery pack 27 into the appliance, push the battery pack 27 along the guide rail into the appliance. It clicks audibly into place.
Removing the battery pack
To remove the battery pack 27, press the release button for the battery pack 31 and pull the battery pack 27 out of the appliance.
◆ Close the battery cover 30 on the operating unit 8.
♦ Push the handle ① back down.
Checking the battery charge level
◆ Press the battery charge level button 24 to check the status of the battery (see also main diagram). The status/remaining charge will be shown on the battery display LED 23 as follows:
RED/ORANGE/GREEN = maximum charge
RED/ORANGE = medium charge
RED = low charge - charge the battery
Operation
NOTE
▶ The minimum water depth during use must be 90 mm.
Switching on/off
Switching the pump on
◆ Insert the battery pack 27 into the operating unit 8 (See "Attaching/disconnecting the battery pack to/from the appliance").
◆ Open the stopcock 32.
You can regulate the amount of water using the stopcock.
◆ Press the power button ④. The charge level indicator ③ lights up and the pump starts sucking up water.
Switching the pump off
◆ Press the power button ④. The pump switches off.
◆ Remove the battery pack ②7 from the operating unit ⑧ (See "Attaching/disconnecting the battery pack to/from the appliance").
Timer
With the pump 11 running, press the timer button 6.
The timer LEDs ⑦ light up.
- Press 1 time -> 5 mins operating time
- Press 2 times -> 10 mins operating time
- Press 3 times -> 15 mins operating time
As soon as the set time has elapsed, the pump ⑪ switches off automatically.
To switch off the timer before the time has elapsed, press the timer button ⑥ repeatedly until all the timer LEDs ⑦ go out.
CAUTION!
- Keep an eye on the appliance during operation to detect automatic shutdown or dry running of the pump in good time and to avoid damage.
Charge level indicator
The charge level of the battery is indicated during operation by the corresponding LED lights on the charge level indicator ③.
Green LED lights up:
battery charge level >60%
Yellow LED lights up:
battery charge level 60–30%
Red LED lights up:
battery charge level 30–10%
Red LED flashes: battery charge level <10%; battery needs to be charged
Cleaning, maintenance and storage

WARNING! RISK OF INJURY!
Always switch the appliance off and remove the battery before carrying out any work on the appliance.
■ Clean the appliance regularly, preferably immediately after completion of the work.
■ Clean the pump with fresh water after each use.
■ Use a water jet to remove any lint and fibrous particles that may have become trapped on and under the pump casing.
Cleaning the filter (fig. E)
The suction foot ⑬ of the pump contains a filter that protects the pump from contamination. It should be checked occasionally and cleaned if necessary, depending on the degree of contamination of the water:
◆ Remove the battery pack 27 from the operating unit 8.
◆ Remove the suction foot 13.
- Clean the suction foot ⑬ under clear running water.
◆ Re-attach the suction foot ⑬ in the reverse order.
NOTE
▶ Do not operate the pump without the suction foot 13 attached.
Flushing the pump
After pumping very dirty water, you need to flush out the pump to prevent deposits in the pump.
◆ Pump lukewarm water (max. 35°C) until the pumped water runs clear.
Storage
■ Clean the pump before storage.
■ Store the pump in a dry and frost-proof location and out of the reach of children.
If you are planning on not using the pump for a long time, it must be thoroughly cleaned and rinsed after the last use and before you use it again. Otherwise, you may experience start-up difficulties due to deposits and residues.
Disposal
Applies only to France

The product, its packaging and the operating instructions are recyclable. They are subject to an extended manufacturer responsibility and will be collected separately.
The adjacent symbol of a crossed-out dustbin means
that this appliance is subject to Directive 2012/19/EU. This directive states that this appliance may not be disposed of in the normal household waste at the end of its useful life, but must be taken to specially set-up collection locations, recycling depots or disposal companies.
The disposal is free of charge for the user. Protect the environment and dispose of this appliance properly.

Your local community or municipal authorities can provide information on how to dispose of the worn-out product.

Do not dispose of batteries in your normal household waste!
Defective or worn-out rechargeable batteries must be recycled
according to Directive 2006/66/EC. Batteries/rechargeable batteries must be treated
as hazardous waste and must therefore be disposed of in an environmentally sound manner by appropriate bodies (dealers, specialist dealers, public municipal bodies, commercial disposal companies). Batteries/recharge able batteries may contain toxic heavy metals.
For this reason, do not dispose of batteries/rechargeable batteries in domestic waste. Take them to a specialist collection point. Only return batteries that are fully discharged.

The packaging is made from environmentally friendly material and can be disposed of at your local recycling plant.
Dispose of the packaging in an environmentally friendly manner. Note the labelling on the packaging and separate the packaging material components for disposal if necessary. The packaging material is labelled with abbreviations (a) and numbers (b) with the following meanings: 1–7: plastics, 20–22: paper and cardboard, 80–98: composites.
Applies only to Spain:
The packaging contains paper and/or cardboard components.
This appliance has a 3-year warranty valid from the date of purchase. If included with the product on delivery, the battery packs of the X12V and X20V Team series also come with a 3-year warranty from the date of purchase. If this product has any faults, you, the buyer, have certain statutory rights. Your statutory rights are not restricted in any way by the warranty described below.
Warranty conditions
The warranty period starts on the date of purchase. Please keep your receipt in a safe place. This will be required as proof of purchase.
If any material or manufacturing fault occurs within three years of the date of purchase of the product, we will either repair or replace the product for you or refund the purchase price (at our discretion). This warranty service requires that you present the defective appliance and the proof of purchase (receipt) within the three-year warranty period, along with a brief written description of the fault and of when it occurred.
If the defect is covered by the warranty, your product will either be repaired or replaced by us. The repair or replacement of a product does not signify the beginning of a new warranty period.
Warranty period and statutory claims for defects
The warranty period is not prolonged by repairs effected under the warranty. This also applies to replaced and repaired components. Any damage and defects present at the time of purchase must be reported immediately after unpacking. Repairs carried out after expiry of the warranty period shall be subject to a fee.
Scope of the warranty
This appliance has been manufactured in accordance with strict quality guidelines and inspected meticulously prior to delivery.
The warranty covers material faults or production faults. The warranty does not cover product parts that are subject to normal wear and tear and can therefore be considered wearing parts, such as saw blades, replacement blades, abrasive papers, etc. or for damage to fragile parts, such as switches or parts made of glass.
The warranty does not apply if the product has been damaged, improperly used or improperly maintained. The directions in the operating instructions for the product regarding proper use of the product are to be strictly followed. Uses and actions that are discouraged in the operating instructions or which are warned against must be avoided.
This product is intended solely for private use and not for commercial purposes. The warranty shall be deemed void in cases of misuse or improper handling, use of force and modifications/repairs which have not been carried out by one of our authorised Service centres.
The warranty does not apply to
■ Normal reduction of the battery capacity over time
■ Commercial use of the product
■ Damage to or alteration of the product by the customer
■ Non-compliance with safety and maintenance instructions, operating errors
■ Damage caused by natural hazards
Warranty claim procedure
To ensure quick processing of your case, please observe the following instructions:
■ Please have the till receipt and the item number (IAN) 465828_2404 available as proof of purchase.
■ You will find the item number on the type plate on the product, an engraving on the product, on the front page of the operating instructions (below left) or on the sticker on the rear or bottom of the product.
If functional faults or other defects occur, please first contact the service department listed below by telephone or use our contact form, which you can find on parkside-diy.com in the Service category.
■ You can return a defective product to us free of charge to the service address that will be provided to you. Ensure that you enclose the proof of purchase (till receipt) and information about what the defect is and when it occurred.

You can view and download these instructions along with many other manuals at parkside-diy.com. This QR code will take you directly to parkside-diy.com. Select your
country and use the search box to search for the operating instructions. Enter the article number (IAN) 465828_2404 to find the operating instructions for your article.
Service
GB Service Great Britain
Tel.: 0800 051 897 0
Contact form on parkside-diy.com
IE Service Ireland
Tel.: 1800 851251
Contact form on parkside-diy.com
IAN 465828_2404
Importer
Please note that the following address is not the service address. Please use the service address provided in the operating instructions.
KOMPERNASS HANDELS GMBH
BURGSTRASSE 21
44867 BOCHUM
GERMANY
www.kompernass.com
We, KOMPERNASS HANDELS GMBH, document officer: Mr Semi Uguzlu, BURGSTR. 21, 44867 BOCHUM, GERMANY, hereby declare that this product complies with the following standards, normative documents and EC directives:
Machinery Directive (2006/42/EC)
Electromagnetic Compatibility (2014/30/EU)
RoHS Directive (2011/65/EU)*
* The manufacturer bears the sole responsibility for compliance with this conformity declaration. The subject of the declaration described above meets the requirements of Directive 2011/65/EU of the European Parliament and Council of 8 June 2011 on the limitations of use of certain dangerous substances in electrical and electronic appliances.
Sound power level LWA
Measured: 91.09 dB (A); Guaranteed: 106 dB (A)
Applied harmonised standards
EN IEC 60335-2-41:2021/A11:2021
EN 60335-1:2012/A15:2021
EN 62233:2008
EN IEC 55014-1:2021
EN IEC 55014-2:2021
EN IEC 63000:2018
Type designation of the machine: 20 V Cordless water butt pump PRPA 20-Li B3
Year of manufacture: 10–2024
Serial number: IAN 465828_2404
Bochum, 15/04/2024

CE
Semi Uguzlu
- Quality Manager -
We reserve the right to make technical changes in the context of further product development.
Ordering a replacement battery and charger
You can easily order a replacement battery or charger on the Internet at www.kompernass.com.


Scan the QR code with your smartphone/tablet.
You can use this QR code to go directly to our website to view and order the available spare parts.
NOTE
▶ If you have problems with your online order, you can contact our service centre by phone or e-mail.
▶ Always quote the article number (IAN) 465828_2404 in your order.
▶ Please note that online ordering of replacement parts is not possible for all countries.
Inhaltsverzeichnis
Einleitung 14
KOMPERNASS HANDELS GMBH
BURGSTRASSE 21
44867 BOCHUM
DEUTSCHLAND
www.kompernass.com
CE
Semi Uguzlu

KOMPERNASS HANDELS GMBH
BURGSTRASSE 21
44867 BOCHUM
ALLEMAGNE
www.kompernass.com
Directive relative aux machines (2006/42/CE)
Directive RoHS (2011/65/EU)*

8 Ah Accupack 2020 l/h
Gele led brandt: accu 60–30% geladen
Rode led brandt: accu 30–10% geladen
KOMPERNASS HANDELS GMBH
BURGSTRASSE 21 | 44867 BOCHUM
DUITSLAND
www.kompernass.com
Semi Uguzlu

KOMPERNASS HANDELS GMBH
BURGSTRASSE 21
44867 BOCHUM
NĚMECKO
www.kompernass.com

8 Ah Akumulator 21 m
KOMPERNASS HANDELS GMBH
BURGSTRASSE 21
44867 BOCHUM
NIEMCY
www.kompernass.com

KOMPERNASS HANDELS GMBH
BURGSTRASSE 21
44867 BOCHUM
NEMECKO
www.kompernass.com


KOMPERNASS HANDELS GMBH
BURGSTRASSE 21
44867 BOCHUM
TYSKLAND
www.kompernass.com

Scan QR-koden med din smartphone/tablet.
PAP20B1/PAP 20B3/Smart PAPS204A1/
Smart PAPS208A1.
KOMPERNASS HANDELS GMBH
BURGSTRASSE 21
44867 BOCHUM
GERMANIA
www.kompernass.com
Semi Uguzlu

KOMPERNASS HANDELS GMBH
BURGSTRASSE 21
44867 BOCHUM
Németország
www.kompernass.com

KOMPERNASS HANDELS GMBH
BURGSTRASSE 21
44867 BOCHUM
GERMANY
www.kompernass.com
Last Information Update · Stand der Informationen · Version des informations
Stand van de informatie · Stav informací · Stan informacji · Stav informácií
Estado de las informaciones · Tilstand af information · Versione delle informazioni