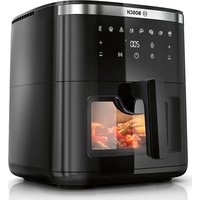
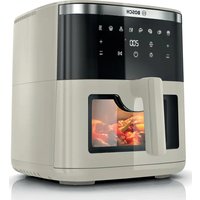
Serie 6 MAF671B0 - Deep fryer BOSCH - Free user manual and instructions
Find the device manual for free Serie 6 MAF671B0 BOSCH in PDF.

| Product type | Oil-free fryer (Air Fryer) |
| Brand | Bosch |
| Model | Serie 6 MAF671B0 |
| Basket capacity | Approx. 3.5 L (MAX mark on inner wall) |
| Temperature range | 40 °C to 200 °C (in 5 °C increments) |
| Duration range | 1 to 120 minutes (up to 8 hours at 40-80 °C) |
| Number of automatic programs | 8 (Fries, Poultry, Meat, Fish, Vegetables, Bread, Small pastries, Keep warm) |
| Heating type | Hot air (top heating element + fan) |
| Special function | SHAKE (reminder to stir food) |
| Compartment lighting | Yes, timed (10 min) |
| Viewing window | Porthole |
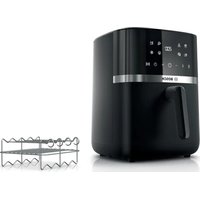
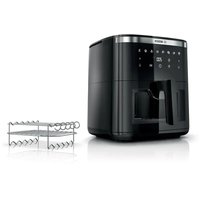
| Included accessories | Basket, combined grid, rack set (grid + 5 skewers) |
| Cleaning | Basket and combined grid dishwasher-safe; housing cleanable with damp cloth |
| Safety | Automatic shutdown if basket removed; overheat protection; hot surface indicator |
| Power | Approx. 1600 W (estimated) |
| Voltage / Frequency | 220-240 V ~ 50/60 Hz (estimated) |
| Weight | Approx. 5 kg (estimated) |
| Dimensions (W x D x H) | Approx. 300 x 350 x 350 mm (estimated) |
| Cord length | Approx. 0.8 m (integrated storage) |
| Maximum operating altitude | 2000 m above sea level |
| Standby mode | Yes, energy saving |
| Repairability index | Spare parts available via Bosch after-sales service (favorable estimate) |
Frequently Asked Questions - Serie 6 MAF671B0 BOSCH
User questions about Serie 6 MAF671B0 BOSCH
0 question about this device. Answer the ones you know or ask your own.
Ask a new question about this device
Download the instructions for your Deep fryer in PDF format for free! Find your manual Serie 6 MAF671B0 - BOSCH and take your electronic device back in hand. On this page are published all the documents necessary for the use of your device. Serie 6 MAF671B0 by BOSCH.
USER MANUAL Serie 6 MAF671B0 BOSCH
MyBosch now andget for
get free benefits:
bosch-home.com/ welcome
Serie | 6
MAF6... MAFS26...
- Read this instruction manual carefully.
- Keep the instruction manual and the product information safe for future reference or for the next owner.
Only use this appliance:
with genuine parts.
for warming, cooking, baking and frying with hot air.
for normal processing quantities and for normal processing times for domestic use.
- in private households and in enclosed spaces in a domestic environment at room temperature.
up to an altitude of max. 2000m above sea level.
The appliance must always be disconnected from the mains after each use, whenever the appliance is unsupervised, before cleaning and in the event of an error.
This appliance may be used by children aged 8 or over and by people who have reduced physical, sensory or mental abilities or inadequate experience and/or knowledge, provided that they are supervised or have been instructed on how to use the appliance safely and have understood the resulting dangers.
Do not let children play with the appliance.
Children must not perform cleaning or user maintenance unless they are at least 8 years old and are being supervised.
Keep children under the age of 8 years away from the appliance and power cable.
- Never operate a damaged appliance.
- Never operate an appliance with a cracked or fractured surface.
- Never pull on the power cord to unplug the appliance. Always unplug the appliance at the mains.
- If the appliance or the power cord is damaged, immediately unplug the power cord or switch off the fuse in the fuse box.
- Call customer services. Page 26
- Connect and operate the appliance only in accordance with the specifications on the rating plate.
- Connect the appliance to a power supply with alternating current only via a properly installed socket with earthing.
-
The protective conductor system of the domestic electrical installation must be properly installed.
-
Never equip the appliance with an external switching device, e.g. a timer or remote control.
- Repairs to the appliance should only be carried out by trained specialist staff.
- Only use genuine spare parts when repairing the appliance.
- If the power cord of this appliance is damaged, it must be replaced by the manufacturer, the manufacturer's Customer Service or a similarly qualified person in order to prevent any risk.
- Never immerse the appliance or the power cord in water or clean in the dishwasher.
- Only use the appliance in enclosed spaces.
- Never expose the appliance to intense heat or humidity.
- Do not use steam- or high-pressure cleaners to clean the appliance.
- Never let the power cord come into contact with hot appliance parts or heat sources.
- Never let the power cord come into contact with sharp points or edges.
- Never kink, crush or modify the power cord.
- Never place the appliance on or near hot surfaces.
- Never place the appliance on or near flammable materials, e.g. curtains or tablecloths.
Always maintain a safety distance of at least 10cm to walls and other objects to avoid a build-up of heat. - Never cover the appliance or set other objects down on it.
- Do not store or deposit objects in the basket or the cooking compartment.
- Never leave the appliance unattended while it is switched on.
- Never fill oil or fat into the basket.
- Never heat food containing high-proof alcohol or other highly flammable constituents in the appliance.
- Take note of the maximum permitted capacity. Never fill food beyond the upper edge of the basket.
- Do not use loose pieces of baking paper or lightweight ingredients that could be sucked in by the fan, e.g. dry herbs.
- If dark smoke comes out of the appliance, disconnect it from the mains immediately. Do not take the basket out until the amount of smoke has decreased.
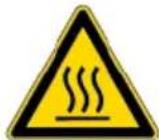
The appliance becomes hot during operation. Never use hot surfaces.
- Allow the appliance to cool down before cleaning or transporting.
- Never reach into the hot cooking compartment.
- Never touch the hot grill rack or the hot skewers with bare hands. Use suitable tools and equipment, e.g. potholders or cooking utensils.
- Be careful when taking out the basket as hot air and steam may escape.
- Do not lean over the appliance.
Always keeps your hands and face away from the air outlets. - To avoid injuries, only use the appliance for its intended purpose.
Take care when handling the skewers. - Keep packaging material away from children.
- Do not let children play with packaging material.
- Keep small parts away from children.
- Do not let children play with small parts.
- Follow the cleaning instructions.
- Clean surfaces which come in contact with food before each use.
To prevent the development of acrylamide, do not cook the food to the point where it is too dark and remove any burnt residues. - Never heat fresh potatoes to over 180^ C .
Avoiding material damage
- Do not use sharp, pointed or metal cooking utensils. Only use cooking utensils made of wood or heat-resistant plastic.
- Place the skewers in the basket carefully to avoid scratching or damaging the basket.
- Never stand the hot basket on heat-sensitive surfaces. Use a heat-resistant base underneath, e.g. a heat or table mat.
- Never fill water or other liquids into the basket.
- Never use the grill rack or skewers in the microwave.
Familiarising yourself with your appliance
Overview
After unpacking all parts, check for any damage in transit and completeness of the delivery.
Fig. 1
D
Main unit
6
Basket
C
Grilling set ^1 →"Grilling set", Page 23
B
Cooking compartment
2 Control panel
3 Air inlet
Air outlet
5 Cord storage
6 Top heating element and fan
7 Handle
Viewing window
Grid
Control panel
You can find an overview of the control panel here.
Note: Press the buttons with your fingers without wearing rubber/oven gloves. Do not operate buttons with objects, e.g. a wooden spoon.
Display elements and function buttons
| Symbol Function | |
| Standby modeActivate and deactivate standbymode or cancel the cookingprocess | |
| Start/Pause Starting or pausing cooking |
| 00:00 | Display When °C lights up, the display shows the temperature. When min lights up, the display shows the time. |
| TEMP | Temperature setting |
| Increase the temperature with+or reduce it with-. | |
| Settings range: 40-200 °C in 5-degree steps |
Note: If a time of more than 120 minutes has been set, the maximum temperature is 80^ .
| TIME | Time setting Increase the cooking time with+ or reduce it with-. Settings range: 1-120 minutes |
Note: If a temperature of 40 - 80^ has been set, the cooking or keep-warm time can be extended to up to 8 hours.
| →"Interior lighting", Page 22 |
| Symbol Function | |
| →"Display SHAKE", Page 21 | |
| Programme buttons | |
| Symbol Programme | |
| French fries | |
| Poultry | |
| Meat | |
| Fish | |
| Vegetables | |
| Bread | |
| Small pastries | |
| Keep warm | |
| Symbols | |
| Symbol Description | |
| Mark for the maximum filling quantity on the inside of the basket |
Standby mode
If the appliance is not used for a certain period of time before or after cooking, it will switch to standby mode and will light up. The appliance only consumes a small amount of energy when in standby mode. Press to deactivate standby mode and use the appliance.
Display SHAKE
On certain programmes, SHAKE flashes after a certain period of time and a signal tone sounds.
Shake or turn the food in the basket when the display flashes. This ensures that all food in the basket is cooked to the same degree.
→"Shaking or turning food", Page 23
Note: If you do not take the basket out and put it back again, the display will flash until the end of the cooking process and the signal tone will sound roughly every 5 seconds.
en Before using for the first time
Interior lighting
Check the progress in cooking the food without taking the basket out of the appliance.
Press to switch on the interior lighting.
Note: The interior lighting switches off automatically after approx. 10 seconds.
Before using for the first time
Prepare the appliance for use.
Attaching the handle
- Loosen the band from the casing enough to pull out the basket.
$$ \rightarrow \text {F i g .} 2 $$
Do not remove the band from the basket.
- Pull the basket out of the appliance by the band and remove the packaging from the basket.
$$ \rightarrow \text {F i g .} \quad 3 $$
- Completely remove the band and take the handle out of the packaging.
$$ \rightarrow \text {F i g .} \quad 4 $$
- Insert the handle in the relevant opening on the basket and press down. Push the assembled basket into the appliance.
$$ \rightarrow \text {F i g .} 5 $$
The handle must have snapped fully into place and be securely connected to the basket.
Cleaning the appliance before using it for the first time
-
Remove any packaging material.
-
Remove any stickers or film.
-
Make sure a window is open and allow the appliance to heat up without food for 30 minutes at the highest temperature setting and then cool down.
"Starting cooking", Page 22
- Clean all parts that come into contact with food before using for the first time.
"Overview of cleaning", Page 24
Note: Slight smoke or odour emission during initial use is normal.
Operation
General information
Please bear this information in mind so that you can get the best out of your appliance.
-
To change these values faster, hold down the settings buttons.
-
To change the temperature or time during cooking, press | change the values and then resume cooking with .
Setting up appliance
- Place the appliance on a stable, horizontal, flat and heat-resistant work surface. Always maintain a safety distance of at least 10cm to walls and other objects.
- Unwind the power cord to the required length.
Adding food to the basket
- Remove the basket. Put the grid in the basket as shown and press it down.
$$ \rightarrow \text {F i g .} 6 $$
- Add the food to the basket and push the basket fully into the appliance.
$$ \rightarrow \text {F i g .} 7 $$
Observe the mark for the maximum filling quantity.
Starting cooking
- Insert mains plug.
$$ \rightarrow \text {F i g .} \quad 8 $$
A signal tone sounds and the control panel is active.
- The display alternately shows the preset temperature and the cooking time for manual cooking.
$$ \rightarrow \text {F i g .} \quad 9 $$
- To use a programme, press the required symbol on the control panel, e.g.
$$ \begin{array}{c} \text {F r e n c h f r i e s .} \end{array} $$
$$ \rightarrow \text {F i g .} \quad 1 0 $$
- The programme symbol flashes and the display alternately shows the preset temperature and the cooking time for the programme.
$$ \rightarrow F i g. \quad 1 1 $$
-
To return to manual cooking mode, press the flashing programme symbol again.
-
To adjust the preset temperature, select the required value with TEMP- or + Fig. 12
-
To adjust the preset cooking time, select the required value with TIME- or +.
$$ \rightarrow \text {F i g .} \boxed {1 3} $$
- Start cooking withStart/Pause.
$$ \rightarrow \text {F i g .} \quad 1 4 $$
-
The display alternately shows the selected temperature and the remaining cooking time.
-
To check the progress of cooking, press
$$ \begin{array}{c} \text {I n t e r i o r l i g h t i n g .} \end{array} $$
$$ \rightarrow \text {F i g .} 1 5 $$
- The cooking compartment is illuminated and the food can be seen through the viewing window.
Shaking or turning food
- When SHAKE flashes, take the basket out of the appliance.
$$ \rightarrow \text {F i g .} 1 6 $$
-
Cooking is paused and the control panel is not lit up as long as the basket is removed.
-
Shake the food in the basket. Turn large items of food or delicate foods using cooking utensils made of wood or heat-resistant plastic.
$$ \rightarrow \text {F i g .} \quad 1 7 $$
- Push the basket fully into the appliance.
$$ \rightarrow \text {F i g .} \quad 1 8 $$
- Cooking will continue automatically and the display alternately shows the selected temperature and the remaining cooking time.
Taking cooked food out
- When cooking has ended, End flashes on the display. An acoustic signal sounds and all symbols light up on the control panel.
$$ \rightarrow \text {F i g .} \quad 1 9 $$
- Take out the basket with the cooked food.
$$ \rightarrow \text {F i g .} \quad 2 0 $$
- With food that has not given off any excess fat, e.g. french fries, shake it out of the basket or take the food out with a cooking utensil.
$$ \rightarrow \text {F i g .} \quad 2 1 $$
Application examples
Your appliance offers 8 different preset programmes. Select a suitable programme depending on the food.
Note: The values specified here are recommendations. As foods differ in terms of origin, size, shape, condition and brand, an optimal setting for your food may diverge from these values.
- With food that has given off excess fat, e.g. marbled meat or pieces of poultry, take it out of the basket with a cooking utensil. To prevent fat running out of the basket onto the cooked food, do not tip the basket out.
$$ \rightarrow \text {F i g .} 2 2 $$
Dispose of the hot excess fat carefully or leave it to cool down in the basket.
Note: If you have cancelled the current cooking process manually with, the display shows COOL and the fan will run for a certain period of time. Do not remove the basket until COOL has disappeared.
Tip: You can now directly cook additional portions or other food with the appliance.
Grilling set
Grill food on the grill rack or cook skewers.
Overview
$$ \rightarrow \text {F i g .} \quad 2 3 $$
1 Grill rack
2 Skewers, 5 pieces
Using the grilling set
- To cook food on the grill rack, proceed as follows.
Place the grid in the basket.
Place the grill rack in the basket.
Place the food on the grill rack.
$$ \rightarrow \text {F i g .} 2 4 $$
- To cook skewers, proceed as follows:
Place the grid in the basket.
Place the grill rack in the basket.
- Place the prepared skewers into the designated recesses.
$$ \rightarrow \text {F i g .} \quad 2 5 $$
- Push the basket fully into the appliance.
- Start cooking.
"Starting cooking", Page 22
| Food Presetting Information | ||
| Frozen french fries, 10 x 10 mm, 500 g | French fries 180 °C 23 min. | When SHAKE flashes, shake or turn the food |
| Chicken legs, 5 pcs, each weighing 125 g | Poultry 200 °C 25 min. | When SHAKE flashes, shake or turn the food |
| Beef steak, 2 pcs, approx. 3 cm thick | Meat 200 °C 20 min. | Preheat the appliance for 4 min. When SHAKE flashes, shake or turn the food |
| Salmon fillet, 2 pcs, each weighing 150 g | Fish 160 °C 12 min. | |
| Grilled vegetables, 700 g | Vegetables 180 °C 20 min. | Cut the vegetables into large pieces and mix with max. 1 tsp. of oil When SHAKE flashes, shake or turn the food |
| Small cakes or muffins, 9 pcs | Small pastries 150 °C 18 min. | |
| Frozen pre-baked bread rolls | Bread 160 °C 12 min. | |
| Keeping cooked food warm | Keep warm 80 °C 30 min. | |
Tips
If the size of the food diverges from those in the table, shorten or lengthen the cooking time.
If the food is not cooked after the selected cooking time, extend the cooking time or increase the temperature.
- To ensure an even cooking result, shake or turn the food in the basket when SHAKE flashes.
- If the food is not as crispy as you would like, apply a little oil to the food before cooking, e.g. with a brush or oil spray. Allow excess oil to drip away or wipe it off.
Overview of cleaning
Clean all parts immediately after use so that residues do not dry on.
- Do not use cleaning agents containing alcohol or spirits.
-
Do not use sharp, pointed or metal objects.
-
Do not use abrasive cloths or cleaning agents.
- Only clean the control panel and the display using a damp microfibre cloth.
Clean the individual parts as indicated in the table.
Fig. 26
Cleaning the appliance and parts
- Clean the main unit with a damp cloth and dry. Use a damp microfibre cloth for the display.
- If necessary, clean the cooking compartment with hot water and a soft cloth or sponge.
- Remove remnants of food on the heating element with a soft brush.
- Remove any excess fat and oil from the basket.
-
If there are stubborn fat residues in the basket, add hot water and a few drops of washing-up liquid to the basket to pre-clean it and leave to act.
-
Clean the basket and the grid with detergent solution and a soft cloth or sponge or put in the dishwasher.
Troubleshooting
| Fault Cause and troubleshooting | |
| The appliance is not working. | Appliance has no power supply. Check whether your appliance is supplied with power. |
| Appliance automatically resumes cooking following an interruption to the power supply. | Appliance saves the aborted cooking process for a certain period of time. 1. If the power supply has been interrupted, unplug the mains plug. 2. Once the power supply has been restored, plug in the mains plug. ✓ The aborted cooking process is resumed. 3. Select one of the following options: · Allow the cooking process to run until the end. · Press ➔to interrupt the cooking process in order to change the values, e.g. increase the temperature. · Cancel the cooking process with ☑. Note: If the power supply was interrupted for a prolonged period of time, the cooking process will not resume automatically. |
| Cooking does not start or continue. | Basket has not been properly inserted in the appliance. Push the basket fully into the appliance. The basket should not protrude from the housing. |
| Basket cannot be fully pushed into the appliance. | Food or objects in the cooking compartment. Remove food or objects from the cooking compartment. Food or objects in the cooking compartment become hot during cooking. Use heat-resistant cooking utensils and proceed with care. |
| An error code appears on the display, e.g. Ex. | The electronics have detected a fault. 1. Pull out the mains plug. 2. Re-insert the mains plug in the socket. 3. If the fault persists, call Customer Service. →"Customer Service", Page 26 |
| White smoke escapes from the appliance. | Dripping fat and residues of fat in the basket or cooking compartment produce white smoke during heating. Clean the basket, grid and cooking compartment thoroughly after each use to remove all residues of fat. Note: White smoke caused by residues of fat does not affect the cooking result or the appliance. |
| Appliance does not fit into the transport packaging with the handle attached. | Once installed, the handle is securely connected to the basket. Note: Only remove the handle in exceptional circumstances, e.g. if you want to return the appliance. |
Fault Cause and troubleshooting
Appliance does not fit into the transport packaging with the handle attached.
- Press down the rubber plug on the top of the handle using a suitable tool, e.g. a small screwdriver.
Fig. 27
- Press the tool back whilst pulling the handle off the basket.
Fig. 28
Disposing of old appliance
- Dispose of the appliance in an environmentally friendly manner. Information about current disposal methods are available from your specialist dealer or local authority.
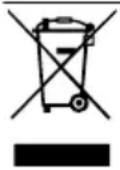
This appliance is labelled in accordance with European Directive 2012/19/EU concerning used electrical and electronic appliances (waste electrical and electronic equipment - WEEE). The guideline determines the framework for the return and recycling of used appliances as applicable throughout the EU.
Customer Service
Detailed information about the warranty period and the warranty conditions in your country is available via the QR code on the enclosed document on service contacts and warranty conditions, from our customer service or on our website.
You can find the information required as per Regulation (EU) 2023/826 online at www.bosch-home.com on the product and service pages for your appliance, in the area of user manuals and additional documents.
Sécurité
Advertencias de character general
IooB DeakTbByBaTHpeXHm rOtOBHOCTi NCKOpNCTaTnC npHaJOM, HATNCHTbQ
IIndkaui SHAKE
Y neBnHex npoRpaMax nicJ3aHaHOrO yacy 6JIIMae iHdNkaCjI SHAKE i LyHae 3ByKOBNI CNrHaJ.
Koln 3a6IImaE uei iHdkatOp, ctpycitb a6o nepeBepHiT b npOyKTn B KOuNKy. Lc 3a6e3neuHTb pIBHomipHy TepMOo6pO6Ky BCix npOyKTiB y KoUKNy.
"CtpyuBbHnA 6o nepeBepTaHHn npOdyKtib", CtopiHa 146
Hotatka: KIIO He BnHrTn He BCTaBnTn KOsHK, iHnKaizyde 6JIMaTH Do KiHcTepMOO6p06Kn, a 3ByKOBn CnHaJI LyHaTmpe np6n3Ho uee3 KoXHi 5 cekyHd.
OcbitJIeHHpo6ooyi kamepn
IpeBipRyTe xID npnroTyBaHHn npOdykTIB, He BnMaHOn KOnka 3 npnlaNy.
Uo6 yBIMKHyTN OCBiTneHnropoboooi KaMepn,HaTNCHiTb
Hotata: OcbitneHH npooyoi kamepn abTOMaTHNO BmKHeTbcra 3a 10 c.
Ipeed nepshm BnKOpncTaHHaM
PiDrToTyTe npnlaD do 3actocyBaHHa.
3akpinJIeHHpyuKN
- BiTyrHitb fikcatop BID KOpnyca TaK, 06 MoXHa 6yNo BnTAYn KOuNK.
→MaJI. 2
He BiD'eDHyIe Te ikCaTOp BiKoUnKa.
- BntaHtB KoWNK 3a φikcaTOp 3 npna-ny; BnMItB i3 KOWNKa yNaKObky.
→MaJ. 3
- 3HIMiTb IKcatOp i BnMItB pyky 3 ynaKOBKn.
→MaJ. 4
- BCTaBTe pyky y BiINOBiHN OTBip Ha KOWNKy I npHTnCHiTb DOHN3y. BCTaBTe 3I6paHNI KOWNK y npINAd.
→MaJ. 5
Pyuka Maec nobHicTIO 3aΦiKCyBaTnCry HadiiHO 3'eDHaTnCry 3 KOuNKOM.
OuHsEHHaNpHJaNy nepeI nepShm BHKOpHcTaHHaM
- 3HIMITb HABHN NaKyBaJIbHN MaTepi-an.
- 3HimiTb HaBHi HaKneiKn Ta nIiBKn.
- BiDHHBn BIKHO Bn6paBn Ha npIaI haBnUy TemnepaTy, nporpiTe Ioro 6e3 npOyKTIB npOTarom 30 xBNH, a NOTIM daITe OXOLOHyTn.
"IouaTOK npnroToyBaHHa", CtopiHa 146 - Yci detani, kki KOHTaKTyIOTb i3 xa-puOBIMn npOdyKTamn, nepei nepShM KOpNCtYBaHHM cIId NOMTN.
"OrnlaIyHueHHa",CTopIHka 148
Hotatka: NOBa He3HaHoi KINbKOcTi dMy u3anaxy nd yac nepworo KopnCTyBaHH - HOpMaJIbHe YBnue.
Ekncnyatacia
3araJIbHI Bka3IBKN
Ioo6 ONTImaJIbHO KOpNCyBaTnCn Iprna- dom, 3BaJkaIte Ha BKa3iBKn.
-Дяшвдшоi 3MiHn 3HaueHB yTpmyIte HATNCHyTI KHOKN.
- Ⅲo6 cKOpnryBaTn TemnepaTy p a60 TpNBaIcTb NiJ uac npnroTyBaHnHaTnCHiTbD,13MiHiTb 3HaueHnHa, a NoTIM HaTnCHiTbDInla npODoBxKeHHa.
YcTaHOBJIeHHI npHJaIy
- NocTaBTe npnlaHa CTiKu I pIBHy TOpn3OHTaIbHy NOBepXHIO, 0o BVNTpMyE BnCOKI Tempeatypn. 3aBxdi 3aIIuAaTe 6e3neuHy BiDCTaHb 0oHaHMeHwe 10 cm Do CTIH TOIO.
- Po3MOTaIe Ka6eIb XINBHeHHa nO- TpiOHy DOBXHHy.
3aBaHTaJKeHH npOdyKTiB y KoUHK
- BnIMtB KOsIK. BcTaHOBiTb peSiITky B KOsIK 3rIaH0 3 iInocTpauciEo I npHTNCHiTb yHN3.
→MaJI. 6
6
uk Ekcnnyatauaia
- 3acnnte npOyKTN B KOuNK i do ynpOy BCTaBTE KOuNK y npuJa. MaJI. He nepeBnUyIte no3HaueHOro maKcImMaJbHOro pIBHa.
CtpuyBaHHa6o nepeBepTaHHnpoDyKtIB
- Koln noyHe 6IIMaTn iHdNKaTOP SHAKE, BnIMtB KOsIK i3 npuJaNy. Man. 16
IpnroToyBaHH np3yHnHTbC; NOKKoWNBnHATn, naHeIb KepyBaHH He niDCbiuyEcBc. - CtpycHITb npOdyKTn B KOUHKy. BeJIHKi a6o yTNIbI npOdyKTn nepeBepHiTb DepeB'HOIO a6o TepMOCTiIKOIO nla-CTNKOBIO IOIOnaTKOIO. Man. 17
- Do ynpy BCTaBTe KOuHK y npuaJ. →MaJ. 18
Пюцес abTomatnHNo npOIOBxHTbCra; HaДиспл ei no Yep3i 3'YBnTmMyTbCra 3aHa TeMnepaTypa n 3aJIuWOk yacy npNroTOyBaHn.
BnMaHHra roTOBHX npOdyKTiB
- Koln npirotoybaHHa3akHHTbcra,Ha dinCnnei 3a6JIMae iHnKauij End. PpOlyHae 3ByKOBn CnHa; Ha naHeJI KepyBaHHaPiDCBITATbCBA BCI CNMBOJI. Man. 19
- BnIMiTb KOUHK 3 FOTOBHMN pOdyKTaMn. Man. 20
- Пюдун Ктуб eз Надлшкib Хиpy (Ha-npнлад, KapToПLO φpi) ВИТPyсiTb 3 KОшнka a60 BИМITb KУХОHHM прладям. →MaI. 21
4.ПpoDyKTH3HaIINHkAmnJnpy(Ha- npNKlaI,KnpHeM'aco a6o PTHIO) BN- mItb 3 KOuNka KxOHNm npNaIaIaM. He haxnIte KoUk,iHaKwe Knp Mo- xe NOTpanNTn Ha rOTOBY cTpaBy. Man. 22 ObepeXHo 3JIneTe rapayi 3aIIuKn Jnpy a6o 3aIIuTe XOLOHyTN B KOuNky.
Hotatka: A KIO Bn BpyHy nepepbann npriotybaHHa KHONKOHOHa dncnlei 3'ABNAETbcn HnKauiaq COOL, a BeHTnIaTOp kNcB yac npaioe. BnMaTe KoWNK nICnTOrO, AK 3raChe COOL.
Iopada: Odpa3y nicna zboRo B npniladi MOxHa rOtuBaTHn HactynHi nopui a6o iHsi npOdykTN.
KoMnJIeKT peSiITkn rpnJr
CmaXTe npOdykTn Ha pewiTuI rpnIa6o roTyIte Ha waMnpax IJr npIra.
Orna
→MaI. 23
1 PewiTk a rnila
2 1aamnpn dna rpnla,5 wT.
BnKOpNCTOByIte KOMNJIeKT peWiITKN rPnla
- Ⅲo6 npnroTyBaTn npOdykTn Ha pewiTci rpnIa, BnKOHaIe TaKi di:
BctaHObitpewiTky B KOUnK.
BcTaHOBIb peWITKy rPnIa B KOWIK.
- POKlaIb npOyKtn Ha pewiTkY rPnJIa.
→MaJI. 24
- Ⅲo6 npnroTyBaTH npOdyKTn Ha amnpax IJI rPnI, BnKoHaIte TaKi II:
BctaHObitpewiTky B KOUnK.
BctaHObitb pewiTky rpnI B KoWNK.
BctaHOBiB NiIroTOBJIeHI 7aMnypn Ira rPnRA B nepeDbaueHi Ira Hnx 3aRn6JIeHH.
→MaI. 25
- Do ynpy BCTaBTe KoWNK y npHaI.
- 3anyctitb npnroTybaHHa
"TouataOK npnroTyBaHHa",
CTopiHa 146
YcyHeHH HeCnpaBHOCTeH
Hecnpabhictb Pnunha ycyneHHn HecnpaBhocti
Register your new device on MyBosch now and profit directly from:
- Expert tips & tricks for your appliance
- Warranty extension options
- Discounts for accessories & spare-parts
- Digital manual and all appliance data at hand
- Easy access to Bosch Home Appliances Service
Free and easy registration - also on mobile phones:
www.bosch-home.com/welcome
BOSCH HOME APPLIANCES SERVICE
Looking for help? You'll find it here.
Expert advice for your Bosch home appliances, help with problems or a repair from Bosch experts.
Find out everything about the many ways Bosch can support you: www.bosch-home.com/service
Contact data of all countries are listed in the attached service directory.
BSH Hausgeräte GmbH
Carl-Wery-StraBe 34
81739 Munchen, GERMANY
www.bosch-home.com
A Bosch Company
Valid within Great Britain:
Imported to Great Britain by
BSH Home Appliances Ltd.
Grand Union House
Old Wolverton Road
Wolverton, Milton Keynes
MK12 5PT
United Kingdom